“`html
Table of Contents
Easy Air Fryer Donuts Recipe – Fluffy & Delicious in Minutes
Craving a Warm, Fluffy Donut Without the Guilt?
Are you like me, dreaming of that perfect, melt-in-your-mouth donut but dreading the deep-frying process and the inevitable calorie bomb? If you’re Googling “easy air fryer donuts” or “healthy donut recipe,” you’re in the right place! In a world where quick and delicious treats are often hard to come by without compromising on health, this Easy Air Fryer Donuts recipe is a game-changer. Imagine enjoying warm, fluffy donuts in under 20 minutes, using your air fryer, and without a single drop of oil for frying. This recipe delivers just that – delightful donuts that are significantly lighter than their deep-fried counterparts, customizable to your heart’s content, and even adaptable for a vegan lifestyle. Let’s ditch the guilt and embrace the joy of homemade donuts done right!
Ingredients for Fluffy Air Fryer Donuts
The beauty of these air fryer donuts lies in their simplicity. Most ingredients are pantry staples, and the texture they create is incredibly light and airy. For the base dough, you’ll need:
- All-Purpose Flour: 2 cups (250g), plus more for dusting. This forms the structure of our donut dough. For a slightly richer flavor or if you prefer whole grains, you can substitute up to half with whole wheat flour, but be mindful it might make the dough slightly denser.
- Granulated Sugar: 1/4 cup (50g). This adds sweetness and helps with browning. You can reduce this to 2 tablespoons for a less sweet donut.
- Baking Powder: 2 teaspoons. This is our leavening agent, crucial for that fluffy, airy texture. Ensure it’s fresh for maximum lift.
- Salt: 1/2 teaspoon. Balances the sweetness and enhances flavors.
- Milk: 3/4 cup (180ml), warm. Whole milk will yield a richer dough, but 2% or even a dairy-free alternative like almond or oat milk works beautifully. For the vegan option, ensure your milk is plant-based.
- Large Egg: 1, beaten. This binds the ingredients and adds richness. For a vegan option, substitute with a “flax egg” (1 tablespoon ground flaxseed mixed with 3 tablespoons water, let sit for 5 minutes) or a commercial egg replacer.
- Melted Butter: 2 tablespoons, unsalted. Adds a lovely richness and tenderness. Use vegan butter or coconut oil for the vegan version.
- Vanilla Extract: 1 teaspoon. For that classic, comforting donut aroma and flavor.
For Toppings (Choose your favorites!):
- Cinnamon Sugar: 1/4 cup granulated sugar mixed with 1 teaspoon ground cinnamon.
- Chocolate Glaze: 1 cup powdered sugar, 2-3 tablespoons milk or water, 1 tablespoon cocoa powder (optional). Whisk until smooth.
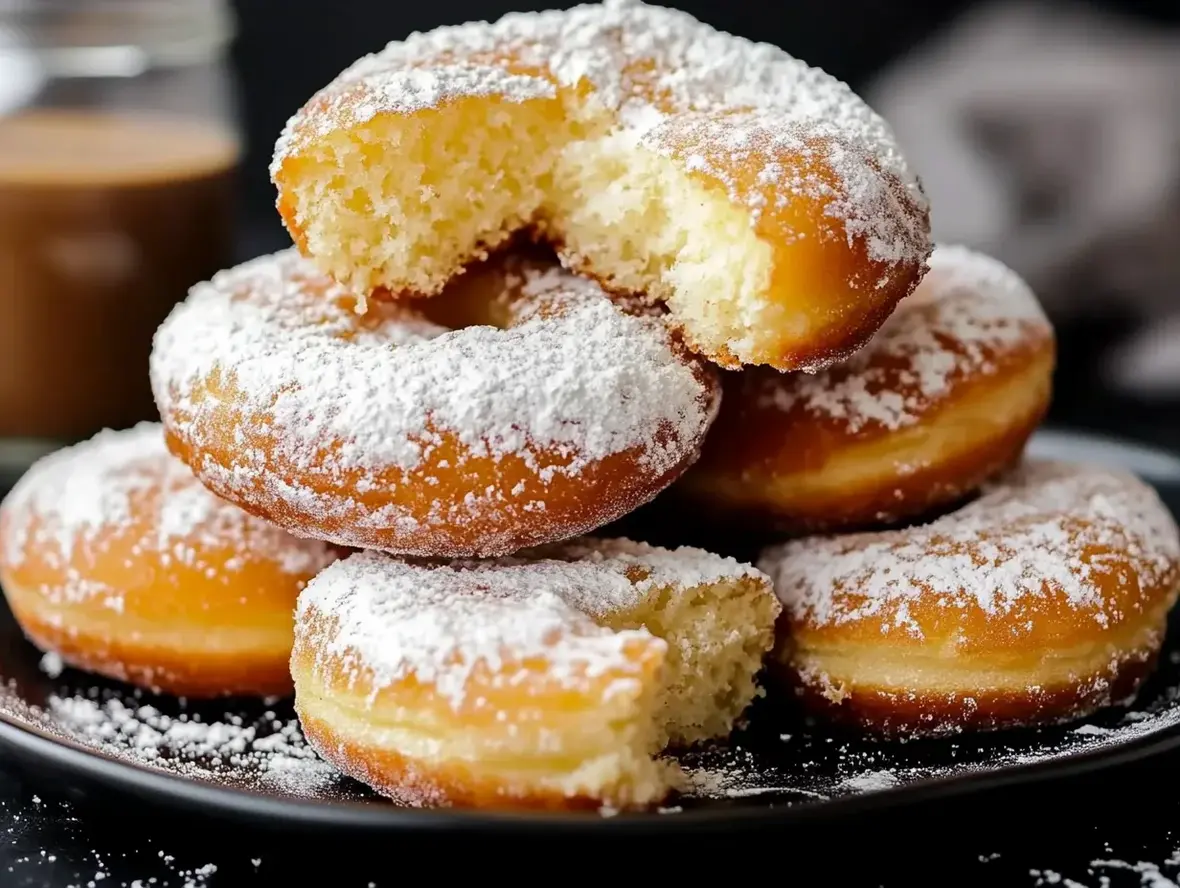
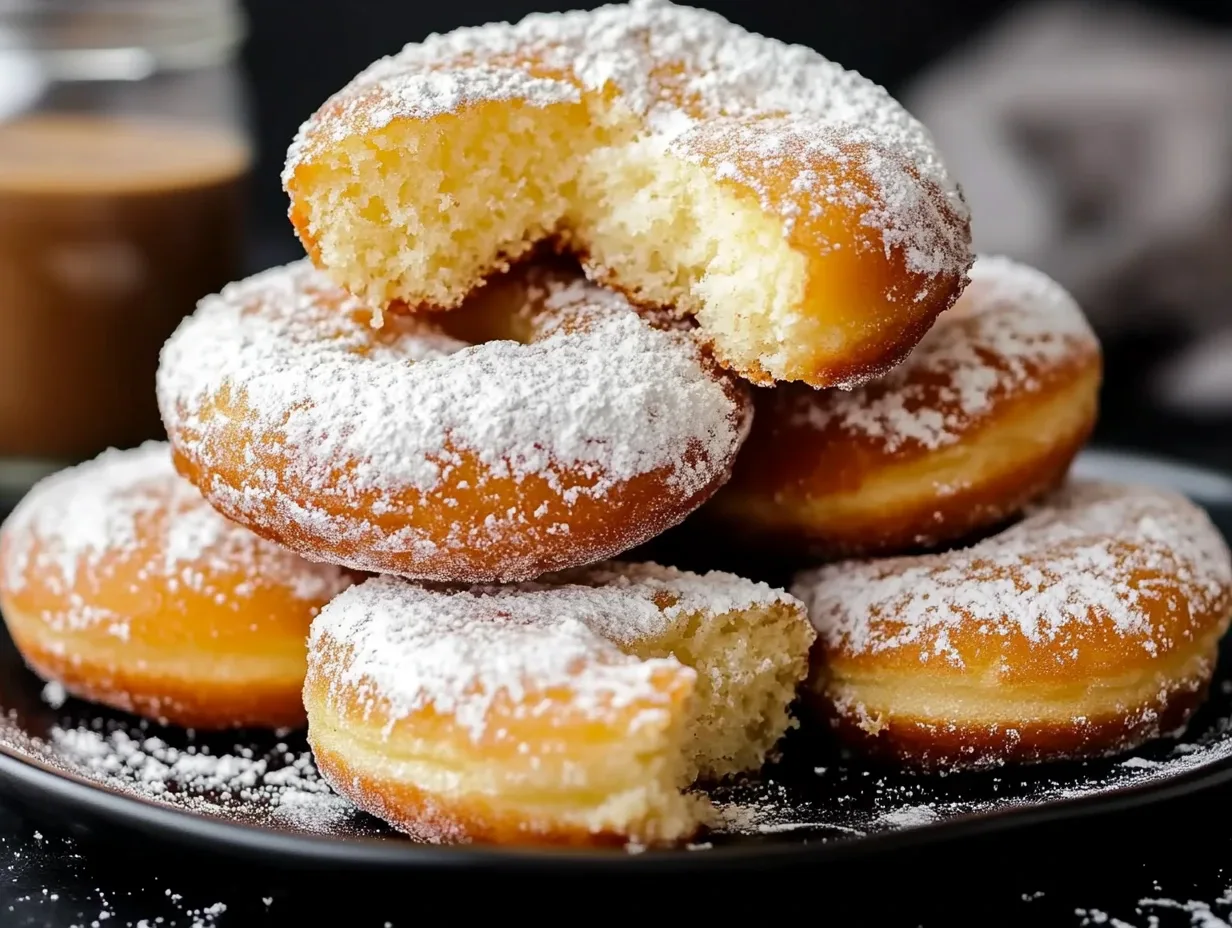
- Powdered Sugar Dusting: Simply dust with powdered sugar once cooled.
- Fruity Drizzle: Melted jam or a fruit glaze.
Timing: Quick & Easy Donuts
15 minutes
6-8 minutes per batch
21-23 minutes (plus topping prep)
This recipe truly shines in its speed. Compared to traditional yeast donuts that require rising times, these cake-style donuts are ready in under 30 minutes from start to finish. Most homemade donut recipes can take well over an hour, factoring in rising and cooling. Our air fryer method drastically cuts down the cooking time and eliminates the mess of frying, making it a perfect weekday treat!
Step-by-Step Instructions to Amazing Air Fryer Donuts
Step 1: Prepare the Dough
In a large bowl, whisk together the flour, granulated sugar, baking powder, and salt. This dry mixture ensures all leavening is evenly distributed. In a separate, smaller bowl, whisk together the warm milk, beaten egg (or flax egg for vegan), melted butter (or vegan alternative), and vanilla extract. Pour the wet ingredients into the dry ingredients. Mix with a spoon or spatula until just combined. Don’t overmix; a few small lumps are perfectly fine! Overmixing can lead to tough donuts.
Step 2: Shape the Donuts
Lightly flour a clean countertop or large cutting board. Turn the dough out onto the floured surface. The dough will be slightly sticky, which is what we want for a tender donut! Gently pat or roll the dough to about 1/2-inch thickness. Use a donut cutter or two round cookie cutters (one larger, one smaller) to cut out donut shapes. Re-roll scraps once to minimize waste, but be gentle. If you don’t have cutters, you can form small balls of dough and press a indent in the center with your thumb.
Step 3: Air Fry
Preheat your air fryer to 350°F (175°C). Lightly grease your air fryer basket or use parchment paper liners if you have them. Carefully place the donut shapes into the air fryer basket in a single layer, ensuring they don’t touch each other. You will likely need to cook them in batches. Air fry for 3-4 minutes. Carefully flip the donuts using a spatula (they are delicate!) and air fry for another 3-4 minutes, or until golden brown and cooked through. Cooking time will vary slightly depending on your air fryer model and donut thickness. They should spring back lightly when touched.
Step 4: Add Toppings
While the donuts are cooking, prepare your desired toppings. Once the donuts are done, let them cool on a wire rack for a few minutes. While they are still slightly warm (but not hot), dip them into your cinnamon sugar mixture, drizzle with chocolate glaze, or dust with powdered sugar. The warmth helps the toppings adhere beautifully. Enjoy them fresh!
Nutritional Information (Approximate per Donut, without toppings)
This is an approximate breakdown. Actual values will vary based on exact ingredients and portion sizes.
- Calories: ~150-180
- Protein: ~3-4g
- Fat: ~5-7g
- Carbohydrates: ~25-30g
- Sugar: ~10-15g
Note: Toppings will significantly alter the nutritional values.
Healthier Alternatives and Flavor-Preserving Swaps
We’ve already incorporated healthier elements by ditching the deep fryer, but here are more ways to enhance this recipe:
- Whole Wheat Flour: Substitute up to half the all-purpose flour with white whole wheat flour for added fiber and nutrients. It might result in a slightly denser, nuttier donut.
- Reduced Sugar: Use a sugar substitute like erythritol or stevia in the dough (adjust quantities as per product instructions). Be mindful that sugar contributes to browning, so you might need to cook them slightly longer.
- Greek Yogurt: Replace some of the milk with plain Greek yogurt for added protein and a tangier flavor that complements sweet toppings.
- Fruit-Based Toppings: Opt for fruit glazes, a light dusting of cinnamon, or fresh berries instead of heavy chocolate or sugar icings.
- Oat Flour: For a gluten-free and whole-grain option, you can experiment with oat flour, though it may require adjusting liquid ratios.
Serving Suggestions
These donuts are best served warm, fresh from the air fryer! They are perfect for:
- A quick breakfast on busy mornings.
- A healthier afternoon snack with a cup of coffee or tea.
- A fun baking activity with kids.
- A light dessert after dinner.
Pair them with a glass of milk, a steaming mug of coffee, or a refreshing herbal tea.
Common Mistakes to Avoid
- Overmixing the Dough: This is the quickest way to tough, dense donuts. Mix until just combined.
- Overcrowding the Air Fryer: Donuts need space for air to circulate. Cook in batches to ensure even cooking and crispiness.
- Opening the Air Fryer Too Often: Each time you open the lid, heat escapes, prolonging the cooking time and potentially affecting texture.
- Using Old Baking Powder: Ensure your baking powder is fresh for maximum fluffiness. Test it by adding a teaspoon to hot water; it should bubble vigorously.
- Not Letting Them Cool Slightly Before Topping: Applying glazes or toppings to piping hot donuts can cause them to melt off or become soggy. Let them cool for a few minutes first.
Storing Tips
These air fryer donuts are truly best enjoyed fresh on the day they are made. However, if you have leftovers:
- Room Temperature: Store unfrosted or cinnamon-sugared donuts in an airtight container at room temperature for up to 1-2 days. They will lose some of their crispness.
- Reheating: For a crispier texture, you can briefly reheat them in the air fryer at 300°F (150°C) for 1-2 minutes.
- Glazed Donuts: Frosted or glazed donuts are best stored at room temperature, uncovered or loosely covered, to prevent the glaze from getting sticky. Consume within 1 day.
Don’t Wait, Make These Easy Air Fryer Donuts Today!
There you have it – a simple, delicious, and relatively guilt-free way to satisfy your donut cravings! These Easy Air Fryer Donuts are fluffy, tender, and incredibly versatile. Whether you’re a seasoned baker or a beginner, you’ll find this recipe a breeze. The speed, simplicity, and delicious results make them a perfect go-to treat. So, preheat that air fryer, gather your ingredients, and get ready to be amazed. You might just discover your new favorite way to enjoy donuts. Give them a try and let us know your favorite topping combinations in the comments below!
Frequently Asked Questions
***Can I make these donuts ahead of time?***
While they are best enjoyed fresh, you can make the dough a few hours in advance and keep it chilled in the refrigerator. For best results, shape and cook them closer to serving time.
***What is the best way to get the donuts out of the air fryer?***
Use a thin spatula or a pair of kitchen tongs to carefully lift the donuts. They are delicate when hot, so be gentle.
***Can I use a donut pan in the air fryer?***
Yes, if you have a silicone donut pan that fits your air fryer, you can grease it well and pour the batter in about halfway. Cooking time might be slightly longer.
***Why are my donuts not fluffy?***
This is usually due to overmixing the dough, using old baking powder, or not preheating the air fryer sufficiently. Ensure all ingredients are fresh and follow the mixing instructions carefully.
***How do I make a vegan version of these donuts?***
Substitute the milk with your favorite plant-based milk (almond, oat, soy) and use vegan butter or coconut oil. Replace the egg with a flax egg (1 tbsp ground flaxseed + 3 tbsp water, let sit for 5 minutes) or a commercial egg replacer.

Easy Air Fryer Donuts
Description
TheseEasy Air Fryer Donutsare light, fluffy, and made without deep-frying! Perfect for a quick treat, they can be customized with different toppings like cinnamon sugar or chocolate glaze. Plus, there’s avegan optionincluded!
Ingredients
- 1 cupall-purpose flour (or gluten-free flour mix)1/4 cupgranulated sugar1 teaspoonbaking powder1/4 teaspoonbaking soda1/4 teaspoonsalt1/2 cupbuttermilk (or almond milk for vegan option)1egg (or 1 flax egg for vegan option: 1 tbsp flaxseed meal +2.5 tbspwater)1/2 teaspoonvanilla extract
- 1/4 cupgranulated sugar1 teaspoonbaking powder1/4 teaspoonbaking soda1/4 teaspoonsalt1/2 cupbuttermilk (or almond milk for vegan option)1egg (or 1 flax egg for vegan option: 1 tbsp flaxseed meal +2.5 tbspwater)1/2 teaspoonvanilla extract
- 1 teaspoonbaking powder1/4 teaspoonbaking soda1/4 teaspoonsalt1/2 cupbuttermilk (or almond milk for vegan option)1egg (or 1 flax egg for vegan option: 1 tbsp flaxseed meal +2.5 tbspwater)1/2 teaspoonvanilla extract
- 1/4 teaspoonbaking soda1/4 teaspoonsalt1/2 cupbuttermilk (or almond milk for vegan option)1egg (or 1 flax egg for vegan option: 1 tbsp flaxseed meal +2.5 tbspwater)1/2 teaspoonvanilla extract
- 1/4 teaspoonsalt1/2 cupbuttermilk (or almond milk for vegan option)1egg (or 1 flax egg for vegan option: 1 tbsp flaxseed meal +2.5 tbspwater)1/2 teaspoonvanilla extract
- 1/2 cupbuttermilk (or almond milk for vegan option)1egg (or 1 flax egg for vegan option: 1 tbsp flaxseed meal +2.5 tbspwater)1/2 teaspoonvanilla extract
- 1egg (or 1 flax egg for vegan option: 1 tbsp flaxseed meal +2.5 tbspwater)1/2 teaspoonvanilla extract
- 1/2 teaspoonvanilla extract
Instructions
- 1️⃣Prepare the batter: In a mixing bowl, whisk together the flour, sugar, baking powder, baking soda, and salt.2️⃣Mix wet ingredients: In a separate bowl, beat the buttermilk, egg (or flax egg), and vanilla extract together until well combined.3️⃣Combine: Gradually mix the wet ingredients into the dry ingredients, stirring until smooth and fully incorporated.4️⃣Fill the donut molds: Transfer the batter into a piping bag or a ziplock bag with a small corner snipped off. Pipe the batter evenly into the donut molds in your air fryer.5️⃣Air fry: Cook at350°F (175°C) for 5-7 minutes, or until a toothpick inserted in the center comes out clean. Depending on your air fryer size, you may need to do this in batches.6️⃣Cool & serve: Let the donuts cool slightly before adding your favorite toppings.
- 2️⃣Mix wet ingredients: In a separate bowl, beat the buttermilk, egg (or flax egg), and vanilla extract together until well combined.
- 3️⃣Combine: Gradually mix the wet ingredients into the dry ingredients, stirring until smooth and fully incorporated.4️⃣Fill the donut molds: Transfer the batter into a piping bag or a ziplock bag with a small corner snipped off. Pipe the batter evenly into the donut molds in your air fryer.5️⃣Air fry: Cook at350°F (175°C) for 5-7 minutes, or until a toothpick inserted in the center comes out clean. Depending on your air fryer size, you may need to do this in batches.6️⃣Cool & serve: Let the donuts cool slightly before adding your favorite toppings.
- 4️⃣Fill the donut molds: Transfer the batter into a piping bag or a ziplock bag with a small corner snipped off. Pipe the batter evenly into the donut molds in your air fryer.5️⃣Air fry: Cook at350°F (175°C) for 5-7 minutes, or until a toothpick inserted in the center comes out clean. Depending on your air fryer size, you may need to do this in batches.6️⃣Cool & serve: Let the donuts cool slightly before adding your favorite toppings.
- 5️⃣Air fry: Cook at350°F (175°C) for 5-7 minutes, or until a toothpick inserted in the center comes out clean. Depending on your air fryer size, you may need to do this in batches.
- 6️⃣Cool & serve: Let the donuts cool slightly before adding your favorite toppings.
Notes
✔️ No donut mold? Use parchment paper and shape small rounds with a hole in the center.✔️ For asweeter donut, increase the sugar to 1/3 cup.✔️ Store leftovers in anairtight containerfor up to 2 days, or freeze for longer storage.
“`