“`html
Table of Contents
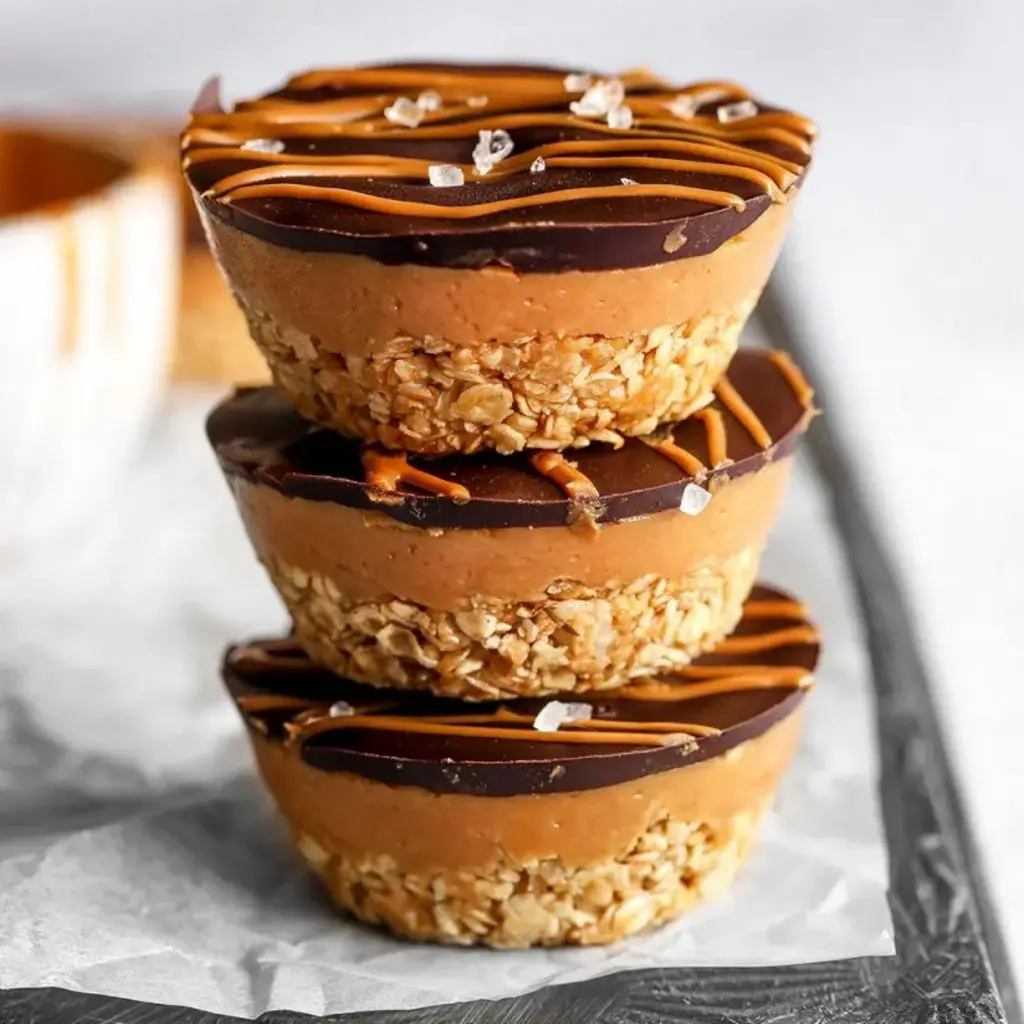
Peanut Butter Chocolate Oat Cups – A No-Bake Vegan Treat That Actually Stays Together
I still remember the first time I made these peanut butter chocolate oat cups. It was a late summer afternoon in my tiny New York City apartment, and I was craving something sweet but didn’t want to turn on the oven — it was easily 90°F outside. I pulled out a bag of rolled oats I’d picked up at the Union Square farmers market, a jar of smooth peanut butter from the corner bodega, and a block of dark chocolate I’d stashed away from a trip to a specialty shop in Brooklyn. Within twenty minutes, I had a tray of these little cups chilling in the fridge, and by the time my husband got home, they were ready. He took one bite and said, “These are dangerous.” And he was right.
The texture is what gets you first — a chewy, slightly crunchy oat base that yields just enough to the tooth, followed by a creamy, salty-sweet peanut butter middle that practically melts on your tongue, all topped with a firm, snappy layer of dark chocolate. When you bite into one, the chocolate cracks ever so slightly, then gives way to that soft peanut butter center, and the oats add this wholesome, hearty chew that makes it feel like a real snack, not just a candy. The dark chocolate brings a gentle bitterness that cuts through the sweetness of the maple syrup, and a tiny pinch of salt in the base ties everything together. It is deeply satisfying, and each component shines without overpowering the others.
What makes my version different from other no-bake oat cups you may have tried is the technique I borrowed from my Paris pastry training — I press the oat base into the molds and freeze it before adding the peanut butter layer. That short freeze firms up the oats just enough so they hold their shape when you spread the peanut butter on top, preventing the dreaded soggy-bottom situation. My trained chef’s palate also means I balance the salt, sweetness, and richness with precision. And I’ll share my favorite pro tip with you below so your cups never fall apart.
Why This Peanut Butter Chocolate Oat Cups Recipe Is the Best
The flavor secret here is the combination of high-quality dark chocolate and a tiny pinch of salt in the oat base. I learned in culinary school in Paris that salt doesn’t just make things savory — it amplifies sweetness and deepens the flavor of chocolate. The peanut butter I use is the kind with no added sugar or oil — just peanuts and salt — because when you control the ingredients, you control the taste. This recipe also uses maple syrup instead of refined sugar, which adds a subtle almost caramel-like note that pairs beautifully with the oats and chocolate.
From a texture perspective, the trick is all in the freeze-and-layer technique. The oat base gets a quick 15-minute freeze before you add the peanut butter filling and chocolate topping. This prevents the layers from bleeding into each other and keeps the base firm and distinct. I tested this recipe six times to get the ratios right — too many oats and the base is dry, too much peanut butter and it won’t hold together. The precise measurements in this recipe are the result of all that testing, so you can trust them completely.
This recipe is foolproof and fast because it requires no baking, no fancy equipment, and just six basic ingredients you can find at any grocery store. If you can stir and press, you can make these. The silicone muffin tray does most of the work for you — the cups pop right out with zero sticking. Even if you’re a brand new cook, you will nail these on your first try. I always say, if my mother in Morocco could learn to make French pastry from my letters home, you can absolutely make these oat cups in your own kitchen.
Peanut Butter Chocolate Oat Cups Ingredients
I source my rolled oats from the bulk bins at the Park Slope Food Coop here in NYC — they’re always fresh and affordable. The maple syrup I look for at the greenmarket, and the dark chocolate I buy from a little shop in the West Village that imports single-origin bars. But honestly, this recipe works beautifully with standard grocery store ingredients too. Here’s everything you’ll need.
Ingredients List
- 70g (about ¾ cup) rolled oats — use certified gluten-free if needed
- 2 tbsp smooth peanut butter (or any nut butter you love)
- 2 tbsp maple syrup
- Pinch of fine sea salt
- 100g (about ⅓ cup + 1 tbsp) smooth peanut butter — for the middle layer
- 1 tbsp maple syrup — for the middle layer
- 70g (about ½ cup) dark chocolate, melted — use dairy-free if needed
- Optional: drizzle of melted Biscoff spread for garnish
Ingredient Spotlight
Rolled Oats — These are the structural backbone of the cups. Rolled oats (not quick oats, not steel-cut) provide the ideal texture: chewy but not mushy, absorbent but not dry. In US grocery stores, look for “old-fashioned rolled oats” — Bob’s Red Mill and Quaker both offer gluten-free versions. Quick oats will work in a pinch but yield a softer, less distinct base.
Peanut Butter — I use two different amounts here: a little in the base for binding, and a generous portion for the middle layer. The middle layer is where the creamy richness shines, so use a peanut butter you love eating straight off the spoon. Natural peanut butter (the kind that separates) works wonderfully — just stir it well before measuring. If you use a no-stir brand, the cups will be slightly firmer but still delicious.
Dark Chocolate — This is the crown jewel. A 60% to 70% dark chocolate gives the perfect balance of sweetness and bitterness. Chip or chopped bar — either works. I prefer chopped bar because it melts more evenly and doesn’t contain stabilizers. If you’re dairy-free, many dark chocolates are naturally vegan — just double the label. Ghirardelli 60% cacao chips are a solid, widely available choice.
| Original Ingredient | Best Substitution | Flavor / Texture Impact |
|---|---|---|
| Rolled oats | Quick oats | Softer, less chewy base; still holds together |
| Peanut butter (any layer) | Almond butter or sunflower seed butter | More subtle nut flavor; sunflower butter turns slightly green when baked but not here (no-bake) |
| Maple syrup | Agave nectar or honey (not vegan) | Agave is milder; honey adds floral notes |
| Dark chocolate | Milk chocolate (not dairy-free) | Sweeter, softer snap; not vegan |
How to Make Peanut Butter Chocolate Oat Cups — Step-by-Step
Trust me when I say this is one of the easiest recipes you will ever make. I have taught it to beginner home cooks and even my teenage nephew, and every single person has succeeded on the first try. Just follow these three simple steps.
Step 1: Mix and Press the Base
In a medium mixing bowl, combine 70g rolled oats, 2 tablespoons smooth peanut butter, 2 tablespoons maple syrup, and a generous pinch of fine sea salt. Stir with a fork until the mixture is completely evenly combined — every oat should be lightly coated. You’re looking for a texture that holds together when you squeeze a small amount in your palm. Divide the mixture evenly among 6 cups of a silicone muffin tray. Press each portion down firmly with your fingers or the back of a small spoon. You want the base to be compact and level. Freeze for 15 minutes.
💡 mia’s Pro Tip: Wet your fingers slightly before pressing the oat mixture into the molds — the oats won’t stick to your hands, and you can press them down much more firmly. This makes a huge difference in how well the cups hold together!
Step 2: Create the Peanut Butter Layer
While the bases are in the freezer, make the middle layer. In a small bowl, stir together 100g smooth peanut butter and 1 tablespoon maple syrup until smooth and uniform. This should take about 30 seconds. Once the oat bases have chilled, remove the tray from the freezer. Spoon about 2 teaspoons of the peanut butter mixture onto each base, then spread it gently to cover the surface almost to the edges. Try not to go all the way to the rim — leave about ⅛ inch (2–3 mm) of oat visible around the edge — this helps the chocolate seal everything in later.
⚠️ Common Mistake to Avoid: Don’t press the peanut butter layer down hard into the oats — you want it to sit on top, not blend into the base. A gentle spreading motion with the back of a spoon is all you need. If you push too hard, the layers will merge and the texture won’t be as distinct.
Step 3: Top with Chocolate and Chill
Melt 70g dark chocolate in a heatproof bowl over a pot of simmering water (double-boiler method) or in the microwave in 20-second bursts, stirring between each. Let the melted chocolate cool for 1–2 minutes so it doesn’t melt the peanut butter when you pour it. Carefully spoon the melted chocolate over each peanut butter layer, covering it completely. Tilt the tray gently if needed to help the chocolate flow to the edges. Return the tray to the refrigerator and chill for at least 15 minutes, or until the chocolate is firm and set. For best results, refrigerate for 30 minutes.
💡 mia’s Pro Tip: For an extra touch, drizzle a little melted Biscoff spread over the top of each cup before the chocolate fully sets. The caramelized spice flavor is incredible with the dark chocolate and peanut butter. If you’ve never tried Biscoff, it’s a cookie spread that tastes like warm, cozy autumn — I find it at any major US grocery store near the peanut butter aisle.
| Step | Action | Duration | Key Visual Cue |
|---|---|---|---|
| 1 | Mix & press base into molds | 5 mins + 15 mins freeze | Base holds together when squeezed |
| 2 | Spread peanut butter layer | 4 mins | Thin even layer, small border visible |
| 3 | Top with melted chocolate & chill | 5 mins + 15–30 mins chill | Chocolate is firm and glossy |
Serving & Presentation
I love serving these peanut butter chocolate oat cups straight from the fridge on a small wooden board or a simple white plate — the contrast of the dark chocolate against the pale peanut butter when you cut one open is really lovely. For a brunch spread, I arrange them alongside fresh berries, a dusting of cocoa powder, and maybe a few flaky sea salt crystals on top for an extra pop. They also make a wonderful homemade gift packed in a little box with a ribbon — I do this for my neighbors in Brooklyn during the holidays.
If you want to take them up a notch, drizzle a little extra melted dark chocolate or Biscoff over the top just before serving, and top with a sprinkle of toasted coconut, crushed peanuts, or even a few puffed grains for crunch. Pair them with a cold glass of oat milk, a strong espresso, or a cup of mint tea — the Moroccan mint tea I grew up drinking is especially perfect because the herbaceous freshness cuts through the richness beautifully.
| Pairing Type | Suggestions | Why It Works |
|---|---|---|
| Side Dish | Fresh berries, sliced banana, apple slices | Fresh fruit acidity balances the richness |
| Sauce / Dip | Extra melted dark chocolate, warm Biscoff, coconut yogurt | Adds indulgence and variety in every bite |
| Beverage | Espresso, oat milk latte, Moroccan mint tea, cold almond milk | Coffee and tea cut sweetness; milk adds creaminess |
| Garnish | Flaky sea salt, toasted coconut, crushed peanuts, cocoa powder | Adds texture and visual appeal |
Make-Ahead, Storage & Reheating
In my busy NYC life, I make a batch of these on Sunday evening and they last me through the week. They’re perfect for grabbing on the way out the door, packing in a lunchbox, or serving as a quick after-dinner sweet treat. Because they’re no-bake and sealed with chocolate, they actually keep better than most homemade snacks.
| Method | Container | Duration | Reheating Tip |
|---|---|---|---|
| Refrigerator | Airtight container, layers separated by parchment | Up to 7 days | Serve cold or let sit 5 mins at room temp |
| Freezer | Freezer-safe bag or container, individually wrapped | Up to 3 months | Thaw in fridge overnight, no need to reheat |
| Make-Ahead | Assemble in molds, cover with plastic wrap | Up to 3 days in advance before unmolding | Unmold and store in airtight container after set |
One thing I’ve learned from years of meal-prepping in my tiny NYC kitchen: these cups are actually better after a day in the fridge. The oats absorb a bit of moisture from the peanut butter and maple syrup, which softens them just slightly and makes the texture even more cohesive. If you freeze them, let them thaw in the fridge for a few hours before eating — never at room temperature, as condensation can form on the chocolate and dull its shine.
If you’re packing these for lunch, I recommend wrapping each cup individually in a small piece of parchment paper or wax paper. They stack nicely in a container without sticking together, and the paper makes them easy to grab and go. My husband takes one in his work bag almost every day, and they always survive the commute.
Variations & Easy Swaps
One of the things I love most about this recipe is how easy it is to customize. I’ve tested countless variations over the years, and these three are my all-time favorites. Each one changes the flavor profile in a way that feels like a completely different recipe — but the basic method stays exactly the same.
| Variation | Key Change | Best For | Difficulty Impact |
|---|---|---|---|
| Moroccan Spiced Cups | Add ½ tsp cinnamon + ¼ tsp cumin to oat base | Adventurous palates, holiday treats | Same — just add spices |
| Coconut Almond Cups | Sub almond butter for peanut butter, add 2 tbsp shredded coconut to base | Nut-free option (use sunflower seed butter), tropical flavor | Same |
| Salted Caramel Cups | Add 1 tbsp date paste to peanut butter layer + flaky salt on top | Sweet-tooth cravings, dessert lovers | Easy — just blend dates |
Moroccan Spiced Cups
Growing up in Morocco, my mother would often add a whisper of warm spices to sweet dishes — cinnamon in dates, cumin in honey cakes. The combination of cinnamon and a tiny pinch of cumin in the oat base of these cups creates a haunting warmth that feels both exotic and comforting. The cumin is not detectable as savory — it simply makes the chocolate taste more chocolatey and the peanut butter more roasted. Trust me on this one. Use ½ teaspoon cinnamon and ¼ teaspoon ground cumin, mixed into the oats before adding the wet ingredients.
Coconut Almond Cups (Gluten-Free / Dairy-Free)
For a variation that’s still vegan and gluten-free but completely different in personality, swap the peanut butter for almond butter and fold 2 tablespoons of unsweetened shredded coconut into the oat base. The almond butter is more delicate and slightly sweet, and the coconut adds a pleasant chewiness that reminds me of the coconut macaroons I used to make in Paris. If you need these to be nut-free, use sunflower seed butter — just note that sunflower butter can sometimes turn a greenish hue when combined with alkaline ingredients, but since this recipe is no-bake, the color stays a lovely golden brown.
Salted Caramel Cups
This variation was born on a rainy Sunday when I had a batch of medjool dates from the greenmarket and couldn’t resist experimenting. Blend 3 pitted medjool dates with 1 tablespoon warm water until smooth, then swirl that into the peanut butter layer instead of using plain maple syrup. The dates create a rich, almost caramel-like flavor that pairs gorgeously with the dark chocolate. Top each cup with a tiny sprinkle of flaky sea salt — I use Maldon — right after adding the chocolate. The salt crystals create little bursts of savory contrast that make each bite absolutely irresistible.
How do you keep peanut butter chocolate oat cups from falling apart?
The most important trick is to freeze the oat base for 15 minutes before adding the peanut butter layer. That quick freeze solidifies the oats so they hold their shape when you spread the peanut butter on top. Additionally, pressing the oat mixture very firmly into the silicone molds — using slightly wet fingers to prevent sticking — creates a compact base that won’t crumble. The peanut butter in the base also acts as a binder, so make sure you’re using a peanut butter that’s not too runny. If your natural peanut butter is very oily, stir it thoroughly and even refrigerate it for 10 minutes before mixing.
Can I use quick oats instead of rolled oats for peanut butter chocolate oat cups?
Yes, you can use quick oats, but the texture will be noticeably different. Quick oats are cut into smaller pieces, so they absorb moisture faster and create a softer, less chewy base that’s more uniform in texture. Rolled oats, on the other hand, remain more intact and give you that satisfying, hearty chew that makes these cups feel substantial. If you only have quick oats on hand, reduce the maple syrup by about 1 teaspoon to compensate for the faster absorption, and press the base even more firmly into the molds. The cups will still taste delicious and hold together well.
Do peanut butter chocolate oat cups need to be refrigerated to set?
Yes, refrigeration is essential for these cups to set properly. The chocolate needs at least 15 minutes in the fridge to firm up, and the peanut butter layer also benefits from chilling because it becomes thicker and less likely to squish out when you bite into it. If you leave them at room temperature, the chocolate will stay soft and the oat base may start to lose its shape after a few hours. I always recommend storing them in the refrigerator long-term as well — they’ll keep for up to a week and actually taste better after a day or two because the flavors meld together beautifully.
What can I substitute for peanut butter in peanut butter chocolate oat cups?
You have several excellent options depending on your dietary needs and flavor preferences. For the base, almond butter works beautifully and gives a milder, slightly sweeter flavor. Cashew butter is even creamier and more neutral. For the middle layer, sunflower seed butter is a perfect nut-free alternative, though it’s a bit thinner so you may want to refrigerate it for 10 minutes before spreading. Tahini (sesame paste) makes a wonderfully savory-sweet variation that pairs exceptionally well with dark chocolate — I love this combination with a drizzle of honey. Each substitute will change the flavor profile, but the structure of the cups remains the same.
How long do peanut butter chocolate oat cups last in the fridge?
Stored in an airtight container with parchment paper between layers, peanut butter chocolate oat cups will stay fresh and delicious for up to 7 days in the refrigerator. After about day 5, the oat base may start to soften slightly as it continues to absorb moisture from the peanut butter, but the flavor actually deepens and becomes more cohesive. I personally find them best on days 2 through 4 — the chocolate is perfectly set, the peanut butter is creamy but not runny, and the oats have just the right amount of chew. If you notice any condensation on the chocolate after a few days, simply pat them dry with a paper towel.
Can I freeze peanut butter chocolate oat cups for longer storage?
Absolutely — these cups freeze beautifully for up to 3 months. To freeze, first chill them in the fridge until the chocolate is completely firm (about 30 minutes), then wrap each cup individually in wax paper or parchment paper. Place the wrapped cups in a freezer-safe bag or container, pressing out as much air as possible. When you’re ready to enjoy one, simply transfer it to the refrigerator overnight to thaw. I don’t recommend thawing at room temperature because the chocolate may develop condensation, which can dull its glossy appearance. Frozen cups also make a fantastic cold treat straight from the freezer — just let them sit for 2–3 minutes before eating.
Are peanut butter chocolate oat cups healthy?
These cups are made with whole food ingredients and contain no refined sugar, no butter, no cream, and no flour — so they are certainly a healthier alternative to traditional candy bars or processed snack cups. Each cup has 273 calories, 7 grams of protein, and 11 grams of sugar (all from maple syrup and the natural sugars in the chocolate). The rolled oats provide fiber and complex carbohydrates for sustained energy, while the peanut butter offers healthy fats and additional protein. The dark chocolate adds antioxidants. That said, they are still a treat and should be enjoyed as part of a balanced diet — but I feel much better about snacking on these than on anything from a wrapper.
What type of chocolate is best for these oat cups?
A 60% to 70% dark chocolate is the sweet spot for these cups. At 60%, the chocolate is noticeably sweet but still has enough cocoa intensity to stand up to the rich peanut butter. At 70%, the chocolate is deeper, more bitter, and more sophisticated — it pairs beautifully with the salt and maple syrup. I recommend using a chocolate bar chopped into small pieces rather than chocolate chips, because chips often contain stabilizers that prevent them from melting as smoothly. Some of my favorite widely available brands for this recipe are Ghirardelli 60% cacao bars, Lindt 70% excellence, and for a special treat, any single-origin dark chocolate from a local chocolatier.
Can I add protein powder to peanut butter chocolate oat cups?
Yes, you can add protein powder, but you need to adjust the recipe slightly to maintain the right texture. Add 1 scoop (about 20–25g) of vanilla or chocolate protein powder to the oat base mixture. Because protein powder absorbs moisture, you’ll need to increase the maple syrup by about 1 teaspoon and add 1 teaspoon of water or non-dairy milk to keep the mixture from becoming too dry and crumbly. Stir until everything is evenly incorporated — the base should still hold together when squeezed. Note that plant-based protein powders tend to work better than whey in this recipe because they are more absorbent and won’t make the cups rubbery.
How do I make these peanut butter chocolate oat cups nut-free?
To make these cups completely nut-free, substitute the peanut butter in both layers with sunflower seed butter or tahini. Sunflower seed butter is the closest in texture and creaminess to peanut butter, though it has a distinct roasted sunflower flavor that I personally love with chocolate. Make sure the sunflower seed butter you buy is well-stirred and smooth. For the oat base, you can also replace the peanut butter with sunflower seed butter or even a slightly firm coconut butter (the kind that’s solid at room temperature). Always check your labels — especially on the oats and chocolate — to confirm they are processed in a nut-free facility if you have allergies.
Share Your Version!
I absolutely love hearing how these peanut butter chocolate oat cups turn out in your kitchen. Did you try the Moroccan spiced version with cinnamon and cumin? Or did you go all in on the salted caramel date swirl? Maybe you invented something entirely new — like a white chocolate drizzle or a crushed pretzel topping. Whatever you did, I want to know about it. Leave a star rating and a comment below to tell me how it went, and feel free to ask any questions you have — I read every single one and answer personally.
If you share a photo on Instagram or Pinterest, tag me @exorecipes so I can see your beautiful creations. I love nothing more than scrolling through my feed and spotting these little cups in kitchens all over the country. And if you have a specific question about a substitution or technique you’re trying, just drop it in the comments — I will always answer with the same care I’d give a student in my own kitchen.
From my NYC kitchen to yours — I hope this recipe brings as much warmth to your table as it does to mine. — mia 🧡
Love This Recipe? Save It to Pinterest!
If you enjoyed this Peanut Butter Chocolate Oat Cups recipe, don’t let it get lost in your browser tabs! 😄 Pin it now so you can find it again anytime — and explore hundreds more tried-and-tested recipes waiting for you on my Pinterest boards.
👉 Follow mia on Pinterest @exorecipe
📌 Pin this recipe · 🔁 Re-pin your favorites · 💬 Tag me when you make it — I love seeing your creations!
“`
Print

Peanut Butter Chocolate Oat Cups
Description
A simple treat with a layer of peanut butter all topped with rich dark chocolate. No-bake, vegan AND gluten-free!
Ingredients
- 70g rolled oats (used gluten-free if necessary)
- 2 tbsp smooth peanut butter (or nut butter of choice)
- 2 tbsp maple syrup
- Pinch of salt
- 100g smooth peanut butter
- 1 tbsp maple syrup
- 70 g dark chocolate (melted)
- Optional drizzle of melted Biscoff spread
Instructions
- Mix all the base ingredients in a bowl, then press into a 6 cup silicon muffin tray. Freeze for 15 minutes.
- In the meantime mix the peanut butter and maple syrup in a small bowl to create the middle layer, then spread over the oat bases and top with the melted chocolate.
- Refrigerate until hardened. Enjoy!
Nutrition
- Calories: 273 kcal
- Sugar: 11 g
- Fat: 17 g
- Carbohydrates: 25 g
- Protein: 7 g
k">
Tried This Recipe? Leave a Comment!
Did you make this recipe? I’d love to hear how it turned out! Please leave a comment and a rating below. Your feedback helps other home cooks and supports cheerychop.com!
For more delicious inspiration, follow me on Pinterest!
