Table of Contents
Easy Ice Cream Sandwich Cake – A No-Bake Summer Classic
I still remember the first time I made an ice cream sandwich cake. It was the middle of a sweltering New York City summer, and my air conditioner had given up. My kitchen felt like a steam bath. I wanted something cold, something indulgent, something that didn’t require turning on the oven. That’s when this easy ice cream sandwich cake came to life – a no-bake wonder that’s as simple as it is spectacular. Growing up in Morocco, my mother taught me that the best desserts don’t need complicated techniques – they need heart, quality ingredients, and a little patience. This ice cream cake recipe is the perfect summer dessert recipe for anyone who wants a stunning, crowd-pleasing treat without breaking a sweat.
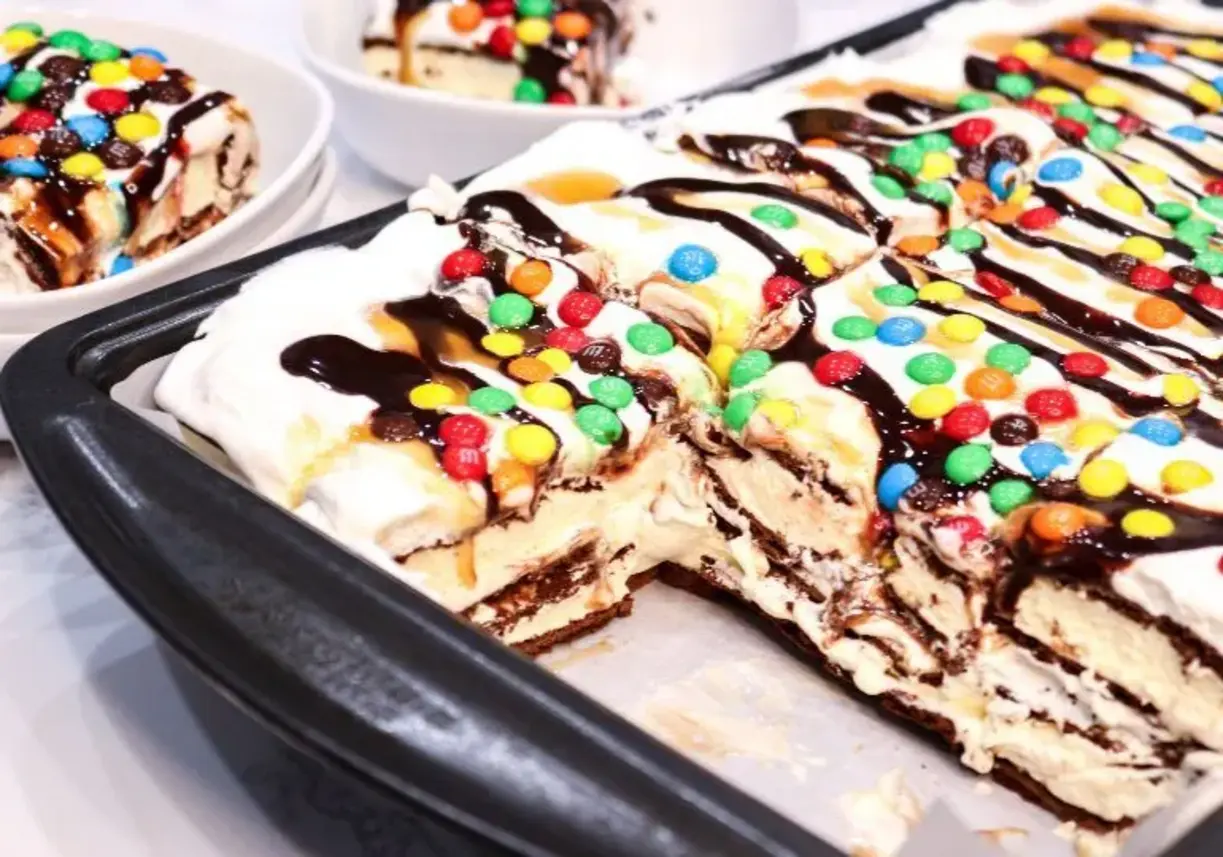
Imagine this: a thick, creamy layer of Cool Whip melding with the rich chocolate and caramel drizzle, all cradled between soft, chewy ice cream sandwiches. The first bite is a symphony of textures – the slight resistance of the cookie, the instant melt of the ice cream, the cool, airy cloud of the topping. It’s the kind of dessert that makes people close their eyes and smile. The mini M&M’s add a pop of color and a satisfying crunch. It’s pure, unadulterated joy in every single forkful, a dessert that reminds me of the simple pleasures I discovered at Parisian patisseries, but with an all-American, backyard-barbecue soul.
Listen, I’ve spent years in professional kitchens, from the bustling brasseries of Paris to the manic prep sessions here in NYC. I’ve learned that the best recipes are often the ones that let the ingredients speak for themselves. This no bake ice cream cake is my gift to you – a foolproof, five-ingredient masterpiece that delivers every single time. I will share with you my one crucial pro tip for perfect layers, the simple trick that keeps this cake from becoming a soggy mess, and the common mistake I see home cooks make. Trust me, after you make this once, it will become your go-to for every birthday, potluck, and hot summer evening.
Why This Ice Cream Sandwich Cake Recipe Is the Best
The Flavor Secret: The magic lies in the marriage of textures and temperatures. Unlike a traditional baked cake, this easy ice cream sandwich dessert doesn’t hide behind flour and eggs. It’s a pure, unfiltered celebration of vanilla, chocolate, and caramel. My twist? I learned from my days in a Parisian pâtisserie that a pinch of sea salt in the caramel layer or sprinkled on top transforms everything. It cuts through the sweetness and elevates this humble dessert into something truly sophisticated. It’s a touch that shows my Moroccan roots, where sweet and savory dance together beautifully.
Perfected Texture: The biggest challenge with any ice cream cake is the dreaded icy, hard-as-a-rock texture. I’ve perfected the technique to avoid that. By using room-temperature Cool Whip and letting the ice cream sandwiches sit out for exactly 5 minutes before assembling, you get a cake that slices cleanly and has a creamy, dreamy texture from edge to edge. It’s a lesson in patience I learned from my mother’s slow-cooked tagines – the best results come from respecting the process.
Foolproof & Fast: This is the most forgiving dessert recipe I know. You can’t overmix it. You can’t overbake it (it’s not baked!). It’s a perfect project for kids and a lifesaver for busy adults. With just 15 minutes of active prep, you can have a show-stopping dessert ready for the freezer. It’s the kind of no-fuss, high-reward cooking that I love to teach – approachable, delicious, and deeply satisfying.
Ice Cream Sandwich Cake Ingredients
When I’m shopping for these ingredients, I usually swing by my local bodega or the Union Square Greenmarket for the freshest toppings. I remember my mother always had a stash of vanilla cookies for making a similar layered dessert – it’s a tradition I love carrying forward. The beauty of this recipe is its simplicity; every ingredient has a job to do, and they all work together in perfect harmony.
Ingredients List
- 24 Ice Cream Sandwiches (vanilla is classic, but any flavor works)
- 16 oz. Container of Cool Whip (thawed in the fridge, not the counter)
- 8 oz. Hershey’s Chocolate Syrup (or any quality chocolate sauce)
- 8 oz. Caramel Sauce (store-bought is fine, or use my easy homemade recipe)
- 1 Cup Mini M&M’s (or your favorite sprinkles, crushed cookies, or chopped nuts)
Ingredient Spotlight
Ice Cream Sandwiches: The backbone of the cake! Look for a brand that’s firm at room temperature (not gooey). The classic square vanilla ones are perfect, but you can use strawberry, chocolate, or even mint for a flavor twist. 💡 mia’s Pro Tip: Let them sit out for 5 minutes before unwrapping – they’ll be soft enough to stack without cracking.
Cool Whip: This is your creamy binder, not just a topping. It lightens the cake and provides a silky mouthfeel. I prefer Cool Whip over homemade whipped cream for its stability; it won’t deflate or weep in the freezer. For a dairy-free option, you can use a chilled coconut cream, but the texture will be slightly denser.
Chocolate & Caramel Sauces: These are your flavor layers. Don’t use cheap imitations – a good chocolate syrup and a rich caramel sauce make all the difference. I often make my own salted caramel, but a high-quality jarred version works beautifully. ⚠️ Common Mistake to Avoid: Don’t drown the layers! A little drizzle goes a long way. Too much liquid makes the cake soggy.
Mini M&M’s: The finishing touch that adds texture, color, and a joyful crunch. They also help hide any messy edges! You can substitute with rainbow sprinkles, toffee bits, crushed Oreos, or even freeze-dried fruit for a sophisticated twist.
| Original Ingredient | Best Substitution | Flavor / Texture Impact |
|---|---|---|
| Vanilla Ice Cream Sandwiches | Chocolate or Strawberry Sandwiches | Richer, more complex flavor; cake becomes a double-chocolate or fruity delight. |
| Cool Whip | Stabilized Homemade Whipped Cream (with gelatin or cream cheese) | Lighter, less sweet, more natural dairy flavor. Less stable in the freezer. |
| Hershey’s Chocolate Syrup | Hot Fudge Sauce (thinned slightly with warm cream) | Thicker, richer, more decadent chocolate flavor. Less likely to make the cake soggy. |
| Caramel Sauce | Dulce de Leche | Thicker, more intense caramel flavor with a slightly chewy texture. Absolutely gorgeous. |
| Mini M&M’s | Crushed Oreos or Toffee Bits | More cookie crunch or buttery toffee flavor instead of candy shell. |
How to Make Ice Cream Sandwich Cake — Step-by-Step
Alright, let’s get building! This is easier than you think. Just follow along, and you’ll have a stunning no-bake ice cream cake in no time.
Step 1: Prep the Pan
Line a 9×13-inch cake pan with parchment paper, leaving an overhang on two opposite sides. This creates a “sling” that will make lifting the finished cake out a breeze. Don’t skip this step – it’s the secret to clean, beautiful slices.
⚠️ Common Mistake to Avoid: Using a pan that’s too small. A 9×13 is the perfect size for 24 sandwiches. A smaller pan will cause the cake to overflow and won’t allow for even layers.
Step 2: Build the First Layer
Unwrap 12 of the ice cream sandwiches and arrange them in a single, snug layer in the bottom of the prepared pan. If needed, you can cut a sandwich in half to fill any gaps. The goal is a solid foundation with no empty spaces.
Step 3: Add the Creamy Layer
Spread half of the Cool Whip evenly over the first layer of ice cream sandwiches. Use an offset spatula for the smoothest results. This layer should be about 1/2-inch thick.
💡 mia’s Pro Tip: Make sure your Cool Whip is fully thawed but still cold. If it’s too cold, it won’t spread easily. If it’s too warm, it will be runny. Aim for a spreadable, mayo-like consistency.
Step 4: Drizzle the Sauces
Drizzle a generous amount of chocolate syrup and caramel sauce over the Cool Whip layer. Don’t be shy, but don’t drown it either. A good drizzle means seeing ribbons of sauce across the white surface.
Step 5: Repeat the Layers
Repeat steps 2-4 exactly: add the remaining 12 ice cream sandwiches, the rest of the Cool Whip, and another generous drizzle of chocolate and caramel sauce. This double-layer construction is what makes the cake so impressive.
⚠️ Common Mistake to Avoid: Pressing down too hard on the top layer of sandwiches. You want them to sit gently on the Cool Whip, not sink into it. Otherwise, the layers will mix together.
Step 6: Add the Topping
Sprinkle the top generously with the mini M&M’s (or your chosen topping). Press them in very gently so they stick. This not only looks fantastic but also adds that essential crunch.
Step 7: Freeze to Set
Place the pan in the freezer for a minimum of 2 hours. This is crucial! The cake needs this time to firm up completely. For best results, freeze overnight. The longer it sets, the cleaner your slices will be.
💡 mia’s Pro Tip: To avoid a frozen-solid cake, remove it from the freezer 10-15 minutes before serving. Let it sit at room temperature to soften slightly for the perfect, creamy slice.
Step 8: Serve Immediately
Once it has set, use the parchment paper sling to lift the entire cake out of the pan. Place it on a cutting board, slice with a sharp knife (run it under hot water between cuts for clean slices), and serve immediately. Watch it disappear!
| Step | Action | Duration | Key Visual Cue |
|---|---|---|---|
| 1 | Line pan with parchment | 2 minutes | Paper overhangs on two sides |
| 2 | Layer 12 sandwiches | 3 minutes | Snug, single layer |
| 3 | Spread half Cool Whip | 2 minutes | Smooth, even layer |
| 4 | Drizzle sauces | 1 minute | Ribbons of chocolate & caramel |
| 5 | Repeat layers | 5 minutes | Second sandwich layer sits gently |
| 6 | Sprinkle topping | 2 minutes | Evenly coated with M&M’s |
| 7 | Freeze | 2+ hours | Firm to the touch |
| 8 | Serve | Immediately | Clean, sharp slices |
Serving & Presentation
This stunning cake is the star of any gathering. For a classic American backyard barbecue, serve it in thick, generous slices on a chilled plate. I love to add a final extra drizzle of warm chocolate and caramel sauce right before serving – it creates a beautiful, glossy finish. In my NYC apartment, I sometimes add a sprinkle of Maldon sea salt (a trick from my Parisian pastry days) to cut the sweetness and add a sophisticated edge. A dollop of fresh whipped cream on the side never hurts, either.
Growing up in Morocco, desserts were often served with a pot of strong mint tea. While that might not be the first pairing you think of here, the contrast of the cold, creamy cake with the hot, aromatic tea is absolutely divine. For a truly decadent experience, serve this cake alongside a scoop of extra vanilla ice cream (yes, more ice cream!) or a shot of espresso for the adults. The presentation is half the fun – use a sharp knife dipped in hot water for those perfect, clean-cut slices.
| Pairing Type | Suggestions | Why It Works |
|---|---|---|
| Side Dish | Fresh berries, a light fruit salsa, or a green salad with citrus vinaigrette | The acidity and freshness balance the rich, sweet cake. |
| Sauce / Dip | Warm hot fudge, extra caramel sauce, or a strawberry compote | Adds a hot/cold contrast and another layer of flavor. |
| Beverage | Cold milk, strong coffee, or a dessert wine like a late-harvest Riesling |
 Tried This Recipe? Leave a Comment!Did you make this recipe? I’d love to hear how it turned out! Please leave a comment and a rating below. Your feedback helps other home cooks and supports cheerychop.com! For more delicious inspiration, follow me on Pinterest!  Hi, I’m Ema! Let’s make every bite unforgettable! ABOUT MELet's connect |