“`html
Table of Contents
Classic Cherry Cheesecake with a Gluten-Free Option: The Ultimate Recipe for Every Occasion
I still remember the first time I made a cherry cheesecake in my tiny Paris apartment — the smell of butter and cream cheese filling every corner, the sound of a springform pan clicking shut, and the deep red cherries bubbling away on the stove. That was years ago, but that moment is baked into every version of this classic cherry cheesecake I make today. Now, from my New York City kitchen, I’m sharing my ultimate gluten-free cherry cheesecake recipe — one that marries French pastry precision with the bold, fruit-forward flavors I grew up with in Morocco. This is the best cherry cheesecake recipe for every occasion, whether it’s a birthday, holiday, or just a Tuesday that deserves something spectacular.
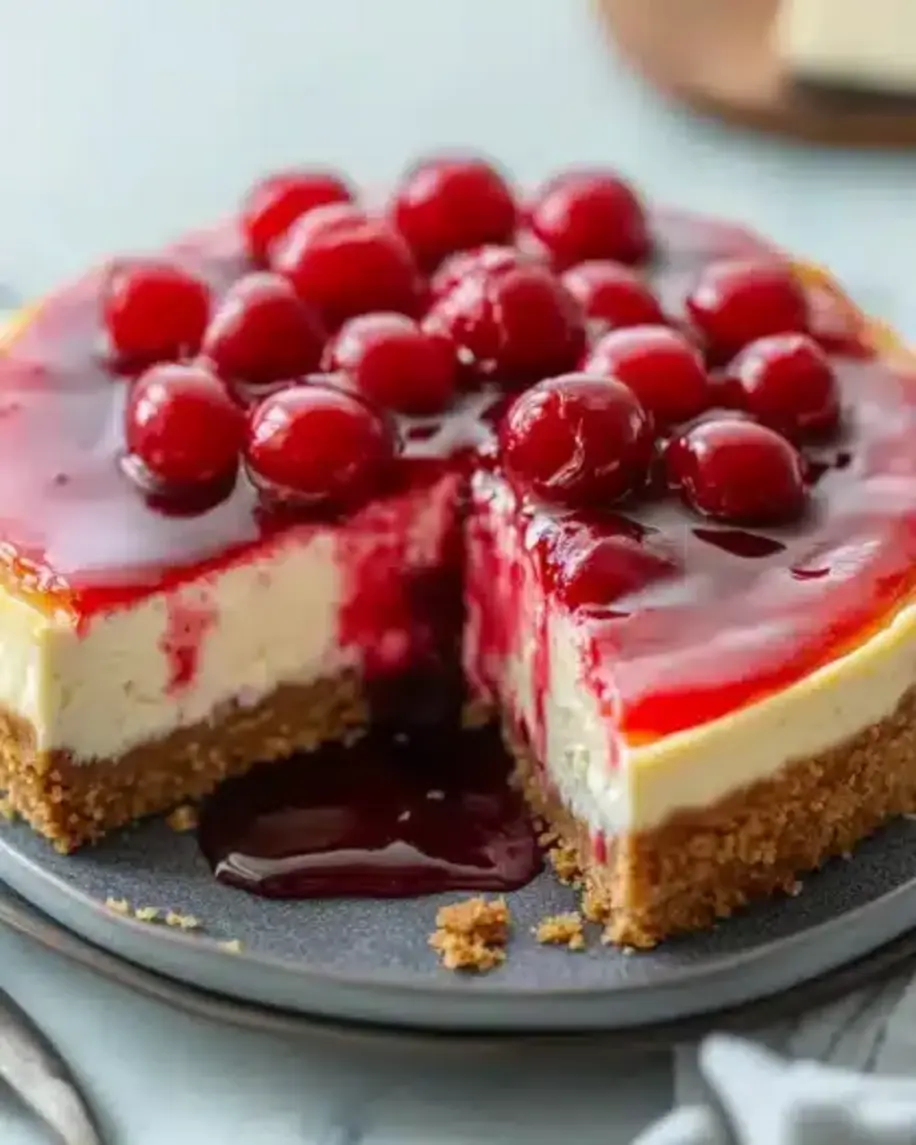
Imagine slicing into a tall, creamy cheesecake — the filling is silky, rich, and perfectly dense, with a whisper of vanilla and a tangy finish from sour cream. The crust is buttery and crisp, made from gluten-free graham crackers that toast to a warm golden brown. And the topping: a luscious cherry compote, ruby-red and jewel-bright, with whole cherries suspended in a glossy syrup that catches the light. Each bite brings a balance of sweet and tart, creamy and crunchy, cool and bright. It’s the kind of dessert that feels both nostalgic and utterly refined.
I’ve tested this recipe more times than I can count — for dinner parties, potlucks, and quiet nights at home with a glass of something cold. This cherry cheesecake gluten-free option doesn’t compromise on texture or flavor. My secret? A slow, gentle bake inspired by my pastry training in Paris, plus a gluten-free crust that’s so good no one will guess it’s GF. One of the biggest challenges with any cheesecake is avoiding cracks — and I’ll show you exactly how to prevent that common mistake. Let’s bake something beautiful together.
Why This Gluten-Free Cherry Cheesecake Recipe Is the Best
The flavor secret here is the cherry topping — I cook it with a touch of lemon juice and just enough sugar to let the fruit shine without being cloying. Growing up in Morocco, my mother always added a squeeze of citrus to fruit compotes, a trick I’ve carried into my French-trained pastry work. That bright note cuts through the richness of the cheesecake and makes every forkful feel balanced. It’s the same principle I use in my New York kitchen when I’m building layers of flavor — never let one element overpower another.
The texture is where this recipe really shines. I use a water bath method combined with a gentle oven-cooling technique that gives the filling a velvety, almost mousse-like consistency. No cracking, no sinking — just a smooth, creamy top that bakes evenly every time. The gluten-free crust adds a sandy, buttery crunch that contrasts beautifully with the lush filling. It’s a texture combination that took me years to perfect, and it’s the one I’m most proud of.
This recipe is also surprisingly foolproof for beginners. The steps are straightforward, the ingredients are all available at any US grocery store, and I’ve included my best pro tips to guide you through each stage. Whether you’re a seasoned baker or making your first gluten-free cheesecake dessert, this recipe is designed to work. No fancy equipment, no complicated techniques — just honest, delicious cheesecake that tastes like it came from a high-end patisserie.
Gluten-Free Cherry Cheesecake Recipe Ingredients
I find most of my ingredients at the Union Square Greenmarket in Manhattan — the cream cheese from a local dairy, the cherries from a farm upstate. But this recipe is designed to work beautifully with whatever you find at your regular supermarket. Here’s everything you’ll need.
Ingredients List
For the Crust:
- 1 1/2 cups gluten-free graham cracker crumbs (about 10–12 crackers)
- 1/4 cup granulated sugar
- 6 tablespoons unsalted butter, melted
For the Filling:
- 4 packages (8 ounces each) cream cheese, softened to room temperature
- 1 1/4 cups granulated sugar
- 1 teaspoon vanilla extract
- 4 large eggs, at room temperature
- 1/2 cup sour cream, at room temperature
- 1/4 cup all-purpose flour (or gluten-free flour blend)
For the Cherry Topping:
- 2 cups fresh or frozen cherries, pitted (if using frozen, do not thaw)
- 1/2 cup granulated sugar
- 2 tablespoons cornstarch
- 1/4 cup water
- 1 tablespoon lemon juice
Ingredient Spotlight
Let me walk you through the key players in this recipe — what they do, how to pick them, and what to swap if you need to.
| Original Ingredient | Best Substitution | Flavor / Texture Impact |
|---|---|---|
| Gluten-free graham cracker crumbs | Regular graham cracker crumbs (if not GF needed) | Slightly less sandy texture; same buttery flavor |
| Cream cheese (full-fat) | Dairy-free cream cheese (e.g., Violife) | Slightly less rich; may need 1 extra tbsp cornstarch for structure |
| Sour cream | Plain Greek yogurt (full-fat) | Slightly tangier; texture remains creamy |
| All-purpose flour | Gluten-free flour blend (cup-for-cup) | No noticeable difference; structure is identical |
| Fresh or frozen cherries | Canned cherries (drained, reduce sugar) | Softer fruit; less vibrant color — still delicious |
How to Make Classic Cherry Cheesecake — Step-by-Step
Trust me — this process is easier than you think. Just follow each step, and you’ll have a bakery-quality cheesecake at home.
Step 1: Prepare the Crust
Preheat your oven to 325°F (163°C). Grease a 9-inch springform pan with butter or non-stick spray. In a medium bowl, combine 1 1/2 cups gluten-free graham cracker crumbs, 1/4 cup granulated sugar, and 6 tablespoons melted butter. Stir with a fork until the mixture looks like wet sand. Press the mixture firmly and evenly into the bottom of the prepared pan — use the flat bottom of a measuring cup to get it nice and compact. Bake for 10 minutes, then set aside to cool while you make the filling.
💡 mia’s Pro Tip: For a cleaner slice later, press the crust about 1/4 inch up the sides of the pan. This creates a small lip that helps prevent the filling from seeping under the crust during baking.
Step 2: Make the Filling
In a large bowl, beat 4 packages (32 ounces total) of softened cream cheese with 1 1/4 cups sugar and 1 teaspoon vanilla extract on medium speed until completely smooth — about 2 minutes. Scrape the bowl well. Add the eggs one at a time, beating on low after each addition just until the yolk disappears. Over-beating at this stage incorporates too much air and can cause cracks. On low speed, mix in 1/2 cup sour cream and 1/4 cup flour until just combined. Give the bowl a final scrape and gently fold the batter a few times with a spatula to ensure everything is uniform.
⚠️ Common Mistake to Avoid: Do not over-mix the filling once the eggs are added. Excess air creates steam bubbles that expand in the oven and cause the surface to crack. Mix just until you see no streaks of flour or sour cream.
Step 3: Bake the Cheesecake
Pour the filling over the cooled crust and spread it into an even layer. Place the springform pan on a large sheet of aluminum foil and fold the foil up around the sides — this prevents water from seeping in if you use a water bath. For the most reliable results, place the pan in a larger roasting pan and pour hot water into the roasting pan until it reaches halfway up the sides of the springform pan. Bake at 325°F for 55–60 minutes, or until the center jiggles like set Jell-O when you gently shake the pan. The edges should look firm and slightly puffed.
💡 mia’s Pro Tip: If you don’t want to use a water bath, place a shallow pan of hot water on the oven’s bottom rack. The steam creates a humid environment that reduces the risk of cracking. I learned this trick from a pastry chef in Paris — it works beautifully.
Step 4: Cool and Chill
Turn off the oven and crack the door open — use a wooden spoon handle to keep it ajar. Leave the cheesecake inside the oven for 1 hour. This gradual cooling is the secret to a crack-free surface. After 1 hour, remove the cheesecake from the oven and run a thin knife around the edge to loosen it from the pan. Let it cool completely on a wire rack (about 45 minutes), then cover with plastic wrap and refrigerate for at least 4 hours — overnight is even better. Chilling firms the filling and makes slicing much cleaner.
⚠️ Common Mistake to Avoid: Never rush the cooling process by placing a warm cheesecake directly in the fridge. The sudden temperature change causes the filling to contract too quickly, leading to surface cracks. Always let it cool gradually first.
Step 5: Prepare the Cherry Topping
In a medium saucepan, combine 2 cups pitted cherries (fresh or frozen), 1/2 cup sugar, 2 tablespoons cornstarch, 1/4 cup water, and 1 tablespoon lemon juice. Stir to dissolve the cornstarch. Cook over medium heat, stirring frequently, until the mixture thickens and the cherries soften — about 5 minutes. You’ll see the liquid turn from cloudy to glossy and translucent. Remove from heat and let the topping cool to room temperature. It will continue to thicken as it cools.
💡 mia’s Pro Tip: If you’re using frozen cherries, do not thaw them first. Add them directly to the saucepan — they’ll release their own liquid as they cook, which adds to the compote’s depth of flavor. Thawed cherries can turn mushy too quickly.
Step 6: Assemble and Serve
Once the cheesecake is fully chilled and the cherry topping is cool, spoon the topping over the cheesecake. Spread it evenly, letting a few cherries cascade down the sides for a rustic look. Return the assembled cheesecake to the refrigerator for at least 30 minutes before serving — this helps the topping set slightly. Slice with a sharp, thin-bladed knife dipped in hot water and wiped dry between cuts for the cleanest slices.
⚠️ Common Mistake to Avoid: Don’t add the cherry topping before the cheesecake is fully chilled. If the cheesecake is still warm or even slightly cool, the topping will slide off and create a messy look. Patience is everything here.
| Step | Action | Duration | Key Visual Cue |
|---|---|---|---|
| 1 | Make crust | 10 min bake | Golden edges, fragrant |
| 2 | Make filling | ~5 min mixing | Smooth, no lumps |
| 3 | Bake cheesecake | 55–60 min | Center jiggles, edges set |
| 4 | Cool in oven | 1 hour | Oven door ajar |
| 5 | Chill | 4+ hours | Firm, cold surface |
| 6 | Cook topping | ~5 min | Glossy, thickened |
| 7 | Assemble & serve | 30 min set | Topping holds shape |
Serving & Presentation
When I serve this cheesecake at dinner parties in my Brooklyn apartment, I like to dress it up simply. A few fresh cherries on top, a light dusting of powdered sugar, and maybe a sprig of mint for color. The glossy cherry compote is already stunning, so keep the garnishes minimal. For a more decadent presentation, drizzle a little melted white chocolate over the top — it’s a trick I picked up from a pastry chef in Lyon.
This cheesecake pairs beautifully with a dollop of lightly sweetened whipped cream or a scoop of vanilla ice cream. I also love serving it with a cup of strong Moroccan mint tea — the contrast between the sweet, creamy dessert and the bright, herbal tea is absolutely perfect. For a wine pairing, a late-harvest Riesling or a Moscato d’Asti complements the cherry notes without overwhelming the cheesecake.
Whether you’re bringing this to a potluck or serving it for a holiday dinner, it always gets the same reaction: wide eyes and a second slice. It’s one of those desserts that feels special without being fussy — exactly the kind of food I love to share from my New York kitchen.
| Pairing Type | Suggestions | Why It Works |
|---|---|---|
| Side Dish | Whipped cream, vanilla ice cream, fresh berries | Adds lightness and contrasts the dense cheesecake |
| Sauce / Dip | Melted white chocolate, caramel sauce, berry coulis | Enhances sweetness and adds visual appeal |
| Beverage | Mint tea, late-harvest Riesling, espresso | Cuts through richness; herbal notes complement cherry |
| Garnish | Fresh cherries, mint sprigs, powdered sugar, edible flowers | Adds freshness and a pop of color |
Make-Ahead, Storage & Reheating
Between running my blog and catering small events in the city, make-ahead desserts are my lifeline. This cheesecake actually tastes better after a day in the fridge — the flavors meld and the texture becomes even creamier. Here’s exactly how I store and prep it in advance.
| Method | Container | Duration | Reheating Tip |
|---|---|---|---|
| Refrigerator | Covered springform or airtight cake carrier | Up to 5 days | Serve cold — no reheating needed |
| Freezer | Tightly wrapped in plastic + foil | Up to 2 months | Thaw overnight in fridge; add fresh topping after thawing |
| Make-Ahead | Bake, cool, chill (no topping) | Up to 2 days in advance | Add cherry topping up to 4 hours before serving |
If you’re freezing the cheesecake, I recommend freezing it without the cherry topping. Wrap the fully chilled cheesecake (still in the springform pan) tightly in plastic wrap, then a layer of aluminum foil. When you’re ready to serve, thaw it overnight in the refrigerator, then add the freshly made cherry topping. The texture stays silky and the crust remains crisp — I’ve done this for countless events and it never fails.
For leftovers, simply cover the springform pan with plastic wrap or transfer slices to an airtight container. The cheesecake will keep beautifully in the fridge for up to 5 days. I actually think the flavor deepens after a day or two — the vanilla and cherry notes become more pronounced.
Variations & Easy Swaps
One of the things I love most about this best cherry cheesecake recipe is how easily it adapts. Whether you’re catering to dietary needs or just want to try something new, here are my favorite variations.
| Variation | Key Change | Best For | Difficulty Impact |
|---|---|---|---|
| Chocolate Cherry Cheesecake | Add 4 oz melted dark chocolate to filling | Chocolate lovers, special occasions | Same — just melt and fold |
| Dairy-Free Cherry Cheesecake | Use dairy-free cream cheese and yogurt | Lactose-intolerant guests | Same ingredients, different brands |
| Lemon Cherry Cheesecake | Add 1 tbsp lemon zest and 2 tbsp lemon juice to filling | Spring and summer entertaining | Same — just add citrus |
Chocolate Cherry Cheesecake
Fold 4 ounces of melted and slightly cooled dark chocolate (70% cacao) into the finished filling before pouring it over the crust. The chocolate adds a deep, earthy richness that pairs beautifully with the cherry topping. I like to use a French dark chocolate from Valrhona, but any high-quality brand works. The texture remains just as silky — just be sure the chocolate isn’t too hot when you add it, or it could seize the cream cheese.
Dairy-Free Cherry Cheesecake
For a dairy-free version, substitute the cream cheese with a high-quality dairy-free alternative like Violife or Miyoko’s. Use a plain, unsweetened dairy-free yogurt in place of sour cream — coconut yogurt works particularly well and adds a slight tropical note. Make sure all other ingredients (including the graham crackers and flour) are certified dairy-free. The texture will be slightly less firm, so I recommend adding an extra tablespoon of cornstarch to the filling for better structure.
Lemon Cherry Cheesecake
Add 1 tablespoon of finely grated lemon zest and 2 tablespoons of fresh lemon juice to the filling along with the vanilla. The lemon brightens the entire cheesecake and cuts through the richness, making it feel lighter. I love this version in late spring when I find beautiful Meyer lemons at the Union Square farmers market. Top with the same cherry compote, or swap for a mixed berry topping for a summer twist.
Share Your Version!
I would absolutely love to see how your classic cherry cheesecake turns out! Leave a star rating and a comment below — it helps other home bakers know what to expect, and I read every single one. If you share a photo on Instagram or Pinterest, be sure to tag @exorecipes so I can see your beautiful creation. I’m always inspired by how you all make these recipes your own.
One question I hear often: what’s the one twist you added that made this recipe feel like your own? I’d love to know — drop it in the comments!
From my NYC kitchen to yours — I hope this recipe brings as much warmth to your table as it does to mine. — mia 🧡
What is the best gluten-free crust to use for a classic cherry cheesecake?
The best gluten-free crust for a classic cherry cheesecake is one made from gluten-free graham cracker crumbs combined with melted butter and a little sugar. Look for certified gluten-free graham crackers — brands like Schär, Kinnikinnick, or even simple gluten-free digestive biscuits work beautifully. The key is to press the crust firmly into the pan and pre-bake it for 10 minutes at 325°F. This creates a stable, buttery base that holds up to the dense filling without getting soggy. Avoid using oat-based crusts unless the oats are certified gluten-free, as cross-contamination is common.
How do you prevent a cherry cheesecake from cracking during baking?
Preventing cracks in a cherry cheesecake comes down to three things: gentle mixing, even baking, and gradual cooling. First, avoid over-beating the filling once the eggs are added — too much air creates steam bubbles that expand and cause cracks. Second, use a water bath or place a pan of hot water on the oven’s bottom rack to create a humid environment. Third, after baking, turn off the oven and leave the cheesecake inside with the door ajar for 1 hour. This slow cooling prevents the sudden temperature change that makes the surface crack. I’ve used this method for years and it never fails.
Can I use frozen cherries instead of fresh for the cherry topping?
Absolutely — frozen cherries work perfectly for the cherry topping in this recipe. In fact, I often prefer them because they’re picked at peak ripeness and are available year-round. Use frozen cherries straight from the bag without thawing them first. They will release their own liquid as they cook, which adds to the compote’s depth of flavor. Just be aware that frozen cherries may cook slightly faster and can be a bit softer than fresh, so keep an eye on the texture. The cooking time remains about 5 minutes over medium heat, or until the mixture thickens and turns glossy.
How long should a cherry cheesecake cool before refrigerating it?
After baking, a cherry cheesecake should cool in the oven with the door ajar for 1 hour, then on a wire rack at room temperature for about 45 minutes to 1 hour before refrigerating. This two-stage cooling process is critical — it prevents the filling from contracting too quickly, which causes cracks. Once the cheesecake has reached room temperature (test by touching the side of the pan — it should feel warm but not hot), you can cover it and place it in the refrigerator. Chill for at least 4 hours, but overnight is ideal for the best texture and flavor development.
Can I make this cherry cheesecake without a springform pan?
Yes, you can make this cherry cheesecake without a springform pan, but it requires a few adjustments. Use a deep, 9-inch round cake pan with at least 3-inch sides, and line it with two long strips of parchment paper that overhang on opposite sides — this creates “handles” for lifting the cheesecake out after it’s chilled. You won’t get the same clean, tall sides as a springform pan, but the flavor and texture will be identical. Avoid using a regular pie dish, as it’s too shallow for the full recipe. If you’re serving the cheesecake directly from the pan, a glass or ceramic dish works beautifully.
How do I know when the cheesecake is done baking?
The best way to tell if a cheesecake is done is to gently shake the pan — the center should jiggle like set Jell-O, while the edges look firm and slightly puffed. The internal temperature should reach 150°F to 155°F when measured with an instant-read thermometer inserted into the center. Do not wait for the center to be completely firm, as the cheesecake will continue to set as it cools. Over-baking is the most common cause of cracks and a dry, grainy texture. When in doubt, err on the side of slightly under-baked — the residual heat in the oven during the cooling phase will finish the job.
Can I use a different fruit topping instead of cherry?
Absolutely — this cheesecake base is incredibly versatile and works with almost any fruit topping. Try a blueberry compote with lemon zest, a strawberry-rhubarb mixture, or a simple raspberry sauce for a different flavor profile. You can also use sliced peaches in summer or a warm apple compote in fall. The method remains the same: cook the fruit with sugar, a thickener (cornstarch or arrowroot), and a splash of lemon juice until thickened. Just adjust the sugar based on the sweetness of the fruit — berries may need less, while tart rhubarb may need a bit more.
What’s the best way to slice a cheesecake cleanly?
For clean, picture-perfect slices, use a long, thin-bladed knife and dip it in hot water before each cut. Wipe the blade dry with a clean towel, then make a single smooth cut through the cheesecake — don’t saw back and forth. Re-dip and wipe the knife between every slice. For the best results, chill the cheesecake for at least 4 hours (overnight is even better) before slicing. If the cherry topping is very thick, warm the knife slightly under hot water and dry it thoroughly before cutting. This technique gives you those gorgeous, clean slices you see in bakeries.
Can I reduce the sugar in this gluten-free cherry cheesecake recipe?
Yes, you can reduce the sugar, but keep in mind that sugar does more than just sweeten — it contributes to the structure and texture of the cheesecake. I recommend reducing the granulated sugar in the filling by no more than 1/4 cup (from 1 1/4 cups to 1 cup). This will still yield a creamy, stable cheesecake with a slightly less sweet profile. For the cherry topping, you can reduce the sugar to 1/3 cup if your cherries are very ripe and sweet. Avoid using artificial sweeteners in the filling, as they can affect the setting properties. If you want a naturally lower-sugar option, try using a monk fruit blend designed for baking.
How do I store leftover cherry cheesecake?
Store leftover cherry cheesecake in the refrigerator, tightly covered, for up to 5 days. The best way is to keep it in the springform pan with the sides attached, covered with plastic wrap or a reusable cake cover. If you’ve already sliced it, transfer the slices to an airtight container with a sheet of parchment paper between layers to prevent sticking. The cherry topping may release a little liquid over time — just spoon it back over the cheesecake before serving. For longer storage, freeze the cheesecake (without the topping) for up to 2 months. Thaw overnight in the fridge and add fresh topping before serving.
Love This Recipe? Save It to Pinterest!
If you enjoyed this Classic Cherry Cheesecake with a Gluten-Free Option recipe, don’t let it get lost in your browser tabs! 😄 Pin it now so you can find it again anytime — and explore hundreds more tried-and-tested recipes waiting for you on my Pinterest boards.
👉 Follow mia on Pinterest @exorecipe
📌 Pin this recipe · 🔁 Re-pin your favorites · 💬 Tag me when you make it — I love seeing your creations!
💬 Made this recipe? I’d love to hear from you!
Drop a ⭐ star rating and a comment below — your feedback helps other home bakers and makes my day! Tag me @exorecipes on Instagram or Pinterest when you share your masterpiece.
From my NYC kitchen to yours — happy baking! — mia 🧡
“`
Print
Classic Cherry Cheesecake with a Gluten-Free Option: The Ultimate Recipe for Every Occasion
- Prep Time: 30 minutes
- Cook Time: 1 hour 5 minutes
- Total Time: 5 hours 35 minutes (includes chilling)
- Yield: 12 1x
- Method: Dessert
- Cuisine: American
Description
This classic cherry cheesecake features a creamy, rich filling on a buttery gluten-free crust, topped with a luscious cherry compote. Perfect for any celebration or special dessert.
Ingredients
- For the Crust:
- 1 1/2 cups gluten-free graham cracker crumbs
- 1/4 cup granulated sugar
- 6 tablespoons unsalted butter, melted
- For the Filling:
- 4 packages (8 ounces each) cream cheese, softened
- 1 1/4 cups granulated sugar
- 1 teaspoon vanilla extract
- 4 large eggs
- 1/2 cup sour cream
- 1/4 cup all-purpose flour (or gluten-free flour blend)
- For the Cherry Topping:
- 2 cups fresh or frozen cherries, pitted
- 1/2 cup granulated sugar
- 2 tablespoons cornstarch
- 1/4 cup water
- 1 tablespoon lemon juice
Instructions
- Preheat oven to 325°F (163°C). Grease a 9-inch springform pan.
- Make the crust: In a medium bowl, combine gluten-free graham cracker crumbs, 1/4 cup sugar, and melted butter. Press firmly into the bottom of the prepared pan.
- Bake crust for 10 minutes. Remove from oven and set aside to cool.
- Make the filling: In a large bowl, beat cream cheese, 1 1/4 cups sugar, and vanilla extract until smooth.
- Add eggs one at a time, beating well after each addition.
- Mix in sour cream and flour until just combined. Pour filling over crust.
- Bake for 55-60 minutes, or until center is almost set. Turn off oven and leave cheesecake inside with door ajar for 1 hour.
- Remove cheesecake from oven and refrigerate for at least 4 hours or overnight.
- Make the cherry topping: In a saucepan, combine cherries, 1/2 cup sugar, cornstarch, water, and lemon juice. Cook over medium heat, stirring frequently, until thickened (about 5 minutes).
- Cool cherry topping slightly, then spoon over chilled cheesecake.
- Refrigerate until ready to serve.
Notes
For a gluten-free option, ensure all ingredients (including graham crackers and flour) are certified gluten-free. This cheesecake can be made a day ahead; add cherry topping just before serving. Store leftovers in the refrigerator.
Nutrition
- Calories: 450
- Sugar: 32g
- Fat: 28g
- Carbohydrates: 45g
- Protein: 8g

Tried This Recipe? Leave a Comment!
Did you make this recipe? I’d love to hear how it turned out! Please leave a comment and a rating below. Your feedback helps other home cooks and supports cheerychop.com!
