“`html
Table of Contents
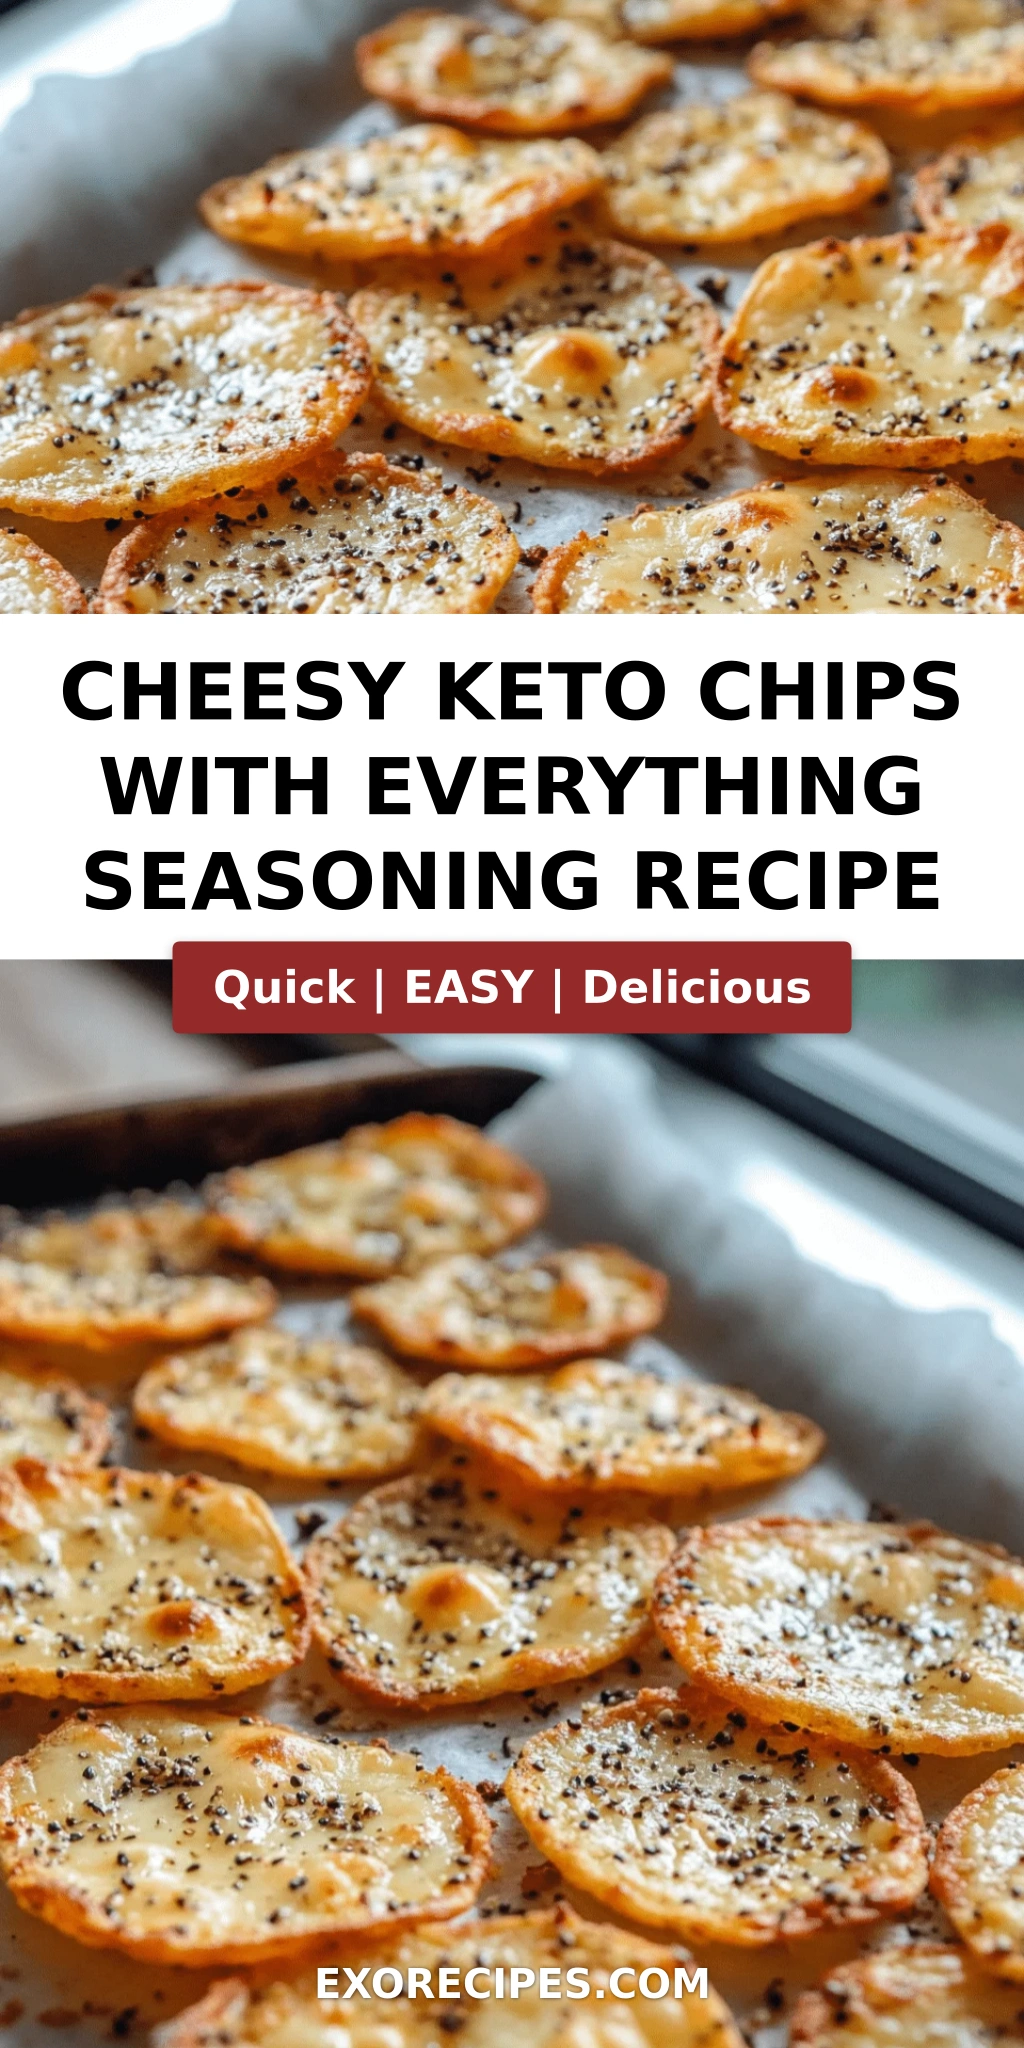
Cheesy Keto Chips with Everything Seasoning – Your New Favorite Low-Carb Snack
Let me take you back to my mother’s kitchen in Morocco for a moment. She would melt cheese on a hot pan until it turned lacy and golden, then sprinkle it with cumin and a pinch of salt — we ate it with our hands, laughing, as the evening call to prayer echoed through the open window. Those humble cheese crisps were my first lesson in how something so simple could bring so much joy. These cheesy keto chips with everything seasoning are my grown-up tribute to that memory, now made in my New York City apartment with a bagel-shop twist that feels utterly American. These keto cheese chips are crispy, savory, and deeply satisfying — exactly what a low carb snack recipe should be. With just four ingredients and thirteen minutes, you get a crunchy, flavorful chip that rivals anything from a bag. The everything seasoning chips idea came to me on a Saturday morning after walking past Russ & Daughters on the Lower East Side — that iconic blend of sesame, poppy, garlic, and onion belongs on more than just bagels, and trust me, it belongs on these.
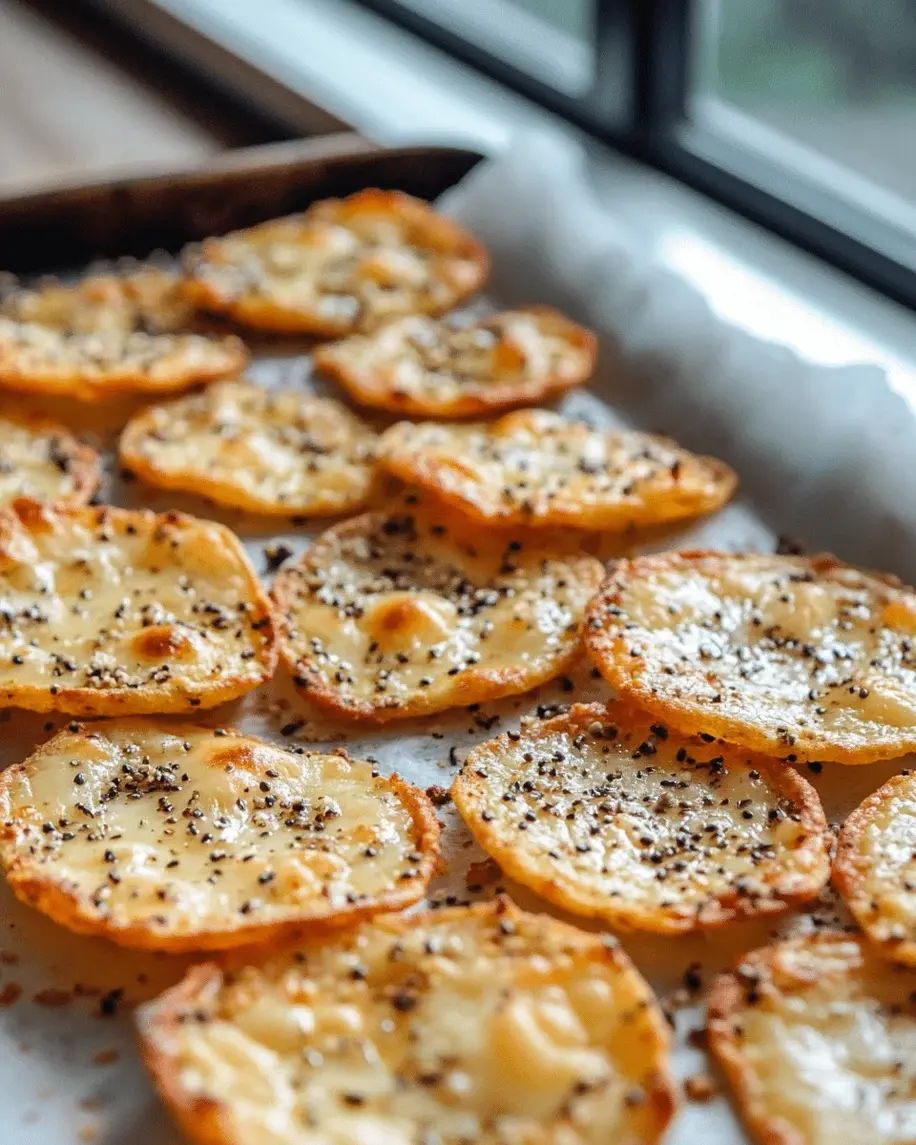
When these keto chips recipe crisps up in the oven, your kitchen fills with the nutty aroma of toasted sesame and melted cheddar — it’s the kind of smell that makes people wander into the kitchen asking, “What is that?” The first bite is a revelation: a shatteringly crisp crunch that gives way to deep, cheesy richness, with pops of savory seasoning on your tongue. The edges turn a deep golden brown, almost caramelized, while the center stays bubbly and lacy. I love how the everything seasoning clings to the melted cheese — each chip is a little mosaic of seeds and herbs that toast in the heat, releasing their oils. It’s a snack that feels indulgent, but at just one gram of net carbs per serving, it’s completely guilt-free. Whether you’re following a keto lifestyle or just looking for a homemade cheese crisps recipe that delivers on texture and taste, these chips are going to become a staple in your kitchen.
I’ve tested this recipe more times than I can count — experimenting with different cheeses, oven temperatures, and seasoning blends — so you don’t have to. What sets this version apart is my French culinary training meeting my Moroccan soul: I use a precise ratio of cheese to seasoning, a specific baking temperature that ensures crispiness without burning, and a cooling technique that locks in the crunch. 💡 mia’s Pro Tip: shred your own cheese from a block — pre-shredded cheese contains anti-caking agents that prevent proper melting and crispiness. I also want to share a common mistake home cooks make: overcrowding the baking sheet. Give each cheese mound at least two inches of space so the chips spread and crisp evenly, not steam. With these tips, you’ll nail this keto chips recipe on your very first try.
Why This Cheesy Keto Chips Recipe Is the Best
The Flavor Secret. The everything seasoning is the star here — it’s a blend I make fresh every week using white sesame seeds, black sesame seeds, dried minced garlic, dried minced onion, poppy seeds, and a touch of flaky sea salt. When it hits the melting cheese in the oven, the seeds toast and release their oils, creating a layer of flavor that’s nutty, savory, and slightly sweet. I learned this layering technique at Le Cordon Bleu in Paris — always toast your spices to unlock their full potential. The cheese itself provides a rich, tangy base that complements the seasoning perfectly. I use sharp cheddar for its bold flavor, but a blend of cheddar and low-moisture mozzarella gives you the best texture — crisp on the outside, tender on the inside.
Perfected Texture. The key to achieving that ultra-crispy, shatter-like texture lies in two things: the cheese-to-fat ratio and the cooling method. I bake the chips at 375°F — hot enough to render the fat quickly and create bubbles, but not so hot that the cheese burns before it crisps. After baking, I let the chips cool completely on the baking sheet for at least three minutes. This step is non-negotiable — moving them too early will cause them to stick or break. The chips continue to crisp as they cool, transforming from bubbly, molten rounds into firm, crunchy chips. My culinary school chef always said, “Patience is the secret ingredient,” and that’s never been truer than here.
Foolproof & Fast. This recipe works every single time, even if you’re a complete beginner in the kitchen. There’s no complicated technique, no special equipment — just a baking sheet, parchment paper, and four ingredients. The total active time is under five minutes, and the oven does all the work. I’ve taught this to my weekend cooking class students in NYC, and every single person walks away with a perfect batch. It’s also endlessly customizable: you can swap the cheese, change the seasoning, or add a pinch of cayenne for heat. This isn’t just a low carb snack recipe — it’s a template for creating your own signature crisps.
Keto Cheese Chips Ingredients
In my NYC kitchen, I keep a block of sharp cheddar in the fridge at all times — it’s one of those staple ingredients that can transform into dinner, a snack, or even a garnish. I buy my everything bagel seasoning from a little spice shop in Chelsea Market, but you can find it at any grocery store or make your own. The beauty of this recipe is that the ingredient list is short and forgiving. Let me walk you through what you need and why each one matters.
Ingredients List
- 1 cup shredded cheddar cheese (or a blend of cheddar and mozzarella) — shredded from a block for best melting
- ½ teaspoon everything bagel seasoning (or to taste) — store-bought or homemade
- Optional: ¼ teaspoon garlic powder — for extra savory depth
- Optional: ¼ teaspoon onion powder — for sweetness and aroma
Ingredient Spotlight
Cheddar Cheese: The backbone of this recipe. Sharp cheddar provides the most flavor, but a blend of cheddar and low-moisture mozzarella creates a chip that’s crispy without being greasy. I recommend shredding your own from a block — pre-shredded cheese has cellulose and starches that can make the chips sticky and less crispy. At the store, look for blocks labeled “sharp” or “extra sharp” for maximum flavor.
Everything Bagel Seasoning: This iconic blend is widely available in the US — brands like Trader Joe’s, McCormick, and Simply Organic all make versions. The combination of sesame seeds, poppy seeds, dried garlic, dried onion, and salt is magic on these chips. If you’re feeling ambitious, toast the seeds lightly before sprinkling to deepen the flavor. I use about ½ teaspoon per cup of cheese, but feel free to adjust to your taste.
Garlic and Onion Powder (Optional): These are my secret boosters. A tiny pinch of each adds layers of savory flavor that complement the cheese and seasoning. Garlic powder brings a warm, pungent note, while onion powder adds a touch of sweetness that balances the saltiness. They’re completely optional but highly recommended if you want a more complex chip.
| Original Ingredient | Best Substitution | Flavor / Texture Impact |
|---|---|---|
| Sharp Cheddar Cheese | Parmesan or Pepper Jack | Parmesan: saltier, crisper, more delicate. Pepper Jack: spicy, creamy, slightly softer crunch. |
| Everything Bagel Seasoning | Sesame seeds + flaky salt + dried garlic flakes | Similar savory profile, slightly less complex. Add a pinch of dried onion flakes to match. |
| Garlic Powder (optional) | Granulated garlic or fresh minced (use sparingly) | Granulated works evenly; fresh may burn. Use ⅛ tsp fresh for every ¼ tsp powder. |
How to Make Cheesy Keto Chips — Step-by-Step
Making these keto cheese chips is almost too easy — but don’t let the simplicity fool you. Each step matters, and I’m going to walk you through every one so your chips turn out perfectly crispy, golden, and delicious every single time.
Step 1: Preheat and Prepare
Preheat your oven to 375°F (190°C). Line a large baking sheet with parchment paper or a silicone baking mat. This step is crucial — without a non-stick surface, the melted cheese will stick and tear when you try to remove the chips. I prefer parchment paper because it allows the cheese to crisp evenly without any greasiness.
💡 mia’s Pro Tip: For extra-crispy edges, use a silicone baking mat — it promotes even heat distribution and prevents the cheese from spreading too thin.
Step 2: Mound and Flatten
Place small mounds of shredded cheese — about 1 tablespoon each — onto the prepared baking sheet, spacing them about 2 inches apart. Flatten each mound slightly into a thin, even round using your fingers or the back of a spoon. Aim for a uniform thickness so the chips cook evenly. If some rounds are thicker in the center, they won’t crisp all the way through.
⚠️ Common Mistake to Avoid: Making the mounds too thick or uneven. Thin, even rounds crisp perfectly; thick centers stay soft and chewy instead of crunchy.
Step 3: Season Each Round
Sprinkle each cheese round with everything bagel seasoning — use about ⅛ teaspoon per round, or adjust to your preference. If you’re using garlic or onion powder, sprinkle a tiny pinch over each round before the everything seasoning. The seasoning will toast as the cheese melts, releasing its full aroma.
💡 mia’s Pro Tip: Season generously — some of the seeds will fall off as the cheese melts, so a little extra ensures every chip is packed with flavor.
Step 4: Bake to Golden Perfection
Bake for 6 to 8 minutes, or until the edges are deep golden brown and the centers are bubbly and lightly browned. Watch carefully during the last 2 minutes — ovens vary, and cheese can go from perfectly golden to burnt very quickly. The chips should look lacy and have a deep amber color around the edges when they’re ready.
⚠️ Common Mistake to Avoid: Overbaking. If the centers turn dark brown, the chips will taste bitter. Remove them when the edges are golden and the centers are still slightly bubbly — they’ll continue to cook from residual heat.
Step 5: Cool and Crisp
Remove from the oven and let the chips cool on the baking sheet for 2 to 3 minutes until firm. Do not try to move them immediately — they are fragile when hot and will stick to the paper. As they cool, they will transform from soft, bubbly rounds into firm, crunchy chips. You’ll actually hear them crisp up as they sit.
💡 mia’s Pro Tip: If your chips are still slightly soft after cooling, return them to a 300°F oven for 2 more minutes. They’ll finish crisping without burning.
Step 6: Drain and Serve
Transfer the cooled chips to a paper towel to drain any excess oil — this step keeps them crisp and not greasy. Serve immediately for the best texture, or store in an airtight container at room temperature for up to 3 days. These chips are amazing on their own, but they also pair beautifully with dips, soups, or salads.
⚠️ Common Mistake to Avoid: Storing chips while still warm. Trapped steam will soften them. Let them cool completely to room temperature before transferring to a container.
| Step | Action | Duration | Key Visual Cue |
|---|---|---|---|
| 1 | Preheat & line baking sheet | 5 minutes | Oven ready, parchment paper fitted |
| 2 | Mound & flatten cheese | 3 minutes | Thin, even rounds, 2 inches apart |
| 3 | Sprinkle seasoning | 1 minute | Even coating of seeds and spices |
| 4 | Bake | 6–8 minutes | Edges golden, centers bubbly |
| 5 | Cool on sheet | 2–3 minutes | Firm to touch, chips release easily |
| 6 | Drain & serve | 1 minute | Crisp, golden, no excess grease |
Serving & Presentation
In my NYC apartment, I love serving these cheesy keto chips in a simple wooden bowl set right on the kitchen island — they disappear within minutes, especially when friends stop by for a drink before dinner. The chips have a beautiful rustic appeal: golden, lacy edges with dark toasted seeds scattered across the surface. I sometimes arrange them on a slate board with small bowls of dip — everything from creamy French onion dip (made with Greek yogurt) to a zesty Moroccan chermoula sauce that adds brightness and a touch of herb.
The texture of these chips is incredible — they shatter when you bite into them, releasing a burst of toasted sesame and sharp cheddar. I love serving them alongside a crisp green salad with lemon vinaigrette for a light lunch, or next to a bowl of tomato soup for dipping. They also make an excellent garnish for keto-friendly chilis and stews, adding a salty crunch that contrasts beautifully with tender vegetables and meat. For a party, I’ll double the batch and serve them with a trio of dips — the combination of textures and flavors always gets people talking.
One of my favorite ways to enjoy these chips is with a simple avocado dip: mash a ripe avocado with lime juice, salt, and a pinch of cayenne, then scoop it up with these everything-seasoned crisps. The creamy, cool avocado balances the salty, savory chips perfectly. It’s a snack that feels both indulgent and nourishing — exactly the kind of food I love creating in my NYC kitchen, inspired by the flavors of my Moroccan childhood and the techniques I learned in Paris.
| Pairing Type | Suggestions | Why It Works |
|---|---|---|
| Side Dish | Green salad, tomato soup, grilled chicken | Adds crunch and savory depth to lighter dishes |
| Sauce / Dip | French onion dip, avocado crema, Moroccan chermoula | Creamy dips contrast the crispy, salty chips |
| Beverage | Dry sparkling water with lemon, light lager, iced green tea | Refreshing, palate-cleansing drinks balance richness |
| Garnish | Fresh chives, flaky sea salt, lime zest | Brightens the presentation and adds freshness |
Make-Ahead, Storage & Reheating
In my busy NYC life, I love recipes that work with my schedule, and these keto cheese chips are a dream for meal prep. I often make a double batch on Sunday afternoon while I’m catching up on podcasts — they last all week if stored properly, though honestly, they rarely last that long in my apartment. The key to maintaining their crispiness is keeping them completely dry and at room temperature.
💡 mia’s Pro Tip: If you live in a humid climate (or a steam-filled NYC apartment in summer), add a silica gel packet or a piece of paper towel to the storage container to absorb excess moisture and keep chips crunchy for days.
| Method | Container | Duration | Reheating Tip |
|---|---|---|---|
| Refrigerator | Airtight container with paper towel | Up to 5 days | Re-crisp at 300°F for 3-4 minutes |
| Freezer | Freezer-safe bag, pressed flat | Up to 2 months | Bake from frozen at 325°F for 5-6 minutes |
| Make-Ahead | Bake, cool completely, store in airtight container | Up to 3 days in advance | No reheating needed — serve at room temp |
If your chips soften after a day or two (which can happen in humid weather), don’t worry — they’re not ruined. Simply spread them on a baking sheet and re-crisp them in a 300°F oven for 3 to 4 minutes. Let them cool again before serving, and they’ll be just as crunchy as the day you made them. I’ve tested this method dozens of times, and it works like a charm. Just be careful not to overheat them — cheese chips can go from perfectly crisp to burnt very quickly.
Variations & Easy Swaps
One of the things I love most about this homemade cheese crisps recipe is how endlessly adaptable it is. Over the years, I’ve developed several variations that reflect different moods and cravings — from spicy Moroccan-inspired chips to dairy-free alternatives that still deliver on crunch. Here are my favorite ways to switch it up, along with exactly what to expect from each version.
| Variation | Key Change | Best For | Difficulty Impact |
|---|---|---|---|
| Spicy Harissa Cheddar | Add ½ tsp harissa paste to cheese before baking | Bold, spicy snacks with North African flair | Easy — stir harissa into shredded cheese |
| Dairy-Free Almond & Herb | Use dairy-free cheddar shreds + 1 tsp almond flour | Dairy-free keto eaters, vegan-ish snacks | Medium — dairy-free cheese melts differently |
| Everything-Bacon-Ranch | Add 1 tbsp crumbled cooked bacon + ranch seasoning to taste | Game day, parties, indulgent snacking | Easy — just mix it into the cheese |
Spicy Harissa Cheddar
This variation is a nod to my Moroccan roots — harissa is a staple in my kitchen, and it adds a smoky, spicy depth that pairs beautifully with sharp cheddar. Simply stir ½ teaspoon of harissa paste into the shredded cheese before mounding it on the baking sheet. The harissa swirls through the melting cheese, creating beautiful orange-red streaks and a gentle heat that builds as you eat. I love serving these with a cooling cucumber-yogurt dip — the contrast is absolutely gorgeous.
Dairy-Free Almond & Herb
For my dairy-free friends (and those who just want a lighter option), this version uses dairy-free cheddar-style shreds combined with a tablespoon of almond flour to help with crispiness. The almond flour absorbs excess moisture and gives the chips a subtle nuttiness that works beautifully with the everything seasoning. Bake at 350°F for slightly longer — 8 to 10 minutes — and watch carefully, as dairy-free cheese can go from melted to burnt quickly. The texture is slightly more delicate than the original, but just as satisfying.
Everything-Bacon-Ranch
This is my ultimate game-day snack. Add 1 tablespoon of crumbled cooked bacon and ½ teaspoon of ranch seasoning mix to the shredded cheese before baking. The bacon adds smoky, salty crunch, while the ranch seasoning brings herbaceous, tangy notes that complement the everything seasoning perfectly. These chips are incredibly addictive — I’ve seen a full batch disappear in under ten minutes at a Super Bowl party. Just be sure to drain the bacon well before mixing to avoid greasy chips.
Can I use a different type of cheese to make cheesy keto chips?
Absolutely! One of the best things about this recipe is how flexible it is with different cheeses. Sharp cheddar is my go-to because it melts beautifully and has a bold, tangy flavor that stands up to the everything seasoning. But you can absolutely use other hard cheeses like Parmesan, Asiago, or Gruyère for a different flavor profile — Parmesan will give you a saltier, more delicate chip, while Gruyère adds a nutty, slightly sweet note. Softer cheeses like mozzarella or Monterey Jack will also work, but they tend to spread more and may be slightly less crispy. I recommend using a blend: half cheddar and half low-moisture mozzarella gives you the best of both worlds — bold flavor and a crisp, sturdy texture. Just avoid pre-shredded cheese, which contains anti-caking agents that can prevent proper melting and crispiness.
How do you keep keto cheese chips from sticking to the baking sheet?
The number one rule is to always line your baking sheet with parchment paper or a silicone baking mat. I’ve tried baking these chips directly on a greased baking sheet, and trust me, it’s not worth the frustration — the melted cheese seeps into every tiny imperfection and becomes nearly impossible to remove without breaking. Parchment paper is my preferred choice because it’s inexpensive, disposable, and provides a non-stick surface that allows the chips to release easily once cooled. Silicone baking mats also work beautifully and are reusable, but they can sometimes cause the cheese to spread slightly more. Whichever you choose, let the chips cool completely on the sheet for 2 to 3 minutes before attempting to move them — they will release on their own once firm. If a chip still sticks, it probably needs another minute to cool.
What can I use instead of everything seasoning for these keto chips?
There are so many delicious alternatives! If you don’t have everything bagel seasoning on hand, you can create a similar blend by mixing white sesame seeds, poppy seeds, dried minced garlic, dried minced onion, and flaky sea salt. That’s essentially what everything seasoning is, and toasting the seeds lightly before sprinkling will deepen the flavor even more. If you want to go in a completely different direction, try using za’atar (a Middle Eastern blend of thyme, sesame, and sumac) for a tangy, herbal note, or furikake (a Japanese seasoning with sesame, seaweed, and bonito flakes) for an umami-rich twist. For a simpler option, just use flaky sea salt and cracked black pepper — sometimes the purest flavors are the most satisfying. I’ve even made these chips with only garlic powder and onion powder, and they turned out incredibly savory and delicious.
How long do cheesy keto chips stay crispy after baking?
When stored properly in an airtight container at room temperature, these chips will stay perfectly crispy for up to 3 days. The key is to make sure they are completely cool before storing — any residual warmth creates steam that softens the chips. I also recommend placing a paper towel inside the container to absorb any excess moisture, especially if you live in a humid climate. After day three, the chips may start to soften slightly, but they can be revived by spreading them on a baking sheet and re-crisping in a 300°F oven for 3 to 4 minutes. Let them cool again, and they’ll be just as crunchy as the day you made them. I’ve tested this method many times, and it works consistently. If you’re planning to make them for a party or gathering, I recommend baking them no more than 24 hours in advance for the best texture.
Can I make these keto cheese chips in the microwave?
Yes, you can! The microwave method is even faster than the oven and works well when you need a quick single serving. Line a microwave-safe plate with parchment paper, place a small mound of shredded cheese (about 1 tablespoon) on the paper, and flatten it slightly. Microwave on high for 45 to 60 seconds, watching carefully — the cheese will bubble and spread, then start to brown around the edges. The exact timing depends on your microwave’s wattage, so start checking at 45 seconds. Let the chip cool on the plate for about a minute before carefully peeling it off the paper. The microwave method produces chips that are slightly more delicate and less uniform in color than oven-baked ones, but they’re just as crispy and delicious. Keep in mind that you can only make one or two chips at a time in a standard microwave, so it’s best for small batches or immediate snacking.
Are these keto chips recipe suitable for meal prep?
Absolutely! These chips are actually one of my favorite things to meal prep for the week. I’ll bake a double batch on Sunday afternoon, let them cool completely, and store them in an airtight container with a paper towel at room temperature. They stay perfectly crunchy for 3 to 4 days, making them an ideal grab-and-go snack for busy weekday afternoons. If I’m packing them for lunch, I’ll portion them into small containers or zip-top bags so they’re ready to go. One thing to keep in mind: if you’re adding any moisture-rich toppings (like fresh herbs or wet seasonings), add those just before serving to prevent the chips from softening. For the best texture, I always keep the chips in a cool, dry place away from direct sunlight and heat sources. They’re also freezer-friendly — just freeze in a single layer on a baking sheet, then transfer to a freezer bag for up to 2 months.
Can I add other seasonings or spices to these keto cheese chips?
Absolutely — consider this recipe a blank canvas for your creativity! The everything seasoning is my signature, but I’ve made dozens of variations over the years. For a smoky kick, try adding a pinch of smoked paprika or chipotle powder along with the seasoning. For an herbal note, dried oregano, thyme, or rosemary pair beautifully with cheddar. If you love heat, a pinch of cayenne pepper or red pepper flakes adds a lovely warmth that builds as you eat. I also love making a “pizza” version by adding dried oregano, garlic powder, and a sprinkle of crushed red pepper — it tastes just like a crispy cheese crust. The key is to use dried rather than fresh herbs and spices, as fresh ingredients contain moisture that can make the chips soggy. Start with ¼ teaspoon per cup of cheese, and adjust to your preference. Remember that the seasoning will intensify as the chips bake, so a little goes a long way.
What is the best way to shred cheese for keto chips?
I always use the large holes of a box grater or the shredding disk of a food processor. Both methods produce uniform shreds that melt evenly and create a consistent texture across all your chips. The most important thing is to shred your own cheese from a block — I cannot stress this enough. Pre-shredded cheese from the store is coated with anti-caking agents (usually cellulose or potato starch) that prevent the cheese from melting properly and can leave your chips with a gummy, sticky texture. When you shred your own, the cheese melts into a pure, homogeneous layer that crisps up beautifully. If you’re using a food processor, cut the cheese into 1-inch cubes first and use the shredding disk — it takes about 30 seconds to shred a whole block. For the best results, use cold cheese straight from the fridge, as it shreds more cleanly than room-temperature cheese.
Can I double this keto chips recipe for a party?
Yes, and I do it all the time! This recipe scales beautifully — just multiply the ingredients by the number of servings you need. For a party of 12 to 16 people, I’ll typically make a quadruple batch using 4 cups of shredded cheese and 2 tablespoons of everything seasoning. The most important thing to keep in mind when scaling up is to bake in batches rather than overcrowding the oven. Use two baking sheets and rotate them halfway through baking for even results. If you’re baking multiple batches, let the baking sheet cool completely between batches — a hot sheet will cause the cheese to melt too quickly and spread unevenly. I also recommend preparing all your cheese mounds on parchment paper ahead of time, then sliding them onto the baking sheet just before baking. This makes the process much more efficient when you’re making large quantities. Your guests will devour these, so make plenty!
Why did my keto cheese chips turn out greasy?
A little bit of oil on the surface is normal — cheese contains fat that renders out during baking. However, if your chips are excessively greasy, a few factors could be at play. The most common culprit is using a high-fat cheese like full-fat mozzarella or a soft cheese that releases more oil as it melts. I recommend using low-moisture mozzarella (the kind that comes in blocks, not fresh mozzarella in brine) and sharp cheddar, which have a better fat-to-protein ratio for crispy chips. Another issue could be baking at too low a temperature, which causes the cheese to render fat slowly without crisping. Baking at 375°F is the sweet spot — hot enough to crisp the chips quickly before too much fat renders out. Finally, make sure to drain the baked chips on a paper towel for a minute after cooling — this absorbs any surface oil and keeps them perfectly crisp. If you’re still getting greasy chips, try reducing the cheese mound size slightly, as larger mounds tend to release more oil.
Share Your Version!
I absolutely love hearing how this recipe turns out in your kitchen — it’s one of the greatest joys of being a food blogger, knowing that something I created in my tiny NYC apartment is now being made in homes across the country and beyond. If you try these cheesy keto chips with everything seasoning, please leave a star rating and a comment below telling me how they came out. Did you stick with the original, or did you try one of the variations? Did you discover a new spice blend that worked beautifully? I want to hear all about it!
And if you’re on social media, I’d love to see your creations! Snap a photo of your chips and share it on Instagram or Pinterest with the hashtag #exorecipes and tag me @exorecipes. I always repost my favorites in my stories. Here’s a question for you: what’s your go-to dip for these everything seasoning chips? I’m always looking for new ideas, so drop your suggestions in the comments. From my NYC kitchen to yours — I hope this recipe brings as much warmth to your table as it does to mine. — mia 🧡
Love This Recipe? Save It to Pinterest!
If you enjoyed this Cheesy Keto Chips with Everything Seasoning recipe, don’t let it get lost in your browser tabs! 😄 Pin it now so you can find it again anytime — and explore hundreds more tried-and-tested recipes waiting for you on my Pinterest boards.
👉 Follow mia on Pinterest @exorecipe
📌 Pin this recipe · 🔁 Re-pin your favorites · 💬 Tag me when you make it — I love seeing your creations!
💬 What’s your favorite way to enjoy these crispy keto chips?
Drop a comment below with your go-to dip or seasoning twist — I read every single one and I’d love to feature your idea in my next newsletter! ⭐
“`
Print
Cheesy Keto Chips with Everything Seasoning Your New Favorite Low-Carb Snack
- Prep Time: 5 minutes
- Cook Time: 8 minutes
- Total Time: 13 minutes
- Yield: 4 servings (about 12 chips) 1x
- Method: Snack
- Cuisine: American
Description
These cheesy keto chips are crispy, crunchy, and incredibly satisfying. Made with just a few simple ingredients, they are the perfect low-carb snack to satisfy your cravings. The everything seasoning adds a savory, flavorful punch that will have you reaching for more.
Ingredients
- 1 cup shredded cheddar cheese (or a blend of cheddar and mozzarella)
- 1/2 teaspoon everything bagel seasoning (or to taste)
- Optional: 1/4 teaspoon garlic powder
- Optional: 1/4 teaspoon onion powder
Instructions
- Preheat your oven to 375°F (190°C). Line a baking sheet with parchment paper or a silicone baking mat.
- Place small mounds of shredded cheese (about 1 tablespoon each) onto the prepared baking sheet, spacing them about 2 inches apart. Flatten each mound slightly into a thin, even round.
- Sprinkle each cheese round with everything bagel seasoning (and garlic or onion powder, if using).
- Bake for 6-8 minutes, or until the edges are golden brown and the centers are bubbly. Watch carefully to prevent burning.
- Remove from the oven and let cool on the baking sheet for 2-3 minutes until firm. They will crisp up as they cool.
- Transfer to a paper towel to drain excess oil (if any). Serve immediately or store in an airtight container at room temperature for up to 3 days.
Notes
Feel free to experiment with different cheese blends like parmesan or pepper jack for a spicy kick. The chips are best enjoyed fresh, but you can re-crisp them in a 300°F oven for a few minutes if they soften.
Nutrition
- Calories: 98
- Sugar: 0g
- Fat: 8g
- Carbohydrates: 1g
- Protein: 6g
k">
Tried This Recipe? Leave a Comment!
Did you make this recipe? I’d love to hear how it turned out! Please leave a comment and a rating below. Your feedback helps other home cooks and supports cheerychop.com!
For more delicious inspiration, follow me on Pinterest!
