Table of Contents
Cheesy Grilled Sandwich Recipe with Cottage or Ricotta Cheese – The Creamiest, High-Protein Twist
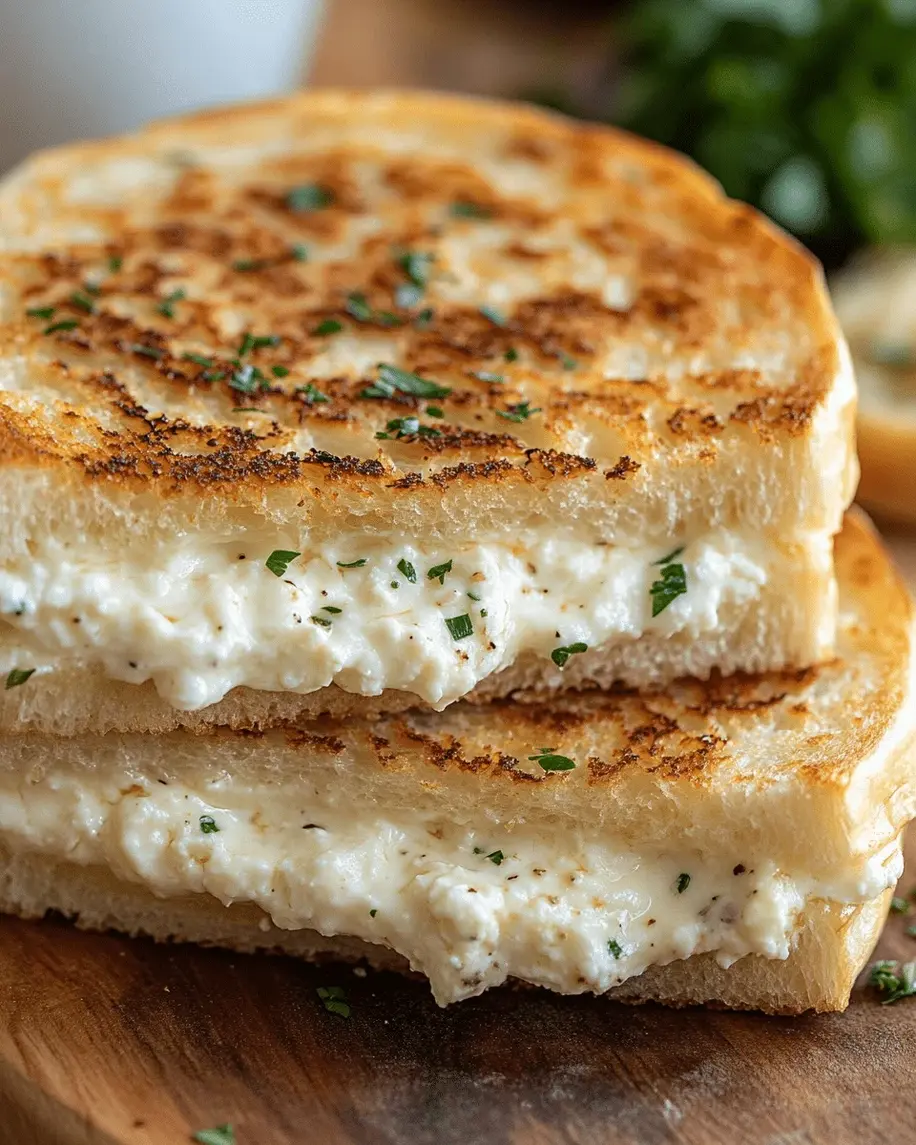
I still remember the first time I made a grilled cheese sandwich with cottage cheese. It was a rainy afternoon in my tiny Manhattan apartment, and I was craving the comforting, golden-brown sandwiches my mother used to make in our kitchen in Morocco. She would always add a spoonful of something creamy — sometimes labneh, sometimes fresh goat cheese — to the filling. That memory came rushing back, and I reached for a tub of cottage cheese in my fridge. The result? The most luscious, creamy, and satisfying Cheesy Grilled Sandwich Recipe I had ever tasted. This is not your average grilled cheese — this is a Cottage Cheese Grilled Sandwich that stays incredibly moist and tender on the inside while turning perfectly crisp and golden on the outside. Whether you use cottage cheese or ricotta, this Ricotta Cheese Sandwich is a total game-changer.
Imagine this: You take a bite, and the crust shatters ever so slightly — that perfect, buttery crunch. Then your teeth sink into a layer of warm, melted mozzarella and Parmesan, followed by the soft, creamy curds of cottage cheese or the delicate richness of ricotta. The garlic powder and oregano whisper through every bite, adding just enough savory depth without overpowering the cheese. The sandwich is golden brown on both sides, with little patches of darker crispiness where the butter has browned beautifully. As you pull the halves apart, a glorious cheese pull stretches between them — gooey, inviting, and absolutely irresistible. It smells like buttered toast and melted cheese, with a faint herbal note that reminds me of the oregano my mother would dry on her kitchen windowsill.
I trained in pastry and sauce work in Paris, and I’ve cooked professionally in New York City for years, but this Easy Grilled Cheese Sandwich is one of the recipes I come back to again and again. What makes my version different is the technique: I use a combination of a soft, high-moisture cheese (cottage or ricotta) with a classic melting cheese (mozzarella) and a salty, umami booster (Parmesan). The butter is spread on the bread before assembling, not melted in the pan — this gives you a more even, restaurant-quality crust. And I’ll let you in on a little secret: the key to preventing a soggy sandwich is to drain your cottage cheese slightly before mixing it into the filling. 💡 mia’s Pro Tip: Don’t skip this step! It makes all the difference between a sandwich that’s perfectly creamy and one that turns your bread into a sad, wet mess. Let me show you how to make this Grilled Cheese with Cottage Cheese the right way.
Why This Cheesy Grilled Sandwich Recipe Is the Best
The Flavor Secret: Most grilled cheese recipes rely on a single cheese, which can be one-dimensional. I draw on my French culinary training to build layers of flavor: the mild creaminess of cottage cheese or ricotta, the stretchy melt of mozzarella, and the sharp, salty bite of Parmesan. This three-cheese combination creates a depth that lingers on your palate. Growing up in Morocco, I learned that the best dishes have contrast — something soft and something bold, something mild and something sharp. That principle is at the heart of this sandwich.
Perfected Texture: Texture is where most homemade grilled cheese goes wrong — either the bread burns before the cheese melts, or the inside turns mushy. I solved this by buttering the bread directly (not the pan) and cooking over medium heat, not high. This gives the bread time to toast evenly while the cheese mixture gently heats through. The cottage cheese stays creamy without becoming watery, the mozzarella stretches like a dream, and the Parmesan adds a faint, crispy lace on the edges where it meets the pan. It’s the kind of texture that makes you close your eyes and chew slowly.
Foolproof & Fast: This Easy Grilled Cheese Sandwich comes together in 18 minutes flat, and it works every single time. The ingredient list is short, the method is simple, and the result is consistently restaurant-worthy. Whether you’re a college student cooking in a dorm kitchen, a busy parent feeding hungry kids, or a home cook who just wants a perfect, no-fuss lunch, this recipe delivers. I’ve tested it with white bread, whole wheat, sourdough, and even gluten-free — and it’s always a winner.
Cheesy Grilled Sandwich Recipe Ingredients
I buy my cottage cheese and ricotta from the farmers market in Union Square on Saturday mornings — the fresh, small-batch brands have a cleaner flavor and creamier texture than the big supermarket tubs. My mozzarella comes from a little Italian deli in Greenwich Village, and the Parmesan is always a real Parmigiano-Reggiano wedge I grate myself. But I know not everyone has time for that, so I’ve tested this recipe with standard grocery-store ingredients too, and it works beautifully. Here’s exactly what you’ll need:
Ingredients List
- 8 slices bread (white, whole wheat, or sourdough)
- 1 cup cottage cheese or ricotta cheese
- 1 cup shredded mozzarella cheese
- 1/4 cup grated Parmesan cheese
- 2 tablespoons butter, softened
- 1/2 teaspoon garlic powder
- 1/2 teaspoon dried oregano
- 1/4 teaspoon salt
- 1/4 teaspoon black pepper
Ingredient Spotlight
Cottage Cheese or Ricotta: This is the star of the show. Cottage cheese gives you a slightly tangy, curdy texture that stays creamy when melted. Ricotta is richer, smoother, and more delicate. Both work wonderfully. I recommend a full-fat version for the best flavor and texture — low-fat or nonfat versions have more water and less creaminess, which can make the filling runny. If using cottage cheese, look for a brand with small curds and a thick, not watery, consistency. If using ricotta, whole-milk ricotta is non-negotiable for that luxurious mouthfeel.
Mozzarella: This is your melt cheese. It provides that iconic, stretchy cheese pull that makes a grilled cheese sandwich so satisfying. Use a low-moisture, shredded mozzarella (the kind that comes in bags) for the best melt. Fresh mozzarella is too watery and will make your bread soggy. If you only have fresh mozzarella, press it between paper towels for 15 minutes to remove excess moisture before shredding.
Parmesan: This is your umami bomb. Just a quarter cup adds a salty, nutty, savory depth that elevates the entire sandwich. Always grate it yourself from a wedge — pre-grated Parmesan contains anti-caking agents that prevent it from melting smoothly. A fine Microplane grate is perfect here, as it disperses evenly through the filling and melts quickly.
| Original Ingredient | Best Substitution | Flavor / Texture Impact |
|---|---|---|
| Cottage Cheese | Ricotta Cheese (same amount) | Richer, smoother, less tangy |
| Mozzarella | Provolone or Fontina (shredded) | Slightly sharper flavor, equally good melt |
| Parmesan | Pecorino Romano (grated) | Saltier, more pungent, even more umami |
| Butter | Mayonnaise (spread on bread) | Crispier crust, slightly tangy flavor (southern-style) |
| Dried Oregano | Dried Thyme or Italian Seasoning | More earthy or floral, still Mediterranean |
How to Make Cheesy Grilled Sandwich Recipe — Step-by-Step
Making this sandwich is almost too easy, but a few small details make a big difference. Follow these steps, and you’ll have a perfect, golden, melty sandwich every single time.
Step 1: Mix the Cheese Filling
In a small bowl, combine 1 cup cottage cheese (or ricotta), 1 cup shredded mozzarella, 1/4 cup grated Parmesan, 1/2 teaspoon garlic powder, 1/2 teaspoon dried oregano, 1/4 teaspoon salt, and 1/4 teaspoon black pepper. Stir with a fork until everything is evenly distributed. If using cottage cheese, you’ll see small curds throughout — that’s exactly what you want. If using ricotta, the mixture will be smoother and more uniform. Set aside.
💡 mia’s Pro Tip: If your cottage cheese looks watery, place it in a fine-mesh strainer over a bowl for 5 minutes before mixing. This removes excess liquid and prevents soggy bread. This is the single most important tip for a perfect cottage cheese grilled sandwich.
Step 2: Butter the Bread
Take 8 slices of your chosen bread and spread a thin, even layer of softened butter on one side of each slice. Use about 2 tablespoons of butter total — about 1/2 teaspoon per slice. The butter should be soft enough to spread without tearing the bread. Spreading it all the way to the edges ensures a sealed, crispy crust with no bare patches.
⚠️ Common Mistake to Avoid: Don’t melt the butter in the pan and then place the bread in it. This leads to uneven browning, with some spots darker and some pale. Spreading butter directly on the bread is the French technique — it gives you total control over the crust.
Step 3: Assemble the Sandwiches
Place 4 slices of bread, buttered side down, on a clean work surface. Divide the cheese mixture evenly among them, spreading it all the way to the edges. This is important — if the filling doesn’t reach the edges, the center will be thick and the edges thin, leading to uneven melting. Top each with a remaining bread slice, buttered side up. Press down gently to help the sandwich hold together.
💡 mia’s Pro Tip: For an extra-crispy exterior, sprinkle a tiny pinch of flaky sea salt on the buttered top before grilling. It adds a subtle crunch and a pop of salt that contrasts beautifully with the creamy cheese filling.
Step 4: Grill the Sandwiches
Heat a large skillet or griddle over medium heat — not medium-high, not high. Medium heat is the sweet spot. Place the sandwiches in the skillet (you may need to work in batches if your skillet is small). Cook for 3–4 minutes per side. The first side is done when the bread is deep golden brown and crispy. Flip carefully with a spatula and cook the second side for another 3–4 minutes, until the cheese is fully melted and the bottom is equally golden.
⚠️ Common Mistake to Avoid: Do not press down on the sandwich with your spatula while it cooks. This squeezes the filling out and compresses the bread, making the sandwich dense and dry instead of light and fluffy. Let it cook undisturbed for the full 3–4 minutes per side.
Step 5: Serve Immediately
Remove the sandwiches from the skillet and let them rest on a cutting board for 30 seconds (this helps the cheese set slightly so it doesn’t all ooze out when you cut). Slice each sandwich diagonally — this isn’t just for looks; the diagonal cut creates a larger surface area for the cheese pull. Serve immediately while the cheese is still hot and stretchy.
💡 mia’s Pro Tip: If you’re making multiple batches, keep the finished sandwiches on a wire rack in a 200°F oven. This keeps them warm and crispy without steaming the crust. Never stack them — stacking traps steam and makes the bread soft and soggy.
| Step | Action | Duration | Key Visual Cue |
|---|---|---|---|
| 1 | Mix the cheese filling | 2 minutes | Uniform, creamy texture with no dry spots |
| 2 | Butter the bread | 2 minutes | Thin, even butter layer edge to edge |
| 3 | Assemble sandwiches | 2 minutes | Filling spread to edges, bread aligned |
| 4 | Grill first side | 3–4 minutes | Deep golden brown crust, edges crisp |
| 5 | Grill second side | 3–4 minutes | Even browning, cheese gently oozing at edges |
Serving & Presentation
I love serving this Cheesy Grilled Sandwich with a simple side that complements its richness without stealing the show. In my NYC kitchen, I often pair it with a bright, acidic tomato soup — the classic combination is classic for a reason. The acidity of the tomatoes cuts through the creamy cheese and makes each bite feel fresh. When I’m feeling nostalgic for Morocco, I’ll serve it with a side of spicy harissa yogurt for dipping — the heat and tang are a stunning contrast to the mild, milky cheese.
For presentation, I like to cut the sandwiches diagonally and arrange them on a wooden board with the cut sides facing up so the cheesy interior is visible. A sprinkle of fresh parsley or basil on top adds a pop of green and a hint of freshness. If I’m serving guests, I’ll add a small dish of warm marinara sauce or a drizzle of balsamic glaze on the plate. The deep red of the sauce against the golden bread is visually gorgeous, and the balsamic adds a sweet-tart note that elevates the whole experience.
| Pairing Type | Suggestions | Why It Works |
|---|---|---|
| Side Dish | Tomato soup, mixed green salad, roasted cherry tomatoes | Acidity and freshness balance the rich, creamy cheese |
| Sauce / Dip | Marinara sauce, harissa yogurt, balsamic glaze | Adds moisture, heat, or sweetness for contrast |
| Beverage | Iced tea, lemonade, light lager, Sauvignon Blanc | Clean, crisp drinks cut through the richness |
| Garnish | Fresh basil, parsley, flaky sea salt, crushed red pepper | Adds freshness, color, and a final flavor pop |
Make-Ahead, Storage & Reheating
In my busy NYC life, I often meal-prep the cheese filling on Sunday so I can throw together a sandwich in minutes on a hectic weekday. The filling keeps beautifully in the fridge, and the sandwiches themselves can be assembled and grilled fresh in just a few minutes. Here’s exactly how to store and reheat them for the best results:
| Method | Container | Duration | Reheating Tip |
|---|---|---|---|
| Refrigerator | Airtight container, parchment between layers | Up to 3 days | Skillet over medium-low heat, 2-3 min per side |
| Freezer | Freezer-safe wrap + bag | Up to 2 months | Thaw in fridge, then reheat in skillet or air fryer at 350°F for 5 min |
| Make-Ahead | Cheese filling in a covered bowl | Up to 4 days in advance | Assemble and grill fresh — takes only 10 minutes |
The best way to reheat a refrigerated grilled cheese is in a skillet over medium-low heat, not the microwave. The microwave will make the bread rubbery and the cheese tough. Place the sandwich in a dry skillet (or add a tiny pat of butter if you want extra crisp) and cook for 2–3 minutes per side, covered with a lid to help the cheese re-melt evenly. If you have an air fryer, that works beautifully too — 350°F for 5 minutes, flipping halfway through. From my experience, the texture is about 90% as good as fresh, which is pretty impressive for a leftover sandwich.
Variations & Easy Swaps
This Cottage Cheese Grilled Sandwich is incredibly versatile. I’ve played with countless variations in my own kitchen, and these are the ones I keep coming back to. Each one changes the flavor profile in a unique way while keeping the core technique exactly the same.
| Variation | Key Change | Best For | Difficulty Impact |
|---|---|---|---|
| Moroccan Spiced | Add 1 tsp ras el hanout + 1/4 tsp cayenne to filling | Adventurous palates, dinner parties | Easy — no extra steps |
| Mediterranean Veggie | Add sliced tomato + fresh spinach + olives | Lighter lunch, meatless Monday | Easy — just add layers |
| Herb & Garlic Blast | Double oregano + add 1 tbsp fresh chopped parsley | Garlic lovers, herb enthusiasts | Easy — no extra steps |
Moroccan Spiced Variation
This is my personal favorite — a nod to my Moroccan roots. Add 1 teaspoon of ras el hanout (a North African spice blend with cinnamon, cumin, coriander, and ginger) and 1/4 teaspoon of cayenne pepper to the cheese filling. The warm, floral spices pair beautifully with the creamy cottage cheese or ricotta, and the cayenne adds a gentle heat that builds with each bite. I like to serve this version with a side of harissa yogurt for dipping — the cool, spicy yogurt is the perfect counterpoint to the warm, spiced sandwich. It’s a flavor combination that tells the story of my childhood in every bite.
Gluten-Free / Dairy-Free Variation
I’ve tested this with gluten-free bread and dairy-free cheese, and it works surprisingly well. Use a sturdy gluten-free bread (I like the ones from the local bakery in NYC that uses a blend of rice and tapioca flour — they toast beautifully without falling apart). For the filling, replace the mozzarella with a dairy-free shredded mozzarella alternative (look for one that melts, usually made from cashew or coconut oil), use a dairy-free ricotta, and skip the Parmesan or use a vegan Parmesan-style grating cheese. The texture is slightly less stretchy, but the flavor is still rich and satisfying. I’ve also found that adding an extra tablespoon of dairy-free butter on the bread helps compensate for the lack of dairy fat and gives a better crust.
New York Bagel Twist
Living in NYC, I couldn’t resist creating a bagel-inspired version. Use everything bagel seasoning in the cheese filling (about 1 tablespoon) and swap the bread for two everything bagel thins or a split bagel. The sesame seeds, poppy seeds, garlic, and onion flakes in the seasoning add an incredible savory depth that echoes the flavors of a classic New York bagel with cream cheese and lox — but in grilled cheese form. I like to add a few thin slices of smoked salmon between the cheese layers for the full NY experience. It’s an indulgence, but one that’s absolutely worth it. I discovered this twist while experimenting with leftovers from a Sunday bagel run, and it’s been a staple ever since.
Share Your Version!
I absolutely love hearing how this recipe comes to life in your kitchen. Did you use cottage cheese or ricotta? Did you add any of the variations, or come up with one of your own? Maybe you threw in some roasted red peppers or a handful of fresh arugula — I want to hear about it! Drop a comment below and let me know how it turned out. If you’re feeling extra generous, a star rating helps other readers find this recipe and know it’s worth their time.
And if you’re on social media, snap a photo of your golden, melty creation and tag me @exorecipes on Instagram or Pinterest. There’s something so special about seeing my recipes recreated in homes across the country — it reminds me why I started this blog in the first place. From my NYC kitchen to yours — I hope this recipe brings as much warmth to your table as it does to mine. — mia 🧡
Love This Recipe? Save It to Pinterest!
If you enjoyed this Cheesy Grilled Sandwich Recipe with Cottage or Ricotta Cheese, don’t let it get lost in your browser tabs! 😄 Pin it now so you can find it again anytime — and explore hundreds more tried-and-tested recipes waiting for you on my Pinterest boards.
👉 Follow mia on Pinterest @chefrecipes2
📌 Pin this recipe · 🔁 Re-pin your favorites · 💬 Tag me when you make it — I love seeing your creations!
What is the best way to prevent a cheesy grilled sandwich with cottage cheese from becoming soggy?
The most important step is to drain the cottage cheese before using it. Place the cottage cheese in a fine-mesh strainer set over a bowl and let it sit for 5–10 minutes at room temperature. This allows the excess whey to drip away, which is the main cause of soggy bread. If you’re in a hurry, you can also press the cottage cheese gently with a paper towel to absorb extra moisture. Additionally, make sure your skillet is hot enough (medium heat) before adding the sandwiches — a properly preheated pan sears the buttered bread quickly, creating a barrier that prevents moisture from soaking in. Finally, avoid overfilling the sandwich; about 1/4 cup of cheese mixture per sandwich is the perfect amount. These three steps — draining, preheating, and proper portioning — will give you a crisp, golden crust every time.
Can I substitute ricotta cheese with cottage cheese in a grilled cheese sandwich?
Absolutely — and the result is deliciously different. Yes, you can substitute ricotta with cottage cheese in any grilled cheese sandwich recipe, including this one. The swap works in both directions: use cottage cheese if you want a tangier, creamier filling with visible curds, or use ricotta for a smoother, richer, and more delicate texture. The key adjustment when using cottage cheese is to drain it slightly (as mentioned above) because cottage cheese has a higher moisture content than ricotta. If you’re substituting cottage cheese for ricotta, you may also want to add an extra tablespoon of grated Parmesan to compensate for ricotta’s natural richness. Both cheeses are mild and creamy, so the flavor profile stays very similar — it’s really a matter of texture preference. I personally love both versions and switch between them depending on what I have in my fridge.
How long should I grill a cheesy sandwich with ricotta cheese for the perfect melt?
For the perfect melt, grill your ricotta cheese sandwich for 3–4 minutes per side over medium heat. This timing allows the bread to become deep golden brown and crispy while the ricotta mixture heats through and the mozzarella melts completely. If you’re using a thick bread like sourdough or a hearty whole wheat, you may need the full 4 minutes per side. For thinner white bread, 3 minutes per side is usually enough. The visual cues are your best guide: the first side is ready when the bread is a uniform golden brown with a few darker spots where the butter has browned, and you can see small bubbles of melted cheese starting to appear at the edges. When you flip it, the cheese should look glossy and fully melted. If the bread is browning too quickly but the cheese isn’t melted, your heat is too high — lower it to medium-low and extend the cooking time slightly.
What are some good add-ins for a grilled sandwich with cottage or ricotta cheese?
There are so many wonderful add-ins that pair beautifully with cottage cheese or ricotta! For a fresh, bright flavor, try thin slices of tomato, fresh spinach, or arugula — these add moisture and a slight bitterness that balances the creamy cheese. For a savory boost, add caramelized onions, sautéed mushrooms, or roasted red peppers. If you like heat, a few slices of jalapeño or a drizzle of hot honey works wonderfully. For a more substantial sandwich, add crispy bacon, prosciutto, or thinly sliced apple or pear for a sweet-savory contrast. My personal favorite is a handful of fresh basil leaves and a few sun-dried tomatoes — the combination is reminiscent of a caprese salad, and the concentrated sweetness of the tomatoes pairs perfectly with the mild cheese. Just remember not to overfill — too many add-ins can make the sandwich difficult to flip and cause the filling to spill out.
Can I use low-fat cottage cheese or ricotta for this grilled sandwich recipe?
Yes, you can use low-fat versions, but I want to be honest with you about the trade-off. Low-fat cottage cheese and low-fat ricotta have a much higher water content than their full-fat counterparts. This extra moisture can lead to a soggy sandwich, so you’ll definitely need to drain them thoroughly — I recommend straining for at least 10 minutes and even gently pressing with a paper towel. The flavor will also be noticeably less rich and creamy. The texture of low-fat ricotta can turn slightly grainy when heated, while low-fat cottage cheese may break down into a watery consistency. If you’re using low-fat dairy for dietary reasons, I recommend adding an extra tablespoon of Parmesan cheese to boost the umami and richness, and be extra careful with your butter-to-bread ratio to ensure a good crust. Full-fat versions give the best results, but low-fat can work in a pinch with these adjustments.
What type of bread works best for a cottage cheese grilled sandwich?
The best bread for a cottage cheese grilled sandwich is one that is sturdy enough to hold the creamy filling without falling apart, but not so thick that it overwhelms the cheese. I’ve tested this recipe with white bread, whole wheat, sourdough, brioche, and rustic Italian bread, and they all work well. My top recommendation is sourdough — its tangy flavor complements the mild cheese beautifully, and its dense crumb structure toasts evenly and stays crisp. White bread gives you that classic, soft, nostalgic texture that many people love in a grilled cheese. Whole wheat is a great option for a heartier, more nutritious sandwich. Avoid very airy or flimsy bread like thin sandwich thins or very soft artisan rolls, as they can tear or become soggy. If you want to use gluten-free bread, choose a sturdy one and consider toasting it lightly before assembling to prevent sogginess.
Can I make this cheesy grilled sandwich ahead of time and reheat it later?
Yes, you can absolutely make this sandwich ahead of time, though it’s best enjoyed fresh. The best approach is to prepare the cheese filling up to 4 days in advance and store it in an airtight container in the refrigerator. Then, when you’re ready to eat, all you need to do is spread the butter, assemble the sandwiches, and grill them — it takes about 10 minutes. If you need to make the full sandwiches ahead, cook them completely, let them cool on a wire rack (never stack them, as steam will make them soggy), then wrap each sandwich individually in foil and refrigerate for up to 3 days. To reheat, unwrap and place in a skillet over medium-low heat for 2–3 minutes per side, or in an air fryer at 350°F for 5 minutes. The microwave is not recommended — it will make the bread rubbery and the cheese tough. Reheated this way, the sandwich is about 90% as good as fresh, which is still delicious.
What is the difference between a grilled cheese with cottage cheese versus ricotta cheese?
The main difference lies in texture and flavor. Cottage cheese has small, distinct curds and a slightly tangy, milky flavor with a noticeable moisture content. When melted, the curds soften but retain a gentle, creamy texture with tiny pockets of richness throughout the filling — it’s like little bursts of creaminess in every bite. Ricotta, on the other hand, is much smoother, finer-grained, and richer in flavor. It’s made from whey and has a higher fat content, which gives it a luxurious, velvety mouthfeel. When melted, ricotta becomes uniformly creamy without any distinct curds, creating a more homogeneous filling. In terms of protein, cottage cheese wins (about 11g protein per 1/2 cup versus 7g for ricotta), making it the more filling option. Personally, I use cottage cheese when I want a more rustic, textured sandwich with a tangy edge, and ricotta when I’m in the mood for something ultra-smooth and indulgent. Both are fantastic — it really comes down to your personal texture preference.
Can I add vegetables like spinach or tomatoes to the cottage cheese grilled sandwich?
Yes, adding vegetables like spinach, tomatoes, or roasted peppers is a wonderful way to boost the flavor and nutrition of this cottage cheese grilled sandwich. Fresh spinach leaves can be added directly to the sandwich — they’ll wilt slightly from the heat, becoming tender and mild. Tomatoes should be sliced thinly and patted dry with a paper towel to remove excess moisture, which helps prevent sogginess. Roasted red peppers are another excellent choice; they add a sweet, smoky flavor that pairs perfectly with the creamy cheese. A few tips from my kitchen: don’t add too many vegetables (about 1/4 cup total per sandwich is plenty), and if you’re using watery vegetables like tomatoes, place them between layers of cheese rather than directly against the bread — the cheese acts as a barrier that protects the bread from moisture. Also, consider salting your tomato slices lightly and letting them sit for a few minutes, then blotting them dry before adding to the sandwich.
How do I get the perfect cheese pull with cottage cheese or ricotta in a grilled sandwich?
The secret to an epic cheese pull is all about the mozzarella, not the cottage cheese or ricotta. Cottage cheese and ricotta are creamy but not stretchy — they don’t form long, elastic strands when melted. Mozzarella, on the other hand, is the stretch champion. To get that iconic cheese pull, use a good-quality low-moisture mozzarella and make sure it’s evenly distributed in the filling. Use shredded mozzarella rather than fresh, as fresh mozzarella releases too much water. I recommend using a full 1 cup of mozzarella for 4 sandwiches, which gives you about 1/4 cup per sandwich — that’s plenty for a satisfying pull. Also, don’t overheat the sandwich: cooking over medium heat ensures the mozzarella melts gradually and evenly, creating long, elastic strands. If you cook over high heat, the bread will burn before the mozzarella fully melts, and you won’t get that beautiful cheese pull. Finally, let the sandwich rest for 30 seconds after grilling — this allows the cheese to firm up just slightly so it stretches rather than breaking when you pull the halves apart.
📸 Made this recipe? I’d love to see it!
Tag @exorecipes on Instagram or Pinterest, or leave a comment below to tell me how your cheesy grilled sandwich turned out. Did you use cottage cheese or ricotta? Any fun add-ins? Your feedback helps me create more recipes you’ll love — and it helps other readers know this one is a winner!
⭐️ Rate this recipe • 💬 Share your twist • 📌 Pin for later
Cheesy Grilled Sandwich Recipe with Cottage or Ricotta Cheese
- Prep Time: 10 minutes
- Cook Time: 8 minutes
- Total Time: 18 minutes
- Yield: 4 sandwiches 1x
- Method: Snack, Lunch
- Cuisine: American
Description
A delicious and easy cheesy grilled sandwich made with creamy cottage cheese or ricotta, perfect for a quick snack or light meal.
Ingredients
- 8 slices bread (white, whole wheat, or sourdough)
- 1 cup cottage cheese or ricotta cheese
- 1 cup shredded mozzarella cheese
- 1/4 cup grated Parmesan cheese
- 2 tablespoons butter, softened
- 1/2 teaspoon garlic powder
- 1/2 teaspoon dried oregano
- 1/4 teaspoon salt
- 1/4 teaspoon black pepper
Instructions
- In a small bowl, combine cottage cheese (or ricotta), mozzarella, Parmesan, garlic powder, oregano, salt, and pepper. Mix well.
- Spread butter on one side of each bread slice.
- Place 4 slices of bread, buttered side down, on a work surface. Divide the cheese mixture evenly among them, spreading to the edges.
- Top with remaining bread slices, buttered side up.
- Heat a large skillet or griddle over medium heat. Cook sandwiches for 3-4 minutes per side, until golden brown and cheese is melted.
- Serve immediately.
Notes
For extra flavor, add sliced tomatoes or fresh spinach before grilling. You can also use gluten-free bread if needed.
Nutrition
- Calories: 350
- Sugar: 4g
- Fat: 18g
- Carbohydrates: 30g
- Protein: 18g
k">
Tried This Recipe? Leave a Comment!
Did you make this recipe? I’d love to hear how it turned out! Please leave a comment and a rating below. Your feedback helps other home cooks and supports cheerychop.com!
For more delicious inspiration, follow me on Pinterest!
