“`html
Table of Contents
Cheesy Garlic Breadsticks Recipe: Quick Homemade Twisted Breadsticks with Mozzarella & Parmesan – Soft, Fluffy, and Loaded with Cheese!
Every time I make these cheesy garlic breadsticks, I’m transported back to my mother’s kitchen in Morocco, where warm bread fresh from the oven meant family was gathered and something special was about to happen. Years later, after training at Le Cordon Bleu in Paris and settling into my tiny but mighty NYC kitchen, I knew I had to create a cheesy garlic breadsticks recipe that captured that same feeling — golden, buttery, impossibly soft, and completely irresistible. This quick garlic breadsticks recipe is the one I turn to when I need a snack that feels both indulgent and effortless.
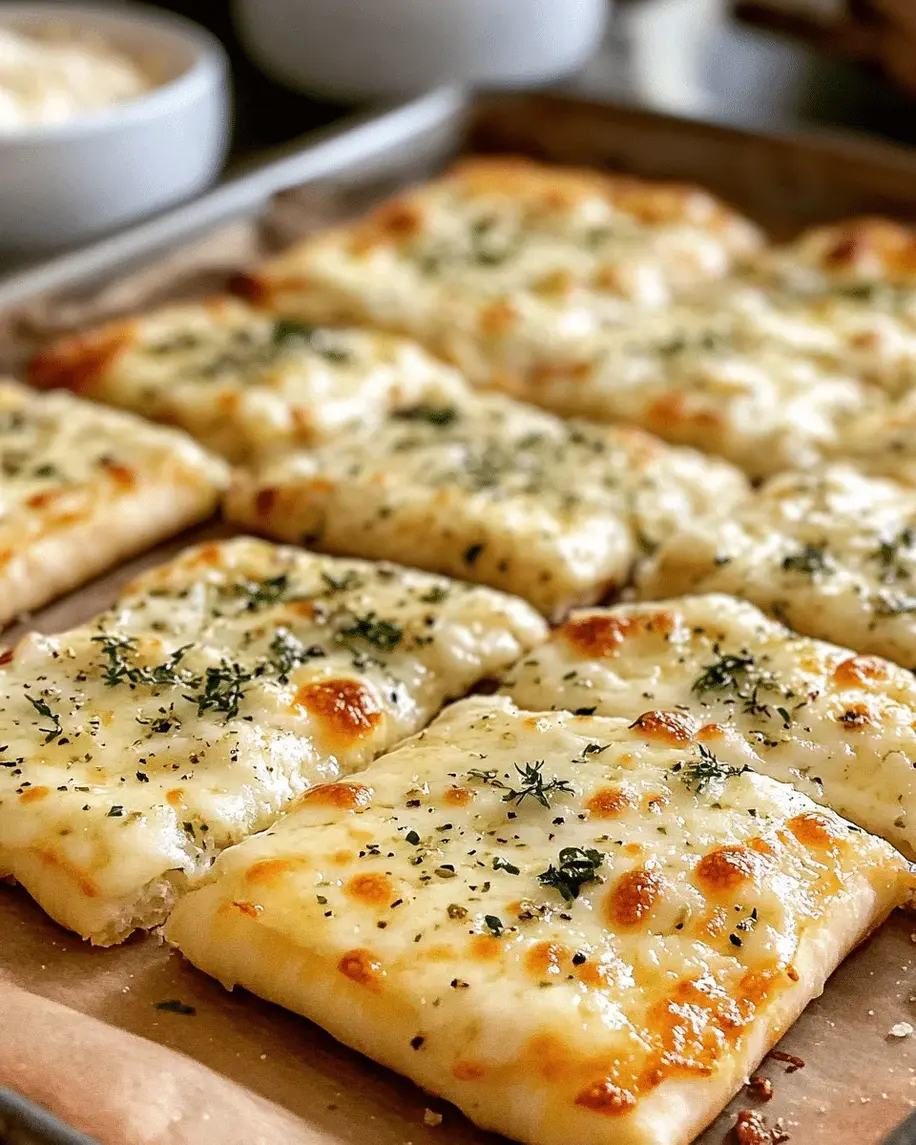
Imagine pulling apart a warm breadstick — the cheese stretches in long, glossy ribbons, the garlic butter glistens, and the first bite gives you a crisp exterior that gives way to a cloud-soft center. The aroma of melted mozzarella, toasted Parmesan, and fragrant garlic fills your kitchen, wrapping you in that cozy, can’t-wait-to-eat feeling. These homemade breadsticks have that perfect balance: rich without being heavy, cheesy without being greasy, and garlicky in that deeply savory way that makes you reach for another one before you’ve finished the first.
What sets my easy garlic bread recipe apart is a technique I learned in Paris — brushing the dough with garlic butter before baking and immediately after, creating layers of flavor that taste like you spent hours in the kitchen. Plus, twisting the dough strips isn’t just pretty — it ensures every bite has an even ratio of dough to cheese. In this post, I’ll share my foolproof method, my favorite pro tip for maximum cheese pull, and the one common mistake that can turn your breadsticks soggy. Let’s bake something wonderful together.
Why This Cheesy Garlic Breadsticks Recipe Is the Best
The Flavor Secret: Most recipes brush garlic butter once — I brush it twice. Half goes on before baking to infuse the dough, and the rest gets brushed over the hot breadsticks straight from the oven. This double application, inspired by a classic French technique I learned at Le Cordon Bleu, means the garlic flavor stays bright and bold rather than baking off. The combination of mozzarella for that iconic stretch and Parmesan for nutty depth creates a cheese profile that’s both familiar and elevated.
Perfected Texture: The twisted shape isn’t just for looks — it creates little crevices where melted cheese pools and browns unevenly, giving you crispy edges and soft, chewy centers in every bite. I’ve tested this dough dozens of times to get that pillowy interior with just enough structural integrity to hold up to dipping. The 30-minute rise is the goldilocks window: long enough for the yeast to develop flavor, short enough that you can have breadsticks on the table in under an hour.
Foolproof & Fast: Even if you’ve never baked with yeast, this quick garlic breadsticks recipe is designed to work. I use active dry yeast with warm water (110°F — think warm bath water) and a small amount of sugar to wake it up. The dough comes together in one bowl, requires no stand mixer, and the rising happens while you prep the topping. Whether you’re a first-time baker or a seasoned cook, these breadsticks deliver restaurant-quality results with minimal fuss.
Cheesy Garlic Breadsticks Recipe Ingredients
When I shop for these ingredients at my local farmers market in NYC, I always look for fresh garlic with firm cloves and a good-quality Parmesan that smells nutty, not sour. The ingredients are simple — that’s the beauty of a great cheesy garlic breadsticks recipe — but each one plays a crucial role. Here’s everything you’ll need.
Ingredients List
For the Dough:
- 2 1/4 cups all-purpose flour
- 1 tablespoon sugar
- 1 teaspoon salt
- 1 packet (2 1/4 teaspoons) active dry yeast
- 3/4 cup warm water (110°F)
- 2 tablespoons olive oil
For the Topping:
- 4 tablespoons unsalted butter, melted
- 4 cloves garlic, minced
- 1/2 teaspoon dried oregano
- 1/2 teaspoon dried parsley
- 1 1/2 cups shredded mozzarella cheese
- 1/4 cup grated Parmesan cheese
- Optional: marinara sauce for dipping
Ingredient Spotlight
Active Dry Yeast: This is the backbone of your dough. Look for packets that aren’t expired — I always check the date at the store. If you’re unsure, proof the yeast in the warm water with a pinch of sugar for 5 minutes; if it gets foamy, it’s alive and ready. Substitution: Use instant yeast (same amount) and skip the proofing — just mix it directly with the dry ingredients.
Mozzarella Cheese: For the best melt, buy a block of low-moisture mozzarella and shred it yourself. Pre-shredded cheese contains anti-caking agents that prevent smooth melting. The low-moisture variety gives you that iconic stretch without making the breadsticks soggy. Substitution: Provolone or fontina work beautifully — both melt well and add a slightly sharper flavor.
Parmesan Cheese: A good Parmesan brings salty, nutty depth that mozzarella alone can’t provide. I use the real thing — Parmigiano-Reggiano — grated fresh from a wedge. The pre-grated stuff in cans won’t melt as smoothly and lacks that complex flavor. Substitution: Pecorino Romano for a saltier, more pungent kick, or Grana Padano for a milder, more budget-friendly option.
Garlic: Fresh garlic is non-negotiable here. Mince it finely so it distributes evenly through the butter. I use about 4 medium cloves, which gives a bold but not overpowering garlic presence. Substitution: In a pinch, 1 teaspoon of garlic powder can replace fresh, but the flavor will be more muted and less aromatic. If using garlic powder, add it to the butter with the herbs.
| Original Ingredient | Best Substitution | Flavor / Texture Impact |
|---|---|---|
| Active dry yeast | Instant yeast (same amount) | No proofing needed; slightly faster rise |
| Low-moisture mozzarella | Provolone or fontina | Slightly sharper flavor; equally good melt |
| Parmigiano-Reggiano | Pecorino Romano or Grana Padano | More salt-forward (Pecorino) or milder (Grana) |
| Fresh garlic (4 cloves) | 1 tsp garlic powder | Less aromatic and less sharp; still pleasant |
How to Make Cheesy Garlic Breadsticks — Step-by-Step
Making these homemade breadsticks is easier than you think — I promise. Follow each step, and you’ll have golden, cheesy, pull-apart breadsticks that taste like they came from a pizzeria. Let’s walk through it together.
Step 1: Activate the Yeast
In a large bowl, combine 1 cup of the all-purpose flour with the sugar, salt, and active dry yeast. Add the warm water (110°F — test it on your wrist; it should feel like warm bath water) and the olive oil. Stir vigorously with a wooden spoon until the mixture is smooth and no dry pockets remain. The yeast will start to bubble and foam — that’s exactly what you want.
💡 mia’s Pro Tip: If your water is too hot (above 130°F), it will kill the yeast. If it’s too cool, the yeast won’t activate. I use a kitchen thermometer to be precise — it’s a small step that guarantees a perfect rise every time.
Step 2: Build the Dough
Stir in the remaining flour, about 1/2 cup at a time, mixing until a soft, shaggy dough forms. Turn the dough out onto a lightly floured surface. Knead for 4 to 5 minutes — push the dough away from you with the heel of your hand, fold it back, and rotate. You’re looking for a smooth, elastic dough that springs back when you press it gently.
⚠️ Common Mistake to Avoid: Adding too much flour during kneading. The dough should be soft and slightly tacky — not sticky, but not dry. If it feels stiff, you’ve added too much flour. Add flour only 1 tablespoon at a time if needed.
Step 3: First Rise
Place the dough in a lightly greased bowl (I use olive oil), turning once to coat. Cover the bowl with a clean kitchen towel or plastic wrap. Let it rise in a warm, draft-free place for 30 minutes — the dough should double in size. I often set it in my oven with the oven light on (but the oven off) for a consistent warm environment.
💡 mia’s Pro Tip: If your kitchen is cold, create a makeshift proofing box: boil a cup of water in the microwave, then place the covered bowl inside with the microwave door closed. The steam and warmth will accelerate the rise beautifully.
Step 4: Prep and Shape
Preheat your oven to 400°F (200°C). Line a baking sheet with parchment paper. Punch down the risen dough to release the air, then turn it onto a floured surface. Roll it into a 12×8-inch rectangle — don’t stress about perfection, just get it close. In a small bowl, mix the melted butter, minced garlic, oregano, and parsley. Brush half of this garlic butter mixture evenly over the dough.
⚠️ Common Mistake to Avoid: Don’t use all the garlic butter at this stage — save half for brushing after baking. This two-step method is the secret to that deep, rounded garlic flavor that tastes like you used twice the butter.
Step 5: Cheese and Twist
Sprinkle the shredded mozzarella and grated Parmesan evenly over the buttered dough, covering the entire surface. Use a pizza cutter or sharp knife to cut the dough into 12 strips, each about 1 inch wide. Pick up each strip, gently twist it from both ends, and place it on the prepared baking sheet, leaving about an inch of space between each breadstick.
💡 mia’s Pro Tip: Don’t twist too tightly — a gentle twist (about two full rotations) is enough. Over-twisting can cause the cheese to fall off during baking. If some cheese falls onto the pan, just sprinkle it back on top before baking.
Step 6: Bake and Finish
Bake the breadsticks for 12 to 15 minutes, until the edges are golden brown and the cheese is bubbly and beginning to brown in spots. Remove from the oven immediately. Brush the remaining garlic butter over the hot breadsticks — the residual heat will melt it into every crevice. Let cool on the pan for 2 minutes, then transfer to a serving plate. Serve warm with marinara sauce if desired.
⚠️ Common Mistake to Avoid: Don’t skip the final butter brush! This is what gives the breadsticks that glossy, garlicky finish and keeps the tops from drying out as they cool. It’s a small step with a huge payoff.
| Step | Action | Duration | Key Visual Cue |
|---|---|---|---|
| 1 | Activate yeast & mix | 3 min | Yeast becomes foamy and bubbly |
| 2 | Knead dough | 4–5 min | Smooth, elastic, springs back when pressed |
| 3 | First rise | 30 min | Doubled in size |
| 4 | Roll, brush, top | 8 min | 12×8-inch rectangle, evenly topped |
| 5 | Cut & twist strips | 5 min | 12 twisted strips, evenly spaced |
| 6 | Bake & finish | 12–15 min | Golden brown edges, bubbly cheese |
Serving & Presentation
These cheesy breadsticks are at their absolute best within 10 minutes of leaving the oven, when the cheese is still stretchy and the garlic butter is glossy. I like to arrange them on a wooden board — the same one I use for everything from Moroccan flatbreads to French cheese plates — and serve them with a small bowl of warmed marinara sauce in the center. A sprinkle of flaky sea salt and a few fresh parsley leaves on top make them look like they came from a Brooklyn pizzeria.
In my NYC apartment, these breadsticks have become my go-to for everything: a quick snack while I’m testing recipes, an appetizer when friends come over for pasta night, or a side dish alongside a big bowl of soup. The twisted shape makes them perfect for dipping, and the fact that they’re so fast to pull together means I can make them even on busy weeknights.
💡 mia’s Pro Tip: For a Moroccan-French twist, serve these with a side of harissa-spiked marinara or a garlicky yogurt sauce (labneh mixed with a little lemon and salt). It’s my favorite way to bridge my two culinary worlds — and it always gets rave reviews.
| Pairing Type | Suggestions | Why It Works |
|---|---|---|
| Side Dish | Tomato soup, minestrone, Caesar salad | The breadsticks add crunch and richness to lighter soups and salads |
| Sauce / Dip | Marinara, garlic butter, ranch, harissa yogurt | The twisted shape holds dips perfectly; each sauce adds a new flavor layer |
| Beverage | Sparkling water with lemon, iced tea, light red wine | Bubbly or acidic drinks cut through the richness of the cheese and butter |
| Garnish | Flaky sea salt, fresh parsley, red pepper flakes | Adds color, texture, and a final pop of flavor right before serving |
Make-Ahead, Storage & Reheating
Between recipe testing, blogging, and exploring NYC’s food scene, I’m all about smart meal prep. This quick garlic breadsticks recipe is incredibly forgiving — you can prep the dough in advance or fully bake and reheat later. Here’s exactly how I do it in my own kitchen.
| Method | Container | Duration | Reheating Tip |
|---|---|---|---|
| Refrigerator | Airtight container with paper towel | Up to 3 days | Reheat at 350°F for 5-6 minutes, then broil 1 minute for crispiness |
| Freezer | Freezer-safe bag or container with parchment between layers | Up to 2 months | Bake from frozen at 375°F for 10-12 minutes; brush with melted butter after |
| Make-Ahead | Covered bowl in fridge (dough only) | Up to 24 hours in advance | Let dough come to room temp for 20 minutes before rolling and baking |
The best way to reheat homemade breadsticks is in the oven — the microwave will make them soggy and rubbery. I preheat to 350°F, spread the breadsticks on a baking sheet, and warm them for 5 to 6 minutes. If I want that just-baked crispness, I switch to broil for the last minute and watch closely. For frozen breadsticks, I bake them straight from the freezer at 375°F for 10 to 12 minutes, then brush with a little melted butter mixed with garlic powder. They taste almost as good as fresh.
⚠️ Common Mistake to Avoid: Don’t stack hot breadsticks in a container while they’re still warm — the steam will make them soggy. Let them cool completely on a wire rack before storing. If you’re in a rush, leave the container lid slightly ajar for the first 10 minutes to let steam escape.
Variations & Easy Swaps
One of the things I love most about this easy garlic bread recipe is how easily it adapts to different cravings and dietary needs. Whether you want to spice things up, go gluten-free, or use up ingredients from your weekly farmers market haul, there’s a variation here for you. These are all tested in my NYC kitchen — I wouldn’t share them otherwise.
| Variation | Key Change | Best For | Difficulty Impact |
|---|---|---|---|
| Spicy Harissa Breadsticks | Add 1 tbsp harissa paste to the garlic butter | Heat lovers, Moroccan-inspired meals | No change — just stir in the harissa |
| Three-Cheese Breadsticks | Add 1/4 cup shredded provolone or asiago | Ultra-cheesy, decadent appetizers | No change — just sprinkle on extra cheese |
| Gluten-Free Breadsticks | Use 1:1 gluten-free flour blend with xanthan gum | Gluten-sensitive guests, Celiac-friendly meals | Slightly trickier — dough will be stickier; add extra flour as needed |
Spicy Harissa Breadsticks
This variation is my love letter to my Moroccan roots. Stir 1 tablespoon of harissa paste into the melted butter along with the garlic, herbs, and a pinch of cumin. The harissa adds a smoky, layered heat that pairs beautifully with the mozzarella. I like to serve these with a cooling yogurt dipping sauce — simply mix labneh or Greek yogurt with lemon juice, salt, and a drizzle of olive oil. It’s the kind of flavor combination that surprises people in the best way.
Gluten-Free Breadsticks
I tested this with a high-quality 1:1 gluten-free flour blend that contains xanthan gum (like King Arthur or Bob’s Red Mill). The dough will be noticeably stickier than the regular version — resist the urge to add too much extra flour. Lightly oil your hands and the work surface instead of flouring them. The rise time stays the same, and the texture is remarkably close to the original: soft, tender, and satisfying. The cheese and garlic butter work the same magic, so your gluten-free guests won’t miss a thing.
Three-Cheese Breadsticks
When I’m feeling extra decadent — which happens often during New York winters — I add 1/4 cup of shredded provolone or asiago to the mozzarella and Parmesan. Provolone brings a buttery, slightly smoky note, while asiago adds a sharp, nutty kick. The three cheeses melt together into a gloriously gooey, golden crust. I sometimes sprinkle a little extra Parmesan over the top right before baking for an even crunchier finish.
Can I use store-bought pizza dough to make these cheesy garlic breadsticks?
Absolutely — store-bought pizza dough works beautifully as a shortcut. Look for fresh pizza dough in the refrigerated section of your grocery store (or ask your local pizzeria if they sell theirs). Let the dough come to room temperature for about 20 minutes before rolling it out, as cold dough is harder to shape. Follow the same steps for brushing with garlic butter, adding the cheese, cutting, twisting, and baking. The texture will be slightly different — a bit more chewy and less pillowy than homemade — but it’s still delicious and cuts the total time by about 35 minutes.
What type of cheese melts best on garlic breadsticks?
Low-moisture mozzarella is hands-down the best cheese for melting on garlic breadsticks. It has just the right amount of moisture to stretch beautifully without making the dough soggy. I combine it with Parmesan for flavor depth — Parmesan doesn’t stretch much, but it adds a salty, nutty crust. Other great melting cheeses include provolone (buttery and smooth), fontina (rich and creamy), and young Gouda (mild and stretchy). Avoid pre-shredded cheese if you can, because the anti-caking coating can make the melt grainy. Always shred your own for the smoothest, stretchiest results.
How do I keep the garlic breadsticks from getting soggy?
Soggy breadsticks happen when moisture gets trapped between the dough and the topping. The fix is threefold: First, use low-moisture mozzarella — the block or bag labeled “low-moisture” has less water than fresh mozzarella packed in brine. Second, brush the garlic butter onto the dough before adding the cheese, which creates a barrier that prevents the cheese’s moisture from soaking into the dough. Third, bake at 400°F on parchment paper on a preheated baking sheet — the high heat creates steam that escapes quickly, keeping the exterior crisp. Let them cool on a wire rack, not on the pan, so air circulates underneath.
Can I make cheesy garlic breadsticks ahead of time and reheat them?
Yes — fully baked cheesy garlic breadsticks reheat beautifully if you do it right. Let them cool completely on a wire rack, then store them in an airtight container with a paper towel to absorb excess moisture. They’ll keep in the refrigerator for up to 3 days. To reheat, place them on a baking sheet at 350°F for 5 to 6 minutes, then switch to broil for the last 30 to 60 seconds to re-crisp the cheese. I don’t recommend the microwave — it makes the texture rubbery and the cheese turns tough. For make-ahead convenience, you can also prepare the dough and refrigerate it overnight, then roll, top, and bake fresh when you’re ready.
Can I freeze these cheesy garlic breadsticks?
Definitely — these breadsticks freeze exceptionally well. The best method is to freeze them after baking and cooling completely. Arrange them in a single layer on a baking sheet and freeze until solid (about 1 hour), then transfer to a freezer-safe bag or container with parchment paper between layers. They’ll keep for up to 2 months. To reheat, bake from frozen at 375°F for 10 to 12 minutes until hot and crispy. I like to brush them with a little melted garlic butter after reheating to revive that just-baked flavor. You can also freeze the unbaked twisted breadsticks on a tray, then transfer to a bag — bake straight from frozen, adding 2-3 extra minutes.
How can I make these breadsticks dairy-free or vegan?
You can easily adapt this recipe for dairy-free or vegan diets. Use a high-quality vegan butter stick (like Miyoko’s or Earth Balance) in place of unsalted butter. For the cheese, look for plant-based mozzarella shreds that melt well — brands like Violife or Follow Your Heart have excellent melting properties. I’ve also had good results with a cashew-based mozzarella. Keep in mind that vegan cheese melts differently: it won’t stretch as much as dairy mozzarella, and it can dry out faster, so watch the bake time closely and remove from the oven as soon as the cheese is bubbly. The garlic butter flavor remains just as delicious.
Why did my breadsticks turn out hard and dry?
Hard, dry breadsticks are usually the result of over-baking or over-working the dough. First, check your oven temperature — an oven that runs hot can brown the outside before the inside is done. Use an oven thermometer if you’re unsure. Second, bake for the minimum time (12 minutes) and check: the breadsticks should be golden at the edges and the cheese bubbly, but the dough should still feel soft to the touch. Third, make sure you’re not over-kneading — 4 to 5 minutes is plenty. Over-kneading develops too much gluten, which creates a tough, dense texture. Finally, don’t skip the final butter brush: it adds moisture and keeps the tops soft after baking.
What dipping sauces go best with these cheesy garlic breadsticks?
Classic marinara is the most popular choice — the acidity of the tomatoes cuts through the rich cheese and butter perfectly. But don’t stop there! A garlic ranch dip (mix ranch dressing with extra minced garlic and a pinch of parsley) is always a hit. For something more adventurous, try a spicy harissa yogurt dip (labneh or Greek yogurt with harissa paste, lemon juice, and salt) — this is my personal favorite and nods to my Moroccan background. A simple balsamic vinegar and olive oil dip works beautifully too, especially if you’re serving the breadsticks alongside a salad. Warm the sauce slightly before serving for the best experience.
Share Your Version!
I absolutely love seeing how these breadsticks turn out in your kitchen. Did you try the Spicy Harissa variation? Did you use store-bought dough for a last-minute snack? Drop a comment below and let me know — your feedback helps other home cooks decide what to try first. If you’re on Instagram or Pinterest, tag me @exorecipes when you make them — I want to see those cheesy pulls! And if you loved this recipe, please leave a ⭐⭐⭐⭐⭐ star rating — it means the world to me and helps more people find these quick, irresistible breadsticks.
From my NYC kitchen to yours — I hope this recipe brings as much warmth to your table as it does to mine. — mia 🧡
Love This Recipe? Save It to Pinterest!
If you enjoyed this Cheesy Garlic Breadsticks recipe, don’t let it get lost in your browser tabs! 😄 Pin it now so you can find it again anytime — and explore hundreds more tried-and-tested recipes waiting for you on my Pinterest boards.
👉 Follow mia on Pinterest @exorecipe
📌 Pin this recipe · 🔁 Re-pin your favorites · 💬 Tag me when you make it — I love seeing your creations!
“`
Print
Cheesy Garlic Breadsticks: A Quick and Irresistible Snack for Any Occasion
- Prep Time: 15 minutes
- Cook Time: 15 minutes
- Total Time: 1 hour (includes rising time)
- Yield: 12 breadsticks 1x
- Method: Appetizer
- Cuisine: Italian-American
Description
These Cheesy Garlic Breadsticks are soft, fluffy, and loaded with garlic butter and melted cheese. Perfect as a snack, appetizer, or side dish!
Ingredients
- For the Dough:
- 2 1/4 cups all-purpose flour
- 1 tablespoon sugar
- 1 teaspoon salt
- 1 packet (2 1/4 teaspoons) active dry yeast
- 3/4 cup warm water (110°F)
- 2 tablespoons olive oil
- For the Topping:
- 4 tablespoons unsalted butter, melted
- 4 cloves garlic, minced
- 1/2 teaspoon dried oregano
- 1/2 teaspoon dried parsley
- 1 1/2 cups shredded mozzarella cheese
- 1/4 cup grated Parmesan cheese
- Optional: marinara sauce for dipping
Instructions
- In a large bowl, combine 1 cup flour, sugar, salt, and yeast.
- Add warm water and olive oil; mix until smooth.
- Stir in remaining flour, 1/2 cup at a time, until a soft dough forms.
- Turn dough onto a floured surface; knead for 4-5 minutes until smooth and elastic.
- Place in a greased bowl, cover, and let rise in a warm place for 30 minutes.
- Preheat oven to 400°F (200°C). Line a baking sheet with parchment paper.
- Punch down dough. Roll into a 12×8-inch rectangle on a floured surface.
- In a small bowl, mix melted butter, garlic, oregano, and parsley. Brush half over the dough.
- Sprinkle mozzarella and Parmesan evenly over the buttered dough.
- Cut dough into 12 strips (about 1 inch wide). Twist each strip and place on the baking sheet.
- Bake for 12-15 minutes until golden brown and cheese is bubbly.
- Brush remaining garlic butter over hot breadsticks. Serve warm with marinara if desired.
Notes
For extra cheesy breadsticks, add an additional 1/2 cup mozzarella. Dough can be prepared ahead and refrigerated overnight.
Nutrition
- Calories: 210 kcal
- Sugar: 2 g
- Fat: 10 g
- Carbohydrates: 22 g
- Protein: 7 g
Tried This Recipe? Leave a Comment!
Did you make this recipe? I’d love to hear how it turned out! Please leave a comment and a rating below. Your feedback helps other home cooks and supports cheerychop.com!
For more delicious inspiration, follow me on Pinterest!
