Salsa Chicken Casserole: A Quick and Flavorful Weeknight Dinner

Mexican chicken casserole, cheesy chicken salsa bake, easy chicken casserole, salsa chicken bake, chicken casserole with salsa

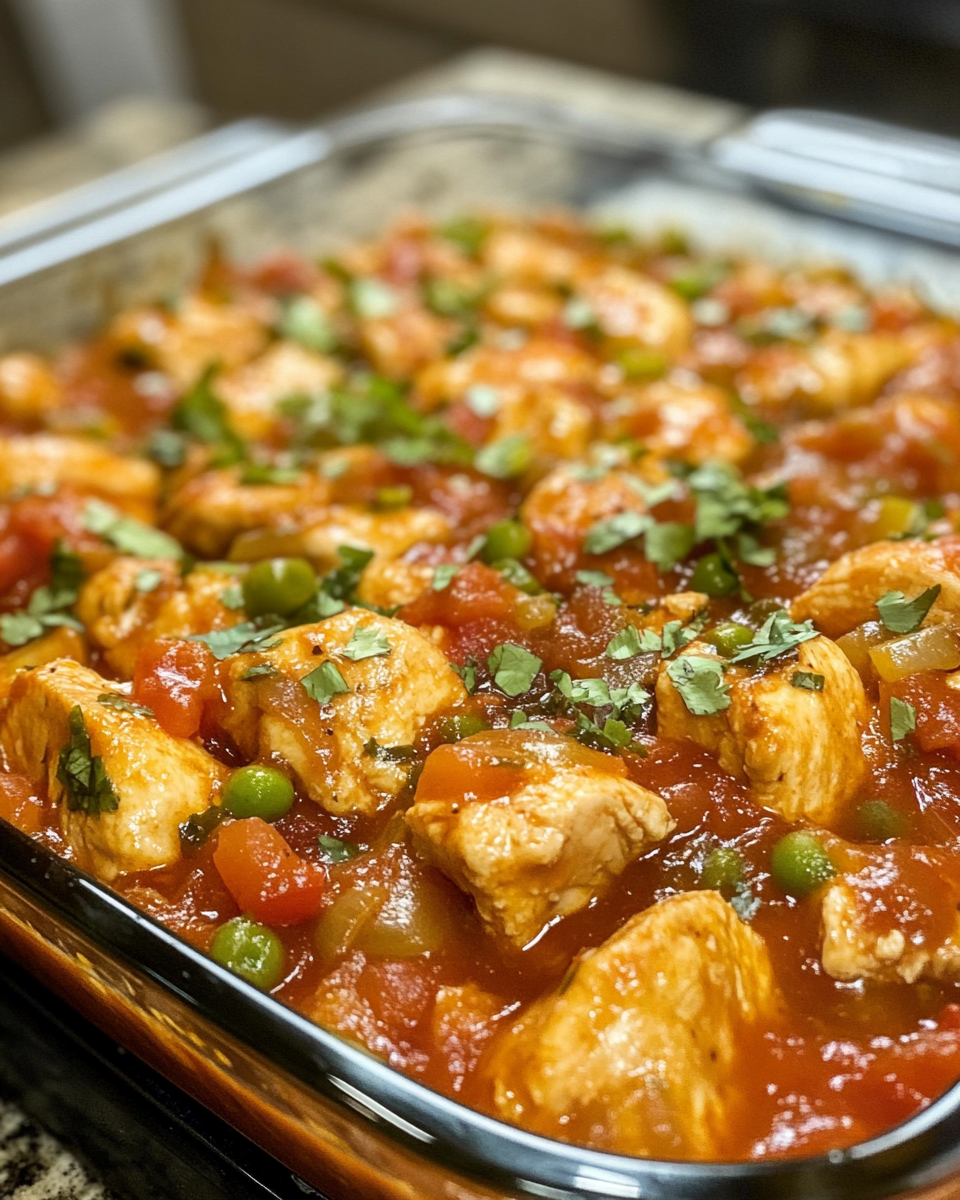
Salsa Chicken Casserole: A Flavorful and Easy Weeknight Dinner

If you’re looking for a dish that brings the bold flavors of Mexican cuisine into a simple casserole, look no further than Salsa Chicken Casserole. This recipe is packed with tender chicken, melted cheese, and a zesty salsa sauce, making it perfect for busy weeknights or weekend gatherings. The versatility of this casserole allows you to customize it to your taste, whether you prefer it spicy, creamy, or loaded with veggies.

For those who love comfort food casseroles, you may also want to explore our Crockpot Potato Soup with Hashbrowns, another cozy and delicious meal option.

Ingredients for Salsa Chicken Casserole

Here’s what you’ll need to make this delicious casserole:

  • Chicken breasts or thighs (shredded rotisserie chicken works great for a quick option)
  • Taco seasoning (store-bought or homemade)
  • Salsa (choose your favorite: chunky, smooth, or even salsa verde)
  • Shredded cheese: Monterey Jack, Cheddar, or a Mexican blend
  • Rice or pasta as the base (optional)
  • Black beans and corn for added texture
  • Sour cream or cream cheese for creaminess
  • Optional: Green chiles, jalapeños, and toppings like cilantro, guacamole, and sliced avocado

You can even make your own taco seasoning using this Homemade Taco Seasoning Recipe for a more personalized flavor profile.

Step-by-Step Instructions

Preparation Time:

15 minutes

Cook Time:

30-35 minutes

Servings:

6-8 people

  1. Preheat the oven to 350°F (175°C).
  2. Prepare the chicken: Season the chicken with taco seasoning and either bake, grill, or pan-fry until cooked through. Shred the chicken once it’s done.
  3. Layer the ingredients: In a greased casserole dish, start with a layer of rice or pasta (if using), followed by the shredded chicken, salsa, black beans, and corn. Top with shredded cheese and a few dollops of sour cream or cream cheese.
  4. Bake: Cover the casserole with foil and bake for 25-30 minutes. Remove the foil in the last 5 minutes to allow the cheese to brown and bubble.
  5. Rest and serve: Let the casserole sit for about 5 minutes before serving. Top with your favorite garnishes like cilantro, sour cream, or guacamole.

For another simple and hearty casserole, you might want to check out the Crock Pot Baked Ziti.

Variations of Salsa Chicken Casserole

One of the great things about Salsa Chicken Casserole is how easily it can be customized. Here are a few variations to try:

  • Vegetarian Salsa Casserole: Swap the chicken for black beans, pinto beans, or even tofu. You can load the casserole with extra veggies like zucchini, bell peppers, or spinach.
  • Spicy Salsa Chicken: Use spicy salsa, and add sliced jalapeños or habanero peppers for an extra kick.
  • Salsa Verde Chicken Casserole: Use green salsa (salsa verde) for a tangy and slightly less spicy version of this dish.
  • Low-Carb or Keto Salsa Casserole: Replace the rice or pasta with cauliflower rice or zucchini noodles for a lower-carb option.

Looking for more protein-packed meals? Try our No-Peek Beef Tips, which is another great comfort dish.

Nutritional Information and Healthier Alternatives

Salsa Chicken Casserole is relatively high in protein, but depending on how it’s prepared, it can also be high in fat and calories. Here’s a breakdown of a typical serving:

  • Calories: 400-450 per serving
  • Protein: 25-30 grams
  • Fat: 15-20 grams
  • Carbohydrates: 30-40 grams

Healthier Alternatives:

  • Use low-fat cheese or reduce the amount of cheese to cut down on fat.
  • Replace sour cream with Greek yogurt to add protein and cut calories.
  • Increase the amount of vegetables like spinach, zucchini, or bell peppers to bulk up the casserole without adding a lot of calories.

If you’re looking to learn more about the best cheeses for melting and optimizing flavor, read Best Cheeses for Melting in Casseroles.

Serving Suggestions and Toppings

While Salsa Chicken Casserole is a complete meal on its own, here are a few serving suggestions to round out the meal:

  • Serve with a side of Mexican rice or quinoa.
  • Add a simple side salad with a citrusy vinaigrette.
  • Pair with refried beans or cornbread for an extra touch of Mexican flair.
  • Top with sour cream, pico de gallo, or sliced avocado.

How to Store, Reheat, and Freeze Salsa Chicken Casserole

This casserole is perfect for meal prepping, as it reheats beautifully and can also be frozen for later use.

Storing:

  • Store leftovers in an airtight container in the refrigerator for up to 3 days.

Reheating:

  • Reheat individual servings in the microwave or warm the entire casserole in the oven at 350°F until heated through.

Freezing:

  • Salsa Chicken Casserole can be frozen before or after baking. If freezing before baking, assemble the casserole, cover tightly with foil, and freeze for up to 3 months. To reheat, thaw in the fridge overnight and bake as usual.

For more details on freezing casseroles, check out this helpful guide on freezing casseroles.

Frequently Asked Questions (FAQs)

Can I make Salsa Chicken Casserole ahead of time?

Absolutely! Assemble the casserole up to 24 hours in advance, cover it tightly, and store it in the fridge. When you’re ready to bake, simply pop it in the oven.

Is Salsa Chicken Casserole gluten-free?

Yes, as long as you use gluten-free taco seasoning and salsa. Ensure your other ingredients, like rice or corn tortillas, are also gluten-free.

Can I use frozen chicken for this recipe?

Yes, you can use frozen chicken, but you’ll need to thaw it and cook it before adding it to the casserole.

Can I substitute the salsa with enchilada sauce?

Definitely! Enchilada sauce provides a smoother texture and a slightly different flavor profile but works just as well in this casserole.

How do I keep the casserole from getting too dry?

Ensure you use enough salsa or add a bit of chicken broth to keep the dish moist. You can also cover the casserole with foil for the first part of the baking process to retain moisture.

Common Mistakes to Avoid

  • Using too little salsa: This can lead to a dry casserole. Be generous with the salsa to ensure the casserole remains moist.
  • Overcooking the chicken: Use pre-cooked or rotisserie chicken to avoid the risk of drying it out during baking.
  • Skipping the seasoning: Ensure you season the chicken well with taco seasoning to avoid bland bites.
  • Not letting it rest: Let the casserole cool for a few minutes before slicing to allow the layers to set.

Conclusion

Salsa Chicken Casserole is the perfect dish for anyone looking for an easy, flavorful, and versatile dinner. Its combination of cheesy goodness and zesty salsa makes it a family favorite, and with the ability to customize it to suit your preferences, it’s a meal you’ll come back to time and again.

For more casserole inspiration, don’t miss the Crockpot Ham, Green Beans, and Potatoes, another hearty and delicious comfort food dish.

Taco Lasagna: The Perfect Fusion of Mexican Flavors and Italian Layers

Mexican lasagna, taco casserole, layered taco lasagna, taco bake, cheesy taco lasagna

Taco Lasagna: A Delicious Twist on a Classic

If you’re a fan of Mexican cuisine and the classic layers of Italian lasagna, Taco Lasagna is a dish you need to try. This fusion meal combines the savory flavors of taco-seasoned beef, beans, cheese, and tortillas with the hearty, layered style of lasagna. It’s an ideal weeknight dinner that pleases everyone at the table. Plus, it’s easy to customize, making it perfect for family dinners, potlucks, or gatherings.

For anyone who loves comfort food classics, you’ll want to explore other recipes, such as the Crockpot Potato Soup with Hashbrowns, another cozy meal to warm up your evenings.

Ingredients for Taco Lasagna

To make a Taco Lasagna, you’ll need some classic taco ingredients and a few layers to bring the lasagna style into the dish. Here’s what you’ll need:

  • Ground beef (or substitute with ground turkey for a healthier option)
  • Taco seasoning (store-bought or homemade)
  • Flour tortillas (you can also use corn tortillas for extra flavor)
  • Shredded cheese: Cheddar or a Mexican blend works great
  • Refried beans or black beans
  • Salsa or enchilada sauce for added moisture and flavor
  • Green peppers, onions, and corn for extra texture
  • Sour cream and guacamole for topping

You can find homemade taco seasoning recipes on sites like Simply Recipes, which allows you to customize your flavors and skip the added preservatives.

Step-by-Step Instructions for Taco Lasagna

Preparation Time:

15 minutes

Cook Time:

30 minutes

Servings:

6-8 people

  1. Preheat the oven to 350°F (175°C).
  2. Cook the ground beef: Brown the beef in a skillet with taco seasoning, onions, and green peppers until the meat is cooked through.
  3. Layer the tortillas: Start with a layer of tortillas at the bottom of a baking dish.
  4. Assemble the lasagna: Spread a layer of refried beans, followed by the beef mixture, then cheese, and salsa. Add another layer of tortillas and repeat the process until all ingredients are used.
  5. Top with cheese: Finish with a generous layer of shredded cheese.
  6. Bake: Bake for 25-30 minutes until the cheese is melted and bubbly.
  7. Serve: Let the lasagna cool for a few minutes, then slice and serve with sour cream, guacamole, or any additional toppings you like.

If you’re looking for another family-friendly dish, try the Slow Cooker Baked Ziti for an Italian-inspired option that’s equally delicious.

Variations of Taco Lasagna

One of the best things about Taco Lasagna is how versatile it can be. Here are some ways you can modify this recipe:

  • Vegetarian Taco Lasagna: Swap the ground beef for black beans, pinto beans, or even lentils. Add extra vegetables like zucchini or mushrooms for a more filling dish.
  • Chicken Taco Lasagna: Use shredded chicken instead of ground beef for a lighter version.
  • Low-Carb Taco Lasagna: Replace the tortillas with thin slices of zucchini or low-carb tortillas to reduce the carb content.
  • Spicy Taco Lasagna: Add jalapeños, chipotle peppers, or spicy salsa for those who love an extra kick.

If you’re a fan of fusion dishes, you might also enjoy the No-Peek Beef Tips, which offers a rich, beefy flavor perfect for comfort food lovers.

Nutritional Information and Healthier Options

While Taco Lasagna is a hearty dish, there are ways to make it a bit lighter without sacrificing flavor. Here’s a rough nutritional breakdown for a serving of Taco Lasagna:

  • Calories: 450-500 per serving
  • Protein: 25-30 grams
  • Fat: 25-30 grams
  • Carbohydrates: 40-50 grams

Healthier Options:

  • Use lean ground turkey instead of beef.
  • Swap sour cream for Greek yogurt to add protein and reduce calories.
  • Increase the amount of vegetables in the lasagna to add more fiber and nutrients.

For those interested in optimizing their nutritional intake, learn more about making meals healthier with options like Best Cheeses for Melting, a useful guide for selecting the right cheeses for your dish.

Serving Suggestions and Toppings

Taco Lasagna is a meal in itself, but it can be paired with several sides or enhanced with the right toppings. Here are some serving ideas:

  • Mexican rice or Spanish rice as a side dish.
  • Corn on the cob or refried beans for a traditional Mexican twist.
  • Fresh guacamole, pico de gallo, or sliced jalapeños on top for added freshness and spice.
  • A side of chips and salsa or queso dip to start the meal.

How to Store, Reheat, and Freeze Taco Lasagna

Taco Lasagna is perfect for meal prep or leftovers, and it stores well in the fridge or freezer.

Storing:

  • Place leftover lasagna in an airtight container and store it in the fridge for up to 3 days.

Reheating:

  • To reheat individual portions, use the microwave, or reheat the entire dish in the oven at 350°F (175°C) until warm.

Freezing:

  • Taco Lasagna can be frozen either before baking or after. Wrap it tightly in plastic wrap and aluminum foil, then freeze for up to 3 months.

For more helpful tips on freezing and reheating casseroles, check out this guide on freezing casseroles.

Frequently Asked Questions (FAQs)

Here are some common questions people have about Taco Lasagna:

Can I make Taco Lasagna ahead of time?

Yes, you can assemble Taco Lasagna up to 24 hours in advance and store it in the fridge. When you’re ready to cook, simply pop it in the oven.

Can I use lasagna noodles instead of tortillas?

Yes, some variations use traditional lasagna noodles instead of tortillas, though tortillas offer a more authentic Mexican flavor.

How do I keep Taco Lasagna from being soggy?

Be careful not to oversaturate the layers with salsa or sauce, and ensure any excess liquid is drained from the cooked beef before layering.

Can I freeze Taco Lasagna?

Yes, Taco Lasagna freezes well, either before or after baking. Just make sure to wrap it tightly to prevent freezer burn.

Common Mistakes to Avoid

When making Taco Lasagna, there are a few common pitfalls to keep in mind:

  • Overfilling the layers: Too much filling can make the lasagna difficult to cut and serve. Keep the layers even.
  • Too much liquid: Adding too much salsa or sauce can make the lasagna soggy. Use just enough to moisten the layers.
  • Skipping the resting time: Let the lasagna rest for a few minutes before cutting to allow the layers to set.

Conclusion

Taco Lasagna is a delightful fusion of Mexican flavors and Italian structure that is sure to become a family favorite. It’s simple to make, versatile enough to adapt to different tastes, and perfect for both weeknight dinners and special occasions. Whether you’re layering with beef, chicken, or going for a vegetarian version, this dish has something for everyone.

For more delicious, easy-to-make recipes, don’t forget to explore Crockpot Ham, Green Beans, and Potatoes for another crowd-pleasing meal.

Instant Pot Salisbury Steak with Rich Mushroom Gravy: A Comfort Food Classic

pressure cooker Salisbury steak, Salisbury steak with gravy, easy Salisbury steak, quick Salisbury steak recipe, Instant Pot beef patties

Instant Pot Salisbury Steak: A Hearty and Quick Comfort Meal

Salisbury Steak has been a staple of comfort food for generations. The combination of juicy beef patties smothered in rich gravy served with mashed potatoes or rice is hard to beat. But cooking Salisbury steak the traditional way can be time-consuming. That’s where the Instant Pot comes in. With this modern kitchen appliance, you can have a delicious meal ready in less than an hour, with minimal prep and cleanup.

In this article, we’ll walk through a step-by-step guide on how to make Instant Pot Salisbury Steak. We’ll also discuss variations, nutritional information, and answer some frequently asked questions. Whether you’re cooking for a weeknight dinner or preparing a meal for a crowd, this recipe is sure to be a hit.

Ingredients for Instant Pot Salisbury Steak

To make Salisbury Steak in the Instant Pot, you’ll need the following ingredients:

Main Ingredients:

  • Ground beef (85% lean) or a mix of ground beef and pork
  • Breadcrumbs (panko or regular)
  • Eggs (to bind the patties)
  • Onion powder, garlic powder, parsley, and thyme for seasoning
  • Worcestershire sauce
  • Beef broth or stock
  • Mushrooms (optional, but highly recommended for the gravy)
  • Onions (for added flavor in the gravy)
  • Cornstarch or brown gravy mix to thicken the sauce

Optional Add-Ins:

  • Mustard for a slight tang in the gravy
  • Sour cream for a creamy texture
  • Bacon bits for a savory touch

By using these ingredients, you can create a flavorful dish that’s quick and easy. For a similar comfort meal, check out this Crockpot Potato Soup with Hashbrowns.

Step-by-Step Instructions for Instant Pot Salisbury Steak

Preparation Time:

15 minutes

Cook Time:

30 minutes

Servings:

4-6 people

  1. Prepare the Patties: In a large bowl, combine the ground beef, breadcrumbs, egg, onion powder, garlic powder, parsley, and thyme. Mix gently and form the mixture into oval-shaped patties.
  2. Sear the Patties: Turn the Instant Pot on to the sauté mode. Add a tablespoon of oil and brown the patties on each side for about 2 minutes. This step adds extra flavor but is optional.
  3. Remove Patties and Sauté Onions & Mushrooms: Once the patties are browned, remove them from the pot. Add the chopped onions and mushrooms to the Instant Pot and sauté until softened (about 5 minutes).
  4. Prepare the Gravy: Add the beef broth, Worcestershire sauce, and any other desired seasonings (such as mustard or sour cream) to the pot. Stir to combine.
  5. Cook Under Pressure: Place the patties back into the pot, layering them over the onions and mushrooms. Secure the Instant Pot lid, set it to high pressure, and cook for 18 minutes. Allow the pressure to release naturally for 5 minutes before performing a quick release.
  6. Thicken the Gravy: If the gravy is too thin, mix 1 tablespoon of cornstarch with 1 tablespoon of water to create a slurry. Stir the slurry into the gravy and sauté for a few minutes until it thickens.
  7. Serve: Serve the Salisbury steak with mashed potatoes, rice, or egg noodles, and garnish with fresh parsley if desired.

For another delicious, easy-to-make dinner, try this Slow Cooker Baked Ziti.

Variations of Instant Pot Salisbury Steak

One of the best things about Salisbury Steak is its versatility. Below are a few variations you can try to suit different dietary needs or flavor preferences:

  • Low-Carb/Keto Salisbury Steak: Replace the breadcrumbs with crushed pork rinds or almond flour. Serve with mashed cauliflower or roasted vegetables instead of mashed potatoes.
  • Vegetarian Version: Use plant-based ground beef or a mixture of mushrooms and lentils for the patties. You can also use vegetable broth for the gravy.
  • Adding Protein: Add cooked bacon bits or sausage into the gravy for an extra layer of flavor. You can also mix ground pork into the beef patties for added richness.
  • Gluten-Free Salisbury Steak: Use gluten-free breadcrumbs and gluten-free gravy mix to make the dish safe for those with gluten intolerances.

For those looking to experiment with flavor, consider trying the No-Peek Beef Tips for a similar beefy and hearty experience.

Nutritional Information and Tips for a Healthier Dish

While Salisbury Steak is undeniably delicious, it’s important to keep an eye on nutritional content. Here’s a rough breakdown for a serving of Instant Pot Salisbury Steak:

  • Calories: 350-400 per serving (depending on the size of the patties and the gravy)
  • Protein: 25-30 grams
  • Fat: 20-25 grams
  • Carbs: 15-20 grams (more if served with potatoes or rice)

To make the dish healthier:

  • Use lean ground beef (90% lean or higher) to cut down on fat.
  • Swap sour cream for Greek yogurt in the gravy for fewer calories and more protein.
  • Use low-sodium beef broth to reduce the salt content.

For more information on healthy cooking tips, check out this helpful guide on Nutritional Information for Ground Beef Dishes.

Frequently Asked Questions (FAQs)

Here are some frequently asked questions based on what people also search for on Google:

Can I make Salisbury Steak without an Instant Pot?

Yes, you can make Salisbury Steak on the stovetop or in a slow cooker. On the stovetop, brown the patties and then simmer them in the gravy for about 25 minutes. In a slow cooker, cook the patties in the gravy on low for 6-7 hours or high for 3-4 hours.

Can I use frozen patties for Salisbury Steak?

You can use frozen patties, but you’ll need to adjust the cooking time. Add 5-7 minutes to the pressure cooking time if using frozen patties. Make sure to check the internal temperature to ensure they’re fully cooked.

How do I prevent the patties from falling apart?

To prevent patties from falling apart, make sure to use enough binding ingredients like eggs and breadcrumbs. Don’t overwork the meat when forming the patties, as this can make them too tough.

Can I use chicken or turkey for Salisbury Steak?

Yes, you can use ground chicken or turkey as a substitute for beef. However, these meats are leaner, so consider adding a bit of olive oil or butter to the mixture to prevent the patties from becoming too dry.

Common Mistakes to Avoid

  • Overmixing the Meat: Overworking the ground beef can lead to tough, dry patties. Mix just until combined.
  • Not Browning the Patties: Browning adds flavor and texture to the patties. Don’t skip this step, even if it takes a few extra minutes.
  • Using Too Much Liquid in the Gravy: If the gravy is too thin, it can overpower the dish. Start with a small amount of broth, and add more as needed.

Expert Tips for Perfect Instant Pot Salisbury Steak

  • Searing the Patties: Searing the patties before pressure cooking helps lock in flavor and gives them a nice crust.
  • Thickening the Gravy: To get a rich, thick gravy, don’t be afraid to use cornstarch or flour. Stirring in a slurry during the sauté stage will ensure your gravy isn’t too thin.
  • Serving Suggestions: Serve the steak over creamy mashed potatoes or egg noodles for a classic combo. For a lighter side, try steamed green beans or a simple side salad.

Conclusion

Instant Pot Salisbury Steak is the perfect combination of convenience and flavor. With the help of the Instant Pot, you can create a hearty, comforting meal in less than an hour. Plus, with the variations and tips mentioned above, you can customize this recipe to suit your dietary needs and preferences. Whether you’re new to the Instant Pot or a seasoned user, this recipe will quickly become a favorite in your household.

For more comforting meals, check out the Crockpot Ham, Green Beans, and Potatoes or dive into other comforting one-pot dishes.

Cheesy Broccoli Casserole: Easy and Creamy Comfort Food Recipe

broccoli cheese casserole, broccoli and cheese bake, easy broccoli casserole, cheesy broccoli bake, broccoli casserole with cheese

Cheesy Broccoli Casserole: A Creamy, Comforting Delight

Cheesy Broccoli Casserole is the perfect dish when you’re craving something warm, cheesy, and full of flavor. Whether you’re preparing for a holiday gathering or just a comforting weeknight dinner, this casserole offers the best of both worlds—delicious flavors and nutritional benefits from the broccoli.

With just a few ingredients and minimal prep time, you can whip up this easy, crowd-pleasing dish that balances indulgence with a hearty serving of vegetables. Plus, you can customize the casserole to suit your preferences by adding proteins or making it gluten-free. Here’s how to create the perfect cheesy broccoli casserole that will have everyone asking for seconds.

If you love slow-cooked meals, consider checking out this Slow Cooker Baked Ziti for another cozy dinner option.

Ingredients for a Perfect Cheesy Broccoli Casserole

This dish relies on simple, yet flavorful ingredients. The following list includes essential items and a few optional extras to add variety.

Main Ingredients:

  • Fresh broccoli florets (or frozen, if preferred)
  • Shredded cheddar cheese
  • Cream of mushroom soup (or substitute with cream of chicken for a milder flavor)
  • Mayonnaise or sour cream for creaminess
  • Onions, finely chopped
  • Eggs to help bind the ingredients
  • Bread crumbs or crushed crackers (Ritz crackers work well) for a crunchy topping
  • Salt, pepper, and optional seasonings like garlic powder and paprika

If you’re looking for a healthier twist on the classic casserole, opt for low-fat cheese and mayonnaise alternatives. You can also explore making a healthier version of comfort food with potato soups. Learn more in this comforting potato soup recipe.

Step-by-Step Recipe Instructions

Preparation Time:

15 minutes

Cook Time:

30-35 minutes

Servings:

6-8 people

  1. Preheat the oven to 350°F (175°C).
  2. Prepare the broccoli: Steam fresh broccoli until just tender, or if using frozen broccoli, thaw and drain any excess water.
  3. Create the mixture: In a large bowl, combine cream of mushroom soup, mayonnaise (or sour cream), eggs, onions, and half of the shredded cheese. Stir until well-mixed.
  4. Fold in the broccoli: Add the steamed or thawed broccoli to the mixture, ensuring all florets are coated evenly.
  5. Assemble the casserole: Spread the broccoli mixture into a greased casserole dish. Top with the remaining shredded cheese and sprinkle bread crumbs or crushed crackers on top.
  6. Bake: Bake uncovered for 30-35 minutes until the casserole is bubbling and the topping is golden brown.
  7. Serve and enjoy: Remove from the oven and let it cool slightly before serving.

For more one-pan or pot dishes, explore easy options like Ham and Potato Casserole.

Variations on Cheesy Broccoli Casserole

One of the great things about this recipe is its versatility. You can tweak it depending on dietary needs or add extra ingredients to suit your taste. Here are some common variations:

  • Low-Carb/Keto Version: Swap out the cream of mushroom soup for a low-carb alternative, like heavy cream with a sprinkle of xanthan gum to thicken.
  • Add Protein: Incorporate cooked chicken, ham, or bacon for a heartier version. These proteins pair wonderfully with the cheesy base.
  • Vegetarian Version: Opt for a vegetarian cream of mushroom soup or make your own creamy sauce using milk and flour.
  • Gluten-Free Option: Use gluten-free crackers or bread crumbs for the topping and ensure the soup is gluten-free.

For more casserole ideas that cater to various diets, try this deliciously rich baked ham and potato casserole.

Nutritional Information and Tips for Healthier Alternatives

While this dish is indulgent, there are ways to make it a bit healthier without sacrificing flavor. A standard serving of Cheesy Broccoli Casserole contains approximately:

  • Calories: 300-350 per serving
  • Protein: 10-12 grams
  • Carbs: 15-20 grams (depending on topping and cream choice)
  • Fat: 20-25 grams

To make it lighter:

  • Use low-fat cheese or reduce the amount of cheese used.
  • Replace mayonnaise with Greek yogurt for added protein and fewer calories.
  • Opt for light cream of mushroom soup or make a homemade roux with almond milk and flour for a dairy-free version.

Serving Suggestions

This casserole works well as a side dish or a main course when served with proteins. Here are some recommended pairings:

  • Grilled chicken or roasted pork chops for a protein boost.
  • Serve it alongside mashed potatoes or garlic bread for a more filling meal.
  • Add a simple side salad with a light vinaigrette to balance the richness of the dish.

Storing, Reheating, and Freezing Cheesy Broccoli Casserole

Storing:

  • Place leftovers in an airtight container and store in the fridge for up to 3 days.

Reheating:

  • Reheat individual portions in the microwave, or cover the entire casserole dish with foil and reheat in the oven at 325°F (165°C) for 15-20 minutes to retain its crispiness.

Freezing:

  • You can freeze the assembled, unbaked casserole for up to 3 months. When you’re ready to bake, thaw it overnight in the fridge, then bake as directed.

FAQs About Cheesy Broccoli Casserole

Can I make Cheesy Broccoli Casserole ahead of time?

Absolutely! You can prepare the entire casserole, cover it tightly, and store it in the fridge for up to 24 hours before baking. This makes it perfect for busy days or prepping in advance for family gatherings.

Should I use fresh or frozen broccoli?

Both fresh and frozen broccoli work well in this recipe. Fresh broccoli offers a firmer texture, while frozen is more convenient. Just ensure that frozen broccoli is thawed and drained to avoid excess moisture in the casserole.

How do I prevent the casserole from becoming watery?

To prevent a watery casserole, be sure to drain your broccoli thoroughly and reduce the amount of liquid in the cream-based ingredients if necessary.

Can I substitute cream of mushroom soup?

Yes! You can use cream of chicken soup, cream of celery soup, or make a homemade white sauce for a more natural flavor.

Internal Links for Additional Inspiration

If you’re looking for more delicious comfort food recipes, why not try out this Slow Cooker Shredded BBQ Chicken? You can also explore another crowd-pleaser like Crockpot Ham, Green Beans, and Potatoes.


Expert Tips for Perfecting Cheesy Broccoli Casserole

  • Use freshly shredded cheese: Pre-shredded cheese contains anti-caking agents that may affect how smoothly the cheese melts.
  • Don’t overcook the broccoli: If using fresh broccoli, make sure it’s just tender but not mushy. Overcooked broccoli can result in a soggy texture.
  • Season generously: The creaminess of the dish can sometimes dull flavors, so don’t be afraid to season with additional spices like paprika, cayenne pepper, or fresh herbs.

Conclusion

In summary, Cheesy Broccoli Casserole is a perfect blend of creamy cheese and wholesome broccoli, offering comfort and nutrition in every bite. Whether you’re looking for a holiday side dish or an easy weeknight meal, this recipe is a winner. By incorporating a few simple tweaks, you can make it fit any dietary preference or occasion. Make sure to try out the variations and pairings to create a dish that suits your family’s needs.

For more savory casseroles or comforting dishes, explore our Crockpot Potato Soup or this rich ham and potato casserole.

Easy Crock Pot Beef Stroganoff: A Hearty Comfort Food Recipe

slow cooker beef stroganoff, easy beef stroganoff, crockpot stroganoff, creamy beef stroganoff, beef and mushroom stroganoff

Crock Pot Beef Stroganoff: The Ultimate Comfort Food

Beef Stroganoff has long been a favorite comfort food, combining tender beef, a creamy mushroom sauce, and hearty noodles into one delicious dish. But have you ever wondered how to make this classic recipe even easier? Enter the crock pot, a kitchen appliance that takes all the guesswork out of cooking and delivers perfectly tender results every time. With just a few simple ingredients and minimal prep, you can enjoy this family-friendly meal without slaving over the stove.

Cooking in a crock pot has many benefits: it allows the flavors to meld beautifully over hours, and the slow cooking process guarantees your meat will be incredibly tender. Whether you’re making this dish for a busy weeknight or a cozy weekend dinner, Crock Pot Beef Stroganoff is sure to please.

Before diving into the recipe, let’s explore a bit of history and learn how this slow-cooker magic works.

A Brief History of Beef Stroganoff

Beef Stroganoff originated in 19th century Russia, named after the wealthy Stroganov family. Traditionally, it was made with sautéed beef and a rich sour cream-based sauce. Over the years, this recipe has evolved and adapted in various regions, with modern-day versions often incorporating mushrooms and onions. Today, we find this classic dish tailored for the convenience of a slow cooker or crock pot.

Using a crock pot for Beef Stroganoff is ideal because the slow cooking process breaks down the tough fibers in beef, leaving you with melt-in-your-mouth tenderness. Unlike stove-top versions, this method doesn’t require much supervision—just set it and forget it.

For more recipe inspiration, check out this Ultimate Comfort Food Crockpot Potato Soup with Hashbrowns. It’s another must-try for slow cooker fans.

Ingredients for the Perfect Crock Pot Beef Stroganoff

The beauty of Crock Pot Beef Stroganoff lies in its simplicity. Below is a list of ingredients to create a rich and flavorful dish.

Main Ingredients:

  • Beef stew meat or chuck roast, cubed (about 2 pounds)
  • Onions, finely chopped (1 medium)
  • Garlic, minced (2 cloves)
  • Mushrooms, sliced (8 ounces)
  • Beef broth (2 cups)
  • Worcestershire sauce (2 tablespoons)
  • Dijon mustard (1 tablespoon)
  • Red wine vinegar (optional, 1 tablespoon)
  • Cream cheese or sour cream (1 cup)
  • Egg noodles or substitute with mashed potatoes or rice

Optional Ingredients:

  • Paprika for an extra kick
  • Parsley for garnish
  • Cornstarch (to thicken the sauce if needed)

Ingredient Substitutions:

  • For a gluten-free version, substitute egg noodles with gluten-free pasta or mashed potatoes.
  • To make it dairy-free, replace the sour cream with a dairy-free alternative like coconut cream or almond-based cream.

Step-by-Step Cooking Instructions

Preparation Time: 15 minutes
Cook Time: 6-8 hours (low setting)

  1. Sear the Beef: Although optional, searing the beef in a pan before placing it in the crock pot adds depth to the flavor. Heat a bit of oil in a skillet and brown the cubed beef for 3-4 minutes until all sides are caramelized.
  2. Layer the Ingredients: Add the beef to the bottom of the crock pot, followed by onions, garlic, and mushrooms. Sprinkle paprika on top if desired.
  3. Prepare the Sauce: In a bowl, whisk together the beef broth, Worcestershire sauce, Dijon mustard, and red wine vinegar. Pour this over the beef and vegetables in the crock pot.
  4. Set and Forget: Cook on low for 6-8 hours or on high for 4-5 hours, depending on your schedule. The beef will become tender, and the flavors will meld beautifully over time.
  5. Thicken the Sauce: In the last 30 minutes of cooking, stir in the cream cheese or sour cream. For a thicker sauce, mix cornstarch with water and add it to the crock pot.
  6. Cook the Noodles: Boil the egg noodles according to the package instructions in a separate pot. If using rice or mashed potatoes, prepare those as well.
  7. Serve and Enjoy: Serve the beef stroganoff over the noodles, mashed potatoes, or rice. Garnish with parsley if desired.

Looking for another hearty, family-friendly dish? Check out this Slow Cooker Baked Ziti for another easy crock pot dinner idea.

Variations on Crock Pot Beef Stroganoff

The beauty of this dish lies in its versatility. Here are some popular variations you can try:

  • Chicken Stroganoff: Substitute beef with boneless chicken thighs for a lighter, poultry-based version.
  • Vegetarian Stroganoff: Replace the beef with mushrooms and vegetables like zucchini or bell peppers. Use vegetable broth instead of beef broth.
  • Keto-Friendly Stroganoff: Skip the noodles and serve the beef stroganoff over cauliflower rice or steamed vegetables for a low-carb option.

Nutritional Information and Health Considerations

While Crock Pot Beef Stroganoff is undeniably delicious, it’s important to consider the nutritional content. One serving typically contains:

  • Calories: Around 400-500 calories per serving (without noodles)
  • Protein: Approximately 30 grams
  • Fat: 25 grams
  • Carbohydrates: 20 grams

For those looking to make a lighter version, here are a few healthy swaps:

  • Use Greek yogurt instead of sour cream for fewer calories and more protein.
  • Reduce the portion of noodles or serve with zoodles (zucchini noodles) to cut down on carbs.

FAQs About Crock Pot Beef Stroganoff

Can I make Beef Stroganoff without mushrooms?
Yes, if you’re not a fan of mushrooms, you can substitute them with zucchini, carrots, or bell peppers for a slightly different texture.

What is the best cut of beef for stroganoff in a crock pot?
Chuck roast, beef stew meat, or sirloin are ideal for Crock Pot Beef Stroganoff because they become incredibly tender after slow cooking.

How do I thicken the sauce?
To thicken the sauce, you can either reduce the liquid by cooking it uncovered for the last 30 minutes or add a cornstarch slurry (1 tablespoon cornstarch mixed with 1 tablespoon water).

Can I prepare this dish ahead of time?
Absolutely! Crock Pot Beef Stroganoff is perfect for meal prep. Store it in an airtight container in the refrigerator for up to 3 days, or freeze for up to 3 months.

Internal Linking Opportunities for Additional Recipes

For a comprehensive cooking experience, you might want to explore other comfort food recipes. This No-Peek Beef Tips Recipe will teach you another slow-cooker classic that is perfect for a cozy family meal. Additionally, if you’re a fan of all things slow-cooked, try this Crockpot Ham, Green Beans, and Potatoes for another hearty dish.


Expert Tips for the Best Beef Stroganoff

  • Use room temperature dairy: Adding cold sour cream or cream cheese can cause the sauce to curdle. Allow these ingredients to come to room temperature before mixing them into the crock pot.
  • Sear the beef: While it’s an optional step, searing the beef adds a richness to the dish by caramelizing the outside of the meat. This extra layer of flavor makes a difference.
  • Don’t overcook the noodles: If you’re serving your stroganoff over egg noodles, be sure to cook them separately. Add them at the end or serve them fresh to avoid mushy noodles.

Delicious Side Dishes to Serve with Beef Stroganoff

While the creamy, hearty beef stroganoff is a complete meal on its own, pairing it with the right side dishes can elevate the entire dining experience.

  • Roasted Vegetables: Roasted carrots, green beans, or Brussels sprouts add a touch of sweetness and balance the richness of the dish.
  • Garlic Bread: A warm, buttery slice of garlic bread is perfect for soaking up that extra sauce.
  • Salad: A light side salad with a tangy vinaigrette can add some freshness to your plate, balancing the richness of the beef stroganoff.

Conclusion

Crock Pot Beef Stroganoff is a must-try recipe for any slow-cooker enthusiast. With minimal prep and maximum flavor, it’s perfect for busy weeknights or lazy weekends. Whether you’re serving it over egg noodles, mashed potatoes, or rice, this dish will have your family coming back for seconds. Remember, cooking is all about experimentation—so feel free to try different variations, swap out ingredients, and make this recipe your own.