How to Make Easy Home Fries: Crispy and Delicious Every Time

breakfast potatoes, crispy home fries, skillet potatoes, fried potatoes, pan-fried potatoes

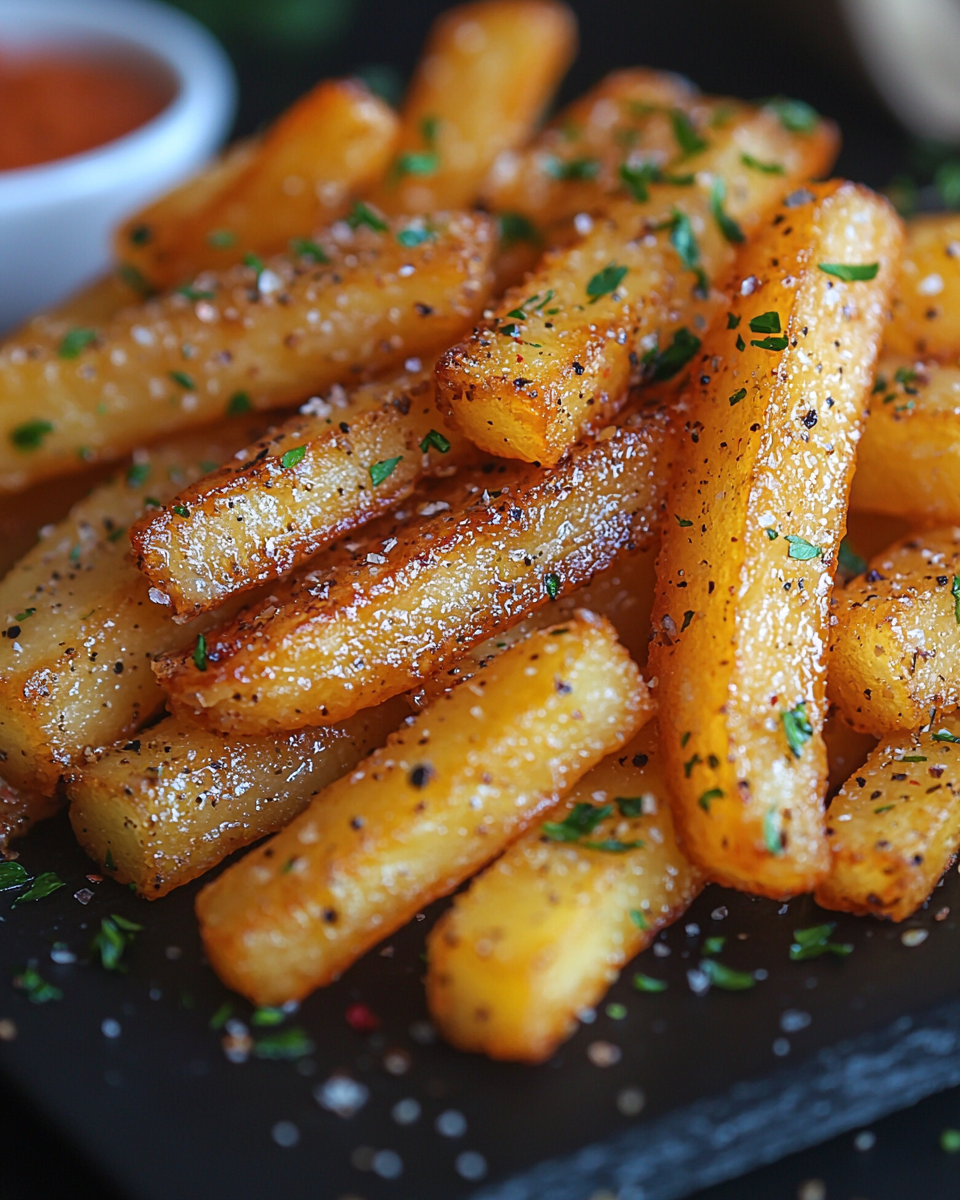
Easy Home Fries: The Perfect Crispy Breakfast Side Dish

Home fries are a classic and beloved breakfast staple. With their crispy exterior and soft interior, they pair wonderfully with eggs, bacon, and any other breakfast dish. In this article, we’ll walk through the step-by-step process of making easy home fries from scratch, share tips for perfecting them, and discuss creative variations to elevate your breakfast game.


Ingredients for Home Fries

To make perfect home fries, you need a few simple ingredients:

  • Potatoes: Russet potatoes are ideal due to their starchy texture, which crisps up beautifully.
  • Oil or Butter: Use olive oil or butter for frying the potatoes. Butter adds flavor, while oil can help achieve crispiness.
  • Seasonings: Salt, pepper, garlic powder, and paprika are essential for flavor. You can also add fresh herbs like rosemary or thyme for an aromatic touch.
  • Onions and Bell Peppers: Optional but recommended for adding extra flavor and texture.

For more details on making your breakfasts complete, check out Crockpot Potato Soup with Hashbrowns, another great potato-based comfort dish.


How to Make Home Fries

Step 1: Prepare the Potatoes

Start by peeling and cubing the potatoes into 1-inch pieces. This ensures even cooking. Parboil the potatoes in salted water for 5 minutes to soften them slightly and speed up the cooking process.

Step 2: Sauté the Potatoes

In a large skillet, heat olive oil or butter over medium heat. Once hot, add the parboiled potatoes in a single layer. Allow them to cook without stirring for about 5-7 minutes, until the bottoms turn golden brown.

For tips on using a cast iron skillet, see Slow Cooker Magic: Unveiling the Ease of Crock-Pot Baked Ziti.

Step 3: Season and Add Vegetables

Add diced onions and bell peppers, stirring them into the potatoes. Continue cooking until the potatoes are crispy on all sides and the vegetables are tender. Season generously with salt, pepper, garlic powder, and paprika.

Step 4: Serve Hot

Once the home fries are crispy and flavorful, serve them immediately as a side dish to scrambled eggs, bacon, or even as part of a breakfast burrito.


Variations of Home Fries

  • Loaded Home Fries: Top with shredded cheddar cheese, crumbled bacon, and a dollop of sour cream for a loaded version.
  • Herb-Infused Home Fries: Add rosemary or thyme for a fragrant twist.
  • Spicy Home Fries: Sprinkle chili flakes or cayenne pepper for a spicy kick.
  • Vegetarian Home Fries: Include mushrooms, spinach, or other vegetables to make the dish heartier and more nutritious.

For more variations on potatoes, try No-Peek Beef Tips for a hearty main course option.


Tips for Perfect Home Fries

  • Use Starchy Potatoes: Russet potatoes work best for achieving that golden-brown crispness.
  • Avoid Overcrowding: Cook the potatoes in batches if needed to avoid steaming. This ensures the potatoes become crispy.
  • Pre-Cook Potatoes: Parboiling or microwaving the potatoes before frying helps them cook through evenly and prevents burning.
  • Use a Cast-Iron Skillet: A cast-iron skillet helps retain heat evenly and gives home fries their signature crispy texture.

Nutritional Information and Healthier Alternatives

Per serving:

  • Calories: 200-250
  • Fat: 10-12g
  • Carbohydrates: 30g
  • Protein: 3g

Healthier alternatives:

  • Bake Instead of Fry: Toss the cubed potatoes in olive oil and roast them in the oven at 425°F for 25-30 minutes, flipping halfway for even browning.
  • Use Sweet Potatoes: Swap regular potatoes for sweet potatoes to add more nutrients and a touch of sweetness.
  • Reduce the Oil: Use non-stick spray or minimal oil to reduce fat content.

Storage and Reheating Tips

  • Refrigeration: Store leftover home fries in an airtight container in the refrigerator for up to 5 days.
  • Freezing: Lay the home fries on a parchment-lined baking sheet and freeze for a few hours. Once frozen, transfer them to a freezer bag. They can be frozen for up to 3 months.
  • Reheating: To restore crispiness, reheat home fries in a skillet with a little oil or in the oven. Microwaving is quicker but will soften them.

For another versatile potato dish, check out Kentucky Butter Cake: A Slice of Southern Comfort, a delightful dessert to pair with your home fries meal.


FAQs About Easy Home Fries

Q: What’s the best potato for home fries?
A: Russet or Idaho potatoes are the best choices due to their starchy nature, which crisps well when fried.

Q: How do you keep home fries from getting soggy?
A: Avoid overcrowding the pan and cook the potatoes in batches if necessary. Also, letting the potatoes sit undisturbed in the skillet for a few minutes allows the surface to crisp.

Q: Can I make home fries in the oven?
A: Yes, you can roast the potatoes in the oven for a healthier version. Simply toss them in oil and bake at 425°F until golden and crispy, flipping halfway through.

Q: Can you freeze home fries?
A: Yes, home fries can be frozen. Make sure to freeze them in a single layer before transferring them to a freezer-safe bag.


Internal Linking Opportunities

How to Make Chocolate Poke Cake From Scratch: A Moist and Decadent Dessert

homemade chocolate poke cake, easy chocolate poke cake, moist poke cake, chocolate cake recipe from scratch, chocolate poke cake recipe

Chocolate Poke Cake From Scratch: A Decadent and Moist Dessert

Chocolate poke cake is a classic dessert that delivers moist, rich chocolate goodness with a fun twist. Holes are poked into the cake, and a luscious chocolate sauce is poured over the top, allowing the cake to absorb the delicious filling. This article will guide you through the process of making a chocolate poke cake from scratch, including tips for perfect results and creative variations to try.


Key Ingredients for Chocolate Poke Cake

The success of this cake lies in the quality of ingredients:

  • Cocoa powder: For a rich chocolate flavor.
  • Sugar: Sweetens the cake batter and the sauce.
  • Flour: All-purpose flour gives structure to the cake.
  • Eggs: Adds richness and helps the cake rise.
  • Milk: Provides moisture and softens the crumb.
  • Butter: Adds flavor and moisture.
  • Chocolate sauce: A mixture of condensed milk and melted chocolate fills the poked holes.
  • Whipped cream topping: Light and fluffy, balancing the cake’s richness.

For another decadent dessert option, explore Kentucky Butter Cake: A Slice of Southern Comfort.


How to Make Chocolate Poke Cake From Scratch

Step 1: Prepare the Chocolate Cake

Start by mixing dry ingredients, including flour, sugar, cocoa powder, and baking powder. In a separate bowl, mix wet ingredients like eggs, milk, and melted butter. Combine the dry and wet ingredients, then bake in a preheated oven at 350°F for 30-35 minutes, or until a toothpick inserted in the center comes out clean.

Step 2: Poking the Cake

Once the cake cools slightly, use the handle of a wooden spoon to poke holes throughout the cake, about 1 inch apart. This step ensures the cake absorbs the chocolate sauce evenly.

Step 3: Prepare the Chocolate Sauce

Melt chocolate chips and combine with condensed milk. Pour the warm sauce over the cake, making sure it seeps into the holes. Allow the cake to cool completely so the sauce can be absorbed.

For another rich dessert with a twist, try Slow Cooker Magic: Unveiling the Ease of Crock-Pot Baked Ziti.


Whipped Cream Topping

Once the cake has cooled and absorbed the chocolate sauce, it’s time to prepare the whipped cream topping. Whip heavy cream with powdered sugar until stiff peaks form. Spread the whipped cream evenly over the cake for a light, creamy finish.


Variations of Chocolate Poke Cake

  • Baileys Chocolate Poke Cake: Add a splash of Baileys Irish Cream to the chocolate sauce for a boozy twist.
  • Peanut Butter Chocolate Poke Cake: Swirl melted peanut butter into the sauce for a peanut butter-chocolate combo.
  • Turtle Chocolate Poke Cake: Drizzle caramel sauce and sprinkle chopped pecans over the top of the whipped cream for a turtle-inspired dessert.

Tips for the Best Chocolate Poke Cake

  • Don’t Overbake: Overbaking leads to a dry cake. Check for doneness with a toothpick to avoid this.
  • Use Hot Water for Cocoa: Blooming the cocoa powder with hot water intensifies the chocolate flavor.
  • Chill Before Serving: Let the cake chill in the refrigerator for a few hours to allow the chocolate sauce to fully soak into the cake.

For more baking tips and tricks, check out The Ultimate Comfort Food: Crockpot Potato Soup with Hashbrowns.


Storage and Serving Tips

  • Storage: Store the cake covered in the refrigerator for up to 5 days. The whipped cream topping holds up well in the fridge, making this cake an excellent make-ahead dessert.
  • Freezing: You can freeze the cake (before adding the whipped cream) for up to 3 months. Thaw in the refrigerator overnight, and add the whipped cream topping before serving.
  • Serving: Serve cold or at room temperature for the best texture.

FAQs About Chocolate Poke Cake

Q: Can I make a poke cake without condensed milk?
A: Yes, you can substitute the condensed milk with a homemade chocolate sauce made of cream, sugar, and cocoa powder.

Q: Why is my cake dry?
A: Overbaking or using too much flour can lead to a dry cake. Use the spoon-and-level method to measure flour accurately, and check for doneness early.

Q: Can I make this cake gluten-free?
A: Yes, you can substitute the all-purpose flour with a 1:1 gluten-free baking flour. Be sure to check that your other ingredients, like cocoa powder, are also gluten-free.

Q: How should I store chocolate poke cake?
A: Store the cake in the refrigerator for up to 5 days. Cover it with plastic wrap or store in an airtight container to keep it fresh.


Internal Linking Opportunities

How to Make Classic Beef Bourguignon: A Hearty French Stew

beef burgundy, classic French stew, red wine beef stew, French beef stew, Burgundy beef stew

Beef Bourguignon: A Classic French Comfort Dish

Beef Bourguignon, also known as beef Burgundy, is a beloved French stew braised in red wine, typically from the Burgundy region. It’s a hearty and flavorful dish that combines tender beef, rich wine, and a variety of aromatic vegetables. This article will guide you through the preparation of an authentic Beef Bourguignon recipe, complete with tips, variations, and frequently asked questions.


Ingredients for Beef Bourguignon

The key to a great Beef Bourguignon is selecting high-quality ingredients:

  • Beef: Choose chuck or brisket for tenderness after long cooking.
  • Red Wine: Burgundy wine, or a similarly rich red wine, is essential for depth of flavor.
  • Vegetables: Onion, carrots, and mushrooms provide texture and flavor.
  • Herbs: Thyme, bay leaves, and garlic add aromatic notes.
  • Bacon: Adds smokiness and a salty punch.
  • Beef Stock: Enhances the richness of the stew.
  • Flour: Thickens the stew as it simmers.

For a complementary side, consider pairing Beef Bourguignon with The Ultimate Comfort Food: Crockpot Potato Soup with Hashbrowns.


How to Make Beef Bourguignon

Step 1: Marinate the Beef

Marinating the beef in red wine and herbs overnight enhances the flavors and tenderizes the meat.

Step 2: Sear the Beef

Brown the beef in batches in bacon fat to develop a rich, caramelized exterior.

Step 3: Cook the Vegetables

In the same pot, sauté onions, carrots, and garlic until soft. Add the bacon and beef back to the pot.

Step 4: Deglaze and Add Wine

Pour in the wine and beef stock to deglaze the pot, scraping up the brown bits for added flavor.

Step 5: Slow Cook

Simmer for 2-3 hours until the beef is tender. Add mushrooms toward the end for a fresh texture.

For another recipe packed with flavor, check out Slow Cooker Magic: Unveiling the Ease of Crock-Pot Baked Ziti.


Variations of Beef Bourguignon

  • Vegetarian Version: Substitute beef with a variety of mushrooms for a hearty, meat-free alternative.
  • Beef Cheek Bourguignon: Use beef cheeks for an even more tender, melt-in-your-mouth result.
  • Quick Version: Use a pressure cooker to reduce cooking time while maintaining the depth of flavor.

Tips for Making the Best Beef Bourguignon

  • Use High-Quality Wine: The quality of the wine significantly affects the flavor of the dish. Use a Burgundy or other rich red wine.
  • Slow Cooking is Key: Allow the stew to simmer for at least 2 hours to develop the rich, complex flavors.
  • Searing the Beef: Properly browning the beef is essential for adding depth to the stew.

For a delightful dessert to follow this rich stew, try Kentucky Butter Cake: A Slice of Southern Comfort.


Nutritional Information

Per serving:

  • Calories: 450-500
  • Protein: 35g
  • Fat: 25g
  • Carbohydrates: 15g

Storage and Reheating Tips

  • Refrigeration: Beef Bourguignon can be stored in the refrigerator for up to 3 days.
  • Freezing: Freeze leftovers for up to 3 months in airtight containers.
  • Reheating: Reheat slowly on the stovetop to preserve the texture of the beef and vegetables.

FAQs About Beef Bourguignon

Q: What wine is best for Beef Bourguignon?
A: Burgundy wine is traditionally used, but Pinot Noir or Merlot are also excellent choices.

Q: Can Beef Bourguignon be made in a slow cooker?
A: Yes, brown the meat first, then transfer everything to a slow cooker for 6-8 hours on low.

Q: What is the best cut of beef for Beef Bourguignon?
A: Chuck roast or brisket are ideal cuts because they become tender after slow cooking.


Internal Linking Opportunities

Creamy Bacon Pea Salad: A Flavorful Side Dish for Any Occasion

pea salad with bacon, creamy bacon pea salad, easy pea salad, bacon cheddar pea salad, frozen pea salad

Bacon Pea Salad: A Creamy, Crunchy Delight for Any Occasion

Bacon pea salad is a classic dish that brings together the savory crunch of bacon, the sweetness of peas, and the creamy richness of a mayonnaise-based dressing. Whether you’re preparing this dish for a family gathering, potluck, or as a side dish for your summer barbecue, it’s always a crowd-pleaser. In this article, we will explore how to make the perfect bacon pea salad, along with tips, variations, and some common questions about this delightful dish.


Ingredients for Bacon Pea Salad

Here’s what you’ll need for a delicious bacon pea salad:

  • Frozen peas: Thawed and drained to ensure they remain crisp and fresh.
  • Bacon: Crispy, smoky bacon adds a salty crunch that balances the sweetness of the peas.
  • Cheddar cheese: Sharp cheddar is ideal for a rich and tangy flavor, adding texture and flavor to the salad.
  • Mayonnaise: Provides the creamy base for the salad.
  • Sour cream: Adds extra richness and tang to the dressing.
  • Vinegar or lemon juice: A touch of acidity to brighten the flavors.
  • Salt and pepper: To season to taste.

For another delightful and creamy dish, try pairing this salad with The Ultimate Comfort Food: Crockpot Potato Soup with Hashbrowns.


Step-by-Step Instructions for Bacon Pea Salad

Preparation Time:

  • Prep Time: 15 minutes
  • Chill Time: 1 hour (optional for flavors to meld)

Instructions:

  1. Prepare the Peas
    Start by thawing your frozen peas. Drain well and pat dry with paper towels to remove excess moisture.
  2. Cook the Bacon
    Fry the bacon until crispy. Once cooked, remove and drain on paper towels, then crumble the bacon into small pieces.
  3. Make the Dressing
    In a mixing bowl, whisk together mayonnaise, sour cream, vinegar, salt, and pepper. Adjust seasoning to taste.
  4. Assemble the Salad
    In a large bowl, combine the peas, crumbled bacon, and cheddar cheese. Gently toss the ingredients with the dressing until everything is well-coated.
  5. Chill and Serve
    For best results, chill the salad in the refrigerator for at least 1 hour before serving. This allows the flavors to meld and intensify.

If you’re looking for more comforting recipes to pair with this salad, check out Slow Cooker Magic: Unveiling the Ease of Crock-Pot Baked Ziti, which is another crowd-pleasing dish.


Variations of Bacon Pea Salad

  • Lighter Version: Substitute Greek yogurt for mayonnaise and sour cream for a lighter, healthier dressing.
  • Sweet and Tangy: Add a tablespoon of honey or sugar to the dressing for a sweet contrast to the smoky bacon.
  • Cheese Variations: Swap out cheddar for feta, mozzarella, or Swiss cheese to create new flavor combinations.
  • Vegetarian Option: Skip the bacon and add crunchy vegetables like carrots, bell peppers, or nuts for added texture and flavor.

Tips for Making the Best Bacon Pea Salad

  • Use Fresh Peas: For a more delicate texture, fresh peas can be used instead of frozen. Blanch them briefly in boiling water before draining.
  • Choose Thick-Cut Bacon: Thick-cut bacon provides more crunch and a hearty bite, complementing the softness of the peas.
  • Make-Ahead Tip: This salad can be made up to a day ahead of time. Just hold off on adding the bacon until right before serving to keep it crispy.

Nutritional Information and Healthier Alternatives

Per serving (based on 6 servings):

  • Calories: 350
  • Fat: 25g
  • Carbohydrates: 15g
  • Protein: 10g

For a healthier version, use reduced-fat mayonnaise and swap sour cream for Greek yogurt. You can also use turkey bacon or reduced-sodium bacon to lower the fat and sodium content.


Storage and Serving Tips

  • Storing Leftovers: Bacon pea salad can be stored in the refrigerator for up to 3 days. Keep it covered in an airtight container to maintain freshness.
  • Reheating: This salad is best served cold, but if you prefer to reheat the bacon, you can fry it separately and add it back into the salad just before serving.
  • Freezing: This dish doesn’t freeze well due to the dairy in the dressing and the texture of the peas. It’s best enjoyed fresh.

For more easy and comforting meals, explore Kentucky Butter Cake: A Slice of Southern Comfort for a sweet finish to your meal.


FAQs About Bacon Pea Salad

Q: Can I make Bacon Pea Salad the day before?
A: Yes, this salad can be made ahead of time. In fact, preparing it the day before allows the flavors to meld and improves the overall taste.

Q: Can I use canned peas in Bacon Pea Salad?
A: While you can use canned peas, they tend to be softer than frozen peas, which may affect the salad’s texture. Frozen peas are preferable for their firmness and vibrant color.

Q: What can I use instead of mayonnaise?
A: If you’re not a fan of mayo, you can substitute Greek yogurt or sour cream. Both options will maintain the creamy texture while adding a slight tang.

Q: How long does Bacon Pea Salad last in the fridge?
A: It will keep for about 3 days in the fridge. Be sure to store it in an airtight container to maintain freshness.


Internal Linking Opportunities

To provide a seamless experience for readers and help them discover more recipes, you can incorporate the following internal links into the article:

How to Make Perfect Sautéed Brussels Sprouts: A Crispy and Delicious Side Dish

crispy Brussels sprouts, pan-fried Brussels sprouts, Brussels sprouts recipe, caramelized Brussels sprouts, easy vegetable side

Sautéed Brussels Sprouts: A Simple and Flavorful Side Dish

Brussels sprouts are a versatile vegetable, and sautéing them is one of the best ways to bring out their natural flavor. With just a few simple ingredients, you can turn this humble vegetable into a crispy, caramelized side dish that pairs well with almost any meal. In this article, we will explore how to make the perfect sautéed Brussels sprouts, along with variations, tips for success, and common questions about preparing this tasty dish.


Ingredients for Sautéed Brussels Sprouts

To make perfectly sautéed Brussels sprouts, you’ll need:

  • Fresh Brussels sprouts: 1 lb, trimmed and halved.
  • Olive oil or butter: 2-3 tablespoons for sautéing.
  • Salt and pepper: To taste.
  • Lemon juice or balsamic vinegar: For a tangy finish.
  • Optional add-ins: Parmesan cheese, bacon, garlic, or toasted nuts (such as almonds or pine nuts).

For a savory main course pairing, try serving your sautéed Brussels sprouts with Slow Cooker Magic: Unveiling the Ease of Crock-Pot Baked Ziti, which complements the richness of the vegetables perfectly.


Step-by-Step Instructions for Sautéed Brussels Sprouts

Preparation Time:

  • Prep Time: 10 minutes
  • Cook Time: 15-20 minutes

Instructions:

  1. Prepare the Brussels Sprouts
    Trim the ends and outer leaves of the Brussels sprouts, then cut them in half. The smaller sprouts can be left whole.
  2. Sautéing the Sprouts
    Heat the olive oil or butter in a large skillet over medium-high heat. Place the Brussels sprouts cut side down in the skillet. Cook them undisturbed for 5-7 minutes to allow the cut sides to caramelize and turn golden brown.
  3. Flip and Finish Cooking
    Once the sprouts are caramelized on the cut side, stir them around in the skillet. Add salt, pepper, and any additional seasonings like garlic or bacon. Continue cooking for another 5-7 minutes until the sprouts are tender.
  4. Add Finishing Touches
    Remove the sprouts from the heat and drizzle with lemon juice or balsamic vinegar for a bright, tangy finish. Optionally, sprinkle with Parmesan cheese or toasted nuts for added texture.

For another vegetable side that complements Brussels sprouts, check out The Ultimate Comfort Food: Crockpot Potato Soup with Hashbrowns.


Variations of Sautéed Brussels Sprouts

  • Brussels Sprouts with Bacon: Crisp up chopped bacon in the skillet before sautéing the Brussels sprouts. Cook the sprouts in the rendered bacon fat for extra flavor.
  • Herbed Brussels Sprouts: Add fresh herbs like thyme, rosemary, or parsley during the last minute of cooking for a fresh, aromatic twist.
  • Brussels Sprouts with Parmesan: After sautéing, sprinkle the sprouts with freshly grated Parmesan cheese for a savory, nutty flavor.
  • Brussels Sprouts with Toasted Nuts: Toss in toasted almonds, pine nuts, or walnuts for a crunchy contrast.

For a delicious dessert to follow this meal, try Kentucky Butter Cake: A Slice of Southern Comfort.


Tips for Perfect Sautéed Brussels Sprouts

  • Use a Heavy-Bottomed Pan: A cast-iron skillet is ideal for sautéing Brussels sprouts, as it helps achieve even caramelization.
  • Don’t Overcrowd the Pan: Give each sprout enough space to brown properly. If necessary, sauté in batches to avoid steaming the sprouts.
  • Let Them Sit: Resist the urge to stir the sprouts too much. Letting them sit undisturbed ensures a beautiful, crispy brown finish.
  • Add a Splash of Acid: Finish with a drizzle of lemon juice or balsamic vinegar to balance the richness of the sautéed sprouts.

Nutritional Information and Healthier Alternatives

Per serving (based on 4 servings):

  • Calories: 120
  • Fat: 7g
  • Carbohydrates: 12g
  • Protein: 4g

For a healthier option, consider these adjustments:

  • Oil Substitutes: Use avocado oil instead of butter for a lighter option with a higher smoke point.
  • Lower Fat: Reduce the amount of oil or butter used, or eliminate cheese and bacon for a lower-calorie dish.
  • Vegan Option: Stick to olive oil and skip cheese and bacon for a vegan-friendly version.

Serving Suggestions

Sautéed Brussels sprouts make an excellent side dish for a variety of meals. Here are some pairing ideas:

  • With Roasted Chicken or Pork: The crispy, caramelized sprouts pair well with roasted or grilled meats.
  • As Part of a Holiday Spread: These sprouts are perfect for holiday meals alongside mashed potatoes and gravy.
  • As a Topping for Grain Bowls: Add sautéed Brussels sprouts to a quinoa or brown rice bowl with other roasted vegetables for a hearty, healthy meal.

Storage, Reheating, and Freezing Tips

  • Storage: Store leftover sautéed Brussels sprouts in an airtight container in the refrigerator for up to 3 days.
  • Reheating: Reheat in a skillet over medium heat for a few minutes to restore their crispiness. Alternatively, use the oven or microwave for a quick reheat.
  • Freezing: While freezing is possible, it can change the texture of the sprouts. If freezing, thaw in the fridge and reheat in a skillet to help crisp them up again.

FAQs About Sautéed Brussels Sprouts

Q: Why Are My Brussels Sprouts Bitter?
A: Larger, older Brussels sprouts can have a more bitter flavor. Choose smaller, fresher sprouts to minimize bitterness, and be sure to caramelize them well during cooking.

Q: Can I Use Frozen Brussels Sprouts?
A: Yes, but frozen sprouts may have a different texture. Be sure to thaw them fully and pat them dry before sautéing to avoid excess moisture.

Q: Do I Need to Blanch Brussels Sprouts Before Sautéing?
A: Blanching is not necessary, but it can help soften the sprouts and reduce cooking time. If you prefer a softer texture, blanch for 3-4 minutes before sautéing.

Q: How Do You Make Brussels Sprouts Crispy?
A: To achieve crispy Brussels sprouts, cook them over medium-high heat in a single layer, and let them sit undisturbed for several minutes before flipping.


Internal Linking Opportunities

To help readers explore more great recipes, consider adding these internal links: