Tapioca Pudding: Classic Creamy Dessert for All Occasions

classic tapioca pudding, easy tapioca pudding recipe, homemade tapioca pudding, creamy tapioca dessert, dairy-free tapioca pudding

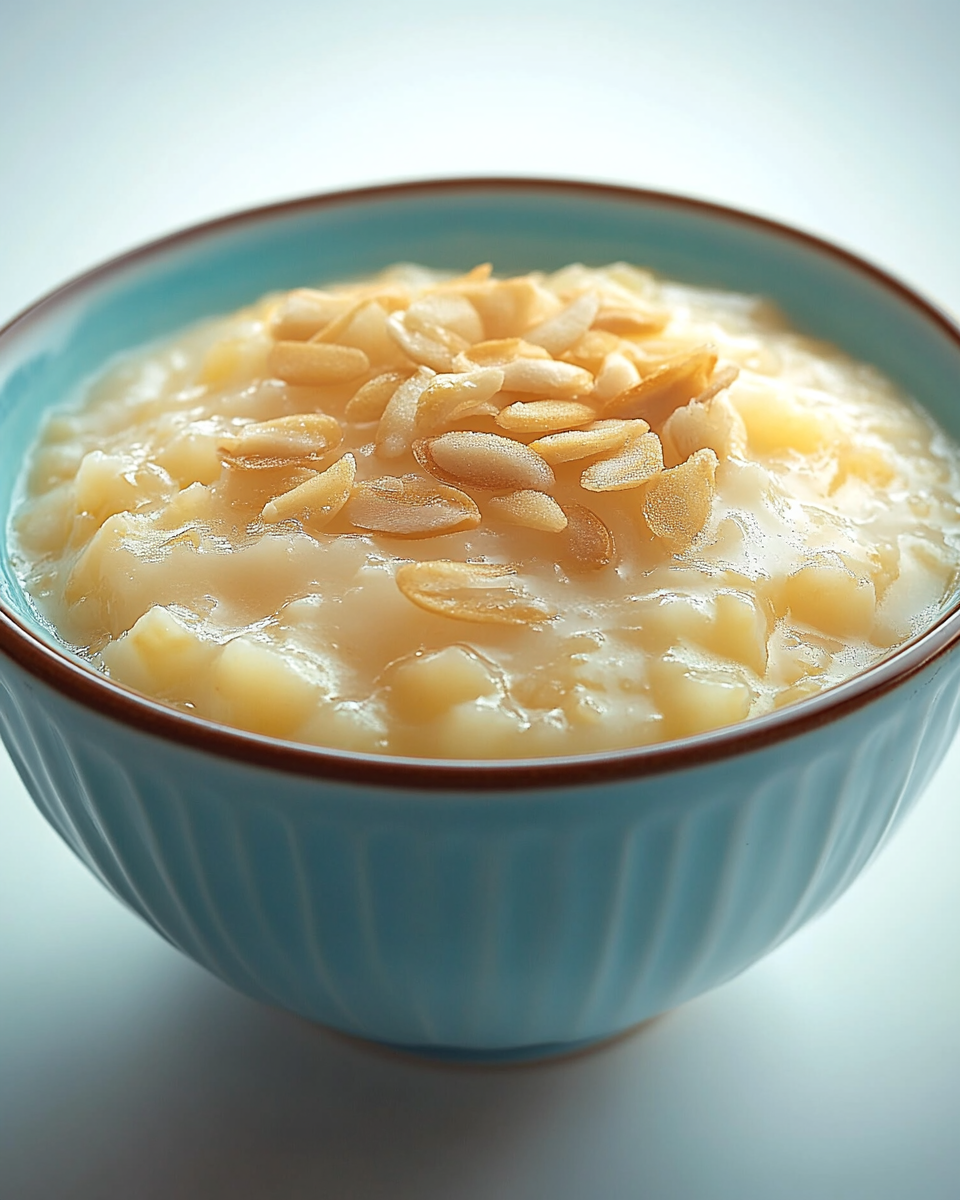
Tapioca Pudding: A Classic Creamy Dessert

Tapioca pudding is a classic, creamy dessert made with tapioca pearls, milk, sugar, and often eggs. Its distinctive chewy texture and subtle sweetness have made it a favorite treat for generations. Whether you’re looking for a traditional recipe or want to explore fun variations, this article will guide you through everything you need to know about making tapioca pudding at home.

For another comforting dessert, check out our Banana Pudding, a sweet, Southern staple that pairs well with tapioca pudding for a nostalgic dessert spread.


What Is Tapioca?

Tapioca comes from the starch of the cassava root, a plant native to South America. It’s used in various forms worldwide, from tapioca flour to pearls, and is known for its thickening properties in puddings and pie fillings.

Tapioca Pearls and Their Role in Pudding

The pearls are made from tapioca starch and are typically small, white balls that turn translucent when cooked. These pearls give tapioca pudding its unique chewy texture, which sets it apart from other custard-based desserts like Peach Cobbler.

Benefits of tapioca:

  • Gluten-free: Tapioca is naturally gluten-free, making it a great dessert option for those with dietary restrictions.
  • Simple ingredients: You only need a few pantry staples to make tapioca pudding—pearls, milk, sugar, and eggs.

Key Ingredients for Tapioca Pudding

Here’s what you’ll need to make the classic tapioca pudding recipe:

  • Tapioca Pearls: Small, large, or quick-cooking pearls can be used depending on your preference.
  • Milk: Whole milk is typically used, but you can substitute with coconut or almond milk for a dairy-free version.
  • Sugar: The primary sweetener in the pudding.
  • Eggs: Used to thicken the pudding and add richness.
  • Vanilla Extract: Enhances the flavor of the pudding.

For a delicious twist on pudding, try adding fresh fruit like in this Apple Cranberry Walnut Salad, which adds a tart contrast to the creamy pudding.


Step-by-Step Guide to Making Tapioca Pudding

1. Preparing the Tapioca Pearls

Before starting, soak the tapioca pearls in water for 30 minutes. This step helps soften the pearls and reduces the overall cooking time. If you’re using instant tapioca, you can skip the soaking process.

2. Cooking the Pudding

Follow these simple steps to make the perfect tapioca pudding:

  • Step 1: In a medium saucepan, combine milk, soaked tapioca pearls, and sugar. Heat the mixture over medium heat, stirring constantly to prevent the milk from scorching.
  • Step 2: Once the mixture reaches a simmer, reduce the heat to low and cook until the pearls become translucent and the mixture thickens.
  • Step 3: Whisk in the eggs and vanilla extract, cooking for another 5 minutes to ensure the eggs are fully incorporated.
  • Step 4: Remove from heat and let the pudding cool to room temperature before serving.

3. Slow Cooker Tapioca Pudding

For a hands-off method, you can use a slow cooker to make tapioca pudding:

  • Step 1: Add tapioca pearls, milk, sugar, and vanilla to the slow cooker.
  • Step 2: Cook on low for 2-3 hours, stirring occasionally.
  • Step 3: Stir in beaten eggs during the last 30 minutes of cooking to thicken the pudding.
  • Step 4: Let it cool and serve with fresh fruit or a dollop of whipped cream.

Variations of Tapioca Pudding

Coconut Tapioca Pudding

If you’re a fan of coconut, substitute half or all of the milk with coconut milk. This gives the pudding a tropical flavor and a creamy texture. Coconut tapioca pudding is especially delicious when topped with toasted coconut flakes.

Chocolate Tapioca Pudding

For a decadent twist, add cocoa powder or melted chocolate to the pudding. Chocolate tapioca pudding is rich and indulgent, perfect for chocolate lovers.

Fruit-Infused Tapioca Pudding

Incorporating fruit into your tapioca pudding adds freshness and a burst of flavor. Try stirring in mango, berries, or peaches during the last few minutes of cooking for a fruity variation.

Looking for more comforting, rich desserts? Try our recipe for Raspberry Lemon Bars as a sweet treat to follow your tapioca pudding.


Best Ways to Serve Tapioca Pudding

Tapioca pudding is versatile and can be enjoyed warm or chilled. Here are a few ways to serve it:

  • Warm: Serve the pudding warm with a drizzle of caramel or chocolate sauce for a cozy dessert.
  • Chilled: For a refreshing summer treat, chill the pudding in the refrigerator and top with fresh berries or tropical fruit.
  • Layered: Create a layered parfait with tapioca pudding, whipped cream, and fruit for a visually appealing dessert.

For a more filling meal option, pair tapioca pudding with a hearty dish like Ham and Potato Casserole for a balanced dinner followed by dessert.


Nutritional Information and Healthier Alternatives

Nutritional Breakdown

Tapioca pudding is relatively low in fat and calories but does contain sugar and carbohydrates from the tapioca pearls. Here’s a basic nutritional breakdown for a typical serving:

  • Calories: 200-250 per serving (1 cup)
  • Carbohydrates: 35-40g
  • Protein: 6-8g
  • Fat: 6-8g

Healthier Substitutes

To make tapioca pudding healthier, you can modify the ingredients:

  • Dairy-Free: Substitute regular milk with almond or coconut milk to make a dairy-free version.
  • Lower Sugar: Replace refined sugar with natural sweeteners like honey or maple syrup to reduce sugar content.
  • Vegan: Omit the eggs and use cornstarch as a thickener for a vegan-friendly version.

FAQs About Tapioca Pudding

1. Can I use quick-cooking tapioca instead of pearls?

Yes, quick-cooking tapioca is a convenient substitute, but it results in a smoother, less chewy pudding compared to using tapioca pearls.

2. How long does tapioca pudding last in the fridge?

Tapioca pudding can be stored in the refrigerator in an airtight container for up to 5 days. Stir before serving to restore its creamy texture.

3. Can I freeze tapioca pudding?

While you can freeze tapioca pudding, it may change in texture when thawed. For best results, enjoy it fresh or after refrigerating.

4. Why did my tapioca pudding curdle?

Curdling can happen if the pudding is cooked at too high a temperature. To prevent this, cook the pudding over low heat and stir constantly.


Conclusion: A Classic Dessert for All Occasions

Tapioca pudding is a timeless dessert that’s easy to make and endlessly customizable. Whether you prefer it warm or chilled, with coconut or chocolate, this pudding offers a versatile base for experimentation. Give this simple recipe a try and discover why it has been a beloved treat for generations.

For another comforting dessert, check out our No-Bake Pumpkin Cheesecake, a fall favorite that pairs beautifully with the creamy texture of tapioca pudding.

Dijon Chicken Breasts: Tangy and Flavorful Dinner Recipe

creamy Dijon chicken, mustard chicken, baked Dijon chicken, grilled Dijon chicken, honey Dijon chicken

Dijon Chicken Breasts: A Tangy and Delicious Meal

Dijon chicken breasts are a classic and versatile dish that pairs the tangy flavor of Dijon mustard with the tender juiciness of chicken. Whether you’re looking for a quick weeknight dinner or an elegant main course to impress guests, Dijon chicken is a go-to recipe that’s easy to prepare and packed with flavor.

For a cozy, comforting meal to complement your Dijon chicken, consider pairing it with Crockpot Potato Soup with Hashbrowns, which adds warmth and heartiness to any dinner.


Why Dijon Mustard Is Perfect for Chicken

Dijon mustard is a key ingredient that elevates chicken breasts from simple to savory and delicious. Its sharp, tangy flavor blends perfectly with the mildness of chicken, creating a balanced dish that is rich, flavorful, and satisfying. Dijon mustard’s natural acidity helps tenderize the chicken, ensuring a juicy texture, while its spicy undertones give the dish a subtle heat.

  • Bold flavor: Dijon mustard is known for its robust, slightly spicy taste that adds depth to chicken dishes.
  • Versatility: It works well in marinades, glazes, and sauces, making it a highly flexible ingredient.
  • Health benefits: Dijon mustard is low in calories and free from sugar, making it a healthier condiment option.

Looking for another dish to impress your guests? Try the Slow Cooker Baked Ziti for a hands-off meal that’s just as delightful.


Ingredients You Need

The beauty of Dijon chicken breasts lies in its simplicity. Most of the ingredients are pantry staples, and together they create a rich, flavorful dish:

  • Boneless, skinless chicken breasts: The star of the show, chicken breasts are lean, easy to cook, and work perfectly with Dijon mustard.
  • Dijon mustard: The key flavoring ingredient that adds tangy, slightly spicy notes.
  • Garlic: Adds depth to the dish, balancing out the mustard’s sharpness.
  • Chicken broth: Provides moisture and richness to the sauce.
  • Cream or Greek yogurt: To create a creamy, luscious sauce.
  • Fresh herbs: Thyme, parsley, or rosemary to garnish.
  • Olive oil: Used for cooking and flavoring the chicken.
  • Seasonings: Salt, pepper, and optional additions like paprika or cayenne for extra flavor.

Step-by-Step Guide to Making Dijon Chicken Breasts

1. Preparing the Chicken Breasts

To achieve perfectly cooked Dijon chicken breasts, start by seasoning the chicken. Season both sides of the breasts with salt, pepper, and a hint of paprika for extra depth. If you prefer a more robust flavor, you can marinate the chicken in a mixture of Dijon mustard, olive oil, and garlic for about 30 minutes before cooking.

  • Tip: Marinating the chicken helps infuse it with extra flavor, ensuring every bite is packed with taste.

2. Cooking the Chicken

There are several methods to cook Dijon chicken breasts, depending on your preference and time:

Skillet-Cooked Dijon Chicken (300-350 words)

  • Step 1: Heat olive oil in a skillet over medium-high heat. Sear the chicken breasts for about 4-5 minutes on each side until they’re golden brown.
  • Step 2: Remove the chicken from the skillet and set aside.
  • Step 3: In the same skillet, add garlic and sauté until fragrant. Stir in Dijon mustard and chicken broth, whisking to combine.
  • Step 4: Lower the heat and add cream or Greek yogurt to the sauce. Let it simmer for 2-3 minutes until the sauce thickens slightly.
  • Step 5: Return the chicken breasts to the skillet, spooning the sauce over the top. Cover and simmer for another 5-7 minutes until the chicken reaches an internal temperature of 165°F (74°C).

Baked Dijon Chicken (200-250 words)

  • Step 1: Preheat the oven to 375°F (190°C).
  • Step 2: Coat the chicken in a mixture of Dijon mustard, olive oil, and garlic.
  • Step 3: Place the chicken breasts in a baking dish, then pour chicken broth into the dish to keep the chicken moist.
  • Step 4: Bake for 20-25 minutes or until the internal temperature reaches 165°F.
  • Step 5: Optional toppings: Add Parmesan cheese or a drizzle of honey for added richness and flavor.

3. Grilling Dijon Chicken

Grilling is another excellent method that gives the chicken a smoky, charred flavor, perfect for summer barbecues or outdoor gatherings.

  • Step 1: Marinate the chicken breasts in a mixture of Dijon mustard, olive oil, and garlic for 30 minutes.
  • Step 2: Preheat the grill and cook the chicken over medium heat for 6-7 minutes per side, or until the internal temperature reaches 165°F.
  • Step 3: Serve with grilled vegetables or a fresh salad for a light, healthy meal.

Variations of Dijon Chicken Breasts

There are endless ways to customize your Dijon chicken breasts. Here are a few popular variations:

  • Honey Dijon Chicken: Add honey to the mustard mixture for a sweet and tangy glaze that caramelizes beautifully during cooking.
  • Creamy Dijon Chicken with Spinach: Sauté fresh spinach in the sauce for added color, flavor, and nutrition.
  • Maple Dijon Chicken: Swap honey for maple syrup to create a complex sweet-savory flavor.
  • Lemon Dijon Chicken: Brighten up the dish with lemon juice and zest in the mustard sauce.
  • Dijon Chicken with Capers: Add capers for a briny, salty contrast to the tangy mustard.

For more recipe ideas, check out this Dorito Chicken Casserole for a crunchy and savory dinner option.


Best Sides for Dijon Chicken Breasts

Pairing your Dijon chicken breasts with the right sides can enhance the overall dining experience. Here are some ideal side dishes:

  • Mashed potatoes: Creamy mashed potatoes pair well with the tangy mustard sauce.
  • Steamed vegetables: Broccoli, asparagus, or green beans are great choices to balance the richness of the chicken.
  • Rice or quinoa: A simple grain helps absorb the flavorful sauce.
  • Crusty bread: Perfect for soaking up the remaining Dijon sauce on your plate.

Nutritional Information

Here’s an approximate breakdown for a serving of Dijon chicken breasts:

  • Calories: 280-320 per serving
  • Fat: 10-14g
  • Carbohydrates: 5-8g
  • Protein: 25-30g

To make this dish healthier, you can swap out heavy cream for Greek yogurt or use skinless chicken thighs for a leaner protein option.


FAQs About Dijon Chicken Breasts

Can I use another type of mustard?

Yes, you can use whole-grain mustard or even spicy brown mustard, but the flavor profile will be slightly different. Dijon mustard is preferred for its balance of tang and mild spice.

How do I keep my chicken from drying out?

Overcooking is the main culprit when it comes to dry chicken. To avoid this, use a meat thermometer to check that the internal temperature reaches 165°F, but no higher. You can also baste the chicken with sauce during cooking to keep it moist.

Can I make Dijon chicken ahead of time?

Yes, you can make Dijon chicken in advance. Store the cooked chicken in an airtight container in the refrigerator for up to 3 days. Reheat gently on the stovetop, adding a bit of chicken broth or cream to refresh the sauce.

Can I freeze Dijon chicken breasts?

Yes, Dijon chicken breasts freeze well. Store them in a freezer-safe container for up to 3 months. When ready to eat, thaw in the refrigerator overnight and reheat on the stovetop or in the oven.


Conclusion

Dijon chicken breasts are a simple yet flavorful dish that’s perfect for any occasion. Whether you’re grilling, baking, or cooking them in a skillet, Dijon mustard enhances the natural flavor of chicken while adding a tangy, creamy richness. With endless variations and pairing options, this dish is sure to become a household favorite.

For more dinner inspiration, check out the Slow Cooker Chicken and Gravy Over Noodles for a comforting, easy-to-make meal.

Crispy Fried Onions: A Delicious Homemade Topping for Every Dish

homemade fried onions, crunchy onions, onion topping, fried onion rings, crispy onion strings

Crispy Fried Onions: Elevate Your Dishes with Crunch and Flavor

Crispy fried onions are the perfect topping to elevate various dishes, adding a delightful crunch and a burst of flavor. Whether you’re making a casserole, topping burgers, or adding texture to salads, these golden-brown onions will take your meal to the next level. The best part? You can easily make them at home with just a few simple ingredients.

For more comfort food ideas, check out this recipe for Crockpot Potato Soup with Hashbrowns, a dish that pairs perfectly with crispy fried onions as a garnish.


Why Make Crispy Fried Onions at Home?

While store-bought fried onions are convenient, making your own at home offers several advantages:

  • Freshness: Homemade crispy fried onions are far fresher than anything you can buy in a can. The texture and flavor are superior when made fresh.
  • Customization: You can control the seasoning and texture to suit your preferences. Want a little extra spice? Add some paprika or cayenne.
  • No preservatives: When you make fried onions at home, you avoid artificial preservatives and additives commonly found in pre-packaged versions.

If you’re looking for more inspiration, consider trying the Slow Cooker Baked Ziti, which could also benefit from a sprinkling of crispy onions for added crunch.


Ingredients for Crispy Fried Onions

To make perfect crispy fried onions at home, you’ll need just a few simple ingredients:

  • Onions: Yellow or sweet onions work best for their flavor and texture.
  • All-purpose flour: Helps create a light and crispy coating.
  • Buttermilk (optional): Soaking the onions in buttermilk helps to tenderize and add flavor.
  • Oil for frying: Use a neutral oil with a high smoke point, such as vegetable oil or canola oil.
  • Seasonings: Basic salt and pepper work well, but you can get creative by adding paprika, garlic powder, or cayenne for a spicy kick.

Step-by-Step Guide to Making Crispy Fried Onions

1. Prepare the Onions

Start by slicing your onions thinly. You can use a sharp knife or a mandoline to ensure even slices. The thinner the slices, the crispier the onions will become.

  • Slice the onions: Aim for thin, even slices to ensure they cook evenly.
  • Optional soak in buttermilk: For an extra tender and flavorful result, soak the onion slices in buttermilk for about 15-30 minutes before frying.

2. Coat the Onions

Once your onions are ready, toss them in flour mixed with your chosen seasonings. This will give them a crispy exterior when fried.

  • Season the flour: Mix salt, pepper, and any other seasonings (like paprika or cayenne) into the flour.
  • Coat the onions: Dredge the soaked onion slices in the seasoned flour until they are fully coated.

3. Fry the Onions

Heat your oil to 350°F (175°C) in a deep pan or skillet. Fry the onions in batches, making sure not to overcrowd the pan.

  • Fry in batches: Place the coated onion slices into the hot oil and fry until golden brown. This typically takes about 3-4 minutes per batch.
  • Drain on paper towels: Remove the onions from the oil using a slotted spoon and drain them on paper towels to absorb any excess oil.

4. Baking Crispy Onions for a Healthier Option

For a healthier alternative, you can bake the onions instead of frying them. Here’s how to achieve that perfect crispness without deep frying:

  • Preheat your oven: Set your oven to 425°F (220°C).
  • Toss the onions in oil: Lightly coat the onion slices with oil and seasonings.
  • Bake: Spread the onions evenly on a baking sheet lined with parchment paper and bake for 15-20 minutes, stirring halfway through for even crisping.

Uses for Crispy Fried Onions

There are endless ways to incorporate crispy fried onions into your meals:

  • Green bean casserole: A classic use for crispy onions, adding a crunchy topping to a creamy casserole.
  • Burger topping: Give your burger an upgrade with crispy fried onions for extra texture and flavor.
  • Salads: Add a sprinkle of crispy onions to salads for a crunch that pairs well with fresh greens.

For a unique twist, try pairing your crispy onions with No-Peek Beef Tips for added texture in a rich, savory dish.


Storing and Reusing Fried Onions

Storage tips: Store your crispy fried onions in an airtight container at room temperature. They will stay fresh for up to a week.

Re-crisping: If your onions lose their crispiness, reheat them in a 350°F (175°C) oven for about 5 minutes.


Nutritional Information for Crispy Fried Onions

Homemade crispy fried onions are a delicious addition to many dishes, but they can also add extra calories and fat to your meal. Here’s a rough breakdown of the nutritional content for a typical serving:

  • Calories: 150-180 per serving (1/4 cup)
  • Fat: 10-12g
  • Carbohydrates: 14-16g
  • Protein: 2g

For those looking for healthier alternatives, consider baking or air frying your onions to reduce the fat content while still enjoying that satisfying crunch.


Healthier Substitutes for Fried Onions

1. Baked Crispy Onions

Baking instead of frying reduces the fat content significantly, making it a healthier alternative.

2. Air-Fried Onions

Using an air fryer, you can achieve similar crispiness with just a fraction of the oil. Toss the onions in a light coating of oil and air fry at 375°F (190°C) for 10-15 minutes.


FAQs About Crispy Fried Onions

1. Can I use a different type of onion?

Yes, although yellow and sweet onions are preferred for their flavor and texture, red onions or white onions can be used for different flavor profiles.

2. How do I prevent my onions from getting soggy?

To keep your onions crispy, ensure the oil is hot enough before frying (about 350°F). After frying, drain the onions on paper towels immediately to remove excess oil.

3. Can I make gluten-free fried onions?

Absolutely! Substitute the all-purpose flour with a gluten-free flour blend or cornstarch for a gluten-free option.

4. How do I store leftover crispy fried onions?

Store them in an airtight container at room temperature for up to a week. You can reheat them in the oven to restore crispiness if needed.


Final Thoughts

Crispy fried onions are a versatile and delicious addition to many dishes, whether used as a topping, a crunchy layer in casseroles, or a flavorful garnish. Making them at home is easy, cost-effective, and allows you to control the ingredients. Whether you choose to fry them or bake them for a healthier option, you’ll love the added crunch and flavor they bring to your meals.

For more culinary inspiration, check out this Dorito Chicken Casserole—a perfect dish to pair with a topping of crispy fried onions.

Orange Cream Cheese Bread: A Sweet and Tangy Citrus Delight

citrus cream cheese bread, orange bread, orange loaf, orange cream cheese loaf, orange glazed bread, orange bread recipe

Orange Cream Cheese Bread: A Sweet and Tangy Delight

Orange cream cheese bread combines the vibrant flavor of citrus with the creamy richness of cream cheese, making it a perfect treat for breakfast, afternoon tea, or dessert. This moist, slightly tangy loaf is incredibly versatile, easy to make, and guaranteed to impress your family and friends.

For those who enjoy comforting baked goods, check out this Kentucky Butter Cake, another rich and buttery favorite perfect for any occasion.


Why You Should Try Orange Cream Cheese Bread

The combination of tangy orange zest and sweet, creamy cheese creates a loaf that’s both refreshing and indulgent. The soft texture, balanced with the subtle tartness of the cream cheese, makes this bread stand out as a crowd-pleaser for all ages. Whether you’re looking for a quick breakfast option or a sweet snack, this bread fits the bill.

Orange cream cheese bread is also:

  • Easy to make: Simple ingredients and minimal prep make this a breeze for bakers of any skill level.
  • Versatile: Enjoy it plain, with a light glaze, or with added nuts or chocolate chips for a twist.
  • Perfect for sharing: It’s a great dish to bring to brunch, a potluck, or as a gift to friends and neighbors.

If you’re looking for more citrus-flavored treats, don’t miss the recipe for Orange Creamsicle Moonshine—a delightful drink that pairs wonderfully with this bread.


Ingredients for Orange Cream Cheese Bread

Here are the key ingredients needed to make a classic orange cream cheese bread:

  • Cream Cheese: Adds creaminess and richness.
  • Orange Zest and Juice: The zest gives an intense citrus flavor, while the juice adds moisture.
  • All-Purpose Flour: Forms the base of the bread.
  • Butter: Adds moisture and flavor to the bread.
  • Sugar: Sweetens the loaf, balancing the tang of the orange and cream cheese.
  • Eggs: Helps bind the ingredients and adds richness.
  • Vanilla Extract: Enhances the overall flavor.
  • Baking Powder and Baking Soda: Ensures the bread rises properly.
  • Optional: Glaze made from powdered sugar and orange juice, or nuts for added texture.

Step-by-Step Instructions for Making Orange Cream Cheese Bread

1. Prepare the Ingredients

Step 1: Prepare the oranges

  • Zest 2 medium oranges, making sure to avoid the bitter white pith.
  • Juice the oranges, ensuring you have about 1/4 cup of fresh orange juice.

Step 2: Soften the cream cheese and butter
Allow the cream cheese and butter to come to room temperature for easier mixing.


2. Make the Batter

Step 3: Cream the butter, cream cheese, and sugar
In a large mixing bowl, use an electric mixer to cream together the butter, cream cheese, and sugar until the mixture becomes light and fluffy. This process usually takes about 3-4 minutes. The air incorporated during this step will help the bread rise and achieve a tender crumb.

Step 4: Add wet ingredients
Beat in the eggs one at a time, followed by the orange zest, juice, and vanilla extract. Continue mixing until everything is well incorporated.

Step 5: Combine the dry ingredients
In a separate bowl, whisk together the flour, baking powder, and baking soda. Slowly add the dry ingredients to the wet mixture, mixing just until combined. Be careful not to overmix, as this can result in a denser loaf.


3. Bake the Bread

Step 6: Prepare the loaf pan
Grease a 9×5-inch loaf pan with butter or non-stick spray. Pour the batter into the prepared pan and smooth the top with a spatula.

Step 7: Bake the bread
Preheat your oven to 350°F (175°C). Bake the bread for 50-60 minutes or until a toothpick inserted into the center comes out clean. If the top of the bread starts to brown too quickly, cover it loosely with aluminum foil during the last 15 minutes of baking.

Step 8: Cool the bread
Let the bread cool in the pan for about 10 minutes before transferring it to a wire rack to cool completely.


Glazing the Orange Cream Cheese Bread

Optional: Make the orange glaze
While the bread cools, prepare the glaze by mixing powdered sugar and fresh orange juice until smooth. Drizzle the glaze over the cooled bread for an added layer of sweetness and citrus flavor.

If you prefer a variation without glaze, try serving the bread with butter or a simple dusting of powdered sugar for a more subtle sweetness.


Popular Variations of Orange Cream Cheese Bread

Here are some fun ways to customize your orange cream cheese bread:

1. Cranberry Orange Cream Cheese Bread

Add 1 cup of dried or fresh cranberries to the batter before baking. The tartness of the cranberries pairs perfectly with the sweet orange flavor.

2. Chocolate Chip Orange Cream Cheese Bread

Mix in 3/4 cup of chocolate chips to the batter for a decadent twist. The combination of chocolate and orange is irresistible.

3. Gluten-Free Orange Cream Cheese Bread

Substitute the all-purpose flour with a 1-to-1 gluten-free baking flour to make the bread suitable for those with gluten sensitivities.

4. Vegan Orange Cream Cheese Bread

To make this bread vegan-friendly, substitute the butter and cream cheese with plant-based alternatives and use flax eggs (1 tablespoon of flaxseed meal mixed with 3 tablespoons of water equals 1 egg).

For a fun vegan dessert option, try this Vegan Pineapple Coconut Cake, which features tropical flavors in a rich, plant-based cake.


Nutritional Information

Here’s an approximate nutritional breakdown for one slice of orange cream cheese bread (based on 12 servings per loaf):

  • Calories: 250-280
  • Fat: 12-14g
  • Carbohydrates: 34-36g
  • Protein: 4-6g

For those looking to enjoy this bread with a bit more health-consciousness, consider the following substitutions:

Healthier Substitutes

  • Reduce Sugar: Cut the sugar by 25% or replace with a natural sweetener like honey or maple syrup.
  • Swap Flour: Use whole wheat flour for added fiber, or blend with all-purpose flour for a balance.
  • Greek Yogurt: Substitute half of the cream cheese with Greek yogurt to lower the fat content and add a slight tang.

FAQs About Orange Cream Cheese Bread

1. Can I freeze orange cream cheese bread?

Yes, orange cream cheese bread freezes beautifully. Wrap the cooled loaf tightly in plastic wrap and aluminum foil, and store it in the freezer for up to 3 months. To serve, thaw at room temperature.

2. How do I store orange cream cheese bread?

Store the bread in an airtight container at room temperature for up to 3 days. For longer storage, refrigerate it for up to a week.

3. Can I use bottled orange juice instead of fresh?

While fresh orange juice provides the best flavor, bottled juice can be used in a pinch. Just make sure it’s 100% juice with no added sugars.

4. What can I add to the bread for extra flavor?

You can add a variety of mix-ins such as chopped nuts, dried fruit, or even a swirl of cinnamon for a unique twist on the traditional recipe.


Conclusion

Orange cream cheese bread is a delightful recipe that’s easy to make and guaranteed to impress. Whether you serve it for breakfast, brunch, or dessert, its bright citrus flavor and creamy texture make it an instant hit. Try experimenting with the variations listed above or enjoy the classic version as is. Either way, you’re in for a treat!

For more baking inspiration, don’t miss our recipe for Dorito Chicken Casserole—a savory, cheesy dish that’s perfect for dinner after enjoying a slice of this sweet bread.

Cheeseburger Pie: A Hearty, Easy-to-Make Family Dinner

easy cheeseburger pie, classic cheeseburger pie, ground beef pie, cheeseburger pie recipe, family cheeseburger pie

Cheeseburger Pie: A Hearty, Comforting Classic for Family Dinners

When it comes to quick and hearty meals, nothing beats the simplicity and satisfaction of cheeseburger pie. Combining the flavors of a classic cheeseburger with the convenience of a savory pie, this dish is perfect for weeknight dinners or family gatherings. Packed with ground beef, melted cheese, and a buttery crust, cheeseburger pie is sure to be a crowd-pleaser.

For more comforting casserole dishes, check out this Crockpot Potato Soup that pairs perfectly with savory pies like this one.


Why Cheeseburger Pie is a Must-Try Recipe

This dish is not only simple to make but also versatile, allowing you to customize the ingredients to suit your tastes. Whether you’re looking for a gluten-free option, a low-carb version, or a vegetarian twist, cheeseburger pie can be adapted easily.

  • Quick to prepare: Most of the ingredients are pantry staples, making this dish a go-to when you need something fast and delicious.
  • Family-friendly: Kids and adults alike will love the cheesy, beefy flavors that mimic a classic cheeseburger.
  • Customizable: From swapping ground beef with turkey to adding a variety of toppings, the possibilities are endless.

For another quick and easy dinner idea, try this Slow Cooker Baked Ziti—another family favorite that’s just as filling and comforting.


Ingredients for Cheeseburger Pie

Here’s a list of the key ingredients you’ll need to make a classic cheeseburger pie:

  • Ground Beef: The base of the dish, providing that essential burger flavor.
  • Onion: Adds sweetness and depth to the beef mixture.
  • Cheddar Cheese: For a rich, gooey cheese layer that mimics a cheeseburger’s melted cheese.
  • Bisquick Mix or Pie Crust: For the base, or you can make this dish crustless for a low-carb option.
  • Eggs: Helps bind everything together and adds richness to the pie.
  • Milk: Adds moisture and lightness to the batter.
  • Tomato Ketchup or Paste: Provides a slightly sweet and tangy flavor, reminiscent of a classic cheeseburger.

Step-by-Step Guide to Making Cheeseburger Pie

1. Prepare the Ground Beef Filling

Start by browning the ground beef in a large skillet over medium heat. As the beef cooks, add chopped onions and a pinch of salt. Cook until the onions become soft and translucent, and the beef is fully browned. If you prefer a spicier kick, you can add some diced jalapenos or chili powder to the mix.

Steps:

  • Brown the Beef: Heat a skillet and cook the beef, stirring occasionally to break it up.
  • Add Seasoning: Mix in salt, pepper, and any other seasonings like Worcestershire sauce for extra flavor.
  • Drain the Fat: Once the beef is fully cooked, drain off the excess fat to prevent the pie from becoming greasy.

For a variation of this dish, check out this Taco Pasta Recipe which combines similar ingredients but in a Mexican-inspired pasta dish.


2. Prepare the Pie Crust (or Go Crustless)

You have two options for the crust: using a pre-made pie crust, or creating your own batter using Bisquick. If you’re looking for a low-carb alternative, you can make a crustless version by omitting the crust entirely.

Steps for Pie Crust:

  • Pre-Bake the Crust: If you’re using a pie crust, pre-bake it for about 10 minutes to ensure it stays crispy after you add the filling.
  • Prepare the Bisquick Batter: In a medium bowl, whisk together Bisquick, eggs, and milk. This will form a light batter that bakes into a golden crust as the pie cooks.

3. Assemble and Bake the Cheeseburger Pie

Assembling the Pie:

  • Spread the cooked beef mixture into the pie crust or directly into the greased pie dish if you’re going crustless.
  • Pour the Bisquick mixture over the beef, ensuring it’s evenly distributed.
  • Sprinkle a generous amount of shredded cheddar cheese on top for that delicious melted finish.

Baking:

  • Bake the pie in a preheated oven at 375°F for about 25-30 minutes, or until the top is golden brown and the filling is set.

Let the pie cool for about 10 minutes before slicing to allow the layers to set.


Popular Variations of Cheeseburger Pie

Cheeseburger pie is highly adaptable. Here are some of the most popular variations:

1. Bacon Cheeseburger Pie

Add crumbled, cooked bacon to the beef mixture for extra flavor and texture. You can also sprinkle bacon on top for a crispy finish.

2. Low-Carb Cheeseburger Pie

For those following a keto or low-carb diet, skip the crust and pour the filling directly into the dish. This creates a casserole-like pie with fewer carbs.

3. Vegetarian Cheeseburger Pie

Swap the ground beef with a plant-based alternative like Beyond Meat or Impossible Burger. The result is a hearty, meatless pie that’s just as satisfying.

For another crowd-pleasing variation, check out this Dorito Chicken Casserole, which features crunchy Doritos and cheesy chicken in a casserole form.


Serving Suggestions for Cheeseburger Pie

To complete your meal, serve cheeseburger pie with these classic sides:

  • Fries or Sweet Potato Fries: For the full “burger” experience, pair the pie with crispy fries.
  • Simple Salad: Balance the richness of the pie with a light salad of mixed greens and a tangy vinaigrette.
  • Steamed Vegetables: For a healthier option, pair with steamed broccoli, green beans, or carrots.

Nutritional Breakdown and Healthier Alternatives

Each slice of cheeseburger pie provides a hearty amount of protein and fat, making it a satisfying meal. Here’s a general estimate per serving:

  • Calories: 450
  • Fat: 25g
  • Carbohydrates: 30g
  • Protein: 25g

For a lighter option, consider these substitutions:

  • Ground Turkey: Replace ground beef with ground turkey to lower fat and calorie content.
  • Cauliflower Crust: Use a cauliflower crust instead of traditional pie crust for a low-carb alternative.
  • Reduced Cheese: Use less cheese or swap for a lighter, lower-fat version.

Frequently Asked Questions (FAQs)

1. Can I Use Ground Turkey Instead of Beef?

Yes, ground turkey is a leaner alternative and can be substituted in a 1:1 ratio. It has a lighter flavor but still works well with the cheese and seasonings.

2. Can I Make Cheeseburger Pie Ahead of Time?

Absolutely. You can prepare the pie, cover it tightly, and store it in the fridge for up to two days before baking.

3. How Do I Reheat Leftover Cheeseburger Pie?

To reheat, place a slice of the pie in a preheated oven at 350°F for about 10 minutes, or until heated through.

4. Can I Freeze Cheeseburger Pie?

Yes, you can freeze cheeseburger pie. Wrap it tightly in plastic wrap and aluminum foil before freezing. To reheat, thaw it in the refrigerator overnight and bake as instructed.


Conclusion

Cheeseburger pie is a delicious, family-friendly dish that’s easy to make and full of comforting flavors. Whether you’re preparing it for a weeknight dinner or making it ahead for a busy day, this recipe is versatile enough to fit into any meal plan. Try out the variations mentioned above or experiment with your own toppings to create a cheeseburger pie that your family will love.

For more family-style dinner ideas, don’t miss this Ham and Potato Casserole recipe—a hearty, cheesy meal that pairs perfectly with any main dish.