Easy Chicken Fajitas: A Flavorful Weeknight Delight
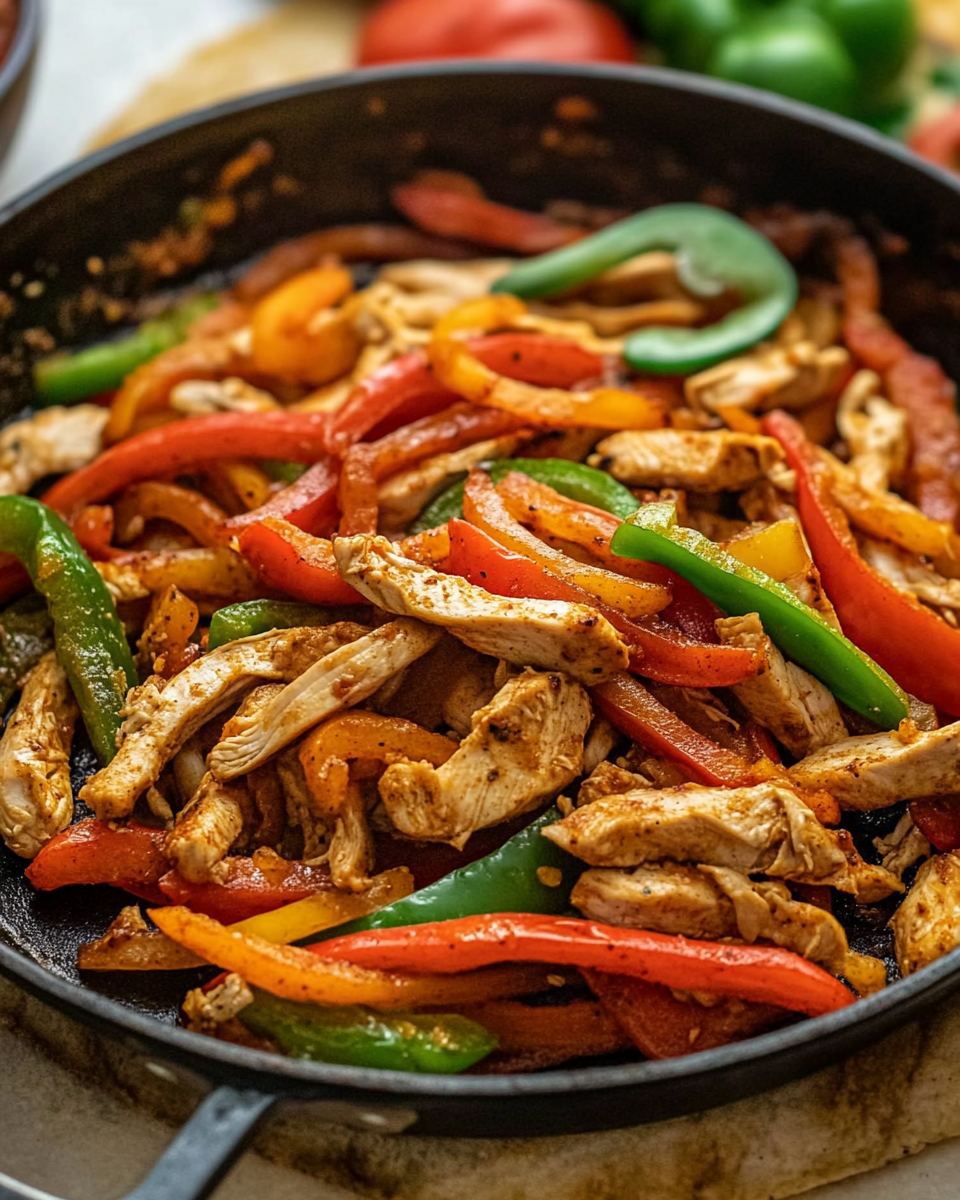
When it comes to quick and delicious meals, easy chicken fajitas top the list. They are a perfect combination of marinated chicken, sautéed bell peppers, onions, and warm tortillas. With just a few simple steps, you can have a vibrant, colorful dish ready for dinner that will satisfy everyone at the table. Whether you’re cooking for a busy weeknight or a casual gathering, these fajitas are guaranteed to impress.
For a hearty and comforting meal on a colder night, try our Slow Cooker Chicken and Gravy Over Noodles, another delicious chicken dish that requires minimal effort but delivers maximum flavor.
Why You’ll Love Easy Chicken Fajitas
Chicken fajitas are not only packed with flavor, but they’re also incredibly versatile. You can adjust the spiciness, change the vegetables, or add different toppings to customize the dish to your liking. Plus, they’re a healthier option compared to other Tex-Mex dishes since you can control the ingredients and avoid unnecessary calories.
Another great dinner idea to pair with your fajitas is our comforting Dorito Chicken Casserole, a crunchy and cheesy delight that brings fun to the table.
Ingredients for Easy Chicken Fajitas
Essential Ingredients:
- Chicken Breasts or Thighs: Chicken breasts are leaner, while thighs offer a richer flavor. You can choose based on your preference.
- Bell Peppers: Use a mix of red, green, and yellow bell peppers for a colorful presentation and sweet flavor.
- Onions: Sliced onions add a slightly caramelized sweetness when sautéed.
- Fajita Seasoning: A blend of paprika, cumin, chili powder, garlic powder, and optional cayenne for heat.
- Lime Juice: Adds brightness and balances the spices.
- Tortillas: Flour tortillas are traditional, but you can use corn tortillas for a more authentic touch.
For a lighter side, pair your fajitas with our Raspberry Lemon Bars Recipe for a sweet yet refreshing dessert after the meal.
Step-by-Step Guide: How to Make Easy Chicken Fajitas
1. Marinate the Chicken
- Step 1: In a bowl, combine olive oil, lime juice, and fajita seasoning.
- Step 2: Add the chicken strips, coat them well, and let them marinate for at least 30 minutes (or up to 2 hours) for maximum flavor.
2. Prepare the Vegetables
- Slice the bell peppers and onions thinly to ensure even cooking. These will add color and texture to your fajitas.
3. Cook the Chicken
- Step 1: Heat a large skillet over medium-high heat and cook the marinated chicken until browned and cooked through. Remove and set aside.
- Step 2: In the same skillet, sauté the sliced peppers and onions until they’re soft and slightly charred.
4. Combine and Serve
- Add the cooked chicken back into the skillet, toss everything together, and serve immediately with warm tortillas.
For more inspiration on easy family meals, check out our Family Night Favorite: Easy French Bread Pizza.
Delicious Variations of Chicken Fajitas
- Grilled Chicken Fajitas: Marinate the chicken and grill it over medium heat for a smoky flavor.
- Sheet Pan Chicken Fajitas: Bake everything on a sheet pan for easy cleanup.
- Vegetarian Fajitas: Swap out the chicken for portobello mushrooms or tofu for a meatless option.
- Spicy Fajitas: Add extra jalapenos or a pinch of cayenne pepper for a kick.
- Low-Carb Fajitas: Serve the fajitas in lettuce wraps instead of tortillas for a low-carb meal.
For another twist on traditional Tex-Mex, try our Taco Bell-Inspired Mexican Pizza Casserole, which delivers bold flavors in a layered, cheesy form.
Toppings and Side Dishes for Chicken Fajitas
Popular Toppings:
- Sour Cream: Adds creaminess to balance the spices.
- Guacamole: A creamy, fresh addition that pairs perfectly with the fajitas.
- Cheese: Shredded cheddar or Monterey Jack adds richness.
- Salsa: Adds a tangy, spicy kick.
- Cilantro: Fresh cilantro brightens the dish and adds a bit of color.
Suggested Side Dishes:
- Mexican Rice: A classic accompaniment that completes the meal.
- Refried Beans: Creamy beans add texture and flavor.
- Corn on the Cob: Grilled or boiled, corn adds a sweet crunch that pairs well with fajitas.
Nutritional Information and Healthier Alternatives
Nutritional Breakdown (Per Serving):
- Calories: Approximately 300-350 depending on the toppings and tortilla size.
- Fat: 10-12g from the chicken and toppings like cheese and sour cream.
- Protein: 25-30g, making this a protein-rich meal.
- Carbs: 30-40g, mostly from the tortillas and vegetables.
Healthier Substitutions:
- Low-Fat Sour Cream or Greek Yogurt: Swap sour cream for Greek yogurt to reduce fat and add protein.
- Whole Wheat Tortillas: Use whole wheat tortillas for more fiber and nutrients.
- Less Oil: Reduce the amount of oil in the marinade to cut down on fat content.
- More Vegetables: Add zucchini or mushrooms to increase the fiber and nutrient content.
FAQs About Chicken Fajitas
1. How Do I Keep Chicken Fajitas Moist?
- Marinating the chicken ensures it stays juicy. Additionally, cooking it over high heat for a short amount of time helps retain moisture.
2. Can I Make Chicken Fajitas Ahead of Time?
- Yes! You can prepare the chicken and vegetables ahead and store them separately in the fridge. Reheat just before serving.
3. What’s the Best Way to Reheat Fajitas?
- Reheat the chicken and vegetables in a skillet over medium heat until warmed through. Avoid microwaving, as it can make the chicken rubbery.
4. Are Chicken Fajitas Gluten-Free?
- If you use corn tortillas instead of flour tortillas, chicken fajitas are naturally gluten-free.
For more tips on making Tex-Mex dishes, visit our Tex-Mex Beef Enchiladas Recipe, a must-try for those who love rich, cheesy flavors.
Conclusion: Why Chicken Fajitas Are a Must-Try
Easy Chicken Fajitas are a crowd-pleasing, versatile dish that delivers on both flavor and simplicity. Whether you’re grilling, baking, or cooking them on the stovetop, the result is always a delicious meal packed with vibrant colors and bold flavors. Add your favorite toppings, serve with a side of rice or beans, and enjoy this Tex-Mex favorite anytime.
For more Tex-Mex-inspired meals, don’t miss our guide to making the Best Homemade Tacos, which brings authentic flavors to your kitchen with minimal effort.