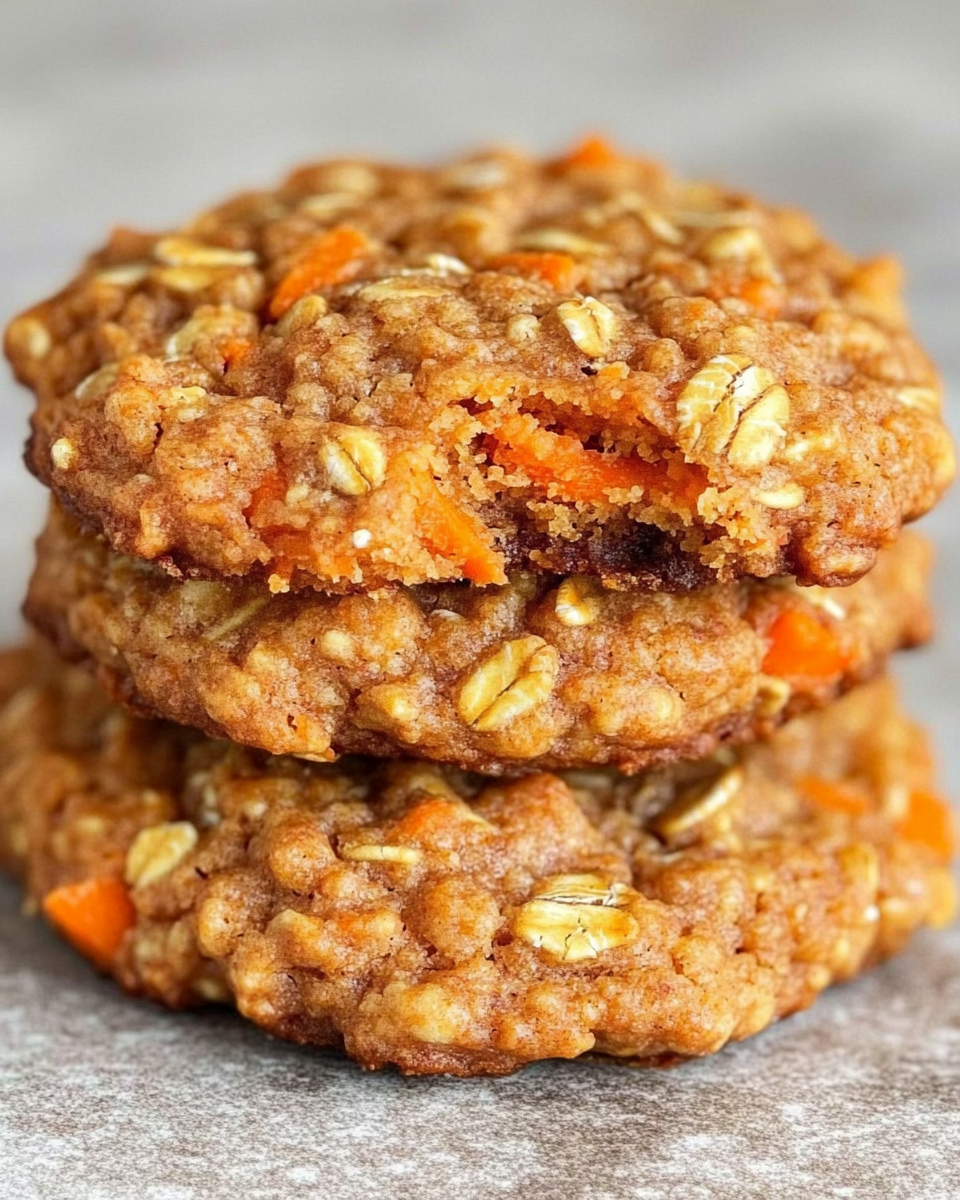
The Ultimate Thin Mint Brownies Recipe: A Perfect Blend of Chocolate and Mint

Mint chocolate brownies, Thin Mint dessert, fudgy mint brownies, chocolate mint brownie recipe

Thin Mint Brownies: A Decadent Fusion of Chocolate and Mint

If you’re a fan of the irresistible combination of chocolate and mint, Thin Mint Brownies will become your new go-to dessert. This dessert marries the richness of fudgy brownies with the refreshing, cool burst of Thin Mint cookies, resulting in a treat that’s both indulgent and refreshing.

Why You’ll Love Thin Mint Brownies

  • Thin Mint Brownies offer the best of both worlds—dense, fudgy brownies and the crisp, minty flavor of Thin Mints.
  • They’re incredibly easy to make and perfect for satisfying any chocolate-mint cravings.
  • With customizable variations like adding frosting, chocolate chips, or even marshmallows, you can tweak the recipe to fit your preferences.

For a step-by-step guide on how to achieve the perfect balance of flavors in this dessert, check out our Ultimate Guide to Crafting the Perfect Thin Mint Brownies.

Ingredients for the Ultimate Thin Mint Brownies

To make these brownies, you’ll need the following:

  • 1 cup butter (melted)
  • 1 ½ cups sugar
  • 4 large eggs
  • 1 teaspoon vanilla extract
  • 1 cup flour
  • ¾ cup cocoa powder
  • 1 teaspoon salt
  • 1 teaspoon baking powder
  • 2 cups crushed Thin Mint cookies
  • Optional: chocolate chips, marshmallows, or frosting for topping

For those who prefer a gluten-free or vegan alternative, be sure to check our guide on making brownies gluten-free and dairy-free for substitution tips.

Step-by-Step Instructions for Thin Mint Brownies

Here’s how to make the perfect Thin Mint Brownies:

  1. Preheat the Oven: Set your oven to 350°F (175°C). Grease or line a baking pan with parchment paper.
  2. Mix Wet Ingredients: In a large mixing bowl, combine melted butter and sugar. Whisk in the eggs one at a time and add the vanilla extract.
  3. Prepare Dry Ingredients: In a separate bowl, mix together the flour, cocoa powder, salt, and baking powder.
  4. Combine Mixtures: Gradually add the dry ingredients to the wet ingredients, stirring until well-combined.
  5. Add Thin Mints: Gently fold in the crushed Thin Mint cookies.
  6. Bake: Pour the batter into the prepared pan and bake for 25-30 minutes or until a toothpick inserted comes out mostly clean.
  7. Cool and Serve: Let the brownies cool for at least 10 minutes before cutting and serving.

If you’re looking for more baking inspiration, you might want to check out our guide on baking perfect brownies. This can provide additional tips to avoid over-baking and help you get the most fudgy results possible.

Pro Tips for Making the Best Thin Mint Brownies

  • Don’t Overmix: To maintain a light, airy texture, stir the batter until just combined.
  • Achieving the Perfect Mint Flavor: If you prefer a stronger mint flavor, you can add a few drops of peppermint extract into the batter for a more intense kick.
  • Crushed Thin Mints on Top: For extra crunch and flavor, sprinkle more crushed Thin Mints over the batter before baking.
  • Texture Control: If you prefer your brownies more cakey, add an extra egg. For more fudginess, decrease the baking time slightly.

Looking for more minty goodness? Check out our creative Thin Mint recipes for additional ideas on how to incorporate this classic cookie into other treats.

Variations of Thin Mint Brownies

There are many ways to customize your Thin Mint Brownies to make them even more indulgent:

  • Thin Mint Brownies with Frosting: Add a layer of rich chocolate ganache or mint frosting on top of your brownies to increase the decadence factor.
  • Double Chocolate Thin Mint Brownies: Mix in some chocolate chips for an extra dose of chocolaty goodness.
  • Thin Mint Brownies with Marshmallow Topping: After baking, top your brownies with marshmallows and broil for a minute until gooey and golden.

For a twist on classic brownies, try adding other toppings like candy canes for a festive touch or toasted coconut for added texture. These little tweaks can turn a simple dessert into something truly special.

Serving Suggestions

Thin Mint Brownies are a hit at parties, family gatherings, and even holiday celebrations. Here are a few ways to serve them:

  • With Ice Cream: Pair your brownies with a scoop of vanilla ice cream for a perfect balance of hot and cold.
  • As a Layer in Parfaits: Use cubes of Thin Mint Brownies as a base for minty parfaits, layering with whipped cream and chocolate sauce.
  • Drizzled with Chocolate Syrup: For added flair, drizzle melted chocolate over the brownies before serving.

For more creative ways to present desserts, check out our tips on crafting delightful brownie-based desserts.

Storing Thin Mint Brownies

To keep your brownies fresh for as long as possible:

  • At Room Temperature: Store in an airtight container for up to 4 days.
  • In the Freezer: For longer storage, wrap individual brownies in plastic wrap and place them in an airtight container. They can last in the freezer for up to 3 months.

When you’re ready to eat them, simply thaw at room temperature for about an hour. You can also reheat them in the oven for a few minutes to regain that fresh-baked feel.

Frequently Asked Questions (FAQs)

Can I Use Other Mint Cookies Besides Thin Mints?
Absolutely! If Thin Mints aren’t available, you can substitute with any other mint-flavored cookies like Grasshoppers.

Can I Make Thin Mint Brownies Without Chocolate Chips?
Yes! Chocolate chips are optional, but they do add an extra layer of texture and flavor. You can leave them out if you prefer a more classic brownie taste.

How Do I Make These Brownies Gluten-Free?
To make gluten-free Thin Mint Brownies, simply replace the flour with a gluten-free flour blend and use gluten-free Thin Mint cookies. For more gluten-free recipes, check out our guide on gluten-free baking.

What’s the Best Way to Make the Brownies Fudgier?
For fudgier brownies, decrease the baking time slightly or add a bit more butter to the batter. This will give them a more moist and chewy texture.

Can I Add Nuts or Other Mix-ins?
Yes! Chopped walnuts, pecans, or even candy pieces make great additions to Thin Mint Brownies for some added crunch and flavor.

Nutritional Information

A single serving of Thin Mint Brownies (based on the recipe provided) typically contains:

  • Calories: 280 kcal
  • Carbohydrates: 34g
  • Protein: 4g
  • Fat: 14g

For a healthier version, consider using a sugar substitute or reducing the butter content slightly. This will lower the calorie count without compromising too much on flavor.

Thin Mint Brownies Around the Web

If you want more inspiration on creating delicious Thin Mint Brownies, check out the following blogs and recipes:

These sources provide additional tips and tricks for perfecting your brownies, as well as creative variations you can try.

Conclusion

There’s nothing quite like the combination of rich chocolate and cool mint in a warm, fudgy brownie. Whether you’re making these Thin Mint Brownies for a special occasion or just to satisfy a craving, this easy-to-follow recipe will ensure your brownies come out perfect every time.

With tips for making them extra fudgy, variations to keep things exciting, and options for serving, these brownies are sure to be a hit. Don’t forget to share this recipe with fellow chocolate lovers and get creative with your toppings and mix-ins!

For more delicious dessert ideas, explore our wide selection of dessert recipes at Exorecipes.

Chicken and Bacon Fried Rice: A Delicious Twist on a Classic Dish

bacon fried rice, fried rice with chicken and bacon, easy chicken and bacon fried rice, chicken and bacon rice dish

Chicken and Bacon Fried Rice: A Hearty and Flavorful Meal

Chicken and Bacon Fried Rice is a quick and satisfying dish that brings together the smoky flavors of bacon and the tenderness of chicken, all mixed into the classic texture of fried rice. This dish is perfect for weeknight dinners, meal prepping, or simply transforming leftover rice into something exciting. The added depth of soy sauce, sesame oil, and the crispy bite of bacon create a rich, savory flavor profile that will become a family favorite.

For more comfort food ideas, you can explore dishes like Crockpot Potato Soup with Hashbrowns or Slow Cooker Baked Ziti, which also combine ease and heartiness.


Ingredients for Chicken and Bacon Fried Rice

To make this delicious fried rice, you’ll need:

  • Rice: Preferably day-old and cold, jasmine or basmati rice work well.
  • Chicken: Boneless, skinless chicken thighs or breasts, cut into small pieces.
  • Bacon: Thick-cut bacon adds a smoky flavor and crispy texture.
  • Vegetables: Commonly used vegetables include peas, carrots, onions, and garlic.
  • Eggs: Lightly scrambled eggs add richness to the rice.
  • Soy Sauce & Seasonings: Soy sauce, sesame oil, ginger, and garlic are key flavorings.

For more inspiration on savory meals, check out the Crockpot Chicken and Gravy Over Noodles, which pairs well with rice-based dishes for a comforting family meal.


Step-by-Step Guide to Making Chicken and Bacon Fried Rice

  1. Cook the Bacon
    • Fry the bacon in a large skillet until crispy. Remove and set aside on a paper towel to drain.
  2. Cook the Chicken
    • In the same skillet, cook the diced chicken in the leftover bacon fat until golden and fully cooked. Set aside with the bacon.
  3. Stir-Fry the Vegetables
    • Add a bit of oil to the skillet, and stir-fry the vegetables until softened. Garlic and onions should be fragrant.
  4. Scramble the Eggs
    • Push the vegetables to the side of the skillet and scramble the eggs. Once cooked, mix them with the vegetables.
  5. Fry the Rice
    • Add the cold rice to the skillet, breaking it apart with a spatula. Stir-fry with soy sauce, sesame oil, and seasonings.
  6. Combine and Serve
    • Return the chicken and bacon to the skillet, mixing everything together. Let it cook for a couple more minutes until everything is heated through. Serve hot!

Popular Variations of Chicken and Bacon Fried Rice

  1. Kimchi Fried Rice: Add chopped kimchi for a spicy, tangy twist.
  2. Pineapple Fried Rice: Mix in pineapple chunks for a sweet and savory combination.
  3. Shrimp Fried Rice: Replace the chicken with shrimp for a seafood variation.
  4. Vegetarian Fried Rice: Use plant-based bacon and tofu for a vegetarian alternative.
  5. Spicy Fried Rice: Add chili paste or Sriracha for an extra kick of heat.

For more creative takes on comforting dishes, try this Italian Stromboli which can be paired with your fried rice for a fun and hearty meal.


Nutritional Information and Healthier Substitutions

Nutritional Breakdown per Serving (Approximate):

  • Calories: 450
  • Fat: 18g
  • Protein: 25g
  • Carbs: 45g

Healthier Substitutions:

  • Cauliflower Rice: For a low-carb option, replace regular rice with cauliflower rice.
  • Turkey Bacon: Use turkey bacon instead of regular bacon for a leaner protein source.
  • Less Oil: Reduce the amount of oil or use a healthier alternative like avocado oil.

FAQs About Chicken and Bacon Fried Rice

  1. Can I use fresh rice instead of day-old rice?
    Yes, but fresh rice can be sticky and clumpy. For the best texture, use day-old, cold rice.
  2. Can I make fried rice ahead of time?
    Yes, fried rice stores well in the fridge for up to 4 days and can be reheated.
  3. Can I freeze fried rice?
    Absolutely! Store the cooked fried rice in airtight containers or freezer bags. Reheat directly from frozen for a quick meal.
  4. What can I serve with Chicken and Bacon Fried Rice?
    This dish pairs well with a side of Garlic Parmesan Chicken or a light green salad.

Conclusion

Chicken and Bacon Fried Rice is an easy, flavorful dish that’s perfect for using up leftover rice and transforming it into a hearty meal. Whether you enjoy it as a weeknight dinner, a meal-prep staple, or for entertaining guests, the combination of crispy bacon, tender chicken, and savory rice is sure to please. For even more comforting meals, pair this fried rice with dishes like Dorito Chicken Casserole for a complete comfort food spread.

Glazed Soft Apple Cookies: The Perfect Fall Treat

apple spice cookies, glazed apple cookies, soft apple cookies, fall apple dessert, apple cinnamon cookies

Glazed Soft Apple Cookies: A Comforting Fall Treat

Glazed soft apple cookies are the perfect balance of warm fall spices, sweet apple chunks, and a delightful glaze that adds the finishing touch. This easy-to-make recipe is ideal for autumn gatherings, cozy evenings, or as a tasty snack for any time of the year. These cookies capture the essence of fall with their soft texture and the sweet glaze that perfectly complements the apple and spice flavors.

For more comforting fall treats, you can try this Salted Caramel Apple Cheesecake with Apple Roses to add a seasonal dessert that will wow your guests.


Ingredients for Glazed Soft Apple Cookies

To make these cookies, you’ll need the following ingredients:

  • Flour: All-purpose flour as the base for the cookies.
  • Baking Soda & Baking Powder: To help the cookies rise and stay soft.
  • Spices: Ground cinnamon, nutmeg, and allspice.
  • Sugar: Brown sugar and granulated sugar for sweetness and moisture.
  • Butter: Adds richness to the cookies.
  • Apples: Fresh apples, diced into small chunks. Granny Smith or Honeycrisp apples are great for this recipe.
  • Eggs & Vanilla Extract: The binding agents that add flavor depth.
  • For the Glaze: Powdered sugar, milk, and vanilla extract.

For a savory counterpart to these cookies, try this hearty Slow Cooker Chicken and Gravy Over Noodles for a balanced fall dinner.


Step-by-Step Guide: How to Make Glazed Soft Apple Cookies

  1. Prepare the Cookie Dough
    • In a bowl, mix together the dry ingredients: flour, baking soda, baking powder, and spices.
    • In another bowl, cream the butter and sugars until light and fluffy. Beat in the eggs and vanilla extract.
    • Gradually add the dry ingredients to the wet ingredients, and fold in the diced apples.
  2. Scoop and Bake
    • Drop the cookie dough by spoonfuls onto a parchment-lined baking sheet. Bake at 350°F for 12-15 minutes, or until the edges are lightly golden.
  3. Prepare the Glaze
    • While the cookies cool, prepare the glaze by whisking together powdered sugar, milk, and vanilla extract. The consistency should be thick but pourable.
    • Once the cookies are cool, drizzle the glaze over each cookie, allowing it to set before serving.

Variations of Glazed Soft Apple Cookies

  1. Apple Cinnamon Oatmeal Cookies: Add rolled oats for an extra chewy texture and fiber boost.
  2. Maple Glazed Apple Cookies: Replace vanilla in the glaze with maple syrup for a richer, fall-inspired glaze.
  3. Vegan Apple Cookies: Use dairy-free butter and flax eggs to create a plant-based version of these cookies.
  4. Pecan Apple Cookies: Add chopped pecans for a crunchy texture and nutty flavor.
  5. Gluten-Free Apple Cookies: Substitute the flour with a gluten-free blend for a crowd-pleasing, gluten-free treat.

For more inspiration, you may want to check out this Smoked Gouda Mac and Cheese Balls for a savory snack that pairs well with sweet treats like these cookies.


Nutritional Information and Healthier Alternatives

Nutritional Breakdown per Cookie:

  • Calories: Approx. 120
  • Fat: 6g
  • Carbs: 16g
  • Protein: 2g

Healthier Alternatives:

  • Use Whole Wheat Flour: Swap all-purpose flour with whole wheat flour to add fiber.
  • Natural Sweeteners: Replace refined sugar with coconut sugar or maple syrup for a lower glycemic option.
  • Dairy-Free: Use plant-based butter and milk in both the dough and glaze for a dairy-free version.

FAQs About Glazed Soft Apple Cookies

  1. Can I use apple sauce instead of fresh apples?
    Yes, but it will change the texture of the cookies. Apple sauce will make the cookies more cake-like and less chunky.
  2. How long do these cookies stay fresh?
    Stored in an airtight container, these cookies can last up to 5 days at room temperature. For longer storage, freeze them without the glaze.
  3. Can I freeze the cookie dough?
    Absolutely! Scoop the dough into balls and freeze them on a tray before transferring to a freezer-safe bag. Bake them directly from frozen, adding a few extra minutes to the bake time.
  4. How do I prevent the glaze from being too runny?
    Make sure to let the cookies cool completely before glazing. If the glaze is too runny, add more powdered sugar to thicken it.

Conclusion

These glazed soft apple cookies are the perfect way to celebrate the flavors of fall. Whether you’re baking for a holiday event or simply want a cozy treat to enjoy with a cup of tea, these cookies will hit the spot every time. With their soft, chewy texture and sweet, spiced glaze, they are sure to become a family favorite.

Pair these cookies with comforting dinner options like Slow Cooker Chicken and Gravy Over Noodles or Crockpot Chicken and Gravy for a full meal of comforting fall flavors.

Homemade Ketchup: Easy Recipe for a Healthier, Tastier Condiment

ketchup recipe, DIY ketchup, homemade condiment, healthy ketchup, sugar-free ketchup

Homemade Ketchup: A Delicious DIY Recipe for Your Favorite Condiment

Homemade ketchup is a healthier, tastier, and fully customizable alternative to store-bought varieties. By making your own ketchup, you can control the ingredients, avoid preservatives, and adjust the flavors to suit your personal preferences.

For more recipes that help you create comforting dishes at home, you may also want to try Crockpot Chicken and Gravy Over Noodles, which pairs beautifully with this ketchup.


Ingredients for Homemade Ketchup

To make homemade ketchup, you’ll need a few simple ingredients:

  • Tomatoes: Fresh, canned, or tomato paste will work.
  • Vinegar: White vinegar or apple cider vinegar adds tang.
  • Sweetener: Sugar, honey, or maple syrup for balancing acidity.
  • Spices: Garlic, onion powder, cinnamon, cloves, and mustard powder.
  • Salt: To enhance flavor.

You can adjust these ingredients to taste, adding more sweetener for a sweeter ketchup or more vinegar for a tangier bite.

For another homemade classic, check out this recipe for Smoked Gouda Mac and Cheese Balls, which also pairs well with homemade ketchup as a dipping sauce.


Step-by-Step Guide to Making Homemade Ketchup

  1. Cook the Tomatoes:
    • Start by cooking your tomatoes (or tomato paste) until they break down and become soft. You can use fresh tomatoes or canned ones, depending on availability.
  2. Add Sweeteners and Spices:
    • Stir in your vinegar, sweetener, and spices. Simmer the mixture on low heat for about 30 minutes, allowing the flavors to meld together.
  3. Blend the Mixture:
    • Use a blender or immersion blender to puree the mixture until smooth. Strain the ketchup to remove any seeds or skin for a smoother texture.
  4. Cook to Thicken:
    • Simmer the ketchup until it reaches your desired consistency. The longer you cook it, the thicker it will become.
  5. Store the Ketchup:
    • Let the ketchup cool before transferring it to a jar or bottle. Store in the fridge for up to 3 weeks, or freeze it for longer storage.

Tips for Perfect Homemade Ketchup

  • Balance the Sweetness and Acidity: Adjust the sugar and vinegar to get the right balance of sweetness and tang.
  • Spices: Feel free to experiment with different spices. Smoked paprika or chipotle powder adds a smoky depth, while cayenne pepper brings heat.
  • Storage: Store your homemade ketchup in sterilized glass jars to extend its shelf life.

Nutritional Information

Homemade ketchup tends to be healthier than store-bought varieties, especially since it doesn’t contain preservatives or high-fructose corn syrup. Here’s an approximate breakdown per tablespoon of homemade ketchup:

  • Calories: 15
  • Carbohydrates: 4g
  • Sugar: 3g
  • Fat: 0g

To make an even healthier version, you can reduce the sugar or replace it with a natural sweetener like stevia.


Homemade Ketchup Variations

  1. Spicy Ketchup:
    • Add cayenne pepper or sriracha for a kick of heat.
  2. Sugar-Free Ketchup:
    • Use sugar substitutes like stevia or erythritol to keep the recipe sugar-free.
  3. Balsamic Ketchup:
    • Replace regular vinegar with balsamic vinegar for a richer, deeper flavor.
  4. Vegan Ketchup:
    • Ensure all ingredients are plant-based, and substitute refined sugars with alternatives like coconut sugar or maple syrup.

FAQs About Homemade Ketchup

  1. How long does homemade ketchup last?
    Homemade ketchup can last up to 3 weeks in the refrigerator if stored properly in an airtight container. For longer storage, it can be frozen for up to 6 months.
  2. Can I use fresh tomatoes instead of canned?
    Yes, fresh tomatoes can be used. However, the cooking process may take a little longer to break down the tomatoes. You may need to simmer for an additional 15-20 minutes.
  3. How do I make my ketchup thicker?
    To thicken homemade ketchup, simmer it for longer to reduce the liquid. You can also add a bit of cornstarch slurry to speed up the thickening process.
  4. Can I can homemade ketchup?
    Yes, homemade ketchup can be canned using the water bath canning method. This will make it shelf-stable for up to a year.

Conclusion

Making your own ketchup at home is a rewarding way to control the ingredients and create a condiment tailored to your taste. Whether you prefer it spicy, tangy, or sweet, homemade ketchup is a delicious upgrade from store-bought options.

For more DIY recipes, check out the Slow Cooker Mississippi Ribeye Steaks Recipe for a slow-cooked, flavorful main dish that pairs wonderfully with homemade ketchup.

Pumpkin Slab Pie: The Perfect Fall Dessert for Feeding a Crowd

pumpkin pie for a crowd, easy pumpkin slab pie, fall dessert slab pie, pumpkin sheet pan pie, slab pie with pumpkin

Pumpkin Slab Pie: A Delicious and Easy Fall Dessert

Pumpkin Slab Pie is a perfect dessert for large gatherings or holiday celebrations. This recipe features all the flavors of a classic pumpkin pie, but baked in a rectangular sheet pan, allowing for easy serving and larger portions. It’s an excellent choice for anyone looking to serve a crowd without the hassle of making multiple pies.

For another delicious fall dessert, you can check out this Salted Caramel Apple Cheesecake with Apple Roses which adds a stunning presentation to your dessert table.


Ingredients for Pumpkin Slab Pie

To make this pumpkin slab pie, you will need:

  • Pie Crust: Either homemade or store-bought.
  • Pumpkin Puree: Canned or homemade pumpkin puree works well.
  • Sweetened Condensed Milk or Heavy Cream: Adds a rich and creamy texture.
  • Eggs: Essential for setting the pie filling.
  • Pumpkin Pie Spice: A blend of cinnamon, ginger, cloves, and nutmeg.
  • Vanilla Extract: Enhances the flavor of the pumpkin filling.

For a complete fall meal, consider pairing this pie with our Ultimate Comfort Food: Crockpot Potato Soup with Hashbrowns for a cozy and satisfying dinner.


Step-by-Step Guide: How to Make Pumpkin Slab Pie

  1. Prepare the Crust
    Roll out the pie crust and press it into the bottom of a sheet pan. Pre-bake the crust for 10 minutes to prevent it from getting soggy later.
  2. Make the Pumpkin Filling
    In a large mixing bowl, whisk together the pumpkin puree, eggs, sweetened condensed milk, and pumpkin pie spices. Pour the filling over the pre-baked crust.
  3. Bake the Pie
    Bake the pie at 375°F (190°C) for 35-40 minutes, or until the filling is set and the crust is golden brown.
  4. Cool and Serve
    Let the pie cool completely before slicing it into squares. Serve with whipped cream or a caramel drizzle for extra indulgence.

Variations of Pumpkin Slab Pie

  • Pumpkin Streusel Slab Pie: Top the pie with a crunchy streusel made from oats, butter, and brown sugar.
  • Pumpkin Cream Cheese Slab Pie: Add a layer of cream cheese between the crust and pumpkin filling for a cheesecake-like twist.
  • Vegan Pumpkin Slab Pie: Use a vegan pie crust and replace the eggs with a flaxseed mixture and the cream with coconut milk.

For more savory dishes that pair well with pumpkin pie, try our Slow Cooker Magic: Unveiling the Ease of Crock-Pot Baked Ziti, which makes a fantastic main course for any fall meal.


Nutritional Information and Healthier Substitutions

Nutritional Breakdown (per serving):

  • Calories: Approx. 300
  • Fat: 15g
  • Carbs: 35g
  • Protein: 5g

Healthier Alternatives:

  • Use low-fat dairy or plant-based milk alternatives to cut down on calories and fat.
  • Replace sugar with a natural sweetener like maple syrup or coconut sugar.
  • For a gluten-free option, use a gluten-free pie crust.

FAQs About Pumpkin Slab Pie

  1. Can I make Pumpkin Slab Pie ahead of time?
    Yes, you can make the pie 1-2 days in advance. Just store it in the refrigerator and bring it to room temperature before serving.
  2. Can I freeze Pumpkin Slab Pie?
    Absolutely! Allow the pie to cool completely, then wrap it tightly and freeze for up to 3 months. Thaw in the fridge overnight before serving.
  3. How do I keep the crust from getting soggy?
    Pre-bake the crust for 10 minutes before adding the filling, and allow the pie to cool completely before slicing.

Conclusion

Pumpkin Slab Pie is a must-try dessert for the fall season, combining the comforting flavors of pumpkin spice with the convenience of a large-format dessert. Whether you’re serving it at a Thanksgiving feast or a casual family dinner, this pie will undoubtedly impress your guests.

Looking for more ways to use seasonal ingredients? Try this Slow Cooker Chicken and Gravy Over Noodles for a cozy, comforting dinner option.