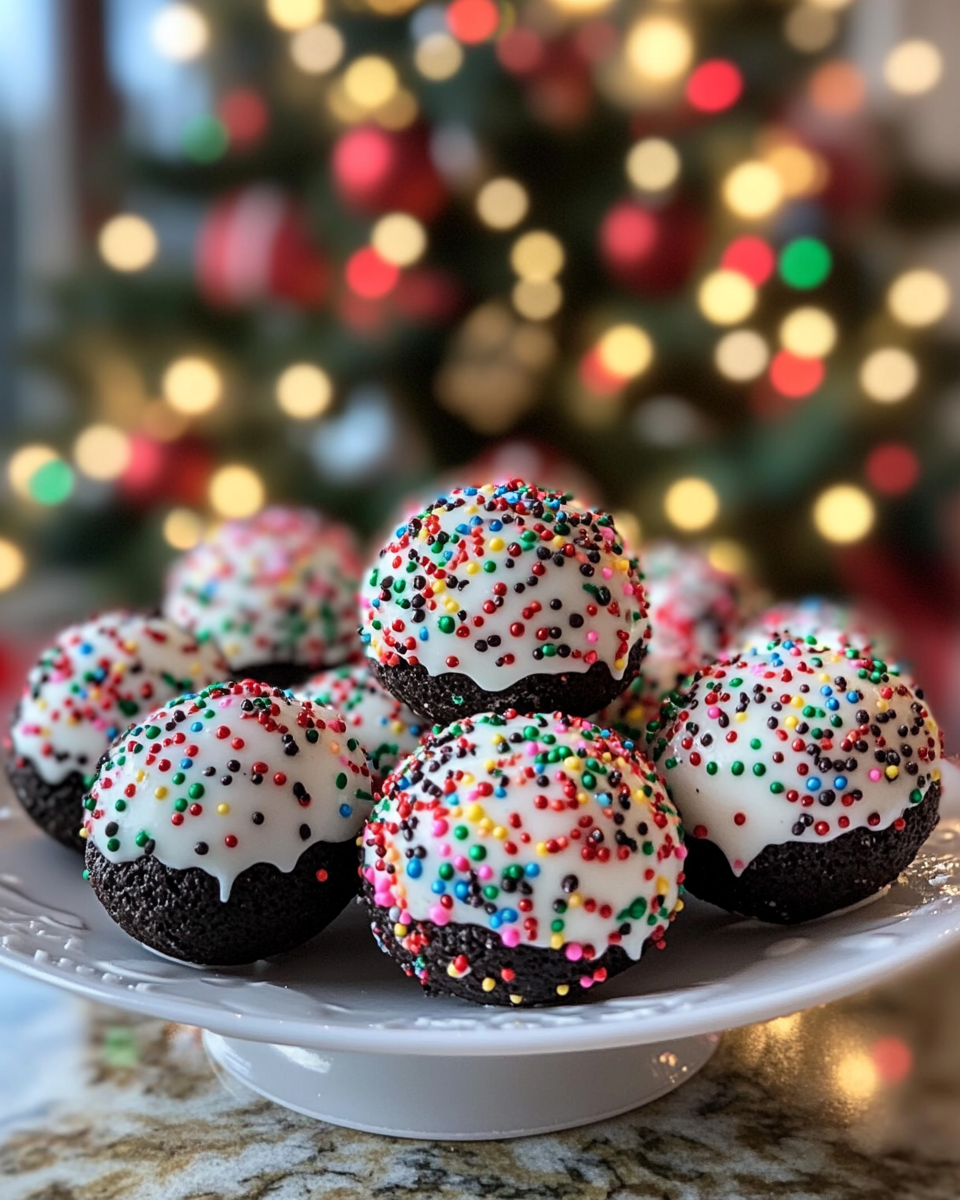
Easy Apple Crisp Bars: A Perfect Fall Dessert Recipe

apple crumble bars, apple oat bars, easy apple dessert bars, fall apple crisp recipe, apple bar dessert

Easy Apple Crisp Bars: A Perfect Fall Dessert

As the weather cools and apple season arrives, Easy Apple Crisp Bars make for a delicious dessert with all the cozy flavors of a classic apple crisp in a convenient, portable bar. With a buttery crust, spiced apple filling, and an oat crumble topping, these bars are perfect for family gatherings, holiday parties, or as an afternoon treat with a cup of tea.

For another delightful fall dessert, check out our Caramel Apple Pecan Dump Cake—a simple yet indulgent treat for apple lovers.


Ingredients for the Best Apple Crisp Bars

To make these apple crisp bars, you’ll need the following ingredients, each playing an essential role in flavor and texture:

  • Apples: Use firm, tart apples like Granny Smith or Honeycrisp for the best flavor and texture.
  • Rolled Oats: Adds a crunchy, hearty element to the crumble topping.
  • Flour: Forms the base of the crust and binds the topping.
  • Brown Sugar: Adds sweetness and depth to the bars.
  • Cinnamon and Nutmeg: Essential warm spices that elevate the apple flavor.
  • Butter: Provides richness to the crust and topping.
  • Vanilla Extract: Enhances the overall flavor with a touch of warmth.

For those who prefer a vegan or gluten-free dessert, try our Gluten-Free Peach Crisp for another fruit-forward dessert that’s adaptable and just as delicious.


Step-by-Step Guide to Making Apple Crisp Bars

1. Prepare the Crust

  • Combine flour, sugar, and melted butter in a bowl, mixing until crumbly.
  • Press the crust mixture into a baking dish lined with parchment paper to ensure easy removal.

2. Prepare the Apple Filling

  • Peel, core, and slice apples. Mix the apple slices with sugar, cinnamon, nutmeg, and a squeeze of lemon juice to prevent browning.
  • Spread the apple mixture evenly over the crust.

3. Add the Crumble Topping

  • Mix oats, flour, brown sugar, and melted butter until crumbly. Sprinkle over the apple layer.
  • Bake at 350°F for 30–35 minutes or until the topping is golden and the apples are tender.

For tips on achieving a perfectly crumbly topping, see our Ultimate Apple Crumble Guide.


Tips for Perfect Apple Crisp Bars

  • Use Firm Apples: This prevents a mushy filling. Granny Smith and Honeycrisp are excellent choices.
  • Press the Crust Firmly: To avoid crumbling, press the crust mixture firmly into the pan.
  • Adjust Sweetness: Adjust the sugar in the filling depending on the sweetness of your apples.

If you enjoy creative apple desserts, try our Easy Apple Hand Pies—an on-the-go treat that captures all the flavors of a traditional apple pie in a portable form.


Variations and Additions

These apple crisp bars are versatile and can be adapted to your preferences. Here are some fun variations:

  1. Caramel Apple Crisp Bars: Drizzle caramel sauce over the apple layer for added sweetness.
  2. Nutty Apple Crisp Bars: Add chopped pecans or walnuts to the topping for extra crunch.
  3. Gluten-Free Apple Crisp Bars: Use gluten-free oats and flour for a gluten-free version.

If you love adding nuts to desserts, you might also enjoy our Pecan Pie Bars—a decadent treat that’s rich, buttery, and nutty.


Serving Suggestions for Apple Crisp Bars

These bars are delicious on their own or can be dressed up for special occasions:

  • Serve Warm with Ice Cream: Apple crisp bars pair perfectly with vanilla ice cream for a classic combination.
  • Drizzle with Caramel: A touch of caramel sauce adds extra sweetness and flavor.
  • Top with Whipped Cream: For a light and creamy contrast, add a dollop of whipped cream.

For a more decadent dessert option, consider our Salted Caramel Rice Krispie Treats, which offer a delightful balance of sweetness and saltiness.


Storing and Freezing Apple Crisp Bars

  • Refrigerate: Store apple crisp bars in an airtight container in the refrigerator for up to five days.
  • Freeze: Wrap each bar individually in plastic wrap, then place in a freezer-safe container. Freeze for up to three months.
  • Reheat: Warm in the oven at 300°F for about 10 minutes or microwave for 15–20 seconds.

For more make-ahead dessert ideas, check out our Big Freezer Meal Prep Guide with tips on storing and freezing your favorite dishes.


Frequently Asked Questions (FAQs)

Can I Use Other Fruits Besides Apples?

Yes, these bars can be made with pears, peaches, or berries. Adjust the sugar based on the sweetness of the fruit.

What Are the Best Apples for Baking?

Firm, tart apples like Granny Smith or Honeycrisp are ideal as they hold up well during baking and provide a nice balance to the sweetness.

Can I Make This Recipe Vegan?

To make these bars vegan, use dairy-free butter and ensure all other ingredients are plant-based.

How Can I Avoid a Soggy Crust?

To prevent a soggy crust, pre-bake the crust for about 10 minutes before adding the apple filling.

Can I Reduce the Sugar in the Recipe?

Yes, you can reduce the sugar in the filling or use a sugar substitute to make it lighter.

For more tips on using different fruits in baked desserts, see our Berry Crumble Recipe for inspiration.


Nutritional Information and Healthier Alternatives

Each apple crisp bar has an approximate nutritional profile as follows (based on a 2-inch square serving):

  • Calories: 180
  • Fat: 8g
  • Carbohydrates: 24g
  • Fiber: 2g
  • Protein: 2g

For a healthier version, consider using low-fat butter or a natural sugar alternative, like maple syrup or coconut sugar.

If you’re interested in healthier dessert options, try our Healthy Avocado Brownies—a deliciously moist dessert with a nutrient-rich twist.


Health Benefits of Apples and Oats in Desserts

In addition to being tasty, apple crisp bars have some health benefits:

  • Apples: Provide dietary fiber, vitamin C, and antioxidants. Regular consumption of apples may support heart health and improve digestion.
  • Oats: Rich in fiber, oats are great for heart health and help stabilize blood sugar.

For more dessert recipes with health benefits, explore our Ultimate Guide to Nut-Based Desserts for tasty options that include nutrient-dense ingredients.


Conclusion: Enjoy the Flavors of Fall with Easy Apple Crisp Bars

Easy Apple Crisp Bars are an excellent way to enjoy the flavors of apple season in a quick, easy-to-serve dessert. From their buttery crust to the spiced apple filling and crunchy oat topping, these bars are sure to be a hit. Whether you’re making them for a family dinner, a holiday party, or just a cozy night in, these bars bring the warmth of fall flavors to your table.

For another delightful apple dessert, try our Classic Apple Dumplings—perfect for an indulgent fall treat with a hint of nostalgia.

Festive Oreo Balls for Christmas: No-Bake Holiday Treats

Christmas Oreo truffles, holiday Oreo cookie balls, no-bake Oreo treats, Christmas dessert balls, Oreo truffles with sprinkles

Oreo Balls for Christmas: A Festive No-Bake Treat for the Holidays

If you’re looking for a simple, delicious, and festive treat to add to your holiday dessert table, Oreo Balls for Christmas are a perfect choice. These bite-sized delights combine crushed Oreo cookies, creamy filling, and a decadent chocolate coating, all adorned with Christmas-themed sprinkles or crushed candy canes. They’re ideal for holiday parties, gifting, or just satisfying a holiday sweet tooth!

For another no-bake delight, try our Easy No-Bake Banana Split Cheesecake, which also makes for a refreshing dessert with minimal effort.


Essential Ingredients for Oreo Balls

Making Oreo balls requires just a handful of ingredients, yet results in a treat that’s rich in flavor and fun to make.

  • Oreo Cookies: The base ingredient for the filling, giving these treats their iconic cookie flavor.
  • Cream Cheese: Adds smoothness and richness to bind the crushed cookies.
  • Chocolate or Candy Melts: Coats the Oreo balls, adding a crunchy shell.
  • Holiday-Themed Sprinkles or Crushed Candy Canes: Adds a festive touch and enhances the visual appeal.

For a more detailed look at creating layered flavors in simple desserts, explore our Classic Oreo Pie, which is another fantastic dessert using Oreo cookies as a base ingredient.


Step-by-Step Guide to Making Oreo Balls for Christmas

  1. Prepare the Filling
    • Crush Oreo cookies into fine crumbs using a food processor or by placing them in a zip-lock bag and rolling them with a rolling pin.
    • In a mixing bowl, combine the cookie crumbs with softened cream cheese until smooth.
  2. Roll and Chill
    • Roll the mixture into small balls, about 1 inch in diameter, and place them on a baking sheet lined with parchment paper.
    • Chill the balls in the refrigerator for at least 30 minutes to make them easier to dip.
  3. Dip and Decorate
    • Melt the chocolate or candy melts in a microwave-safe bowl, stirring until smooth.
    • Dip each Oreo ball in the melted chocolate, ensuring it’s fully coated. Use a fork or toothpick to lift the ball and shake off excess chocolate.
    • Before the chocolate sets, sprinkle with holiday-themed sprinkles or crushed candy canes for decoration.

For perfect chocolate dipping tips, see Melting Chocolate for Desserts.


Tips for Perfect Christmas Oreo Balls

  • Use Fresh Oreos: They provide a softer texture when mixed with cream cheese.
  • Chill Before Dipping: Chilling helps the balls stay firm during the dipping process.
  • Avoid Overheating Chocolate: Melt chocolate slowly to avoid seizing, ensuring a smooth coating.

For similar no-bake ideas, you can also check out our No-Bake Pumpkin Cheesecake, which is a fantastic fall treat that’s simple and creamy.


Decorating Ideas for Festive Oreo Balls

These creative decorating options turn Oreo balls into eye-catching holiday treats:

  1. Snowman Oreo Balls: Use white chocolate coating and decorate with mini chocolate chips for eyes, an orange sprinkle for the nose, and a licorice scarf.
  2. Hot Cocoa Oreo Balls: Top with a few mini marshmallows and a sprinkle of cocoa powder to give the look of a cozy winter drink.
  3. Peppermint Crunch: Add a few drops of peppermint extract to the filling and roll in crushed candy canes after dipping for a refreshing twist.

If you’re a fan of themed treats, consider our Candy Cane Pie Recipe, which also brings a festive peppermint flair to your dessert table.


Serving Suggestions for Oreo Balls

These versatile treats can be served in multiple ways:

  • On a Festive Tray: Arrange Oreo balls with other holiday cookies and desserts for a colorful spread.
  • In Mini Cupcake Liners: Place each ball in a liner to prevent them from sticking and make them easy to pick up.
  • As a Gift: Package Oreo balls in decorative tins or cellophane bags tied with ribbons for a thoughtful homemade gift.

Looking for another easy treat idea? Try our Homemade Peppermint Bark for a festive option that pairs well with Oreo balls.


Storing and Freezing Oreo Balls for Christmas

  • Refrigerate: Store in an airtight container in the refrigerator for up to two weeks.
  • Freeze: Freeze for up to three months. Thaw in the refrigerator before serving to maintain the best texture.

For long-lasting holiday desserts, see our Classic Freezer-Friendly Chocolate Fudge for a treat that’s easy to store and serve.


Frequently Asked Questions (FAQs)

Can I Make Oreo Balls Without Cream Cheese?

Yes, try using mascarpone for a similar texture or substitute with peanut butter for a nutty flavor variation.

How Do I Keep Chocolate From Cracking?

Let Oreo balls reach room temperature before dipping, and don’t refrigerate immediately after dipping to prevent rapid cooling, which can cause cracks.

Can I Use Other Cookies?

Absolutely! Try using mint-flavored Oreos, golden Oreos, or gluten-free versions for different flavors.

For more dessert customization ideas, check out our Ultimate Guide to Cookie Modifications.

What’s the Best Way to Prevent Oreo Balls from Sticking?

Use parchment paper on baking sheets, and chill the balls to reduce stickiness.

Can I Add Other Flavors to the Filling?

Yes, peppermint extract, orange zest, or a touch of vanilla can add extra holiday flair.


Nutritional Information and Healthier Alternatives

Each Oreo ball has an approximate nutritional profile of:

  • Calories: 120
  • Fat: 6g
  • Carbohydrates: 12g
  • Protein: 1g

For a lighter option, use reduced-fat cream cheese or opt for dark chocolate instead of milk chocolate for the coating.

To create more wholesome, bite-sized treats, see our Healthy Snack Ball Recipes, perfect for snacking with less sugar and fat.


Health Benefits of Chocolate in Moderation

Enjoying chocolate in moderation provides several benefits, especially when dark chocolate is chosen:

  • Mood Enhancement: Chocolate has compounds that improve mood.
  • Antioxidants: Dark chocolate is rich in antioxidants, which support heart health.

For more insights into chocolate’s health benefits, see Health Benefits of Dark Chocolate.


Conclusion: Oreo Balls for Christmas – A Sweet Holiday Treat

Easy to make and highly customizable, Oreo Balls for Christmas are a delightful addition to your holiday dessert lineup. From snowman-themed Oreo balls to peppermint-flavored bites, these treats can be tailored to suit your family’s tastes and holiday decor. Whether you’re creating an indulgent dessert platter or gifting them to friends, Oreo balls are a guaranteed holiday hit.

For another fun and festive holiday dessert, try our Snowball Cookies Recipe for a traditional treat that adds a seasonal touch to any gathering.

Easy Crockpot Ravioli Lasagna Recipe: A No-Fuss Italian Comfort Food

crockpot lasagna recipe, slow cooker ravioli lasagna, easy ravioli lasagna, Italian crockpot lasagna, no-layer crockpot lasagna

Easy Crockpot Ravioli Lasagna Recipe: A Comforting, No-Fuss Meal

When craving the flavors of classic lasagna but don’t have the time for layering, this Easy Crockpot Ravioli Lasagna Recipe is the answer. Combining ravioli, ground meat, marinara sauce, and cheese, this dish brings together all the comforting elements of traditional lasagna with minimal prep and cooking time. Whether you’re serving it for a family dinner or meal prepping for the week, this crockpot meal is sure to become a household favorite.

For another comforting slow-cooker recipe, check out our Crockpot Potato Soup with Hashbrowns, a creamy and hearty dish that pairs perfectly with this lasagna.


Essential Ingredients for Crockpot Ravioli Lasagna

To make this simple yet flavorful dish, you’ll need:

  • Frozen Cheese Ravioli: Acts as both pasta and filling.
  • Marinara Sauce: Provides a rich, tomato-based flavor.
  • Ground Beef or Italian Sausage: Adds protein and savory depth.
  • Shredded Mozzarella Cheese: Melts beautifully for a creamy texture.
  • Ricotta or Cottage Cheese: Adds richness to each layer.
  • Italian Seasoning and Garlic Powder: Enhance the Italian-inspired flavors.

For a fun twist on pasta dishes, try our Slow Cooker Baked Ziti for a similar, easy Italian meal that cooks itself.


Step-by-Step Guide to Making Crockpot Ravioli Lasagna

1. Brown the Meat

  • Step 1: In a skillet, cook the ground beef or sausage over medium heat until browned. Drain any excess fat. Add garlic powder and Italian seasoning to the meat for extra flavor.

2. Layer the Ingredients

  • Step 2: Start with a layer of marinara sauce at the bottom of the crockpot. Next, add a layer of frozen ravioli, then a portion of the browned meat, followed by a layer of ricotta and shredded mozzarella cheese.

3. Repeat the Layers

  • Step 3: Continue layering sauce, ravioli, meat, and cheese until all ingredients are used, finishing with a layer of cheese on top.

4. Cook

  • Step 4: Cover and cook on low for 4–5 hours or on high for 2–3 hours. You’ll know it’s done when the cheese is melted and bubbly.

For additional tips on layering in slow-cooker meals, see Make-Ahead Meal Tips for Busy Families.


Tips for Perfect Crockpot Ravioli Lasagna

  • Use Frozen Ravioli: It prevents the pasta from overcooking and becoming mushy.
  • Layer Cheese Between Each Level: This keeps each bite flavorful and creamy.
  • Avoid Overfilling the Crockpot: Give enough space for the ingredients to heat evenly.

If you’re a fan of layered pasta dishes, you might also enjoy our Italian Stromboli Recipe, a delicious twist on traditional Italian flavors.


Recipe Variations and Flavor Additions

One of the best things about this Crockpot Ravioli Lasagna recipe is its versatility. Here are some variations to try:

  1. Vegetarian Ravioli Lasagna: Use cheese or spinach ravioli, and add veggies like mushrooms, bell peppers, or spinach.
  2. Spicy Italian Lasagna: Use hot Italian sausage and add a pinch of red pepper flakes for heat.
  3. Four-Cheese Ravioli Lasagna: Use a mix of ricotta, mozzarella, Parmesan, and provolone for a richer flavor profile.

For a more robust take on comfort food, try our Creamy Garlic Parmesan Chicken, a one-pot dish with a deliciously creamy sauce.


Serving Suggestions for Crockpot Ravioli Lasagna

  • Garlic Bread: Perfect for soaking up the delicious marinara sauce.
  • Caesar Salad: Adds a fresh, tangy contrast to the rich lasagna.
  • Roasted Vegetables: Carrots, zucchini, and bell peppers make a colorful and nutritious side.

Looking for more serving ideas? Our Homemade French Bread Pizza is another Italian-inspired dish that pairs well with lasagna.


Storing and Reheating Crockpot Ravioli Lasagna

To enjoy leftovers or make this dish in advance, follow these tips:

  • Refrigerate: Store in an airtight container in the fridge for up to 3 days.
  • Freeze: For longer storage, freeze in individual portions for up to 3 months.
  • Reheat: Use the microwave or reheat in the oven for 15 minutes at 350°F.

For another freezer-friendly meal idea, check out our Baked Ziti Recipe—a perfect choice for make-ahead dinners.


Frequently Asked Questions (FAQs)

Can I use fresh ravioli instead of frozen?

Yes, but reduce the cooking time slightly to avoid overcooking. Fresh ravioli will cook faster than frozen.

How do I prevent the pasta from sticking?

Ensure that each layer starts with sauce, and make sure there’s enough liquid throughout the dish to prevent sticking.

Can I make this recipe dairy-free?

Yes, substitute dairy-free cheese alternatives, and choose vegan ravioli for a completely dairy-free version.

What’s the best way to keep the cheese from burning?

Place the cheese in the middle layers and on top only in the final hour to prevent burning.

Can I add other vegetables to this dish?

Absolutely! Try adding bell peppers, zucchini, mushrooms, or spinach for extra nutrition.

For more answers to common slow-cooking questions, check out our Ultimate Slow Cooker Guide.


Nutritional Information and Healthier Alternatives

Each serving of Crockpot Ravioli Lasagna (based on six servings) provides approximately:

  • Calories: 450
  • Protein: 18g
  • Carbohydrates: 45g
  • Fat: 20g

For a healthier version, consider using low-fat cheeses, lean ground turkey, or spinach ravioli. Adding vegetables to each layer can also increase the fiber and reduce overall calories.

If you’re looking to enjoy Italian flavors with a healthier twist, try our Italian Sausage Pasta with a lighter sauce option.


Health Benefits of Protein and Vegetables in Pasta Dishes

Adding protein and vegetables to pasta dishes like Crockpot Ravioli Lasagna offers balanced nutrition:

  • Protein: Essential for muscle repair and energy.
  • Fiber from Vegetables: Supports digestion and provides vitamins and minerals.

For more ways to incorporate protein and veggies, see our One-Pot Creamy Broccoli and Parmesan Noodles, which combines pasta with nutrient-rich broccoli.


Conclusion: Enjoy Every Bite of Crockpot Ravioli Lasagna

This Easy Crockpot Ravioli Lasagna Recipe is a delicious, low-maintenance dish that brings all the flavors of classic lasagna to the table without the hassle of layering. With minimal prep and the convenience of a slow cooker, this dish is perfect for busy weeknights, meal prepping, or even holiday gatherings.

For a delightful way to end your meal, try our Classic Apple Dumplings, a sweet and comforting dessert that pairs perfectly with any Italian meal.

M&M Cookie Dough Fudge: Easy, No-Bake Treat for Sweet Lovers

cookie dough fudge with M&Ms, no-bake M&M fudge, M&M dessert fudge, easy fudge recipe, cookie dough fudge recipe

M&M Cookie Dough Fudge: A Sweet Treat with a Burst of Color

M&M Cookie Dough Fudge combines the rich, creamy texture of fudge with the nostalgic sweetness of cookie dough and a pop of color from M&Ms. This no-bake dessert is quick to make, using simple ingredients that you likely already have on hand. Perfect for parties, holidays, or simply indulging your sweet tooth, this fudge recipe will surely become a household favorite.

For another colorful treat, try our Reese’s Pieces Chocolate Chip Cookie Bars—they’re a great way to enjoy peanut butter and chocolate in every bite!


Essential Ingredients for M&M Cookie Dough Fudge

To make this delicious dessert, you’ll need the following ingredients:

  • All-Purpose Flour: Provides the cookie dough texture and structure.
  • Butter: Adds richness and binds the ingredients.
  • Sweetened Condensed Milk: Creates the creamy fudge base.
  • Mini Chocolate Chips: Adds chocolatey goodness without overpowering the M&Ms.
  • Vanilla Extract: Enhances the overall flavor.
  • M&Ms: Adds both color and a delightful crunch.

For a similar fudge recipe, explore our Mama Dee’s Never-Fail Creamy Fudge that offers a smooth texture and is a perfect base for experimenting with flavors.


Step-by-Step Guide to Making M&M Cookie Dough Fudge

1. Toast the Flour

  • Begin by toasting the flour to eliminate any potential bacteria. Spread it on a baking sheet and bake at 350°F (175°C) for 5–10 minutes, stirring occasionally.

2. Cream the Butter and Sugar

  • In a large mixing bowl, beat the butter and brown sugar until smooth and fluffy. This ensures a creamy, non-grainy fudge base.

3. Add Sweetened Condensed Milk and Vanilla Extract

  • Gradually mix in the sweetened condensed milk and vanilla extract, blending until smooth and well incorporated.

4. Fold in Chocolate Chips and M&Ms

  • Gently fold in mini chocolate chips and M&Ms, reserving some M&Ms to sprinkle on top for added color.

5. Chill the Fudge

  • Pour the mixture into a lined 8×8-inch baking dish, smoothing it evenly. Sprinkle the reserved M&Ms on top, pressing them slightly into the fudge. Refrigerate for at least 2 hours, or until set.

For tips on achieving the right consistency, visit our Perfect Guide to No-Bake Desserts.


Tips for the Perfect M&M Cookie Dough Fudge

  • Avoid Overmixing the Butter and Sugar: Overmixing can result in a greasy fudge. Aim for a smooth, creamy mixture.
  • Use Room Temperature Butter: This helps blend ingredients evenly.
  • Allow Time to Set: Refrigerate for a full two hours for a firmer consistency.

For more baking tips, check out our Ultimate Baking Guide to enhance your dessert skills.


Flavor Variations and Add-Ins

This M&M Cookie Dough Fudge recipe is highly adaptable, making it easy to customize:

  1. Peanut Butter Swirl: Add a swirl of creamy peanut butter for a nutty twist.
  2. Double Chocolate Fudge: Use dark chocolate chips and drizzle melted chocolate on top.
  3. Oreo Cookie Dough Fudge: Substitute half the M&Ms with crushed Oreo cookies for a cookies-and-cream effect.
  4. Nutty Delight: Mix in chopped pecans or almonds for added texture and flavor.

For a nutty, buttery dessert, try our Kentucky Butter Cake, which has a rich, moist texture that melts in your mouth.


Serving Suggestions for M&M Cookie Dough Fudge

M&M Cookie Dough Fudge is perfect for serving on various occasions:

  • Party Platters: Cut into small squares and arrange alongside cookies and brownies for a festive dessert spread.
  • Gifting: Wrap in decorative boxes for holiday treats or thoughtful gifts.
  • Dessert Pairing: Serve with a scoop of vanilla ice cream to balance the sweetness.

For another great gifting option, try our Classic Apple Dumplings, which make for a cozy and nostalgic dessert.


Storing and Freezing M&M Cookie Dough Fudge

To keep your fudge fresh:

  • Storage: Store in an airtight container at room temperature for up to a week or refrigerate for up to two weeks.
  • Freezing: Freeze in an airtight, freezer-safe container for up to three months. Thaw at room temperature before serving.

If you love desserts that can be stored and savored later, try our No-Bake Banana Pudding Cheesecake, which is easy to make ahead and freeze for special occasions.


Frequently Asked Questions (FAQs)

Here are answers to common questions about M&M Cookie Dough Fudge:

1. Do I have to toast the flour?

  • Yes, toasting the flour is essential for safety as it eliminates potential bacteria.

2. Can I use different M&Ms?

  • Absolutely! Try peanut butter, caramel, or mini M&Ms for different flavors and textures.

3. How do I make the fudge less sweet?

  • Use semi-sweet or dark chocolate chips to balance the sweetness from the M&Ms.

4. What’s the best way to keep the fudge from sticking?

  • Line the baking pan with parchment paper, leaving an overhang for easy removal.

5. Can I add other toppings to this fudge?

  • Yes, feel free to sprinkle on crushed pretzels, sprinkles, or a drizzle of melted chocolate.

For more answers to common dessert questions, check out our Dessert Tips and Tricks for everything from baking to storing treats.


Nutritional Information and Healthier Alternatives

Each piece of M&M Cookie Dough Fudge provides approximately:

  • Calories: 200
  • Fat: 9g
  • Carbohydrates: 28g
  • Protein: 2g

For a lighter version, consider reducing the sugar and opting for dark chocolate chips. Adding nuts can also increase protein content.


Health Benefits of Chocolate in Moderation

Chocolate provides several health benefits when consumed in moderation:

  • Mood Booster: Chocolate contains compounds that can improve mood.
  • Antioxidants: Dark chocolate, in particular, is rich in antioxidants, supporting heart health.

For more on chocolate’s benefits, see Health Benefits of Chocolate.


Conclusion: Enjoy Every Bite of M&M Cookie Dough Fudge

M&M Cookie Dough Fudge is a delightful, no-bake treat that’s as colorful as it is delicious. With its blend of creamy fudge, cookie dough flavor, and crunchy M&Ms, this dessert is a crowd-pleaser perfect for any occasion. Try experimenting with different flavors or toppings to make it your own, and share the sweetness with family and friends.

For more sweet inspiration, try our Strawberry Freezer Pie, another quick, no-bake dessert that’s perfect for summer gatherings.

One-Pot Chicken Parmesan Pasta: Quick, Delicious Comfort Food for Busy Nights

chicken pasta one-pot recipe, easy chicken parmesan pasta, one-skillet chicken pasta, creamy chicken parmesan pasta, Italian chicken pasta

Delicious One-Pot Chicken Parmesan Pasta: A Perfect Weeknight Meal

One-Pot Chicken Parmesan Pasta combines tender chicken, pasta, marinara sauce, and melted cheese into one comforting dish. This all-in-one recipe means fewer dishes, less fuss, and maximum flavor, making it ideal for busy weeknights. With a few pantry staples and some fresh ingredients, you can prepare a meal that satisfies the whole family in under an hour.

For another quick and comforting dish, try our Crockpot Potato Soup—a warming meal that pairs beautifully with this pasta for a cozy dinner.


Essential Ingredients for One-Pot Chicken Parmesan Pasta

To make this dish, you’ll need the following key ingredients:

  • Chicken Breast: Provides lean protein and a tender bite.
  • Pasta: Rotini, penne, or any pasta that holds sauce well.
  • Marinara Sauce: Adds tomato-based flavor and binds the pasta.
  • Chicken Broth: Creates the base for the sauce, enhancing flavor.
  • Mozzarella and Parmesan Cheese: Melt for a creamy, cheesy finish.
  • Garlic: Adds depth and fragrance.
  • Italian Seasoning, Salt, and Pepper: Seasoning brings out the rich flavors.

If you love Italian-inspired meals, check out our Slow Cooker Baked Ziti for another one-pot wonder.


Step-by-Step Guide to Making One-Pot Chicken Parmesan Pasta

1. Sauté the Chicken

  • In a large pot or Dutch oven, heat olive oil over medium-high heat. Add diced chicken breast and cook until golden brown, about 5–7 minutes. Season with salt and pepper.

2. Add Garlic and Italian Seasoning

  • Add minced garlic and Italian seasoning, cooking for an additional 1–2 minutes until fragrant. This step infuses the chicken with a robust, Italian flavor base.

3. Combine Pasta, Marinara, and Broth

  • Pour in the marinara sauce, chicken broth, and pasta. Stir everything together, ensuring the pasta is submerged in the liquid. Bring the mixture to a boil, then reduce to a simmer.

4. Simmer Until Pasta is Tender

  • Let the pasta cook for about 10–12 minutes, stirring occasionally to prevent sticking. Adjust the heat as needed to maintain a gentle simmer until the pasta is tender.

If you want to learn more about perfect pasta techniques, check out Guide to Perfect Pasta Cooking for helpful tips on achieving the right texture.

5. Add Cheese and Serve

  • Stir in half of the mozzarella and Parmesan cheese, allowing them to melt into the sauce. Sprinkle the remaining cheese over the top, cover, and let it sit until melted. Garnish with fresh basil or parsley if desired.

If you enjoy creamy pasta dishes, you might love our Cheesy Smoked Sausage Pasta for another one-pot dinner idea.


Tips for Perfect One-Pot Chicken Parmesan Pasta

  • Avoid Overcooking the Chicken: Browning the chicken lightly ensures it stays tender throughout the cooking process.
  • Use the Right Pasta: Choose a pasta shape that holds sauce well, like penne or rigatoni, for optimal flavor absorption.
  • Balance Liquid Levels: Adding enough broth prevents the pasta from drying out and creates a creamy texture when combined with the cheese.

For a heartier one-pot meal, try our Crock Pot Beef Tips, which has a similar comforting flavor.


Recipe Variations and Flavor Additions

This one-pot chicken parmesan pasta recipe can be customized to suit your preferences:

  1. Creamy One-Pot Chicken Parmesan Pasta: Add ½ cup of heavy cream along with the broth for a rich, creamy texture.
  2. Spicy Variation: Sprinkle crushed red pepper flakes or use a spicy marinara sauce for an extra kick.
  3. Vegetable Additions: Add quick-cooking vegetables like spinach or zucchini during the last few minutes of cooking to boost nutrition.

Serving Suggestions for One-Pot Chicken Parmesan Pasta

  • Garlic Bread: The pasta pairs perfectly with our Classic Garlic Bread, providing a crunchy contrast to the creamy pasta.
  • Caesar Salad: A crisp Caesar salad complements the pasta, adding freshness and a tangy note.
  • Red Wine Pairing: Serve with a light red wine like Chianti or Pinot Noir to balance the rich flavors.

For more easy meal ideas that serve well with this pasta, see our Italian Sausage Pasta, which offers a different twist on classic Italian flavors.


Storing and Reheating One-Pot Chicken Parmesan Pasta

To preserve the texture and flavor of this pasta:

  • Refrigeration: Store in an airtight container in the fridge for up to 3 days.
  • Freezing: Freeze individual portions in freezer-safe containers for up to 3 months.
  • Reheating: To reheat, add a splash of chicken broth to restore creaminess, then microwave or heat on the stove.

For more tips on preserving one-pot meals, check out Tips for Cooking One-Pot Meals.


Frequently Asked Questions (FAQs)

Here are some common questions about One-Pot Chicken Parmesan Pasta:

1. Can I make this recipe gluten-free?

  • Yes, simply substitute gluten-free pasta, but be aware of cooking time adjustments.

2. What’s the best way to prevent the pasta from becoming mushy?

  • Ensure the pasta is just submerged in liquid and keep a close eye on cooking time to avoid overcooking.

3. Can I use pre-cooked chicken for this recipe?

  • Yes, add it towards the end to prevent it from drying out.

4. Can I make this dish dairy-free?

  • Use dairy-free cheese alternatives for a similar creamy effect.

For a similar recipe without dairy, try our Vegan Pasta Salad, which uses fresh ingredients for a flavorful twist.


Nutritional Information and Health Benefits

Each serving of One-Pot Chicken Parmesan Pasta provides approximately:

  • Calories: 420
  • Protein: 28g
  • Carbohydrates: 45g
  • Fat: 12g

For a lighter version, reduce the cheese or use whole-wheat pasta. Chicken offers lean protein, while pasta provides energy-boosting carbohydrates, making this dish both satisfying and nutritious.


Health Benefits of Chicken and Whole Ingredients

Using wholesome ingredients in this recipe contributes to its overall healthiness:

  • Chicken: Rich in protein, aiding in muscle repair and energy.
  • Garlic and Italian Seasoning: These natural ingredients provide antioxidants and add flavor without extra calories.

For more on the health benefits of chicken, see Health Benefits of Chicken.


Conclusion: Enjoy Every Bite of One-Pot Chicken Parmesan Pasta

This One-Pot Chicken Parmesan Pasta is a delicious, hassle-free dish that brings the comfort of Italian cuisine to your table in one pot. With simple ingredients and an easy preparation process, this recipe is perfect for both beginners and seasoned cooks. Experiment with different flavors and enjoy a meal that’s sure to please everyone at the table.

For more family-friendly dinner ideas, explore our One-Pot Creamy Broccoli Pasta, which offers a unique twist on pasta night.