In the pantheon of comfort foods, crispy chicken strips hold a revered place. They’re the culinary equivalent of a warm hug, a dish that conjures memories of childhood dinners, game-day gatherings, and late-night snacks. This guide will take you through the art and science of making the perfect crispy chicken strips, ensuring that you can bring this beloved comfort food to your table, with a golden crust and tender, juicy interior every time.
The Origins of Crispy Chicken
Before we dive into the recipe itself, let’s take a moment to appreciate the journey of crispy chicken through history. While the exact origins of fried chicken are disputed, its roots can be traced back to various cultures, each adding its unique twist to the preparation. The version we know and love today—a marriage of seasoning, breading, and deep-frying—owes much to the culinary traditions of the American South, where fried chicken became a staple. The adaptation into strips or tenders is a more recent innovation, offering a boneless, snack-sized version that’s perfect for dipping and sharing.
Selecting Your Ingredients
The key to outstanding crispy chicken strips lies in the quality and preparation of your ingredients. This recipe calls for simple, everyday items, but each plays a crucial role in the final outcome.
- Chicken: Opting for tender fillets ensures that each strip is easy to eat and cooks evenly.
- Seasoning: The addition of garlic, paprika, salt, and pepper is not just about flavor—it’s about creating a depth of taste that complements the chicken and stands up to the frying process.
- Breading: A triple-layer coat of flour, eggs, and breadcrumbs guarantees that irresistible crunch, while the eggs and garlic provide a layer of flavor that binds the breading to the chicken.
The Art of Breading
Breading is not just a step in the process—it’s an art form. It’s what separates the good from the great in the world of crispy chicken strips. Achieving the perfect breading is about more than just adhering to the recipe; it’s about ensuring each strip is evenly coated, creating a barrier that seals in the chicken’s moisture during frying. The sequential dredge in flour, egg wash, and breadcrumbs, each seasoned to perfection, builds up layers of texture and flavor.
Mastering the Fry
Frying, the most critical step in achieving the perfect crispy chicken strip, is all about temperature control and timing. The oil needs to be hot enough to immediately start crisping the breading upon contact, but not so hot as to burn the exterior before the chicken is cooked through. This section could delve into the science of frying, including how the Maillard reaction creates that golden-brown deliciousness and how to maintain the ideal frying temperature.
Serving and Enjoyment
Crispy chicken strips are more than just a dish; they’re an experience. This section can explore various ways to serve and enjoy them, from traditional dips to more inventive sauces, and how to pair them with sides to create a balanced meal. It could also discuss the communal joy of sharing crispy chicken strips, making them a staple for gatherings.
Beyond the Recipe
Incorporating crispy chicken strips into your culinary repertoire opens up a world of creativity. This section could offer variations on the basic recipe, such as adding different spices to the breading or experimenting with baking instead of frying for a healthier option. It could also explore the global appeal of crispy chicken, highlighting similar dishes from around the world and how they reflect their cultural origins.
FAQs: Crispy Chicken Strips
Can I use chicken breasts instead of fillets for this recipe? Yes, chicken breasts can be used. Simply slice them into thin strips. Keep in mind that cooking times may vary slightly based on the thickness of the strips.
How can I ensure my chicken strips are fully cooked without burning the coating? Maintaining the correct oil temperature is crucial. Aim for 350°F to 375°F (175°C to 190°C). Use a cooking thermometer to monitor the oil. Additionally, don’t overcrowd the pan, as this can lower the temperature. Cooking in batches ensures even cooking and browning.
What are the best breadcrumbs to use for extra crunch? Panko breadcrumbs are an excellent choice for achieving an extra crunchy texture. They’re larger and flakier than traditional breadcrumbs, providing a crispier finish to your chicken strips.
Can I bake these chicken strips instead of frying? Absolutely! To bake, preheat your oven to 400°F (200°C), place the breaded chicken strips on a baking sheet lined with parchment paper, and bake for 20-25 minutes, flipping halfway through, until golden brown and cooked through.
Is there a gluten-free alternative for breading? For a gluten-free version, you can use almond flour or coconut flour in place of all-purpose flour and crushed gluten-free cereal or breadcrumbs for the outer coating. Ensure all other ingredients used are gluten-free.
Can I make these chicken strips in an air fryer? Yes, air frying is a great alternative. Preheat your air fryer to 390°F (200°C), place the chicken strips in the basket, ensuring they don’t overlap, and cook for 10-12 minutes, flipping halfway through, until golden brown and cooked through.
How can I add more flavor to the breading? Feel free to experiment with spices and herbs. Adding Parmesan cheese, smoked paprika, garlic powder, onion powder, or dried herbs like oregano and thyme to your flour mixture can enhance the flavor profile.
What dipping sauces pair well with crispy chicken strips? The beauty of chicken strips is their versatility with dipping sauces. Classic options include ketchup, barbecue sauce, honey mustard, ranch dressing, and sweet and sour sauce. For something different, try a homemade garlic aioli or spicy buffalo sauce.
How should I store leftovers, and how do I reheat them? Leftover chicken strips can be stored in an airtight container in the refrigerator for up to 3 days. Reheat in the oven at 375°F (190°C) for 10-15 minutes, or until heated through and crispy. Microwaving is not recommended, as it can make the breading soggy.
Can I freeze cooked chicken strips? Yes, cooked chicken strips freeze well. Allow them to cool completely, then freeze them on a baking sheet before transferring to a freezer-safe bag or container. They can be frozen for up to 3 months. Reheat from frozen in the oven for best results.
Conclusion: Crispy Chicken Strips as a Culinary Journey
In closing, this article could reflect on crispy chicken strips not just as a recipe, but as a journey through history, culture, and personal memories. It could emphasize how, by mastering this dish, you’re not just feeding your body but also nourishing your soul with the warmth of shared experiences and the joy of cooking.
Print
Crispy Chicken Strips Recipe
Description
Crispy chicken strips are a universally loved treat, ideal for parties, family dinners, or simply as a delightful snack. The secret to the perfect chicken strip lies in its crispy exterior paired with tender, juicy chicken inside. This recipe takes you through a simple yet foolproof method to achieve just that, with a hint of garlic to add a depth of flavor that will have everyone asking for seconds. Here’s how to make them.
Ingredients
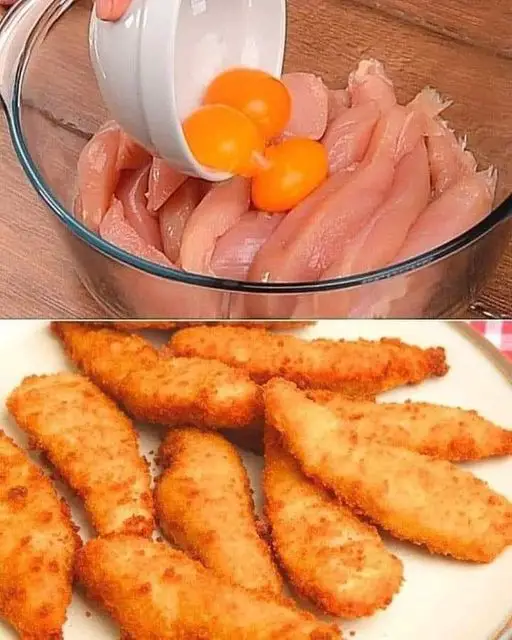
- 3 eggs: The foundation of your wet batter, helping the coating stick to the chicken.
- 2 chicken fillets: Sliced into strips. Choosing high-quality chicken is key to getting that tender, juicy bite.
- 2 cloves of garlic: Minced. Garlic adds a punch of flavor that complements the chicken beautifully.
- 1 cup all-purpose flour: For dredging. It creates the first layer of the crisp coating.
- 1 cup breadcrumbs: For the outer layer. Breadcrumbs are the secret to achieving that satisfying crunch.
- 1 teaspoon paprika: Adds a subtle heat and color to the chicken strips.
- Salt and pepper to taste: For seasoning the chicken and enhancing its natural flavors.
- Vegetable oil for frying: Choose an oil with a high smoke point to achieve a golden-brown finish without burning.
Instructions
Prep the Chicken: Start by slicing the chicken fillets into strips, roughly the same size for even cooking. Season them with salt and pepper to taste.
Create the Garlic-Egg Wash: In a shallow dish, beat the eggs and mix in the minced garlic. This mixture will not only add flavor but also ensure the flour and breadcrumbs adhere to the chicken strips.
Dredge the Chicken: Set up your dredging station with two more dishes – one for the flour seasoned with paprika, salt, and pepper, and another for the breadcrumbs. Coat each chicken strip in the flour, dip it into the garlic-egg wash, and then roll it in the breadcrumbs until fully covered.
Fry the Chicken Strips: Heat vegetable oil in a large frying pan over medium-high heat. Once hot, carefully add the chicken strips, making sure not to overcrowd the pan. Fry until golden brown and crispy, about 3-4 minutes per side, depending on the thickness of the strips.
Drain and Serve: Once cooked, transfer the chicken strips to a plate lined with paper towels to drain any excess oil. Serve hot with your favorite dipping sauces, such as honey mustard, barbecue sauce, or a creamy garlic dip.
Notes
Tips for Perfect Crispy Chicken Strips:
- Double Coating: For extra crunch, you can double-dip the chicken strips by repeating the flour and egg wash steps before coating them in breadcrumbs.
- Resting Time: Let the coated chicken strips rest for about 5-10 minutes before frying. This helps the coating to set and reduces the chances of it falling off during frying.
- Frying Temperature: Keep the oil at a consistent temperature of around 350°F (175°C) to ensure even cooking and browning. Using a thermometer can help monitor the oil’s temperature.
Serving Suggestions:
Crispy chicken strips are incredibly versatile. They can be served as a main course with sides of mashed potatoes and coleslaw, as a protein-rich salad topping, or as a snack with an assortment of dips. They’re also a hit with kids and adults alike, making them a great choice for family meals or gatherings.
