How to Make the Best S’mores Crunchwraps: A Campfire-Inspired Dessert Wrap

s’mores dessert wrap, campfire s’mores recipe, chocolate marshmallow crunchwrap, tortilla dessert wrap, easy s’mores recipe

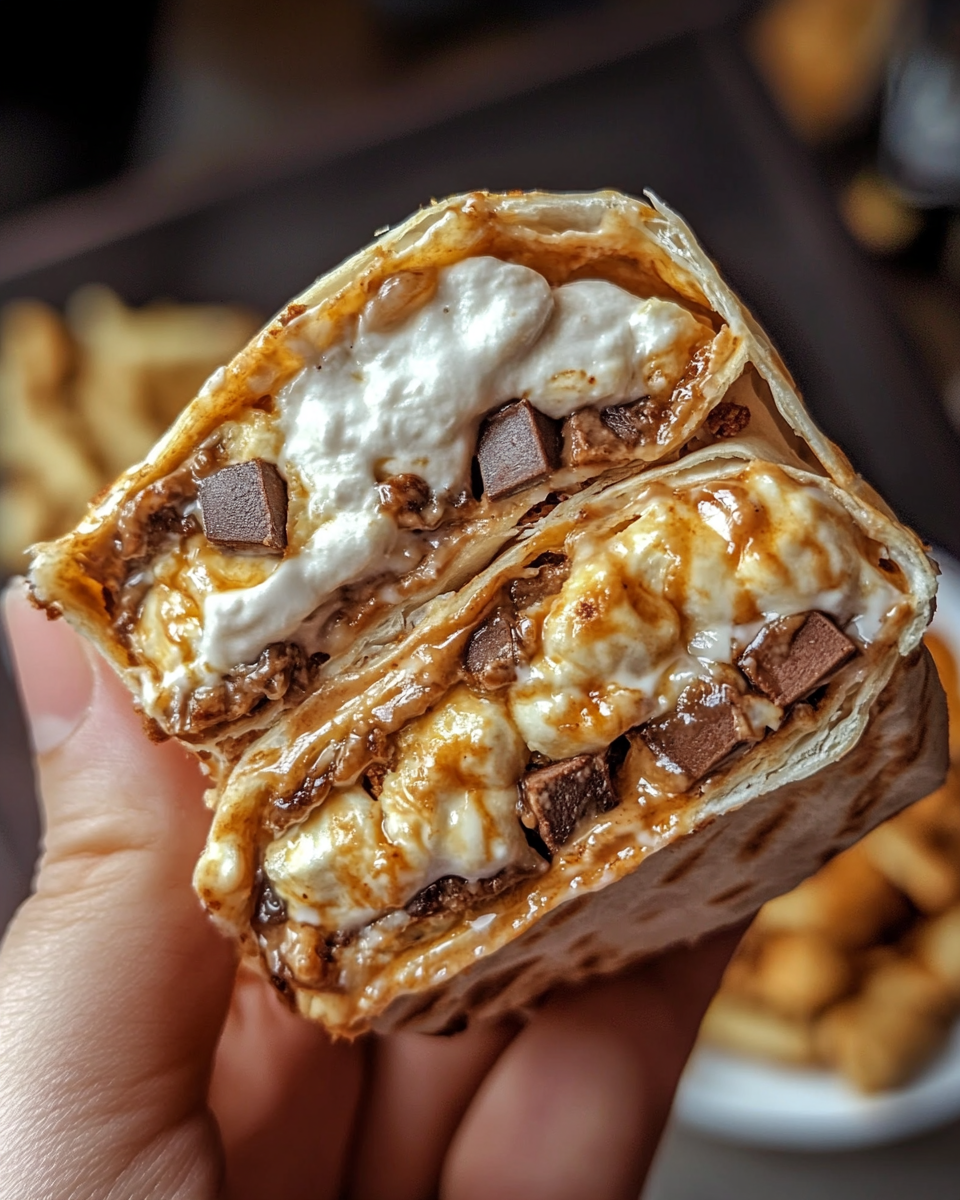
S’mores Crunchwraps: A Delicious Twist on a Campfire Classic

Imagine the gooey, sweet goodness of traditional s’mores packed into a portable, crispy tortilla wrap—S’mores Crunchwraps combine the iconic campfire treat with the convenience of a handheld snack. This fun dessert is perfect for gatherings, kids’ parties, or even as an indulgent midnight treat. Let’s dive into everything you need to know to make the ultimate S’mores Crunchwrap.


Essential Ingredients and Tools

To craft your S’mores Crunchwraps, you’ll need:

  • Graham Crackers – These form the base layer, providing a familiar, crunchy texture.
  • Chocolate Bars – Opt for milk or dark chocolate that melts well, enhancing the gooey factor.
  • Marshmallows – Standard or mini marshmallows work best, but marshmallow fluff can be an alternative for smoother layering.
  • Flour Tortilla – Choose a large, soft tortilla to securely wrap all the ingredients without tearing.
  • Butter or Oil – For achieving a golden, crispy exterior.
  • Optional: Nutella, peanut butter, or caramel drizzle for added flavor dimensions.

For tools, you’ll need a skillet or griddle, spatula, and some parchment paper for assembly ease.


How to Make S’mores Crunchwraps: Step-by-Step

Creating a S’mores Crunchwrap involves layering, folding, and cooking to perfection. Here’s a detailed guide:

  1. Prepare Ingredients and Work Area
    • Crush the graham crackers slightly to help them fit in the wrap, and break the chocolate bars into smaller pieces.
    • Preheat your skillet over medium heat, adding a touch of butter for flavor.
  2. Layer the Filling
    • Start with a piece of tortilla on a flat surface. Place a small pile of crushed graham crackers in the center.
    • Add a layer of chocolate pieces, followed by marshmallows. Consider trying a few variations, like a Nutella spread or a sprinkle of sea salt on the chocolate for added depth.
  3. Fold the Tortilla
    • Carefully fold the edges of the tortilla inward, creating a sealed wrap around the filling. Use a technique similar to folding a burrito but ensure all sides are sealed to prevent leaking during cooking.
  4. Cook the Wrap
    • Place the Crunchwrap in the skillet, seam side down, and cook for about 2-3 minutes on each side or until golden and crisp. The goal is to achieve a crunchy exterior while allowing the chocolate and marshmallow to melt inside.

For a more detailed method, you can check out this guide on creative s’mores variations, which includes additional twists on the classic dessert.


Creative Variations to Try

Once you’ve mastered the basic S’mores Crunchwrap, explore these flavor variations:

  • Peanut Butter S’mores Crunchwrap: Spread peanut butter on the tortilla before adding graham crackers, chocolate, and marshmallows.
  • Salted Caramel: Drizzle caramel sauce over the filling and add a pinch of sea salt for a sweet and savory experience.
  • Cookies and Cream: Substitute graham crackers with crushed Oreos and use white chocolate for a new twist.
  • Seasonal Variations: For example, adding peppermint bark during the holiday season or pumpkin spice in the fall can make your Crunchwraps seasonally festive.

Experimenting with these twists can turn a simple recipe into a versatile dessert that surprises and delights.


Tips for the Perfect S’mores Crunchwrap

To elevate your S’mores Crunchwrap game, keep these expert tips in mind:

  • Avoid Overfilling: Too much filling can make the wrap hard to seal and may lead to ingredient leaks while cooking.
  • Seal Securely: A secure seal is crucial for even cooking. Consider using a toothpick to hold edges in place while cooking (just remember to remove it before serving).
  • Low to Medium Heat: Cooking over high heat may cause the tortilla to burn before the filling has melted. Medium heat is ideal for a crispy wrap with a molten center.

For more dessert wrap ideas, refer to this recipe guide on crafting unique handheld desserts, which provides inspiration for portable treats like the S’mores Crunchwrap.


Healthier and Vegan-Friendly Options

If you’re looking to make a lighter or vegan version of this treat, try these substitutions:

  • Vegan Marshmallows: There are several brands of vegan marshmallows available that mimic the traditional texture.
  • Dark Chocolate: Opt for dairy-free dark chocolate.
  • Whole-Wheat or Gluten-Free Tortillas: These can add a healthy twist without compromising on taste.

For a healthier spin, consider reducing the chocolate or opting for a lower-sugar dark chocolate.


FAQs About S’mores Crunchwraps

Q: Can I bake S’mores Crunchwraps instead of pan-frying?
A: Yes, baking at 350°F for about 8-10 minutes can work, though you may not achieve the same crispiness as with pan-frying.

Q: What’s the best way to store leftover Crunchwraps?
A: Allow them to cool completely, wrap tightly in foil, and store in the fridge for up to 3 days. Reheat in a toaster oven to retain crispiness.

Q: Can I add fruits like bananas or strawberries?
A: Absolutely! Adding thinly sliced fruits can introduce a fresh, tangy balance to the sweetness of the S’mores Crunchwrap.


Final Thoughts and Serving Suggestions

S’mores Crunchwraps are a fun, versatile way to enjoy the essence of campfire s’mores all year round. Serve with a side of vanilla ice cream or a drizzle of chocolate sauce for an indulgent experience. The convenience and ease of this recipe make it a hit for parties or family nights.


Internal Linking Opportunities

Based on the sitemap, here are some articles from ExoRecipes that make for ideal internal links to enhance user engagement and SEO:

  1. Homemade S’mores JarsFor a unique presentation of s’mores, link to ExoRecipes’ S’mores Jars recipe to suggest an alternative way to enjoy this campfire classic at home.
  2. Chocolate Magic Shell Yogurt CupFor chocolate lovers, guide readers to this recipe, which pairs well with the S’mores Crunchwraps for a dessert-focused night.
  3. Cinnamon Sugared Doughnut Drops Recipe – Perfect as a companion dessert suggestion in the “Serving Suggestions” section.

Rice Krispie Chocolate Chip Cookies: A Crispy Twist on a Classic Recipe

Rice Krispies chocolate chip cookies, crispy chocolate chip cookies, chocolate chip cookies with Rice Krispies, crunchy chocolate chip cookies

Rice Krispie Chocolate Chip Cookies: A Crispy Twist on a Classic Treat

If you love the combination of crunchy Rice Krispies and gooey chocolate chips, these cookies are a must-try! They’re easy to make, bringing together the classic flavors of chocolate chip cookies with a unique twist. The addition of Rice Krispies cereal provides a delightful crunch, making these cookies both soft and crispy – perfect for any occasion.

To expand your recipe collection of fun, crunchy treats, try our Smores Jars: Bringing the Campfire to Your Kitchen or Dorito Chicken Casserole: A Crunchy Twist on Comfort Food, each offering unique textures and flavors.


Key Ingredients for Rice Krispie Chocolate Chip Cookies

These cookies only require a few ingredients, but each one contributes to the delicious balance of flavors and textures:

  • Rice Krispies – Adds an airy crunch that contrasts perfectly with the soft cookie dough.
  • Chocolate Chips – For a gooey, sweet addition.
  • Butter – The base for a rich, chewy texture.
  • Brown and White Sugar – A mix of sugars provides depth and the right amount of sweetness.
  • Eggs and Vanilla Extract – Classic cookie ingredients that bring everything together.
  • All-Purpose Flour and Baking Soda – Provides structure to the cookie dough.

Step-by-Step Guide to Making Rice Krispie Chocolate Chip Cookies

1. Preparing the Ingredients (150 words)

  • Soften Butter: For a smooth, creamy dough, let the butter soften at room temperature.
  • Measure Precisely: Accurate measurements ensure balanced flavor and texture.

2. Mixing the Dough (200 words)

  • Cream Butter and Sugars: Cream together butter, brown sugar, and white sugar until fluffy.
  • Add Wet Ingredients: Beat in eggs and vanilla for a rich, cohesive dough.

3. Folding in Rice Krispies and Chocolate Chips (200 words)

  • Gently Fold: To maintain the Rice Krispies’ crunch, fold them in carefully.
  • Add Chocolate Chips Last: This ensures even distribution of chocolate in every bite.

4. Portioning and Shaping the Cookies (200 words)

  • Scoop Evenly: Use a cookie scoop to keep the cookies uniform.
  • Optional: Chill Dough: Chilling for 20-30 minutes can result in a thicker, chewier cookie.

5. Baking the Cookies (150 words)

  • Bake at 350°F: Bake until the edges are golden brown, keeping the centers soft and chewy.
  • Cooling Tips: Allow cookies to cool on the sheet for a few minutes before transferring to a rack.

For more unique twists on classic treats, check out our Reese’s Pieces Chocolate Chip Cookie Bars, which offer a similar blend of crunchy and chewy textures.


Tips for Perfect Rice Krispie Chocolate Chip Cookies

To achieve the best results, here are some tips and tricks:

  • Use Fresh Ingredients: Ensures the best flavor and texture.
  • Avoid Overmixing: Overmixing the dough can make cookies tough.
  • Chill the Dough: If you want a thicker cookie, chilling helps control spreading.

Flavor Variations and Creative Additions

Customize these cookies with fun variations and extra ingredients:

  • Add Mini Marshmallows: For a Rice Krispie treat-inspired version.
  • Try Different Chocolate Chips: Experiment with dark chocolate, white chocolate, or butterscotch.
  • Include Coconut Flakes: Adds a unique flavor and extra chewiness.

For more crunchy dessert ideas, take a look at our Cinnamon Sugared Doughnut Drops, which also bring delightful textures and a sweet flavor.


FAQs About Rice Krispie Chocolate Chip Cookies

Can I freeze the cookie dough?
Yes, portion the dough and freeze on a baking sheet. Once frozen, transfer to a freezer-safe bag. Bake directly from frozen, adding a few extra minutes to the bake time.

How do I keep Rice Krispies crunchy in the cookies?
To maintain crunch, fold in the Rice Krispies gently and avoid overmixing. Bake at the correct temperature and avoid overbaking.

What other mix-ins work well with Rice Krispies?
Mini marshmallows, chopped nuts, or white chocolate chips make excellent additions for extra texture and flavor.

How should I store Rice Krispie chocolate chip cookies?
Store in an airtight container at room temperature for up to 5 days. Adding a slice of bread to the container helps keep them soft.

Can these cookies be made gluten-free?
Yes, substitute the flour with a gluten-free blend, and make sure the Rice Krispies you use are certified gluten-free.


Conclusion

With their perfect balance of crunchy Rice Krispies and gooey chocolate chips, these cookies bring a delightful twist to the classic chocolate chip cookie. Easy to make and fun to eat, they’re perfect for family gatherings, school lunches, or anytime you want a sweet, crunchy treat. Don’t forget to explore other creative dessert ideas on our site, such as Ultimate Blueberry Pie for more baking inspiration.

One-Pot Macaroni Cheeseburger Soup: A Hearty Comfort Food Recipe

cheeseburger soup, macaroni cheeseburger soup, one-pot cheeseburger soup, creamy cheeseburger pasta soup, hamburger macaroni soup, cheesy beef soup

One-Pot Macaroni Cheeseburger Soup: A Cozy Comfort Meal in One Bowl

Nothing says comfort like a warm, hearty bowl of macaroni cheeseburger soup. This recipe combines all the flavors of a cheeseburger, complete with ground beef, cheddar cheese, and elbow macaroni, all simmered in one pot for easy cooking and cleanup. It’s a perfect meal for chilly evenings or when you crave something filling and delicious.

For more comforting soup options, pair this dish with Crockpot Potato Soup with Hashbrowns, or try serving it alongside Slow Cooker Baked Ziti to create a well-rounded family meal.


Ingredients for One-Pot Macaroni Cheeseburger Soup

Creating a rich, creamy, and flavorful soup requires the following key ingredients:

  • Ground Beef – Adds a hearty, rich base and classic cheeseburger flavor.
  • Elbow Macaroni – The perfect pasta shape for holding broth and cheese.
  • Cheddar Cheese – Essential for that signature creamy, cheesy taste.
  • Beef Broth – Creates a savory, rich broth that complements the beef.
  • Vegetables – Onions and garlic for flavor, with optional carrots and celery.
  • Seasonings – Salt, pepper, garlic powder, and optional Worcestershire sauce for depth.

If you love cheesy, hearty dishes, consider trying Creamy Garlic Parmesan Chicken for another creamy, savory meal option.


Step-by-Step Instructions for One-Pot Macaroni Cheeseburger Soup

1. Prepare the Ingredients (200 words)

  • Start by chopping onions, garlic, and any optional vegetables.
  • Grate cheese for smoother melting, and set aside your seasonings.

2. Brown the Ground Beef (150 words)

  • In a large pot, brown the ground beef until fully cooked. This process adds a depth of flavor, so let it brown thoroughly.

3. Add Vegetables and Seasonings (200 words)

  • Sauté the onions and garlic, then add seasonings to build a rich base for the soup.

4. Incorporate Broth and Pasta (200 words)

  • Add the beef broth, bring to a simmer, and add the macaroni. Cooking the pasta in the broth allows it to absorb all the flavors.

5. Add Cheese and Final Touches (150 words)

  • Once the macaroni is tender, add cheese and stir until melted. Adjust the thickness by adding more broth or cream as desired.

Tips for Making the Best Macaroni Cheeseburger Soup

For the best texture and flavor, keep these tips in mind:

  • Use Freshly Grated Cheese: Pre-grated cheese can be clumpy; freshly grated cheese melts smoother.
  • Add Pasta at the Right Time: To avoid mushy pasta, add it closer to the end of cooking.
  • Adjust Consistency: Add more broth for a thinner soup or extra cheese for a creamier consistency.

Flavor Variations for Macaroni Cheeseburger Soup

This soup is versatile and easily customizable:

  • Spicy Version: Add diced jalapeños or a splash of hot sauce for a kick.
  • Vegetable-Loaded: Include bell peppers, carrots, or spinach for added nutrition.
  • Low-Carb Option: Substitute pasta with cauliflower or zucchini noodles.
  • Dairy-Free: Use plant-based cheese and cream alternatives.

For a more indulgent soup, try pairing this with Dorito Chicken Casserole, which combines cheesy flavors with a crunchy topping.


Frequently Asked Questions (FAQs) on Macaroni Cheeseburger Soup

Can I make this soup ahead of time?
Yes, but add the pasta just before serving to prevent it from becoming too soft.

What cheese works best for cheeseburger soup?
Sharp cheddar offers a great balance of creaminess and flavor, but feel free to mix in mozzarella or gouda.

Can I use ground turkey instead of beef?
Yes, ground turkey is a leaner option that works well with extra seasonings.

How do I prevent the pasta from getting mushy?
Cook pasta separately if you plan to store the soup, then add it before serving.

What side dishes go well with this soup?
Try pairing it with garlic bread, a side salad, or Italian Stromboli for a hearty meal.


Conclusion

One-Pot Macaroni Cheeseburger Soup is an ideal meal for chilly nights or family gatherings, offering all the flavors of a cheeseburger in a cozy, creamy soup. It’s easy to make, adaptable, and only requires one pot, making cleanup a breeze. For more comforting dishes, consider Creamy Garlic Parmesan Chicken or explore other one-pot wonders on ExoRecipes.

Cheesy Parmesan Mozzarella Bites: Perfect Appetizer Recipe for Every Occasion

cheesy bites, mozzarella Parmesan appetizer, cheese snack bites, crispy cheese balls, baked mozzarella bites, cheesy party appetizer

Cheesy Parmesan Mozzarella Bites: The Ultimate Appetizer

Indulge in the cheesy goodness of Parmesan and Mozzarella bites, a perfect combination of gooey, crispy textures and rich flavors. These bites are ideal for parties, game days, or any occasion that calls for a snack with a bit of flair. The recipe is straightforward, requiring just a few ingredients and minimal effort, making it a go-to favorite for cheese lovers.

Looking for more cozy appetizers? Pair these bites with our delicious Crockpot Potato Soup with Hashbrowns to create a hearty, comforting spread perfect for chilly evenings.


Ingredients You’ll Need for Cheesy Parmesan Mozzarella Bites

To achieve the perfect blend of crisp and melt-in-your-mouth textures, gather these ingredients:

  • Mozzarella Cheese – Provides the gooey, stretchy quality we all love.
  • Parmesan Cheese – Adds a sharp, tangy flavor and a crispy outer layer.
  • Eggs – Acts as a binder to keep everything together.
  • Breadcrumbs – Essential for a crunchy exterior.
  • Herbs and Seasonings – Garlic powder, Italian seasoning, and salt to enhance the flavors.

For those who enjoy cooking with rich, savory flavors, consider adding these bites alongside our Slow Cooker Baked Ziti for a meal that’s both satisfying and crowd-pleasing.


Step-by-Step Guide to Making Cheesy Parmesan Mozzarella Bites

1. Prepare the Ingredients (200 words)

  • Grate the Parmesan and Mozzarella cheeses finely, which will help them melt evenly and bind well.
  • Set aside a bowl with beaten eggs, another with breadcrumbs, and a mix of garlic powder, Italian herbs, and salt for seasoning.

2. Shape the Cheese Mixture (150 words)

  • Combine grated cheeses with seasoning.
  • Use a small scoop to shape them into bite-sized balls for even cooking.

3. Coating Process (150 words)

  • Dip each cheese ball into the beaten eggs, then roll in breadcrumbs until thoroughly coated.

4. Frying or Baking Options (250 words)

  • Frying: Heat oil to 350°F and fry until golden brown.
  • Baking: Place on a baking sheet, drizzle with oil, and bake at 400°F for 10-15 minutes.

5. Draining and Serving (100 words)

  • Let them drain on a wire rack to maintain crispiness, then serve with marinara sauce or ranch dressing.

Pro Tips for Perfect Bites

Achieving the perfect Cheesy Parmesan Mozzarella Bites is about balancing textures and flavors.

  • Use Freshly Grated Cheese: Pre-grated cheese has anti-caking agents that can affect the final texture.
  • Chill Before Cooking: Chilling the cheese balls helps them hold their shape better during frying or baking.
  • Choose Quality Ingredients: Opt for authentic Parmesan and Mozzarella for the best flavor.

Flavor Variations to Try

These bites are easily customizable to suit various flavor preferences:

  • Spicy Kick: Add crushed red pepper flakes to the cheese mixture.
  • Herb-Infused: Incorporate fresh basil or rosemary for a fragrant twist.
  • Italian-Inspired: Use Italian breadcrumbs for extra seasoning.

For other snack ideas that bring a twist to traditional comfort foods, check out our Dorito Chicken Casserole, which adds a satisfying crunch and bold flavor profile.


Nutritional Information and Healthier Alternatives

Homemade cheese bites can be a healthier choice compared to store-bought fried snacks:

  • Lower in Sodium: Adjust salt to taste.
  • Reduced Calories: Bake instead of frying to reduce oil usage.
  • Add Veggies: Consider adding finely chopped spinach or bell peppers for added nutrients.

For more insights on baking versus frying, see this Healthline article on baking vs. frying.


Serving Ideas and Dipping Sauces

Pair these bites with:

  • Marinara Sauce – Classic Italian dip.
  • Ranch Dressing – Creamy, tangy complement.
  • Pesto – Adds an herby, rich flavor.

If you’re hosting, pair them with other appetizers like our easy Italian Stromboli, which also has an Italian flavor base and complements cheesy bites perfectly.


FAQs on Cheesy Parmesan Mozzarella Bites

Can I freeze these cheese bites?
Yes, freeze uncooked bites on a baking sheet before transferring them to a freezer-safe bag. Cook from frozen, adjusting cooking time as needed.

What’s the best way to reheat them?
Reheat in an oven or air fryer for crispiness; avoid microwaving as it may make them soggy.

How do I keep them from sticking during frying?
Ensure the oil is hot enough before adding the bites, and avoid overcrowding the pan.

Are there alternatives to eggs for coating?
Yes, use a milk-and-flour mixture as a binder if eggs are not an option.

What other cheeses can I use?
Cheddar, Gouda, or even Swiss can work for different flavor profiles.


Conclusion

With their crispy exterior and melty cheese interior, Cheesy Parmesan Mozzarella Bites are a treat everyone will love. Perfect as a party appetizer or a simple snack, these bites bring together Mozzarella’s gooeyness and Parmesan’s sharpness, creating a mouthwatering flavor combination. Remember to experiment with flavors and try pairing these with complementary dishes like our Italian-inspired Stromboli to make your next meal extra special.

Homemade KFC Chicken Recipe: Crispy, Flavorful, and Easy to Make at Home

KFC-style chicken, crispy fried chicken recipe, homemade fried chicken, Kentucky fried chicken recipe, KFC copycat chicken

Homemade KFC Chicken Recipe: A Guide to Crispy, Flavorful Perfection

Making KFC-style chicken at home has become a fun and popular trend. This guide will help you recreate the irresistible crunch and secret blend of spices right in your kitchen, offering a cost-effective and personalized alternative to fast food.


1. Introduction to Homemade KFC Chicken (200 words)

Kentucky Fried Chicken, or KFC, is legendary for its crispy coating and unique flavor, attributed to its secret blend of 11 herbs and spices. This homemade version gives you control over ingredients, making it a healthier choice while retaining that iconic KFC taste.

For those interested in additional homemade comfort foods, check out our Crockpot Potato Soup with Hashbrowns for a cozy side dish to accompany your fried chicken.


2. Essential Ingredients for Homemade KFC Chicken (300 words)

To nail the taste and texture, gather these core ingredients:

  • Chicken: Preferably bone-in cuts like drumsticks, thighs, and wings.
  • Buttermilk: A classic marinade that tenderizes and flavors the meat.
  • 11 Spices & Herbs: A combination of garlic powder, onion powder, paprika, black and white pepper, celery salt, dried thyme, basil, and more.
  • Flour: The base for a crispy coating.
  • High-Heat Oil: Like canola or peanut oil for deep-frying.

3. Step-by-Step Cooking Instructions for KFC-Style Chicken (700 words)

Follow these steps to replicate that famous fried chicken experience:

  1. Marinate the Chicken
    Marinate the chicken pieces in buttermilk and a portion of the spice mix for 4 hours or overnight. This step infuses flavor and tenderness into each bite.
  2. Prepare the Flour Coating
    Mix flour with the remaining spice blend to create the perfect coating.
  3. Double Coating for Extra Crunch
    For an extra crispy texture, coat the chicken pieces twice: first in the buttermilk marinade, then in the flour mix.
  4. Frying the Chicken
    • Deep Frying: Heat oil to 350°F (175°C) and fry each piece for about 15 minutes.
    • Oven-Baking Option: For a lower-fat alternative, bake the chicken at 400°F on a wire rack for 30-40 minutes.

4. Tips for the Perfect Homemade KFC Chicken (300 words)

  • Keep Oil Temperature Consistent: Maintaining a steady temperature of around 350°F is essential to avoid greasy or soggy chicken.
  • Drain Properly: After frying, let the chicken rest on a wire rack to preserve its crunch.
  • Season Generously: Don’t skimp on the spices for that signature KFC flavor.

Consider trying other crispy favorites like crispy fried seafood techniques, which provide tips for perfecting the crunchy exterior.


5. Nutritional Comparison and Healthier Alternatives (250 words)

Homemade KFC chicken is generally healthier than fast-food options since you control the ingredients:

  • Calories: Choosing to oven-bake instead of deep-frying can reduce calories.
  • Sodium: Adjust the salt level to your preference, unlike KFC’s fixed recipe.
  • Additive-Free: Avoid preservatives and additives present in some fast-food items.

For more details on the benefits of home-cooked meals, see this Healthline article on homemade food advantages.


6. Variations on KFC-Style Chicken (300 words)

Enhance your homemade KFC chicken with these tasty variations:

  • Spicy Version: Add cayenne pepper or hot paprika for extra heat.
  • Extra Crispy: Double-dip the chicken in buttermilk and flour.
  • Herb-Infused: Fresh rosemary or thyme sprigs can be added to the oil for added aroma.

Pair your KFC-style chicken with complementary sides like our Slow Cooker Baked Ziti for a hearty meal.


7. Frequently Asked Questions (FAQs) (300 words)

  • Can I make this chicken gluten-free?
    Yes, substitute all-purpose flour with gluten-free flour.
  • What oil is best for frying?
    High-heat oils like canola or peanut oil work best.
  • Is oven-frying a good option?
    Absolutely! It’s a healthier option that still provides a crispy coating.
  • Does this taste exactly like KFC?
    While it’s close, the original recipe remains a closely guarded secret.

For more fried chicken inspiration, try our Dorito Chicken Casserole which offers a crunchy twist on comfort food classics.


8. Conclusion and Final Tips (150 words)

Creating homemade KFC chicken allows you to enjoy fast-food flavors without the added costs and preservatives. From double-coating techniques to creative spice mixes, this recipe will be a hit at any family gathering. Experiment with different herbs and spices to personalize it further, and explore ExoRecipes for more comfort food options like our KFC-Style Famous Bowl Casserole to complete your meal.