How to Make the Ultimate Pepperoni Pizza Layer Cake: A Show-Stopping Recipe

pizza cake, layered pizza, stacked pepperoni pizza, multi-layer pizza, pizza layer cake recipe

The Ultimate Guide to Making a Pepperoni Pizza Layer Cake

Are you ready to elevate your pizza game? The pepperoni pizza layer cake is a fun, unique twist on the classic pizza that adds a multi-layered flair perfect for gatherings, parties, or special events. This ultimate guide will take you through the history, preparation, and variations of the pepperoni pizza layer cake, as well as tips to make it a success every time.

Related: The Ultimate Comfort Food Crockpot Potato Soup with Hashbrowns

What Is a Pepperoni Pizza Layer Cake?

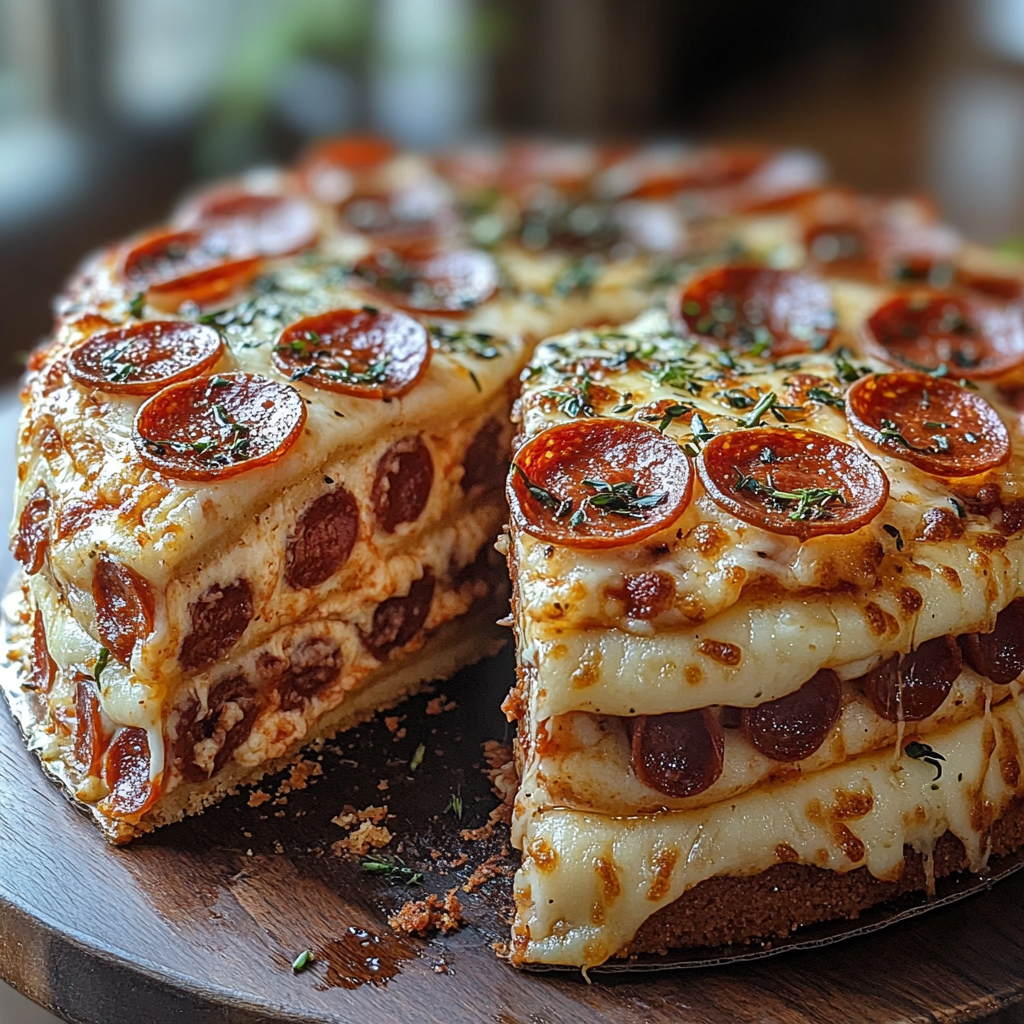
The pepperoni pizza layer cake is exactly what it sounds like—a layered stack of pizza goodness with each level loaded with sauce, cheese, and pepperoni. Imagine multiple pizzas, stacked together like a cake, providing a towering pizza experience.

This pizza creation, popularized in recent years, takes inspiration from both the deep-dish pizza and layered cakes. It combines the hearty structure of layered dishes with the savory flavors we love in a pizza.

Also See: Slow Cooker Magic: Unveiling the Ease of Crock-Pot Baked Ziti

Why Choose a Layered Pizza Cake?

Creating a pepperoni pizza layer cake isn’t just about making pizza—it’s about making a statement. This dish is perfect for:

  • Special Occasions: Impress your guests with a towering pizza.
  • Family Gatherings: Layered pizza means you’re baking once but serving everyone.
  • Creative Cooking: Step up your culinary creativity with this non-traditional pizza.

How to Make a Pepperoni Pizza Layer Cake

To create this multi-layered masterpiece, follow these steps to prepare each component, from dough to baking.

1. Gather Your Ingredients

You’ll need the following ingredients to bring your pepperoni pizza layer cake to life:

  • Pizza dough (homemade or store-bought)
  • Pizza sauce
  • Mozzarella cheese
  • Sliced pepperoni
  • Optional: Toppings like mushrooms, olives, or bell peppers

2. Preparing the Dough

Each layer needs a stable base, so be sure to stretch your pizza dough to fit your baking pan. Using a round cake pan or springform pan can help hold each layer together.

3. Layering the Pizza Cake

  1. Dough Base: Start with a layer of dough.
  2. Sauce and Cheese: Spread a thin layer of sauce, then sprinkle cheese and pepperoni.
  3. Repeat Layers: Continue with layers of dough, sauce, cheese, and toppings until you reach the desired height.
  4. Top Layer: Finish with a generous amount of cheese and pepperoni on the top layer.

4. Baking the Pizza Cake

Preheat your oven to 375°F (190°C). Bake the pizza layer cake for 45-60 minutes or until the dough is fully cooked and the cheese on top is golden and bubbling. Allow the cake to cool slightly before cutting to keep the layers intact.

Delicious Variations for a Pizza Layer Cake

If you want to experiment with flavors, consider these exciting twists:

  • Vegetarian Layer Cake: Substitute the pepperoni with vegetables like bell peppers, spinach, and onions.
  • Meat Lovers’ Dream: Add layers with sausage, bacon, and other meats for a richer flavor.
  • Spicy Pizza Cake: Add jalapeños or spicy pepperoni to bring heat to your layered cake.

Related: Discover the Joy of Homemade Pineapple Soft Serve Ice Cream

Tips for the Perfect Pepperoni Pizza Layer Cake

Here are some pro tips to ensure your pepperoni pizza layer cake turns out perfectly every time:

  • Use Springform Pans: These make it easier to remove the pizza layer cake once it’s baked.
  • Don’t Overload with Toppings: Keep the layers balanced so that they don’t collapse.
  • Baking Time: Make sure the dough layers are cooked thoroughly by covering the cake with foil halfway through baking.

Frequently Asked Questions (FAQs)

What’s the Best Way to Serve a Pepperoni Pizza Layer Cake?

It’s best to slice the pizza layer cake like a regular cake. Use a sharp knife to make clean cuts, and serve with a side of marinara sauce for dipping.

Can I Make This Recipe Ahead of Time?

Yes, you can assemble the cake in advance and refrigerate it for up to a day. Bake when you’re ready to serve.

How Do I Store Leftovers?

Store leftovers in an airtight container in the fridge for up to 3 days. Reheat in an oven for the best texture.

Can I Freeze a Pizza Layer Cake?

Yes, you can freeze it before or after baking. Just be sure to wrap it tightly to prevent freezer burn.


Nutritional Information

One slice of pepperoni pizza layer cake contains approximately:

  • Calories: 400
  • Protein: 15g
  • Fat: 20g

Healthier Alternatives

Consider swapping out regular mozzarella for part-skim and using turkey pepperoni for a lower-fat version.

Conclusion

A pepperoni pizza layer cake combines the best of both worlds—a classic pizza with the look of a cake. It’s a show-stopping dish that’s perfect for any pizza lover looking for something a little different. Whether you stick with traditional pepperoni or try a new variation, this recipe will surely impress.

Gooey Salted Caramel Cream Cheese Cupcakes – A Decadent Dessert Recipe

caramel cream cheese cupcakes, gooey caramel cupcakes, salted caramel dessert, creamy caramel cupcakes, tangy cream cheese cupcakes

Gooey Salted Caramel Cream Cheese Cupcakes

Gooey Salted Caramel Cream Cheese Cupcakes offer a decadent experience that blends the rich tanginess of cream cheese with the sweet-salty allure of caramel. These cupcakes are ideal for any occasion, providing a unique mix of flavors that will satisfy any sweet tooth.


Ingredients for Gooey Salted Caramel Cream Cheese Cupcakes

For the Cupcakes:

  • All-purpose flour
  • Granulated sugar
  • Baking powder and baking soda
  • Unsalted butter
  • Large eggs
  • Whole milk

For the Cream Cheese Filling:

  • Cream cheese, softened
  • Granulated sugar
  • Vanilla extract

For the Salted Caramel Sauce:

  • Granulated sugar
  • Heavy cream
  • Salted butter
  • Sea salt

Each ingredient in this recipe contributes to the cupcake’s moist texture and rich flavors. The use of cream cheese provides a subtle tang that perfectly balances with the sweetness of the caramel.


Step 1: Preparing the Cupcake Batter

  1. Mix Dry Ingredients: In a large mixing bowl, combine the flour, sugar, baking powder, and baking soda.
  2. Add Wet Ingredients: Blend in the softened butter, eggs, and milk until smooth and lump-free.
  3. Fill Cupcake Tins: Divide the batter into lined cupcake tins, filling each about halfway to allow for the cream cheese filling.

For more inspiration, check out our Salted Caramel Apple Cheesecake with a similar rich flavor profile.


Step 2: Making the Cream Cheese Filling

The cream cheese filling enhances the moistness of these cupcakes. Here’s how to create it:

  1. Blend Ingredients: In a medium bowl, mix cream cheese, sugar, and vanilla extract until smooth.
  2. Add to Cupcakes: Drop a spoonful of the cream cheese filling in the center of each cupcake.

Step 3: Baking the Cupcakes

  1. Preheat Oven: Set your oven to 350°F (175°C).
  2. Bake: Place the filled tins into the oven and bake for 18-20 minutes or until the cupcakes are golden brown.
  3. Cool Completely: Allow the cupcakes to cool before applying the frosting.

A similar cake that incorporates cream cheese is our Cinnamon Roll Cake with Cream Cheese Glaze, perfect for those who love cream cheese-based desserts.


Step 4: Crafting the Salted Caramel Sauce

Salted caramel sauce is the highlight of these cupcakes, adding depth to every bite.

  1. Heat Sugar: Over medium heat, melt sugar in a saucepan until it turns a deep amber color.
  2. Add Cream and Butter: Stir in heavy cream and butter, mixing until smooth and creamy.
  3. Finish with Sea Salt: Sprinkle sea salt for that signature sweet and salty taste.

Using salted caramel in desserts like our Decadent Caramel Chocolate Cupcakes brings out a satisfying flavor contrast that complements the other elements of the cupcake.


Step 5: Frosting and Drizzling the Cupcakes

  1. Cream Cheese Frosting: Beat cream cheese and powdered sugar together until fluffy and smooth.
  2. Drizzle Salted Caramel Sauce: Generously drizzle the salted caramel sauce over each frosted cupcake, adding a touch of elegance.

FAQs for Gooey Salted Caramel Cream Cheese Cupcakes

  • What makes these cupcakes gooey? The cream cheese filling and the caramel sauce keep these cupcakes moist and soft.
  • Can I use store-bought caramel? Homemade caramel gives the best texture and flavor, but store-bought works in a pinch.
  • How should I store these cupcakes? Keep refrigerated due to the cream cheese frosting, and consume within 5 days.
  • Can these cupcakes be frozen? Yes, freeze the unfrosted cupcakes in an airtight container for up to a month.

Nutrition Insights and Dietary Tips

Each cupcake is a treat, with a balance of fats, carbs, and sugars. For a lighter version, consider using low-fat cream cheese or replacing some of the sugar with a substitute.

Cranberry Pecan Cheese Ball – A Festive Holiday Appetizer Everyone Will Love

holiday cheese ball, cranberry pecan appetizer, festive cheese ball, Christmas cheese ball, cranberry cream cheese ball, party cheese ball

Cranberry Pecan Cheese Ball – A Festive and Flavorful Holiday Appetizer

The Cranberry Pecan Cheese Ball is an ideal appetizer for holiday gatherings, blending the creamy richness of cheese with the sweet and nutty flavors of cranberries and pecans. It’s not only visually appealing but also incredibly easy to make, ensuring you have more time to enjoy the festivities.

For more ideas on creating delicious holiday appetizers, check out our Ultimate Comfort Food: Crockpot Potato Soup with Hashbrowns, which is perfect for warming up a winter gathering.


Why You’ll Love Cranberry Pecan Cheese Ball

This cheese ball recipe stands out for several reasons:

  • Balanced Sweet and Savory Flavor: The tartness of dried cranberries paired with the nuttiness of pecans and creaminess of cheese makes it an irresistible combination.
  • Simple and Quick: With only a few ingredients and minimal prep, this recipe is both convenient and impressive.
  • Perfect for Holiday Gatherings: Its festive colors make it a visually stunning centerpiece on any appetizer spread.

For a unique twist on cheesy appetizers, consider our Cheesy Bacon Jalapeno Corn Dip, which offers a spicy counterpart to the sweetness of the cranberry pecan cheese ball.


Ingredients for Cranberry Pecan Cheese Ball

Core Ingredients

  1. Cream Cheese: Provides a creamy and tangy base for the cheese ball.
  2. Cheddar Cheese: Adds a sharp flavor that balances the sweetness of cranberries.
  3. Dried Cranberries: For a pop of tart flavor and festive color.
  4. Chopped Pecans: Adds crunch and nutty flavor.
  5. Green Onions: Adds a mild, savory note.
  6. Honey or Maple Syrup: A touch of sweetness to enhance the flavor.

Tip: For a smoother texture, allow the cream cheese to reach room temperature before mixing.

Optional Additions

  • Bacon Bits: Adds a smoky flavor to the cheese ball.
  • Herbs (like parsley or thyme): Fresh herbs can add an aromatic touch and extra color.
  • Almonds or Walnuts: Can be used instead of pecans for a different nutty flavor.

Step-by-Step Recipe for Cranberry Pecan Cheese Ball

1. Preparing the Ingredients

  • Soften the Cream Cheese: Leave the cream cheese out for about 20 minutes, so it’s easier to mix.
  • Chop the Pecans and Cranberries: For even distribution, chop these ingredients into small, bite-sized pieces.

2. Mixing the Ingredients

  • Combine Cream Cheese and Cheddar: In a mixing bowl, combine the cream cheese and shredded cheddar until smooth.
  • Add Cranberries, Pecans, and Onions: Gently fold in the cranberries, pecans, green onions, and honey until evenly distributed.

For another unique cranberry recipe that combines sweetness and crunch, try our Caramel Apple Pecan Dump Cake, a dessert that pairs wonderfully with fall and winter flavors.

3. Shaping and Rolling the Cheese Ball

  • Form the Mixture into a Ball: Use your hands or a spoon to shape the mixture into a ball.
  • Roll in Toppings: Roll the cheese ball in extra chopped pecans and cranberries for a decorative, festive look.

4. Chilling and Serving

  • Chill for 1–2 Hours: Chilling the cheese ball helps the flavors meld together and makes it easier to serve.
  • Serve with Crackers and Fresh Vegetables: Pair with a selection of crackers, sliced baguette, and fresh vegetables like carrots and celery for a complete appetizer.

Serving Suggestions and Presentation Ideas

  1. Holiday-Themed Presentation: Place the cheese ball on a festive platter with rosemary sprigs for a Christmas tree-like garnish.
  2. Serve with Fresh Fruit: Pair with apple or pear slices for a sweet and tangy contrast.
  3. Individual Mini Cheese Balls: Form smaller, bite-sized balls for easy, individual servings.

For a show-stopping centerpiece at your next gathering, you may also enjoy our Salted Caramel Rice Krispie Treats, which offer a deliciously sweet addition to any holiday dessert spread.


Creative Variations for Cranberry Pecan Cheese Ball

Alternative Ingredients

  • Swap Pecans with Walnuts or Almonds: Use different nuts for varied flavors and textures.
  • Try Goat Cheese or Blue Cheese: For a more intense flavor, mix in some goat cheese or blue cheese.

Adding Spices and Herbs

  • Fresh Herbs: Add parsley or thyme for extra color and flavor.
  • Cayenne Pepper: A pinch of cayenne can add a surprising kick to balance the sweetness of the cranberries.

If you love experimenting with flavors, try our Easy No-Bake Pumpkin Cheesecake, which is another crowd-pleaser perfect for holiday tables.


FAQs Section

1. Can I make the cranberry pecan cheese ball without nuts?
Yes, you can skip the pecans and roll the cheese ball in chopped cranberries or herbs instead.

2. How do I prevent the cheese ball from becoming too soft?
Ensure it’s chilled for at least an hour before serving and avoid placing it near warm foods.

3. Can I freeze a cheese ball?
Yes, you can wrap it tightly and freeze it. Thaw in the fridge before serving.

4. Can I make this cheese ball a day ahead?
Absolutely, making it ahead allows the flavors to meld even more.

For additional tips on holiday appetizer storage, explore our Ultimate Guide to Making French Bread Pizza, where we cover storage and reheating tips for party foods.


LSI and NLP Keywords for SEO Optimization

Incorporate these keywords to improve SEO:

  • holiday cheese ball recipes
  • cranberry pecan appetizers
  • easy cheese ball recipe
  • Christmas party appetizers
  • festive cheese ball ideas
  • savory cheese ball with cranberries
  • pecan cheese appetizer

For more savory and creamy recipes, check out Mom’s Lemon Cream Pie, which balances tangy and sweet flavors, ideal for dessert lovers.


Conclusion

The Cranberry Pecan Cheese Ball is a visually appealing, easy-to-make appetizer that brings a festive touch to any holiday gathering. The blend of creamy cheese, sweet cranberries, and crunchy pecans offers a delightful contrast in flavors and textures. This cheese ball can be customized with different cheeses, herbs, and spices, making it versatile and adaptable to any occasion.

For a festive spread, don’t miss our Strawberry Lemon Bars or Easy Apple Cheesecake Tacos, both of which offer refreshing flavors perfect for holiday tables.

Lemon Cream Swiss Roll – Light, Zesty, and Perfect for Summer

lemon Swiss roll recipe, citrus cream dessert, lemon roll cake, lemon sponge roll, lemon curd Swiss roll, easy lemon dessert

Lemon Cream Swiss Roll – A Citrusy Delight for Every Occasion

If you’re looking for a dessert that balances lightness with a burst of citrus flavor, the Lemon Cream Swiss Roll is a perfect choice. This elegant dessert combines a fluffy sponge cake with a tangy lemon cream filling, creating a refreshing treat that’s ideal for spring and summer gatherings. Not only does it look impressive, but it’s also surprisingly easy to make with a few key tips and techniques.

For more inspiring citrus-based desserts, don’t miss our Two-Ingredient Lemon Pie Filling, which is another simple yet delightful way to enjoy the flavor of lemon.


Why You’ll Love Lemon Cream Swiss Roll

This lemon Swiss roll is not only visually appealing but also:

  • Perfectly Balanced in Flavor: The citrus notes add a refreshing contrast to the sweetness of the cream.
  • Light and Airy: Ideal for those who prefer a lighter dessert that doesn’t feel overly rich.
  • Versatile and Customizable: The recipe can be adapted with various fillings or flavorings to suit different preferences.

If you’re in the mood for more light desserts, check out our Easy No-Bake Banana Split Cheesecake, which pairs wonderfully with fresh fruit flavors.


Ingredients for Lemon Cream Swiss Roll

Creating this lemon Swiss roll requires a few basic ingredients, most of which you likely already have on hand.

Core Ingredients

  1. Eggs: The foundation of a fluffy sponge cake.
  2. Granulated Sugar: Adds sweetness and structure to the batter.
  3. All-Purpose Flour: Provides the base structure of the cake.
  4. Lemon Zest and Juice: Fresh lemon zest and juice infuse the cake with a bright, natural citrus flavor.
  5. Lemon Curd: For a more intense lemon taste, use either homemade or high-quality store-bought lemon curd.
  6. Heavy Cream or Mascarpone: Adds a smooth, creamy texture to the filling.

Tip: For a smoother texture, sift the flour before adding it to the egg mixture.

Optional Additions

  • Almond Extract: Pairs beautifully with lemon for added depth of flavor.
  • Powdered Sugar: A dusting on top of the roll adds a professional finish.

Step-by-Step Recipe for Lemon Cream Swiss Roll

1. Preparing the Sponge Cake

  • Preheat the Oven and Prepare the Pan: Start by preheating the oven to 350°F (175°C). Line a jelly roll pan with parchment paper to prevent sticking.
  • Beat the Eggs and Sugar: Whisk the eggs and sugar until pale and fluffy, which helps achieve a light sponge.
  • Add Lemon Zest and Juice: This infuses the batter with a subtle lemon flavor.
  • Fold in Flour: Carefully fold in the flour to maintain the airiness of the batter.

For more tips on achieving the perfect cake texture, explore our Lemon Buttermilk Sheet Cake, which offers insights into keeping cakes moist and flavorful.

2. Baking and Rolling the Sponge

  • Spread the Batter Evenly: Pour the batter onto the prepared pan, smoothing it out to an even thickness.
  • Bake Until Lightly Golden: Bake for about 10–12 minutes, or until the cake is set and lightly golden.
  • Roll While Warm: After removing the cake from the oven, roll it gently with parchment paper to prevent cracks as it cools.

Making the Lemon Cream Filling

A delicious lemon cream filling complements the light sponge, enhancing the dessert’s fresh flavor.

1. Prepare the Filling

  • Whip the Cream: Whip heavy cream to soft peaks.
  • Fold in Lemon Curd: Gently fold in lemon curd for a tangy, creamy filling.

If you enjoy tangy desserts with cream fillings, consider trying our Classic Apple Dumplings, which feature a rich apple filling and a delightful crust.

2. Assembling the Swiss Roll

  • Unroll the Cake: Gently unroll the cake and spread the lemon cream filling evenly over the surface.
  • Re-Roll and Chill: Carefully re-roll the cake, peeling away the parchment, and place it seam-side down on a serving platter. Chill in the refrigerator to set.

Serving Suggestions and Presentation Ideas

A beautifully presented lemon Swiss roll can enhance any dessert table.

  • Slice and Serve with Garnish: Cut into slices and garnish with a sprinkle of powdered sugar, lemon zest, or fresh mint leaves.
  • Pair with Fresh Berries: Serve with strawberries or blueberries for a pop of color and flavor.
  • Create Mini Rolls: For individual servings, consider cutting the roll into smaller sections before serving.

For another crowd-pleasing presentation, try our Mini Pineapple Coconut Milk Cheesecakes, which offer a similar refreshing flavor profile.


Creative Variations for Lemon Cream Swiss Roll

Alternative Flavors

  • Raspberry Lemon: Swirl raspberry preserves with the lemon cream for a berry twist.
  • Coconut Cream: Add a layer of coconut cream for a tropical flavor.

Dairy-Free Option

  • Coconut Whipped Cream: Substitute heavy cream with whipped coconut cream for a dairy-free filling.

If you love unique flavor combinations, our Raspberry Lemon Bars are another must-try dessert that combines tart and sweet flavors.


FAQs Section

1. Can I make lemon Swiss roll without lemon curd?
Yes, you can substitute lemon curd with a mixture of lemon zest and a bit of cream cheese for a similar tangy flavor.

2. What’s the trick to rolling a Swiss roll without cracking?
Roll the cake while it’s still warm and use parchment paper to support the roll and prevent cracks.

3. Can I freeze the lemon Swiss roll?
Yes, wrap it tightly in plastic wrap and store it in the freezer for up to a month.

4. How do I prevent the filling from becoming soggy?
Ensure that the cake is fully cooled before adding the filling to prevent moisture buildup.

For more dessert-making tips, check out our Ultimate Guide to Perfect French Bread Pizza, which includes techniques that can be useful across various recipes.


LSI and NLP Keywords for SEO Optimization

Incorporate these keywords to improve SEO:

  • lemon Swiss roll recipe
  • citrus cream desserts
  • light summer desserts
  • easy rolled cake recipe
  • lemon sponge cake roll
  • lemon curd Swiss roll
  • holiday dessert ideas

For additional lemon-based recipes, try Mom’s Lemon Cream Pie, another classic dessert with a rich, creamy filling that lemon lovers will enjoy.


Conclusion

The Lemon Cream Swiss Roll is a show-stopping dessert that combines a light, airy sponge with a tangy lemon cream filling. Perfect for spring and summer occasions, this dessert is both visually impressive and packed with flavor. Its versatility allows for countless variations, making it a recipe worth revisiting.

For more refreshing and creamy desserts, don’t miss our Strawberry Lemon Bars or Easy Apple Cheesecake Tacos, which offer unique takes on fruit-forward treats.

Cherry Pistachio Snowballs – Festive Holiday Cookies with a Nutty Twist

holiday snowball cookies, cherry pistachio cookies, powdered sugar snowballs, festive nut cookies, Christmas pistachio cookies

Cherry Pistachio Snowballs – A Festive, Nutty Delight for the Holidays

If you’re searching for the perfect holiday cookie recipe that’s both visually stunning and delicious, Cherry Pistachio Snowballs are a must-try. These delightful cookies bring together the rich flavors of pistachios and the tartness of cherries, rolled in a sweet layer of powdered sugar that mimics a snowy finish. Perfect for gift-giving or holiday parties, these snowball cookies offer a delightful twist on classic holiday treats.

For more festive holiday treats, don’t miss our Peanut Butter Blossoms, which make a delicious addition to any holiday cookie platter.


Why You’ll Love Cherry Pistachio Snowballs

  • Visually Festive: The vibrant green of pistachios and the red of cherries make these cookies ideal for holiday gatherings.
  • Deliciously Nutty and Fruity: The combination of buttery pistachios and tangy cherries creates a balanced flavor.
  • Simple to Make: With just a few steps, these cookies are easy to prepare, making them a great recipe for holiday baking.

For more nut-based holiday recipes, try our Pistachio Shortbread Cookies, which bring a rich, buttery flavor to any dessert table.


Ingredients for Cherry Pistachio Snowballs

Creating these delicious snowballs requires a handful of ingredients that you may already have in your pantry.

Core Ingredients

  1. Unsalted Butter: For a rich, tender cookie.
  2. Powdered Sugar: Adds sweetness to the dough and is perfect for rolling the cookies.
  3. All-Purpose Flour: Forms the structure of the cookie.
  4. Pistachios: Adds a nutty flavor and a vibrant green color.
  5. Chopped Cherries: Use dried cherries or maraschino cherries for a pop of color and flavor.
  6. Vanilla Extract: Enhances the flavor of the cookie.

Tip: For a more intense cherry flavor, consider using a few drops of cherry extract along with vanilla.

Optional Additions

  • Almond Extract: Pairs beautifully with cherries and pistachios.
  • Salted Butter: If using salted butter, reduce or omit additional salt.

Step-by-Step Recipe for Cherry Pistachio Snowballs

1. Prepare the Ingredients

  • Soften the Butter: Leave the butter out at room temperature until softened, which will help with mixing.
  • Chop the Cherries and Pistachios: Finely chop for even distribution throughout the cookies.

2. Make the Dough

  • Cream the Butter and Sugar: In a mixing bowl, cream butter and powdered sugar until smooth.
  • Add Vanilla and Dry Ingredients: Mix in vanilla, flour, and salt until a dough forms. Gently fold in the cherries and pistachios.

For more easy holiday baking ideas, check out our Easy No-Bake Banana Split Cheesecake, a delightful dessert that’s as simple as it is delicious.

3. Shaping and Baking the Cookies

  • Form the Dough Balls: Roll the dough into 1-inch balls and place them on a baking sheet.
  • Bake: Bake at 350°F for 12–15 minutes, or until the edges are lightly golden.

4. Roll in Powdered Sugar

  • Cool and Roll: Once cooled, roll each cookie in powdered sugar. For a snowy look, double-roll them after the first layer has settled.

Serving Suggestions

  • Holiday Cookie Platter: Arrange these cookies with other festive treats for a beautiful holiday spread.
  • Gift-Worthy Packaging: Place the snowballs in a festive tin lined with wax paper as a perfect gift idea.
  • Pairing Suggestions: Serve with coffee, tea, or a holiday cocktail like eggnog for a cozy treat.

For more holiday cookie ideas, check out our Classic Apple Dumplings, a perfect fall and winter dessert.


Creative Variations of Cherry Pistachio Snowballs

Different Nut Options

  • Almonds or Walnuts: Substitute pistachios with almonds or walnuts for a different nutty flavor.

Alternative Flavors

  • Add Zest: Orange or lemon zest can add a refreshing twist to the cookie dough.
  • Chocolate Drizzle: A drizzle of white or dark chocolate adds a bit of indulgence to the cookies.

For a fruity dessert with a twist, try our Raspberry Lemon Bars, which combines tart and sweet flavors in every bite.


Tips for Perfect Snowball Cookies

  1. Chill the Dough: Chilling the dough for 15–20 minutes helps prevent spreading.
  2. Use Quality Ingredients: Fresh pistachios and high-quality cherries make a difference.
  3. Double Roll in Sugar: To achieve the snowy effect, roll the cookies twice in powdered sugar.

For more cookie-baking tips, explore our Ultimate Guide to Perfect French Bread Pizza, which includes techniques for achieving ideal textures.


Frequently Asked Questions (FAQs)

1. Can I use fresh cherries in these cookies?
It’s best to use dried cherries as fresh ones have too much moisture, which can affect the texture.

2. How do I store cherry pistachio snowballs?
Store them in an airtight container at room temperature for up to a week or freeze for longer storage.

3. Can I make these cookies without nuts?
Yes, you can omit pistachios if needed, though they add a unique flavor and texture.

4. Do I have to roll them in powdered sugar twice?
Double-rolling helps the powdered sugar stick and gives them their signature snowy appearance.

For more storage tips, see our No-Bake Pumpkin Cheesecake, a dessert that’s perfect for make-ahead holiday preparations.


LSI and NLP Keywords for SEO Optimization

Incorporate these keywords to improve SEO:

  • holiday cookie recipes
  • nutty cherry cookies
  • easy snowball cookies
  • pistachio cherry desserts
  • Christmas cookie platter ideas
  • powdered sugar cookies
  • no-egg holiday cookies

For additional holiday treats, explore Salted Caramel Rice Krispie Treats for a quick, sweet treat.


Conclusion

Cherry Pistachio Snowballs offer a festive, unique twist on classic snowball cookies, making them an ideal addition to any holiday gathering. With their blend of nutty pistachios, tart cherries, and a dusting of powdered sugar, they’re as beautiful as they are delicious.

For more holiday baking ideas, be sure to try our Strawberry Lemon Bars or Mom’s Lemon Cream Pie for citrusy dessert options that are sure to impress.