Avocado Sushi Cake Recipe: A Stunning and Healthy Sushi Alternative

avocado sushi recipe, sushi cake with avocado, layered sushi cake, healthy sushi recipe, creative sushi ideas

Avocado Sushi Cake: A Culinary Delight for Every Occasion

Avocado sushi cake is a vibrant, layered dish that combines the classic flavors of sushi with a stunning presentation. This recipe has grown in popularity for its versatility and aesthetic appeal, making it perfect for celebrations, dinner parties, or simply to treat yourself to a delightful fusion of taste and elegance.

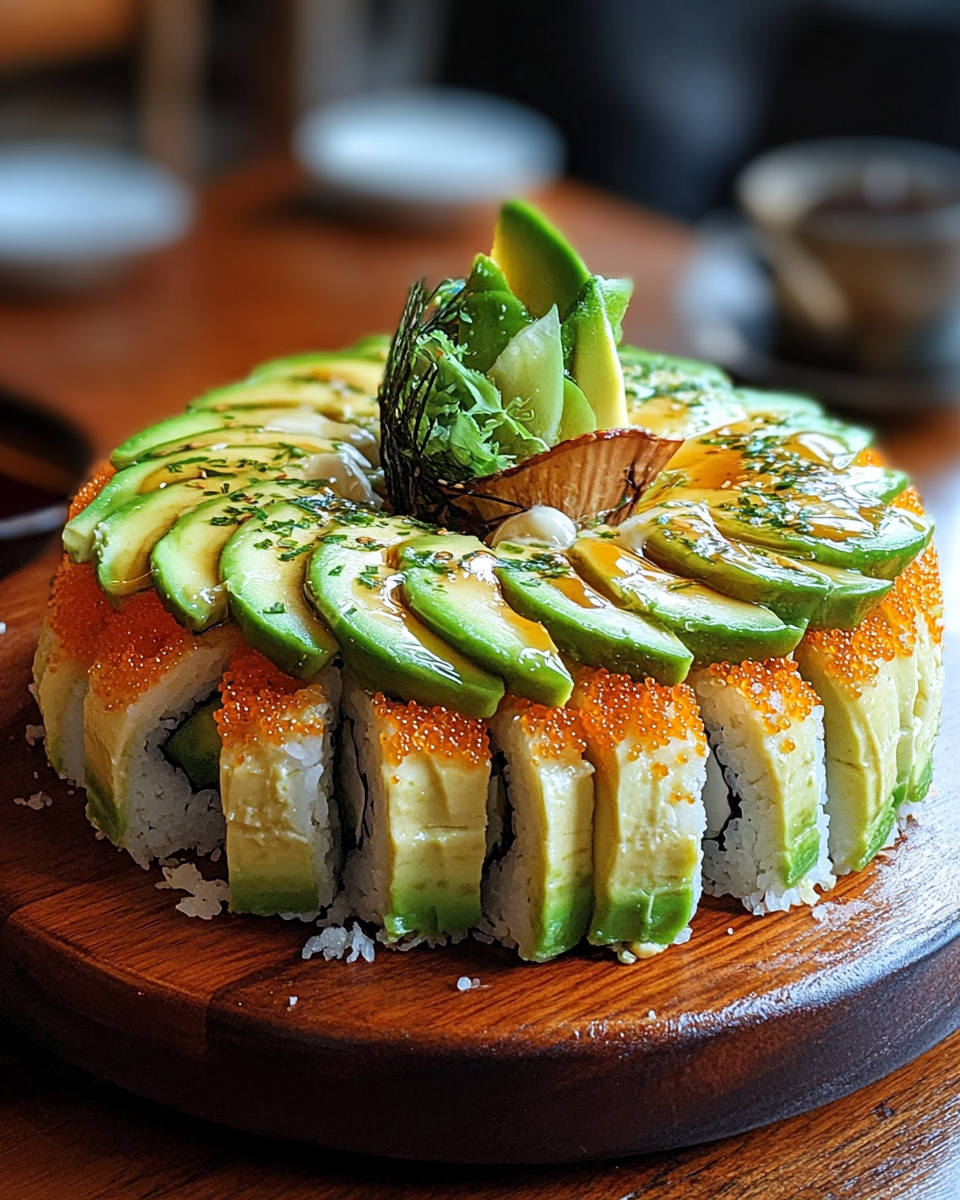
What is Avocado Sushi Cake?

An avocado sushi cake is essentially a layered sushi made to resemble a cake. It features layers of perfectly seasoned sushi rice, fresh avocado, sushi-grade fish, and toppings like nori, sesame seeds, or vegetables. This creative twist not only tastes amazing but also looks like an edible masterpiece.

For a detailed guide on variations of sushi cakes, check out Food Daydreaming’s article on creative sushi recipes.


Ingredients for Avocado Sushi Cake

To create this delectable dish, you’ll need the following:

  • Sushi rice: Cooked and seasoned with rice vinegar, sugar, and salt.
  • Avocado: Creamy and ripe for the perfect texture.
  • Fish or protein: Sushi-grade salmon or tuna, or alternatives like smoked salmon or tofu for vegetarians.
  • Nori sheets: Essential for the sushi flavor.
  • Toppings: Thinly sliced cucumbers, shredded carrots, or edamame.

For tips on handling sushi-grade fish, refer to Serious Eats’ guide.


How to Make Avocado Sushi Cake

  1. Prepare the Sushi Rice
    • Rinse the rice thoroughly and cook until tender.
    • Mix rice vinegar, sugar, and salt, and fold into the rice while warm.
  2. Layer the Base
    • Line a cake mold with plastic wrap for easy removal.
    • Spread a layer of rice evenly at the bottom.
  3. Add the Avocado Layer
    • Slice avocado thinly and layer it atop the rice.
    • Add a sprinkle of lemon juice to prevent browning.
  4. Add Protein and Vegetables
    • Layer thinly sliced fish, tofu, or smoked salmon.
    • Add cucumber slices or julienned carrots for crunch.
  5. Finish with Garnishes
    • Top with sesame seeds, chopped green onions, and nori strips.
  6. Chill and Serve
    • Refrigerate for 30 minutes to set.
    • Remove from the mold and serve with soy sauce or wasabi.

Why You’ll Love Avocado Sushi Cake

  • Healthy and Nutritious: Packed with omega-3 fatty acids, fiber, and essential vitamins.
  • Customizable: Swap proteins or add your favorite veggies to suit your taste.
  • Impressive Presentation: Ideal for special occasions or Instagram-worthy meals.

Variations and Customizations

Vegetarian Avocado Sushi Cake

Replace fish with:

  • Grilled tofu
  • Marinated mushrooms
  • Pickled radishes

Protein-Packed Options

  • Crab meat or imitation crab
  • Seared ahi tuna
  • Shrimp tempura for added texture

For more inspiration, check out the recipe for “Healthy Avocado Egg Salad Roll-Ups” here.


Nutritional Benefits

  1. Avocado: Rich in healthy fats, fiber, and potassium, making it a superfood.
  2. Fish: Provides high-quality protein and omega-3s, beneficial for heart health.
  3. Vegetables: Add vitamins and antioxidants, enhancing the dish’s overall nutritional value.

FAQs About Avocado Sushi Cake

1. Can I prepare this dish ahead of time?
Yes, you can prepare the layers a few hours in advance, but assemble it just before serving to maintain freshness.

2. How do I store leftovers?
Wrap the sushi cake tightly in plastic wrap and refrigerate. Consume within 24 hours for the best taste.

3. Are there gluten-free options?
Ensure your soy sauce is gluten-free, and choose ingredients that meet dietary restrictions.


Serving Suggestions

  • Pair with a light salad or miso soup for a complete meal.
  • Serve with dipping sauces like spicy mayo or ponzu for an extra kick.

SEO-Optimized LSI Keywords

To make your article rank higher, consider integrating these keywords:

  • Easy sushi cake recipe
  • Avocado sushi cake ideas
  • Healthy sushi recipes
  • Layered sushi cake tutorial
  • Japanese sushi cake variations

Internal Linking Opportunities

While exploring this article, don’t miss:


Conclusion

Avocado sushi cake is a stunning dish that brings together the classic flavors of sushi with a modern twist. Whether you’re hosting a dinner party or simply treating yourself, this recipe is a guaranteed crowd-pleaser. With its adaptability and health benefits, it’s no wonder avocado sushi cake has become a trending favorite.

Almond Joy Cookies: A Sweet Blend of Coconut, Chocolate, and Almonds

chocolate coconut cookies, almond coconut dessert, easy Almond Joy cookies recipe, candy-inspired cookies

Article: How to Make Perfect Almond Joy Cookies in Minutes

Introduction

When it comes to quick and indulgent desserts, Almond Joy Cookies reign supreme. With a combination of coconut, chocolate, and almonds, these cookies capture the essence of the classic candy bar while bringing an easy homemade touch. Whether you’re preparing for a party, a cozy evening at home, or simply craving something sweet, this recipe promises a flavorful experience. Learn how to create this delightful treat step by step.


Why You’ll Love These Almond Joy Cookies

  • Simple ingredients: Only a few pantry staples are needed.
  • Quick preparation: Perfect for beginners or busy schedules.
  • Rich flavor: Combines the decadence of chocolate with the nutty taste of almonds.

For inspiration on other creative dessert ideas, check out Homemade Oreo Donuts.


Ingredients You’ll Need

  • 1 cup sweetened shredded coconut
  • 1 cup semi-sweet chocolate chips
  • 1 cup slivered almonds
  • 1 cup condensed milk
  • 1 teaspoon vanilla extract

Pro Tip: For an extra kick, consider using dark chocolate or adding a pinch of sea salt.


Step-by-Step Recipe for Almond Joy Cookies

Step 1: Preparing the Dough

  1. Preheat your oven to 350°F (175°C).
  2. In a large mixing bowl, combine shredded coconut, chocolate chips, slivered almonds, condensed milk, and vanilla extract.
  3. Mix until all ingredients are evenly coated.

Step 2: Shaping the Cookies

  1. Use a tablespoon to scoop small portions of the mixture.
  2. Roll each portion into a ball and gently flatten onto a baking sheet lined with parchment paper.
  3. Ensure adequate spacing to prevent sticking.

Step 3: Baking the Cookies

  1. Bake in the preheated oven for 12–15 minutes or until the edges are golden.
  2. Allow the cookies to cool for 10 minutes before transferring them to a wire rack.

Looking for another cookie recipe to try? Consider the Reese’s Pieces Chocolate Chip Cookie Bars.


Tips for the Perfect Almond Joy Cookies

  • Use fresh ingredients: Fresh coconut and high-quality chocolate enhance flavor.
  • Customize sweetness: Swap semi-sweet chocolate for milk or dark chocolate based on preference.
  • Experiment with add-ins: Try dried cranberries, orange zest, or caramel chips.

Serving Suggestions

  • Serve warm with a glass of milk.
  • Pair with vanilla ice cream for a decadent dessert.
  • Gift-wrap in cookie boxes for a thoughtful homemade present.

FAQs About Almond Joy Cookies

How should I store Almond Joy Cookies?

Store cookies in an airtight container at room temperature for up to five days or freeze for three months.

Can I make these cookies gluten-free?

Yes! Ensure all ingredients, especially chocolate chips, are certified gluten-free.

What can I substitute for almonds?

Pecans, walnuts, or even macadamia nuts work as great alternatives.

Do I need a mixer for this recipe?

No. Mixing by hand is sufficient due to the simplicity of the ingredients.


Nutritional Information (per serving)

  • Calories: 200
  • Fat: 10g
  • Carbs: 25g
  • Protein: 3g

For a healthier twist, check out Healthy Avocado Egg Salad Roll-Ups.


Internal Linking Opportunities

To enrich the reader’s experience, link to the following:


Conclusion

Almond Joy Cookies are an effortless yet indulgent treat for any occasion. With just a handful of ingredients and a few simple steps, you can create a dessert that satisfies every craving. Whether you’re sharing these cookies with loved ones or enjoying them as a personal indulgence, this recipe guarantees smiles all around. Try it today and experience the joy of homemade goodness!

Italian Ricotta Cookies: Soft, Delicious, and Perfect for Any Occasion

ricotta cookies recipe, Italian Christmas cookies, soft ricotta cookies, traditional Italian cookies, easy ricotta desserts

Italian Ricotta Cookies: A Timeless Delight

Italian Ricotta Cookies are a cherished tradition, celebrated for their moist, tender texture and classic flavors. This detailed guide provides everything you need to know about these cookies, including their history, preparation, and creative variations to impress family and friends alike.


What Makes Italian Ricotta Cookies Special?

The hallmark of Italian Ricotta Cookies is their unique texture, achieved through the use of creamy ricotta cheese. Unlike traditional cookies, these have a cake-like consistency that stays moist and flavorful for days. Their signature glaze and decorative sprinkles add a festive touch, making them perfect for holidays and special occasions.

For a similar indulgent dessert, check out the Kentucky Butter Cake for inspiration on rich, buttery treats.


Ingredients for Italian Ricotta Cookies

To create these delightful cookies, you’ll need:

  • 2 cups all-purpose flour
  • 1 teaspoon baking powder
  • ½ teaspoon baking soda
  • ½ teaspoon salt
  • 1 cup granulated sugar
  • ½ cup unsalted butter, softened
  • 1 cup ricotta cheese
  • 1 large egg
  • 1 teaspoon vanilla extract

For the Glaze:

  • 1 cup powdered sugar
  • 2-3 tablespoons milk
  • ½ teaspoon vanilla extract
  • Colored sprinkles (optional)

Step-by-Step Recipe

1. Preparing the Dough

  1. Preheat the oven to 350°F (175°C) and line baking sheets with parchment paper.
  2. In a medium bowl, whisk together flour, baking powder, baking soda, and salt.
  3. In a large bowl, beat sugar and butter until fluffy. Add the ricotta, egg, and vanilla, mixing until smooth.
  4. Gradually incorporate the dry ingredients into the wet mixture until just combined.

2. Shaping the Cookies

  • Using a cookie scoop or spoon, drop tablespoon-sized portions onto the prepared baking sheets, spacing them 2 inches apart.
  • Bake for 12-15 minutes, or until the edges are lightly golden.

3. Glazing and Decorating

  1. Allow cookies to cool completely before glazing.
  2. In a small bowl, whisk together powdered sugar, milk, and vanilla until smooth.
  3. Drizzle the glaze over the cookies and immediately add sprinkles.

Tips for Perfect Italian Ricotta Cookies

  • Choose high-quality ricotta: Ensure your ricotta is full-fat for the best texture.
  • Chill the dough: This helps the cookies retain their shape during baking.
  • Experiment with flavors: Add citrus zest or almond extract for a unique twist.

If you’re exploring other Italian-inspired dishes, try pairing these cookies with a savory Ribeye Steak Recipe for a balanced menu.


Creative Variations

  • Lemon Ricotta Cookies: Add zest and juice of one lemon to the dough and glaze.
  • Chocolate Chip Ricotta Cookies: Fold in mini chocolate chips for extra decadence.
  • Holiday-Themed Cookies: Use red and green sprinkles or add food coloring to the glaze.

Why You Should Make These Cookies

Italian Ricotta Cookies are perfect for gifting, holiday gatherings, or simply satisfying a sweet tooth. Their versatile nature makes them a hit for any occasion.

Pair them with a refreshing dessert like Homemade Pineapple Soft Serve Ice Cream for a delightful treat.


FAQs About Italian Ricotta Cookies

1. Can I freeze Italian Ricotta Cookies?

Yes! Store the cookies in an airtight container and freeze for up to 3 months. Thaw and glaze them when ready to serve.

2. What can I use instead of ricotta cheese?

Mascarpone or cream cheese can work as substitutes, though they slightly alter the flavor and texture.

3. How do I prevent the glaze from being too runny?

Gradually add milk to the powdered sugar while whisking, ensuring the consistency is thick but pourable.


Nutritional Information

  • Serving Size: 1 cookie
  • Calories: 120
  • Fat: 5g
  • Carbohydrates: 18g
  • Protein: 2g

Storage and Serving Suggestions

  • Store in an airtight container at room temperature for up to a week.
  • Serve with coffee, tea, or milk for a comforting treat.

For more easy-to-make desserts, explore Homemade Pineapple Soft Serve Ice Cream or Homemade Pizza Sticks.


Conclusion

Italian Ricotta Cookies are a must-try for their delightful texture, versatile flavor, and festive appearance. Whether you’re celebrating the holidays or indulging in a sweet treat, these cookies are guaranteed to please.

Red Velvet Crinkle Cookies: A Festive and Delicious Holiday Treat

red velvet cookies, crinkle cookie recipe, festive cookies, holiday cookie recipe, chocolate crinkle cookies

Article: “Red Velvet Crinkle Cookies: A Festive Delight”


Introduction

There’s something irresistible about the chewy texture and the vibrant red color of Red Velvet Crinkle Cookies. Perfect for holiday gatherings or as a thoughtful homemade gift, these cookies are a blend of cocoa flavor, tangy undertones, and a dusting of powdered sugar that creates their signature crackled look. Whether you’re an experienced baker or a beginner, this recipe promises festive fun and delicious results.

Learn more about creating the perfect crinkle cookie texture with expert tips in How to Perfect Crinkle Cookies.


Ingredients You’ll Need

Essential Ingredients:
  • Butter: Softened for easy mixing.
  • Sugar: Granulated and powdered for coating.
  • Eggs: Provides structure and moisture.
  • Vanilla Extract: Enhances the red velvet flavor.
  • Buttermilk: Adds a subtle tang.
  • All-Purpose Flour: The base for the cookie dough.
  • Cocoa Powder: Gives the cookies their chocolatey flavor.
  • Baking Soda: Helps the cookies rise.
  • Red Food Coloring: Creates the iconic red hue.

Discover the best food coloring for your baked goods at Best Gel Food Coloring for Baking.


Step-by-Step Preparation

1. Preparing the Dough
  • Cream butter and sugar until fluffy.
  • Add eggs, vanilla, and food coloring, mixing thoroughly.
  • Slowly combine the dry ingredients with wet ingredients to form a soft dough.
  • Chill dough for at least 1 hour for easier handling.
2. Shaping and Coating
  • Scoop dough into balls, approximately 1 inch in diameter.
  • Generously roll each ball in powdered sugar.
3. Baking to Perfection
  • Preheat oven to 350°F (175°C).
  • Place cookie balls on a parchment-lined baking sheet.
  • Bake for 10–12 minutes, ensuring cookies retain a soft center.
  • Allow cookies to cool on a wire rack.

For freezing tips and baking convenience, refer to Freezing Cookie Dough and Baking from Frozen.


Variations and Add-Ons

Chocolate Lover’s Crinkles

  • Fold in chocolate chips for an extra indulgence.

Holiday Peppermint Crinkles

  • Add peppermint extract for a refreshing twist.

Nutty Red Velvet

  • Incorporate chopped walnuts or pecans.

Presentation and Serving Ideas

  • Drizzle melted white chocolate over cooled cookies for a bakery-style finish.
  • Arrange on a festive platter, garnished with sprigs of holly or mint leaves.

FAQs and Troubleshooting

How do I store Red Velvet Crinkle Cookies?

  • Store in an airtight container at room temperature for up to a week.

Can I make these cookies gluten-free?

  • Substitute all-purpose flour with a gluten-free baking mix.

Why don’t my cookies have crinkles?

  • Ensure the dough is chilled and generously coated in powdered sugar before baking.

Pro Tips for Perfect Cookies

  • Measure accurately: Baking is a science; precise measurements are key.
  • Use room temperature ingredients: This ensures even mixing.
  • Chill thoroughly: Prevents the cookies from spreading too much during baking.

Suggested Internal Links for Enhanced Reader Experience


Conclusion

Whether you’re baking for the holidays, a party, or simply to satisfy a craving, Red Velvet Crinkle Cookies are a show-stopping treat. With their crackled sugar coating and soft, chocolatey center, they’re guaranteed to impress. Experiment with variations, share the joy, and make every occasion sweeter with these delightful cookies.

Mini Cheese Ball Bites: A Perfect Party Appetizer

cheese ball appetizers, mini cheese bites, bite-sized cheese snacks, party cheese recipes, easy cheese appetizers

Suggested Internal Linking Opportunities for the Article on “Mini Cheese Ball Bites”

After analyzing the sitemap at ExoRecipes, here are relevant internal links you can incorporate into the article:

  1. Use for Rich Anchor Text:
  2. Use for Rich Anchor Text:
  3. Use for Rich Anchor Text:

Article: “Mini Cheese Ball Bites: The Ultimate Party Appetizer”

Introduction

When it comes to crowd-pleasing appetizers, mini cheese ball bites stand out as a versatile, mess-free, and delicious option. Perfect for holiday gatherings, game nights, or casual get-togethers, these bite-sized treats are as fun to make as they are to eat.

Why Mini Cheese Ball Bites are a Must-Try

  • Mess-Free Convenience: Unlike large cheese balls, mini versions offer individual servings, making them easy to handle.
  • Versatility: From herbs to nuts, the customizable coatings suit all taste preferences.
  • Perfect for Any Occasion: Elegant enough for dinner parties and casual enough for potlucks.

Learn how these snacks pair beautifully with creative dishes like simple entertaining recipes.


Ingredients You’ll Need

For the Cheese Base:

  • Cream cheese (softened)
  • Shredded cheddar
  • Garlic and onion powder
  • A dash of salt and pepper

Coating Options:

  • Chopped herbs (parsley, dill)
  • Crumbled bacon
  • Crushed pretzels or crackers
  • Finely diced nuts (pecans, almonds)

Explore how other creative finger foods like quick and flavorful appetizers can complement these bites.


How to Make Mini Cheese Ball Bites

  1. Prepare the Cheese Mixture:
    • Mix cream cheese, shredded cheddar, and seasonings until smooth.
  2. Shape the Cheese Balls:
    • Roll the mixture into uniform balls, about 1-inch in diameter.
  3. Coat the Cheese Balls:
    • Roll the balls in your choice of toppings for even coverage.
  4. Chill Before Serving:
    • Refrigerate for at least an hour for optimal texture.

Creative Variations

  1. Spicy Cheese Balls:
    • Add diced jalapeños or a pinch of cayenne pepper.
  2. Sweet and Savory:
    • Incorporate dried cranberries or honey for a unique twist.
  3. Herbed Perfection:
    • Combine goat cheese with rosemary and thyme for a rich, fragrant bite.

Tips for Success

  • Prevent Sticking: Lightly oil your hands while rolling the cheese mixture.
  • Make Ahead: These bites can be prepared a day in advance, stored in the fridge, and served fresh.

For more creative ideas, explore homemade comfort foods like these casseroles.


Serving Suggestions

  • Pair with a platter of crackers, breadsticks, or fresh veggies.
  • Add a dipping sauce like ranch or honey mustard for extra flavor.

FAQs About Mini Cheese Ball Bites

  1. Can I freeze mini cheese ball bites?
    Yes, but thaw them in the refrigerator before serving and add coatings fresh.
  2. How long can they be stored?
    Store in an airtight container in the fridge for up to 3 days.
  3. What toppings work best for kids?
    Use mild flavors like crushed crackers or shredded cheese.

Conclusion

With their customizable flavors, simple preparation, and versatile presentation, mini cheese ball bites are a must-have for any occasion. Whether hosting a casual game night or an elegant dinner, these cheesy delights are sure to impress your guests.