Cheesy Garlic Chicken Wraps Recipe: Easy and Flavorful

Garlic chicken wraps, cheesy chicken tortilla wraps, creamy chicken wraps, garlic chicken wrap recipe, easy chicken wrap ideas

Cheesy Garlic Chicken Wraps Recipe

Cheesy garlic chicken wraps combine creamy chicken filling, melted cheese, and warm tortillas to create a comforting and quick meal. Whether it’s a busy weeknight dinner or a weekend snack, these wraps are sure to delight your family. They’re versatile, easy to prepare, and endlessly customizable for different tastes.


Why Cheesy Garlic Chicken Wraps Are Perfect for Your Table

These wraps offer:

  • A rich and creamy texture with a burst of garlic flavor.
  • Quick preparation, ready in under 30 minutes.
  • An opportunity to experiment with fillings, from classic shredded chicken to vegetarian alternatives like tofu.

Pair these wraps with a hearty soup for a complete meal. For instance, Crockpot Potato Soup adds warmth and complements the creamy filling of the wraps perfectly.


Ingredients Needed

For the Filling:

  • 2 cups shredded rotisserie chicken
  • 1 cup shredded mozzarella cheese
  • ½ cup cream cheese, softened
  • 2 tablespoons minced garlic
  • 1 teaspoon garlic powder
  • ½ teaspoon onion powder
  • Salt and pepper to taste

For the Wraps:

  • 4 large tortillas
  • Olive oil or butter for toasting

Optional Add-ins:

  • ½ cup diced bell peppers for crunch
  • ¼ cup chopped fresh parsley for garnish

How to Make Cheesy Garlic Chicken Wraps

Step 1: Prepare the Filling

  • In a medium skillet over medium heat, combine shredded chicken, cream cheese, minced garlic, garlic powder, onion powder, and seasonings.
  • Stir until the mixture is creamy and evenly heated. Remove from heat and mix in shredded mozzarella cheese.

Step 2: Assemble the Wraps

  • Lay tortillas flat and evenly distribute the chicken mixture onto each one.
  • Roll the tortillas tightly, tucking in the sides as you go.

Step 3: Toast the Wraps

  • Heat olive oil or butter in a skillet over medium heat.
  • Place wraps seam-side down and toast until golden brown on each side, about 2 minutes per side.

Step 4: Serve

  • Slice each wrap diagonally and serve warm with your favorite dipping sauce, such as ranch or garlic aioli.

For another garlic-rich dish, check out Creamy Garlic Parmesan Chicken for more ideas.


Customizing Your Wraps

Vegetarian Options:

  • Swap chicken with tofu or black beans for a plant-based alternative.
  • Add vegetables like spinach or mushrooms for extra nutrients.

Spice It Up:

  • Incorporate jalapeños or a pinch of cayenne pepper for a spicy kick.

Kid-Friendly Variations:

  • Use cheddar cheese instead of mozzarella for a milder flavor.
  • Serve with ketchup or a sweet chili sauce for dipping.

Pairing Suggestions

To enhance the experience of these wraps, pair them with side dishes like:


Storage and Reheating Tips

  1. Storing Leftovers:
    • Wrap tightly in aluminum foil and refrigerate for up to 3 days.
  2. Reheating:
    • Place wraps in a skillet over low heat until heated through, ensuring the tortilla stays crispy.
  3. Freezing:
    • Wraps can be frozen for up to 2 months. Reheat directly from frozen in a preheated oven at 350°F for 20 minutes.

FAQs About Cheesy Garlic Chicken Wraps

Can I use other meats?

Absolutely! These wraps work great with turkey, shredded pork, or even seafood like shrimp.

What’s the best cheese for this recipe?

Mozzarella offers a gooey texture, but you can experiment with provolone, gouda, or even pepper jack.

Can I make these wraps ahead of time?

Yes, you can prepare the filling a day in advance and assemble the wraps when ready to serve.


Internal Linking Opportunities


Conclusion

Cheesy garlic chicken wraps are a delightful and versatile meal that can be tailored to suit various tastes. Whether you prefer a classic preparation or a spiced-up version, these wraps are bound to become a household favorite. Pair them with complementary dishes, store them for easy meals later, and enjoy experimenting with the endless variations!

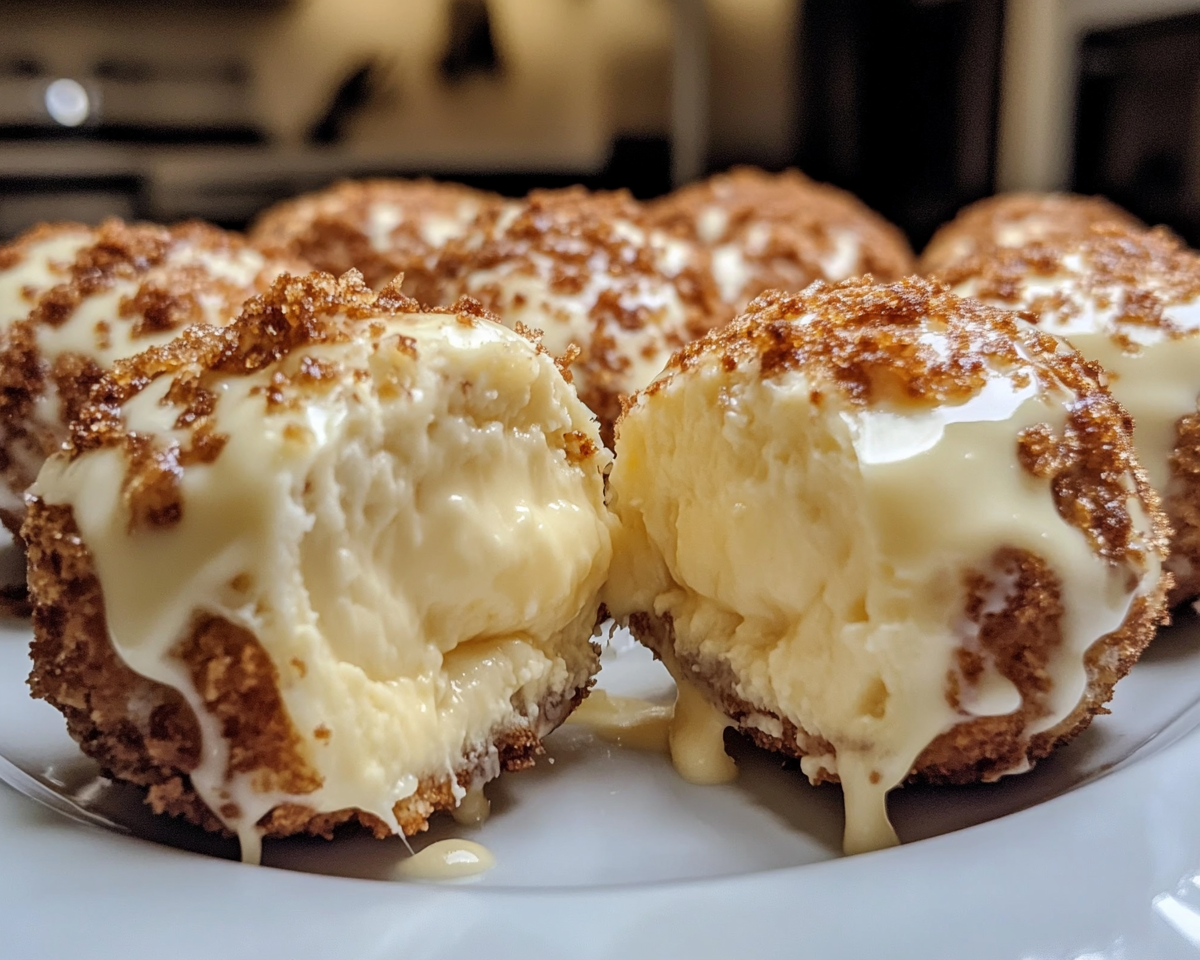
No-Bake Cheesecake Balls: A Simple and Delicious Dessert

Cheesecake truffles, no-bake cream cheese balls, easy cheesecake bites, quick dessert balls, no-bake treats

No-Bake Cheesecake Balls: The Ultimate Bite-Sized Treat

No-Bake Cheesecake Balls are the perfect solution for those who want a quick, no-fuss dessert that’s as versatile as it is delicious. These creamy, bite-sized delights are ideal for parties, gifting, or just indulging at home. With a rich base of cream cheese and powdered sugar, these treats can be customized with endless mix-ins, coatings, and flavors.


Why Choose No-Bake Cheesecake Balls?

  • Effortless Preparation: No need to turn on the oven. These treats are quick to assemble with minimal tools.
  • Customizable Flavors: From chocolate to fruit, you can tailor the recipe to your taste preferences.
  • Perfect for All Occasions: Whether it’s a holiday party, birthday celebration, or casual gathering, these balls are a hit.

If you’re intrigued by other no-bake dessert ideas, check out this guide on Perfect No-Bake Desserts.


Ingredients for No-Bake Cheesecake Balls

Base Ingredients:

  • 8 oz cream cheese, softened
  • 1 cup powdered sugar
  • 1 teaspoon vanilla extract

Optional Mix-Ins:

  • Crushed graham crackers or Oreos
  • Mini chocolate chips
  • Finely chopped nuts

Coatings and Decorations:

  • Melted chocolate (dark, milk, or white)
  • Sprinkles or edible glitter
  • Crushed nuts or cookies

Explore creative coating options in this article on Creative Dessert Coating Ideas.


Step-by-Step Instructions

  1. Prepare the Cheesecake Mixture:
    • In a mixing bowl, beat the cream cheese until smooth.
    • Gradually add powdered sugar and vanilla extract. Mix until fully combined.
    • Fold in your choice of mix-ins, such as crushed cookies or chocolate chips.
  2. Chill and Shape:
    • Cover the bowl with plastic wrap and refrigerate for 30 minutes to firm up the mixture.
    • Scoop out small portions using a cookie scoop or tablespoon and roll them into balls.
  3. Coat and Decorate:
    • Melt your choice of chocolate and dip each ball to coat. Alternatively, roll in crushed nuts or sprinkles.
    • Place the coated balls on a parchment-lined tray and refrigerate for at least 1 hour.

For tips on working with cream cheese, visit this cream cheese preparation guide.


Creative Variations

  • Chocolate-Peanut Butter Cheesecake Balls: Add peanut butter to the mixture and coat with crushed peanuts.
  • Festive Holiday Balls: Use red and green sprinkles for a Christmas theme.
  • Boozy Cheesecake Balls: Mix in a splash of Baileys or Amaretto for an adult twist.
  • Vegan Option: Substitute dairy-free cream cheese and chocolate for a plant-based dessert.

Serving and Storage Tips

  • Serve chilled on a decorative platter, possibly alongside other bite-sized treats like Mini Pineapple Cheesecakes.
  • Store leftovers in an airtight container in the refrigerator for up to 5 days. For longer storage, freeze them for up to 3 months.

FAQs About No-Bake Cheesecake Balls

  1. Can I freeze these treats? Yes, they freeze well. Place them in an airtight container with parchment paper between layers.
  2. How far in advance can I make them? They can be made 1-2 days ahead and stored in the refrigerator.
  3. What if I don’t have powdered sugar? You can blend granulated sugar in a food processor to make a fine powder.
  4. Can I use a different sweetener? Yes, try honey or agave syrup for a natural sweetness.

Internal Linking Opportunities

Here are some relevant recipes from the Exo Recipes sitemap that complement the theme of No-Bake Cheesecake Balls:


Nutritional Insights

Each cheesecake ball (depending on size and ingredients) typically contains:

  • Calories: ~100-150
  • Sugar: ~8-12 grams
  • Fat: ~6-8 grams

For a healthier option, consider:

  • Using low-fat cream cheese.
  • Reducing sugar with a natural substitute.

Conclusion

No-Bake Cheesecake Balls are a versatile and easy dessert that you can whip up in no time. Their endless customization options make them a go-to for every occasion. Whether dipped in chocolate, sprinkled with nuts, or enjoyed plain, these delightful treats are guaranteed to satisfy your sweet tooth.

Get creative with flavors and toppings, and share your results with family and friends!

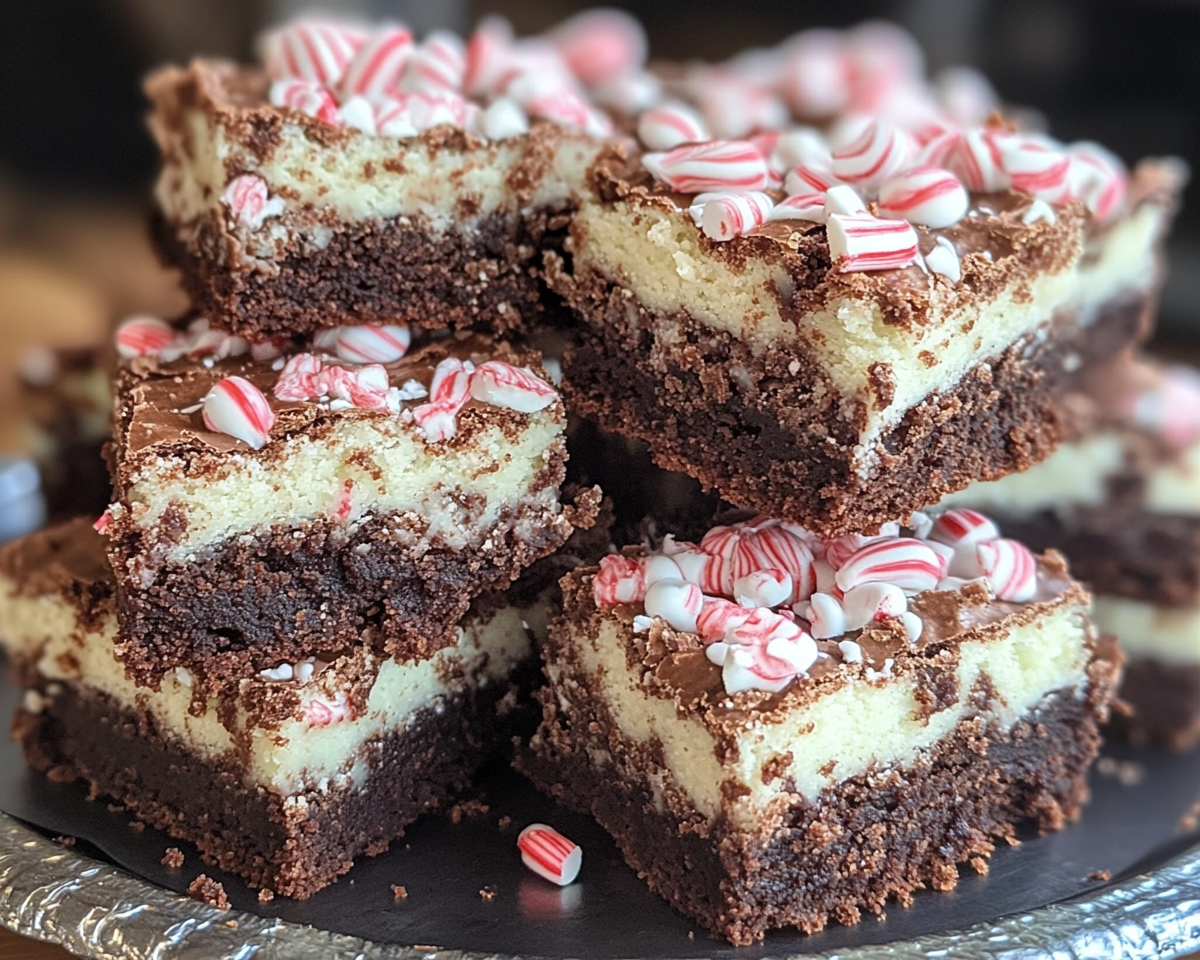
Peppermint Brownies: A Fudgy Holiday Delight

Holiday peppermint dessert, chocolate peppermint brownies, festive brownies recipe, fudgy brownies with peppermint, candy cane brownies

Peppermint Brownies


Introduction

Peppermint brownies are the ultimate holiday treat. The rich chocolate flavor paired with refreshing peppermint creates a dessert that’s perfect for Christmas gatherings, gifting, or simply indulging in a festive snack. Let’s dive into how to make these deliciously fudgy brownies and explore creative twists to suit every taste.


Ingredients

For the Brownie Base
  • 1 cup unsalted butter
  • 2 cups granulated sugar
  • 4 large eggs
  • 1 teaspoon vanilla extract
  • 1 teaspoon peppermint extract
  • 1 cup all-purpose flour
  • ¾ cup cocoa powder
  • ½ teaspoon salt
For the Peppermint Topping
  • 1 cup powdered sugar
  • 2 tablespoons milk
  • 1 teaspoon peppermint extract
  • Crushed candy canes for garnish

How to Make Peppermint Brownies

Step 1: Prepare the Batter

  1. Preheat your oven to 350°F and grease a 9×13-inch baking pan.
  2. Melt the butter in a medium saucepan. Mix in sugar until smooth.
  3. Add eggs one at a time, beating well after each addition. Stir in vanilla and peppermint extracts.
  4. Sift flour, cocoa powder, and salt into the wet mixture. Mix until just combined.

Step 2: Bake the Brownies

  1. Pour the batter into the prepared pan and spread evenly.
  2. Bake for 25–30 minutes or until a toothpick inserted in the center comes out with moist crumbs.
  3. Cool completely before adding the topping.

Step 3: Add the Peppermint Topping

  1. In a bowl, whisk powdered sugar, milk, and peppermint extract until smooth.
  2. Spread over the cooled brownies and sprinkle with crushed candy canes.

Creative Variations

  • Layered Peppermint Brownies: Add a middle layer of peppermint cream filling for extra decadence.
  • Peppermint Mocha Brownies: Incorporate instant coffee powder into the batter for a mocha twist.
  • Vegan Peppermint Brownies: Use flaxseed meal as an egg substitute and plant-based butter.

Serving Suggestions

  • Serve with a dollop of whipped cream or a scoop of peppermint ice cream.
  • Pair with a cup of hot cocoa or peppermint tea.
  • Decorate with holiday-themed sprinkles for festive gatherings.

Storage Tips

  • Store brownies in an airtight container at room temperature for up to three days.
  • For longer storage, freeze unglazed brownies for up to two months. Thaw and glaze before serving.

Internal Linking Opportunities

  1. Link to Kentucky Butter Cake for another rich dessert option.
  2. Include Mini Pineapple Upside-Down Cakes for readers seeking tropical treats.
  3. Recommend Slow Cooker Baked Ziti for a savory pairing.

FAQs

1. Can I use a boxed brownie mix for this recipe?
Absolutely! Add peppermint extract and crushed candy canes to customize the flavor.

2. How can I prevent brownies from overbaking?
Check for doneness with a toothpick and remove from the oven as soon as it comes out with a few moist crumbs.

3. Can I skip the peppermint topping?
Yes, you can serve the brownies plain or with a dusting of powdered sugar.

4. Are there any substitutes for candy canes?
Peppermint bark or white chocolate chips work well as substitutes.


Conclusion

Peppermint brownies are an irresistible combination of rich chocolate and refreshing peppermint, making them a must-have for holiday celebrations. Whether you stick to the classic recipe or try creative variations, these brownies are guaranteed to delight. For more holiday baking ideas, explore Mini Pineapple Upside-Down Cakes or Kentucky Butter Cake.

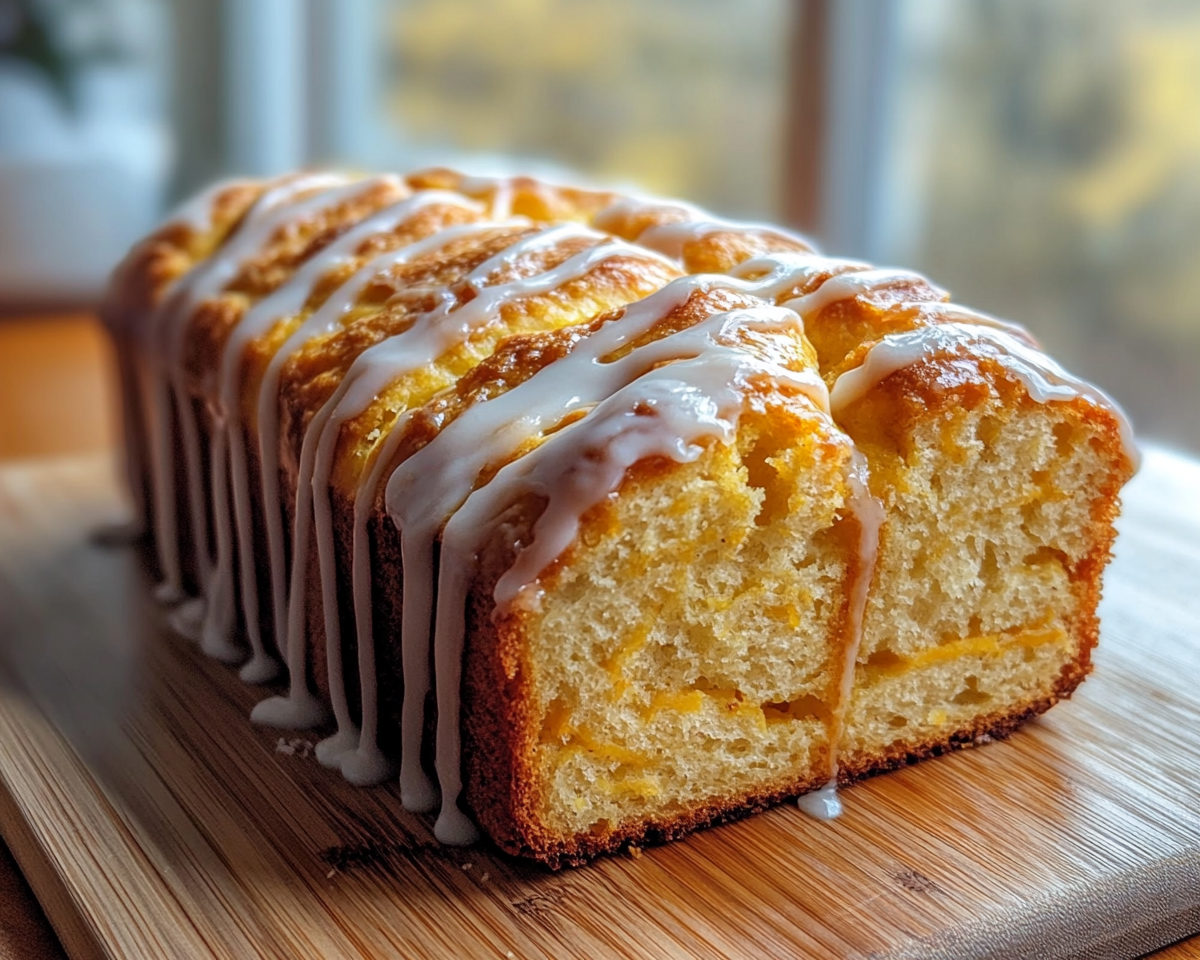
Carrot Bread with Sweet Vanilla Glaze: A Deliciously Moist Treat

Carrot loaf recipe, vanilla-glazed carrot bread, moist carrot bread, spiced carrot dessert, easy carrot bread recipe

Carrot Bread with Sweet Vanilla Glaze


Introduction

Carrot Bread with Sweet Vanilla Glaze is a delightful blend of wholesome carrots and a sugary, decadent vanilla topping. This quick bread is the perfect treat for brunches, holiday gatherings, or simply enjoying a slice with coffee. Its moist texture and aromatic spices make it a crowd-pleaser.

For more baking inspiration, explore Kentucky Butter Cake, a Southern classic.


What Makes Carrot Bread Special?

Carrot bread is a sweet, spiced loaf that balances the natural sweetness of carrots with a hint of cinnamon and nutmeg. It’s topped with a vanilla glaze that enhances its flavor and adds a touch of indulgence.


Ingredients

Bread

  • 1 ¾ cups all-purpose flour
  • 1 teaspoon baking powder
  • ½ teaspoon baking soda
  • 1 teaspoon cinnamon
  • ¼ teaspoon nutmeg
  • ½ teaspoon salt
  • 2 large eggs
  • ½ cup granulated sugar
  • ½ cup brown sugar
  • 1/3 cup vegetable oil
  • 1 teaspoon vanilla extract
  • 1 cup grated carrots
  • ½ cup chopped nuts or raisins (optional)

Vanilla Glaze

  • 1 cup powdered sugar
  • 2–3 tablespoons milk
  • 1 teaspoon vanilla extract

How to Make Carrot Bread

Step 1: Prepare the Batter

  1. Preheat your oven to 350°F. Grease a 9×5-inch loaf pan.
  2. Combine flour, baking powder, baking soda, cinnamon, nutmeg, and salt in a bowl.
  3. In another bowl, whisk eggs, sugars, oil, and vanilla until smooth.
  4. Gradually fold the dry ingredients into the wet mixture. Add grated carrots and optional nuts or raisins.

Step 2: Bake the Bread

  1. Pour the batter into the prepared loaf pan. Smooth the top with a spatula.
  2. Bake for 50–55 minutes or until a toothpick inserted into the center comes out clean.
  3. Cool the bread in the pan for 10 minutes before transferring it to a wire rack.

Step 3: Glaze the Bread

  1. Whisk powdered sugar, milk, and vanilla until smooth.
  2. Drizzle the glaze over the cooled bread. Let it set before slicing.

For complementary dessert ideas, check out Mini Pineapple Upside-Down Cakes.


Creative Variations

  • Zesty Lemon Glaze: Replace vanilla extract in the glaze with lemon juice and zest.
  • Nutty Delight: Add chopped walnuts or pecans to the batter.
  • Healthier Version: Use whole wheat flour and substitute sugar with honey or maple syrup.
  • Vegan Option: Replace eggs with flaxseed meal and use almond milk for the glaze.

Serving Suggestions

  • Serve warm with a dollop of cream cheese frosting.
  • Pair with tea or coffee for a cozy afternoon treat.
  • Include as part of a brunch spread with other baked goods like Slow Cooker Baked Ziti.

FAQs

1. Can I freeze carrot bread?

Yes, freeze unglazed carrot bread in an airtight container for up to three months. Thaw before glazing.

2. What if my bread is too dense?

Overmixing the batter can cause density. Mix until ingredients are just combined.

3. How do I store glazed carrot bread?

Store in an airtight container at room temperature for 3–4 days or refrigerate for up to a week.

4. Can I make muffins instead?

Yes, bake the batter in a muffin tin at 350°F for 18–22 minutes.


Internal Linking Opportunities


Closing Thoughts

Carrot Bread with Sweet Vanilla Glaze is a versatile recipe that’s easy to make and perfect for any occasion. With its blend of warm spices, sweet glaze, and tender crumb, it’s sure to become a family favorite. Whether you’re baking for a holiday or just craving something comforting, this carrot bread delivers every time.

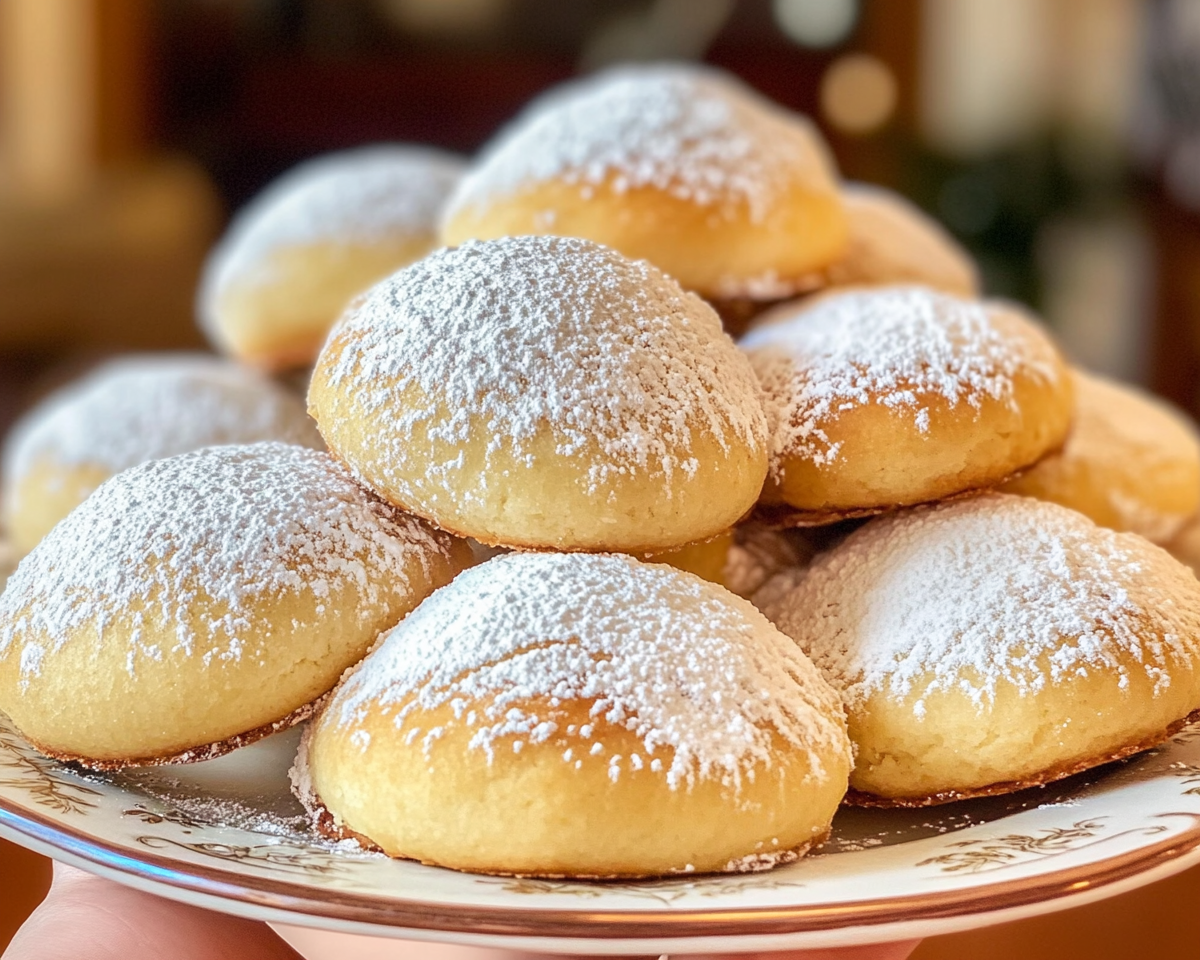
Authentic Italian Ricotta Cookies: Soft, Sweet, and Irresistible

Ricotta cookies recipe, Italian dessert cookies, soft ricotta cookies, holiday ricotta treats, glazed ricotta cookies

Italian Ricotta Cookies: A Sweet Classic with Endless Variations


Introduction

Italian Ricotta Cookies are beloved treats often served during the holidays or special occasions. Their soft, moist texture combined with a hint of sweetness makes them a versatile and crowd-pleasing dessert. This recipe pairs well with other Italian classics like Pizzelles and Biscotti.

To master your baking game, explore Perfect Baking Tips for additional insights.


What Are Italian Ricotta Cookies?

Italian Ricotta Cookies are soft, cake-like cookies made with ricotta cheese to achieve their unique texture. Their subtle sweetness is enhanced by a simple glaze and decorative sprinkles, making them both delicious and visually appealing.

A Glance at Their History

  • Originated as a traditional Italian dessert.
  • Often associated with festive celebrations, particularly Christmas.

Ingredients

Cookie Dough

  • Butter: 1 cup, softened
  • Granulated sugar: 2 cups
  • Eggs: 2 large
  • Ricotta cheese: 16 oz (full-fat preferred for richness)
  • Vanilla extract: 2 teaspoons
  • All-purpose flour: 4 cups
  • Baking powder: 1 teaspoon
  • Baking soda: ½ teaspoon

For the Glaze

  • Powdered sugar: 2 cups
  • Milk: 2–3 tablespoons
  • Almond or lemon extract: 1 teaspoon

Step-by-Step Recipe

1. Preparing the Dough

  1. Cream butter and sugar until fluffy.
  2. Mix in eggs, ricotta, and vanilla extract.
  3. Slowly incorporate dry ingredients to form a sticky dough.

2. Baking the Cookies

  1. Preheat the oven to 350°F.
  2. Drop spoonfuls of dough onto parchment-lined baking sheets.
  3. Bake for 10–12 minutes, or until lightly golden.

3. Glazing and Decorating

  1. Whisk powdered sugar, milk, and extract until smooth.
  2. Dip cooled cookies into the glaze and top with sprinkles.

For creative dessert ideas, explore Festive Dessert Inspirations.


Creative Variations

  • Citrus Bliss: Add orange zest to the dough and substitute vanilla with orange extract.
  • Chocolate Drizzle: Replace half of the glaze with melted dark chocolate.
  • Festive Fun: Incorporate holiday-themed sprinkles.

Serving Suggestions

  • Pair with espresso or cappuccino for an authentic Italian experience.
  • Include in holiday cookie gift boxes alongside Italian Drunken Noodles.
  • Serve as a dessert at gatherings, paired with Homemade Picadillo with Flour Tortillas.

FAQs

1. Can I freeze Italian Ricotta Cookies?

Yes, freeze unglazed cookies in an airtight container for up to 3 months.

2. How do I store them?

Store in an airtight container at room temperature for 4–5 days.

3. What if my dough is too sticky?

Chill the dough for 30 minutes to make it easier to handle.

4. Can I substitute ricotta with another ingredient?

Mascarpone is a close alternative but may alter the texture slightly.


Internal Linking Opportunities


Closing Thoughts

Italian Ricotta Cookies are a delightful addition to any dessert repertoire. Their versatility in flavor and decoration makes them a perfect choice for holidays or everyday indulgence. Try these recipes and create lasting memories with friends and family.