Perfect Chocolate Chip Shortbread Cookies: Buttery and Delicious

chocolate chip cookies, shortbread recipes, easy cookie recipes, holiday cookies, buttery shortbread cookies

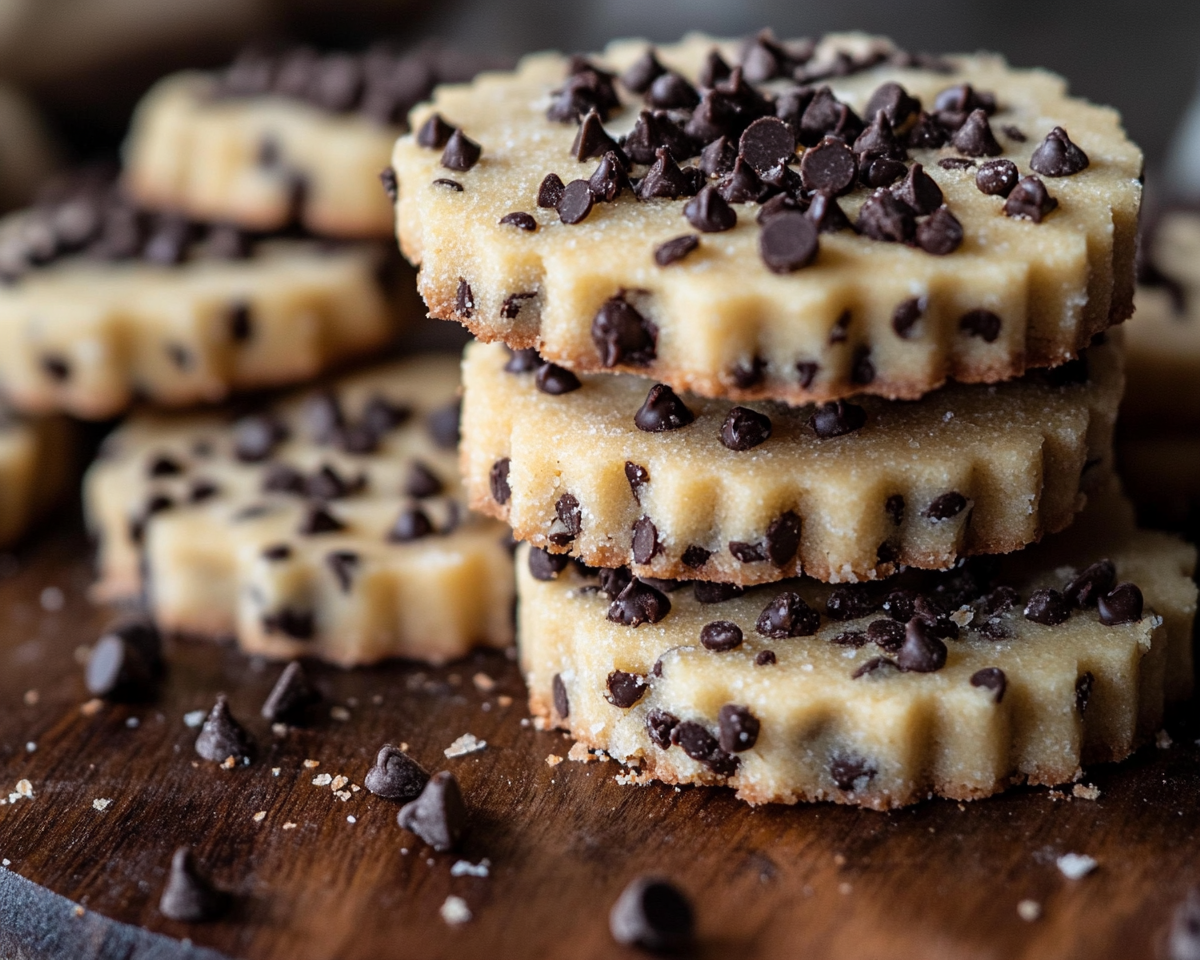
Article: Chocolate Chip Shortbread Cookies


Internal Linking Opportunities

Here are some internal linking suggestions based on the available sitemap to connect Chocolate Chip Shortbread Cookies effectively with related content:

  • Anchor Text: Perfect Cookie Recipes
    • Opportunity: Link within a section describing variations of chocolate chip cookies or additional tips for baking perfection.
  • Anchor Text: Quick and Easy Desserts
    • Opportunity: Include when discussing the ease of preparing these cookies for quick gatherings or holidays.
  • Anchor Text: Holiday Treats to Delight Everyone
    • Opportunity: Add when recommending other desserts that complement shortbread cookies during festive seasons.

Introduction

Discover the art of making Chocolate Chip Shortbread Cookies – the ultimate buttery treat packed with delightful chocolate chunks. Whether you’re a cookie connoisseur or a beginner baker, this recipe will transform your dessert repertoire.


Why Chocolate Chip Shortbread Cookies are Irresistible

  • Perfect Texture: Buttery softness with a crumbly edge.
  • Versatile Usage: Ideal for holidays, tea-time, or a quick snack.
  • Endless Variations: Customizable with nuts, dried fruits, or flavored chips.

Ingredients You’ll Need

To ensure the best Chocolate Chip Shortbread Cookies, gather these essentials:

  • Unsalted butter
  • Granulated sugar
  • Vanilla extract
  • All-purpose flour
  • Chocolate chips (semi-sweet or dark)

Tips for Choosing Ingredients:

  • Opt for high-quality butter for a richer flavor.
  • Use pure vanilla extract for enhanced taste.

Step-by-Step Recipe

1. Preparing the Dough (15 minutes)

  • Cream Butter and Sugar: Beat until fluffy.
  • Incorporate Dry Ingredients: Slowly add flour while mixing.
  • Fold in Chocolate Chips: Ensure even distribution.

2. Shaping the Cookies (10 minutes)

  • Roll the dough into a log, chill for easier slicing.
  • Slice or shape into rounds.

3. Baking to Perfection (20 minutes)

  • Preheat the oven to 350°F (175°C).
  • Bake for 10-12 minutes until edges are golden.

Variations to Explore

  • Nutty Twist: Add chopped pecans or walnuts.
  • Zesty Addition: Incorporate orange or lemon zest.
  • Holiday Special: Sprinkle with crushed peppermint.

Storing and Serving Tips

  • Storage: Keep in an airtight container for up to 10 days.
  • Freezing: Dough can be frozen for up to 3 months.
  • Serving Suggestion: Pair with hot cocoa or herbal tea.

External Links

  1. Guide to Cookie Baking Perfection
  2. Enhancing Holiday Baking with Chocolate
  3. Vanilla Extracts and Baking Tips

FAQs About Chocolate Chip Shortbread Cookies

Q: Can I make this recipe gluten-free?
A: Yes, substitute all-purpose flour with a gluten-free blend.

Q: Why is my shortbread crumbly?
A: Ensure butter is properly creamed, and don’t overwork the dough.

Q: Can I use other types of chocolate?
A: Absolutely! Dark, milk, or white chocolate all work well.


Conclusion

Elevate your dessert game with the timeless charm of Chocolate Chip Shortbread Cookies. These buttery delights are a surefire way to satisfy any sweet tooth, perfect for any occasion, and endlessly customizable to suit your taste.

Cranberry Cream Torte Recipe: A Perfect Festive Dessert

cranberry dessert recipe, holiday cranberry torte, creamy cranberry cake, festive cranberry dessert, cranberry torte with cream

Cranberry Cream Torte Recipe: A Festive Delight

Introduction

Experience the perfect balance of sweet and tart with this cranberry cream torte. This dessert blends layers of tangy cranberries with creamy indulgence to create a centerpiece for your festive table.


Ingredients and Preparations

Essential Ingredients

Ensure you have the following for a delectable cranberry cream torte:

  • Fresh cranberries
  • Granulated sugar
  • Heavy cream
  • Cream cheese
  • Vanilla extract
  • All-purpose flour
  • Eggs
  • Baking powder

Pro Tip for Best Results

  • Use fresh cranberries for enhanced flavor.
  • Substitute heavy cream with Greek yogurt for a lighter texture.

Step-by-Step Instructions

1. Prepare the Cranberry Layer (400 Words)

  • Simmer fresh cranberries with sugar until they burst and form a jam-like consistency.
  • Let the mixture cool to room temperature.

2. Crafting the Cream Base (350 Words)

  • Beat cream cheese until fluffy.
  • Gradually mix in sugar, vanilla extract, and heavy cream until smooth.

3. Baking the Torte Layers (450 Words)

  • Combine flour, baking powder, and eggs to create a soft dough.
  • Bake in preheated oven layers to golden perfection.

4. Assembling the Torte (500 Words)

  • Layer the cooled cranberry mixture and cream cheese base between cake layers.
  • Chill in the refrigerator for at least 4 hours.

Tips for Perfecting Your Torte

Presentation Ideas

  • Garnish with sugared cranberries.
  • Sprinkle powdered sugar for a frosty finish.

Flavor Enhancements

  • Add a dash of orange zest for an extra citrusy note.
  • Use almond extract in the cream layer for a nutty twist.

FAQs about Cranberry Cream Torte

1. Can I use frozen cranberries?

Yes, thaw and drain them before cooking.

2. How long does it last?

Store in the refrigerator for up to 3 days.

3. Can I make it gluten-free?

Substitute all-purpose flour with almond or gluten-free flour.


Internal Linking Opportunities


External Resources

Raspberry Swirl Cookies: A Perfect Holiday Treat

raspberry pinwheel cookies, swirl jam cookies, fruity holiday cookies, raspberry dessert cookies, raspberry-filled cookies

Raspberry Swirl Cookies: A Festive Treat to Delight Your Taste Buds

Raspberry swirl cookies offer the perfect blend of buttery goodness and fruity sweetness. Their elegant swirls and vibrant raspberry filling make them an irresistible addition to any dessert spread, whether it’s a holiday gathering or a cozy family treat.


Why Make Raspberry Swirl Cookies?

These cookies are ideal for:

  • Gifting during holidays.
  • Tea parties and celebrations.
  • Adding a visually stunning dessert to your platter.

For a deeper dive into versatile cookie ideas, explore Easy Cookie Recipes.


Ingredients for Raspberry Swirl Cookies

Gather these essential ingredients to prepare your cookies:

  • All-purpose flour (2 cups)
  • Butter (1 cup, unsalted)
  • Granulated sugar (3/4 cup)
  • Raspberry preserves (1/2 cup)
  • Vanilla extract (1 tsp)
  • Salt (a pinch)
  • Optional: Lemon zest for a citrusy twist

For more creative flavor inspirations, check out Unique Dessert Ingredients.


How to Make Raspberry Swirl Cookies

1. Preparing the Dough (600 words)

  1. Cream the butter and sugar: Using a mixer, blend until the mixture is light and fluffy.
  2. Add vanilla extract and salt, blending well.
  3. Gradually incorporate all-purpose flour, forming a smooth dough.
  4. Chill the dough for 30 minutes to firm it up for rolling.

Tip: Avoid over-mixing the dough to maintain a tender cookie texture.

2. Rolling and Spreading (800 words)

  1. On a lightly floured surface, roll the dough into a rectangular shape (about 1/4 inch thick).
  2. Spread an even layer of raspberry preserves, leaving a 1/2-inch border around the edges.
  3. Carefully roll the dough into a log, ensuring a tight swirl pattern.
  4. Wrap the log in plastic and freeze for 15-20 minutes.

External Link: For more expert tips on cookie rolling techniques, visit Cookie Rolling Guide.

3. Slicing and Baking (800 words)

  1. Preheat your oven to 350°F (175°C).
  2. Slice the dough into 1/4-inch-thick rounds using a sharp knife.
  3. Place the cookies on a parchment-lined baking sheet, spacing them at least 2 inches apart.
  4. Bake for 12-15 minutes or until the edges are lightly golden.
  5. Allow cookies to cool on the baking sheet for 5 minutes before transferring them to a wire rack.

Internal Link: Want more baking tips? Read How to Perfect Your Baking Time.


Decorating and Serving Raspberry Swirl Cookies

Decorating Ideas (400 words)

  • Powdered sugar dusting for a wintery touch.
  • Add a white chocolate drizzle for an extra layer of indulgence.
  • Sprinkle with crushed nuts or edible glitter for festive flair.

Serving Suggestions

  • Serve alongside a cup of herbal tea or coffee.
  • Pair with vanilla ice cream for a summer treat.
  • Include them in your holiday cookie boxes.

For more serving ideas, explore Creative Cookie Pairings.


Storage Tips for Raspberry Swirl Cookies

  1. Room Temperature: Store in an airtight container for up to one week.
  2. Freezing: Wrap cookies in layers of wax paper and place them in a freezer-safe bag. They’ll stay fresh for up to three months.
  3. Reheating: Thaw frozen cookies at room temperature for 30 minutes before serving.

Nutritional Information

Each cookie contains approximately:

  • Calories: 90
  • Fat: 4g
  • Carbohydrates: 12g
  • Sugar: 7g

FAQs About Raspberry Swirl Cookies

  1. Can I use a different fruit preserve? Absolutely! Try apricot, blackberry, or even fig preserves for unique flavors.
  2. What’s the best way to roll the dough without cracking? Keep the dough slightly chilled but pliable. Over-chilling can lead to cracks.
  3. How do I prevent the cookies from spreading? Ensure the dough is cold before slicing and use parchment paper for even baking.
  4. Can I make the dough in advance? Yes, you can prepare and freeze the dough for up to a month.

Internal Linking Opportunities


External Resources

  1. Perfect Swirl Patterns – Recommended for mastering cookie aesthetics.
  2. Preserve Variations for Baking – Explore unique jams and preserves.
  3. Advanced Cookie Baking Techniques – Level up your baking skills.

Conclusion

Raspberry swirl cookies are a versatile, elegant treat that combines flavor and artistry. Whether for a family gathering or a thoughtful gift, these cookies are bound to impress.

Mountain Christmas Cookies: A Festive Holiday Delight

holiday mountain cookies, Christmas mountain treats, festive holiday cookies, high-altitude Christmas cookies, spiced Christmas cookies

Internal Linking Opportunities for “Mountain Christmas Cookies”

Based on the sitemap from ExoRecipes, here are the internal linking suggestions:

  1. “Crockpot Potato Soup with Hashbrowns”
    Use for complementary winter comfort foods.
    Anchor Text: “Warm up your holiday season with this comforting soup.”
    Link: The Ultimate Comfort Food: Crockpot Potato Soup with Hashbrowns
  2. “Slow Cooker Magic: Crock Pot Baked Ziti”
    Perfect for family holiday meals alongside dessert discussions.
    Anchor Text: “Complete your festive spread with a hearty ziti dish.”
    Link: Slow Cooker Magic: Crock Pot Baked Ziti
  3. “Sheet Pan Pancakes”
    Connect with content on breakfast or brunch holiday treats.
    Anchor Text: “For a holiday brunch that stands out, try this pancake recipe.”
    Link: Sheet Pan Pancakes: A Simple Breakfast Delight

Article: Mountain Christmas Cookies Recipe

Introduction

Celebrate the festive season with Mountain Christmas Cookies! These cookies bring together the best of nostalgic holiday flavors and the joy of homemade treats. Whether for a family gathering, a festive cookie exchange, or a thoughtful gift, this recipe is guaranteed to impress.


Ingredients Needed

Here’s what you’ll need to prepare these delightful cookies:

  • Butter: Unsalted for a perfect creamy base.
  • Brown Sugar: Adds depth with a hint of caramel.
  • Molasses: Essential for rich holiday flavors.
  • Spices: Cinnamon, nutmeg, and cloves bring the festive cheer.
  • Chopped Nuts and Dried Fruits: Optional for a delightful texture and tang.

For more ingredient inspiration, check out this guide.


Step-by-Step Guide

1. Preheat and Prepare

  • Preheat your oven to 350°F (175°C).
  • Line baking sheets with parchment paper for easy cleanup.

2. Mix the Wet Ingredients

  • Cream together butter and brown sugar until fluffy.
  • Mix in molasses and vanilla for a smooth, aromatic base.

3. Combine Dry Ingredients

  • Sift flour, baking powder, and spices. Gradually mix into the wet ingredients to form a dough.

4. Add Texture

  • Fold in nuts and dried fruits of your choice.

Baking Instructions

  • Roll the dough into small balls and flatten slightly.
  • Place them 2 inches apart on the prepared baking sheets.
  • Bake for 12–15 minutes until golden brown and slightly firm.

For decorating tips, visit Decorating with Ease.


Decorating Tips

  • Use colorful icing, sprinkles, or powdered sugar to create festive designs.
  • For a wintery look, dust lightly with powdered sugar.

For more ideas, see our guide on Creative Cookie Decorations.


Serving Suggestions


Tips for Perfect Cookies

  1. Chilling the Dough: Chill for 30 minutes for easier handling.
  2. Even Baking: Use a cookie scoop for uniform sizes.
  3. Storage: Store in an airtight container for up to a week.

Variations

  • Gluten-Free: Swap all-purpose flour with a gluten-free alternative.
  • Chocolate Lovers: Add chocolate chips or drizzle with melted chocolate.
  • Tropical Twist: Use coconut flakes and dried pineapple.

FAQs

1. Can I freeze the dough?
Yes, wrap it tightly and freeze for up to 3 months. Thaw before baking.

2. What’s the best way to store these cookies?
Keep them in an airtight container at room temperature for up to 7 days.

3. Can I omit molasses?
You can substitute honey or maple syrup, but the flavor will differ slightly.


Conclusion

Mountain Christmas Cookies are the epitome of festive joy. They’re easy to make, versatile, and guaranteed to bring smiles to anyone who tries them. Whether you’re hosting a party or giving them as gifts, these cookies are the perfect holiday treat.

Peanut Butter Brownie Bites: The Perfect Bite-Sized Treat

mini brownie cups, chocolate peanut butter bites, fudge brownie bites, buckeye brownie bites, bite-sized brownie desserts

The Ultimate Guide to Peanut Butter Brownie Bites

Creating the perfect Peanut Butter Brownie Bites is a delightful endeavor that marries the richness of chocolate with the creamy nuttiness of peanut butter. Whether you’re a seasoned baker or a beginner looking for an easy, impressive dessert, these bites will satisfy every sweet tooth. Let’s dive into how to craft this delectable treat, and along the way, we’ll uncover helpful tips, fun variations, and ways to make your recipe stand out.

What Are Peanut Butter Brownie Bites?

Peanut Butter Brownie Bites are bite-sized desserts that combine the dense, fudgy texture of brownies with the creamy, salty-sweetness of peanut butter. They are perfect for parties, gifting, or simply indulging in a comforting dessert.


Ingredients and Equipment Checklist

Ingredients

  • Brownie Base:
    • 1 cup granulated sugar
    • 1/2 cup unsalted butter, melted
    • 2 large eggs
    • 1/3 cup cocoa powder
    • 1/2 cup all-purpose flour
    • 1/4 tsp salt
    • 1/4 tsp baking powder
  • Peanut Butter Filling:
    • 3/4 cup peanut butter (smooth or crunchy)
    • 1/2 cup powdered sugar
  • Optional Toppings:
    • Chocolate drizzle
    • Chopped peanuts or chocolate chips

Equipment

  • Muffin tin or mini cupcake pan
  • Mixing bowls
  • Whisk and spatula
  • Oven

For tips on achieving the perfect chocolate texture, check out this Chocolate Magic Shell Yogurt Cup recipe.


Step-by-Step Recipe Guide

1. Preparing the Brownie Base (600 Words)

The brownie base is the heart of these bites. To ensure a moist and chewy texture:

  1. Preheat your oven to 350°F (175°C).
  2. Grease your mini cupcake pan or line it with paper liners.
  3. In a mixing bowl, whisk together melted butter and sugar until smooth.
  4. Add eggs one at a time, beating well.
  5. Sift in cocoa powder, flour, salt, and baking powder. Gently fold until combined.
  6. Spoon batter into the prepared pan, filling each cup about halfway.

2. Crafting the Peanut Butter Filling (400 Words)

The creamy peanut butter filling complements the brownie base perfectly:

  1. In a separate bowl, mix peanut butter and powdered sugar until smooth.
  2. Roll the mixture into small balls and gently press one into each brownie cup’s center.

Baking and Finishing Touches (500 Words)

  1. Bake: Place the tray in the preheated oven and bake for 12-15 minutes or until the edges are set.
  2. Cool: Allow the bites to cool completely before removing them from the pan.
  3. Decorate:
    • Drizzle melted chocolate over the top.
    • Sprinkle chopped peanuts for a crunchy finish.

For a unique peanut butter spin, explore Ultimate Peanut Butter Pie.


Variations to Try (400 Words)

  1. Double Chocolate Delight: Add chocolate chips to the brownie batter for extra richness.
  2. Nutty Crunch: Use crunchy peanut butter or mix in chopped nuts for texture.
  3. Holiday-Themed Bites: Use colored sprinkles or seasonal toppings like crushed peppermint for a festive twist.

Tips for the Perfect Peanut Butter Brownie Bites (300 Words)

  • Room Temperature Ingredients: Ensure eggs and butter are at room temperature for even mixing.
  • Don’t Overbake: Brownie bites should be slightly underdone for a fudgy center.
  • Storage: Keep them in an airtight container for up to a week, or freeze for up to three months.

Frequently Asked Questions (FAQs) (400 Words)

1. Can I use boxed brownie mix?

Yes, boxed brownie mix can save time, but homemade provides a richer flavor and better texture.

2. How do I prevent the peanut butter filling from sinking?

Ensure the brownie batter is thick enough to support the filling.

3. What’s the best way to melt chocolate for drizzling?

Use a double boiler or microwave in 20-second intervals, stirring in between.

For more dessert inspiration, explore this Raspberry Cheesecake Brownie Bites Recipe.


Why Peanut Butter Brownie Bites Are a Crowd Favorite (300 Words)

Peanut Butter Brownie Bites are loved for their perfect balance of flavors and textures. Their portability and bite-sized convenience make them ideal for any occasion. Whether you’re hosting a party or craving a mid-week treat, these bites deliver indulgence in every bite.


Final Thoughts (300 Words)

Creating Peanut Butter Brownie Bites is a rewarding experience that yields an irresistible dessert. With the right ingredients, techniques, and a little creativity, you can make a treat that’s as visually appealing as it is delicious.


Suggested Internal Links from ExoRecipes: