Master the Art of Chinese Takeout Orange Chicken: Recipe, Tips, and Variations
Chinese Takeout Orange Chicken: A Comprehensive Guide
Introduction
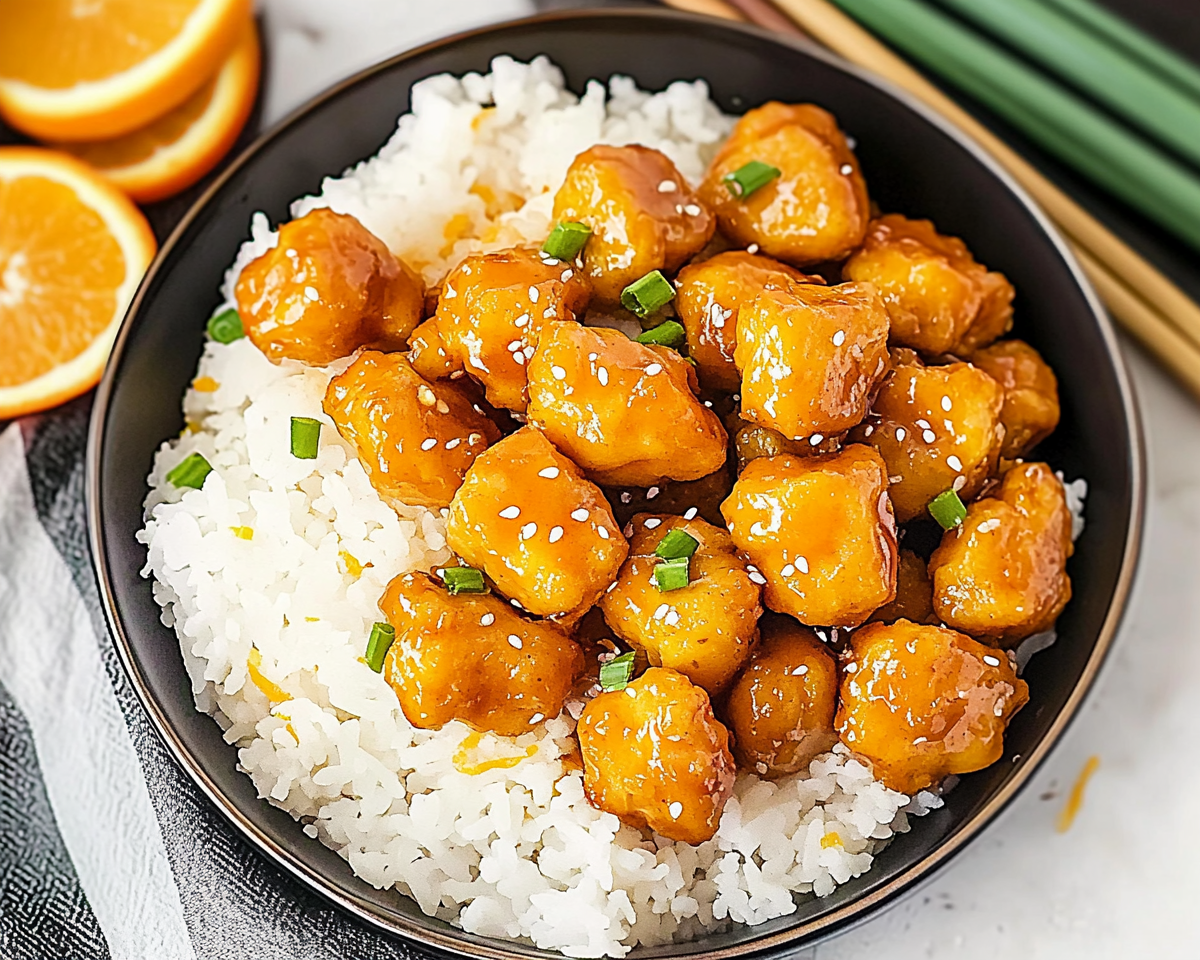
When we think of Chinese-American cuisine, few dishes are as iconic as Orange Chicken. Loved for its balance of sweet and tangy flavors, crispy texture, and vibrant orange glaze, this dish has cemented its place on takeout menus and in home kitchens alike. But where did it originate? What makes it so irresistible? Let’s explore everything there is to know about Chinese Takeout Orange Chicken, from its cultural significance to a step-by-step guide on making it at home.
Understanding Orange Chicken’s Popularity
The Origins of Orange Chicken
Orange Chicken is a product of Chinese-American culinary fusion, created to suit Western taste preferences.
Unlike traditional Chinese dishes, this meal focuses on bold sweetness paired with savory flavors.
Why It’s a Takeout Favorite
The perfect balance of crispy chicken and glossy orange sauce is an unbeatable combination.
Versatility: Whether served with steamed rice, fried rice, or noodles, Orange Chicken adapts beautifully.
The Science Behind the Perfect Orange Chicken
Key Ingredients
Chicken: Traditionally thigh meat, known for its juicy texture.
Orange Sauce: A mix of fresh orange juice, soy sauce, vinegar, sugar, and aromatic spices like ginger and garlic.
Batter: A crispy coating achieved by frying battered chicken pieces to perfection.
Nutritional Considerations
A standard serving of Orange Chicken contains around 490 calories, with significant contributions from sugar and fat.
Tip: For a healthier option, substitute frying with baking or air frying.
Explore Healthier Chicken Recipes for ideas on making your Orange Chicken lighter and more nutritious.
How to Make Orange Chicken at Home
Ingredients
Chicken
1 lb boneless, skinless chicken thighs or breast.
Orange Sauce
½ cup fresh orange juice.
1 tbsp orange zest.
3 tbsp soy sauce.
¼ cup sugar or honey.
2 tsp rice vinegar.
Optional: Chili flakes for heat.
Batter
½ cup cornstarch.
½ cup all-purpose flour.
Salt, pepper, and water to mix.
Steps to Prepare
Prepare the Batter
Combine dry ingredients, then add water to create a pancake-like consistency.
Coat and Fry the Chicken
Coat chicken pieces in the batter.
Fry in hot oil until golden and crispy.
Remove and drain excess oil.
Make the Orange Sauce
In a saucepan, combine all sauce ingredients.
Simmer until thickened, adjusting sweetness or tanginess as desired.
Combine and Serve
Toss fried chicken in the sauce until evenly coated. Serve immediately.
Common Mistakes to Avoid
Overcooking the Chicken: Results in dry, rubbery bites. Aim for golden brown, not dark brown.
Too Much Sauce: The goal is to coat the chicken lightly, not drown it.
Imbalanced Flavors: Always taste your sauce; adjust sugar, vinegar, or orange juice for balance.
Creative Variations and Serving Suggestions
Variations
Healthy Twist: Bake the chicken at 400°F for 25 minutes or until crispy.
Vegan Option: Substitute chicken with cauliflower florets or tofu.
Add a side of fried rice or spring rolls for the full takeout experience.
Cultural Significance of Orange Chicken
Orange Chicken is a symbol of culinary adaptation. While it doesn’t have roots in traditional Chinese cuisine, it represents the ingenuity of chefs adapting to local tastes. Chains like Panda Express popularized it further, cementing its status as a must-try dish in the US.
FAQs About Orange Chicken
What’s the difference between authentic and takeout Orange Chicken?
Authentic versions are less sweet and focus more on natural orange flavors.
Can I make it ahead of time?
Yes, but store the chicken and sauce separately to maintain crispiness.
What’s a good substitute for orange juice?
Use pineapple juice for a tropical twist or lemon juice for a tangier flavor.
Mastering Chinese Takeout Orange Chicken at home is easier than ever with these tips and recipes. Whether you’re looking for a healthier option or want to perfect the crispy, tangy delight, this dish guarantees satisfaction for any craving.
Southern Fried Cabbage Recipe – A Classic Comfort Food Dish
Article: Southern Fried Cabbage Recipe
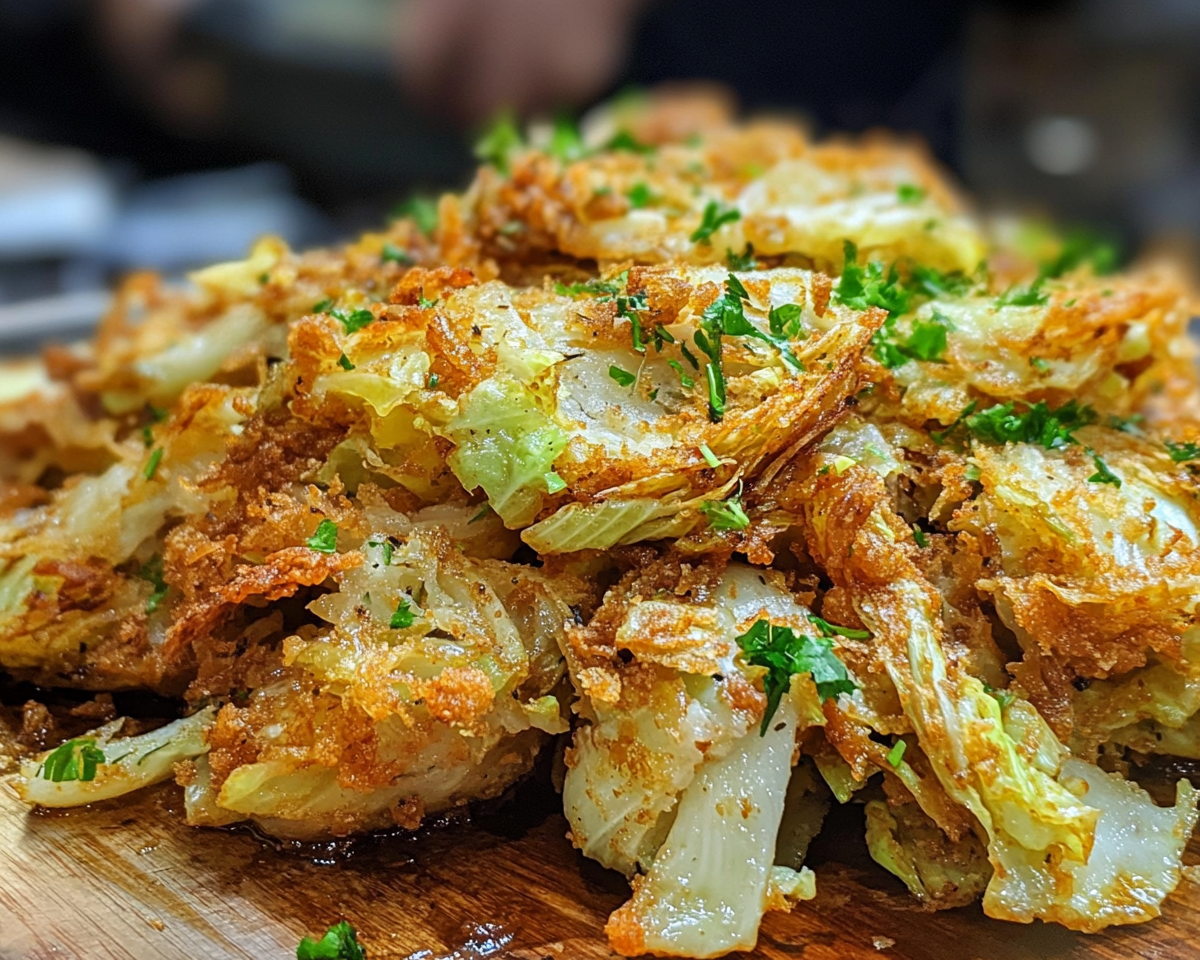
Southern Fried Cabbage Recipe: A Delicious Comfort Dish
Ingredients for Southern Fried Cabbage
Cabbage – Shredded or chopped into bite-sized pieces.
Bacon – Adds a smoky flavor and crunchy texture.
Onion – Sautéed to enhance the dish’s sweetness.
Seasonings – Salt, pepper, garlic powder, and paprika.
Instructions for Preparing Southern Fried Cabbage
Cook the Bacon: In a large skillet, cook chopped bacon until crispy. Remove and set aside.
Sauté the Onion: Add diced onions to the bacon drippings and cook until softened.
Add the Cabbage: Stir in the cabbage, coating it well with the bacon fat. Cover and let it cook until tender.
Season the Dish: Sprinkle with salt, pepper, and other seasonings. Adjust according to taste.
Combine and Serve: Mix the cooked bacon back into the skillet, stir well, and serve hot.
Tips for Perfect Southern Fried Cabbage
Use fresh cabbage for the best flavor and texture.
Adjust the seasonings to match your preference.
Add extra vegetables like carrots or bell peppers for a colorful twist.
Serve with cornbread or as a side dish with grilled meats.
Suggested Internal Links
Here are potential internal linking opportunities from the ExoRecipes sitemap:
“Rediscovering Comfort: Sour Cream and French Fried Onion Pork Chops”: Ideal for linking within the section on pairing Southern Fried Cabbage with meat dishes.
“Slow Cooker Cabbage, Sausage, and Potatoes”: Complement this recipe by highlighting slow-cooked alternatives.
“Kentucky Butter Cake: A Slice of Southern Comfort”: Mentioned under the pairing suggestions for desserts.
External References
For added context and credibility, link to external recipes and guides:
How to Perfectly Cook Bacon: Adds depth to the section on prepping bacon.
Vegetable Preparation Tips: Enhances the instructional section on cutting and prepping cabbage.
History of Southern Cuisine: Adds a cultural touch to the introduction.
FAQs About Southern Fried Cabbage
Can I make this dish vegetarian?
Yes! Substitute bacon with smoked paprika or liquid smoke for the same smoky flavor.
What type of cabbage is best for frying?
Green cabbage is traditional, but Savoy cabbage works well for a tender, buttery texture.
How do I store leftovers?
Store in an airtight container in the fridge for up to 3 days. Reheat in a skillet for best results.
What can I pair with Southern Fried Cabbage?
Pair it with cornbread, fried chicken, or grilled sausage for a classic Southern meal.
Optimize SEO for Southern Fried Cabbage
Title: Southern Fried Cabbage Recipe – Smoky, Flavorful, and Easy to Make
Focus Keyphrase: Southern Fried Cabbage Recipe
Slug: southern-fried-cabbage-recipe
Meta Description: Discover the ultimate Southern Fried Cabbage recipe—smoky, flavorful, and easy to make. Perfect for family dinners or as a delicious side dish.
Indulge Your Senses with Irresistible Triple Chocolate Mousse Cake
Decadent Triple Chocolate Mousse Cake: A Celebration of Chocolate
⚖️
Difficulty
Intermediate
⏲️
Prep Time
30 mins
🕒
Cook Time
30 mins
⏱️
Total Time
60 mins
🍽️
Servings
8-10
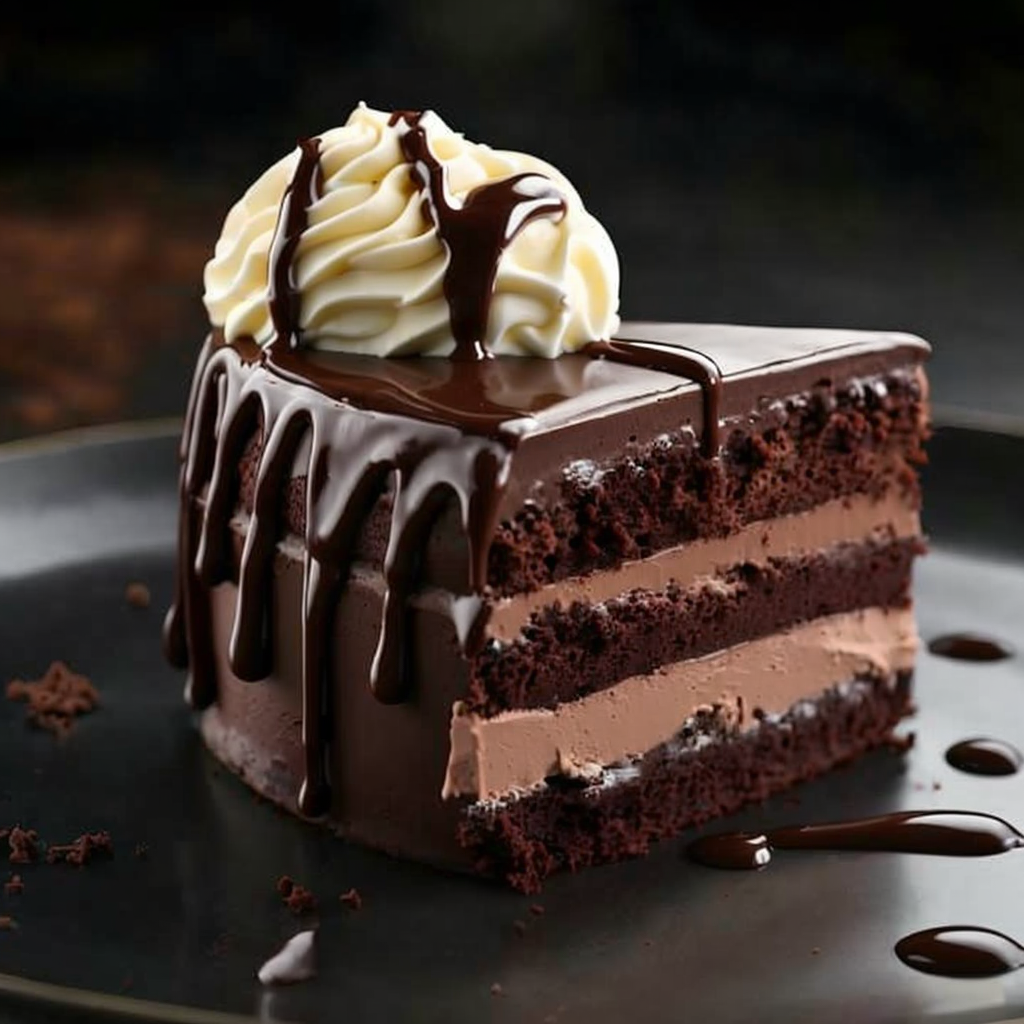
Dive into a world of chocolate bliss with this Triple Chocolate Mousse Cake, a luscious dessert that promises a taste experience like no other. Featuring layers of rich dark chocolate, creamy milk chocolate, and airy white chocolate mousse, this cake is a masterpiece of indulgent flavors and textures. Perfect for chocolate lovers and special occasions, each bite delivers a smooth and velvety mouthfeel, making it a memorable centerpiece for any celebration.
Quick Recipe Highlights
Flavor Profile: This cake offers a harmonious blend of bittersweet and creamy chocolate notes, balanced perfectly between its three layers.
Texture: Experience alternating layers of dense cake and light, whipped mousse, providing a satisfying contrast that melts in your mouth.
Aroma: The cake exudes deep cocoa aromas with hints of vanilla and espresso, enhancing its rich chocolate essence.
Visual Appeal: Impress your guests with this elegantly layered cake, crowned with a glossy chocolate ganache and a sprinkle of cocoa powder.
Skill Level Needed: An intermediate skill level is required, as it involves multiple steps including tempering chocolate and layering mousse.
Special Equipment: Prepare with a springform pan, mixer, and offset spatula to achieve layers without seams.
Recipe Overview
Difficulty Level: Considered intermediate due to the need for tempering chocolate and creating seamless mousse layers, but achievable with patience and practice.
Category: This dessert fits into party and special occasion categories, elevating any gathering with its sophisticated presentation.
Cuisine: Rooted in French patisserie traditions, this cake borrows techniques from the art of classic mousse crafting.
Cost: While featuring premium ingredients, the cake remains cost-effective for a specialty dessert, suitable for those willing to invest in a quality treat.
Season: Best enjoyed in cooler months due to its rich and warming nature; however, it’s a hit year-round at festive celebrations.
Occasion: Ideally served at celebrations, holidays, and gatherings, offering an impressive and indulgent dessert option.
Why You’ll Love This Recipe
The Triple Chocolate Mousse Cake stands out for its irresistible combination of deep chocolate flavors and light, fluffy mousse. The distinct layers create a captivating experience that balances richness with lightness, making each forkful a decadent pleasure. This cake is perfect for impressing guests with its elegant structure and mouth-watering taste. Moreover, it offers the flexibility to prepare components in advance, simplifying the process of assembling it fresh for events.
Not only is this cake a treat for your senses, but it is also a surprisingly convenient dessert to prepare. Each part of the mousse can be made ahead, allowing for an easy final assembly on the day of serving. This convenience makes it a go-to option for hosts looking to maintain a stress-free kitchen while ensuring the delivery of a delightful homemade masterpiece.
While indulgent in nature, this chocolate mousse cake provides a touch of nutritional benefits through the use of high-quality chocolate, which contains antioxidants and heart-healthy properties. By portioning correctly, it can be part of a balanced diet, fitting perfectly as an occasional, luxurious treat.
The cake’s impressive visual appeal and rich flavors make it ideal for social gatherings, both formal and informal. It encourages sharing among family and friends, creating lasting memories complemented by the universal love of chocolate. Boasting taste and texture that appeals to both young and old, this dessert blends elegance with nostalgia, fostering a shared culinary experience.
Cost-effective and accessible in terms of ingredients and preparation, the Triple Chocolate Mousse Cake uses easily sourced items that do not skimp on quality. Its timeless appeal makes it adaptable to various settings, from intimate dinners to large parties, without losing its luxurious and sophisticated edge.
Historical Background and Cultural Significance
The Triple Chocolate Mousse Cake roots itself in the rich tradition of French pastry, where the mousse was first crafted in the late 19th century. Originally, chocolate mousse was served as a solo dish, praised for its light texture and rich taste. Gradually, it evolved, integrating itself into more complex desserts—like this cake—favored for their multilayered flavors.
This cake holds cultural weight as a perfect representation of chocolate’s evolving role in dessert making, reflecting both the simplicity of pure chocolate flavor and the complexity of creating a sophisticated, layered dessert. It exemplifies the art of patisserie, showcasing the technique and precision associated with classic French baking.
Over the years, the recipe has evolved from its ancestral forms, incorporating modern twists with the addition of various chocolate types and nuanced flavors. These adaptations allow each baker to inject their unique flair, ensuring the timelessness of this beloved dessert.
Regional variations abound, from adding local flavors like fresh fruit or nuts to altering the types of chocolate used. Such deviations highlight the universal appeal of chocolate mousse cakes while allowing regional identity to shine through, celebrating global culinary diversity.
Ingredient Deep Dive
Dark chocolate serves as the backbone of this Triple Chocolate Mousse Cake, bringing depth and bitterness to the flavor profile. Historically esteemed as a treasured ingredient, chocolate’s significance reaches into the cultural practices of ancient civilizations, once reserved for royalty and trade. Its bitter notes and high cocoa content make it a healthy choice, providing antioxidants known for their health benefits. Selection tips include choosing bars with a minimum of 70% cocoa, stored at a consistent, cool temperature to retain flavor and texture. If unavailable, semi-sweet chocolate offers a close substitute.
White chocolate, made from cocoa butter, sugar, and milk solids, adds a creamy counterpart to the other chocolate layers. Although technically not chocolate, its smooth texture makes it an essential component of the mousse, creating contrast and balance. Nutritional benefits include milk protein and calcium. Look for high-quality bars with a high cocoa butter percentage to ensure flavor quality. Storage requires a cool, dry place to prevent separation. Opt for creamier variants to maintain consistency in mousse texture, or substitute with milk chocolate for a sweeter touch.
Common Mistakes to Avoid
Overheating the chocolate during melting can burn it, sacrificing flavor. Always melt gently over a double boiler.
Incorporating whipped cream too aggressively can deflate your mousse, leading to a denser consistency. Fold gently for an airy result.
Rushing the setting time reduces the structural integrity of the cake. Allow ample refrigeration time for layers to set fully.
Improper tempering of chocolate results in a dull finish. Ensure precise temperature control using a candy thermometer.
Skipping the cake base can lead to a less impressive presentation. Always include a supportive base layer for structure.
Inconsistent mousse textures arise from insufficient mixing. Ensure all ingredients are well-combined for even layers.
Neglecting to chill your equipment when making mousse can prevent optimal results. Keep bowls and beaters cool for best results.
Forgetting to line your springform pan leads to difficult removal. Use parchment paper for easy extraction and clean edges.
Essential Techniques
Mastering the art of tempering chocolate is essential for a professional finish. This process involves melting chocolate to a specific temperature, cooling it, and slightly reheating it to achieve a glossy, snap-worthy final product. Key visual cues include the chocolate’s smooth texture and viscosity; any clumping indicates overheating. An often-made mistake is failing to monitor temperature closely, so use a digital thermometer for accuracy. This technique is crucial for achieving the cake’s elegant appearance and impeccable texture, ensuring the chocolate layers maintain their integrity when sliced.
Pro Tips for Perfect Triple Chocolate Mousse Cake
Opt for a high-quality, 70% cocoa content dark chocolate to ensure your cake retains a deep, sophisticated flavor palette. This choice enhances both taste and structural stability.
When whipping cream for mousse, aim for soft peaks to avoid stiff, hard textures that don’t blend seamlessly with melted chocolate. Soft peaks create a light, airy consistency.
To prevent sticking, always line your springform pan with parchment paper, both on the bottom and around the edges, ensuring easy release and smooth, straight mousse layers.
Allow each layer of the cake to firm up in the fridge before adding the next. This gradual setting assures clean separation between flavors and layers, vital for a visually appealing slice.
Maintain precision in your measurements. Baking is a science requiring exact amounts for consistent results, so use digital scales and measuring spoons.
For an impressive finish, top your cake with a smooth ganache and a sprinkle of shaved chocolate or cocoa powder, highlighting the cake’s duality of simplicity and elegance.
Variations and Adaptations
Individuals observing a gluten-free diet can substitute the standard cake base with almond flour or a gluten-free cake mix, maintaining the body and flavor without gluten content.
For a keto-friendly option, use sugar-free chocolate and sweetener in place of traditional sugar, ensuring a low-carb treat that doesn’t sacrifice taste.
Seasonal adaptations might include incorporating fresh, sliced berries in the summer for a refreshing, fruity contrast to the rich chocolate layers.
Create a mocha variation by adding a shot of espresso or a teaspoon of espresso powder to the dark chocolate layer, enhancing depth and intensifying the chocolate’s natural bitterness.
Explore textural modifications by introducing crushed nuts or crumbled cookies between the mousse layers, offering a surprise crunch in each bite.
Embrace presentation alternatives by serving in individual ramekins or dessert cups, offering a modern twist and elegant individual portions for diverse settings.
Serving and Presentation Guide
Enhance your cake’s visual allure by using a clean, sharp knife, dipped in hot water and wiped dry, to achieve smooth, precise slices. This technique allows even portions that showcase the layered design.
Garnish with a gentle snowfall of cocoa powder or dollops of whipped cream, offering visual and textural contrast alongside each slice.
Traditionally served chilled, consider pairing with a scoop of vanilla ice cream or a dollop of mint-flavored whipped cream for a temperature contrast that pleases the palate.
Present alongside chilled dessert plates to maintain mousse texture throughout serving, particularly in warmer climates, ensuring each piece remains fresh and appealing.
For an upscale touch, plate with a drizzle of raspberry coulis or caramel sauce, adding a splash of color and complementary tangy or sweet flavors.
Wine and Beverage Pairing
Select a robust red wine, such as a Malbec or Merlot, with enough fruitiness to complement the cake’s richness without overpowering its delicate mousse layers.
Alternatively, a dessert wine like Port offers a sweeter, equally indulgent pairing, aligning harmoniously with the chocolate’s fruity undertones.
Non-alcoholic alternatives include a high-quality sparkling water with a twist of lime, cleansing the palate between bites and maintaining balance.
Coffee enthusiasts will appreciate the pairing of cappuccino or espresso, where the creamy coffee notes align beautifully with the dessert’s smooth layers.
Ensure all beverages are served cool to allow the contrasting chocolate notes to shine, with coffee served slightly cooler than its usual piping hot temperature to harmonize better.
Storage and Shelf Life
Store in an airtight container within the refrigerator to maintain freshness and prevent the mousse layers from drying out or becoming soggy.
Ideally, consume within 3-4 days for best taste and texture, monitoring the ganache for any signs of dullness as an indicator of aging.
When freezing, wrap individual slices tightly in plastic wrap and foil to maintain integrity, thawing in the refrigerator overnight for gradual defrosting and optimal texture retention.
Watch for any separation between mousse layers as a sign of spoilage or textural compromise, indicating it is time to discard and create fresh.
For best results, avoid reheating, as temperature fluctuations can destabilize mousse consistency and chocolate integrity.
Make Ahead Strategies
Craft each mousse component up to 24 hours in advance, storing separately in airtight containers in the fridge until assembly, streamlining the preparation process.
During assembly, ensure ample chilling time for each layer, improving texture alignment and structural stability, allowing for no rush assembly on the day of serving.
Assess quality by ensuring mousse remains fluffy and layers distinct, avoiding extended waiting times that might compromise texture through over-set mousse or dry layers.
Reheat dishes only gently to bring them to desired temperature without sacrificing the integrity of the mousse layers.
Add any fresh fruit garnishes or creams at the moment of serving, preserving vibrant color and fresh taste.
Scaling Instructions
When halving the recipe, use smaller pans and adjust chilling times to ensure layers set correctly without overwhelming or losing intended structure.
Doubling the recipe requires careful scaling of ingredients, acknowledging that larger pans may necessitate increased chilling times to maintain consistency.
Consider equipment adjustments, opting for larger bowls during mousse preparation to comfortably accommodate increased volume without spilling or uneven mixing.
Modify timing by closely monitoring cooling temperatures and set times for each chocolate type, allowing uniformity and structured results.
Store larger batches of mousse in shallow pans for even chilling and optimal textural consistency upon assembly.
Nutritional Deep Dive
The Triple Chocolate Mousse Cake is a balanced blend of macronutrients, providing ample carbohydrates from the chocolate and cream layers, alongside moderate protein content derived from cream and eggs.
Micronutrient offerings include small quantities of calcium and antioxidants from quality chocolate and cream, accompanied by trace minerals found in dark chocolate.
Maintaining health benefits involves portion control, indulging mindfully to enjoy the dessert’s rich flavors without excessive caloric intake.
Ideal for occasional indulgence, this cake fits within a balanced diet through calculated portioning and mindful savoring, aligning with weight management principles.
Dietary Adaptations
For gluten-free needs, substitute the cake base with almond flour alternatives, providing a gluten-free option that remains flavorful and texturally compatible.
Dairy-free adaptations involve utilizing coconut cream in place of traditional cream and dairy-free chocolate to maintain the mousse’s richness without dairy-based ingredients.
Vegan modifications replace eggs and cream with aquafaba and coconut-based creams, alongside vegan chocolate, ensuring inclusivity of different dietary requirements.
Low-carb and keto adaptations involve using sweeteners like erythritol, aligning the dessert with low-carb dietary standards while preserving its essential flavors.
Troubleshooting Guide
If mousse lacks airiness, reassess whipped cream folds—aim for gentle, deliberate folding motions to incorporate without deflation or losing creaminess.
Too solid a texture suggests over-mixing; manage stages delicately, focusing on knowing visual cues and maintaining crisp ingredient temperatures.
Imbalanced flavors may result from using overly sweet chocolate varieties; incorporate a touch of espresso or salt to enhance depth and reduced sweetness.
To troubleshoot under-set cakes, extend chilling times to ensure each layer solidifies fully, providing stability and stratification clarity.
For ingredient substitutions, substitute with care, acknowledging how texture shifts with alternative flours, creams, or sweeteners might occur.
Recipe Success Stories
Our community shares glowing feedback, often customizing their Triple Chocolate Mousse Cake with local fruit additions or festive adornments.
Readers found success using alternative flours and creams, solidifying this dessert’s versatility across dietary needs and ingredient availability.
Frequent praise is directed at the cake’s ability to maintain structural integrity during difficult measurements, resulting in a successful yet forgiving beginner’s option.
Supplement photography with natural lighting tips, positioning cake slices near ambient sunlight for beautiful shadows and dynamic highlights.
Suggestions for elevating presentation include experimenting with fruit coulis or liquor infusions, offering innovative layers of customization.
Frequently Asked Questions
What type of chocolate works best? Opt for high-quality 70% cocoa content dark chocolate and complementary milk and white chocolates to ensure balanced flavor and texture.
Can this cake be made gluten-free? Yes, swap out the cake base with gluten-free alternatives such as almond flour or gluten-free cake blends.
How can I prevent mousse from falling flat? Ensure gentle folding of whipped cream within melted chocolate batches, maintaining layering and integrity with every fold.
What’s the best pan for this recipe? Use a springform pan for best results, ensuring it retains layers cleanly without sticking or difficulty in removal.
Is advance preparation possible? Indeed, you can prepare mousse components ahead of time, assembling fresh cakes a day in advance without textural or flavor loss.
How should mousse be cooled? Always keep mousse layered within cool or chilled conditions, ensuring optimal texture without deflation or melting concerns.
What’s the ideal serving arrangement? Serve on chilled dessert plates, pre-cutting cake portions to maintain aesthetic appearance and avoid melting on plate warmth.
Can caffeine be integrated? Many enjoy adding espresso for added character and complexity; this approach highlights natural bitterness within the cake’s layers.
Could I use vegan alternatives? Absolutely, coconut-based cream varieties and vegan chocolates work excellently in replicating conventional cream and chocolate properties.
Is alcohol pairing recommended? Yes, dessert wines such as Port serve as excellent complements, highlighting depth and harmonizing with the dessert’s rich flavor profile.
Additional Resources
Explore related chocolate mousse recipes, similar flavor development techniques, and enhancing ingredient profiles to expand ingredient adaptation knowledge.
Technique guides illustrate chocolate tempering and layer creation, providing salient tips and insights into mastering mousse production.
Ingredient information is detailed through articles exploring chocolate selection, cocoa butter applications, and the significance of vanilla presence.
Equipment recommendations advocate for precise tools that ensure uniform mousse blending, chocolate melting, and cake pan preparation success.
Seasonal variations, including summer fruit additions, highlight adaptational approaches to maintaining recipe dynamics year-round.
Join the Conversation
Engage with our community via social media platforms, exchanging photographs, insights, and modifications of beloved favorites, further enriching recipe success stories.
Submit personal experiences utilizing local flavors, offering guidance and inspiration for innovative adaptations while sharing stunning dessert images with technique-enhancing tips.
Submit reviews detailing your varied successes or challenges, fostering shared community knowledge via online forums and digital interaction avenues.
Encourage participation in recipe modifications through seasonal, regional, and skill adaptations, all while enjoying personal culinary experimentation, exchanges, and discovery.
The Recipe
Triple Chocolate Mousse Cake
Serves: 8-10
Prep Time: 30 mins
Cook Time: 30 mins
Total Time: 60 mins
Kitchen Equipment Needed
Springform pan
Double boiler
Stand or hand mixer
Offset spatula
Digital kitchen thermometer
Ingredients
200g dark chocolate (70% cocoa content)
200g milk chocolate
200g white chocolate
600ml heavy cream
6 large eggs
1 cup granulated sugar
1/4 teaspoon salt
1 tablespoon vanilla extract
1/4 cup strong brewed coffee (optional for flavor depth)
Directions
Preheat your oven to 350°F (175°C). Grease and line a springform pan.
Melt each chocolate type separately using a double boiler.
In a separate bowl, whip 300ml of cream until soft peaks form. Divide equally among three bowls for each chocolate type.
Fold one portion of whipped cream into each melted chocolate, creating three distinct mousses.
For the base, beat eggs with sugar until pale and thick; gently fold in melted dark chocolate. Pour into the springform pan and bake for 20 minutes or until set. Let it cool.
Spread the dark chocolate mousse over the cooled base; chill until firm.
Repeat layering with milk chocolate mousse, followed by white chocolate mousse, refrigerating between layers.
Rest the completed cake in the fridge for at least 4 hours or overnight for optimal setting.
When ready to serve, remove the outer ring of the pan carefully and transfer cake to a serving platter.
Recipe Notes
Substitute almond flour for the base to achieve a gluten-free cake.
Use dairy-free cream and chocolate for vegan adaptations.
Consider adding citrus zest for a flavor contrast to the chocolate richness.
Indulge Your Sweet Tooth with a Layered Chocolate Delight Recipe
Layered Chocolate Delight: A Decadent Indulgence
⚖️
Difficulty
Intermediate
⏲️
Prep Time
25 mins
🕒
Cook Time
5 mins
⏱️
Total Time
30 mins
🍽️
Servings
8
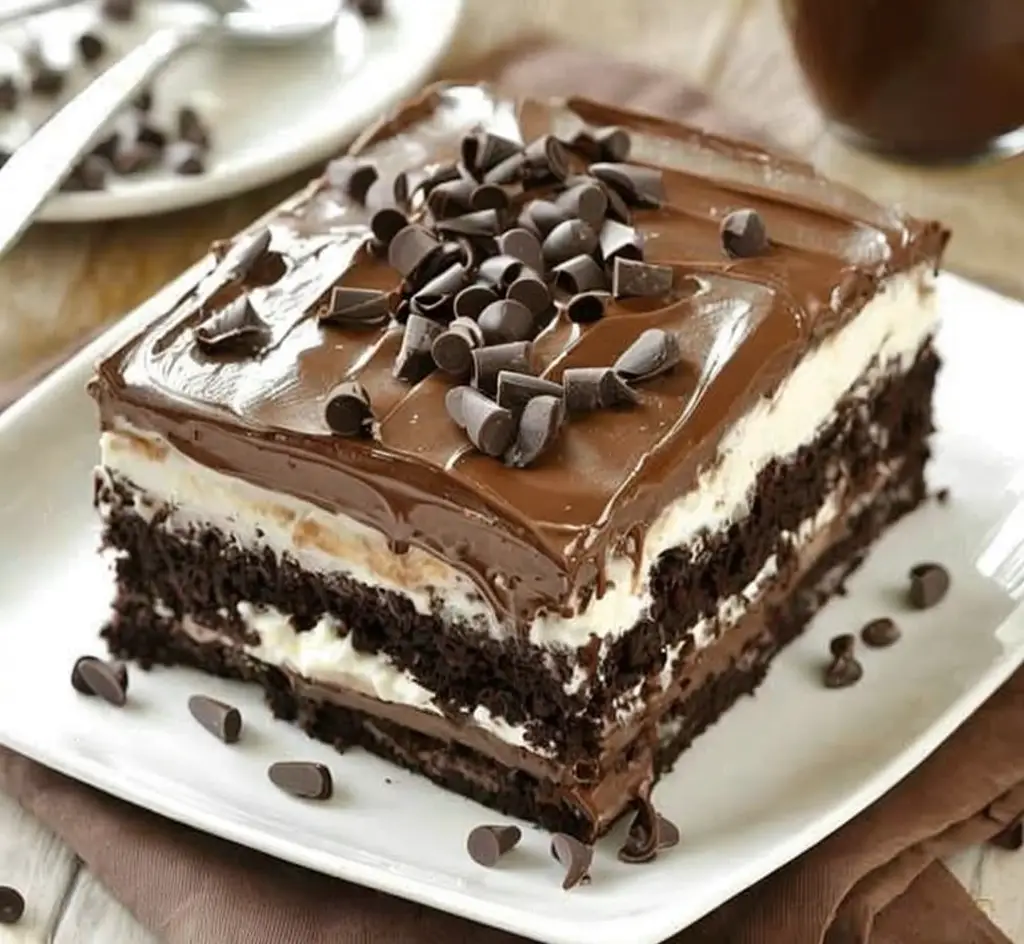
Indulge in our irresistible Layered Chocolate Delight recipe that brings the rich flavors of chocolate together in an easy yet elegant dessert. This layered masterpiece is composed of a smooth chocolate custard, a light and airy whipped topping, and a delightful chocolate cookie crust. Perfect for chocolate lovers, this dessert is bound to become a family favorite. Whether it’s a special occasion or an ordinary day, the Layered Chocolate Delight is sure to impress with its decadent taste that satisfies any sweet craving.
Quick Recipe Highlights
Flavor Profile: This dessert offers a harmonious blend of rich chocolate, creamy custard, and a slight bitterness from the cookie base, resulting in a perfectly balanced treat.
Texture: Enjoy the smoothness of the custard paired with the soft, fluffy whipped topping contrasted by the crunchy cookie crust.
Aroma: The inviting scent of chocolate permeates each layer, creating a mouthwatering aroma that fills the kitchen.
Visual Appeal: Layers are beautifully defined, showcasing light and dark contrasts that are visually stunning and inviting.
Skill Level Needed: Suitable for intermediate bakers, as it requires careful layering and patience to achieve the perfect texture.
Special Equipment: A springform pan is essential to construct the layers and reveal an impressive presentation.
Recipe Overview
Difficulty Level: Intermediate. The process involves creating multiple layers requiring precision to ensure each layer is distinct without blending together.
Category: Dessert, perfect for an after-dinner treat or as the highlight of a dessert table.
Cuisine: A fusion of American dessert styles with a nod to classic French custard techniques, offering a sophisticated taste experience.
Cost: While premium chocolate might add to the cost, the overall expense is moderate, making it accessible for most occasions.
Season: Ideally suited for year-round enjoyment, but especially comforting during cooler months with its rich, warming flavors.
Occasion: Ideal for family gatherings, dinner parties, or any celebration where a show-stopping dessert is needed.
Why You’ll Love This Recipe
Experience the unparalleled taste of our Layered Chocolate Delight, where each spoonful delivers a burst of rich chocolate flavor combined with creamy textures. The dish successfully marries velvety chocolate custard, fluffy whipped topping, and a crisp cookie crust, offering a satisfying mouthfeel that appeals to all palates. Additionally, this dessert is straightforward to prepare, with most of the time spent on assembly rather than hands-on work—making it achievable for home cooks seeking a touch of indulgence without extensive effort.
Historical Background and Cultural Significance
Chocolate desserts have a storied history steeped in cultural tradition and beloved worldwide. The European influence, evident in the decadent layers of custard and whipped topping, trace back to early 20th-century recipes when chocolate became a culinary staple. The Layered Chocolate Delight merges these historic aspects with modern American interpretations of layered desserts, creating an innovative dish that still respects traditional flavor profiles.
Ingredient Deep Dive
Chocolate is the star of this recipe, requiring a careful selection to ensure rich flavor and smooth texture. Opt for high-quality cocoa powder and real chocolate to maximize the dessert’s depth. Fresh cream and vanilla play supporting roles, enhancing the custard’s richness and creating a whipped topping that’s light yet flavorful.
Common Mistakes to Avoid
Using low-quality chocolate: This can result in a less flavorful dessert.
Overmixing the whipped cream: This mistake can cause the topping to collapse.
Rushing the layering: Allow each layer to cool before adding the next to prevent blending.
Essential Techniques
Layering is key to perfecting this recipe. Carefully spoon each layer to maintain the structure and ensure each component stays distinct and visually appealing.
Pro Tips for Perfect Layered Chocolate Delight
Use room temperature ingredients to ensure even mixing and prevent the custard from seizing.
Variations and Adaptations
Experiment with seasonal fruits as garnish or introduce a hint of liqueur for an adult twist.
Serving and Presentation Guide
Utilize a sharp knife for clean slices and maintain the dessert’s elegant layers on the plate. Sprinkle cocoa powder or shaved chocolate for an enhanced visual appeal.
Wine and Beverage Pairing
Complement this dessert with a bold red wine like a Cabernet Sauvignon or a robust coffee variant. These selections emphasize the chocolate’s deep flavors without overpowering the delicate balance of the custard and whipped topping.
Storage and Shelf Life
Keep refrigerated until serving to maintain the dessert’s integrity. Consume within three days for optimal freshness and flavor.
Make Ahead Strategies
Construct layers a day before your event to allow for convenient serving. This strategy also enhances the melding of flavors.
Scaling Instructions
Adjust ingredient measurements for larger gatherings without altering the fundamental layering techniques or baking times.
Nutritional Deep Dive
Despite its indulgent nature, this dessert offers moderate portions of essential nutrients from real dairy and high-quality cocoa, making it a smarter sweet-choice.
Dietary Adaptations
A gluten-free cookie base can accommodate gluten sensitivities, without compromising the dessert’s textural delight.
Troubleshooting Guide
Ensure custard is fully cooled before layering to prevent it from melting through the whipped topping, which can lead to structural issues.
Recipe Success Stories
Many home bakers have praised the Layered Chocolate Delight for its blend of simplicity and sophistication, often noting how it becomes a family favorite at first bite.
Frequently Asked Questions
How can I prevent the crust from becoming soggy?
Make sure to let your crust cool completely before adding the custard layer.
Additional Resources
For those interested in expanding their chocolate dessert repertoire, consider exploring our related recipes such as Chocolate Mousse and Chocolate Fondant, each offering unique techniques and flavors.
Join the Conversation
Engage with our vibrant community of dessert enthusiasts on social media. Share your own Layered Chocolate Delight creations and gain inspiration from fellow bakers around the world.
The Recipe
Layered Chocolate Delight
Serves: 8
Prep Time: 25 mins
Cook Time: 5 mins
Total Time: 30 mins
Kitchen Equipment Needed
Springform Pan
Mixing Bowls
Electric Mixer
Spatula
Measuring Cups
Ingredients
1 1/2 cups chocolate cookie crumbs
1/2 cup unsalted butter, melted
2 cups heavy cream
1 cup milk
4 oz bittersweet chocolate, chopped
1 tbsp cocoa powder
1/4 cup sugar
1 tsp vanilla extract
Directions
Preheat the oven to 350°F (175°C). In a mixing bowl, combine the chocolate cookie crumbs with melted butter. Press the mixture into the bottom of a springform pan to create the crust. Bake for 5 minutes, then let cool.
In a saucepan, heat milk on low and add the chopped chocolate, stirring until melted and smooth. Remove from heat and let cool slightly.
In a separate bowl, whip the heavy cream with sugar and vanilla until soft peaks form.
Fold cocoa powder into whipped cream gently to create the top fluffy layer.
Pour the cooled chocolate mixture over the crust, followed by the whipped cream layer. Smooth the top with a spatula.
Refrigerate for at least 2 hours before serving for best texture and flavor integration.
Recipe Notes
Ensure the chocolate mixture is completely cool before layering it to prevent melting the whipped topping.
For additional flavor, consider adding a layer of chopped nuts over the chocolate mixture.
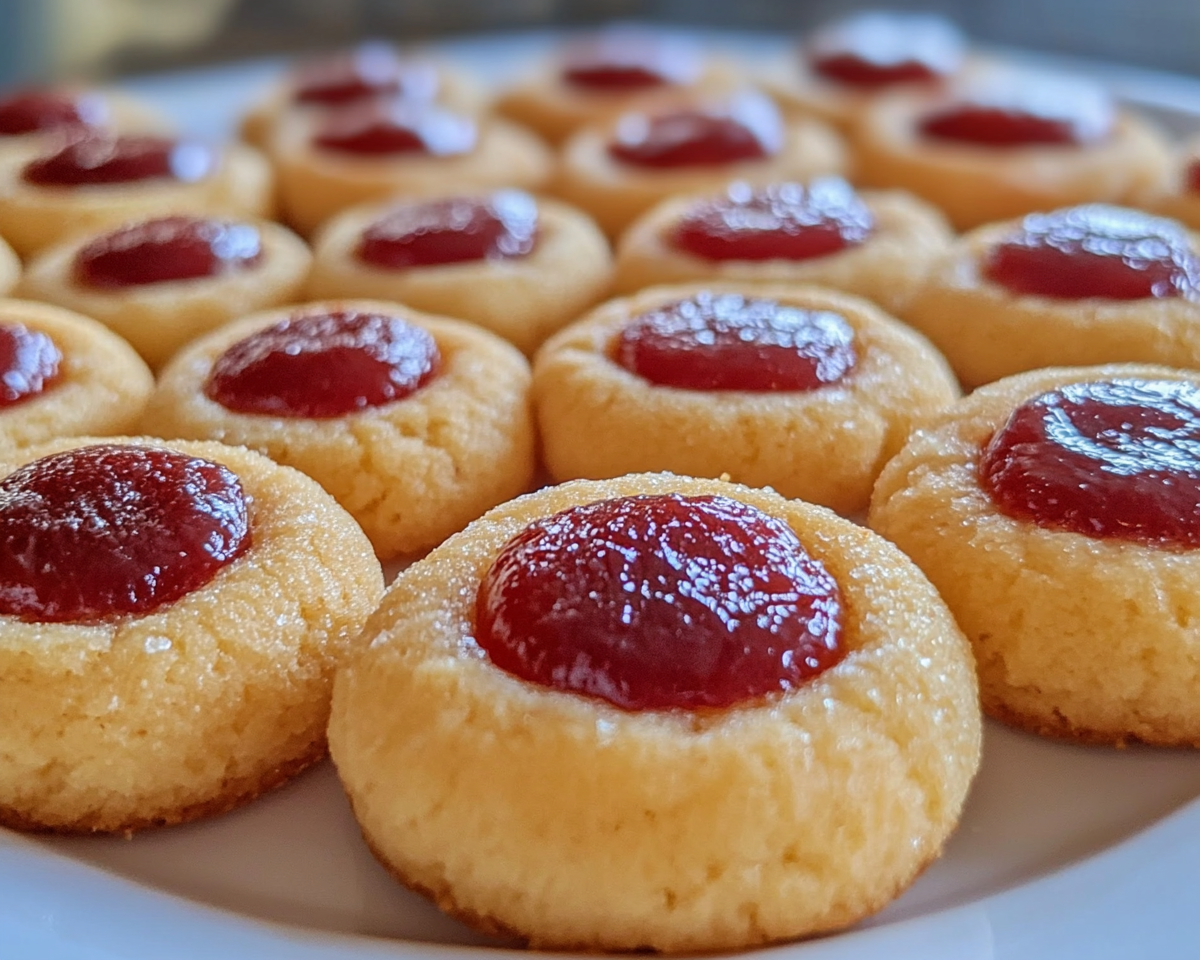
Thumbprint Cookies: The Ultimate Best Recipe for Every Occasion
Article: Thumbprint Cookies: The Ultimate Best
Internal Linking Opportunities Based on the sitemap analysis from ExoRecipes, the following internal linking opportunities were identified:
Thumbprint cookies are an all-time classic dessert. These delightful treats combine a buttery, melt-in-your-mouth cookie base with a sweet jam center, making them a favorite for holidays and special occasions.
Ingredients for Perfect Thumbprint Cookies
Butter: Use unsalted, high-quality butter for the best flavor.
Sugar: Granulated sugar works perfectly for sweetness.
Egg yolk: Adds richness and a tender texture.
All-purpose flour: Ensures a sturdy yet soft cookie.
Vanilla extract: Provides aromatic depth.
Jam: Your choice of strawberry, raspberry, or apricot.