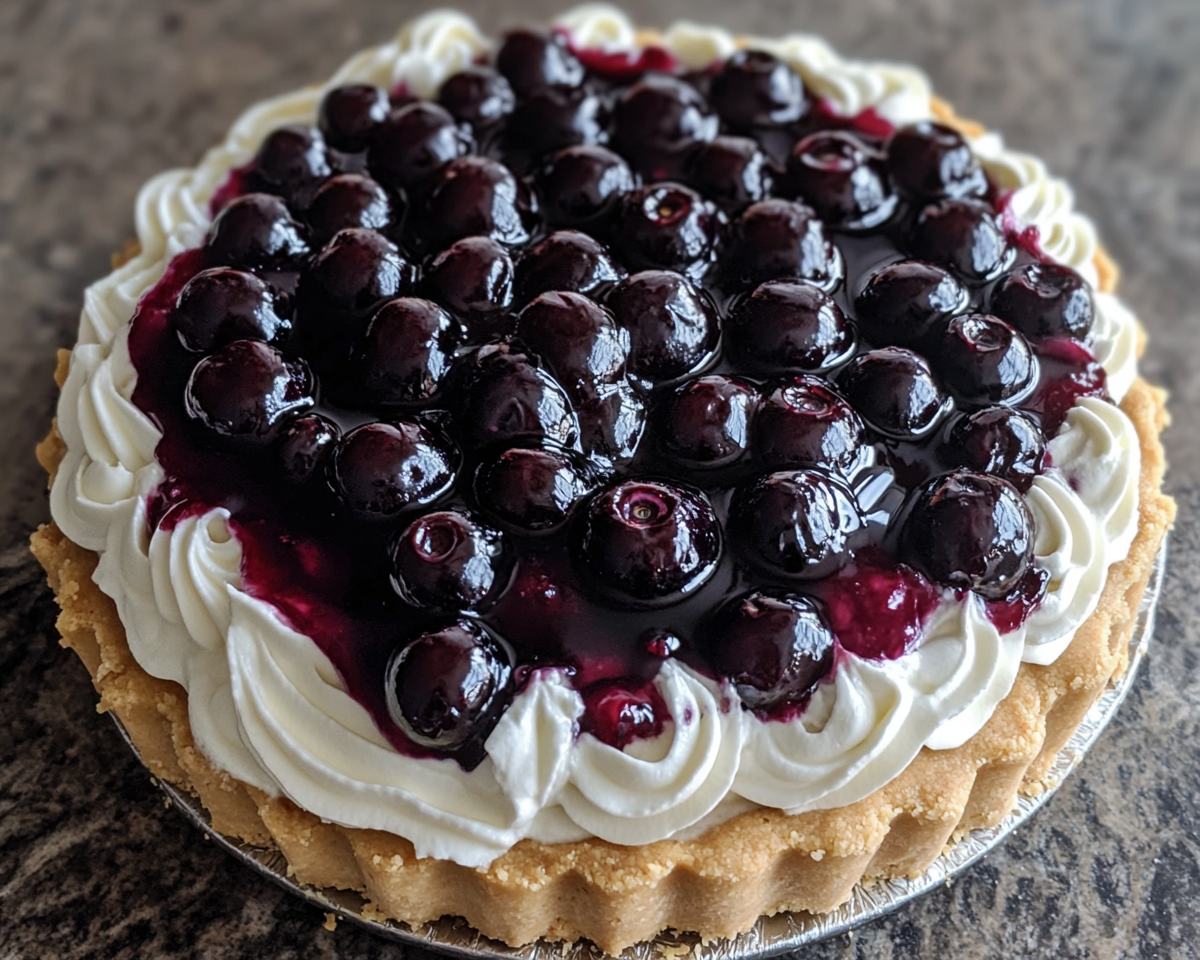
No-Bake Blueberry Cheesecake: Easy and Creamy Dessert Recipe
No-Bake Blueberry Cheesecake: A Delicious and Effortless Dessert
This recipe for No-Bake Blueberry Cheesecake combines creamy indulgence with the simplicity of no baking required. Whether you’re hosting a dinner party or craving something sweet and satisfying, this dessert is a guaranteed show-stopper.
For additional no-bake inspiration, try this recipe for No-Bake Pumpkin Cheesecake, perfect for fall gatherings and holiday dinners.
Why No-Bake Cheesecake?
No-bake cheesecakes are loved for their simplicity and versatility:
Effortless Preparation: Skip the oven and save time.
Versatile Flavors: Customize the cheesecake with different fruits, toppings, or crusts.
Perfect for Any Occasion: From family dinners to special events, this dessert is always a hit.
No-Bake Blueberry Cheesecake is an indulgent yet easy-to-make dessert that’s perfect for any occasion. With a buttery crust, creamy filling, and fresh blueberry topping, this recipe combines flavor, simplicity, and elegance.
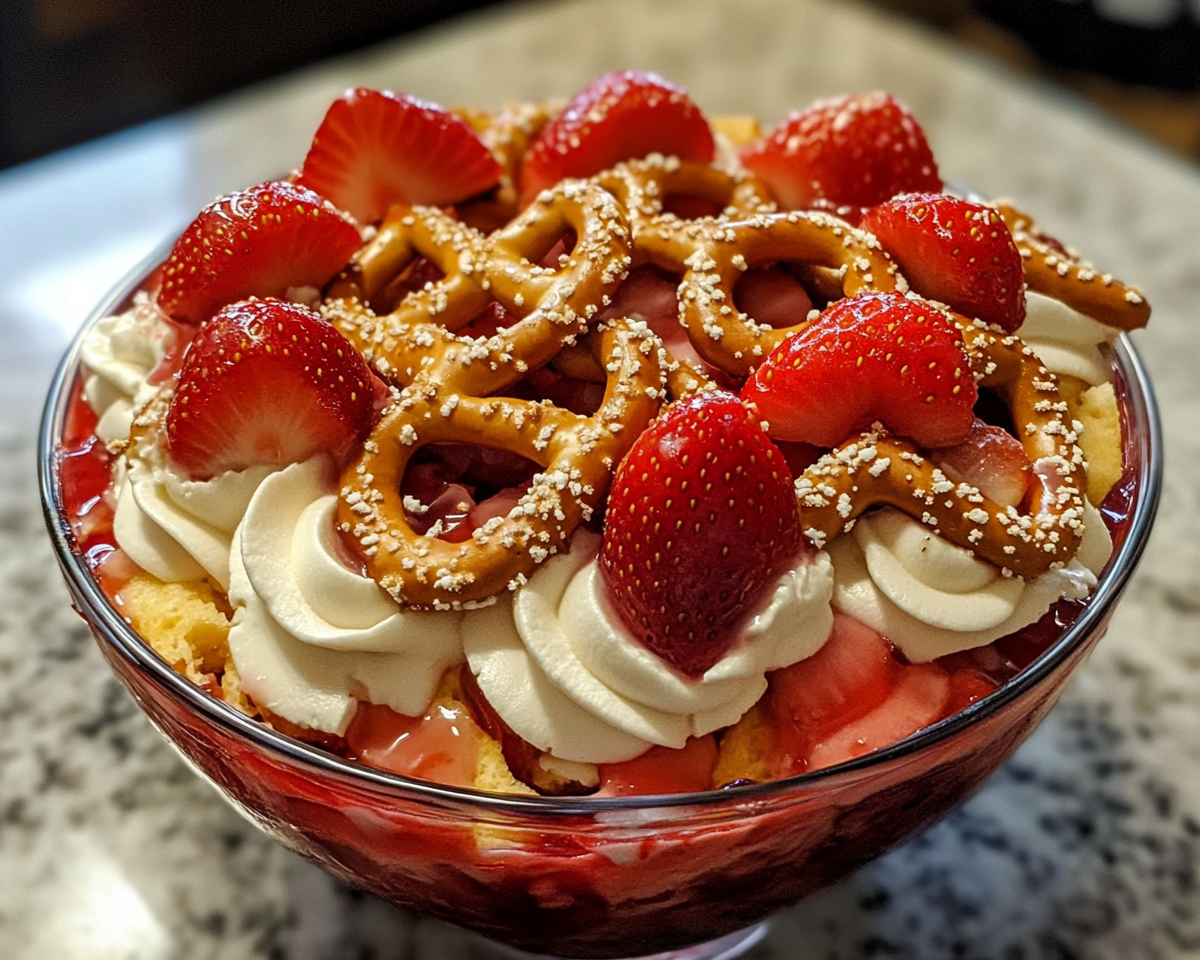
Grandma’s Strawberry Pretzel Salad: A Sweet and Salty Classic Dessert
Grandma’s Strawberry Pretzel Salad: A Nostalgic Dessert Recipe
Grandma’s Strawberry Pretzel Salad is a delightful combination of sweet, salty, and tangy flavors that have graced tables for generations. With a buttery pretzel crust, a creamy middle layer, and a fruity strawberry topping, this dessert is a potluck favorite and a testament to classic comfort food.
For other nostalgic recipes, explore Kentucky Butter Cake, a buttery treat loved for its simplicity.
What Makes Strawberry Pretzel Salad Unique?
This layered dessert strikes the perfect balance of flavors:
Salty and Crunchy Crust: Made from crushed pretzels, butter, and sugar.
Creamy Middle Layer: A blend of cream cheese, sugar, and whipped topping.
Sweet and Tangy Topping: Strawberry Jell-O combined with fresh or frozen strawberries.
Grandma’s Strawberry Pretzel Salad is a timeless dessert that blends simplicity with indulgence. Perfect for family gatherings, potlucks, or holidays, this dish is a nostalgic favorite that never fails to impress. Ready to create this masterpiece? Start assembling and watch it become the star of your next event!
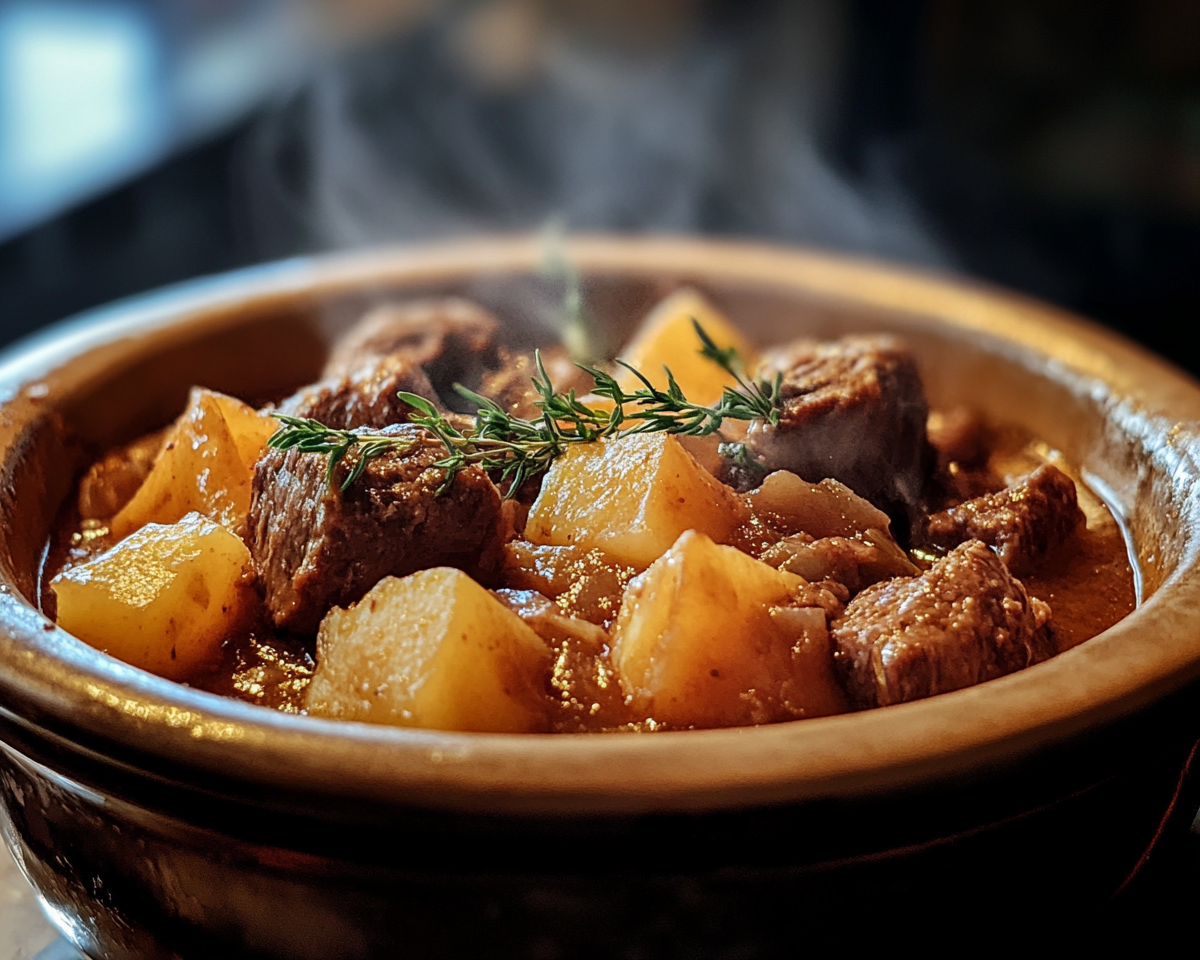
Slow Cooker Beef Stew Recipe: The Ultimate Comfort Food
Slow Cooker Beef Stew: A Comforting Classic
Slow Cooker Beef Stew is the epitome of hearty, home-cooked meals. With tender beef, rich broth, and a medley of vegetables, this recipe is a crowd-pleaser perfect for chilly nights or family gatherings. This detailed guide will walk you through crafting the perfect beef stew, sharing variations, and answering your most pressing questions.
For a complementary dish, pair this stew with Crockpot Potato Soup, another comforting slow cooker recipe that’s easy to prepare.
Why Slow Cooker Beef Stew Stands Out
Slow Cooker Beef Stew is a timeless recipe for several reasons:
Convenience: The slow cooker does the heavy lifting, making this a hands-off meal.
Flavorful Results: Low, slow cooking ensures tender beef and a deeply savory broth.
Versatility: Easily customizable with different vegetables or seasonings.
For more slow-cooked inspiration, try this recipe for Slow Cooker Baked Ziti, another effortless crowd-pleaser.
Ingredients for Slow Cooker Beef Stew
Essential Ingredients
Beef Cuts: Chuck roast, brisket, or short ribs.
Vegetables: Carrots, celery, potatoes, and onions.
Broth Base: Beef stock, red wine, and tomato paste.
Seasonings: Thyme, rosemary, garlic, and bay leaves.
Optional Additions
Mushrooms, parsnips, or turnips.
Worcestershire sauce for added depth.
A cornstarch slurry for thickening.
Step-by-Step Recipe
1. Preparing the Ingredients
Cube the beef and season with salt and pepper.
Chop vegetables into uniform pieces for even cooking.
2. Browning the Beef
Sear the beef in a hot skillet to lock in flavor before adding it to the slow cooker.
3. Layering in the Slow Cooker
Add beef, vegetables, seasonings, and broth to the slow cooker.
Cook on low for 8 hours or high for 4-6 hours.
4. Finishing Touches
Stir in a cornstarch slurry to thicken the stew, if desired.
Taste and adjust seasonings before serving.
Variations of Slow Cooker Beef Stew
1. Classic Beef Stew
Stick to traditional ingredients for a comforting, nostalgic flavor.
2. Red Wine Beef Stew
Add red wine for a deeper, richer flavor profile.
3. Spicy Beef Stew
Incorporate chili flakes or cayenne pepper for a kick.
4. Gluten-Free Beef Stew
Use gluten-free flour or cornstarch to thicken the broth.
FAQs About Slow Cooker Beef Stew
Can I Skip Browning the Beef?
Browning enhances the stew’s flavor, but it’s optional for those short on time.
What’s the Best Way to Thicken the Stew?
Use a cornstarch slurry or mashed potatoes to achieve your desired consistency.
How Do I Prevent Mushy Vegetables?
Add firmer vegetables like potatoes and carrots later in the cooking process.
Can I Make This Recipe Ahead of Time?
Yes, beef stew tastes even better the next day. Store in an airtight container in the refrigerator.
Serving Suggestions
Pair With: Crusty bread or buttery biscuits for dipping.
Drinks: Pair with a robust red wine or an earthy ale.
Garnishes: Sprinkle fresh parsley or chives for color and freshness.
Slow Cooker Beef Stew is the ultimate comfort food, combining tender beef and hearty vegetables in a rich, flavorful broth. Whether you’re feeding a crowd or prepping meals for the week, this recipe is a versatile and satisfying choice.
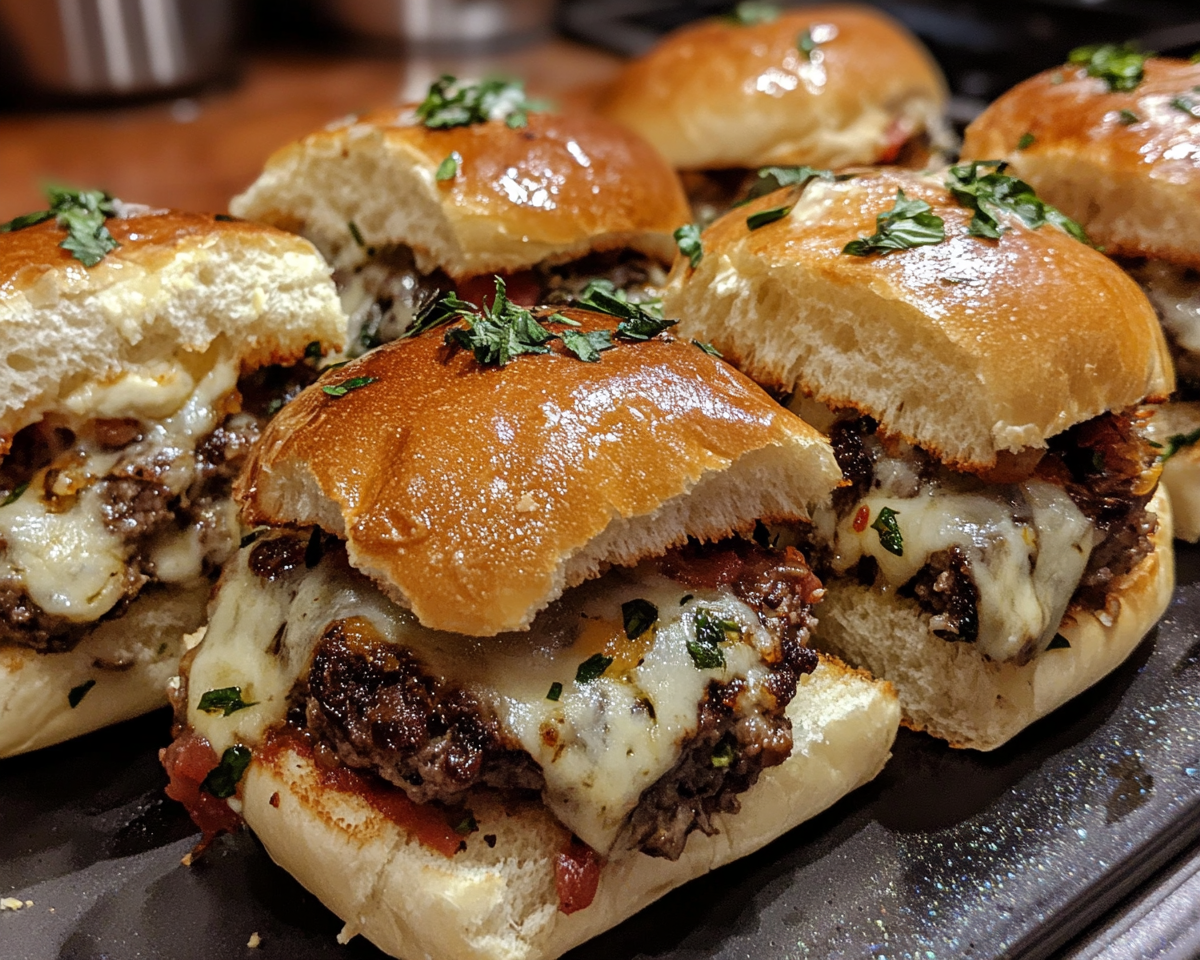
Easy Italian Sliders Recipe: Perfect Party Appetizer
Italian Sliders: The Ultimate Party Appetizer
Perfect for gatherings, game days, or family dinners, Italian sliders are a versatile and crowd-pleasing appetizer. These mini sandwiches pack bold Italian flavors with layers of meats, cheeses, and seasonings all baked to perfection. Whether you’re hosting a party or looking for an easy meal idea, Italian sliders are a go-to option.
Pair your sliders with Crockpot Potato Soup for a hearty meal that’s perfect for any occasion.
What Are Italian Sliders?
Italian sliders are small, flavorful sandwiches made with slider buns, Italian meats like salami and pepperoni, and cheeses such as provolone or mozzarella. These ingredients are layered and baked with a savory butter mixture for a warm, gooey finish.
For an effortless addition to your party menu, try these No-Peek Beef Tips, another satisfying and easy-to-prepare dish.
Ingredients for Italian Sliders
Essential Ingredients
Bread: Slider buns, Hawaiian rolls, or brioche.
Italian Meats: Salami, pepperoni, ham, or mortadella.
Cheeses: Provolone, mozzarella, or Parmesan.
Seasonings: Italian seasoning, garlic powder, and red pepper flakes.
Optional Add-Ons
Pesto or marinara sauce.
Roasted red peppers or sun-dried tomatoes.
Fresh basil leaves.
How to Make Italian Sliders
Step 1: Assemble the Sliders
Slice slider buns in half.
Layer meats, cheeses, and optional toppings on the bottom half.
Step 2: Prepare the Butter Topping
Melt butter and mix with garlic powder, Italian seasoning, and Parmesan.
Brush over the assembled sliders for added flavor.
Step 3: Bake to Perfection
Cover with foil and bake at 350°F (175°C) for 15 minutes.
Remove foil and bake an additional 5 minutes for a golden top.
Variations of Italian Sliders
1. Caprese Sliders
Basil, fresh mozzarella, and tomato with a drizzle of balsamic glaze.
2. Spicy Italian Sliders
Add spicy Italian sausage or jalapeños for a kick.
3. Vegetarian Italian Sliders
Use roasted vegetables like zucchini and bell peppers instead of meat.
FAQs About Italian Sliders
Can I Make Italian Sliders Ahead of Time?
Yes, assemble the sliders and refrigerate until ready to bake.
What’s the Best Cheese for Sliders?
Provolone and mozzarella work best due to their meltability and flavor.
How Do I Keep Sliders Warm for a Party?
Cover with foil and keep in a warm oven or chafing dish.
Can I Make Gluten-Free Italian Sliders?
Absolutely! Substitute regular buns with gluten-free options.
Serving and Pairing Suggestions
Pair With: Garlic bread, pasta salad, or a simple green salad.
Beverages: Italian soda, red wine, or sparkling water.
Garnish: Sprinkle sliders with fresh parsley or grated Parmesan for a finishing touch.
Storage and Reheating Tips
Refrigeration: Store in an airtight container for up to 3 days.
Reheating: Warm in the oven at 350°F for 5–10 minutes or in an air fryer for a crispy finish.
Italian sliders are a versatile and delicious option for any occasion. Their rich flavors, easy preparation, and endless customization make them a favorite among both novice and experienced cooks. Add them to your next party menu or weeknight dinner rotation, and watch them disappear in no time!
Delicious BBQ Chicken Pasta Salad Bowl Recipe for Summer Fun
BBQ Chicken with Pasta Salad Bowl: A Flavorful Summer Delight
⚖️
Difficulty
Easy
⏲️
Prep Time
15 mins
🕒
Cook Time
30 mins
⏱️
Total Time
45 mins
🍽️
Servings
4 servings
Welcome to the sunny flavors of summer with this vibrant BBQ Chicken with Pasta Salad Bowl. This recipe combines juicy, barbecue-flavored chicken with a refreshing pasta salad packed with colorful vegetables. Each bite offers a delightful harmony of smoky, savory, and tangy flavors, making it the perfect option for your next picnic, family gathering, or casual dinner. Imagine the enticing aroma of grilled chicken wafting through the air, inviting everyone to dig in!
The barbecue chicken brings a tender, juicy quality that pairs beautifully with the cool, crisp pasta salad. It’s an ideal blend of textures; the tender chicken contrasts with the crunchy vegetables and the soft pasta, creating a satisfying mouthfeel. Children and adults alike will enjoy this dish whether served warm or cold, proving that it’s versatile enough for any occasion.
Quick Recipe Highlights
Flavor Profile: The sweet and tangy barbecue sauce perfectly complements the salty chicken, while the fresh vegetables add a burst of natural sweetness from the garden.
Texture: Expect a mix of chewy chicken, al dente pasta, and crunchy veggies that give your palate a lovely variety of sensations.
Aroma: The smell of grilling chicken mingled with fresh herbs and tangy dressing will make your mouth water.
Visual Appeal: A colorful plate showcasing golden chicken against a backdrop of pasta and vibrant veggies creates an inviting dish.
Skill Level Needed: This dish is beginner-friendly, requiring minimal cooking techniques that even novice cooks can master.
Special Equipment: You will need a grill or grill pan for the chicken, along with a large pot for cooking the pasta.
Recipe Overview
Difficulty Level: This easy-to-follow recipe is perfect for beginners or busy weeknight cooking enthusiasts. The straightforward steps allow you to create a delicious meal without too much fuss.
Category: This dish fits comfortably in the categories of summer meals, barbecue food, and family dinners—ideal for sharing with loved ones.
Cuisine: Drawing on classic American barbecue traditions, this recipe celebrates the joy of outdoor cooking and the casual dining that comes with summertime.
Cost: Budget-friendly ingredients and ease of preparation make this recipe accessible for most, with an average cost of around $15-$20 for four servings.
Season: Summer is the perfect season for this dish, as it encourages outdoor grilling and utilizes fresh, seasonal produce.
Occasion: Perfect for barbecues, potlucks, or a delightful weeknight dinner, this recipe is versatile and sure to please any crowd.
Why You’ll Love This Recipe
First and foremost, the taste and texture appeal of this BBQ Chicken with Pasta Salad Bowl are unparalleled. The grilled chicken, infused with smoky barbecue flavors, creates a mouthwatering centerpiece for your meal. Complimenting the chicken is the pasta salad, which not only enhances the dish visually but balances out the hearty protein with its fresh, crunchy vegetables. Each bite invites you to savor summer’s essence, making it a delightful option for long, sunny days.
The convenience and preparation benefits of this recipe will also impress. With a total preparation and cook time of just 45 minutes, you can easily fit this into your busy schedule. By utilizing pre-made barbecue sauce, you streamline the cooking process even further, making it an ideal choice for families or individuals seeking speedy meal solutions without sacrificing flavor.
Nutritionally, this dish offers a well-rounded meal, combining protein from the chicken with carbohydrates from the pasta and an array of vitamins and minerals from the fresh vegetables. This makes it not only a filling option but a healthy one that can support your lifestyle choices.
Socially, the BBQ Chicken with Pasta Salad Bowl serves as a great conversation starter at gatherings. Its colorful presentation and dynamic flavors encourage sharing and enjoying the dish together, making it a perfect addition to any meal where guests will gather around the table.
Lastly, the cost-effectiveness and accessibility of this recipe should not be overlooked. All ingredients are typically found in any grocery store and are affordable, ensuring you can make a delicious meal without overspending. Perfect for feeding a family or hosting friends, this dish will leave everyone satisfied and impressed.
Historical Background and Cultural Significance
This BBQ Chicken dish has its roots in American cooking traditions, particularly within southern and southwestern cuisine, where grilling meats is deeply embedded cultural practice. Barbecue has long been a method of cooking that brings family and friends together, fostering community and shared experiences at outdoor gatherings.
Culturally, barbecue holds significance as not only a cooking method but also as a celebration of regional identities. In various parts of the United States, barbecue styles differ, reflecting local tastes, traditions, and available resources. This recipe serves as an homage to that diversity while remaining approachable for home cooks.
Over time, the evolution of barbecue cooking has led to the infusion of various styles, flavors, and sauces, transitioning this culinary practice from rustic outdoor fires to gourmet dining experiences. The combination of barbecue chicken with pasta salad is a relatively modern interpretation, excitingly encasing traditional flavors in contemporary culinary fashion.
In terms of regional variations, some love to add local spices or incorporate seasonal produce into their pasta salad, highlighting the beauty of what’s fresh and accessible. This adaptability keeps the spirit of barbecue alive while honoring home cooks’ creativity nationwide.
Ingredient Deep Dive
BBQ Chicken
The essence of this dish revolves around the barbecue chicken, which has its historical significance linked to traditional outdoor cooking practices. Grilling chicken allows fat to drip away, promoting healthier eating while delivering a smoky flavor that is irresistibly appealing. Nutritionally, chicken is a great source of lean protein that supports muscle growth and overall health.
Selecting the right chicken is crucial; opt for skinless, boneless chicken breasts for a healthy dish that cooks evenly and absorbs flavors beautifully. Proper storage involves refrigeration and using it within a couple of days to ensure freshness. If looking for alternatives, turkey breast can offer similar nutritional benefits with a slightly different flavor profile.
Pasta
Pasta, a staple in Italian cuisine, has become a beloved food worldwide. Its significance comes not only from versatility but also from providing a satisfying carbohydrate source that can adapt to various flavors. Whole wheat or vegetable-based pasta can provide enhanced nutritional value and cater to dietary preferences.
When selecting pasta, look for low-processed options that retain natural nutrients. Proper storage is essential; keep dry pasta in a cool, dry place and cooked pasta in an airtight container in the refrigerator. For gluten-free alternatives, consider quinoa or chickpea pasta for a nutritious variation in texture and taste.
Common Mistakes to Avoid
Underseasoning the chicken: Many neglect to season their chicken adequately, resulting in bland flavor. Don’t be shy to apply your barbecue sauce generously, alongside salt and pepper before grilling.
Overcooking the chicken: It’s easy to overcook poultry on the grill. Use a meat thermometer to check for doneness at 165°F for perfectly juicy results.
Using a dull knife: Cutting into your chicken with a dull knife can lead to tearing instead of slicing. Invest in a good chef’s knife for clean cuts.
Not letting the chicken rest: Allowing the chicken to rest after grilling is crucial; this helps retain juices and enhances flavor profile.
Skimping on the vegetables: A vibrant pasta salad relies on fresh vegetables for flavor and texture. Don’t underestimate their importance in brightening up the dish.
Cooking pasta too long: Overcooked pasta can become mushy and unappealing. Aim for al dente for the best texture in your salad.
Forgetting to taste: Always taste your dressing before adding it to the salad; adjusting flavors at this stage ensures a balanced dish.
Neglecting to prep in advance: A bit of meal prep can go a long way. Having all ingredients washed and ready will make assembling your bowl quicker and easier.
Not mixing components well: Take time to mix the pasta salad ingredients thoroughly; this promotes even flavor distribution throughout the dish.
Skipping garnishes: Fresh herbs or crumbled feta can elevate your dish visually and flavor-wise, adding a culinary finesse that can impress guests.
Essential Techniques
Grilling Chicken
Grilling chicken is essential for this recipe as it imparts a smoky flavor while sealing in moisture. To master grilling, preheat your grill to medium-high, ensuring a good sear. Common pitfalls include not oiling the grill grates, leading to sticking, or grilling over too high a heat, causing charred outsides and raw insides. Visual cues for success include nice grill marks and an internal temperature of 165°F.
Cooking Pasta
Cooking pasta al dente preserves its texture and prevents mushiness. Use a large pot of salted water; this ensures even cooking. It’s important to remember not to add oil to the water, as it will prevent the sauce from sticking later. Watch for that subtle bite that indicates perfect doneness.
Pro Tips for Perfect BBQ Chicken with Pasta Salad Bowl
1. Marinate your chicken for at least an hour or overnight to achieve maximum flavor infusion from the barbecue sauce.
2. Use a mixture of different colored vegetables in your pasta salad for a nutrient-dense dish that is visually appealing.
3. Consider grilling additional vegetables alongside your chicken to enhance the dish’s flavor and nutrition.
4. Prepare your pasta salad a few hours in advance and let it chill; this allows the flavors to meld beautifully.
5. For added acidity, a squeeze of fresh lemon juice can brighten the flavors of your pasta salad.
6. If time permits, trying out homemade barbecue sauce can elevate the dish and add a personalized touch.
7. Experiment with herb garnishes like fresh basil or cilantro for added freshness.
8. Serve with a side of garlic bread for a complete meal experience.
Variations and Adaptations
Regional variations of this recipe can reflect local tastes; Southern-style recipes might incorporate corn or beans into the pasta salad. Seasonal adaptations allow you to utilize fresh summer produce, such as peaches or zucchini, adding a unique twist. For dietary modifications, consider using a plant-based protein in place of chicken, catering to vegan diets. If you prefer different flavors, try a buffalo sauce for a spicy kick or a pesto for an Italian flair. Additionally, experimenting with gluten-free pasta options is simple with varieties like brown rice or chickpea pasta.
Serving and Presentation Guide
For plating, display the pasta salad in a large bowl as a centerpiece, placing the sliced grilled chicken on top to create an eye-catching contrast. Garnish with fresh herbs for a pop of color. Traditional accompaniments like crisp lettuce or tortilla chips can offer added texture. Modern serving suggestions include packaging individual bowls to make meals portable and easy for gatherings. Serve at room temperature, but consider keeping the chicken slightly warm for optimal enjoyment, and aim for portion control by measuring based on servings needed.
Wine and Beverage Pairing
For wine pairings, a chilled Sauvignon Blanc or a fruit-forward rosé complements the barbecue chicken beautifully, enhancing its smoky flavors while balancing the acidity from the pasta salad. For non-alcoholic alternatives, consider a sparkling lemonade or iced herbal tea dressed with mint for a refreshing accompaniment. If serving coffee, a light roast can provide an uplifting finish to a summer meal. Serving should be catered to guest preferences and the outdoor nature of summer dining, offering chilled options to beat the heat.
Storage and Shelf Life
Store any leftover BBQ Chicken with Pasta Salad Bowl in airtight containers in the refrigerator for up to three days. Proper storage is essential, so ensure the chicken is cooled before sealing. When reheating, it’s best to warm the chicken separately to avoid sogginess in the salad. The chicken can safely be reheated in the microwave or oven, while the salad can be enjoyed cold or at room temperature. Freezing is not recommended for the fully prepared dish, but cooked chicken can be frozen separately for future use.
Make Ahead Strategies
For a make-ahead strategy, marinate the chicken the night before to enhance flavor absorption. Cook the pasta and prepare the salad components well in advance to save time on the day of serving. Storing the components separately will maintain freshness until assembly. When it’s time to serve, combine everything and top with the freshly grilled chicken. Always plan to add any fresh elements, such as herbs or dressing, just before serving to preserve quality.
Scaling Instructions
When halving the recipe, adjust cooking times slightly, especially for the chicken, ensuring it cooks evenly. If doubling or tripling, consider using a grill basket for the chicken to maximize space while allowing all pieces to cook evenly. Timing modifications should account for larger quantities; plan for longer grill times. Any leftovers should be stored according to the previously discussed methods to keep components separate until ready to enjoy.
Nutritional Deep Dive
The macro breakdown of this dish showcases balanced nutrition with approximately 30g of protein and 40g of carbohydrates per serving, along with healthy fats from the barbecue sauce. Micronutrient analysis reveals a source of vitamin C, vitamin A, and potassium derived from the vegetables in the salad. Health benefits include supporting muscle repair and providing energy, making this dish suitable for active lifestyles. Dietary considerations can easily be adapted with alternatives such as gluten-free pasta or plant-based proteins to accommodate various dietary needs.
Dietary Adaptations
This recipe can be modified to meet the needs of various dietary preferences. For a gluten-free option, choose gluten-free pasta and ensure the barbecue sauce is free of gluten-containing ingredients. Those on a dairy-free diet can opt for vegan sauces and dressings, while individuals following a keto or low-carb plan can substitute with zucchini noodles. For vegetarian or vegan diets, grilled portobello mushrooms or grilled tofu can replace chicken, making the dish hearty yet plant-based. Adapting flavors with unique spices can cater to different dietary needs while keeping the essence of the original recipe intact.
Troubleshooting Guide
If the texture of the chicken seems dry, ensuring to marinate adequately and using a meat thermometer can help in achieving moist results. For flavor balance issues, adjust seasoning gradually; it’s easier to add than to take away. If facing temperature problems during cooking, practice patience and avoid opening the grill too often to ensure even heat distribution. Should there be challenges with your equipment, ensure that your grill is clean and functioning well by checking for even heating and appropriate fuel sources.
Recipe Success Stories
Readers often share glowing feedback on their experiences with this BBQ Chicken with Pasta Salad Bowl, highlighting its flavor-packed punch and ease of preparation. Many have enjoyed trying their unique variations, whether swapping sauces or experimenting with seasonal vegetables. Adaptation stories frequently mention how families have made this dish their own, often becoming a new staple at gatherings. Photography tips shared among the community encourage vibrant plates and natural lighting for beautiful captures that showcase the recipe’s appeal.
Frequently Asked Questions
Can I freeze the BBQ Chicken? Yes, cooked chicken can be frozen. Ensure it’s cooled completely and stored in airtight containers or freezer bags for up to three months. Reheat thoroughly before serving.
How do I substitute barbecue sauce? You can easily substitute with a homemade sauce or other condiments like teriyaki or even spicy mustard, depending on your taste preference.
What type of pasta is best to use? While traditional pasta works well, using whole-grain, chickpea, or gluten-free pasta can enhance the dish to fit various dietary preferences.
Can I use store-bought barbecue sauce? Absolutely! Feel free to use store-bought sauces to save time, but consider enhancing with fresh herbs or spices to elevate flavor.
Is this recipe suitable for meal prep? Yes, this dish is great for meal prep, as the components can be stored separately and combined just before serving.
How long does the pasta salad last in the fridge? When stored properly, the pasta salad can last in the refrigerator for up to three days.
Can I make the pasta salad without chicken? Yes, for a vegetarian or lighter option, you can omit the chicken and increase the variety of vegetables or add beans for protein.
What side dishes pair well with this recipe? Garlic bread, corn on the cob, or a fresh garden salad can complement the BBQ Chicken Bowl wonderfully.
What can I do with leftover pasta salad? Leftover pasta salad can be enjoyed cold as a quick lunch or can be mixed with grilled shrimp or chicken for a different meal.
How can I make this dish spicier? To boost the heat, consider adding hot sauce to the barbecue sauce or incorporating jalapeños in the pasta salad.
Additional Resources
If you’re looking for related recipes, consider trying grilled veggie skewers or refreshing fruit salads to accompany your BBQ Chicken with Pasta Salad Bowl. Techniques like mastering marinating chicken or how to create homemade dressings can elevate your cooking skills. For ingredient information, explore seasonal vegetables to enhance your salad, ensuring it’s fresh and flavorful. Also, investing in quality kitchen equipment, like a dependable grill and sharp knives, can significantly improve your cooking experience.
Join the Conversation
We encourage you to share your BBQ Chicken with Pasta Salad Bowl journey on social media by tagging your dish photos! Photography tips like focusing on color and lighting will help capture this delicious recipe beautifully. Don’t hesitate to leave your recipe reviews and suggestions in the comments, sharing any personal twists or how you enjoyed this dish. Let’s create a community where everyone can discover and share their favorite variations of this summer delight!
The Recipe
BBQ Chicken with Pasta Salad Bowl
Serves: 4 servings
Prep Time: 15 mins
Cook Time: 30 mins
Total Time: 45 mins
Kitchen Equipment Needed
Grill or grill pan
Large pot
Cutting board
Sharp knife
Large bowl for mixing
Ingredients
4 chicken breasts
1 cup of your favorite barbecue sauce
8 ounces of pasta (your choice)
1 cup cherry tomatoes, halved
1 cup cucumber, diced
1 bell pepper, diced
1/4 cup red onion, finely chopped
1/4 cup fresh basil, chopped
1/4 cup olive oil
Juice of 1 lemon
Salt and pepper to taste
Directions
Preheat the grill to medium-high heat.
Marinate chicken in barbecue sauce for at least 30 minutes.
Cook pasta according to package directions; drain and set aside to cool.
Grill chicken for about 6-7 minutes on each side or until cooked through.
In a large bowl, combine cooked pasta, cherry tomatoes, cucumber, bell pepper, and red onion.
In a separate bowl, whisk together olive oil, lemon juice, salt, and pepper; pour over pasta salad.
Slice grilled chicken and serve it atop the pasta salad.
Garnish with fresh basil and enjoy!
Recipe Notes
Feel free to customize your pasta salad with different vegetables based on seasonal availability.
For extra creaminess, consider adding sliced avocado or feta cheese on top.
Leftover grilled chicken can be shredded and used in sandwiches or salads.