Chicken Bubble Biscuit Bake Casserole: A Comforting Family Meal
Introduction
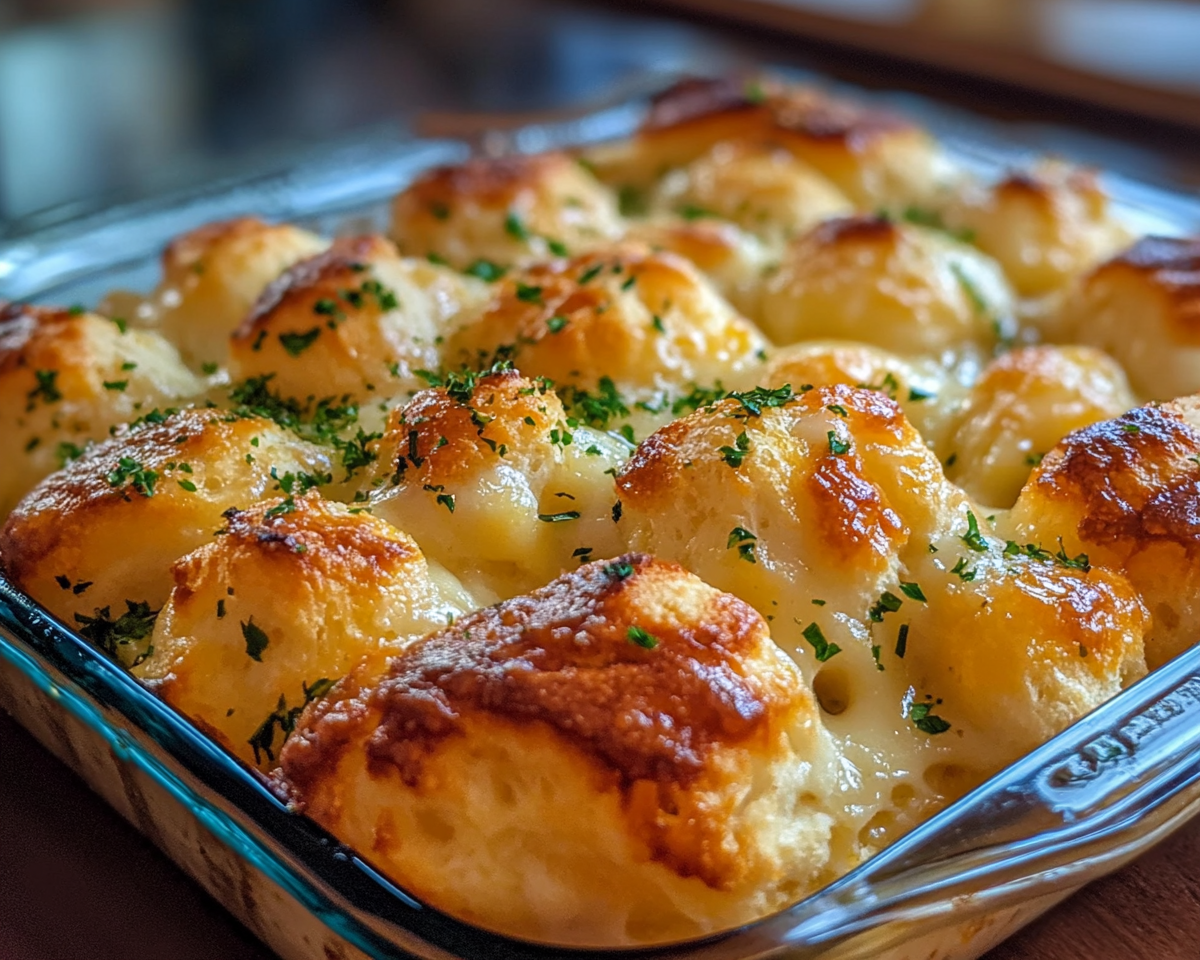
There’s something magical about a warm, creamy casserole straight from the oven. The Chicken Bubble Biscuit Bake Casserole is a crowd-pleaser, combining tender chicken, fluffy biscuits, and a rich, cheesy sauce. It’s a perfect option for weeknight dinners or potluck gatherings.
Prepare the Chicken: Shred pre-cooked chicken or dice raw chicken and cook thoroughly.
2. Creating the Sauce
In a large bowl, mix cream of chicken soup, sour cream, milk, and seasonings.
3. Assembling the Casserole
Cut biscuit dough into quarters and toss in the creamy mixture.
Combine with chicken and spread evenly in a greased baking dish.
4. Baking to Perfection
Sprinkle shredded cheese on top.
Bake for 25–30 minutes, or until biscuits are golden brown and bubbly.
Creative Variations
1. Buffalo Chicken Twist
Add buffalo sauce to the creamy mixture.
Top with blue cheese crumbles after baking.
2. Vegetarian Option
Swap chicken for sautéed mushrooms and spinach.
3. Mexican-Inspired Bake
Add taco seasoning, black beans, and corn. Top with jalapeños for a spicy kick.
Check out this Taco Bell-Inspired Mexican Pizza Casserole for more ideas: Taco Casserole Recipe.
Serving Suggestions
Sides: Pair with a crisp green salad or roasted vegetables.
Garnishes: Fresh parsley or green onions for a pop of color.
Drinks: Sweet tea or lemonade complements the rich flavors.
Nutritional Insights
Calories and Macros
Approx. 450 calories per serving.
Healthier Swaps
Use reduced-fat cheese and soup.
Opt for whole-grain biscuit dough.
FAQs about Chicken Bubble Biscuit Bake Casserole
1. Can I use leftover chicken?
Absolutely! Leftover rotisserie chicken works perfectly for this dish.
2. What’s the best way to reheat leftovers?
Reheat in the oven at 350°F until warmed through or microwave individual portions.
3. Can I freeze this casserole?
Yes, assemble and freeze unbaked. When ready to use, thaw overnight and bake as directed.
Conclusion
The Chicken Bubble Biscuit Bake Casserole is a comforting dish that brings joy to the table. Whether you’re feeding a crowd or preparing a cozy meal for your family, this casserole is sure to satisfy. For more comforting recipes, check out Crockpot Ham, Green Beans, and Potatoes.
Homemade Butterscotch Pudding: Creamy and Irresistible Dessert Recipe
Butterscotch Pudding: A Creamy, Nostalgic Dessert
Introduction
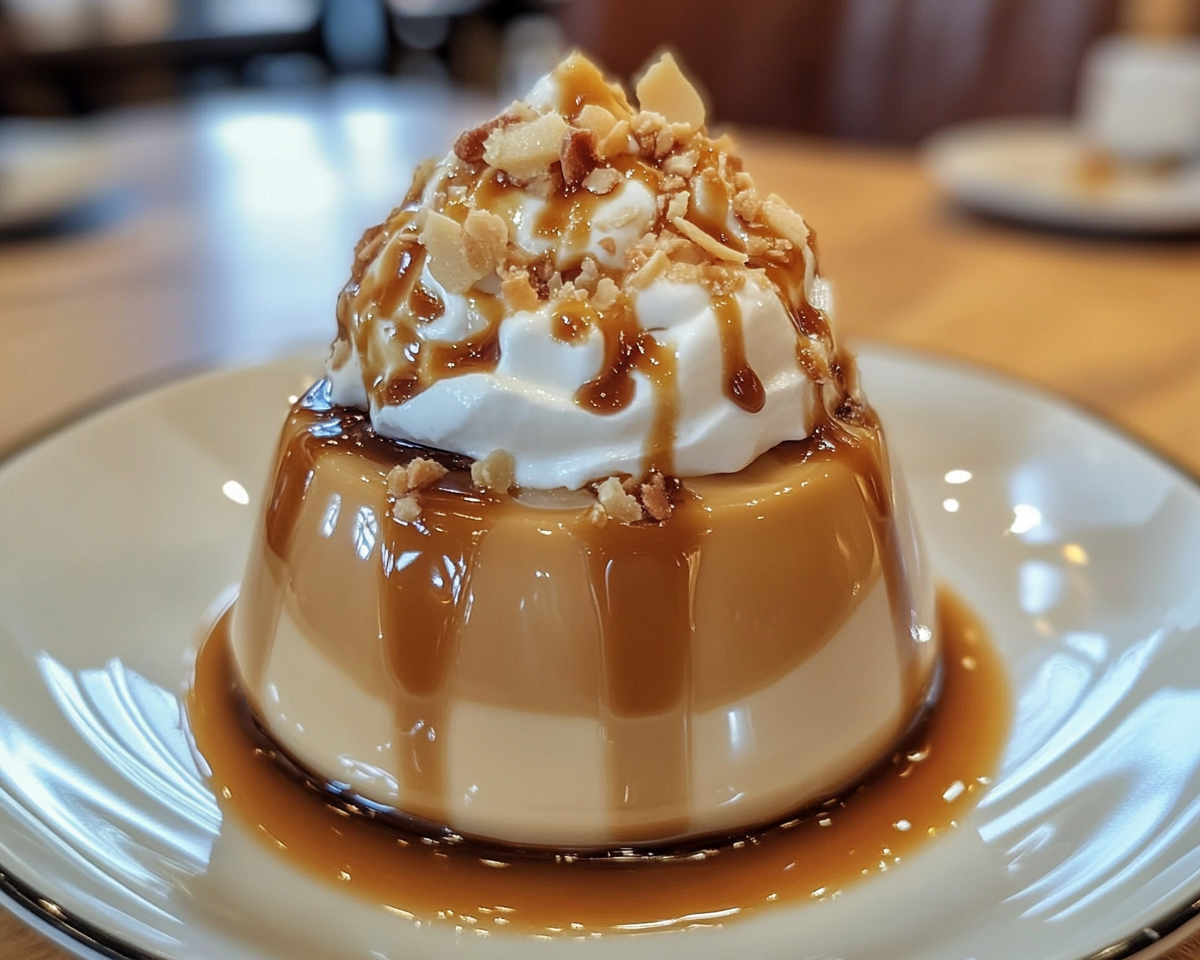
Butterscotch pudding is the quintessential dessert that blends nostalgia with indulgence. Its rich caramelized flavor and silky texture make it a timeless favorite among dessert enthusiasts.
Understanding the science of pudding preparation can elevate your results. For instance, the experts at Serious Eats explain the role of heat in achieving the perfect consistency. This guide delves into the details, from ingredients to variations, to help you master the art of butterscotch pudding.
Ingredients for Butterscotch Pudding
Key Components
Brown Sugar: Provides the signature caramelized flavor.
Butter: Adds richness and depth.
Heavy Cream: Ensures a silky, creamy consistency.
Cornstarch: Acts as a thickening agent.
Vanilla Extract: Enhances the overall flavor profile.
For more on crafting creamy delights, check out the Homemade Pineapple Soft Serve Ice Cream recipe on ExoRecipes.
Step-by-Step Recipe Guide
1. Preparing the Base
Melt butter in a saucepan over medium heat.
Add brown sugar, stirring until it dissolves completely.
2. Incorporating Cream
Gradually pour in heavy cream, whisking continuously to prevent clumps.
Bring to a gentle boil, then reduce heat.
3. Thickening the Pudding
Dissolve cornstarch in a small amount of cold water.
Stir the mixture into the saucepan and cook until it thickens.
Creative Variations
1. Salted Butterscotch Pudding
Sprinkle sea salt over the top for a gourmet twist.
2. Boozy Butterscotch
Add a splash of bourbon or rum to the pudding base.
3. Vegan Adaptation
Use coconut cream and vegan butter for a plant-based version.
Serving and Presentation Ideas
Glassware Elegance: Serve in tall dessert glasses for a layered look.
Toppings: Garnish with whipped cream, toffee bits, or caramel drizzle.
For more creative dessert ideas, visit Strawberry Shortcake Sushi on ExoRecipes.
FAQs about Butterscotch Pudding
What’s the difference between butterscotch and caramel?
Butterscotch uses brown sugar, while caramel typically uses white sugar.
Can I make butterscotch pudding without cream?
Yes, you can substitute milk or plant-based alternatives.
How long does homemade pudding last?
It can be stored in the fridge for up to 4 days in an airtight container.
Conclusion
Butterscotch pudding is a dessert that blends tradition with versatility. Its rich, caramelized flavor can be tailored to suit any palate, from simple comfort food to gourmet presentations. For more comforting desserts, check out Kentucky Butter Cake on ExoRecipes.
Savory Stuffed Chicken with Peppers, Spinach, and Mozzarella Recipe
Savory Stuffed Chicken with Roasted Red Peppers, Spinach, and Mozzarella: A Delightful Culinary Experience
⚖️
Difficulty
Medium
⏲️
Prep Time
20 mins
🕒
Cook Time
30 mins
⏱️
Total Time
50 mins
🍽️
Servings
4
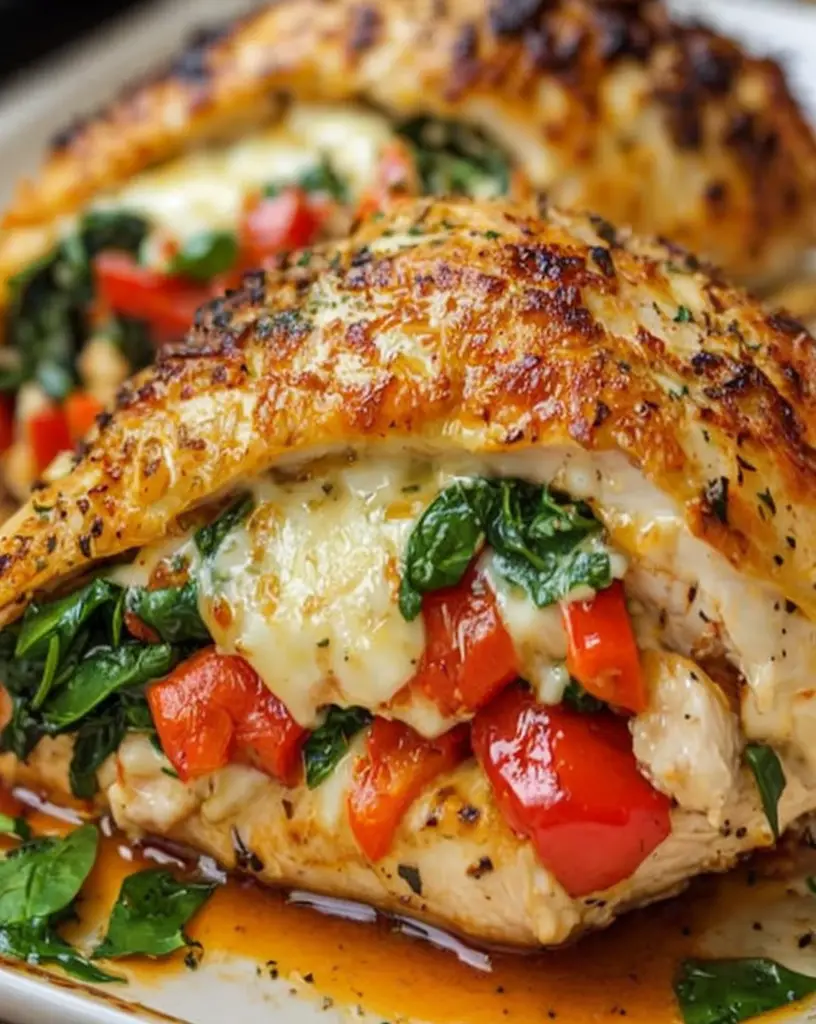
Welcome to the enticing world of savory stuffed chicken with roasted red peppers, spinach, and mozzarella. This delightful dish is not only comforting but also bursting with flavors that will tantalize your taste buds. The succulent chicken fillets are generously filled with a mixture of roasted red peppers, vibrant spinach, and creamy mozzarella, creating a medley of taste and texture. Whether you’re preparing a weeknight dinner for your family or hosting a dinner party, this recipe is sure to impress and satisfy everyone at the table.
The combination of juicy chicken, aromatic spices, and fresh ingredients creates an irresistible dish that embodies culinary excellence. As you prepare the stuffing, the roasted red peppers add a touch of sweetness while the spinach contributes a wholesome freshness. Meanwhile, the melted mozzarella cheese provides a rich creaminess that binds all the flavors together. This savory stuffed chicken not only tastes gourmet but is also simple enough to make at home, proving that elegance in dining doesn’t have to come with complexity.
Quick Recipe Highlights
Flavor Profile: The sweet and smoky roasted red peppers perfectly complement the earthy spinach and rich mozzarella.
Texture: Each bite offers a tender, juicy chicken with a delightful, creamy center.
Aroma: Expect a fragrant blend of savory spices, fresh herbs, and caramelized vegetables wafting through your kitchen.
Visual Appeal: The vibrant colors of the filling peek through the golden, baked chicken, making for a stunning presentation.
Skill Level Needed: Requires basic cooking skills; perfect for enthusiastic beginners and experienced cooks.
Special Equipment: A sharp knife for cutting and a baking dish to hold and cook the chicken.
Recipe Overview
Difficulty Level: This recipe is rated medium due to the art of stuffing the chicken and ensuring even cooking.
Category: Ideal for a main course, this dish fits perfectly into dinner menus.
Cuisine: This recipe draws inspiration from Mediterranean cuisine, renowned for its use of fresh ingredients and vibrant flavors.
Cost: The approximate cost to make this dish is budget-friendly, thanks to accessible ingredients.
Season: Savory stuffed chicken shines in any season but is particularly delightful during spring and summer when fresh vegetables are abundant.
Occasion: Perfect for family gatherings, festive dinners, or a special date night to impress.
Why You’ll Love This Recipe
The taste and texture appeal of savory stuffed chicken can’t be overstated. The juicy chicken combined with the rich, melted mozzarella creates a flavorsome experience that dances on your palate. Each bite of the tender fillet will remind you of a cozy Italian kitchen, perfectly blended flavors, and hearty dishes. You’ll savor the delightful contrast between the flavors of roasted red peppers and fresh spinach, making every piece memorable.
Convenience and preparation benefits also make this dish a family favorite. With a prep time of just 20 minutes and a cooking time that doesn’t exceed 30 minutes, this recipe is perfect for busy weeknights or last-minute entertaining. You can easily prepare the filling ahead of time, making it easy to pull together whenever you need a satisfying meal without spending all day in the kitchen.
From a nutritional perspective, this savory stuffed chicken is a guilt-free indulgence. Packed with lean protein from the chicken, vitamins, and minerals from the spinach and peppers, it offers a balanced meal that supports a healthy lifestyle. Plus, the addition of mozzarella allows you to enjoy cheesy goodness without overwhelming calories.
This dish holds social and entertaining value as well. It’s both visually presented and flavorful, making it the centerpiece of any table setting. When served to guests, it’s a conversation starter, inviting compliments as well as requests for the recipe. It fosters a sense of shared experience, bringing loved ones together over a delicious meal.
Moreover, the cost-effectiveness and accessibility of this recipe ensure that it can be made without breaking the bank. Most ingredients are not only easy to find but also budget-friendly, making it a worthwhile investment for meal planning. This means you can whip up an impressive dish without worrying about expenses, allowing culinary creativity to shine.
Historical Background and Cultural Significance
The origin story of stuffed chicken dates back centuries, with roots in Mediterranean cuisine, where it was often served at special occasions. This culinary tradition has evolved over time, with each region putting a unique spin on the concept. As cultures blended through trade and migration, the dish became a symbol of celebration and abundance in many households.
Culturally, stuffed chicken conveys a sense of warmth and hospitality, often associated with family gatherings and festive meals. It represents the love and effort put into cooking for others, creating memorable dining experiences that can be cherished for years. In many cultures, sharing a hearty meal signifies care and togetherness, making stuffed chicken a timeless choice for both everyday nourishment and special events.
The evolution of the recipe has seen numerous variations across different cuisines, including the use of various fillings and cooking methods. From Italian variations filled with herbs and cheeses to Middle-Eastern stuffed chicken, the endless possibilities reflect the adaptability of this beloved dish. Today, it continues to inspire home cooks worldwide, offering a canvas for creativity and personal expression.
Regional variations also enrich the appeal of stuffed chicken. In many Asian cuisines, chicken is often stuffed with aromatic spices and herbs, while in Latin America, you might find it filled with savory beans and grains. Each adaptation provides a glimpse into local culinary practices, fostering appreciation for diverse flavors and cooking techniques.
Ingredient Deep Dive
For the main ingredient, chicken provides not only flavor but also essential nutrients. Known for its lean protein content, chicken is a staple in many diets, promoting muscle health and overall wellness. When selecting chicken, look for fresh, organic options where possible—these often have more flavor and better texture. Store raw chicken in the refrigerator and use it within a day or two. For long-term storage, freezing is an excellent option, ensuring that you’ll always have this versatile meat on hand.
Roasted red peppers add vibrant color and sweetness to the dish, making them an excellent complement to the savory elements. Full of vitamins A and C, they offer numerous health benefits, including skin protection and immunity support. When choosing red peppers, pick ones that are firm to the touch and free of blemishes. They can be roasted or purchased jarred for convenience, but if making them at home, remember to store any leftovers in an airtight container in the fridge, where they can last for up to a week.
Spinach is the ultimate nutritional powerhouse, loaded with iron, calcium, and antioxidants. It adds a fresh taste and vibrant green hue to your meal, enhancing both visual appeal and nutrient density. Selecting fresh spinach means looking for crisp, dark leaves that aren’t wilted or discolored. Store it in a breathable bag in your refrigerator to keep it fresh longer. You can also opt for frozen spinach as a substitute.
Finally, mozzarella cheese binds all these ingredients together, providing a luscious creamy texture and rich flavor that elevates the entire dish. Mozzarella is known for its low-fat content compared to other cheeses, making it a healthier option for those watching their intake. When selecting mozzarella, choose part-skim or fresh varieties for the best results. Store it in the refrigerator and use it within a week for optimal taste.
Common Mistakes to Avoid
Not pounding the chicken: Failing to pound chicken to an even thickness can result in uneven cooking.
Overstuffing: Putting too much filling in the chicken can cause it to burst during cooking, making a mess and ruining presentation.
Skipping seasoning: Not adequately seasoning the chicken and stuffing can lead to bland flavor.
Insufficient cooking time: Undercooking the chicken can pose food safety risks, while overcooking makes it tough.
Ignoring resting time: Not letting chicken rest before slicing can cause juices to run out, resulting in dry meat.
Using old ingredients: Utilizing stale or expired ingredients can compromise flavor and safety.
Inadequate preheating: Failing to preheat oven properly can affect cooking time and texture.
Not using a meat thermometer: Not checking the internal temperature may lead to undercooked chicken.
Essential Techniques
Pounding chicken is an essential technique that creates an even, thin layer, which makes it easier to stuff and ensures even cooking. To master this technique, place the chicken between two pieces of plastic wrap and gently pound with a meat mallet until evenly thick. Be careful not to tear the meat. Look for an even color and thickness across the chicken breast as a visual cue of success.
Stuffing the chicken correctly is crucial for ensuring that it cooks evenly and retains moisture. When adding the filling, spread it evenly along the center of the chicken breast, leaving space at the edges. A good visual cue is to fold the chicken over the stuffing without it overflowing. This way, the cheese will melt beautifully while keeping the savory concoction inside.
Pro Tips for Perfect Savory Stuffed Chicken
1. Try marinating the chicken in lemon juice and herbs for added flavor and tenderness.
2. Consider using different types of cheese like goat cheese or feta for a unique twist.
3. Don’t overfill, as this can lead to bursts during cooking; just fill to the point where you can fold the chicken over.
4. Add spices or herbs directly to the stuffing for an extra flavor kick.
5. Browning the chicken in a skillet before baking adds depth of flavor and a beautiful color.
6. Let the chicken rest after cooking for at least 10 minutes to ensure juiciness.
7. Pair the dish with a fresh salad for a well-rounded meal.
8. Experiment with added vegetables in the stuffing, like mushrooms or artichokes, for added texture and flavor.
Variations and Adaptations
Regional variations of this savory stuffed chicken may include using local ingredients, like fresh basil or sun-dried tomatoes, to enhance the flavor profile. Seasonal adaptations can also be made by including ingredients like zucchini or asparagus for a different take in the spring or summer months. For dietary modifications, try using gluten-free breadcrumbs in the stuffing or swapping the chicken for a plant-based protein to create a vegan version. Flavor variations might include using different spices or sauces, such as pesto or balsamic glaze, while texture modifications can come from adding nuts such as pine nuts for crunch. Lastly, consider presentation alternatives by serving the stuffed chicken on a bed of sautéed vegetables or with a light drizzle of herb-infused oil.
Serving and Presentation Guide
Plating techniques play a vital role in the visual appeal of savory stuffed chicken. Aim to slice the chicken in a way that showcases the colorful filling. Use a clean, sharp knife for neat slices, and arrange them in a fan shape on the plate. Garnishing ideas can include a sprinkle of freshly chopped parsley or microgreens for a pop of color. Traditional accompaniments such as mashed potatoes or rice provide a rustic touch, while modern suggestions like a light salad can brighten the dish. Temperature considerations are crucial; serve the chicken warm along with any sides. For portion control tips, consider 4-6 oz servings depending on whether it’s a light dinner or hearty meal.
Wine and Beverage Pairing
When it comes to pairing wine with savory stuffed chicken, a light-bodied red like Pinot Noir complements the dish beautifully, enhancing its flavors without overwhelming them. Alternatively, a crisp white wine, such as Sauvignon Blanc, adds a refreshing touch that balances the richness of the melted cheese. For non-alcoholic alternatives, sparkling water with a twist of lemon can cleanse the palate, while a light herbal tea offers a soothing complement. Serve wines chilled to room temperature for red and chilled for white wines, aiming for a refreshing experience with every sip.
Storage and Shelf Life
Proper storage methods are essential for preserving the quality of savory stuffed chicken. Store leftovers in an airtight container in the refrigerator for up to four days, ensuring they stay fresh and safe to eat. For longer storage, freeze the stuffed chicken in a suitable container where it can last for up to three months. Temperature requirements are crucial as well; never leave cooked chicken at room temperature for more than two hours to prevent spoilage. When reheating, aim for an internal temperature of 165°F to ensure food safety, and consider using an oven for even reheating. Signs of spoilage can include an off smell or discoloration—discard if you have any doubts.
Make Ahead Strategies
Preparing savory stuffed chicken ahead of time can ease your cooking stress. Assemble the chicken and filling, but hold off on cooking until closer to serving time. Store it in the fridge for up to a day to allow flavors to meld beautifully. Quality will remain high if you don’t freeze it, but if you are preparing for an event, consider freezing uncooked chicken in individual portions, which makes cooking a breeze. Assemble the chicken and filling at least a few hours ahead, and when you’re ready, pop it into the oven. Finally, just before serving, add fresh asparagus or green beans for an exhilarating crunch and color.
Scaling Instructions
If you wish to halve the recipe, simply divide all ingredients and cooking times accordingly. For doubling or tripling, ensure that your baking dish is large enough to accommodate the increase in size without crowding the chicken. Timing modifications may be necessary, particularly if cooking multiple batches, as they will require slightly more time to cook through evenly. Check for doneness regularly. Storage considerations should include ensuring that the chicken cools before being placed in the fridge or freezer. For guests or larger family meals, this dish can easily feed a crowd without losing flavor quality.
Nutritional Deep Dive
A macro breakdown of this savory stuffed chicken shows a balanced meal consisting of protein from the chicken and cheese, healthy fats from olive oil used during cooking, and carbohydrates depending on side dishes served. The micronutrient analysis reveals vitamin A from the spinach and vitamins C and E from the roasted red peppers. Overall health benefits include high protein content supporting muscle recovery and vitamin benefits that promote good vision and skin health. For dietary considerations, portion analysis suggests that 4-6 oz portions allows for a balanced approach to eating while supporting weight management by providing a filling yet healthy meal.
Dietary Adaptations
For a gluten-free version of savory stuffed chicken, replace regular breadcrumbs with gluten-free options or skip them altogether for a low-carb meal. For those who need dairy-free variations, consider using nutritional yeast instead of cheese or a plant-based cheese substitute. Vegan alternatives can include using tofu or tempeh, marinated with the essence of the original recipe’s flavors. Low-carb enthusiasts can modify the stuffing to include low-carb vegetables and spices instead. Paleo fans will appreciate using almond flour instead of breadcrumbs, while keeping ingredients aligned with whole food preferences. Additionally, a low-FODMAP option may require avoiding garlic in the stuffing.
Troubleshooting Guide
If texture issues arise, like dry chicken, check the cooking temperature and time, as they can easily dry out at high heat. For flavor balance, ensuring adequate seasoning before baking is crucial; taste the filling first. Temperature problems can usually be resolved by using a meat thermometer to ensure you’ve reached the right internal temperature. Equipment challenges are often solved by ensuring compatibility with pans and ensuring a proper oven setup. Ingredient substitutions should be made cautiously, as they can alter the final flavor but can also enhance creativity. Timing concerns can sometimes be resolved by starting the meal prep earlier or using side dishes that don’t require last-minute attention.
Recipe Success Stories
Stories from the community reveal how this savory stuffed chicken has brought families together. Readers share their variation successes, like adding extra vegetables to the stuffing or experimenting with spices. Feedback highlights how approachable the dish is for beginners, often becoming a staple in meal rotation. Adaptation stories speak volumes about the versatility of this recipe, with readers describing unique twists that captured their family’s attention, sparking requests for repeat meals. Enthusiasts suggest photography tips such as plating ideas that can elevate the visual appeal when shared online.
Frequently Asked Questions
Can I prepare the stuffed chicken a day in advance? Yes, you can prepare the stuffed chicken up to a day ahead. Assemble the ingredients and store them in the refrigerator until you’re ready to bake.
What can I serve with savory stuffed chicken? Wonderful accompaniments include roasted vegetables, mashed potatoes, or a fresh garden salad, offering a nice balance to the main dish.
Is it okay to freeze leftovers? Absolutely! You can freeze cooked stuffed chicken in an airtight container, and it should be good for 2-3 months. Just reheat thoroughly before serving.
Can I use different types of cheese? Yes! While mozzarella is traditional, you can try cheddar, goat cheese, or even a spicy pepper jack for a flavor twist.
How do I know when the chicken is cooked through? The best method is to use a meat thermometer, aiming for an internal temperature of 165°F (74°C).
Can I substitute spinach with other greens? Absolutely! Kale, Swiss chard, or even arugula can make for delicious alternatives.
What if I don’t have roasted red peppers? You can substitute with fresh red peppers or even use sun-dried tomatoes for a different flavor profile.
Is this recipe suitable for meal prep? Yes! This dish holds well, making it perfect for meal prep to enjoy throughout the week.
Can I grill the chicken instead of baking it? Yes, grilling adds a fantastic smoky flavor, but ensure to minimize the filling to prevent spillage on the grill.
How can I make the dish spicier? Consider adding red pepper flakes or jalapeños to the stuffing to give it an extra kick!
Additional Resources
Explore related recipes such as creamy spinach and artichoke dip or contemporary twists on chicken parmesan for varied inspirations. Technique guides discussing how to properly roast vegetables or master the art of stuffing can enhance your skills. Ingredient information about the benefits of fresh herbs can also complement this dish, adding layers of flavor. Equipment recommendations for quality kitchen tools simplify the cooking process, while addressing seasonal variations can keep your meal planning fresh year-round.
Join the Conversation
Engage with our community through social media sharing! We encourage you to post your photo recreations of savory stuffed chicken or share your unique adaptations. Photography tips can help capture the beauty of your plating and inspire others. Don’t forget to leave a review of this recipe and interact with fellow food enthusiasts about your favorite variations or side dishes. Your feedback and creativity can spark new ideas and recipes within our vibrant cooking community!
The Recipe
Savory Stuffed Chicken with Roasted Red Peppers, Spinach, and Mozzarella
Serves: 4
Prep Time: 20 mins
Cook Time: 30 mins
Total Time: 50 mins
Kitchen Equipment Needed
Meat mallet
Baking dish
Sharp knife
Cutting board
Sauté pan
Mixing bowl
Ingredients
4 boneless, skinless chicken breasts
1 cup roasted red peppers, chopped
1 cup fresh spinach, chopped
1 cup mozzarella cheese, shredded
1/2 cup breadcrumbs (or gluten-free option)
2 cloves garlic, minced
1 teaspoon Italian seasoning
Salt and pepper to taste
Olive oil for drizzling
Directions
Preheat the oven to 375°F (190°C).
Pound the chicken breasts to an even thickness for easier stuffing.
In a mixing bowl, combine roasted red peppers, spinach, mozzarella, breadcrumbs, garlic, Italian seasoning, salt, and pepper.
Place an equal portion of the filling onto each chicken breast, then fold them over to encase the filling.
Place the stuffed chicken in a greased baking dish and drizzle with olive oil.
Bake for 30 minutes, or until the chicken is fully cooked and the cheese is melted and bubbly.
Let rest for a few minutes before slicing to serve.
Recipe Notes
Feel free to customize the stuffing ingredients to suit your taste.
This dish can be served with a light salad or over a bed of rice.
Leftovers can be stored in the refrigerator for 3-4 days.
Air Fryer Steak Bites and Gnocchi: Quick and Flavorful Dinner Recipe
Air Fryer Steak Bites and Gnocchi: A Delicious One-Pan Meal
Introduction
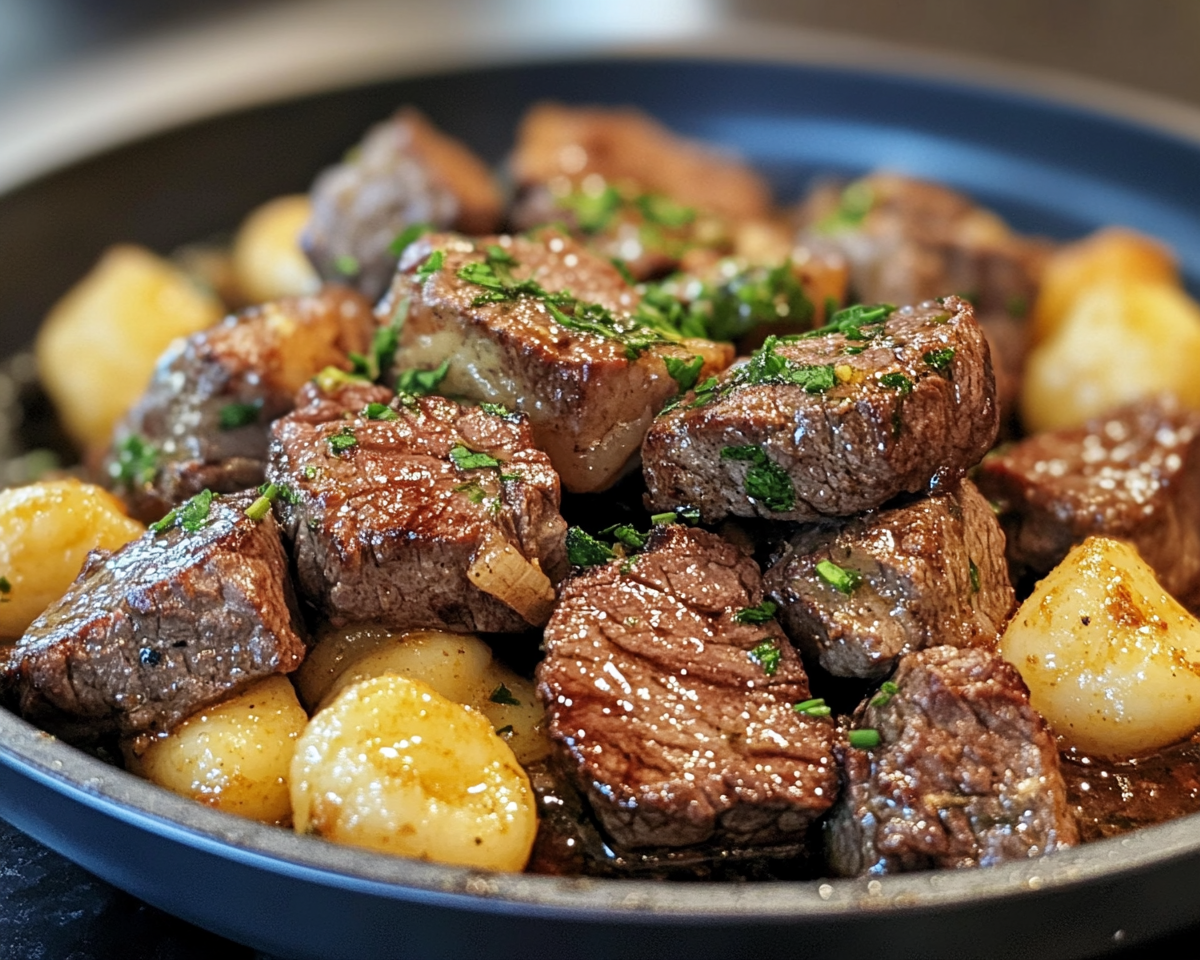
Who says gourmet meals require hours in the kitchen? With an air fryer, you can prepare mouthwatering steak bites paired with crispy, golden gnocchi in no time. This quick, easy, and incredibly flavorful dish is perfect for weeknight dinners or entertaining guests.
Not only is this meal simple, but the air fryer ensures perfectly cooked steak bites every time. According to Mason Fit, the air fryer locks in moisture and creates a crisp exterior for steak bites, making it a must-have tool for home cooks.
For those who love the versatility of gnocchi, pairing it with steak bites elevates the dish. You can explore other innovative recipes like the Perfect Ribeye Steak Recipe on ExoRecipes.
Ingredients for Success
To craft this incredible dish, you’ll need the following:
1. Key Ingredients
Steak Bites: Use tender cuts like sirloin or ribeye for the juiciest results.
Gnocchi: Store-bought or homemade works well. Choose shelf-stable gnocchi for convenience.
Seasonings: Garlic powder, smoked paprika, salt, and pepper.
Garlic Butter Sauce: Made with butter, minced garlic, and fresh parsley.
2. Tools You’ll Need
Air fryer
Mixing bowl
Tongs for flipping steak bites
For more equipment ideas, check out Essential Kitchen Gadgets for Easy Meals on ExoRecipes.
Step-by-Step Cooking Guide
1. Preparing the Steak Bites
Marinate the Steak: Toss the steak cubes with olive oil, garlic powder, paprika, salt, and pepper. Let them marinate for at least 15 minutes.
Preheat the Air Fryer: Set it to 400°F (200°C) for 5 minutes.
2. Cooking the Steak
Place the marinated steak bites in the air fryer basket in a single layer.
Cook for 8-10 minutes, shaking the basket halfway through for even cooking.
3. Preparing the Gnocchi
Toss the gnocchi in olive oil, ensuring an even coat.
Air fry at 375°F (190°C) for 10-12 minutes, shaking occasionally to achieve a crispy texture.
Tips for Perfect Steak Bites and Gnocchi
Use fresh parsley for the garlic butter sauce to add vibrant flavor.
Avoid overcrowding the air fryer basket to ensure even cooking.
Experiment with different seasonings, like Cajun spice or lemon zest, for a unique twist.
For more air fryer tips, visit Mastering Air Fryer Recipes on ExoRecipes.
Creative Variations
1. Add Vegetables
Toss asparagus, zucchini, or cherry tomatoes into the air fryer alongside the gnocchi for a complete meal.
2. Surf and Turf Option
Add shrimp to the steak bites for a decadent surf and turf experience.
3. Vegan Adaptation
Replace steak with marinated tofu cubes and use vegan butter for the sauce.
Plating and Serving Suggestions
Serve the steak bites and gnocchi on a large platter, drizzled with garlic butter sauce.
Garnish with grated parmesan cheese and a sprinkle of red pepper flakes.
For side dish inspiration, check out the Perfect Pasta Salad Recipe on ExoRecipes.
Nutritional Insights
Calorie Count: A serving of steak bites and gnocchi contains approximately 450 calories.
Health Tips: Swap regular butter with ghee for a healthier fat alternative.
FAQs
1. Can I use frozen gnocchi?
Yes, just thaw it slightly before air frying for optimal crispiness.
2. What’s the best steak cut for this dish?
Sirloin and ribeye are excellent choices for their tenderness and flavor.
3. How do I reheat leftovers?
Reheat in the air fryer at 350°F (175°C) for 5 minutes to maintain the crisp texture.
Conclusion
Air Fryer Steak Bites and Gnocchi is the perfect dish for those looking to combine convenience with gourmet flavors. With minimal prep and cook time, this recipe is a game-changer for busy weeknights. Explore more unique recipes like One-Pot Creamy Broccoli and Parmesan Noodles on ExoRecipes.
Strawberries & Cream Rolls: A Delicious and Easy Dessert Recipe
Strawberries & Cream Rolls: The Perfect Dessert Delight
Introduction
Strawberries & Cream Rolls are the epitome of dessert perfection, blending the sweetness of fresh strawberries with the light, airy texture of whipped cream. These rolls are not only visually stunning but also versatile, making them suitable for a wide range of occasions, from casual brunches to formal celebrations.
Did you know strawberries are packed with antioxidants and vitamin C? Their health benefits, as highlighted by PubMed, add a nutritional twist to this delightful dessert.
But the real charm of Strawberries & Cream Rolls lies in their simple preparation and endless customization options, making them a must-try for home bakers and professionals alike. Learn how to recreate this culinary masterpiece with our comprehensive guide.
The History Behind Strawberries & Cream Rolls
The concept of pairing strawberries and cream dates back centuries, originating as a royal treat in England. Adding this iconic duo to a rolled dessert creates a harmonious blend of flavor and presentation.
Explore another iconic strawberry treat like Big Boy’s Fresh Strawberry Pie on ExoRecipes. These recipes celebrate the versatility of strawberries across cuisines.
Essential Ingredients for Strawberries & Cream Rolls
Creating the perfect roll starts with choosing the finest ingredients. Here’s what you’ll need:
Fresh Strawberries: Opt for ripe, juicy strawberries to achieve the best flavor.
Whipped Cream: Use heavy cream whipped to soft peaks or a vegan alternative like coconut cream.
Sponge Cake Base: A light and fluffy sponge provides the foundation for the roll.
Sweetener: Powdered sugar blends smoothly into the whipped cream.
For step-by-step inspiration, visit the Perfect French Bread Pizza Recipe on ExoRecipes to see how simple baking techniques can elevate your dish.
Step-by-Step Recipe: Crafting the Rolls
1. Prepare the Sponge Base
Preheat your oven to 350°F (175°C) and line a baking sheet with parchment paper.
Whisk together eggs and sugar until pale and fluffy.
Sift in the flour, folding gently to maintain the airiness of the batter.
Bake for 12-15 minutes until the sponge is golden.
2. Whip the Cream
Beat heavy cream with powdered sugar and vanilla extract.
Fold in finely chopped strawberries for bursts of flavor.
3. Assemble the Roll
Once the sponge has cooled slightly, spread the whipped cream evenly across the surface.
Roll the sponge tightly using parchment paper to guide the shape.
Chill in the refrigerator for at least 30 minutes before slicing.
Creative Variations
Chocolate-Dipped Rolls
Add a layer of melted chocolate over the roll for a luxurious twist.
Top with grated dark chocolate or cocoa powder.
Vegan-Friendly Option
Substitute whipped coconut cream for dairy cream.
Use flaxseed meal as an egg replacement in the sponge.
For more innovative ideas, explore Strawberry Shortcake Sushi on ExoRecipes, a fusion dessert that pushes creative boundaries.
Nutritional Benefits of Strawberries
Packed with Nutrients
Strawberries are rich in vitamin C, fiber, and antioxidants.
They support heart health and help manage blood sugar levels.
Calorie Count
Each slice of Strawberries & Cream Rolls contains around 200-250 calories, making it a guilt-free indulgence. To enhance your knowledge of strawberries’ health advantages, check out Tastewise.
Serving and Presentation Tips
1. Elevate the Aesthetic
Garnish with powdered sugar, fresh mint leaves, or chocolate shavings.
Arrange slices on a tiered cake stand for visual impact.
2. Best Pairings
Serve with a cup of herbal tea or a sparkling rosé for a sophisticated touch.
Storage and Shelf Life
Refrigeration: Store in an airtight container for up to three days.
Freezing: Wrap individual slices in plastic wrap and freeze for up to one month.
For more storage tips, visit Homemade Pineapple Soft Serve Ice Cream on ExoRecipes.
Frequently Asked Questions
1. Can I use frozen strawberries?
Yes, but be sure to thaw and drain them thoroughly to prevent excess moisture in the roll.
2. How do I prevent my roll from cracking?
Roll the sponge immediately after baking while it’s still warm.
3. Are there low-sugar options for the filling?
Use natural sweeteners like honey or stevia for a healthier alternative.
4. How do I transport cream rolls?
Use a sturdy container with a lid, keeping the dessert cool to maintain its structure.
Conclusion
Strawberries & Cream Rolls are a testament to the beauty of simple ingredients transformed into something extraordinary. Whether you’re a novice baker or a seasoned chef, this dessert offers endless opportunities for creativity and customization.
Want more dessert inspiration? Check out Delightful Mini Pineapple Upside-Down Cakes on ExoRecipes.