Article: Creamy Crockpot Crack Chicken: A Comfort Food Classic
Introduction
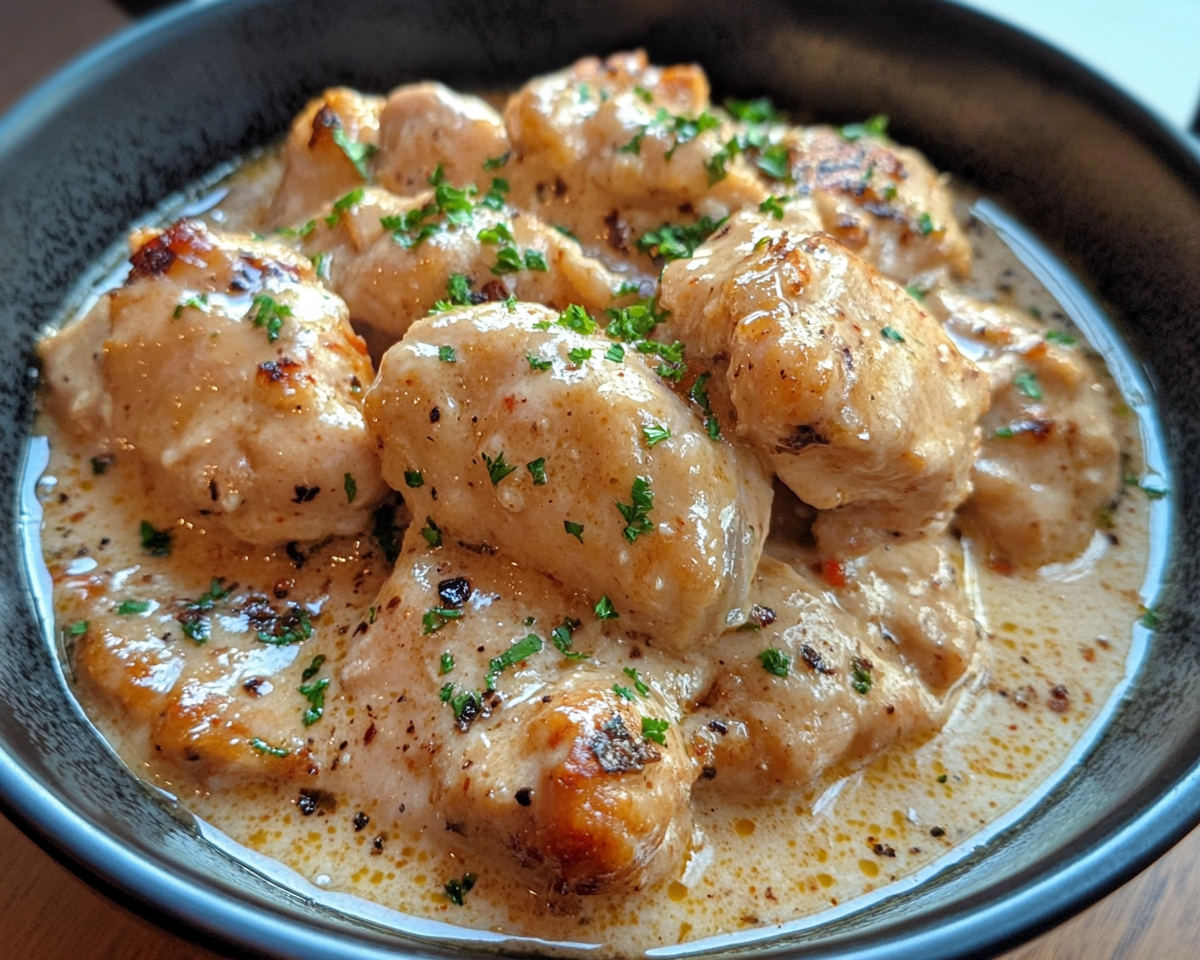
When it comes to comforting, crowd-pleasing meals, few dishes rival Creamy Crockpot Crack Chicken. This slow-cooker recipe combines juicy chicken, cream cheese, bacon, and ranch seasoning to create an irresistible flavor medley. Whether served over rice, in sandwiches, or as a dip, this dish is as versatile as it is delicious. To ensure your chicken turns out perfectly every time, check out this slow cooker guide.
Ingredients for Creamy Crockpot Crack Chicken
Key Ingredients
To make this creamy delight, gather the following:
Chicken Base:
2 lbs boneless, skinless chicken thighs or breasts
1 packet of ranch seasoning mix
8 oz cream cheese
Flavor Enhancers:
6 slices cooked and crumbled bacon
1 cup shredded cheddar cheese
Optional: chopped green onions or jalapeños for garnish
Substitutions and Alternatives
Use low-fat cream cheese for a lighter version.
Swap cheddar with mozzarella or pepper jack for a different flavor.
Replace ranch seasoning with a homemade mix to control sodium levels.
Creamy Crockpot Crack Chicken is a simple, versatile recipe that delivers rich flavors with minimal effort. Whether you’re feeding a crowd or preparing a comforting family meal, this dish is guaranteed to please. Try it today and let your creativity shine with custom variations and serving ideas!
Jalapeño Popper Deviled Eggs: Creamy, Spicy, and Perfect for Any Occasion
Article: Jalapeño Popper Deviled Eggs: A Bold and Creamy Appetizer
Introduction
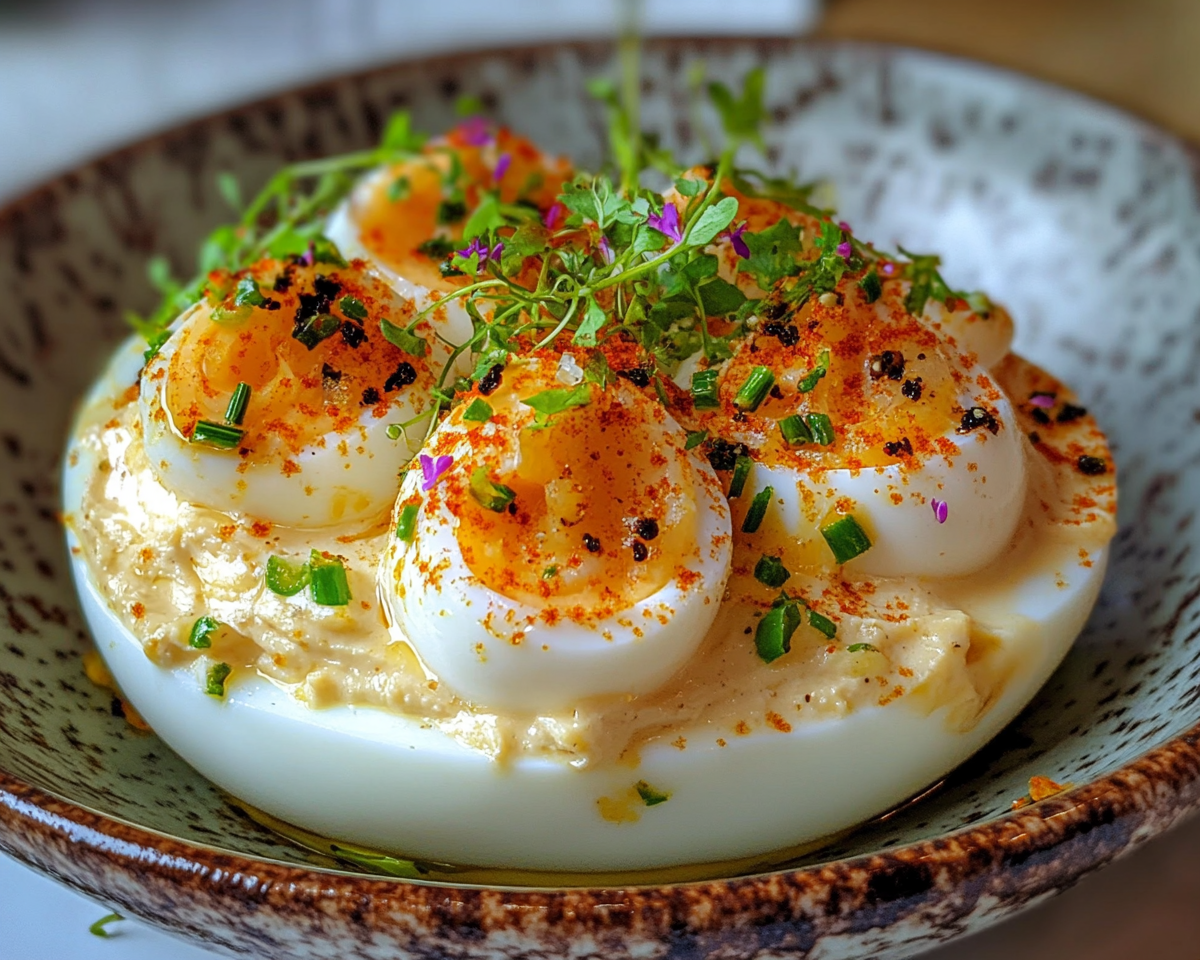
Deviled eggs are a timeless classic, but when you add the spicy kick of jalapeños and the creamy richness of cream cheese, they transform into something extraordinary: Jalapeño Popper Deviled Eggs. This recipe brings together the best of two beloved appetizers, making it the ultimate crowd-pleaser for holidays, potlucks, or game days. For tips on boiling eggs perfectly, see this guide.
Ingredients and Tools
Key Ingredients
To make the perfect Jalapeño Popper Deviled Eggs, you’ll need:
Egg Base:
12 large eggs (hard-boiled)
Salt and pepper to taste
Filling:
4 oz cream cheese (softened)
3 tbsp mayonnaise
1 tsp Dijon mustard
1/4 tsp apple cider vinegar
2 jalapeños (seeded and diced)
6 slices bacon (crispy and crumbled)
Optional: garlic powder, cayenne pepper, or shredded cheddar cheese
Garnish:
Jalapeño slices, bacon crumbles, and paprika.
Tools
Mixing bowl
Piping bag or spoon for filling
Skillet for cooking bacon and jalapeños
Step-by-Step Recipe
1. Preparing the Ingredients
Boil eggs, peel, and halve them lengthwise.
Remove yolks and place them in a mixing bowl.
Dice jalapeños and cook them in bacon grease for enhanced flavor.
2. Making the Filling
Mash egg yolks with cream cheese, mayonnaise, mustard, and apple cider vinegar.
Mix in cooked jalapeños, crumbled bacon, and seasonings.
3. Assembling the Eggs
Pipe or spoon the filling into the egg white halves.
Garnish with fresh jalapeño slices, bacon crumbles, and a sprinkle of paprika.
Tips and Variations
Expert Tips
Egg Peeling Hack: Add a splash of vinegar to boiling water for easier peeling.
Balanced Heat: Adjust the amount of jalapeños or substitute with pickled jalapeños for milder spice.
Smooth Filling: Use a hand mixer for a creamy consistency.
Creative Variations
Cheesy Delight: Add shredded cheddar to the filling for extra richness.
Spicy Kick: Mix in a dash of hot sauce or chipotle powder.
Vegetarian Option: Omit bacon and add finely chopped roasted red peppers.
Jalapeño Popper Deviled Eggs combine the creamy, tangy filling of traditional deviled eggs with the bold flavors of jalapeños and bacon, making them an unforgettable appetizer. Customize the spice level and garnishes to suit your preferences and impress your guests at your next gathering!
Delicious Hawaiian Pineapple Carrot Cream Cake Recipe You’ll Love
Hawaiian Pineapple Carrot Cream Cake: A Tropical Delight
⚖️
Difficulty
Medium
⏲️
Prep Time
30 mins
🕒
Cook Time
40 mins
⏱️
Total Time
1 hr 10 mins
🍽️
Servings
12 slices
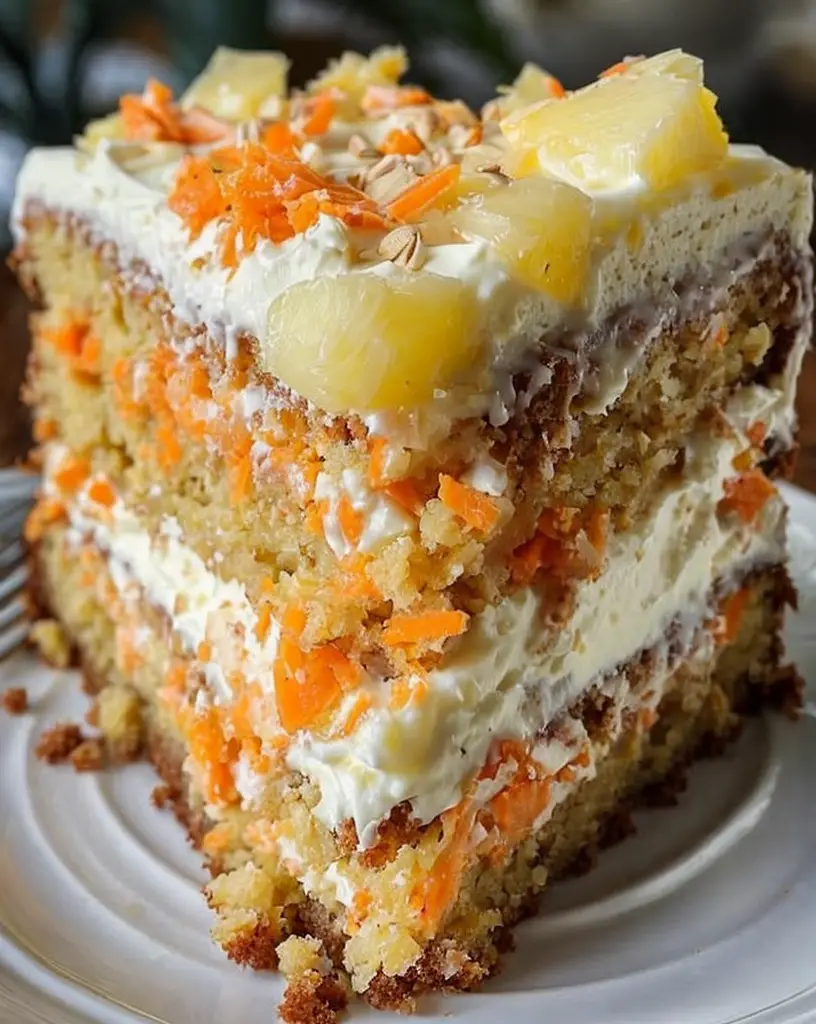
If you’re craving a sweet treat that bursts with tropical flavors, look no further than this Hawaiian Pineapple Carrot Cream Cake. This delightful cake beautifully combines the sweetness of fresh pineapple with the earthy notes of carrots, creating a harmonious balance that will transport your taste buds straight to the beaches of Hawaii. Topped with a luscious cream cheese frosting, this cake is not just a feast for your taste buds, but also a visual delight, making it the perfect centerpiece for any celebration or gathering.
With its moist and flavorful layers, this Hawaiian Pineapple Carrot Cream Cake is sure to leave everyone asking for seconds. The combination of crunch from the carrots and the juicy pineapple offers a wonderful texture contrast that adds to the overall appeal. Whether you’re celebrating a special occasion or simply want to enjoy a slice of paradise at home, this recipe is a must-try for cake lovers everywhere.
Quick Recipe Highlights
Flavor Profile: A sweet and tangy fusion featuring luscious pineapple and spicy carrot notes.
Texture: Delightfully moist layers with a soft crumb and creamy frosting topping.
Aroma: Inviting tropical aromas from pineapple mixed with warm carrot spice.
Visual Appeal: Beautifully layered with a vibrant orange hue, topped with creamy white frosting.
Skill Level Needed: Suitable for home bakers with moderate experience.
Special Equipment: You’ll need mixing bowls, a whisk, a cake pan, and an electric mixer.
Recipe Overview
Difficulty Level: This cake leans toward medium difficulty, as it involves layering and frosting, but is manageable for most bakers.
Category: A fantastic dessert perfect for afternoon tea or festive occasions.
Cuisine: This dish showcases Hawaiian influences, combining tropical ingredients with traditional cake techniques.
Cost: Ingredients are generally affordable, with a cost range of $15-$20 depending on local prices.
Season: Ideal for spring and summer when fresh pineapple is abundant and seasonal vibes call for tropical flavors.
Occasion: Perfect for birthday parties, potlucks, and holiday gatherings, bringing a slice of sunshine to any event.
Why You’ll Love This Recipe
This Hawaiian Pineapple Carrot Cream Cake is a cake lovers’ paradise, primarily due to its unique taste and appealing texture. The vibrant combination of flavors creates a moist cake that is both refreshing and satisfying. The natural sweetness of the pineapple balances wonderfully with the warm spices from the carrots, making each bite irresistible. Also, the cream cheese frosting adds a tangy contrast, enhancing the overall cake experience and making it a hit for dessert lovers of all ages.
Preparation is straightforward, which makes this recipe a wonderful choice for both novice and seasoned bakers. With a clear set of instructions and simple techniques required, it allows for a stress-free baking experience that yields impressive results. Once baked, the cake can be enjoyed right away or saved for later, ensuring flexibility in serving.
From a nutritional standpoint, this cake offers some benefits. Carrots provide essential vitamins and fiber, while pineapple adds a boost of vitamin C. Though it’s a treat, this cake can be seen as a slightly healthier indulgence compared to more overly sweet desserts. The fresh fruit elements present a great way to incorporate natural ingredients into your treat.
This recipe shines during social gatherings, effortlessly impressing guests with its tropical charm. Being a dessert full of flavor and visual allure makes it perfect for sharing. Any get-together can be enhanced by a slice of this cake, inviting delightful conversations and a sense of community around the dessert table.
Lastly, its cost-effectiveness and accessibility allow this cake to make frequent appearances in various settings. The ingredients are readily available at local stores, ensuring that whipping up a delicious sprinkle of Hawaiian flair in your kitchen is both economical and simple.
Historical Background and Cultural Significance
The Hawaiian Pineapple Carrot Cream Cake has origins rooted in the tropical regions of the world, particularly influenced by the agricultural abundance of Hawaii. The use of pineapple in desserts has strong ties to Hawaiian hospitality, reflecting the islanders’ love of fresh ingredients and their commitment to creating delightful experiences for guests.
Culturally, pineapple has always held significant value in Hawaiian society, symbolizing hospitality and friendship. This cake not only highlights local pride in pineapple production but also expands its reach by incorporating the familiar flavors of carrot cake, which have become a beloved favorite in American baking traditions. Together, they create a sweet narrative celebrating Hawaiian culture and culinary history.
Over the years, this recipe has evolved from traditional carrot cake recipes by introducing tropical twists that showcase local flavors. While many variations may exist, the foundational elements remain the same: a moist cake layered generously with cream cheese frosting, bringing smiles to faces around the world.
Variations of this cake can often be found in regional community cookbooks in Hawaii, showcasing the unique presentations and adaptations made by local families. Whether it’s adding macadamia nuts or variations in spices, each version tells a story of creativity and community love.
Ingredient Deep Dive
The pineapple used in this recipe carries a rich history, believed to have originated from South America before making its way to Hawaii in the 19th century. Nutritionally, pineapple is an excellent source of vitamin C and manganese, making it a healthy addition to desserts. Whether using fresh or canned pineapple, choosing ripe, sweet fruits enhances the final flavor. For best results, store fresh pineapple in the refrigerator and use within a few days while canned pineapple should be kept in a cool, dry place until opened.
Carrots are a quintessential ingredient in many desserts and have been cultivated for thousands of years. Sweet, crunchy, and vibrant in color, they bring both taste and nutrition into the mix. Carrots are packed with beta-carotene, fiber, and antioxidants, which contribute to various health benefits. When selecting, go for firm, unblemished carrots and store them in a cool place to maintain their freshness. If you find yourself short on carrots, consider using zucchini or pumpkin as a substitute for a delightful twist.
Cream cheese, a key element in the frosting, is creamy and rich, providing a tangy flavor that complements the sweetness of the cake. Cream cheese originated in the U.S. in the 19th century and has since become a staple in American baking. It’s important to use softened cream cheese for smooth mixing, and storing it in the refrigerator will keep it fresh for several weeks. For a dairy-free alternative, consider using a plant-based cream cheese to keep the flavor while adjusting to dietary needs.
Common Mistakes to Avoid
Overmixing the batter: This can lead to tough, dense cake layers instead of the desired light, moist texture. Mix just until ingredients are combined.
Not measuring ingredients accurately: Baking is precise, and incorrect measurements can throw off your recipe. Use a kitchen scale or measuring cups to ensure accuracy.
Using cold ingredients: Always bring your eggs and cream cheese to room temperature before combining to achieve a smooth batter and frosting.
Baking at incorrect temperatures: Double-check your oven temperature to prevent uneven baking. An oven thermometer can help ensure accuracy.
Skipping the cooling process: Allow your cake to cool completely before frosting. A warm cake can cause the frosting to melt or slide off.
Neglecting to line the cake pan: Greasing and lining the pan helps prevent the cake from sticking and allows for easy removal.
Frosting too soon: Wait until the cake has cooled down; this avoids melting the frosting and creating a messy presentation.
Over-baking: Keep an eye on your cake and do a toothpick test. Over-baked cake turns dry and crumbly, lacking the desired moisture.
Not tasting as you go: Always taste your batter before baking to check for sweetness and balance in flavor.
Forgetting to adjust for high altitudes: If baking at high altitudes, consider reducing sugar and increasing flour to maintain cake structure.
Essential Techniques
One essential technique for this recipe is cream mixing. Achieving the right amount of incorporation of air into the batter is crucial as it affects cake loftiness. Use a handheld or stand mixer at medium speed, and beat until the mixture becomes fluffy and light. A common pitfall is mixing too long, which can lead to a dense cake. Look for a lightened batter as a visual cue for success.
Another key technique is the frosting application. A well-crafted frosting can elevate your cake both visually and in taste. Start with a crumb coat—a thin layer of frosting to seal in crumbs—before applying the final coat. This not only provides a clean finish but also prevents loose crumbs from being visible. Watch for even distribution of frosting as a visual indicator of a perfectly frosted cake.
Pro Tips for Perfect Hawaiian Pineapple Carrot Cream Cake
1. For added moisture, consider soaking the dried pineapple in rum or pineapple juice before incorporating it into the batter.
2. Enhance the flavor by adding a pinch of cinnamon or nutmeg to the batter for a traditional spice cake profile.
3. Use a food processor to finely shred the carrots for a smoother texture in the cake.
4. Let the cream cheese frosting sit at room temperature for 10 minutes before frosting the cake to make spreading easier.
5. Decorate with toasted coconut or chopped nuts on top of the frosting for added texture and taste.
6. If you find the cake layers rise unevenly, trim the tops with a serrated knife before frosting for a flat finish.
7. Consider chilling the cake for about an hour after frosting to set the cream cheese frosting properly, making it easier to slice.
8. Use fresh, ripe pineapple for the best flavor and a delightful tropical aroma.
Variations and Adaptations
For a regional twist, try incorporating macadamia nuts or coconut flakes into the batter for a local Hawaiian flavor. Additionally, swapping out the pineapple for other tropical fruits such as mangoes or bananas can give your cake a different yet delicious profile.
Seasonal adaptations also exist, such as adding seasonal spices—like pumpkin spice in the fall—as well as variations in frosting by replacing cream cheese with whipped cream for a lighter dessert option during summer months.
If dietary modifications are desired, opt for gluten-free flour blends or substitute honey for sugar for a healthier touch. Vegan options can be created by replacing eggs with flaxseed or chia seeds and using a dairy-free cream cheese substitute.
Texture modifications can be made by adding crushed pineapple but draining it well to prevent the cake from becoming too wet, lending it a unique texture without sacrificing flavor.
Finally, for a more elegant presentation, consider layering with fruit compote or serving with a side of tropical fruit on the plate for a beautiful dining experience.
Serving and Presentation Guide
When serving your Hawaiian Pineapple Carrot Cream Cake, opt for simple plating that allows the cake’s colorful layers to shine. A clean white plate can enhance the vibrant colors of the cake, while a light dusting of powdered sugar adds a touch of elegance.
Garnishing ideas include fresh shredded coconut, a slice of pineapple, or mint leaves that can elevate the visual appeal while enhancing the tropical theme. Traditional accompaniments such as a scoop of vanilla ice cream or a dollop of whipped cream can provide a delightful contrast to the cake’s richness.
Consider temperature when serving; letting the cake sit at room temperature for about 20 minutes before serving allows flavors to bloom, while also ensuring a pleasant texture for the cream cheese frosting.
Lastly, keep portion control in mind. A slice of cake around 1-2 inches wide is a good serving size, allowing guests to enjoy it without feeling overwhelmed.
Wine and Beverage Pairing
Pairing this Hawaiian Pineapple Carrot Cream Cake with the right beverages can enhance the overall experience. For a wine pairing, consider a sweet Riesling or a light Merlot—both complement the tropical and sweet flavors of the cake.
For those preferring non-alcoholic alternatives, a refreshing pineapple or passion fruit punch can work beautifully, bringing out the fruity notes in the cake.
If coffee or tea is more your style, a light herbal tea or a smooth cup of cold brew coffee can balance the sweetness and complement the cake flavors well.
Always serve beverages chilled to balance the richness of the cream cheese frosting while enhancing the overall tropical experience of the dessert.
Storage and Shelf Life
To store your Hawaiian Pineapple Carrot Cream Cake, place it in an airtight container at room temperature for up to two days. If storing longer, keep it refrigerated to maintain freshness, which allows it to last up to one week.
Using a cake carrier also preserves the cake’s moisture and protects it from external elements. If you notice any bubbling or moisture on the frosting, it may indicate spoilage; always check for visual signs of mold or change in smell.
When reheating, cover slices loosely with a damp paper towel and microwave for short intervals to retain moisture without drying it out. Freezing the cake is also possible; wrap it tightly in plastic wrap, followed by aluminum foil, and it can last up to three months in the freezer.
For best results, thaw the cake in the refrigerator overnight before serving for optimum flavor.
Make Ahead Strategies
When preparing for an event, making the Hawaiian Pineapple Carrot Cream Cake ahead of time is certainly achievable. You can bake the layers a day before and store them wrapped in plastic wrap to maintain moisture.
If you’d like to make the frosting ahead of time, store it in the refrigerator in an airtight container, and let it soften before spreading it on the cake when ready to serve.
To streamline final assembly, chill the layers for easy handling and to keep the cake from crumbling during construction. Assemble and frost the cake the day of serving for the freshest taste and visual appeal.
Finally, consider adding fresh fruits or garnishing on the day of serving to maintain their color and texture, ensuring your cake looks vibrant and inviting on the dessert table.
Scaling Instructions
Scaling your Hawaiian Pineapple Carrot Cream Cake recipe is simple and rewarding. To halve the recipe, reduce all ingredient quantities by 50%, using a smaller pan, like an 8-inch round pan, to achieve the same impressive appearance.
For a larger gathering, doubling or tripling the recipe can be accommodated. Make sure to adjust the baking time, as larger batches may need additional time to cook through fully, testing with a toothpick for doneness.
Consider equipment adjustments, such as using multiple pans or a larger mixer, to handle the increased volume without compromising the mixing process.
Additionally, plan for proper storage considerations, especially if baking large quantities. Store extra layers or frosted cakes as mentioned prior for convenience and freshness.
Nutritional Deep Dive
The Hawaiian Pineapple Carrot Cream Cake provides a rich macro breakdown. Each slice generally contains carbohydrates derived from flour and sugar, while the cream cheese adds richness through fats. Keep an eye on portion sizes to enjoy its deliciousness while managing caloric intake.
Micronutrient analysis reveals vitamins from fresh ingredients, particularly the carrots which add beta-carotene, equating to its vibrant orange color and health benefits. The pineapple further enhances the cake’s profile with vitamin C, crucial for immune health.
Dietary considerations can be made for those looking to include healthier options; swapping out sugars for natural sweeteners like honey can enhance flavors while reducing refined sugar content. This cake caters to various dietary needs, allowing for adaptable recipes.
Finally, portion analysis is vital. A typical serving size of 1 slice of cake should contain approximately 250-300 calories, making it a treat best enjoyed in moderation for weight management strategies.
Dietary Adaptations
This recipe can be easily adapted for various dietary preferences. For gluten-free options, consider using almond flour or a commercially available gluten-free blend to replace traditional flour.
To create a dairy-free version, swap out cream cheese with plant-based alternatives and use coconut milk for moisture instead of buttermilk.
Vegan adaptations can be achieved by utilizing flax eggs or chia eggs and employing oil instead of butter for a deliciously moist texture without animal products.
Low-carb enthusiasts can substitute the sugar with erythritol or stevia to create a cake that fits low-carb diets without sacrificing flavor.
Other specific diets, such as Paleo, can also enjoy a modified version by using healthy oils like coconut oil, eliminating refined sugar, and adding nuts for flavor and texture.
Troubleshooting Guide
If your Hawaiian Pineapple Carrot Cream Cake’s texture is denser than expected, it likely means the batter was overmixed or the ingredients were overmeasured, leading to excess flour. Always combine gently to maintain airiness.
For flavor balance issues, if the cake is too sweet, consider reducing the sugar next time or adding a pinch of salt to counteract sweetness. Adjustments highlight flavor elements alongside sweetness for a perfect bite.
If your cake has risen unevenly, it could be due to inaccurate oven temperatures. Always check that your oven is correctly calibrated to prevent over- or under-baking, while also ensuring even heat distribution during baking.
Equipment challenges might also arise. For instance, if your cake sticks to the pan, ensure proper greasing and maybe consider parchment lining for easy release.
Finally, timing concerns, such as a cake that collapses after baking, often results from removing it from the oven too soon or not allowing it to cool properly.
Recipe Success Stories
Community feedback often highlights this Hawaiian Pineapple Carrot Cream Cake for its tropical flair and moist texture, making it an instant fan favorite. Readers have shared variations, such as adding ginger for extra warmth, showcasing the adaptability of the recipe.
Variation successes have emerged, with others excitedly sharing their success in using different fruits or nuts, allowing the recipe to cater to a broader audience while staying true to its Hawaiian roots.
Adaptation stories have illuminated the ways in which readers use this recipe in their local neighborhoods, creating new family traditions that honor both the cake and their unique cultural practices.
Additionally, tips shared by readers often include capturing the cake on camera before guests arrive, ensuring visual documentation of a beloved dessert that captivates both taste buds and eyes alike.
Frequently Asked Questions
Can I use canned pineapple for this recipe?
Yes, you can use canned pineapple. Just make sure to drain it well to avoid excess moisture in your batter, which could affect the cake’s texture.
How do I store leftovers?
Store leftovers in an airtight container in the refrigerator for up to a week. Make sure to let the cake sit at room temperature for about 20 minutes before serving for best flavor.
Can I freeze the cake?
Yes, you can freeze this cake! Wrap it tightly in plastic wrap and then in foil. It will stay fresh for about three months in the freezer.
What can I use instead of cream cheese for frosting?
You can substitute cream cheese with mascarpone or a plant-based cream cheese product if you need a dairy-free option.
Is there a way to make this cake gluten-free?
Absolutely! Replace all-purpose flour with a gluten-free flour blend or almond flour for a delicious gluten-free version.
How long does it take to bake the cake?
This cake typically takes about 40 minutes to bake. Check for doneness with a toothpick inserted in the center; it should come out clean.
Can I add nuts to the batter?
Yes, feel free to add chopped walnuts or macadamia nuts for an extra layer of flavor and texture.
What’s the best way to frost a layered cake?
Start with a crumb coat to seal the crumbs, then refrigerate for about 15 minutes before applying the final layer of frosting for a beautiful finish.
Can the recipe be halved or doubled?
Yes, you can easily halve or double the recipe. Just remember to adjust your baking times accordingly, especially if you’re using different-sized pans.
What should I do if the cake sinks in the middle?
If your cake sinks, it may be due to underbaking or not cooling it properly in the oven. Ensure even baking and allow the cake to cool gradually.
Additional Resources
For those inspired by this Hawaiian Pineapple Carrot Cream Cake, you might also enjoy trying your hand at other fruity cake recipes, such as coconut layer cake or a tropical fruit tart. Explore technique guides that delve into frosting techniques or cake decorating to elevate your baking game.
Ingredient information, especially regarding seasonal produce, can enhance your baking experience and provide new ideas for delicious desserts. Explore recommendations for essential kitchen equipment, from mixers to high-quality baking pans, ensuring you have the right tools for success.
Join the Conversation
We’d love to hear from you! Share your own experiences with this recipe or suggestions for variations you’ve tried in the comments below. Don’t forget to share your photos on social media with our hashtag for a chance to be featured in our next recipe round-up.
Your reviews help other bakers find success, so let’s keep the conversation going about this delightful Hawaiian Pineapple Carrot Cream Cake and other delicious recipes you love to create!
The Recipe
Hawaiian Pineapple Carrot Cream Cake
Serves: 12 slices
Prep Time: 30 mins
Cook Time: 40 mins
Total Time: 1 hr 10 mins
Kitchen Equipment Needed
Mixing bowls
Handheld or stand mixer
9-inch round cake pans
Measuring cups and spoons
Whisk
Rubber spatula
Cooling rack
Plastic wrap
Ingredients
2 cups all-purpose flour
1 ½ cups granulated sugar
1 cup vegetable oil
4 large eggs
2 cups finely grated carrots
1 cup crushed pineapple, drained
1 tsp baking powder
1 tsp baking soda
1 tsp ground cinnamon
½ tsp salt
8 oz cream cheese, softened
2 cups powdered sugar
1 tsp vanilla extract
Directions
Preheat your oven to 350°F (175°C) and grease and line three 9-inch round cake pans with parchment paper.
In a large mixing bowl, combine flour, sugar, baking powder, baking soda, cinnamon, and salt, stirring well.
In another bowl, whisk together the eggs, oil, and vanilla extract until combined.
Gradually add the wet mixture to the dry ingredients, stirring just until combined.
Fold in the grated carrots and crushed pineapple gently until well incorporated.
Divide the batter evenly among the three prepared pans and smooth the tops.
Bake for 30-35 minutes or until a toothpick comes out clean when inserted in the center.
Remove the cakes from the oven and let cool in pans for 10 minutes before transferring to a wire rack to cool completely.
Meanwhile, prepare the cream cheese frosting by beating the softened cream cheese and powdered sugar until smooth and creamy.
Once the cakes are completely cool, frost the top of one layer, add the second layer, and frost that as well. Repeat this for the final layer, frosting the entire outside of the cake.
Chill the cake for about an hour to set the frosting before serving. Enjoy!
Recipe Notes
For a lighter frosting, consider using whipped cream instead of cream cheese.
You can customize by adding nuts or raisins to the batter for more texture and flavor.
Store leftovers in an airtight container for optimal freshness.
Honey Peach Cream Cheese Cupcakes: A Perfect Blend of Sweet and Fruity
Article: Honey Peach Cream Cheese Cupcakes
Introduction
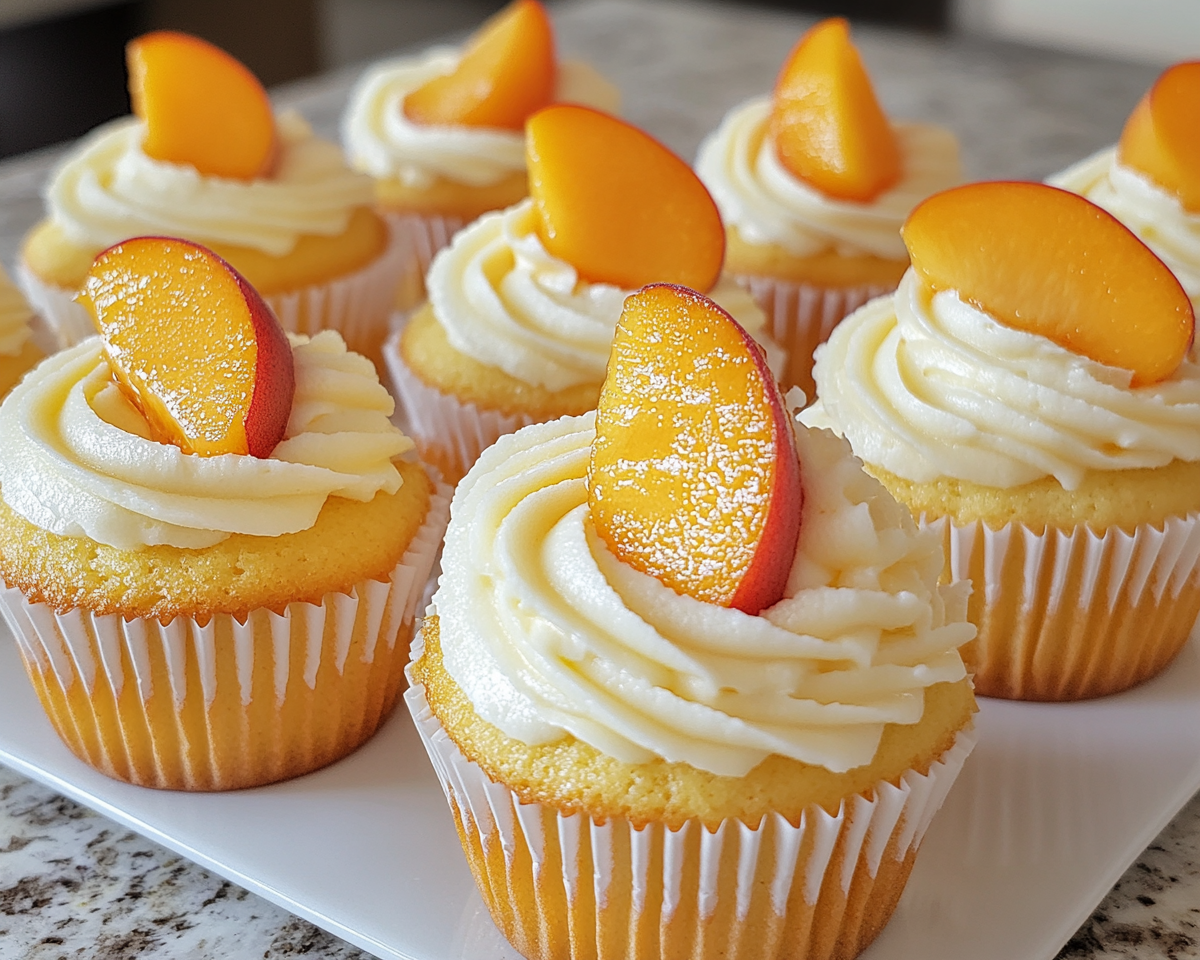
Few desserts capture the essence of summer as perfectly as Honey Peach Cream Cheese Cupcakes. Combining the natural sweetness of honey, the fruity brightness of peaches, and the tangy richness of cream cheese frosting, these cupcakes are a treat for all occasions. Whether you’re preparing for a party or looking to elevate your baking game, this recipe has everything you need. To ensure the best results, consider choosing the best honey for baking, as it significantly impacts flavor and texture.
Honey Peach Cream Cheese Cupcakes are a delightful blend of flavors that celebrate the sweetness of summer. With their moist texture, fruity accents, and creamy frosting, they’re guaranteed to impress. Whether you’re experimenting with variations or sticking to the classic recipe, these cupcakes are a must-try for any baking enthusiast.
Perfect Brown Sugar Chops Recipe: Sweet and Savory Pork Chops
Article: Brown Sugar Chops: A Sweet and Savory Delight
Introduction
When it comes to easy yet delicious recipes, brown sugar chops stand out as a perfect combination of sweet and savory flavors. This dish is a crowd-pleaser, making it ideal for family dinners or gatherings. The key to achieving perfection lies in the caramelized glaze that enhances the natural juiciness of the pork chops. Whether you’re baking, grilling, or pan-searing, this recipe offers flexibility to suit any occasion. Learn how to master this dish with insights on how to cook pork safely for optimal results.
Ingredients for Perfect Brown Sugar Chops
Essential Ingredients
To create this mouthwatering dish, gather the following:
4 bone-in or boneless pork chops (1-inch thick recommended)
4 tbsp brown sugar
4 tbsp butter, melted
1 tbsp soy sauce
1 tbsp Worcestershire sauce
Optional: cayenne pepper, garlic powder, or orange zest for added depth
Kitchen Tools
Baking dish or skillet
Mixing bowl
Basting brush
Meat thermometer
For a deeper understanding of tools like meat thermometers, check out this guide.
Step-by-Step Recipe
1. Preparing the Glaze
Combine brown sugar, melted butter, soy sauce, and Worcestershire sauce in a mixing bowl.
Mix until smooth and well-blended.
2. Preparing the Pork Chops
Pat the pork chops dry with a paper towel.
Season with salt, pepper, and optional spices like cayenne or garlic powder.
3. Cooking Methods
Baking:
Preheat the oven to 375°F.
Place the pork chops in a greased baking dish and brush them generously with the glaze.
Bake for 25–30 minutes, basting every 10 minutes.
Use a thermometer to check that the internal temperature reaches 145°F.
Grilling:
Preheat the grill to medium-high heat.
Grill the chops for 5–7 minutes per side, brushing with glaze frequently.
Pan-Searing:
Heat a skillet over medium heat and sear the chops for 4–5 minutes per side.
Add glaze during the last few minutes for a caramelized finish.
Tips for Perfect Brown Sugar Chops
Marinate Ahead: Let the pork chops marinate in the glaze for a few hours to enhance flavor.
Rest After Cooking: Allow the chops to rest for 5 minutes before serving to retain juices.
Baste Regularly: Brushing the chops with glaze while cooking ensures even coating and rich flavor.
Creative Variations
Spicy Brown Sugar Chops: Add red pepper flakes or sriracha to the glaze for a fiery kick.
Citrus Glaze: Incorporate orange or lemon zest for a refreshing twist.
Asian-Inspired: Add ginger and sesame oil for a fusion flavor profile.
Brown sugar chops are a versatile and delicious dish that combines sweet and savory flavors effortlessly. Whether you bake, grill, or pan-sear, the caramelized glaze adds a delightful richness to every bite. Customize the recipe to suit your taste and pair it with your favorite sides for a memorable meal. Try it today and impress your family and friends!