Creamy Mushroom Chicken and Wild Rice Soup: The Ultimate Comfort Food

wild rice chicken mushroom soup, creamy chicken soup recipe, mushroom rice soup, hearty chicken soup with rice, wild rice creamy soup

Article: Creamy Mushroom Chicken and Wild Rice Soup: A Bowl of Comfort

Introduction

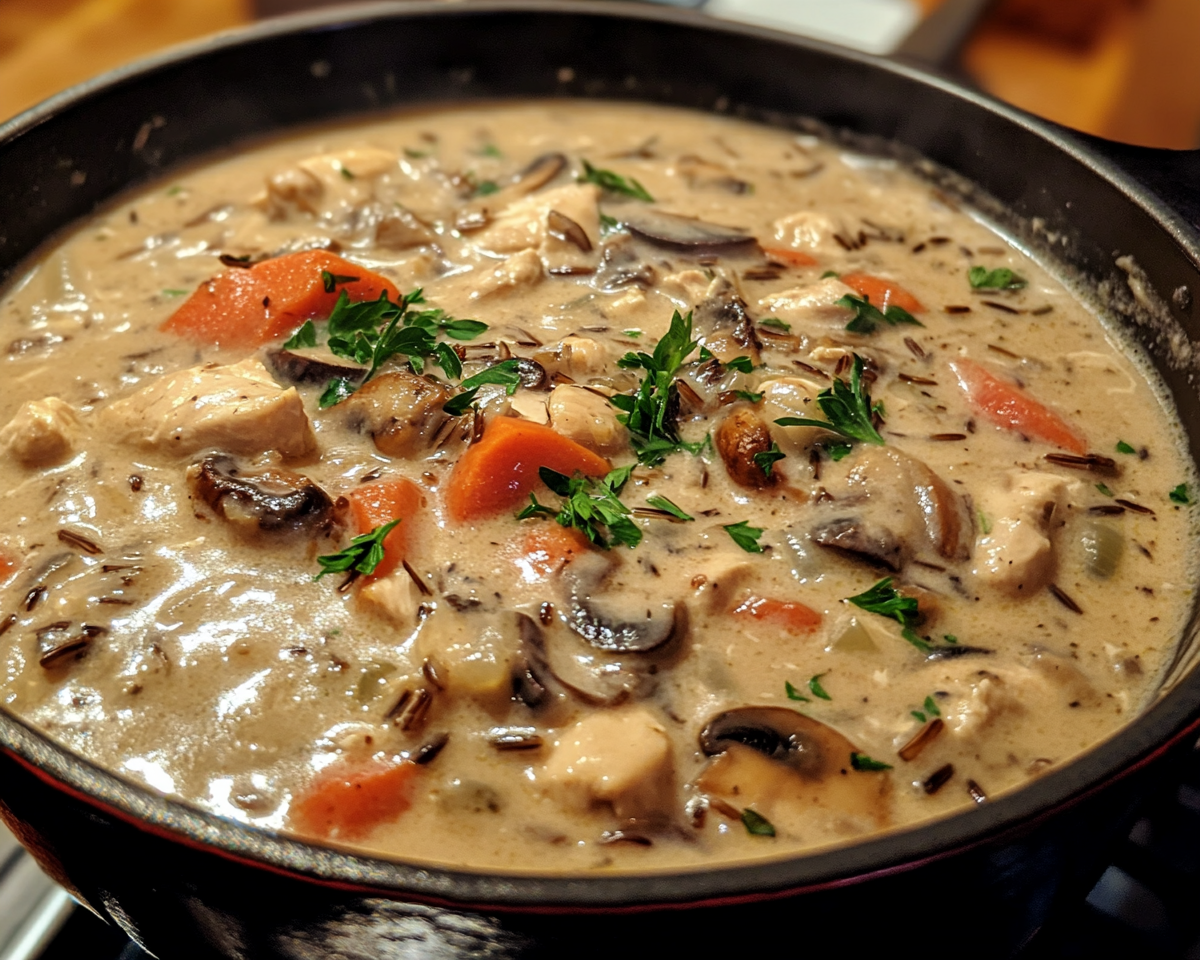
When the weather turns chilly, few meals are as comforting as a hearty bowl of Creamy Mushroom Chicken and Wild Rice Soup. This dish combines earthy mushrooms, tender chicken, and the nutty texture of wild rice, all enveloped in a creamy broth that warms the soul. For tips on perfecting a creamy soup, explore how to use Parmesan in soups.

For more comfort food ideas, you might also enjoy Crockpot Potato Soup with Hashbrowns, another hearty option to try.


Ingredients for Success

Essential Ingredients

To craft this flavorful soup:

  • Main Ingredients:
    • 1 lb mushrooms (white, cremini, or a mix), sliced
    • 1 cup wild rice
    • 2 cups cooked and shredded chicken
    • 6 cups chicken broth
    • 1 cup heavy cream or milk
  • Aromatics:
    • 1 onion, finely diced
    • 2 carrots, chopped
    • 2 celery stalks, diced
    • 2 cloves garlic, minced
    • 1 tsp thyme (fresh or dried)
  • Seasonings:
    • Salt and black pepper to taste
    • Optional: 1/4 tsp red pepper flakes for heat
  • Optional Add-ins:
    • 1/2 cup chopped spinach or kale for added greens
    • Parmesan cheese for garnish

Suggested Tools

  • A large Dutch oven or stockpot
  • Wooden spoon for stirring
  • Ladle for serving

For another creamy chicken dish, explore Creamy Garlic Parmesan Chicken.


Recipe Instructions

Step 1: Sauté the Mushrooms

  • Heat butter in a large pot over medium-high heat.
  • Add mushrooms and cook until golden brown. Remove and set aside.

Step 2: Cook the Aromatics

  • In the same pot, sauté onions, carrots, and celery until softened.
  • Add garlic and thyme, cooking until fragrant.

Step 3: Build the Base

  • Pour in chicken broth and bring to a gentle simmer.
  • Add the wild rice and cook for 20–30 minutes, stirring occasionally.

Step 4: Add Chicken and Cream

  • Stir in cooked chicken and mushrooms.
  • Pour in heavy cream and simmer for another 10 minutes.

Step 5: Season and Serve

  • Adjust seasoning with salt, pepper, and optional red pepper flakes.
  • Serve hot with crusty bread or a side salad.

Tips and Variations

Expert Tips

  • Use fresh herbs for a more vibrant flavor profile.
  • Avoid overcooking the rice to maintain texture.
  • Let the soup rest for a few minutes before serving to enhance the flavors.

Creative Variations

  • Vegetarian Version: Substitute chicken with chickpeas and use vegetable broth.
  • Lighter Option: Use skim milk instead of heavy cream.
  • Cheesy Twist: Stir in grated Parmesan or Gruyere for a richer flavor.

For more one-pot meals, consider Slow Cooker Chicken and Gravy Over Noodles.


Serving Suggestions

Best Pairings

  • Serve with garlic bread, focaccia, or dinner rolls for dipping.
  • Pair with a crisp white wine like Sauvignon Blanc or a light Chardonnay.

Presentation Tips

  • Garnish with fresh parsley or grated Parmesan for added color and flavor.
  • Use rustic bowls for a cozy, inviting presentation.

FAQs

Q: Can I freeze this soup?
A: Yes, allow the soup to cool completely, then store in airtight containers for up to 3 months.

Q: Can I use brown rice instead of wild rice?
A: Absolutely, but adjust the cooking time as brown rice takes longer to cook.

Q: What can I use instead of cream?
A: Substitute with coconut milk or a roux made with flour and milk for a non-dairy option.

Q: Can this recipe be made in a slow cooker?
A: Yes, combine all ingredients except the cream, cook on low for 6–8 hours, then stir in cream before serving.


Internal Linking Opportunities


Conclusion

Creamy Mushroom Chicken and Wild Rice Soup is the ultimate comfort food, combining earthy, hearty, and creamy elements into one dish. Perfect for cold days or when you’re craving something warm and filling, it’s a recipe that’s easy to customize to suit any palate. Make it today and experience the taste of home in every bite!

Beef and Bowtie Pasta with Alfredo Sauce: Creamy Comfort Food

creamy bowtie pasta with beef, Alfredo beef pasta, easy bowtie pasta recipes, pasta with ground beef and Alfredo sauce, creamy pasta dinners

Article: Beef and Bowtie Pasta with Alfredo Sauce: A Comfort Food Classic

Introduction

When it comes to comfort food, Beef and Bowtie Pasta with Alfredo Sauce is a winning combination. This dish blends the heartiness of seasoned ground beef, the creaminess of Alfredo sauce, and the delightful texture of bowtie pasta into one satisfying meal. Perfect for family dinners or special occasions, it’s a recipe that’s both versatile and easy to prepare. Learn more about the best pasta pairings for creamy sauces.


Ingredients

Key Ingredients

To create this comforting dish, you’ll need:

  • Protein:
    • 1 lb ground beef
    • Optional: Substitute ground turkey or chicken for a lighter option
  • Pasta:
    • 12 oz bowtie pasta (farfalle)
  • Sauce:
    • 1 1/2 cups Alfredo sauce (store-bought or homemade)
  • Seasonings:
    • 1 tsp Italian seasoning
    • 1/2 tsp garlic powder
    • Salt and pepper to taste
  • Add-ons:
    • 1/2 cup shredded Parmesan cheese
    • Optional: Sautéed mushrooms or spinach for added texture

Tools

  • Large skillet
  • Pasta pot
  • Mixing bowl
  • Baking dish (if baked version is preferred)

For another comforting dish, try No-Peek Beef Tips.


Recipe Instructions

Step 1: Prepare the Pasta

  • Bring a large pot of salted water to a boil and cook bowtie pasta according to package instructions.
  • Reserve 1/2 cup of pasta water for later use, then drain the pasta.

Step 2: Cook the Beef

  • Heat a large skillet over medium heat. Add the ground beef and season with Italian seasoning, garlic powder, salt, and pepper.
  • Cook until the beef is browned and fully cooked. Drain excess fat if necessary.

Step 3: Combine the Ingredients

  • Add the Alfredo sauce to the skillet with the cooked beef.
  • Gradually stir in the reserved pasta water for a smoother consistency.
  • Toss the cooked pasta with the beef and sauce mixture until evenly coated.

Step 4 (Optional): Bake the Dish

  • Transfer the pasta mixture to a greased baking dish.
  • Sprinkle with shredded Parmesan cheese.
  • Bake at 375°F (190°C) for 10–15 minutes until the cheese is melted and bubbly.

Tips and Variations

Expert Tips

  • Use freshly grated Parmesan for a richer, more authentic flavor.
  • Avoid overcooking the pasta to maintain its al dente texture.
  • For a thicker sauce, reduce the Alfredo sauce slightly on low heat before combining it with the beef.

Creative Variations

  • Spicy Option: Add red pepper flakes or a dash of hot sauce.
  • Vegetarian Alternative: Replace the beef with sautéed vegetables such as mushrooms, zucchini, or eggplant.
  • Cheesy Upgrade: Mix in shredded mozzarella or cheddar for extra creaminess.

For additional pasta inspiration, explore Slow Cooker Magic: Crockpot Baked Ziti.


Serving Suggestions

Ideal Pairings

  • Serve with garlic bread or a fresh Caesar salad for a complete meal.
  • Pair with a glass of Pinot Noir or Chardonnay to complement the creamy sauce.

Presentation Tips

  • Garnish with freshly chopped parsley or basil for a pop of color.
  • Use a shallow serving dish for a restaurant-style presentation.

FAQs

Q: Can I use a different type of pasta?
A: Absolutely! Penne, rigatoni, or rotini work well as substitutes for bowtie pasta.

Q: How can I make this dish ahead of time?
A: Prepare the pasta and beef mixture in advance and store in the refrigerator. Reheat and combine with Alfredo sauce when ready to serve.

Q: Can I freeze leftovers?
A: Yes, store leftovers in an airtight container in the freezer for up to 3 months. Thaw and reheat in the oven or stovetop.

Q: How do I make the dish healthier?
A: Use whole-grain pasta, lean ground beef, and a light Alfredo sauce to reduce calories without sacrificing flavor.


Internal Linking Opportunities


Conclusion

Beef and Bowtie Pasta with Alfredo Sauce is a flavorful and versatile dish that’s easy to make and sure to impress. Whether served for a family dinner or a special gathering, it combines rich, hearty ingredients with creamy goodness. Customize the recipe to suit your preferences and create a memorable meal. Try it today and elevate your pasta night!

Olive Oil Dip with Warm Bread: A Mediterranean Classic

Mediterranean olive oil dip, bread dipping oil recipe, herbed olive oil for bread, easy appetizer dip, olive oil balsamic bread dip

Article: Olive Oil Dip with Warm Bread: A Mediterranean Delight

Introduction

Few dishes capture the simplicity and elegance of Mediterranean cuisine like Olive Oil Dip with Warm Bread. Combining premium-quality olive oil, aromatic herbs, and warm, crusty bread, this appetizer elevates casual gatherings into gourmet experiences. For the best dipping experience, consider serving with freshly baked bread, inspired by this crusty bread recipe.


Ingredients

Key Components

To prepare a flawless olive oil dip:

  • Olive Oil: Use 1/2 cup of high-quality extra virgin olive oil.
  • Herbs & Spices:
    • 1 tsp dried oregano
    • 1/2 tsp dried rosemary
    • 1/2 tsp crushed red pepper flakes
    • 2 cloves garlic, minced
    • Salt and black pepper to taste
  • Additional Flavors:
    • 1 tsp balsamic vinegar or lemon juice
    • Optional: grated Parmesan cheese

Bread Suggestions

  • Warm Bread Options:
    • Ciabatta
    • Baguette
    • Focaccia

For more warm bread inspiration, visit Garlic Rosemary Steak and Potatoes Skillet to pair this dip with a savory entrée.


Recipe Instructions

Step 1: Mix the Dip

  • Combine olive oil, minced garlic, oregano, rosemary, and red pepper flakes in a small bowl.
  • Add balsamic vinegar or lemon juice for a zesty touch.
  • Mix thoroughly and let it rest for 10 minutes to infuse flavors.

Step 2: Prepare the Bread

  • Slice bread into bite-sized pieces or strips.
  • Heat in a preheated oven at 350°F (175°C) for 5–7 minutes or until slightly crispy outside but soft inside.

Step 3: Serve and Enjoy

  • Pour the olive oil dip into a shallow dish.
  • Arrange warm bread slices around the dip for a visually appealing presentation.

Tips and Variations

Expert Tips

  • Use cold-pressed olive oil for enhanced aroma and taste.
  • Toast bread lightly to create a crisp texture that holds up well when dipped.
  • Avoid overpowering the dip with too many flavors; simplicity is key.

Creative Variations

  • Spicy Twist: Incorporate chili oil or smoked paprika.
  • Cheesy Dip: Add grated Parmesan or Pecorino cheese for richness.
  • Herbal Blend: Mix in fresh basil, thyme, or parsley for a fragrant touch.

For an exciting side pairing, explore Crockpot Potato Soup with Hashbrowns for a full Mediterranean-themed meal.


Serving Ideas

Perfect Pairings

  • Serve alongside grilled meats, roasted vegetables, or fresh salads.
  • Pair with wine, such as a light Chardonnay or a crisp Sauvignon Blanc, to complement the flavors.

Presentation Tips

  • Use a shallow ceramic or glass dish for the dip to show off the vibrant colors.
  • Garnish with sprigs of rosemary or a dash of paprika for visual appeal.

FAQs

Q: Can I make the dip in advance?
A: Yes, prepare the dip and refrigerate it for up to 2 days. Bring to room temperature before serving.

Q: What’s the best bread for dipping?
A: Baguette, ciabatta, or focaccia are excellent options, but pita bread and crackers also work well.

Q: How do I store leftovers?
A: Store in an airtight container in the fridge for up to 3 days. Reheat bread in the oven before serving.

Q: Can I use flavored olive oil?
A: Yes, infused oils like garlic or basil enhance the dip’s flavor.


Internal Linking Opportunities


Conclusion

Olive Oil Dip with Warm Bread is a timeless appetizer that combines rich flavors and simple ingredients to create a memorable dining experience. Perfect for any occasion, this dish can be customized to suit your taste preferences and paired with a variety of dishes for a complete Mediterranean-inspired menu. Try it today and bring a touch of elegance to your table!

Garlic Butter Turkey Bacon Cheeseburger Rollups: A Flavor-Packed Snack

cheeseburger rollups recipe, turkey bacon rollups, garlic butter snacks, crescent roll appetizers, cheesy rollup recipe, easy snack ideas

Article: Garlic Butter Turkey Bacon Cheeseburger Rollups: A Flaky, Flavorful Treat

Introduction

Garlic Butter Turkey Bacon Cheeseburger Rollups combine the best of comfort food and creativity. With layers of savory turkey, crispy bacon, gooey cheese, and buttery garlic, these rollups are perfect for snacks, parties, or quick dinners. Whether you’re looking for a crowd-pleasing appetizer or an innovative twist on the classic cheeseburger, this recipe delivers. For tips on working with crescent roll dough, check out this helpful guide.


Ingredients for Success

Key Ingredients

To create these delicious rollups, gather:

  • Filling:
    • 1 lb ground turkey, cooked and seasoned
    • 6 slices turkey bacon, cooked and crumbled
    • 1 cup shredded cheddar cheese
  • Dough:
    • 1 can refrigerated crescent roll dough
  • Garlic Butter:
    • 2 tbsp melted unsalted butter
    • 2 cloves garlic, minced
    • 1 tsp chopped parsley (optional garnish)
  • Seasonings:
    • Salt and pepper to taste
    • 1/2 tsp smoked paprika (optional for flavor enhancement)

For another creative recipe, explore Cheesy Bacon Jalapeño Corn Dip, a perfect companion appetizer.


Step-by-Step Recipe

1. Preparing the Filling

  • Cook ground turkey over medium heat until browned, seasoning with salt, pepper, and smoked paprika.
  • Crumble cooked turkey bacon and mix it with shredded cheddar cheese.

2. Prepping the Dough

  • Roll out the crescent roll dough on a flat surface.
  • Pinch seams together to form a single sheet.

3. Assembling the Rollups

  • Spread the turkey-bacon-cheese mixture evenly over the dough.
  • Roll the dough tightly into a log and slice into 1-inch pieces.
  • Arrange slices on a parchment-lined baking sheet.

4. Adding Garlic Butter and Baking

  • Brush the tops with melted garlic butter, ensuring an even coating.
  • Bake at 375°F (190°C) for 15–20 minutes, or until golden brown.
  • Garnish with parsley for added color.

Tips and Variations

Expert Tips

  • Keep the dough cold to make rolling and cutting easier.
  • Don’t overfill the rollups to prevent bursting during baking.
  • Allow the rollups to cool slightly before serving.

Creative Variations

  • Spicy Kick: Add jalapeños or sriracha to the filling.
  • Vegetarian Option: Replace turkey bacon with sautéed mushrooms.
  • Cheese Swaps: Try mozzarella, pepper jack, or Swiss for new flavor profiles.

For more cheesy delights, check out Ultimate Loaded Sweet Potato Nachos.


Serving Suggestions

Ideal Pairings

  • Serve with dipping sauces like honey mustard, barbecue, or ranch.
  • Pair with sides such as coleslaw, potato wedges, or a fresh salad.

Party Presentation

  • Arrange on a platter with dipping sauces in small bowls.
  • Use toothpicks for easy serving at gatherings.

Storing and Reheating

Storage Tips

  • Store leftovers in an airtight container in the refrigerator for up to 3 days.

Reheating Instructions

  • Reheat in the oven at 350°F (175°C) for 5–7 minutes to retain crispness.

FAQs

Q: Can I freeze these rollups?
A: Yes, freeze unbaked slices and bake directly from frozen, adding 5–10 minutes to the baking time.

Q: Can I prepare them ahead of time?
A: Absolutely. Assemble and refrigerate up to 24 hours in advance, then bake before serving.

Q: How do I prevent soggy dough?
A: Ensure the filling is not too wet and avoid overfilling.

Q: What’s the best cheese for these rollups?
A: Cheddar is classic, but mozzarella or pepper jack work well for a unique flavor.


Internal Linking Opportunities


Conclusion

Garlic Butter Turkey Bacon Cheeseburger Rollups are a flavorful, easy-to-make treat that will delight your taste buds. Perfect for parties, quick dinners, or snacks, these rollups combine bold flavors with a flaky crust. Customize them with your favorite cheeses, spices, and garnishes to make them uniquely yours. Try them today and elevate your appetizer game!

Slow Cooker Creamy Chicken & Gravy: The Ultimate Comfort Food

crockpot creamy chicken, slow-cooked chicken in gravy, chicken and gravy recipe, creamy chicken dinner, easy comfort food recipes, one-pot chicken meal

Article: Slow Cooker Creamy Chicken & Gravy: The Perfect Comfort Meal

Introduction

Few meals define comfort food like Slow Cooker Creamy Chicken & Gravy. With tender chicken simmered in a rich, velvety gravy, this dish is a go-to for family dinners and easy meal prep. Its versatility shines, whether served over mashed potatoes, rice, or biscuits. For a perfect slow-cooking experience, explore these slow cooker tips.


Ingredients for Success

Key Ingredients

To make this hearty dish, you’ll need:

  • Chicken Base:
    • 2 lbs boneless, skinless chicken breasts or thighs
    • 1 can (10.5 oz) cream of chicken soup
    • 1 can (10.5 oz) cream of mushroom soup
    • 1 packet chicken gravy mix
  • Seasonings and Enhancers:
    • 1 cup chicken broth
    • 1 tsp garlic powder
    • 1 tsp onion powder
    • Salt and pepper to taste
  • For Creaminess:
    • 1/2 cup sour cream

Tools

  • Slow cooker (6-quart size recommended)
  • Mixing bowls
  • Forks for shredding

For a similar slow-cooked comfort meal, try the Crockpot Potato Soup with Hashbrowns.


Step-by-Step Recipe

1. Preparing the Ingredients

  • Season the chicken with salt and pepper.
  • Combine cream soups, chicken broth, gravy mix, and seasonings in a bowl.
  • Prepare any optional toppings like fresh parsley or paprika.

2. Cooking the Chicken

  • Place chicken in the slow cooker and pour the soup mixture over it.
  • Cook on low for 6–8 hours or high for 3–4 hours without lifting the lid.

3. Shredding and Mixing

  • Once cooked, shred the chicken directly in the crockpot using forks.
  • Stir in sour cream to create a smooth and creamy gravy.

4. Serving Suggestions

  • Serve over rice, mashed potatoes, or biscuits.
  • Garnish with parsley or paprika for a pop of color.

Tips, Variations, and Common Problems

Expert Tips

  • Juicy Chicken: Use chicken thighs for extra moisture.
  • Thicker Gravy: Mix 1 tbsp cornstarch with 2 tbsp water and stir into the gravy.
  • Flavor Boost: Add a splash of Worcestershire sauce or smoked paprika.

Creative Variations

  • Cheesy Gravy: Mix in shredded cheddar cheese for a rich twist.
  • Spicy Kick: Add diced green chilies or a dash of hot sauce.
  • Vegetarian Option: Replace chicken with mushrooms and use vegetable broth.

Troubleshooting Common Issues

  • Watery Gravy: Avoid adding too much broth or thicken with cornstarch slurry.
  • Too Salty: Balance with a splash of lemon juice or plain Greek yogurt.

For another hearty slow-cooked recipe, explore No-Peek Beef Tips.


Storage and FAQs

Storage Tips

  • Store leftovers in an airtight container in the fridge for up to 3 days.
  • Freeze for up to 3 months; thaw overnight in the refrigerator before reheating.

Frequently Asked Questions

Q: Can I use frozen chicken?
A: Yes, but increase the cooking time by 1–2 hours for even cooking.

Q: Can I double the recipe?
A: Absolutely! Ensure your slow cooker has enough capacity.

Q: How can I make this dish gluten-free?
A: Use gluten-free gravy mix and cream soups.

Q: What’s the best way to reheat leftovers?
A: Reheat on the stovetop over low heat, adding a splash of broth if needed.


Internal Linking Opportunities


Conclusion

Slow Cooker Creamy Chicken & Gravy delivers rich, savory flavors with minimal effort, making it a perfect meal for busy weeknights or lazy Sundays. Customize it with your favorite variations and serve with classic sides for a comforting dinner everyone will love. Try it today and make it a staple in your meal rotation!