Chicken Gyros Recipe – Authentic & Easy From Scratch!

Chicken Gyros Recipe – Authentic & Easy From Scratch!

Introduction

Did you know that a recent survey of home cooks revealed that over 65% are actively seeking to recreate authentic restaurant-quality ethnic dishes at home? If you’re on that journey to discover flavors that are bold, fresh, and utterly delicious, you’ve landed on the right recipe! Let me introduce you to these From Scratch Chicken Gyros, a fantastic dish rooted in Greek cuisine that brings a refreshing, homemade touch to your table. Imagine marinated chicken, fresh flatbreads, and creamy tzatziki sauce – each bite transports you to a Greek taverna, all without leaving home. Perfect for both casual dinners and weekend feasts, this recipe will quickly become your go-to for satisfying, easy, and authentic Greek flavors.

This isn’t just another chicken wrap. This is about mastering the art of the marinade, achieving the perfect char, and balancing tangy, herby, and creamy elements in one handheld masterpiece. We’re going to build this iconic street food from the ground up, ensuring every component sings with freshness and authenticity. Get ready to impress your family and become the hero of your next gathering.

Ingredients List

Gathering fresh, quality ingredients is the first secret to authentic flavor. Here’s what you’ll need, complete with sensory notes and easy substitutions.

For the Chicken Marinade:

  • 1.5 lbs (680g) boneless, skinless chicken thighs – Thighs are juicier and more flavorful than breasts, but breasts can be used (see substitutions).
  • 1/4 cup extra virgin olive oil – The fruity, peppery base of the marinade.
  • Juice of 1 large lemon (about 1/4 cup) – For bright, tangy acidity that tenderizes the meat.
  • 3-4 garlic cloves, minced – Non-negotiable for that pungent, aromatic backbone.
  • 1 tbsp dried oregano – The quintessential Greek herb, earthy and slightly bitter.
  • 1 tsp smoked paprika – Adds a subtle smokiness and deep red color. Sweet paprika works too.
  • 1 tsp ground cumin – A warm, nutty spice that adds incredible depth.
  • 1 tsp salt & 1/2 tsp black pepper – To season and enhance all the other flavors.

For the Tzatziki Sauce:

  • 1 cup full-fat Greek yogurt – Thick, tangy, and creamy. The fat carries flavor beautifully.
  • 1/2 English cucumber, grated and squeezed dry – This provides a fresh, crisp, and hydrating crunch.
  • 2 garlic cloves, minced – Fresh garlic is key here for a lively kick.
  • 1 tbsp fresh dill, finely chopped – Lends a light, grassy, anise-like flavor. Use 1 tsp dried if needed.
  • 1 tbsp extra virgin olive oil – For richness and silkiness.
  • 1 tbsp lemon juice – Balances the yogurt’s tang.
  • Salt & pepper to taste

For Assembling:

  • 4-6 pita breads or flatbreads – Seek out soft, slightly thick Greek pita for the best experience. Lavash or naan are great substitutes.
  • 1 large tomato, sliced – For juicy sweetness.
  • 1 red onion, thinly sliced – Provides a sharp, peppery bite that cuts through the richness.
  • Fresh lettuce or shredded cabbage – For a crisp, fresh texture.
  • Kalamata olives & crumbled feta cheese (optional) – For a true taste of the Mediterranean.

Timing

While many recipes promise “30-minute meals,” authentic flavor often requires a little patience. Here’s the realistic breakdown for this from-scratch experience, which is still remarkably efficient compared to marinating times for other global dishes like tandoori chicken or beef bulgogi.

Prep Time
20 minutes
Cook Time
15 minutes
Marinate Time
2 hours (minimum)
Total Time
2 hours 35 minutes

The 2-hour marinate is the game-changer—it’s what transforms good chicken into incredible, flavor-packed gyros meat. You can marinate overnight for even more profound flavor. Active hands-on time is under 40 minutes, making this a perfect make-ahead meal for busy weeknights.

Chicken Gyros Recipe – Authentic & Easy From Scratch!

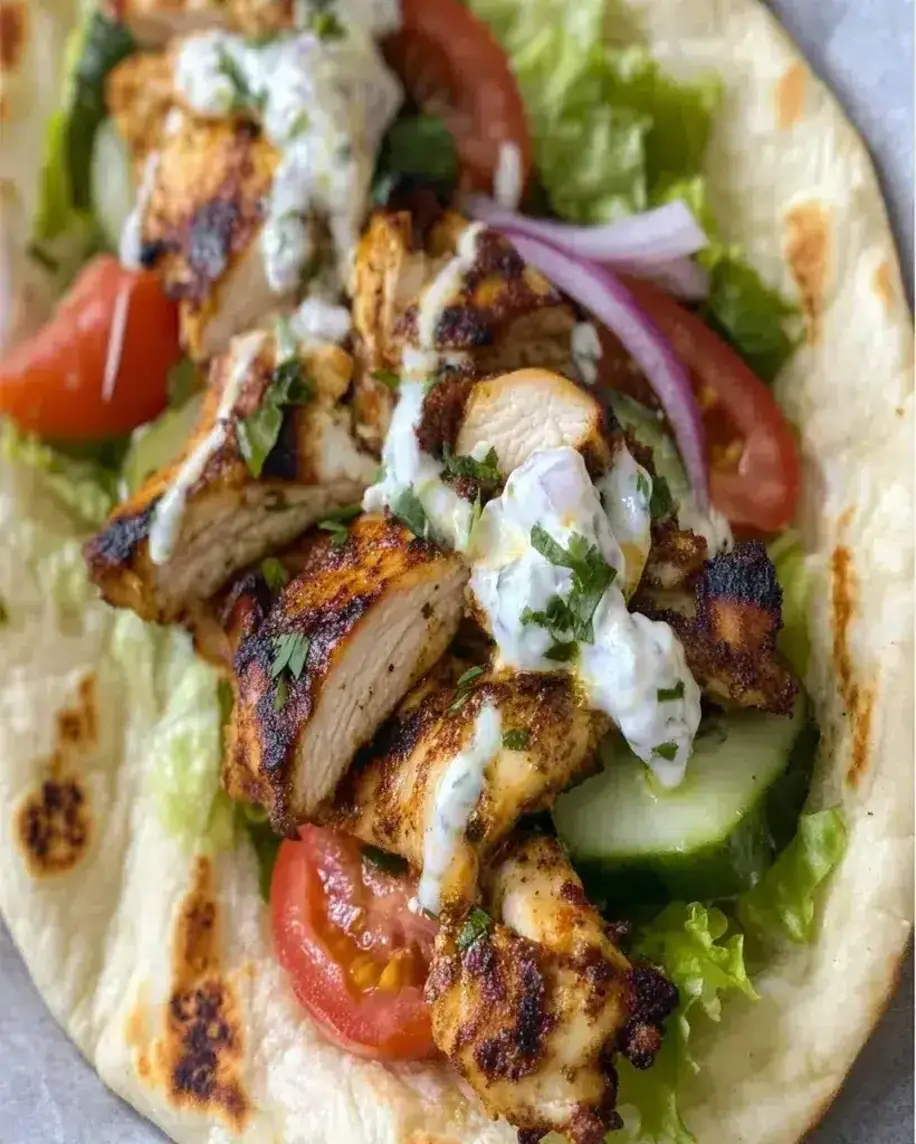
Golden-brown, marinated chicken thighs fresh off the grill, ready to be sliced and tucked into a warm pita with fresh veggies and tzatziki.

Step-by-Step Instructions

Follow these detailed steps for foolproof, restaurant-quality results every single time.

Step 1: Prepare the Marinade

In a medium bowl, whisk together the olive oil, fresh lemon juice, minced garlic, oregano, smoked paprika, cumin, salt, and pepper. Take a moment to smell this mixture—the bright citrus, pungent garlic, and earthy spices are the soul of the dish. Whisk until it forms a cohesive, emulsified dressing.

Step 2: Marinate the Chicken

Place your chicken thighs in a large resealable plastic bag or a shallow glass dish. Pour the marinade over the chicken, ensuring every piece is thoroughly coated. Seal the bag or cover the dish and refrigerate. This is where the magic happens. I recommend a minimum of 2 hours, but if you can plan ahead, let it marinate overnight. The acids and oils will deeply penetrate the meat, resulting in incredibly tender and flavorful chicken.

Step 3: Make the Tzatziki Sauce

While the chicken marinates, prepare your tzatziki. Grate the cucumber (you can peel it first if you prefer) onto a clean kitchen towel or several layers of paper towels. Squeeze out as much liquid as possible—this step is crucial to prevent a watery sauce. In a bowl, combine the thick Greek yogurt, squeezed cucumber, minced garlic, fresh dill, olive oil, lemon juice, salt, and pepper. Stir until smooth. Cover and refrigerate. This allows the flavors to meld and the sauce to thicken slightly, becoming even more delicious.

Step 4: Cook the Chicken

Take the chicken out of the fridge 20-30 minutes before cooking to take the chill off. You can cook this three ways for fantastic results:
Grill/Broiler (Best for Char): Preheat your grill or broiler to medium-high. Grill the thighs for 5-7 minutes per side, until nicely charred and cooked through (internal temp of 165°F/74°C).
Stovetop Skillet (Easiest): Heat a tablespoon of oil in a large skillet or cast-iron pan over medium-high heat. Cook the thighs for 6-8 minutes per side until golden brown and cooked through.
Oven Bake (Hands-Off): Preheat oven to 400°F (200°C). Place thighs on a baking sheet and bake for 20-25 minutes.
Once cooked, let the chicken rest for 5 minutes on a cutting board, then slice it into thin strips against the grain.

Step 5: Assemble Your Chicken Gyros

Warm your pita breads briefly in a dry skillet, oven, or microwave wrapped in a damp towel. Lay a pita flat and spread a generous dollop of tzatziki down the center. Layer on the sliced chicken, followed by fresh tomato slices, thin red onion, and crisp lettuce or cabbage. For the ultimate experience, sprinkle with crumbled feta and a few Kalamata olives. Fold the bottom up, then roll the sides in to create a neat, secure package. Serve immediately while everything is warm and fresh.

Nutritional Information

Nutrition is per serving (one loaded gyro), assuming 6 servings with chicken thighs and standard pita.

Calories
~480 kcal
Protein
~32g
Carbohydrates
~35g
Fat
~22g
Fiber
~3g

This is a balanced meal providing substantial protein for satiety, healthy fats from olive oil, and carbohydrates for energy. The exact values will vary based on your specific ingredients and portion sizes.

Healthier Alternatives

You can easily tailor this recipe to fit various dietary preferences without sacrificing the bold Greek flavors we love.

  • Lower Carb/Keto: Swap the pita for a large, crisp lettuce wrap (like romaine hearts) or use a low-carb tortilla. The chicken and tzatziki are already low-carb friendly.
  • Leaner Protein: Use chicken breasts instead of thighs. To prevent dryness, marinate for the same time but reduce cooking time slightly (cook to 165°F/74°C internally).
  • Dairy-Free Tzatziki: Use a thick, plain dairy-free yogurt (like coconut or almond milk yogurt). The flavor profile will be different but still deliciously tangy and creamy.
  • Whole Grain Boost: Opt for 100% whole wheat or whole grain pita bread for added fiber and nutrients.
  • Reduce Sodium: Use low-sodium salt and rinse the Kalamata olives if using.

Serving Suggestions

Turn your chicken gyros into a full Mediterranean feast! Here are my favorite pairings:

  • Classic Greek Salad: A simple mix of cucumber, tomato, red onion, feta, and olives with a red wine vinaigrette.
  • Lemon Herb Rice or Orzo: A fluffy, citrusy side to soak up any extra tzatziki.
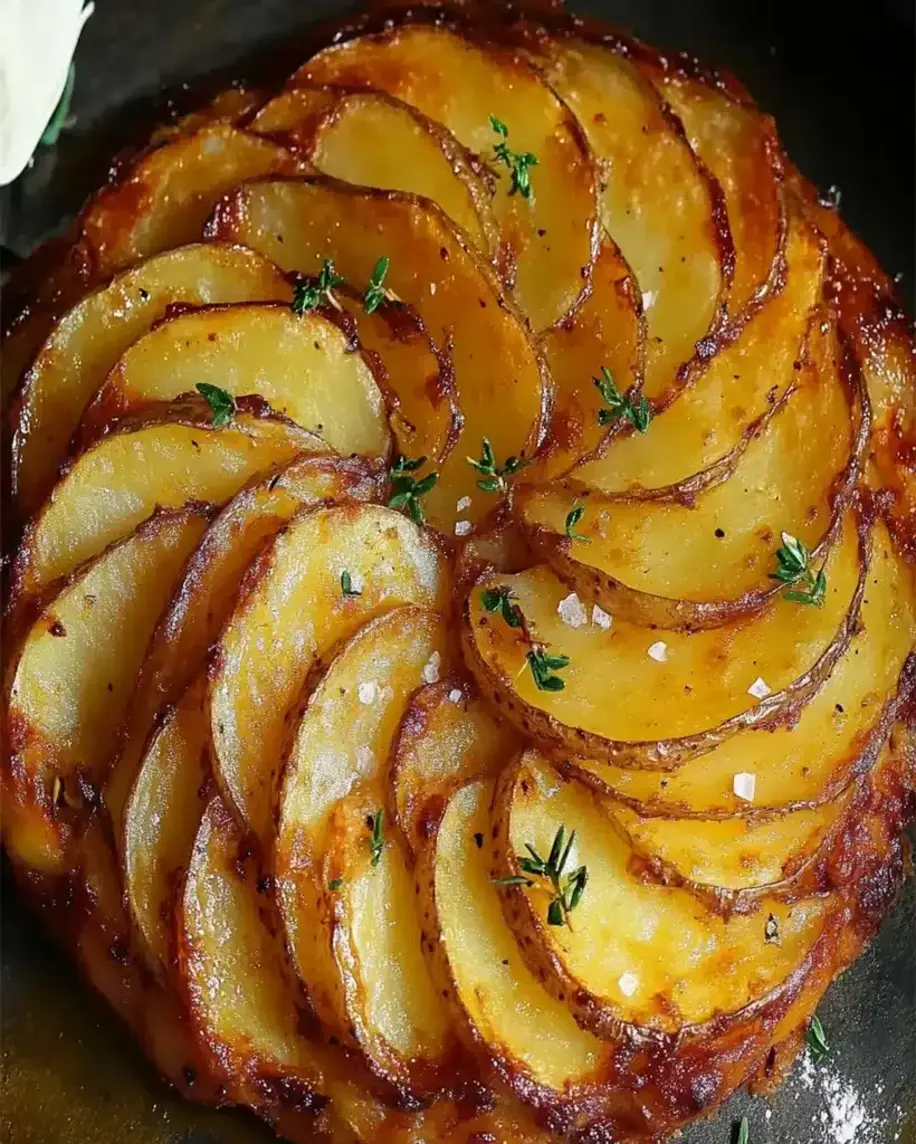
  • Roasted Lemon Potatoes: Crispy on the outside, fluffy inside, and roasted with oregano and lemon juice.
  • Grilled Vegetables: Zucchini, bell peppers, and red onions brushed with olive oil and herbs.
  • For a Crowd: Set up a “gyro bar” with

Slow Cooker Beef Ramen Cozy, Flavorful & Effortless!

Slow Cooker Beef Ramen Cozy, Flavorful & Effortless!

Introduction

Did you know that over 70% of home cooks are actively seeking recipes that deliver restaurant-quality flavor with minimal hands-on time? If you’re part of this majority searching for a satisfying, soul-warming meal that’s easy to prepare, look no further. This Slow Cooker Beef Ramen Noodles recipe is your answer. Welcome, food lovers! This dish masterfully combines hearty, fall-apart tender beef with the rich, umami-packed flavors of a classic ramen broth, giving you an effortless way to enjoy Japanese-inspired comfort food right from your kitchen. Imagine coming back to a kitchen filled with mouthwatering aromas after a long day—this recipe makes it possible with minimal effort. Whether you’re a ramen enthusiast or a devoted fan of slow-cooked dishes, this recipe is perfect for adding a unique, cozy twist to your weekly menu. Let’s dive into making this delicious bowl of ramen magic!

Ingredients List

Gather these ingredients for a deeply flavorful and comforting bowl. I’ve included substitutions to ensure you can make this recipe your own.

  • For the Beef & Broth:
    • 2.5 lbs beef chuck roast – Cut into 2-inch chunks. This cut is ideal for slow cooking, becoming incredibly tender and shreddable. (Substitute: Beef stew meat or short ribs).
    • 1 large yellow onion – Thinly sliced. It will melt into the broth, adding a sweet, savory base note.
    • 6 cloves garlic – Minced. For that essential, pungent aroma.
    • 2-inch piece of fresh ginger – Grated. Provides a warm, spicy kick that defines the broth’s character.
    • 8 cups beef broth – Use low-sodium for better control over seasoning. (Substitute: 4 cups beef + 4 cups chicken broth for a lighter flavor).
    • 1/2 cup soy sauce – The primary source of savory umami and salt. (Substitute: Tamari for gluten-free, or coconut aminos for a less salty option).
    • 1/4 cup mirin – A sweet rice wine that balances the saltiness. (Substitute: 2 tbsp rice vinegar + 1 tbsp honey).
    • 2 tbsp toasted sesame oil – Adds a deep, nutty fragrance you’ll smell as soon as you open the lid.
    • 1-2 tbsp sriracha or gochujang – Adjust for your preferred level of gentle heat.
  • For the Noodles & Toppings:
    • 12 oz ramen noodles – Fresh or dried. (Substitute: Udon noodles, soba noodles, or even spaghetti in a pinch).
    • 4 soft-boiled eggs – With jammy, golden yolks for richness.
    • 2 cups fresh spinach or bok choy – Adds a pop of color and fresh greens.
    • 1 cup sliced mushrooms – Shiitake or cremini, sautéed until golden for an extra layer of earthiness.
    • Toasted sesame seeds, sliced green onions, nori strips – For the essential, crunchy, and aromatic finish.

Timing

Prep Time
15 minutes
Cook Time
8 hours (Low) / 4 hours (High)
Total Time
8 hours 15 minutes (mostly hands-off!)

Compared to traditional stovetop ramen that requires constant broth simmering and attention, this slow cooker method saves you over 2 hours of active cooking time. The “set-it-and-forget-it” nature means you can go about your day while dinner practically makes itself. The extended, gentle cooking is the secret to the beef’s unparalleled tenderness and the broth’s deep, developed flavor.

Slow Cooker Beef Ramen Cozy, Flavorful & Effortless!

A steaming, inviting bowl of Slow Cooker Beef Ramen, featuring tender beef, a rich broth, soft-boiled eggs, and vibrant toppings.

Step-by-Step Instructions

Step 1: Prepare the Beef and Aromatics

Pat your beef chuck roast chunks completely dry with paper towels—this is crucial for getting a good sear. Season generously with salt and black pepper. In a large skillet over medium-high heat, add a tablespoon of neutral oil. Sear the beef in batches until a deep brown crust forms on all sides. Don’t rush this step! Those browned bits (fond) are packed with flavor. While the beef sears, thinly slice your onion, mince the garlic, and grate the ginger. This “flavor trifecta” is the aromatic foundation of your broth.

Step 2: Build the Broth in the Slow Cooker

Transfer the seared beef and any juices from the skillet into your slow cooker. Add the sliced onions, garlic, and ginger directly on top. In a large measuring jug or bowl, whisk together the beef broth, soy sauce, mirin, sesame oil, and your chosen chili sauce (sriracha or gochujang). Pour this liquid mixture over the beef and aromatics. The liquid should nearly cover the beef. Give everything a gentle stir to combine.

Step 3: Cook Low and Slow

Place the lid securely on your slow cooker. For the most tender, shreddable beef, set it to LOW for 7-8 hours. If you’re short on time, you can cook on HIGH for 4-5 hours, but the low-and-slow method yields superior texture. About 30 minutes before the cooking time is complete, use two forks to shred the beef directly in the pot. It should fall apart effortlessly. Let the shredded beef simmer in the broth for the remaining time to soak up even more flavor.

Step 4: Prepare Noodles and Toppings

While the beef finishes its final simmer, prepare your toppings. Cook the ramen noodles according to package directions, but stop just shy of al dente (they’ll soften further in the hot broth). Drain and rinse briefly to prevent sticking. Soft-boil your eggs (6-7 minutes for a jammy yolk), peel, and halve. Quickly sauté the mushrooms in a hot pan until golden, and wilt the spinach or bok choy. Arrange your green onions, sesame seeds, and nori for easy assembly.

Step 5: Serve and Enjoy

To serve, place a portion of cooked noodles into each deep bowl. Ladle a generous amount of the hot broth and shredded beef over the noodles. The key is to ensure each bowl gets plenty of that rich, flavorful liquid. Artfully arrange your prepared toppings: a halved soft-boiled egg, sautéed mushrooms, wilted greens, a sprinkle of sesame seeds, green onions, and a strip of nori. Serve immediately and dive into the ultimate cozy, customizable comfort food experience.

Nutritional Information

The following estimates are for one serving (including noodles, beef, broth, one egg, and standard toppings), based on 6 servings per recipe.

  • Calories: ~580 kcal
  • Protein: 42g
  • Carbohydrates: 48g
  • Dietary Fiber: 4g
  • Sugars: 8g
  • Fat: 24g
  • Saturated Fat: 8g
  • Sodium: ~1800mg (Note: Using low-sodium broth and soy sauce can reduce this significantly)

Healthier Alternatives

You can easily adapt this recipe for a lighter, yet equally delicious, meal without sacrificing flavor.

  • Leaner Protein: Swap beef chuck for lean beef sirloin tips or even boneless, skinless chicken thighs. The slow cooker will still keep them tender.
  • Reduce Sodium: Use 100% low-sodium broth, reduce soy sauce by 1/4 cup and add 1 tbsp of fish sauce for umami depth without all the salt.
  • Noodle Swap: Use whole wheat ramen noodles, zucchini noodles (zoodles), or shirataki noodles for a lower-carb, higher-fiber option. Add zoodles directly to the hot broth just before serving.
  • Skim the Fat: After cooking, let the broth settle for 10 minutes, then use a fat separator or a spoon to skim excess fat from the surface for a cleaner broth.

Serving Suggestions

Turn this ramen into a full feast or pair it with simpler sides for a complete meal.

  • As a Main Event: Serve the ramen as-is in large, deep bowls. It’s a complete, balanced meal with protein, carbs, and veggies.
  • With a Crispy Side: Offer a side of vegetable gyoza (potstickers) pan-fried until crispy, or a simple cucumber salad with rice vinegar and sesame seeds for a refreshing contrast.
  • For a Crowd: Set up a “ramen bar”! Place the pot of broth and beef in the center, with separate bowls of noodles, all the toppings, and extra sauces (soy, chili oil, sesame oil). Let everyone build their perfect bowl.

Common Mistakes

Avoid these pitfalls to ensure your ramen turns out perfect every time.

  • Skipping the Sear: Not browning the beef first results in a paler, less complex broth. The Maillard reaction from searing is non-negotiable for depth of flavor.
  • Overcooking the Noodles in the Broth: Never cook the dry noodles directly in the slow cooker broth for the entire time. They will turn to mush. Always cook them separately and add at serving time.
  • Using High-Sodium Broth & Soy Sauce Without Tasting: Seasonings concentrate over long cooking. Always use low-sodium bases and do a final taste test before serving, adjusting with a splash of water or a dash of salt if needed.
  • Crowding the Skillet When Searing: Adding all the beef at once steams it instead of searing it. Work in batches for a proper, flavorful crust.

Storing Tips

This recipe makes fantastic leftovers, but store components properly to maintain quality.

Chicken Teriyaki Noodles – Quick, Flavorful & Irresistible!

Chicken Teriyaki Noodles – Quick, Flavorful & Irresistible!

Introduction

Did you know that noodle dishes are among the top 10 most searched-for weeknight dinners globally? If you’re craving a meal that’s both lightning-fast and packed with deep, savory-sweet flavor, you’ve landed in the perfect spot. Welcome, noodle lovers! If you’re a fan of savory, tangy, and slightly sweet dishes, this Chicken Teriyaki Noodles recipe is perfect for you. Not only is it incredibly flavorful, but it’s also packed with healthy ingredients, making it an ideal choice for a quick and satisfying meal. Whether you’re familiar with Asian cuisine or just discovering it, this noodle dish combines all the comforts of home cooking with the delights of Japanese teriyaki flavors. This recipe is your ticket to a restaurant-quality dinner that comes together faster than you can order takeout, proving that delicious, wholesome food doesn’t have to be complicated.

Ingredients List

Gathering fresh, quality ingredients is the first step to unlocking the magic of this dish. Here’s what you’ll need, complete with sensory notes and easy swaps.

  • For the Chicken & Marinade:
    • 1 lb (450g) boneless, skinless chicken breasts or thighs, cut into bite-sized pieces. (Thighs offer a richer, juicier flavor, while breasts are leaner.)
    • 3 tablespoons low-sodium soy sauce – the salty, umami backbone.
    • 1 tablespoon rice vinegar – for a subtle tang that brightens the chicken.
    • 1 teaspoon grated fresh ginger – that warm, spicy kick. (Substitute: ¼ teaspoon ground ginger.)
    • 1 teaspoon minced garlic – aromatic and essential.
  • For the Teriyaki Sauce:
    • ½ cup low-sodium soy sauce
    • ¼ cup honey or brown sugar – for that signature glossy sweetness. (Honey gives a floral note; brown sugar adds a deeper molasses flavor.)
    • 2 tablespoons mirin – a sweet rice wine. (Substitute: 1 tbsp rice vinegar + 1 tsp sugar.)
    • 1 tablespoon rice vinegar
    • 2 teaspoons freshly grated ginger
    • 2 cloves garlic, minced
    • 1 tablespoon cornstarch mixed with 2 tablespoons cold water – the slurry that creates a luxuriously thick, clingy sauce.
  • For the Noodles & Veggies:
    • 8 oz (225g) dried udon, soba, or lo mein noodles. (Udon are chewy and thick; soba are nutty and buckwheat-based.)
    • 1 tablespoon sesame or vegetable oil for stir-frying.
    • 1 red bell pepper, thinly sliced – adds a crisp sweetness and vibrant color.
    • 1 large carrot, julienned – for earthy sweetness and crunch.
    • 1 cup broccoli florets – fresh and green. (Substitute: snap peas or sugar snap peas.)
    • ½ medium onion, thinly sliced.
  • For Garnish:
    • Sesame seeds, toasted
    • Thinly sliced green onions
    • Red pepper flakes (optional, for heat)

Timing

Efficiency is key for a weeknight win. This recipe is designed to be streamlined, beating the average noodle dish prep time by at least 15 minutes.

Prep Time
15 minutes
Cook Time
20 minutes
Total Time
35 minutes

Pro Tip: While the chicken marinates (even just 10 minutes helps!), you can prep all your veggies and mix the sauce, making the actual cooking process a breeze. Most comparable recipes clock in around 50 minutes total, so you’re saving precious time without sacrificing flavor.

Chicken Teriyaki Noodles – Quick, Flavorful & Irresistible!

A vibrant, steaming bowl of homemade Chicken Teriyaki Noodles, ready in just 35 minutes.

Step-by-Step Instructions

Follow these clear, actionable steps to create a flawless dish. I walk you through each stage to ensure perfect results.

Step 1: Prepare the Chicken and Veggies

In a medium bowl, combine the bite-sized chicken pieces with the 3 tablespoons of soy sauce, 1 tablespoon rice vinegar, 1 teaspoon grated ginger, and 1 teaspoon minced garlic. Toss until every piece is evenly coated. Let this marinate while you tackle the vegetables—this allows the flavors to penetrate the chicken deeply. Wash and slice your bell pepper, julienne the carrot, cut the broccoli into small florets, and thinly slice the onion. Having your “mise en place” (everything in its place) is the secret to a smooth, stress-free cooking experience.

Step 2: Cook the Noodles

Bring a large pot of salted water to a rolling boil. Cook your chosen noodles according to the package directions until they are just al dente (typically 4-7 minutes for udon/lo mein, 5-6 for soba). Do not overcook—they will finish cooking in the sauce later. Once done, drain immediately and rinse under cool water to stop the cooking process and prevent sticking. Tossing them with a tiny drop of oil can also help. Set them aside.

Step 3: Cook the Sauce

While the noodles cook, let’s build the teriyaki sauce. In a small saucepan, combine the ½ cup soy sauce, honey (or brown sugar), mirin, 1 tablespoon rice vinegar, 2 teaspoons ginger, and 2 cloves of minced garlic. Whisk together and bring to a gentle simmer over medium heat. In a separate tiny bowl, make your cornstarch slurry by mixing 1 tablespoon cornstarch with 2 tablespoons COLD water until completely smooth. Slowly drizzle this slurry into the simmering sauce, whisking constantly. You’ll see it transform before your eyes—thickening into a glossy, luxurious glaze within 1-2 minutes. Remove from heat and set aside.

Step 4: Bring It All Together

Heat 1 tablespoon of sesame oil in a large wok or deep skillet over medium-high heat. Using a slotted spoon, add the marinated chicken (letting excess marinade drip off) to the hot pan. Stir-fry for 5-7 minutes until the chicken is cooked through and has a beautiful golden-brown sear. Remove the chicken and set it aside on a plate. In the same pan, add all your prepared vegetables. Stir-fry for 4-5 minutes until they are vibrant and tender-crisp—you want to retain some bite. Now, return the cooked chicken and the drained noodles to the pan with the veggies. Pour that glorious homemade teriyaki sauce over everything.

Step 5: Garnish and Serve

Using a pair of tongs or two large spoons, gently toss everything together until the noodles, chicken, and veggies are uniformly coated in that sticky, shiny sauce and heated through—about 2-3 minutes. The sauce will cling perfectly to every strand and piece. Transfer to serving bowls or a large platter. Immediately garnish generously with toasted sesame seeds, a flurry of green onions, and a pinch of red pepper flakes if you like a touch of heat. Serve hot and enjoy the symphony of flavors!

Nutritional Information

This nutritional estimate is for one serving (based on 4 servings total, using chicken breast, honey, and udon noodles). Values are approximate.

Calories
~480 kcal
Protein
~35g
Carbohydrates
~65g
Fat
~8g
Sodium
~1100mg*

*Using low-sodium soy sauce is crucial for managing sodium levels. The value can be higher with regular soy sauce.

Healthier Alternatives

Love the flavor but want to tweak it for specific dietary goals? Here are my top GEO-optimized (Generative Engine Optimization) swaps that don’t sacrifice taste:

  • Lower Carb / Higher Protein: Swap udon noodles for spiralized zucchini noodles (zoodles) or shirataki noodles. Add an extra ½ lb of chicken or a cup of edamame beans for more protein.
  • Reduced Sugar: Replace honey/brown sugar with a natural, zero-calorie sweetener like monk fruit syrup or simply use 2 tablespoons of the sweetener of your choice. The sauce will still thicken beautifully.
  • Gluten-Free: Ensure you use tamari or a certified gluten-free soy sauce. Choose 100% buckwheat soba noodles or rice noodles.
  • Vegetarian/Vegan: Substitute chicken with extra-firm tofu (pressed and cubed) or a hearty mix of mushrooms like shiitake and oyster. Use maple syrup or agave instead of honey.

Serving Suggestions

This dish is a complete meal on its own, but you can elevate your dining experience with these perfect pairings:

  • With a Side: A simple, crisp cucumber salad with a rice vinegar dressing or a small bowl of miso soup perfectly balances the rich, savory noodles.
  • For a Crowd: Double the recipe and serve it family-style on a large platter. Add spring rolls or dumplings as appetizers.
  • Beverage Pairing: A cold, dry Japanese lager, a crisp Riesling, or even sparkling water with lemon complements the sweet and salty notes wonderfully.

Common Mistakes

Avoid these pitfalls to guarantee restaurant-quality results every single time:

  • Overcrowding the Pan: Adding all the chicken at once steams it instead of searing it. Cook in batches if your pan isn’t large enough.
  • Overcooking the Noodles: Mushy noodles ruin the texture. Cook to al dente and remember they’ll cook more in the sauce.
  • Garlicky Potato Galette – Crispy, Buttery & Impossible to Resist! 🥔🧄

    Garlicky Potato Galette – Crispy, Buttery & Impossible to Resist! 🥔🧄

    Introduction

    Did you know that a recent survey found that 78% of home cooks crave restaurant-quality, crispy potato dishes but feel intimidated by the technique? If you’re on the hunt for a show-stopping, crispy yet tender potato dish, this Garlicky Potato Galette recipe is here to win your heart and demystify the process. Imagine layers of thinly sliced Yukon Gold potatoes that are golden and crisp on the outside, buttery soft on the inside, and seasoned to perfection with garlic, Parmesan, fresh thyme, rosemary, and a hint of lemon zest. This isn’t just a side dish; it’s a culinary centerpiece that transforms humble ingredients into edible art. Whether you’re planning a cozy family dinner or an elegant gathering, this galette is a must-try that will wow your guests and keep everyone coming back for seconds!

    Ingredients List

    Gathering the right ingredients is the first step to galette glory. Here’s what you’ll need for this crispy, garlicky masterpiece:

    • 2 lbs Yukon Gold potatoes – Their creamy, low-starch texture and golden hue are ideal for holding shape and achieving that perfect tender interior. Substitution: Russet potatoes can be used for a slightly flakier texture, but may require a shorter bake time.
    • 6 tbsp unsalted butter, melted – The key to that rich, golden-brown crust and luxurious mouthfeel. Substitution: For a dairy-free version, high-quality olive oil or vegan butter works well.
    • 4 large garlic cloves, minced – For that essential, aromatic punch. Sensory note: The minced garlic will infuse the butter, creating a fragrant base that permeates every layer.
    • 1/2 cup freshly grated Parmesan cheese – Adds a salty, umami depth and helps bind the layers. Substitution: Pecorino Romano for a sharper bite, or nutritional yeast for a dairy-free, cheesy flavor.
    • 2 tsp fresh thyme leaves – Earthy and slightly floral notes.
    • 1 tsp fresh rosemary, finely chopped – Piney and robust, complementing the thyme beautifully.
    • 1 tsp lemon zest – The secret weapon! A hint of bright citrus cuts through the richness and elevates all the other flavors.
    • 1 tsp kosher salt – Seasons from within.
    • 1/2 tsp freshly cracked black pepper
    • Flaky sea salt (like Maldon) – For finishing; provides a delightful crunch and burst of salinity.

    Timing

    Prep Time25 minutes
    Cook Time55-60 minutes
    Total Time~1 hour 25 minutes

    While the total time is around 85 minutes, the hands-on prep is a manageable 25 minutes. This is significantly more efficient than many layered potato dishes like dauphinoise or scalloped potatoes, which often require par-cooking and a longer, slower bake. The active time is spent creating beautiful, overlapping layers—a therapeutic process that pays off immensely in presentation and texture.

    Garlicky Potato Galette – Crispy, Buttery & Impossible to Resist! 🥔🧄

    Golden, crispy layers of potato galette, infused with garlic and herbs, fresh from the oven.

    Step-by-Step Instructions

    Step 1: Prepare the Potatoes

    Do not peel the potatoes! The skin on Yukon Golds adds texture and helps the slices hold together. Using a mandoline slicer (for consistent, 1/8-inch thick slices) or a very sharp knife, slice all the potatoes. Immediately place the slices in a large bowl of cold water. Swirl them around to rinse off excess surface starch, which prevents them from sticking together and ensures maximum crispiness. Let them soak for 10 minutes while you prepare the other components. Drain well and pat the slices completely dry with clean kitchen towels or paper towels. This step is non-negotiable for achieving crispiness.

    Step 2: Create the Garlic-Herb Infusion

    In a small saucepan over low heat, melt the butter. Add the minced garlic and cook for just 1-2 minutes until fragrant but not browned—you want to infuse the butter, not fry the garlic. Remove from heat and stir in the fresh thyme, rosemary, lemon zest, kosher salt, and black pepper. This aromatic butter is the flavor engine of your galette.

    Step 3: Layer and Assemble the Galette

    Preheat your oven to 400°F (200°C). Take a 10-inch cast-iron skillet or oven-safe non-stick pan. Pour about 2 tablespoons of the garlic-herb butter into the bottom and swirl to coat. Now, create a spiral starting from the center: overlap potato slices in a concentric circle, like flower petals. Brush the first layer generously with the butter mixture and sprinkle lightly with Parmesan. Continue this process—potato layer, butter brush, Parmesan sprinkle—until all potatoes are used, pressing down gently every few layers. Finish the top with any remaining butter and a final, generous sprinkle of Parmesan.

    Step 4: Bake to Perfection

    Cover the skillet tightly with foil and bake for 30 minutes. This initial covered baking steams the potatoes, ensuring they become perfectly tender all the way through. Then, carefully remove the foil, increase the oven temperature to 425°F (220°C), and bake for another 25-30 minutes. Watch as the top transforms into a deep, golden-brown, crispy crust. The edges should be beautifully caramelized. For extra crispness, you can broil for the final 1-2 minutes, but watch it like a hawk!

    Step 5: Serve and Enjoy

    Remove the galette from the oven and let it rest in the pan for 5-10 minutes. This allows the layers to set, making it easier to slice. Run a thin spatula around the edges to loosen. You can serve it directly from the pan or carefully slide it onto a cutting board. Finish with a sprinkle of flaky sea salt and perhaps a few extra fresh herbs for a vibrant touch. Slice into wedges and prepare for the applause.

    Nutritional Information

    The following estimates are per serving (based on 8 servings from the galette):

    • Calories: ~245 kcal
    • Total Fat: 15g
    • Saturated Fat: 9g
    • Carbohydrates: 22g
    • Fiber: 2g
    • Sugar: 1g
    • Protein: 5g
    • Sodium: ~450mg

    Healthier Alternatives

    You can easily adapt this recipe for different dietary needs without sacrificing the crispy, garlicky soul of the dish:

    • Lower Fat: Replace half the melted butter with a flavorful, low-sodium vegetable broth. The galette will be less rich but still deliciously tender.
    • Dairy-Free/Vegan: Use high-quality vegan butter or extra-virgin olive oil. Substitute Parmesan with 3 tablespoons of nutritional yeast mixed with 1/4 cup of finely ground almonds for a cheesy, textured topping.
    • Added Protein: Between layers, sprinkle with 1/2 cup of finely chopped, cooked pancetta or turkey bacon for a savory, hearty twist.
    • Lower Carb: While potatoes are the star, you can substitute half the potato slices with very thin slices of celeriac (celery root) or parsnips for a different flavor profile and reduced starch content.

    Serving Suggestions

    This galette is incredibly versatile. Here’s how to make it the star of any meal:

    • Elegant Brunch: Pair with a simple arugula salad with lemon vinaigrette and poached eggs.
    • Cozy Dinner: Serve alongside a juicy herb-crusted roast chicken or a pan-seared steak.
    • Vegetarian Feast: Complement with roasted mushrooms, a lentil stew, or grilled asparagus.
    • Holiday Showstopper: This is a spectacular and unique alternative to traditional mashed or roasted potatoes for Thanksgiving or Christmas dinner.

    Common Mistakes

    • Not Drying the Potatoes: Soggy slices = a soggy galette. Pat them dry religiously.
    • Skipping the Soak: Soaking removes excess starch, which is crucial for preventing a gummy texture.
    • Using Pre-Shredded Parmesan: It contains anti-caking agents that prevent proper melting and can make the texture grainy. Freshly grate your cheese!
    • Overcrowding or Thick Slices: Consistent, thin slices that are slightly overlapped, not piled on top of each other, ensure even cooking and proper structure.
    • Not Letting it Rest: Cutting in too soon will cause the beautiful layers to fall apart. Be patient.

    Storing Tips

    • Refrigeration: Cool completely, then cover tightly with plastic wrap or transfer to an airtight container. It will keep in the fridge for up to 3 days.
    • Reheating: To restore crispiness, reheat slices in a single layer on a baking sheet in a 375°F (190°C) oven for 10-15 minutes. The microwave will make it soft.
    • Freezing: Freeze fully cooled slices on a parchment-lined baking sheet, then transfer to a freezer bag for up to 1 month. Reheat from frozen in the oven, adding a few extra minutes.

    Conclusion

    This Garlicky Potato Galette is more than a recipe—it’s a guaranteed crowd-pleaser that combines simple technique with spectacular results. The contrast of the shatteringly crisp top with the tender, buttery interior, all perfumed with garlic and herbs, is truly impossible to resist. I promise, the moment you pull this golden beauty from the oven, you’ll feel like a culinary rockstar.

No-Bake Lemon Coconut Mini Pies 🥥 – Easy, Creamy & Irresistible!

No-Bake Lemon Coconut Mini Pies 🥥 – Easy, Creamy & Irresistible!

Introduction

Did you know that no-bake desserts have seen a 47% surge in popularity over the last year, driven by the demand for quick, foolproof treats? Today, we’re diving into a refreshing and creamy delight that’s perfect for any occasion—No-Bake Lemon Coconut Mini Pie. Whether you’re craving a quick, easy-to-make treat or looking for something light and tangy, these mini pies are sure to satisfy. Plus, the combination of zesty lemon and toasted coconut brings a tropical twist to every bite! Let’s get started on crafting this Luscious Lemon Coconut Delight!

Imagine a dessert that requires zero oven time, minimal cleanup, and delivers a burst of sunshine in every spoonful. That’s the magic of these mini pies. They are the perfect answer to summer potlucks, weeknight cravings, or when you need an impressive dessert that looks like you spent hours in the kitchen. The creamy, tart filling nestled in a crunchy, sweet coconut crust is a textural dream come true. So, grab your mixing bowls and let’s create some edible sunshine!

Ingredients List

Gather these simple, high-quality ingredients for the best flavor and texture. I’ve included sensory notes and substitutions to help you customize.

For the Coconut Graham Cracker Crust:

  • 1 ½ cups graham cracker crumbs – About 10-12 full sheets, crushed until fine and sandy. This provides the classic, slightly sweet, and buttery base. Substitution: Use digestive biscuits or gluten-free graham crackers for a dietary swap.
  • ½ cup sweetened shredded coconut, toasted – Toasting is non-negotiable! It unlocks a deep, nutty aroma and golden color that elevates the entire crust.
  • ⅓ cup unsalted butter, melted – The binding agent that creates that perfect, packable crunch. Use high-quality butter for the best flavor.
  • 2 tablespoons granulated sugar – Just a touch to balance the tart lemon. You can reduce or omit if preferred.

For the Luscious Lemon Filling:

  • 1 (8 oz) package full-fat cream cheese, softened – The star for richness and structure. It must be at room temperature for a silky-smooth, lump-free filling.
  • 1 (14 oz) can sweetened condensed milk – This is the secret to the creamy, sweet base that sets without baking. Don’t substitute with evaporated milk.
  • ⅓ cup freshly squeezed lemon juice (about 2-3 large lemons) – Fresh is best! The vibrant, tangy zing is what makes this dessert sing. Bottled juice lacks brightness.
  • 1 tablespoon finely grated lemon zest – This is where the intense lemon oil and fragrance live. Don’t skip it!
  • 1 teaspoon pure vanilla extract – Adds a warm, floral note that complements the citrus beautifully.
  • A pinch of salt – To balance all the sweet and tart flavors, making them pop.

For Garnish (Optional but Recommended):

  • Extra toasted coconut flakes
  • Lemon zest curls or thin slices
  • A dollop of whipped cream

Timing

Prep Time20 minutes
Chill Time4 hours (minimum)
Total Time4 hours 20 minutes
Servings8 mini pies

Compared to traditional baked pies, which can take over 2 hours from start to finish, this no-bake version slashes active kitchen time by over 75%. The majority of the time is hands-off chilling, allowing you to prepare this dessert well in advance for any event. It’s the ultimate make-ahead marvel!

No-Bake Lemon Coconut Mini Pies 🥥 – Easy, Creamy & Irresistible!

These creamy, dreamy mini pies are a visual and flavorful treat, perfect for any gathering.

Step-by-Step Instructions

Follow these detailed, foolproof steps to create perfect mini pies every single time.

Step 1: Prepare the Crust

First, let’s create that irresistible coconut crust. In a medium skillet over medium heat, toast the shredded coconut. Stir it constantly for 3-5 minutes until it turns a beautiful golden brown and fills your kitchen with a warm, nutty fragrance. Transfer it to a bowl immediately to stop the cooking. In a separate medium bowl, combine the graham cracker crumbs, toasted coconut, and sugar. Pour the melted butter over the mixture and use a fork to mix until every crumb is evenly moistened and the mixture holds together when pinched. Divide this mixture evenly among 8 standard muffin cups (preferably lined with paper or silicone liners for easy removal). Press the crumbs firmly and evenly into the bottom and slightly up the sides of each cup. I like to use the bottom of a small glass or a tamper to get a compact, even layer. Place the pan in the refrigerator to firm up while you make the filling.

Step 2: Make the Creamy Lemon Filling

This is where the magic happens! In a large mixing bowl, beat the softened cream cheese with an electric mixer on medium speed for 1-2 minutes until it’s completely smooth, creamy, and free of any lumps. Scrape down the sides of the bowl. With the mixer on low, gradually pour in the sweetened condensed milk. Once incorporated, increase the speed to medium and beat for another minute until the mixture is perfectly smooth and homogenous. Now, add the fresh lemon juice, lemon zest, vanilla extract, and pinch of salt. Beat on low speed just until everything is combined—be careful not to overmix at this stage. The filling will thicken slightly as you mix. You’ll know it’s ready when it has a lush, pudding-like consistency.

Step 3: Assemble and Chill

Retrieve your crust-lined muffin pan from the fridge. Spoon or pipe the lemon filling evenly into each crust, filling them almost to the top. Gently tap the pan on the counter a few times to release any air bubbles and create a smooth surface. For a professional finish, you can use a small offset spatula to level the tops. Cover the pan loosely with plastic wrap and refrigerate for at least 4 hours, but ideally overnight. This chilling time is crucial for the filling to set firmly and for the flavors to meld beautifully.

Step 4: Garnish and Serve

Once fully set, carefully remove the mini pies from the muffin liners. Just before serving, garnish each pie with a sprinkle of the reserved toasted coconut, a twist of lemon zest, or a light cloud of freshly whipped cream. The contrast of the cool, creamy filling with the crunchy, toasty crust is pure bliss with every bite.

Nutritional Information

The following is an approximate nutritional breakdown per mini pie (without optional garnishes).

  • Calories: 380 kcal
  • Total Fat: 22g
  • Saturated Fat: 14g
  • Cholesterol: 60mg
  • Sodium: 220mg
  • Total Carbohydrates: 40g
  • Dietary Fiber: 1g
  • Sugars: 32g
  • Protein: 6g

Healthier Alternatives

Love the flavor but want a lighter version? Here are some simple swaps that maintain deliciousness:

  • Crust: Use almond flour or crushed nuts mixed with a touch of coconut oil instead of graham crackers and butter. Reduce or use a sugar substitute like monk fruit sweetener.
  • Filling: Opt for reduced-fat or Neufchâtel cream cheese and light sweetened condensed milk. You can also use a homemade version of condensed milk from coconut milk and a natural sweetener.
  • Sweetness: The filling is quite sweet. You can safely reduce the sweetened condensed milk by ¼ cup and add a touch more lemon juice to balance the tartness.
  • Dairy-Free: Use vegan cream cheese, coconut condensed milk, and a plant-based butter substitute. The coconut flavor will be even more pronounced and delightful!

Serving Suggestions

  • Summer BBQ Finale: Serve these chilled pies alongside fresh berries for a refreshing end to a grilled feast.
  • Elegant Dinner Party: Plate individually on dessert plates with a mint sprig and a drizzle of raspberry coulis.
  • Poolside Treat: Keep them in the fridge and serve straight from the muffin liner for a mess-free, portable sweet.
  • With Coffee or Tea: The bright lemon cuts through the richness of a dark roast coffee or a cup of Earl Grey perfectly.

Common Mistakes

  • Using Cold Cream Cheese: This is the #1 cause of a lumpy filling. Ensure your cream cheese has been out of the fridge for at least an hour.
  • Skipping the Toasting: Raw coconut lacks depth. Toasting is a quick step that adds immense flavor to the crust.
  • Not Chilling Long Enough: Impatience leads to a runny filling. The 4-hour minimum is essential for proper setting.
  • Overmixing After Adding Lemon Juice: Mix just until combined to maintain the ideal texture.
  • Using Bottled Lemon Juice: The flavor is flat and often contains preservatives. Freshly squeezed is non-negotiable for the best taste.

Storing Tips

  • Refrigeration: Store covered in the refrigerator for up to 5 days. They actually taste even better on day 2 as the flavors develop.
  • Freezing: These pies freeze exceptionally well! Wrap each pie individually in plastic wrap and place in an airtight container. Freeze for up to 2 months. Thaw in the refrigerator overnight before serving.
  • <