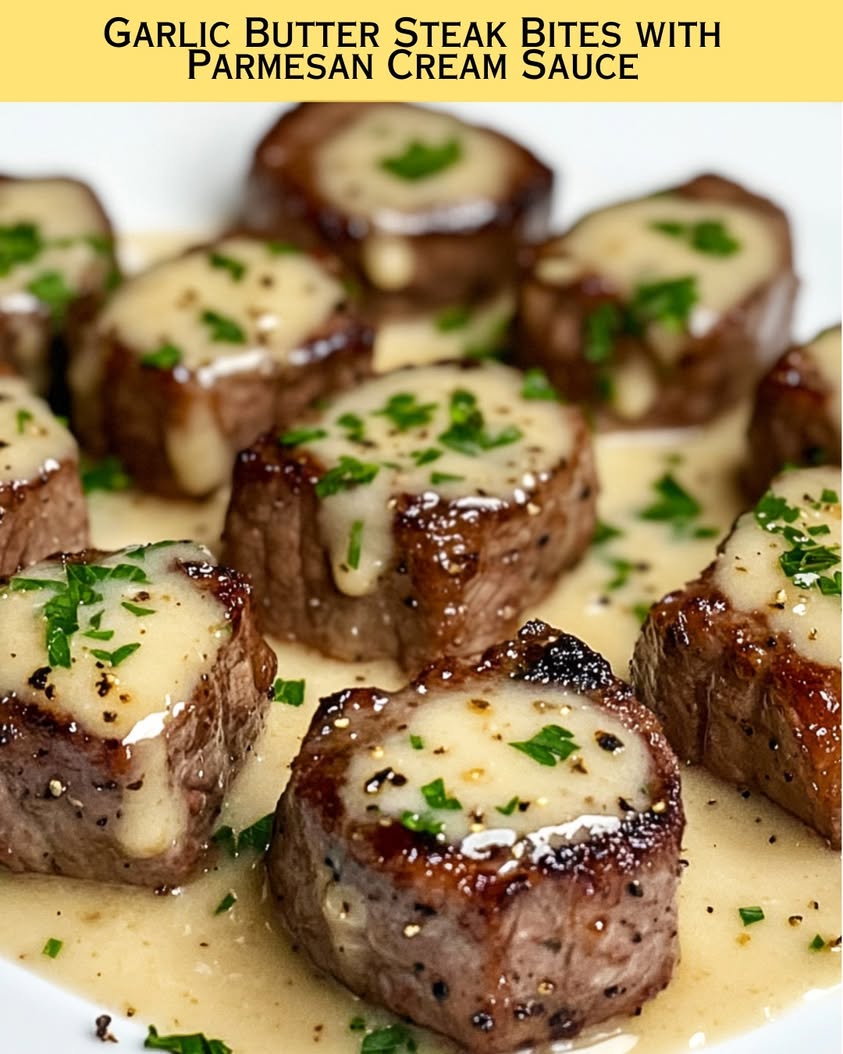
Indulge in Garlic Butter Steak Bites with Parmesan Cream Sauce

Garlic Butter Steak Bites with Parmesan Cream Sauce: A Mouthwatering Delight

⚖️
Difficulty
Easy

⏲️
Prep Time
10 mins

🕒
Cook Time
10 mins

⏱️
Total Time
20 mins

🍽️
Servings
4 servings

If you’re looking for a quick, savory dish to impress family or guests, look no further than Garlic Butter Steak Bites with Parmesan Cream Sauce. These perfectly seared steak bites are enveloped in a rich butter and garlic sauce, which pairs wonderfully with a luscious Parmesan cream sauce. This recipe not only satisfies your cravings but also creates an elegant dining experience that appears more complicated than it is.

The combination of butter and garlic infuses the steak with an irresistible flavor, while the creamy sauce adds a decadent touch that elevates the dish. Cooking these steak bites is simple and quick, making it ideal for busy weeknights or special occasions alike. In just 20 minutes, you’ll have a plate of delicious, juicy steak bites that are sure to impress.

Quick Recipe Highlights

  • Flavor Profile: A delightful combination of savory garlic, rich butter, and nutty Parmesan creates an explosion of flavor in each bite.
  • Texture: The steak is tender and juicy, while the creamy sauce adds an irresistible, rich mouthfeel.
  • Aroma: The aromatic scents of garlic and sizzling steak will fill your kitchen, enticing everyone to the table.
  • Visual Appeal: The golden-brown steak bites glisten with garlic butter, complemented by the creamy, pale sauce for a stunning presentation.
  • Skill Level Needed: This recipe is simple enough for beginners, requiring basic cooking techniques and minimal equipment.
  • Special Equipment: A skillet for searing the steak and a saucepan for making the sauce are all you need.

Recipe Overview

  • Difficulty Level: This Garlic Butter Steak Bites recipe is easy to prepare, with straightforward steps that require minimal culinary expertise.
  • Category: This dish is perfect for dinner, but it can also shine as an appetizer at parties or gatherings.
  • Cuisine: Combining elements of American and Italian cuisine, this dish embodies comfort food with a touch of gourmet flair.
  • Cost: The approximate cost of this recipe is reasonable, especially considering the freshness and ease of preparation.
  • Season: Ideal for any season, the flavors of garlic and steak are comforting in winter yet satisfying in warmer months.
  • Occasion: Whether it’s a family dinner or an elegant dinner party, these steak bites will be a hit with everyone.

Why You’ll Love This Recipe

Garlic Butter Steak Bites with Parmesan Cream Sauce is a perfect harmony of taste and texture, delivering savory, buttery goodness in every bite. The juicy steak is complemented beautifully by the creamy Parmesan sauce, enhancing the overall flavor profile that is utterly satisfying. The dish’s simplicity makes it convenient for weeknight dinners, yet it has an elegant flair that makes it suitable for special occasions.

This recipe also offers the advantage of being packed with essential nutrients. Steak is an excellent source of protein and provides vital minerals such as iron and zinc. Combined with the flavors of garlic, known for its potential health benefits, this dish is not just about taste; it’s nutritious too!

For those who love hosting, this recipe is perfect for entertaining. Your guests will be thrilled by the dish’s flavor and presentation, sparking conversations and compliments. Plus, you’ll have plenty of time to relax and enjoy your company since this dish comes together so quickly.

Another fantastic reason to love these steak bites is their affordability. The ingredients are budget-friendly, especially if you shop for sales on steak, making it accessible for everyone. You can enjoy a gourmet meal without breaking the bank, making it a great go-to recipe.

Finally, the accessibility of this recipe is a strong selling point. Most ingredients are staples in the kitchen, and it requires minimal cooking equipment, making it attainable for any home cook looking to whip up something extraordinary.

Historical Background and Cultural Significance

The origins of steak bites can be traced back to various culinary traditions that embrace the delightful flavors of beef. Traditionally, steak has been a beloved choice in Western cuisine, often celebrated for its rich taste and versatility. Garlic, on the other hand, has roots in ancient cultures and has been used for centuries not just for its flavor but also for its medicinal properties.

The significance of combining these elements lies in the way global culinary techniques intertwine. By adding a creamy sauce, this dish pays homage to Italian cuisine, highlighting the fusion of comfort and elegance. Such adaptations showcase how food evolves while honoring traditional flavors across different cultures.

This particular recipe for Garlic Butter Steak Bites has gained popularity in modern cooking, particularly in American households. As more people embrace cooking at home, this dish represents an easy yet impressive option that can be prepared quickly without sacrificing flavor.

Though steak bites are now seen as a staple in many homes, variations can be found around the world. Different regions may tweak the cooking method or the seasonings used, reflecting local ingredients and preferences while still retaining the essence of tender, flavorful meat.

Ingredient Deep Dive

Steak is the star ingredient in Garlic Butter Steak Bites. Known for its high protein content, it provides essential amino acids necessary for muscle repair and growth. Selecting a high-quality cut, such as sirloin or ribeye, enhances the flavor experience. It’s best to choose fresh cuts that have a bright red color and minimal marbling. Store steak in the fridge for up to three days or freeze it for longer preservation.

Garlic, another vital ingredient, is renowned for its distinct flavor and health benefits. It has antioxidant properties and may support heart health. When selecting garlic, opt for firm heads with unblemished skins. To store garlic, keep it in a cool, dry place or refrigerate after breaking open the head. Fresh garlic enhances the dish significantly, while powdered garlic can be a suitable substitute in a pinch.

Common Mistakes to Avoid

  • Overcrowding the Pan: This causes the steak to steam instead of sear, resulting in less flavor. Always leave enough space between pieces.
  • Using the Wrong Steak Cut: Not all cuts are created equal. Tough cuts will not yield tender bites; opt for tender varieties like ribeye or sirloin.
  • Neglecting to Rest the Meat: Cutting into meat too soon does not allow the juices to redistribute, leading to a dry bite. Let the steak rest for a few minutes.
  • Not Monitoring the Heat: Cooking at too high a heat can lead to overly charred exteriors while leaving the inside undercooked.
  • Skipping Seasoning: A simple seasoning of salt and pepper enhances the natural flavors of the steak. Don’t overlook this crucial step!
  • Overcooking the Steak: Aim for medium-rare to medium doneness for juicy and tender results. Use a meat thermometer to check temperatures accurately.
  • Not Incorporating Fresh Herbs: Herbs elevate the flavor. Parsley, chives, or thyme can add freshness that complements the dish beautifully.
  • Using Cold Ingredients: Ensure butter and cream are at room temperature for a smoother sauce. Cold ingredients can create a lumpy texture.

Essential Techniques

Knowing how to properly sear steak is fundamental for achieving the best flavor and texture. It’s important to heat your pan adequately before adding the meat to ensure a good crust forms. Avoid moving the steak too soon; let it sear for a few minutes without disturbance for optimal results. Look for a golden-brown crust to signal that it’s ready to flip.

Making the Parmesan cream sauce requires attention to heat and timing. Begin by gently sautéing garlic in butter without browning it, then gradually whisk in the cream and cheese. This ensures a smooth, creamy texture. The key is to keep the heat low to prevent the cream from separating; if you notice bubbles, lower the heat immediately for a velvety sauce.

Pro Tips for Perfect Garlic Butter Steak Bites

Use a cast-iron skillet for superior heat retention, leading to better caramelization of the steak. This tool is perfect for achieving that restaurant-quality sear.

Marinate your steak bites for as little as 30 minutes to maximize flavor. Even a short marinade with garlic and olive oil can enhance the overall taste profile.

Experiment with spices! A dash of paprika or cayenne can add a delightful kick to the garlic butter, making it even more flavorful.

Serve immediately after cooking for best results. Letting steak sit can cool it down and change the desired texture.

Combine the sauce ingredients in a separate bowl before adding to the skillet. This allows for smoother incorporation and prevents clumping.

If you’re meal-prepping, prepare the steak bites and sauce beforehand and refrigerate separately before reheating. This keeps the flavors fresh when you are ready to serve.

Variations and Adaptations

For a regional variation, try adding chimichurri sauce instead of the Parmesan cream. This vibrant, herbal sauce is the perfect partner for beef and adds a fresh touch to the dish.

Seasonal adaptations include incorporating seasonal vegetables, such as asparagus or bell peppers, sautéed alongside the steak bites for a more colorful and nutritious meal.

For dietary modifications, consider swapping out the cream for cashew cream or coconut cream for a dairy-free and vegan-friendly option without compromising on creaminess.

Add some heat by including diced jalapeños or red pepper flakes in the garlic butter for a spicy twist that enhances flavor complexity.

Alternative presentations could involve serving the steak bites over a bed of arugula or mixed greens for added crunch and freshness.

Serving and Presentation Guide

For an eye-catching presentation, arrange the steak bites on a large platter, drizzling the Parmesan cream sauce generously over the top. Consider garnishing with finely chopped parsley for a pop of color and freshness.

Offering a side of crusty bread can encourage guests to soak up the remaining sauce, enhancing the dining experience. This pairing also adds a rustic charm to the presentation.

Serve the dish hot, straight from the skillet if possible, as it looks appealing and provides a delightful aroma that enhances anticipation.

Consider portion control by using smaller plates and serving sizes to help guests sample various accompaniments without overwhelming them.

Temperature considerations are important; ideally, the steak bites should be served at a perfect medium-rare temperature to enhance tenderness and flavor.

Wine and Beverage Pairing

A bold red wine, such as a Cabernet Sauvignon or Malbec, pairs excellently with Garlic Butter Steak Bites, complementing the rich flavors beautifully. The tannins in the wine balance the fat content of the steak.

If you’re looking for a non-alcoholic alternative, consider serving a sparkling water with lime or lemonade, which can cleanse the palate between bites.

For those who prefer coffee or tea, a dark roast coffee can offer a delightful contrast, and green tea’s refreshing qualities might also enhance the overall dining experience.

Remember to serve your wines at the right temperature—red wines should be slightly below room temperature for the best tasting experience.

Storage and Shelf Life

To store leftover Garlic Butter Steak Bites, place them in an airtight container and refrigerate for up to three days. Make sure to cool down the steak bites before sealing to avoid condensation.

For freezing, place the steak bites in a freezer-safe container, ensuring no excess air is trapped inside. They can be frozen for up to three months; however, the texture may slightly change after thawing.

Signs of spoilage include an off smell or discoloration; if you notice these symptoms, it’s best to discard the leftovers for safety.

To reheat, use a skillet over low heat to avoid overcooking the steak. You can add a little butter and garlic when reheating to refresh the flavors.

Make Ahead Strategies

Preparing the garlic butter in advance allows the flavors to meld and intensify. You can make this mixture a few days ahead and store it in the fridge until you are ready to cook.

Prep the steak bites by cutting and seasoning them ahead of time, allowing you to cook them quickly when needed. Just store them in the fridge until you’re ready to sear.

For the sauce, consider making it ahead of time and gently reheating it on the stove while you sear the steak. Just be sure to whisk it well to restore its creamy texture.

If you incorporate any fresh elements, like herbs or veggies, add them just before serving to maintain their vibrant colors and flavors.

Scaling Instructions

If you need to halve the recipe, simply cut each ingredient measurement in half and adjust cooking times slightly to ensure even cooking.

To double or triple the recipe, ensure you have a large enough pan to accommodate the increased quantity, as overcrowding can impact searing quality.

For equipment adjustments, larger quantities may require using multiple skillets or cooking in batches to maintain optimal heat.

Timing modifications may be necessary; ensure that each batch has sufficient time to sear properly without being rushed, which could compromise quality.

Nutritional Deep Dive

One serving of Garlic Butter Steak Bites typically contains a healthy dose of protein, approximately 25-30g, depending on the cut of steak used. Protein is essential for muscle repair and growth, making this dish beneficial for active individuals.

The macros also include healthy fats from the butter, which can provide sustained energy. Though high in calories, the moderate portions make it easier to enjoy this rich dish without overeating.

The addition of garlic not only enhances flavor but also provides various health benefits, including potential cholesterol-lowering effects and immune-boosting properties.

When enjoying this dish, portion control becomes essential to maintain a balanced diet, especially if you’re keeping track of calorie intake.

Dietary Adaptations

For a gluten-free version, ensure that all ingredients—particularly store-bought options like cream—are certified gluten-free. This makes the dish accessible for those with gluten sensitivities.

If you’re looking for a dairy-free option, substitute the butter for olive oil or dairy-free margarine and use coconut cream in place of heavy cream to keep the creamy texture.

Those following a vegan diet can replace the steak with seitan or portobello mushrooms, mimicking the steak’s texture and richness while maintaining flavor with garlic-infused oil.

For lower-carb options, cut back on the sauce or use alternative thickening methods like pureeing cauliflower to maintain a creamy texture without the carbs.

Troubleshooting Guide

If your steak bites are tough, it may be due to overcooking. Always aim for medium-rare to medium doneness, and rest the meat after cooking to allow juices to redistribute.

To adjust flavor balance, consider adding a splash of vinegar or a squeeze of lemon juice to the sauce to brighten the richness and cut through the heaviness.

For temperature problems, use a meat thermometer to gauge doneness accurately. This ensures that your steak is cooked to your liking, whether rare, medium, or well-done.

If you encounter equipment challenges, such as a non-stick pan not performing well, switching to cast iron might resolve sticking issues while also improving crust development.

Recipe Success Stories

Variations of the recipe have surfaced in online communities, with chefs sharing instances of swapping the cream sauce for chimichurri or blue cheese, showcasing the dish’s versatility.

Readers have also provided feedback on the ease of preparation; many appreciate the quick cooking time, making it a go-to recipe even on busy weeknights.

Enthusiastic cooks share tips on presentation, highlighting that these steak bites are perfect for entertaining and evoke restaurant-quality dining at home with just a few simple steps.

Frequently Asked Questions

Q: Can I use chicken instead of steak for this recipe?
A: Yes, you can substitute chicken, but ensure to adjust the cooking time as chicken typically takes longer to cook through, especially when aiming for juicy results.

Q: How do I know when my steak bites are perfectly cooked?
A: Use a meat thermometer; for medium-rare, aim for about 130°F (54°C). Remember to let them readjust to temperature while they rest.

Q: Can leftovers be frozen?
A: Certainly! Just ensure they are properly packed in airtight containers. However, the texture may alter slightly when reheated.

Q: What can I use if I don’t have Parmesan cheese?
A: Pecorino Romano or Grana Padano can be great substitutes that deliver a similar flavor profile.

Q: Is it necessary to marinate the steak?
A: While not necessary, a short marination can enhance flavor; don’t skip seasoning if you choose not to marinate.

Q: How can I make this dish spicier?
A: Add cayenne pepper or diced jalapeños to the garlic butter for an extra kick that complements the savory flavors.

Q: What side dishes pair well with this recipe?
A: Simple sides like roasted vegetables, a fresh salad, or creamy mashed potatoes complement these steak bites beautifully.

Q: Can I use other types of meat?
A: Absolutely! Tender cuts of pork or lamb would work nicely, just adjust cooking times accordingly.

Q: How do I store the sauce separately?
A: Once cooled, the sauce can be stored in a sealed container in the refrigerator for up to three days.

Q: What’s the best way to reheat leftover steak bites?
A: The best method is gently reheating in a skillet over low heat, adding a bit of butter for flavor if desired.

Additional Resources

For those looking to expand their cooking repertoire, consider exploring other beef recipes, like Beef Wellington or Beef Stroganoff, forsimilar rich flavors and finesse.

Additionally, many technique guides on searing and sauce-making can further enhance your culinary skills, leading to greater success in the kitchen.

Books on meat cuts and cooking methods can provide deep insights into selecting the best cuts for your dietary needs and preparation style.

Seasonal variations also play a role in enhancing this dish; understanding which vegetables or herbs are in season can elevate the flavor and freshness of your meal.

Join the Conversation

Share your experience making Garlic Butter Steak Bites on social media. Tag friends and family to try it out too, and don’t forget to share your own variations!

Engagement is key; encourage others to share their cooking photos or tips regarding textures and ingredient substitutions to foster a community around culinary exploration.

By reviewing the recipe and providing feedback, you not only help improve the dish but inspire future cooks to take on the challenge.

Community engagement around food allows for the exchange of ideas, making cooking a delightful and shared experience—embrace it and enjoy the journey in creating delicious meals together!

The Recipe

Garlic Butter Steak Bites with Parmesan Cream Sauce

Serves: 4 servings

Prep Time: 10 mins

Cook Time: 10 mins

Total Time: 20 mins

Kitchen Equipment Needed

  • Skillet
  • Cutting Board
  • Knife
  • Measuring Cups and Spoons
  • Whisk

Ingredients

  • 1 lb sirloin steak, cut into bite-sized pieces
  • 2 tablespoons butter
  • 4 cloves garlic, minced
  • 1/2 cup heavy cream
  • 1/4 cup grated Parmesan cheese
  • Salt and pepper to taste
  • Fresh parsley for garnish

Directions

  1. In a skillet over medium-high heat, melt 1 tablespoon of butter. Add steak bites, seasoning with salt and pepper, and sear until browned (about 4-5 minutes). Remove from skillet and set aside.
  2. In the same skillet, reduce heat to medium and add the remaining butter and minced garlic. Sauté until fragrant (about 1 minute).
  3. Pour in heavy cream, stirring to combine, then add Parmesan cheese. Continuously whisk until the cheese is melted and the sauce thickens (about 3-4 minutes).
  4. Add the cooked steak bites back into the skillet, coating them with the creamy sauce. Cook for an additional 1-2 minutes to heat through.
  5. Serve immediately, garnished with fresh parsley and enjoy!

Recipe Notes

  • For a spicier kick, add red pepper flakes to the sauce.
  • Feel free to substitute the steak with chicken or tofu for a different flavor profile.
  • This dish goes well with fresh bread or over pasta for a heartier meal.

Delightful Heart-Shaped Chocolate Chip Cookies for Valentine’s Day

Perfect Heart-Shaped Chocolate Chip Cookies for Valentine’s Day: A Sweet Treat for Your Loved Ones

⚖️
Difficulty
Easy

⏲️
Prep Time
15 mins

🕒
Cook Time
10 mins

⏱️
Total Time
25 mins

🍽️
Servings
12 cookies

Valentine’s Day is the perfect opportunity to showcase your affection for those you love. What better way to express your feelings than with a batch of delightful, Perfect Heart-Shaped Chocolate Chip Cookies? This recipe is not just about baking; it’s about creating cherished memories that will sweeten your celebrations. Each heart-shaped cookie is crafted with love, featuring gooey chocolate chips that melt in your mouth, leaving a lasting impression.

These cookies have a rich, buttery flavor paired with the comforting taste of brown sugar, making them irresistible. The combination of crispy edges and a soft, chewy center creates a symphony of textures that is sure to delight your loved ones. As the cookies bake, the sweet aroma fills your kitchen, inviting everyone to gather around and enjoy these scrumptious treats.

Quick Recipe Highlights

  • Flavor Profile: Buttery and sweet with the richness of chocolate.
  • Texture: Crispy edges with a soft, chewy center.
  • Aroma: Warm chocolate and freshly baked cookies.
  • Visual Appeal: Adorable heart shapes, golden brown edges, and melted chocolate bits.
  • Skill Level Needed: Perfect for beginners and experienced bakers alike.
  • Special Equipment: Heart-shaped cookie cutter and baking sheets.

Recipe Overview

  • Difficulty Level: This recipe is easy to follow, making it perfect for those new to baking.
  • Category: Great for desserts or special occasions like Valentine’s Day.
  • Cuisine: Influenced by classic American baking traditions.
  • Cost: Minimal ingredients make this a budget-friendly choice.
  • Season: Ideal for winter and spring holidays when you want to share love.
  • Occasion: Perfect for Valentine’s Day, anniversaries, or just a special treat.

Why You’ll Love This Recipe

When it comes to treats, the appealing taste and texture of these Perfect Heart-Shaped Chocolate Chip Cookies will undoubtedly win the hearts of your loved ones. The sweetness of the chocolate chips combined with the rich, buttery cookie base creates a flavor profile that is comfortingly familiar yet always delightful. The chewy texture makes each bite satisfying, providing that nostalgic feeling of enjoying homemade cookies.

Besides their wonderful taste, the convenience of this recipe cannot be overstated. With just a few simple ingredients and minimal prep time, you can whip up a batch quickly. It’s an excellent option for a last-minute dessert or a spontaneous treat. Plus, the process itself is joyful as you mix and see the dough come together, turning into beautiful heart shapes.

Nutritionally, while these cookies are a dessert, they still offer some benefits when made with quality ingredients. Using dark chocolate provides antioxidants, and the addition of whole grain flour can add a touch of fiber. Enjoying these cookies in moderation can fit nicely into a balanced diet.

Socially, baking this recipe is a heartwarming activity. Get your loved ones involved in the process—from mixing the dough to cutting out heart shapes. It’s a wonderful opportunity to bond while creating delicious treats, making it a memorable experience for everyone involved.

Lastly, the cost-effectiveness of this recipe makes it accessible. Most of the ingredients are staples found in your kitchen, which means you can bake these delicious cookies without breaking the bank. They provide an affordable yet heartfelt way to celebrate love on Valentine’s Day.

Historical Background and Cultural Significance

Cookies have been a beloved treat for centuries, with chocolate chip cookies emerging in the United States in the 1930s. Ruth Wakefield, who owned the Toll House Inn in Massachusetts, is credited with creating the first chocolate chip cookie. This innovation quickly became a classic American dessert, symbolizing warmth, comfort, and home.

Culturally, cookies, especially chocolate chip cookies, hold a special place in American hearts, often associated with home-baked goodness. They are a staple at family gatherings, celebrations, and especially around holiday seasons, where sharing these treats reinforces social bonds and traditions.

Over time, the recipe continued to evolve, with variations like adding nuts, oats, or even different types of chocolate. Today, the heart-shaped rendition adds a romantic twist, making it a perfect dessert for celebrations of love such as Valentine’s Day.

Regional variations have also emerged, with different parts of the U.S. having their unique takes on the classic chocolate chip cookie. For instance, some prefer a softer, thicker cookie while others enjoy a crispier texture. Regardless of the variation, the heart-shaped version remains a cherished expression of love and affection.

Ingredient Deep Dive

– All-purpose flour is a staple in many baking recipes; it provides structure and texture to cookies. Ensure you measure correctly for the best results. Store in a cool, dry place, and it can last months if kept airtight. For gluten-free options, almond flour or a gluten-free blend can be great substitutes.

– Brown sugar adds moisture and richness to the cookies, enhancing their flavor. It’s known for its caramel notes, making cookies taste richer. Keep it stored in a sealed container to prevent hardening. If needed, you can replace it with white sugar mixed with molasses.

– Chocolate chips are the stars of this cookie recipe. They provide bursts of sweetness and rich chocolate flavor in each bite. Choose semi-sweet or dark chocolate for an adult twist. Store in a cool location, and you can easily substitute with chunks of chocolate or even white chocolate.

– Butter is essential for the perfect texture of cookies. Use unsalted butter to control the saltiness of your batch. Butter should be soft but not melted for optimal consistency. You can substitute with margarine or coconut oil if you’re looking for dairy-free options.

– Eggs act as a binding agent and help the cookies rise; they also contribute moisture. For a vegan adaptation, consider using flaxseed meal mixed with water. Properly store eggs in the refrigerator for freshness.

Common Mistakes to Avoid

  • Using cold butter: Ensure your butter is softened at room temperature for the best texture.
  • Overmixing the dough: Mixing too much can lead to tough cookies; stop as soon as the flour is incorporated.
  • Not measuring ingredients correctly: Accurate measurements are key to successful baking.
  • Skipping chilling the dough: Allowing the dough to chill helps cookies maintain their shape while baking.
  • Baking on an ungreased pan: While parchment paper is often preferred, greasing your baking sheet can also help prevent sticking.
  • Overbaking: Keep an eye on your cookies; they should be golden brown at the edges but soft in the center when done.
  • Not using fresh ingredients: Always check your baking soda and powder for freshness to ensure the right rise.
  • Ignoring oven temperature: Make sure to preheat your oven for even baking.
  • Not allowing cookies to cool: Letting them cool on the baking sheet helps them set without breaking.
  • Not customizing flavors: Don’t shy away from adding nuts, spices, or extracts to enhance the flavor.

Essential Techniques

– **Measuring Ingredients:** Accurate measurement is crucial in baking. Use proper measuring cups for dry and liquid ingredients. Always level off flour with a knife for precision to avoid dense cookies.

– **Creaming Butter and Sugar:** This technique aerates the butter and sugar, leading to a fluffy dough. Beat the mixture until it’s light in color and texture. This process is essential as it affects the final texture of your cookies.

– **Chilling the Dough:** Chilling helps the fat solidify, resulting in less spreading during baking and creating denser, chewier cookies. Ideally, chill the dough for at least 30 minutes.

– **Baking in Batches:** When baking multiple trays of cookies, rotate them halfway through to ensure even baking. This is important, especially if your oven has hot spots.

Pro Tips for Perfect Heart-Shaped Chocolate Chip Cookies

– Use high-quality chocolate for maximum flavor; it makes a significant difference in taste.
– Experiment with adding a pinch of sea salt on top before baking for a flavor boost.
– Consider using cookie dough scoopers for uniform cookie sizes, ensuring the same bake time for each cookie.
– Rotate the baking sheets halfway through to avoid uneven heating that could lead to burnt edges.
– For added flair, drizzle melted chocolate over cooled cookies for a professional touch.
– Customize your cookies with seasonal sprinkles or edible glitter before baking.
– Allow cookies to cool on the baking sheet for a few minutes before transferring to a wire rack to avoid breakage.
– Store leftover cookies in an airtight container to keep them fresh longer.

Variations and Adaptations

For those looking to add a twist, consider regional variations such as adding shredded coconut or using almond flour for a nutty flavor. Seasonal adaptations can include festive spices like cinnamon or nutmeg for a holiday twist, emphasizing the warmth in every bite. Dietary modifications can also be made — opt for dairy-free chocolate chips and substitute butter with coconut oil for a vegan version. Flavor variations mean adding in peanut butter chips or toffee for a delightful mix. Texture modifications can present you with options like oats for chewiness or crushed nuts for a crunchy surprise. Lastly, presentation alternatives could involve stacking cookies with cream filling for a sandwich-style treat.

Serving and Presentation Guide

Present your Perfect Heart-Shaped Chocolate Chip Cookies with style! Arrange them on a decorative plate and consider garnishing with fresh berries or a sprig of mint for a pop of color. You can use cookie boxes or cellophane bags to create beautiful gifts for loved ones. Traditional accompaniments like milk or coffee can enhance the experience, while modern serving suggestions involve pairing with ice cream for a decadent dessert. Always consider serving temperature—the cookies should be warm and inviting while retaining just the right amount of gooeyness.

Wine and Beverage Pairing

Pair these cookies with dessert wines like a sweet Riesling or a rich port for a sophisticated treat. If you’re not into wine, consider a hot cup of cocoa or even coffee to complement the sweetness, enhancing the overall flavor experience. Be mindful of serving temperatures; ensure your drinks are chilled or warmed appropriately to balance the richness of the cookies.

Storage and Shelf Life

Store your cookies in an airtight container at room temperature for up to a week, or refrigerate for a longer shelf life. If you’d like to freeze them, ensure they are completely cooled and layered with parchment paper in a freezer-safe container. They can last up to three months in the freezer. When reheating, pop them in the microwave for a few seconds to regain that fresh-baked feel, which brings back the softness.

Make Ahead Strategies

For those planning a special day, you can prepare the dough a day in advance and keep it refrigerated. This will allow the flavors to meld beautifully. Alternatively, you can bake the cookies ahead and freeze them without toppings. Ensure thorough cooling before packing them away. On the day of serving, reheat them slightly for that fresh-baked aroma. Adding toppings, like a chocolate drizzle, right before serving maintains their appearance and taste.

Scaling Instructions

If you want to halve the recipe, simply reduce the quantities accordingly, but while doubling or tripling, make sure you have enough oven space and baking sheets. This could mean adjusting bake times slightly, as larger batches may need a few extra minutes in the oven. Always check for doneness by visual cues and adjust storage methods based on the recipe size.

Nutritional Deep Dive

Each cookie provides a satisfying balance of macros with carbohydrates for energy, fats for richness, and proteins for structure. Vitamin E and antioxidants found in dark chocolate offer additional health benefits. Portioning your cookies helps in weight management, and enjoying one or two can satisfy a sweet craving without overindulging. Knowing the caloric content can help you enjoy these treats mindfully.

Dietary Adaptations

– **Gluten-free:** Use a gluten-free flour blend to enjoy these cookies while avoiding gluten.
– **Dairy-free:** Swap butter for coconut oil and use non-dairy chocolate chips for a complete dairy-free option.
– **Vegan:** Replace eggs with flaxseed meal and water and use the substitutions for dairy.
– **Low-carb and Keto:** Use almond flour and sugar substitutes like erythritol to keep your cookie enjoyment guilt-free.
– **Paleo:** Opt for almond or coconut flour and honey or maple syrup for a natural sweetener.
– **Low-FODMAP:** Ensure chosen ingredients like dark chocolate are low-FODMAP compliant.

Troubleshooting Guide

If your cookies spread too much, ensure your butter wasn’t too warm or melted. If they come out too dry, you may have either overbaked or used too much flour—always spoon and level flour. If the cookies lack that buttery flavor, consider adding a pinch more of good quality butter or even using browned butter for deeper flavor. Should they turn out too sweet, consider adjusting your chocolate ratios in future batches. For crispy cookies, refraining from chilling dough can lead to overly brown edges instead of a chewy center.

Recipe Success Stories

Community feedback reveals that many have cherished the experience of baking and sharing these heart-shaped cookies with friends and family, emphasizing the warmth of home baking. Readers have successfully adapted the base recipe to their preferences, showcasing a variety of flavors and additions that highlight individual tastes. Photography tips shared by users also suggest capturing the cookies while still warm, showcasing the melting chocolate, adding to their irresistible allure.

Frequently Asked Questions

Q1: Can I use dark chocolate instead of semi-sweet?
Yes, using dark chocolate adds a richer flavor to your cookies. Just keep in mind that the sweetness will be reduced.

Q2: How can I keep cookies from spreading too much?
Chilling the dough for at least 30 minutes before baking helps solidify the fats, leading to less spread.

Q3: Are these cookies suitable for freezing?
Absolutely! These cookies freeze well for up to three months. Ensure they are fully cooled before storing in airtight containers.

Q4: Can I substitute coconut oil for butter?
Yes, coconut oil makes a great dairy-free substitute, providing a unique flavor profile.

Q5: What’s the best way to store these cookies?
Store in an airtight container at room temperature for up to a week, or refrigerate for longevity.

Q6: Can I add nuts to the recipe?
Definitely! Chopped walnuts or pecans can elevate the flavor and texture of your cookies.

Q7: Will using an electric mixer change my cookies?
An electric mixer can streamline mixing butter and sugar for a fluffy texture, but be cautious not to overmix once adding flour.

Q8: What if I don’t have a heart-shaped cutter?
A regular round cutter or even a glass can work well as an alternative—get creative!

Q9: How can I enhance the flavor?
Consider adding a teaspoon of vanilla or almond extract to the batter to deepen the flavor experience.

Q10: Is there a way to make these cookies healthier?
You can reduce sugar and incorporate whole wheat flour for added fiber and nutrients without compromising texture too much.

Additional Resources

Explore related recipes like oatmeal raisin cookies or peanut butter blossoms for great alternatives. Consider technique guides like “How to Bake Perfect Cookies” for more baking insights. Ingredient information on chocolate can also enhance your understanding of flavor profiles while looking into equipment recommendations for tools like silicone baking mats can make preparation smoother. Seasonal variations can include festive recipes for various holidays, providing more opportunities to bake love-filled treats.

Join the Conversation

We invite you to share your baking experiences on social media! Don’t hesitate to post photos of your heart-shaped cookies and tag us. Engage with the community by leaving your recipe reviews and suggestions; your unique variations can inspire others. The joy of baking is best when shared, so embark on new creations and connect with fellow cooking enthusiasts who share your passion.

The Recipe

Perfect Heart-Shaped Chocolate Chip Cookies

Serves: 12 cookies

Prep Time: 15 mins

Cook Time: 10 mins

Total Time: 25 mins

Kitchen Equipment Needed

  • Mixing bowls
  • Electric mixer
  • Baking sheets
  • Parchment paper
  • Heart-shaped cookie cutter

Ingredients

  • 1 cup unsalted butter, softened
  • 1 cup brown sugar, packed
  • 1/2 cup granulated sugar
  • 2 large eggs
  • 1 teaspoon vanilla extract
  • 2 1/2 cups all-purpose flour
  • 1 teaspoon baking soda
  • 1/2 teaspoon salt
  • 2 cups semi-sweet chocolate chips

Directions

  1. Preheat your oven to 350°F (175°C) and line baking sheets with parchment paper.
  2. In a large bowl, cream together butter, brown sugar, and granulated sugar until light and fluffy.
  3. Add in eggs one at a time, followed by the vanilla extract, mixing well after each addition.
  4. In another bowl, whisk together flour, baking soda, and salt.
  5. Gradually add dry ingredients to the wet mixture, mixing until just combined.
  6. Fold in chocolate chips evenly throughout the dough.
  7. Chill the dough for 30 minutes before rolling it out on a floured surface.
  8. Use a heart-shaped cookie cutter to cut out cookies and place them on the prepared baking sheets.
  9. Bake for 10-12 minutes until the edges are golden and centers are soft.
  10. Allow to cool on the baking sheet for a few minutes before transferring to a wire rack to cool completely.

Recipe Notes

  • For best results, chill the dough before baking.
  • Feel free to customize with nuts or different types of chocolate.
  • If the dough is too sticky, add a little more flour.

Deliciously Easy Strawberry Puff Pastry Hearts for Any Occasion

Easy Strawberry Puff Pastry Hearts: A Delightful Treat for Any Occasion

⚖️
Difficulty
Easy

⏲️
Prep Time
15 mins

🕒
Cook Time
20 mins

⏱️
Total Time
35 mins

🍽️
Servings
4 servings

Creating memorable desserts doesn’t have to be a long, complicated process. With these Easy Strawberry Puff Pastry Hearts, you’ll delight your family and friends in no time! Flaky and buttery pastry combined with juicy strawberries makes for a treat that’s not only visually appealing but also deliciously satisfying. Whether you’re hosting a gathering or just want to indulge in a sweet snack, these charming hearts are the perfect pick.

Strawberries, with their natural sweetness and vibrant color, shine in this simple yet elegant dessert. The contrast of the warm, flaky puff pastry against the cold whipped cream creates an irresistible combination. As you take a bite, the delightful crunch followed by the soft, juicy strawberries will awaken your taste buds and bring a smile to your face. Made with minimal ingredients and effort, these hearts are truly a showstopper.

Quick Recipe Highlights

  • Flavor Profile: The sweetness of ripe strawberries complements the buttery, slightly flaky pastry, balanced by a light dusting of powdered sugar for sweetness.
  • Texture: A combination of crispy pastry and juicy strawberry filling creates a delightful contrast in every bite.
  • Aroma: The aroma of baked puff pastry provides a comforting and inviting scent that fills your kitchen.
  • Visual Appeal: These puff pastry hearts look stunning, garnished with fresh strawberries and a sprinkle of powdered sugar.
  • Skill Level Needed: This recipe is beginner-friendly, requiring only basic pastry skills which anyone can master.
  • Special Equipment: A baking sheet, parchment paper, and a heart-shaped cookie cutter are essential for perfect results.

Recipe Overview

  • Difficulty Level: Easy, this recipe features straightforward steps making it accessible for all skill levels, even those who are new to baking.
  • Category: These puff pastry hearts are perfect for dessert, snack time, or a special treat for Valentine’s Day or anniversaries.
  • Cuisine: Reflecting classic French pastry techniques, this dessert brings elegance to everyday baking with a twist of freshness.
  • Cost: With affordable ingredients, this dessert can be made for under $10, providing an economical way to impress.
  • Season: Best made in spring and summer when strawberries are at their peak sweetness, but can be enjoyed year-round.
  • Occasion: Perfect for celebrations, romantic dinners, or as a delightful surprise after a family meal.

Why You’ll Love This Recipe

When it comes to taste, these Easy Strawberry Puff Pastry Hearts excel with their harmonious blend of flavors. The buttery pastry creates a delicate outer shell, while each bite surprises you with the sweet and tangy taste of fresh strawberries. This delightful combination is further elevated with a light dusting of powdered sugar, making every morsel a mini celebration of sweetness.

In terms of convenience, this recipe comes together quickly, allowing you to whip up something delightful even on a busy day. The use of store-bought puff pastry saves time and effort without compromising quality. The flexibility of the recipe allows you to prepare the hearts ahead of time without sacrificing freshness – simply assemble and bake when you’re ready to enjoy!

Additionally, the nutritional advantages of using fresh strawberries cannot be overlooked. Strawberries are packed with vitamins C and K, fiber, and beneficial antioxidants, making this dessert a guilt-free indulgence. When paired with the modest amounts of pastry, it becomes a flavorful yet light treat that cultivates a balance in your dessert choices.

Socially, making and sharing these heart-shaped pastries offers an excellent opportunity to connect with friends and family. Whether served at a gathering or as a romantic gesture, they invite conversation and shared experience. You may even find yourself creating new traditions around this delightful treat!

Cost-effectiveness is a significant advantage of this recipe. With minimal ingredients and few tools required, you can create something that looks and tastes far more expensive. Hosting a gathering doesn’t need to take a toll on your budget when such delicious options are within reach.

Historical Background and Cultural Significance

The origins of puff pastry can be traced back to various European culinary traditions, with France often credited for perfecting it. Historically, this technique involved multiple layers of butter and dough, creating a flaky texture that defines many pastries today. Interestingly, the method reflects the innovation of bakers who sought to elevate simple desserts into elegant finishes for meals.

Culturally, strawberries symbolize love and friendship in many societies. Their vibrant red color and heart-shaped profile make them a perfect fit for romantic gestures or celebrations. Notably, the combination of strawberries and pastry became popular during the summer months when strawberries were abundant, paralleling festive occasions.

Over time, this recipe has evolved into a simpler version that appeals to modern bakers who appreciate quick and easy desserts. By using ready-made puff pastry, home cooks can focus on the joy of creating without being overwhelmed by complexity. Thus, these strawberry hearts maintain a delightful balance of tradition and modern convenience.

Regional variations abound; in some cultures, strawberries may be swapped for other fruits like raspberries or peaches, showcasing the recipe’s versatility. This incorporation of local ingredients reflects how culinary practices can adapt to different regions while keeping the fundamental concept intact.

Ingredient Deep Dive

Strawberries: Rich in history, strawberries were cultivated by the Romans and have been celebrated for their numerous health benefits, including anti-inflammatory properties. When selecting strawberries, look for vibrant color and firmness, avoiding overly soft or blemished ones. Store your strawberries in the refrigerator to maintain freshness, and consider freezing any extras for future smoothies or desserts.

Puff Pastry: Puff pastry is a classic French creation, known for its multi-layered structure produced through a process called lamination. This intricate method brings air into the pastry, causing it to puff while baking. To achieve the best results, ensure the dough remains cold during preparation to avoid melting the butter. Store any leftover puff pastry in the refrigerator to maintain its flakiness for at least 2-3 days.

Common Mistakes to Avoid

  • Using warm strawberries: Always use fresh, chilled strawberries to maintain texture and prevent sogginess in the pastry.
  • Overworking the dough: Handle the puff pastry gently to prevent it from becoming tough and losing its airy texture.
  • Skipping egg wash: Applying an egg wash before baking ensures a beautiful golden finish that enhances visual appeal.
  • Not preheating the oven: Preheat your oven thoroughly; placing the pastry in a cool oven can lead to uneven cooking.
  • Inadequate spacing: Give the puff pastries enough room to expand on the baking sheet, avoiding them from sticking together.
  • Choosing the wrong pastry thickness: Roll out puff pastry too thin, and it may not rise properly, impacting texture and flavor.
  • Ignoring the cooling time: Allowing the pastries to cool briefly enhances flavor and prevents burns when biting into them.
  • Not fully baking: Ensure the pastries are golden brown before removing them from the oven to avoid an undercooked interior.

Essential Techniques

Laminating Pastry: This technique is critical for creating flaky pastries. It involves folding layers of dough and butter repeatedly to form thin layers. Mastering this method ensures the pastry puffs beautifully while baking. Pay attention to visual cues—look for distinct layers before baking for best results.

Preparing Fruit Fillings: When preparing fruit for a pastry, it is essential to macerate fruits like strawberries in sugar to enhance their natural sweetness and release juices. This process helps hydrate the filling while preventing sogginess in the pastry, ensuring texture remains intact.

Pro Tips for Perfect Easy Strawberry Puff Pastry Hearts

1. Chill your puff pastry before rolling it out to keep the butter firm, resulting in flakier pastry after baking.
2. Dust your work surface with flour to prevent sticking while rolling out the dough, ensuring a smooth process.
3. For added flavor, consider sprinkling a little cinnamon or nutmeg over the pastry before adding the strawberries.
4. Use fresh whipped cream to garnish the hearts just before serving, as it enhances the freshness of the dessert.
5. Experiment with different fillings, like chocolate or custard, for a unique twist on this classic recipe.
6. Ensure your oven is preheated to a consistent 400°F for optimal puff pastry rise and even cooking.
7. Let the pastries cool slightly before serving to enhance flavor and avoid burns.
8. Keep extra strawberries on hand for garnish; a few whole strawberries can make your plate look even more irresistible.

Variations and Adaptations

You can create delightful variations of Easy Strawberry Puff Pastry Hearts by considering seasonal fruits or flavors. For example, during autumn, swap out strawberries for ripe apples or pears. Simply slice the fruit thinly and toss with cinnamon and sugar for a warm, spiced filling.

For a unique twist, try infusing the pastry cream with flavors like vanilla or almond extract, adding an added layer of sophistication to the dessert. Alternatively, use a combination of berries for a mixed berry version, capturing various flavors all in one heart.

If you’re looking to lighten the recipe, consider using a sugar substitute for the filling or opting for a whole grain puff pastry option for a health-conscious adaptation. For those with dietary restrictions, a gluten-free puff pastry can be used as a great substitute while retaining the original integrity of the recipe.

The presentation can also be adapted seasonally; in spring, garnishing with edible flowers or microgreens adds a touch of whimsy and freshness to your dessert, making it even more appealing for special occasions.

Serving and Presentation Guide

When it comes to serving, presentation plays an essential role. Arrange the puff pastry hearts on a clean white platter to allow their colors to pop. A light dusting of powdered sugar can elevate the visual appeal, enhancing the elegance of the dish.

To complement the sweetness of the dessert, serve it with a side of freshly whipped cream or a scoop of vanilla ice cream. For added flair, consider garnishing with fresh mint leaves or a drizzle of chocolate sauce for a gourmet touch.

Temperature considerations are vital; these pastries are best served warm alongside a scoop of ice cream that gently melts upon contact. Portion control can be easily managed by cutting each heart into halves or quarters, allowing guests to sample different flavors without feeling overwhelmed.

Lastly, incorporating seasonal fruits along the plate’s border adds color and vibrancy to the presentation, elevating the dining experience and encouraging grateful compliments from your guests.

Wine and Beverage Pairing

For a delightful pairing, consider serving these Easy Strawberry Puff Pastry Hearts with a light sparkling wine, such as Prosecco or a sweet Moscato. The effervescence and sweetness of these wines complement the sweetness of the strawberries beautifully.

If you’re looking for non-alcoholic alternatives, a fresh fruit spritzer made with sparkling water and a splash of berry juice can be a refreshing substitute. For coffee lovers, a smooth cappuccino or a lightly sweetened vanilla latte pairs well with the dessert, balancing the sweetness with rich coffee flavors.

Don’t forget to consider temperature when serving beverages; chilled options for wine or spritzers will enhance the lightness of the dessert while warm beverages will provide a comforting contrast against the cool whipped cream.

Storage and Shelf Life

To maintain freshness, store any leftover Easy Strawberry Puff Pastry Hearts in an airtight container at room temperature for up to a day. However, the best practice for storing them is to keep the strawberry filling separate from the pastry.

If refrigerated, consume them within two days to enjoy the best texture and flavor. Signs of spoilage include a sour smell from the strawberries or soggy pastry; good pastries should be flaky and aroma-rich.

When reheating, do so gently in a preheated oven at 350°F for about 5 minutes to restore their crispiness. Freezing is not ideal due to the moisture in the strawberries, but if necessary, wrap the individual pastries in plastic wrap and place them in a freezer-safe bag for up to a month, ensuring you are prepared for any future cravings!

Make Ahead Strategies

Preparing ahead of time can simplify your baking experience. You can roll out the puff pastry and cut it into heart shapes a day in advance, then store them in the refrigerator lined with parchment paper to minimize sticking.

Consider macerating the strawberries the day before as well, allowing their natural juices to enhance flavor even more. When you’re ready to serve, simply assemble and bake, enjoying the freshly made aromas filling your kitchen.

Additionally, you can prepare the whipped cream in advance; store it in an airtight container in the fridge until serving. When plating, simply whip it again for a fluffy texture to top your pastries.

Lastly, arrange the plated hearts without garnishing just before your guests arrive to maintain their fresh appearance. This way, they’ll look just as delightful as the moment they came out of the oven!

Scaling Instructions

Scaling this Easy Strawberry Puff Pastry Hearts recipe is straightforward. If you plan to halve the recipe, use a smaller baking sheet and enjoy a family-sized treat that fits perfectly in your kitchen without waste.

For doubling or tripling, ensure you have an appropriate number of baking sheets and that your oven can handle multiple trays at once. Adjust baking times for larger quantities, checking the pastries frequently to ensure they don’t over-bake while achieving that golden hue.

Consider storage solutions as well; larger batches should be made more to utilize your freezer if you plan on preparing in advance. Make sure to arrange baked hearts carefully to avoid crushing any in layers.

Timing modifications might be necessary; larger amounts will require close attention during the baking stage to prevent the edges from overcooking while the center remains undercooked.

Nutritional Deep Dive

Examining the nutritional content of Easy Strawberry Puff Pastry Hearts reveals a delightful balance. Each serving features a macro breakdown that includes healthy fats from the butter in the puff pastry, which adds richness while still remaining within reasonable limits of sugar thanks to seasonal produce.

The fiber from strawberries provides significant health benefits, improving digestion while the antioxidants contribute to overall health, promoting skin rejuvenation. Beyond taste, keeping colorful fruits at the forefront showcases the importance of vitamins essential for immune function.

For dietary considerations, remember to adjust portion sizes to fit individual dietary needs. Small portions keep the indulgence in check while enabling enjoyment of this homemade dessert.

Lastly, creative combinations like adding nuts or seeds can provide healthy fats, essential proteins, and additional dietary fiber. This empowers you to adapt the recipe while keeping it nutritious and appealing.

Dietary Adaptations

Adapting the Easy Strawberry Puff Pastry Hearts for various dietary needs is simple and can make this delightful dessert suitable for everyone. For a gluten-free option, consider gluten-free puff pastry which is becoming increasingly available, ensuring no one misses out on the fun.

For those looking for dairy-free options, substitute butter with coconut oil and use a plant-based cream for a similar flair without the dairy. Customizing the filling to utilize dairy-free cream cheese or cashew cream can also provide a unique taste profile that remains satisfying.

Vegan modifications can easily switch out butter and cream methods while replacing eggs in the egg wash with a milk substitute, like almond or oat milk, providing fun exploratory avenues for flavor.

Low-carb dieters may opt for sugar-free filling while using almond flour to create a tailored pastry that fits specific weight management goals while retaining taste.

Lastly, for paleo and keto lifestyles, swap fruits for low-sugar alternatives and avoid the pastry entirely by using a nut-based crust for a healthier twist on this classic dessert.

Troubleshooting Guide

If you encounter texture issues with your puff pastry, it starts with the handling. Ensure it’s kept cold during preparation; warm dough leads to a loss of that flaky structure. For undercooked pastry, adjust your baking times or check for consistent oven temperature.

Flavor balance can be tricky; if your dessert is too sweet, consider incorporating tangy yogurt or a side of citrus to brighten the overall taste. Additionally, adjustments in sweetness can create a balanced profile, so taste testing along the way helps ensure satisfaction.

When dealing with temperature problems, uneven baking may root back to preheating the oven or the temperature settings while baking. Always verify your oven’s exact temperature with a thermometer for assured accuracy.

Successful puff pastries can feel intimidating, especially concerning equipment challenges. If you lack a proper baking sheet, use parchment paper on a tray to avoid sticking. Always position your pastries according to your oven’s heat distribution to achieve consistent cooking.

In terms of ingredient substitutions, ensure you’re well aware of how substitutions can impact both texture and flavor. Some flours or sweeteners can produce unexpected results, so always follow recommended ratios or conduct small tests before full-scale implementations.

Recipe Success Stories

Community feedback highlights how these Easy Strawberry Puff Pastry Hearts bring joy not just to the creators but also to everyone who experiences them. Many readers share stories about introducing their children to baking for the first time, sparking a new love for kitchen creativity.

Successes in variations abound; from different fillings like chocolate ganache or mixed berry combinations, individuals have explored myriad flavors based on seasonal preferences and inspiration from their cultural backgrounds.

The adaptability of the recipe means that families are enjoying this treat at their gatherings, with unique suggestions leading to breakthroughs in family traditions centered around these delightful pastries.

Photography tips shared by readers showcase the importance of natural lighting, presenting the pastry on colorful dishes, which enhances aesthetics and engages viewers on social media. The vibrant visuals inspire more bakers to try this easy recipe and enjoy their culinary accomplishments.

Your own adaptations do not go unnoticed, as various readers suggested ideal serving suggestions and personal touch recommendations, fostering a conversation that unites food enthusiasts across platforms and even promotes experimentation in personalized presentations.

Frequently Asked Questions

Can I freeze the strawberry puff pastry hearts?

Yes, you can freeze the strawberry puff pastry hearts. However, it’s best to freeze them without the filling. Once baked, let them cool completely, then wrap them in plastic wrap and place them in an airtight container for up to a month.

What is the best way to thaw frozen pastry hearts?

To thaw frozen pastry hearts, simply take them out of the freezer and place them in the refrigerator overnight. If you’re in a rush, a quick room temperature thaw will work, but they should be consumed shortly after thawing to ensure freshness.

How do I know when my pastries are done baking?

Your pastries are done baking when they turn a lovely golden-brown on the outside and have puffed up nicely. A good tip is to also check the underside; it should be brown and crispy, indicating perfect doneness.

Can I use other fruits instead of strawberries?

Absolutely! You can use a variety of fruits such as raspberries, blueberries, peaches, or even apples depending on the season and personal preference. Just make sure to adjust the sugar level based on the fruit’s natural sweetness.

What is the best way to store leftover puff pastry hearts?

Store any leftover puff pastry hearts in an airtight container at room temperature for up to one day. For longer storage, consider refrigeration; however, they are best fresh to maintain that delightful texture.

Is there a way to make this recipe gluten-free?

Yes, you can make the strawberry puff pastry hearts gluten-free by using gluten-free puff pastry, which is available at most grocery stores. Just make sure to follow the package instructions for baking time and temperatures.

How far in advance can I prepare the filling?

You can prepare the strawberry filling a day in advance. Just store it in a sealed container in the refrigerator until you’re ready to assemble and bake the pastries.

Can I add other flavors to the whipped cream?

Yes! Adding extracts such as vanilla, almond, or even a hint of orange or lemon zest can give your whipped cream a delightful flavor that complements the pastries beautifully.

What’s the best way to reheat the puff pastry hearts?

The best way to reheat puff pastry hearts is to place them in a preheated oven at 350°F for about 5 minutes. This method restores the crispiness of the pastry without making it soggy.

How can I make this dessert more decadent?

To make the dessert more decadent, consider drizzling melted chocolate over the pastries, or serve them with rich chocolate sauce or custard on the side for dipping.

Additional Resources

If you’re intrigued to explore different culinary creations, check out other related recipes that utilize fresh fruit or puff pastry techniques. Additionally, there are technique guides that delve into the art of pastry making, ensuring you master the essential methods for future baking adventures.

For those looking to enhance their kitchen equipment, recommendations for essential baking tools can be found, offering options for any budget ensuring delicious results with future recipes. Incorporating seasonal variations into your cooking can also inspire creativity; for instance, summer fruits invite unique flavor profiles, providing tempting alternatives to classic recipes.

Further, community-driven platforms serve to share seasonal variations, celebrate new flavors, and promote engagement in enhancing culinary skills together, ensuring mutual support among those who revel in home cooking.

Join the Conversation

The beauty of cooking lies in sharing experiences and discoveries. By participating in conversations about this Easy Strawberry Puff Pastry Hearts recipe, you can bring together fellow cooking enthusiasts who share your passion. Share your own culinary adventures through social media platforms or cooking forums, showcasing the variations you’ve tried or tips learned along the way.

Engagement can also come through recipe reviews, which provide valuable feedback and inspire others to attempt new adjustments or versions of the original recipe. Encouraging storytelling through these interactions fosters a sense of community where everyone can contribute their own insights.

Creating these charming desserts opens the door to discussions about personal adaptations, dietary modifications, and photography tips that add an artistic feel to food presentation. Embrace the opportunity to connect with others who appreciate the art of baking, sharing your successes and culinary hazards alike.

The Recipe

Easy Strawberry Puff Pastry Hearts

Serves: 4 servings

Prep Time: 15 mins

Cook Time: 20 mins

Total Time: 35 mins

Kitchen Equipment Needed

  • Baking sheet
  • Parchment paper
  • Heart-shaped cookie cutter
  • Mixing bowl
  • Whisk (for whipped cream)
  • Pastry brush (for egg wash)

Ingredients

  • 1 sheet of puff pastry (thawed)
  • 1 pint of fresh strawberries (hulled and sliced)
  • 2 tablespoons of sugar (adjust based on sweetness of strawberries)
  • 1 egg (beaten for egg wash)
  • Powdered sugar (for dusting)
  • Whipped cream (for serving)

Directions

  1. Preheat your oven to 400°F (200°C). Line a baking sheet with parchment paper.
  2. In a mixing bowl, combine the sliced strawberries and sugar. Let them macerate for about 15 minutes.
  3. Roll out the puff pastry on a lightly floured surface to about 1/8 inch thick.
  4. Use a heart-shaped cookie cutter to cut out hearts from the pastry.
  5. Transfer the hearts onto the prepared baking sheet.
  6. Place a spoonful of the strawberry filling in the center of half the hearts, leaving space around the edges.
  7. Top with another heart, pressing the edges to seal. Use a fork to crimp the edges securely.
  8. Brush the tops with the beaten egg for a golden finish.
  9. Bake for 15-20 minutes or until golden brown and puffy.
  10. Once baked, let the puff pastries cool slightly and then dust with powdered sugar before serving.

Recipe Notes

  • Store any leftovers in an airtight container at room temperature for up to a day.
  • You can substitute strawberries for other fruits based on preference or seasonal availability.

Delicious Sweet Potato Pie Bars for Your Holiday Dessert Table

Best Sweet Potato Pie Bars – Perfect for Holiday Desserts

⚖️
Difficulty
Easy

⏲️
Prep Time
20 mins

🕒
Cook Time
40 mins

⏱️
Total Time
1 hour

🍽️
Servings
12 bars

Are you looking for a delightful dessert that embodies the essence of the holidays? Look no further than these Best Sweet Potato Pie Bars! With their rich and creamy filling, perfectly spiced flavor profile, and a buttery crust, these bars are not just a treat for the taste buds but also a feast for the eyes. Perfect for holiday gatherings, these bars combine the classic flavors of traditional sweet potato pie into a convenient, sharable format.

Imagine slicing into these beautifully baked bars, the warm aroma of sweet potatoes, cinnamon, and nutmeg enveloping your kitchen. Each bite delivers a harmonious blend of sweetness and warmth, making them an ideal comfort food for any holiday table. Whether you serve them at Thanksgiving, Christmas, or any festive occasion, these sweet potato pie bars will quickly become a dessert favorite among family and friends.

Quick Recipe Highlights

  • Flavor Profile: These bars feature a sweet and earthy flavor from the sweet potatoes complemented by warm spices such as cinnamon and nutmeg.
  • Texture: The bars have a smooth and creamy filling with a crumbly crust, creating a delightful contrast in each bite.
  • Aroma: You’ll experience the inviting scents of freshly baked sweet potatoes with hints of spice wafting through your home.
  • Visual Appeal: The golden brown crust and vibrant orange filling make these bars not only delicious but visually appealing, perfect for any dessert platter.
  • Skill Level Needed: This recipe is perfect for beginner bakers, as it’s straightforward and requires minimal techniques.
  • Special Equipment: You will need a rectangular baking pan and a mixing bowl to make the preparation easy and convenient.

Recipe Overview

  • Difficulty Level: The Best Sweet Potato Pie Bars are easy to make, making them suitable for bakers of all skill levels.
  • Category: These bars are perfect for holiday desserts, potlucks, and family gatherings.
  • Cuisine: Drawing from traditional Southern culinary influences, sweet potato pie is a classic comfort dessert in many homes.
  • Cost: With affordable ingredients like sweet potatoes, flour, and sugar, this recipe is budget-friendly.
  • Season: Best enjoyed during the fall and winter months when sweet potatoes are in their prime.
  • Occasion: Ideal for holiday celebrations such as Thanksgiving and Christmas, or simply as a cozy dessert for family meals.

Why You’ll Love This Recipe

The Best Sweet Potato Pie Bars are not just delicious; they are a sensation in taste and texture that will leave everyone craving more. The combination of creamy sweet potato filling, infused with spices, sits atop a flaky crust that complements the sweetness perfectly. Unlike traditional sweet potato pie, these bars are easy to cut and serve, making them a convenient choice for entertaining.

With minimal preparation, you’ll find that these sweet potato pie bars are efficient to create, allowing you to spend more time enjoying the company of your guests. The recipe’s simplicity means you’ll have more energy to enjoy the holiday festivities while treating your loved ones to a delightful dessert.

Nutritionally, sweet potatoes are a powerhouse; they are high in vitamins, particularly Vitamin A, and fiber. This makes them a wholesome choice, giving you a little extra satisfaction knowing that your dessert is not only indulgent but also good for you.

These sweet potato pie bars are perfect for gatherings, providing a delicious way to engage with your friends and family. Whether served at a large gathering or an intimate dinner, they are sure to spark conversations and compliments. They offer a beautiful presentation, pleasing both the eye and the palate.

Lastly, the cost-effectiveness of this recipe cannot be ignored. With pantry staples and seasonal ingredients, you can create an impressive dessert without breaking the bank, making your holiday celebrations even sweeter.

Historical Background and Cultural Significance

Sweet potato pie has deep roots in Southern cuisine, tracing back to early American history when sweet potatoes were cultivated for their nutritional value. This comforting dessert has evolved over generations, becoming a staple at family gatherings and holiday celebrations. The addition of various spices like cinnamon and nutmeg reflects the diverse flavors that have come to define Southern cooking.

Sweet potato pie traditionally represented comfort and home, often associated with family gatherings and celebrations. The simplicity of the ingredients made it accessible to many households, and over time, recipes were handed down through generations, reflecting personal touches and family traditions.

As culinary practices evolved, the introduction of variations in recipes indicated cultural significance. The sweet potato pie joined the ranks of other classic American desserts, taking on regional variations that often incorporated unique flavors or presentation styles. Today, these pie bars have made it possible for more people to enjoy the beloved flavors of sweet potato pie in a more convenient format.

Regional variations also contribute to the ongoing popularity of sweet potato pie, with ingredients like pecans or variations in spices adding unique characteristics. These adaptations keep the tradition alive while allowing for inventive twists that delight the palate.

Ingredient Deep Dive

Sweet Potatoes: As the main ingredient, sweet potatoes are not only delicious but also packed with nutrients. They provide a rich source of vitamins, especially Vitamin A, and fiber that aid in digestion. Selecting firm, smooth sweet potatoes ensures quality and flavor. Store them in a cool, dark place for longevity, and consider substituting with canned sweet potatoes for convenience.

Flour: Essential for creating the crust, flour is a pantry staple in many homes. Using all-purpose flour helps achieve that desired flakiness. It is important to sift flour before measuring for accuracy. For those with dietary restrictions, gluten-free flour can be used as a substitute, providing a similar texture.

Common Mistakes to Avoid

  • Not cooking the sweet potatoes thoroughly can lead to a lumpy filling. Always ensure they are soft before mashing.
  • Overmixing the crust can make it tough; mix just until combined for a flakier texture.
  • Using cold ingredients in the filling can affect its smoothness; allow ingredients to reach room temperature first.
  • Not letting the bars cool completely before cutting can cause them to crumble; patience is key!
  • Forgetting to preheat the oven can lead to uneven baking; always check oven temperature before starting.
  • Using old spices can dull the flavors; always use fresh spices for maximum flavor impact.
  • Not greasing the baking pan can lead to sticking; a light coat of cooking spray or butter prevents this.
  • Not adjusting baking times based on differing oven types can result in over or underbaking; keep a close eye!
  • Leaving the bars in the pan too long after baking can make them soggy; remove them promptly after cooling.
  • Forgetting to test the filling’s sweetness may result in an overly sweet or bland outcome; taste as you mix!

Essential Techniques

Preparing Sweet Potatoes: Proper preparation of sweet potatoes is critical for a smooth filling. Bake or steam them until fork-tender, and then let them cool before mashing. Ensure there are no lumps for the best texture in your bars.

Making the Crust: Creating the perfect crust requires a balance of ingredients and technique. Combine the dry ingredients before gradually incorporating cold butter. Use a pastry cutter or your fingers to form a crumbly texture, which is essential for flakiness while baking.

Pro Tips for Perfect Best Sweet Potato Pie Bars

1. Use fresh sweet potatoes instead of canned for superior flavor and texture. If using canned, drain them thoroughly.

2. Experiment with the spice blend; adding a pinch of ginger can elevate the flavor profile.

3. Consider adding a layer of caramel sauce before baking for added richness.

4. Chill the crust in the fridge for at least 30 minutes before baking to prevent it from shrinking.

5. Allow the bars to cool completely in the pan before slicing to retain shape.

6. To add a nutty flavor, incorporate ground pecans into the crust mixture for added depth.

7. Use a sharp knife to cut the bars for clean edges; warm the knife in hot water for best results.

8. Serve warm or at room temperature, with a dollop of whipped cream or a scoop of vanilla ice cream for an indulgent experience.

Variations and Adaptations

For a regional twist on these Best Sweet Potato Pie Bars, consider incorporating maple syrup as a natural sweetener instead of sugar. This adds depth and an earthy sweetness that resonates with traditional flavors. For a seasonal adaptation, try adding cranberries or nuts atop the filling for a festive flair.

Dietary modifications can be made easily by swapping the butter for coconut oil or using a vegan substitute for the milk. Those following gluten-free diets can use almond flour or a gluten-free flour blend for the crust.

If you’re feeling adventurous, try adding spices like cardamom or allspice to enhance the flavor. For a unique texture, mix in some chopped pecans for added crunch, or create smaller, bite-sized bars for a trendy presentation at parties.

For presentation alternatives, dust the tops of the bars with powdered sugar or drizzle with chocolate ganache for a gourmet touch. Each variation can make the bars stand out at any holiday table!

Serving and Presentation Guide

When serving Best Sweet Potato Pie Bars, consider using a beautiful platter to enhance presentation. Garnish with a sprinkle of cinnamon or nutmeg to complement the visual appeal. Serve alongside a dollop of fresh whipped cream or a scoop of ice cream in creative bowls for an inviting dessert station.

Temperature is important to consider; these bars can be enjoyed warm or chilled, depending on personal preference. Ensure portions are uniform for a clean look, using a ruler or reference lines on the pan before cutting. Accompany with a seasonal beverage like spiced cider for an all-around festive experience.

Wine and Beverage Pairing

For an ideal pairing with Best Sweet Potato Pie Bars, consider a light dessert wine such as a Late Harvest Riesling or a sweet Chenin Blanc, both of which complement the natural sweetness of the sweet potatoes. If you prefer a non-alcoholic option, a spiced apple cider or a rich hot chocolate would work wonderfully.

For coffee lovers, a mild cup of brewed coffee or a mocha latte pairs well, balancing the sweetness of the bars with deeper flavors. Serve these beverages at a warm temperature to enhance your festive gathering experience.

Storage and Shelf Life

To store your Best Sweet Potato Pie Bars, keep them covered in an airtight container at room temperature for up to 3 days. For longer storage, refrigerate them up to a week. If you wish to freeze the bars, wrap them tightly in plastic wrap, followed by foil, and freeze for up to 3 months.

When reheating, gently warm them in the oven at a low temperature, checking frequently to prevent drying out. Thaw frozen bars in the fridge overnight before serving, to ensure the best quality and flavor upon your next enjoyment.

Make Ahead Strategies

To save time on a busy holiday schedule, you can prepare the filling and crust in advance. Keep them separately stored in the refrigerator until you are ready to bake. You can also bake the bars a day or two before the event, allowing the flavors to meld and enhancing their overall taste.

When ready to serve, simply warm the bars or let them sit at room temperature for a while. Adding last-minute flair, such as whipped cream or chocolate drizzle, right before serving ensures freshness and presents an appetizing appearance.

Scaling Instructions

If you’re looking to make a smaller batch of the Best Sweet Potato Pie Bars, you can halve the recipe, and use a smaller baking pan. Conversely, for larger gatherings, double or triple the ingredients, adjusting baking times as necessary based on the size of the pan used.

While doubling the recipe, keep an eye on baking time, as larger pans can often require a bit longer. Always check for doneness with a toothpick inserted into the center of the bars, ensuring it comes out clean before removing them from the oven.

Nutritional Deep Dive

Each serving of these Best Sweet Potato Pie Bars offers a delightful balance of macronutrients, providing carbohydrates from sweet potatoes and flour while incorporating some healthy fats from butter. Sweet potatoes are renowned for their high fiber content, contributing to better digestive health.

Additionally, the bars are rich in essential micronutrients, including Vitamin A, which is vital for ocular health, and potassium, important for heart function. Balancing these bars with nutritious ingredients makes them a wholesome indulgence even during festive times.

Dietary Adaptations

For gluten-free options, simply substitute the all-purpose flour with a gluten-free blend or almond flour. This allows those with gluten sensitivities to enjoy these delicious bars without any adverse effects.

For a vegan adaptation, replace the butter with coconut oil or vegan margarine, and use almond or oat milk in the filling to create a harmonious flavor profile. These simple changes ensure everyone can enjoy this exquisite dessert while adhering to their dietary needs.

Troubleshooting Guide

If your sweet potato filling turns out too watery, ensure that you have properly drained any excess moisture from the sweet potatoes and consider adding a thickening agent. A tablespoon of cornstarch or extra flour can remedy overly runny filling.

For bars that are too dry, ensure you measure the flour accurately and do not overmix the crust. If using a newer, untested recipe, it’s best to start checking for doneness a few minutes early to prevent overbaking.

Recipe Success Stories

Many bakers have shared glowing feedback about their experiences with the Best Sweet Potato Pie Bars, praising their ease of preparation and delighting in the nostalgic flavors reminiscent of family gatherings. Variations using different spices or crusts have also led to exciting adaptations and positive responses from those lucky enough to taste them.

Readers have also shared their techniques for enhancing presentation, such as topping the bars with toasted pecans or delicate meringue clouds, creating visually stunning desserts that leave a lasting impression at any table.

Frequently Asked Questions

Can I use canned sweet potatoes instead of fresh?
Yes, using canned sweet potatoes is a great time-saver, but be sure to drain them thoroughly to avoid excess moisture in your filling.

How should I store leftover bars?
Keep your sweet potato pie bars in an airtight container at room temperature for up to 3 days, or refrigerate them for up to a week.

Can I freeze the bars?
Absolutely! Wrap them tightly in plastic wrap and foil, storing them in the freezer for up to 3 months.

What can I use as a substitute for butter?
Coconut oil or vegan margarine makes an excellent substitute for butter, maintaining the rich texture of the bars.

Is there a way to make these bars gluten-free?
Yes! Simply swap out all-purpose flour with a gluten-free flour blend to create a gluten-free version of these delicious bars.

Can I use spices other than cinnamon and nutmeg?
Definitely! Feel free to experiment with ginger, allspice, or cardamom to elevate the flavor of your sweet potato filling.

How do I know when the filling is done baking?
A toothpick inserted into the center of the bars should come out clean, indicating they are fully baked.

Can these be made in advance?
Yes, you can prepare the crust and filling ahead of time and assemble the bars just before baking for maximum freshness.

What’s the best way to serve these bars?
Serve warm, with a dollop of whipped cream or a scoop of vanilla ice cream for a delectable experience that everyone will love!

How can I enhance the presentation?
Dust the top with powdered sugar or drizzle with caramel sauce for a beautiful and enticing presentation.

Additional Resources

For more sweet potato inspiration, check out our other recipes such as Sweet Potato Casserole or Classic Sweet Potato Pie. Also, consider browsing our technique guides for mastering crust making and seasoning basics to further enhance your culinary skills.

Join the Conversation

We encourage our community to share their own variations of the Best Sweet Potato Pie Bars! Connect with us on social media and post your creations, tagging us for a chance to be featured. We love hearing about your experiences, tips, and tricks when making these delightful bars!

The Recipe

Best Sweet Potato Pie Bars

Serves: 12 bars

Prep Time: 20 mins

Cook Time: 40 mins

Total Time: 1 hour

Kitchen Equipment Needed

  • Mixing bowl
  • Rectangular baking pan
  • Parchment paper
  • Electric mixer (optional)

Ingredients

  • 2 cups mashed sweet potatoes (about 2 large sweet potatoes)
  • 1 cup granulated sugar
  • 1/2 cup brown sugar
  • 2 large eggs
  • 1/2 cup evaporated milk
  • 1 tsp vanilla extract
  • 1 tsp ground cinnamon
  • 1/2 tsp ground nutmeg
  • 1/4 tsp salt
  • 1 1/2 cups all-purpose flour
  • 1/2 cup unsalted butter, melted

Directions

  1. Preheat your oven to 350°F (175°C) and line a rectangular baking pan with parchment paper.
  2. Pierce the sweet potatoes with a fork and bake them in the oven until soft (about 45-60 minutes). Cool, peel, and mash.
  3. In a large mixing bowl, combine the mashed sweet potatoes with granulated sugar, brown sugar, eggs, evaporated milk, vanilla, cinnamon, nutmeg, and salt. Mix until well combined.
  4. In another bowl, mix the flour and melted butter until crumbly. Press the mixture into the bottom of the prepared pan to form the crust.
  5. Spread the sweet potato filling evenly over the crust and smooth the top.
  6. Bake for 40-45 minutes or until the filling is set and a toothpick comes out clean.
  7. Allow the bars to cool completely in the pan before slicing into squares.

Recipe Notes

  • For a deeper flavor, add a tablespoon of maple syrup to the filling.
  • Feel free to adjust spices according to personal taste.
  • You can top with whipped cream or nuts before serving for added texture and flavor.

Delicious No-Bake Oreo Mud Pie Recipe for Every Celebration

Easy No-Bake Oreo Mud Pie – The Ultimate Dessert for Any Occasion

⚖️
Difficulty
Easy

⏲️
Prep Time
15 mins

🕒
Cook Time
0 mins

⏱️
Total Time
15 mins

🍽️
Servings
8 servings

Oreo Mud Pie is an indulgent and decadent treat that’s impressively easy to make, making it perfect for any gathering. The rich layers of chocolate cream, creamy whipped topping, and crunchy Oreo crust blend seamlessly to create an irresistible dessert. Every luscious bite teases your taste buds and leaves you craving more. Plus, this no-bake recipe is a breeze to assemble, making it a popular choice for busy cooks and dessert lovers alike.

In this delightful treat, the nostalgic flavor of Oreos shines through, combined with smooth cream that melts in your mouth. Whether it’s a birthday party, holiday gathering, or simply a weekend treat, this Easy No-Bake Oreo Mud Pie is sure to impress. It serves as a show-stopping dessert that brings smiles and satisfaction, making it a staple for any occasion.

Quick Recipe Highlights

  • Flavor Profile: A delicious blend of chocolate and creamy filling, perfectly complemented by the classic Oreo cookie flavor.
  • Texture: The creamy, smooth layers contrast beautifully with the crunchy Oreo base, providing a delightful mouthfeel.
  • Aroma: The pie emanates a sweet vanilla and chocolate aroma that tantalizes your senses.
  • Visual Appeal: The gorgeous layers of dark chocolate and white cream create an attractive dessert that’s eye-catching.
  • Skill Level Needed: This recipe requires minimal effort and skill, making it accessible for both novice and experienced bakers.
  • Special Equipment: No special tools are needed—just a mixing bowl, a spatula, and a pie pan!

Recipe Overview

  • Difficulty Level: This Easy No-Bake Oreo Mud Pie is simple to make, requiring no baking skills. Perfect for beginner bakers, it lets anyone impress friends and family with its delicious outcome.
  • Category: As a dessert pie, it fits perfectly into the sweet course of any meal, whether served after dinner or at a gathering.
  • Cuisine: While influenced by classic American dessert traditions, the use of Oreos gives it a fun, modern twist that many adore.
  • Cost: This dessert is budget-friendly, with ingredients that are typically affordable and easy to find.
  • Season: Enjoy this treat any time of the year, thanks to its no-bake nature that keeps it refreshing in hot weather.
  • Occasion: Ideal for birthdays, holidays, potlucks, or even as a mid-week treat, this pie fits well in any context.

Why You’ll Love This Recipe

The combination of flavors in Oreo Mud Pie makes it exceptional. The chocolate layers are rich yet balanced by the sweet whipped cream, creating a delightful contrast that’s utterly satisfying. Each bite bursts with flavor, making it a favorite at parties. The creamy texture of the filling mixed with the crunch of the Oreo crust adds an exciting mouthfeel, ensuring that everyone comes back for seconds.

In terms of convenience, this no-bake dessert saves time and hassle. Traditional pies often require time in the oven, but with this recipe, you simply mix and chill, leaving you free to enjoy other aspects of your gathering or dinner. This makes it a great choice for those who need a last-minute dessert that still delivers on taste.

Nutritionally, while it’s a treat, there’s some comfort in knowing that Oreos provide a nostalgic link to childhood for many. Moderation is key, and this pie allows you to indulge just a little without overdoing it. It can be a fun treat that brings joy without feeling overly guilty.

Socially, desserts like this Oreo Mud Pie bring people together. Sharing a delicious dessert can create memories and strengthen connections among family and friends. Whether you’re hosting a casual gathering or an elaborate celebration, this pie serves as a stellar conversation starter, sparking joy and satisfaction.

Lastly, regarding cost-effectiveness, this dessert is geared toward simplicity and affordability. You can whip it up with minimal ingredients, and it typically serves many, making it a great budget-friendly option for gatherings—proving that great taste doesn’t have to come at a high price point.

Historical Background and Cultural Significance

The origins of Oreo cookies date back to their creation in the United States in the early 20th century. Since then, they have become a staple in American dessert culture. The Easy No-Bake Oreo Mud Pie takes these beloved cookies and transforms them into a rich dessert that celebrates both nostalgia and modern culinary creativity.

Culturally, Oreos hold a special place in American hearts. They have inspired countless recipes and adaptations, from milkshakes to cakes, showcasing their versatility across culinary applications. This pie not only highlights Oreos themselves but also reflects the general trend of quick and easy desserts that don’t compromise on flavor.

Over the years, various versions of mud pie have emerged, each bringing a unique spin to the concept. The Easy No-Bake Oreo version simplifies the process while retaining the indulgent, creamy essence of traditional mud pies, appealing to a modern audience that appreciates convenience without sacrificing satisfaction.

In terms of regional variations, while the Oreo Mud Pie is mostly found in American kitchens, it has inspired similar desserts around the world, influenced by local cookie varieties and preferences. Each adaptation often tells the local story of celebration, comfort, and shared experience, transcending borders.

Ingredient Deep Dive

Oreo cookies are the star of this dessert. First introduced in 1912, their unique interplay of two dark chocolate wafer cookies filled with vanilla cream quickly made them iconic in homes across America. Nutritionally, they provide a delightful crunch but should be enjoyed in moderation. When selecting Oreos, look for ones that have a consistent texture and freshness within the package. For storage, keep them in an airtight container to maintain their crispness, and if you need a substitute, chocolate wafer cookies can be a suitable alternative.

Next, cream cheese forms the creamy base of this pie, adding richness that balances the sweetness of other ingredients. It’s essential to use fresh cream cheese for the best flavor, with full-fat versions offering a superior texture and taste. Cream cheese can be stored in the refrigerator and should be checked regularly for spoilage. If you need a substitute for cream cheese, consider using Greek yogurt or cashew cream for a dairy-free option.

Whipped topping, both a light and airy component of the pie, lends a luxurious texture. When buying, look for brands with minimal preservatives for the cleanest flavor. Store leftover whipped topping in the freezer for future use. If you’re looking to substitute, homemade whipped cream can be a great alternative, adding even more freshness.

Common Mistakes to Avoid

  • Overmixing ingredients: Take care not to overmix your filling, as this can lead to a dense texture instead of a light, airy consistency.
  • Skipping the chilling time: Allowing the pie to chill is crucial as it helps set the layers properly and enhances the flavors.
  • Using stale ingredients: Ensure your Oreos and cream cheese are fresh, as stale products can spoil the flavor and texture.
  • Ignoring ingredient temperatures: Make sure the cream cheese is at room temperature to ensure smooth blending with other ingredients.
  • Underestimating the crust: Press the Oreo crust firmly into the bottom of the pie pan to create a stable base that holds together during serving.
  • Not tasting as you go: Always taste your filling before pouring it into the crust to adjust sweetness and flavor to your liking.
  • Forgetting to cover the pie: If you’re not serving right away, cover it to prevent it from absorbing smells and flavors from the fridge.
  • Rushing assembly: Allow the time needed for each layer to set, creating a beautiful presentation when you’re ready to serve.

Essential Techniques

One key technique for this recipe is mixing the filling. It’s important to blend the cream cheese and sugar until smooth for a creamy texture. Start on low speed to avoid splashing, then gradually increase to medium speed. Look for a smooth consistency without lumps.

Another crucial technique is preparing the crust. Finely crush the Oreo cookies while ensuring there are no large chunks. Use a blender or food processor for an even texture. When pressing the mixture into the pie dish, make sure it’s compact to hold its form when serving. A flat measuring cup can help achieve an even layer.

Pro Tips for Perfect Easy No-Bake Oreo Mud Pie

To ensure your Easy No-Bake Oreo Mud Pie turns out perfect every time, consider these pro tips. First, use softened cream cheese to blend easily with the sugar and whipped topping, creating a smooth, lump-free filling. Secondly, try chilling your mixing bowl before whipping the topping; this keeps it firm and helps hold its shape better.

For an added flavor twist, consider mixing in some vanilla extract or even coffee into the cream cheese layer for a modern spin. When serving, run a knife under hot water before cutting the pie. This ensures you get clean slices, which are much more presentable.

If you have leftovers, consider layering them with additional cookie crumbs in dessert cups for an easy and delicious trifle. For decoration, simply sprinkle some extra crushed Oreos on top before serving to enhance the visual appeal of the dessert.

Lastly, to vary it up, experiment with different flavored Oreos such as mint or peanut butter for a fun twist on the classic recipe.

Variations and Adaptations

Consider making regional variations of the Oreo Mud Pie by switching out Oreos for local cookies or biscuits that fit the flavor profile. For seasonal adaptations, incorporate seasonal flavors such as pumpkin spice during autumn or peppermint for a festive twist during the winter holidays.

Dietary modifications can also be applied by using gluten-free or vegan alternatives. For instance, replace the regular Oreos with gluten-free cookies and use coconut cream in place of whipped topping for a delicious dairy-free option.

If you’re looking for flavor variations, experimenting with different flavored whipped toppings, such as chocolate or caramel, can elevate the pie’s taste. To modify the texture, you might layer in pieces of chocolate fudge or a layer of mousse to introduce new textures.

Finally, presentation alternatives could involve serving the pie in individual cups or jars for an elegant touch at parties or gatherings, making it easy to serve and enjoy.

Serving and Presentation Guide

When it comes to serving your Easy No-Bake Oreo Mud Pie, consider using a clean, sharp knife for cutting to give neat slices. A pie server or spatula can help lift each slice without destroying the layers. For garnishing ideas, topping each slice with a dollop of whipped topping and a sprinkle of crushed Oreos creates an appealing presentation.

Traditional accompaniments can include a drizzle of chocolate sauce, enhancing the pie’s rich flavor. Modern serving suggestions could involve presenting mini jars filled with pie layers for a trendy dessert display, perfect for gatherings.

Temperature considerations play a role as well; serve the pie chilled, as it is best enjoyed cold and allows the flavors to emerge fully. Finally, for portion control tips, cut the pie into small slices, allowing guests to savor the rich flavors without overindulging.

Wine and Beverage Pairing

Pairing wine with your Easy No-Bake Oreo Mud Pie can enhance the overall dessert experience. A sweet dessert wine like a late harvest Riesling complements the rich chocolate flavors beautifully. Alternatively, a creamy Port can mirror the smoothness of the pie, providing a lovely balance.

For those avoiding alcohol, consider serving with a rich vanilla or chocolate-flavored milkshake, which can be just as indulgent. If you prefer coffee, a hot mocha or espresso serves as a wonderful counterpoint, enhancing the chocolatey notes of the pie.

Temperature consideration is essential; serve beverages chilled, keeping in line with the dessert, ensuring a cohesive experience. A garnish of whipped cream can be added to coffee for a delightful finishing touch.

Storage and Shelf Life

To maximize the shelf life of your Easy No-Bake Oreo Mud Pie, store it covered in the refrigerator. Properly stored, it can last for about three to four days, ensuring you have plenty of time to enjoy it. An airtight container works best to prevent it from absorbing odors from other foods in the fridge.

When checking for signs of spoilage, look for changes in texture or any off smell. If you notice any separation in the layers or a change in color, it’s best to discard it. For those considering freezing, while it’s not ideal, the pie can be stored for up to a month if covered well and allowed to thaw in the refrigerator before serving.

Reheating is typically unnecessary; this dessert is enjoyed chilled. If you’re making it ahead of time, prepare the layers separately, do not assemble them until ready to serve, allowing for fresh flavors.

Make Ahead Strategies

To make your Easy No-Bake Oreo Mud Pie ahead of time, consider preparing the filling the day before and chilling it overnight. This allows the flavors to develop, making for a more flavorful dessert. You can also crush the Oreo crust in advance, storing it in the fridge until assembly.

Another tip is to layer the pie in the morning if you’re serving it later in the day. This retains freshness and allows it to chill thoroughly before serving. Quality impact can be significant if you allow the layers to meld together, creating a more cohesive flavor.

For assembly tips, consider preparing individual servings in cups, allowing you to skip the cutting method altogether at the serving time. This also keeps the presentation neat and appealing.

If adding any fresh elements, such as fruit or toppings, leave them off until just before serving to ensure they remain fresh and vibrant.

Scaling Instructions

If you want to halve the Easy No-Bake Oreo Mud Pie recipe, simply adjust the ingredient measurements accordingly and use a smaller pie dish. Be mindful of the chilling time, as smaller portions may set faster.

Doubling or tripling the recipe requires different equipment; consider using larger mixing bowls and pans or preparing in batches. Timing modifications may be necessary for preparing larger batches, as you might need to churn out multiple pies, so plan accordingly to ensure everything is ready in time.

For storage considerations in scaled recipes, be sure to keep everything well covered and ensure pie is maintained at a consistent temperature to avoid spoilage.

Nutritional Deep Dive

The nutritional value of the Easy No-Bake Oreo Mud Pie will depend on ingredient choices, but typically, it provides a rich source of carbohydrates and fats, primarily from the cookies and cream cheese. For those watching their macros, portion control is essential.

When analyzing micronutrients, you’ll find that Oreos and cream cheese provide moderate levels of calcium and iron, but they are higher in sugars. Balancing this dessert with other nutrient-dense foods can help mitigate its indulgence.

In terms of health benefits, enjoying desserts in moderation can contribute to overall well-being, providing psychological satisfaction and joy. This pie can also serve as a means to enjoy shared experiences, which can be just as important for mental health.

For those mindful of diet, keeping track of portions during use is beneficial; one slice can still provide a delightful treat without going overboard.

Dietary Adaptations

If you’re looking for a gluten-free option, simply switch out Oreos for certified gluten-free cookies, ensuring the rest of your ingredients are also gluten-free. For a dairy-free alternative, use a plant-based cream cheese and coconut whipped cream instead of regular whipped topping.

A vegan version can be achieved by selecting suitable ingredients, such as using dairy-free cream cheese and whipped coconut cream. For a low-carb version, opt for sugar-free cookies and cream cheese while reducing sugar or omitting it altogether.

Other dietary modifications include considering paleo or keto-friendly options by using nut-based flour for the crust and incorporating healthier sweetener alternatives.

The Easy No-Bake Oreo Mud Pie can easily cater to various dietary preferences by adjusting the key ingredients, ensuring everyone can enjoy a delightful slice.

Troubleshooting Guide

If you encounter texture issues, such as a runny filling, it may be due to not blending the cream cheese sufficiently or not chilling it long enough. Ensure that all ingredients are well combined and cold before serving.

For flavor balance, if the pie is too sweet, try adding a pinch of salt to the filling to enhance overall flavor complexity. Conversely, if it lacks sweetness, consider adding more sugar while blending the filling.

Temperature problems can arise when it’s not set properly; ensure you chill it for a sufficient duration. If it’s too soft, continue to chill until it reaches the desired firmness.

Equipment challenges can occur if your food processor or mixer isn’t powerful enough to make a smooth filling. In such cases, consider mixing by hand or using a whisk, though this may take longer.

Ingredient substitutions can also cause unexpected results; make sure replacements offer similar textures and flavors to avoid unwanted surprises.

If timing concerns arise, ensure that each step is followed diligently, as allowing proper setting time directly impacts quality.

Recipe Success Stories

Community feedback has been overwhelmingly positive, with many sharing their delightful results after making the Easy No-Bake Oreo Mud Pie for their gatherings. Readers rave about its easy preparation and impressive taste that impresses both children and adults alike.

Variation successes also abound as people customize their Mud Pie with various cookie flavors, making each experience unique to their tastes. Others share anecdotal stories of how this pie has turned casual gatherings into memorable events due to its popularity.

Photography tips have emerged from those eager to show off their creations on social media, focusing on lighting and plating for the best presentation. The chocolate and white layers provide stunning aesthetics, making for a picture-perfect dessert.

Reader suggestions often involve making the recipe their own, from unique ingredient substitutions to creative garnishing ideas. Many have embraced their creativity, using this pie as a base for exploring additional flavors and combinations.

Frequently Asked Questions

Can I freeze the Easy No-Bake Oreo Mud Pie?
Yes, you can freeze the pie, but it’s best served fresh. If you do freeze it, wrap it well to avoid freezer burn and allow it to defrost in the fridge before serving.

How long does the pie last in the fridge?
The pie can last about three to four days in the refrigerator if stored properly. Be sure to keep it covered to prevent it from getting soggy or absorbing odors.

Can I use flavored Oreos?
Absolutely! Flavored Oreos, like mint or peanut butter, can add a fun twist to this recipe. Adjust other flavors accordingly to match the chosen Oreo variety.

What can I use instead of whipped topping?
You can use homemade whipped cream as a substitute for whipped topping. Just be sure to stabilize it with powdered sugar or cornstarch if needed.

Is there a way to make this pie gluten-free?
Yes, by using gluten-free cookies instead of regular Oreos, you can easily adapt the recipe for a gluten-free diet.

Can I prepare the pie a day in advance?
Definitely! Making the pie a day before allows it to chill thoroughly and ensures the flavors meld beautifully.

What should I do if my filling is too soft?
If your filling seems too soft, make sure to chill it longer or add more cream cheese to bind it.

How do I achieve clean slices when cutting the pie?
For neat slices, dip your knife in hot water before cutting, wiping it clean after each slice to prevent the pie from dragging.

Can I make individual servings?
Yes, layering the pie in small cups or jars is a great way to serve individual portions and allows for beautiful presentation.

What are some good toppings for this pie?
Consider topping the pie with additional whipped cream, chocolate shavings, or crushed Oreos for an extra touch of decadence.

Additional Resources

If you’re looking for related recipes, try exploring other no-bake desserts such as cheesecake or pudding parfaits. These offer similar preparation methods and delightful flavors.

For technique guides, consider researching tips on whipping cream or making pie crusts from scratch, which can expand your dessert repertoire. Ingredient information can also be valuable, particularly regarding the properties of different types of cookies or creams used in baking, helping you make informed choices in your kitchen.

If you’re in need of equipment recommendations, investing in a quality food processor will make crushing cookies and blending fillings much easier. Finally, explore seasonal variations of this pie inspired by flavors like pumpkin or peppermint for added festive flair.

Join the Conversation

Engage with us on social media by sharing your Easy No-Bake Oreo Mud Pie successes, and don’t forget to take stunning photos of your creations! We love seeing how you recreate the recipe and any adaptations you make to suit your tastes.

Leave your recipe reviews and feedback in the comments, offering tips or suggestions for others who may want to try it. We encourage readers to share their unique variations, whether it’s incorporating different cookies or presenting it in innovative ways.

Join our community of dessert lovers where we exchange ideas, stories, and advice for creating delicious experiences in the kitchen. Let’s create sweet memories together!

The Recipe

Easy No-Bake Oreo Mud Pie

Serves: 8 servings

Prep Time: 15 mins

Cook Time: 0 mins

Total Time: 15 mins

Kitchen Equipment Needed

  • Mixing bowl
  • Pie dish
  • Food processor or zip-top bag
  • Spatula
  • Electric mixer

Ingredients

  • 24 Oreo cookies
  • 4 tablespoons unsalted butter, melted
  • 8 ounces cream cheese, softened
  • 1/2 cup powdered sugar
  • 1 teaspoon vanilla extract
  • 8 ounces whipped topping, thawed
  • Chocolate syrup (optional for garnishing)
  • Additional crushed Oreos (for topping)

Directions

  1. Crush the Oreo cookies in a food processor or inside a zip-top bag until finely ground. Mix with melted butter until combined.
  2. Press the Oreo mixture evenly into the bottom of a pie dish to form a crust. Chill in the freezer while preparing the filling.
  3. In a mixing bowl, beat the softened cream cheese, powdered sugar, and vanilla extract until smooth and creamy.
  4. Gently fold in the whipped topping until well combined. Do not overmix to maintain fluffiness.
  5. Spread the filling evenly over the chilled crust, smoothing the top with a spatula.
  6. Chill the pie for at least 2-4 hours or until set. Top with additional crushed Oreos and chocolate syrup before serving.

Recipe Notes

  • For variations, experiment with flavored Oreos for a unique twist.
  • You can add a layer of chocolate ganache on top before the filling for an added indulgence.
  • Ensure all ingredients are at room temperature for optimal blending.