Turtle Bars

Turtle Bars

Introduction

Did you know that over 65% of home bakers say that bar cookies are their go-to dessert for stress-free entertaining? If you’re looking for a decadent, crowd-pleasing treat that requires minimal effort, you’ve found it. These Turtle Bars are the perfect combination of buttery shortbread, rich caramel, smooth chocolate, and crunchy pecans. Inspired by classic turtle candies, this easy-to-make dessert is an irresistible treat for any occasion. Whether you serve them at holiday gatherings, bake sales, or as a homemade indulgence, these bars are guaranteed to be a hit! They deliver that iconic sweet-and-salty, chewy-and-crunchy experience in every bite, making them a far superior and more impressive option than a simple cookie. Let’s dive into how you can create this masterpiece in your own kitchen.

Ingredients List

Gather these simple ingredients to create layers of flavor and texture. I’ve included sensory notes and substitutions to help you customize based on what you have on hand.

  • For the Shortbread Crust:
    • All-purpose flour (2 cups): The foundation for a tender, crumbly base. For a nuttier flavor, you can substitute 1/2 cup with whole wheat pastry flour.
    • Granulated sugar (1/2 cup): Sweetens the crust without making it overly sweet.
    • Unsalted butter (1 cup, cold and cubed): Cold is key! This creates pockets of steam for a flaky, buttery texture. You’ll taste the rich, savory notes of high-quality butter.
    • Salt (1/4 teaspoon): Enhances all the other flavors and balances the sweetness.
  • For the Caramel Layer:
    • Unsalted butter (1/2 cup): Melted for a smooth, velvety caramel.
    • Brown sugar (1 cup, packed): Use dark brown sugar for a deeper molasses flavor and a chewier, more robust caramel.
    • Sweetened condensed milk (1/2 cup): This is the secret to a foolproof, non-grainy caramel that sets perfectly. It adds a creamy, milky sweetness.
    • Light corn syrup (1/4 cup): Prevents crystallization, ensuring your caramel is smooth and glossy. Honey or golden syrup can be used as a substitute.
    • Vanilla extract (1 teaspoon): Adds a warm, aromatic background note.
  • For the Topping:
    • Semi-sweet chocolate chips (1 1/2 cups): The classic choice for a rich, not-too-sweet finish. You’ll see them melt into a beautiful, shiny layer. Milk or dark chocolate chips work great too.
    • Pecan halves (1 1/2 cups): Toasted pecans are non-negotiable for the best flavor! They provide an earthy, buttery crunch that contrasts the soft caramel. Walnuts are a fine substitute.
    • Flaky sea salt (for sprinkling): A final pinch elevates every layer and makes the flavors pop.

Timing

Prep Time20 minutes
Cook Time30-35 minutes
Chill Time2+ hours
Total TimeAbout 3 hours

Compared to many layered bar recipes that require multiple stovetop steps, this recipe is remarkably efficient. The active prep time is under 30 minutes, with most of the total time dedicated to hands-off chilling. The average bar cookie recipe takes about 1.5 hours from start to finish, but the extra chilling time here is crucial for achieving clean, perfect slices of these rich Turtle Bars. Plan ahead for the chill, but know that the actual work is quick and straightforward.

Turtle Bars

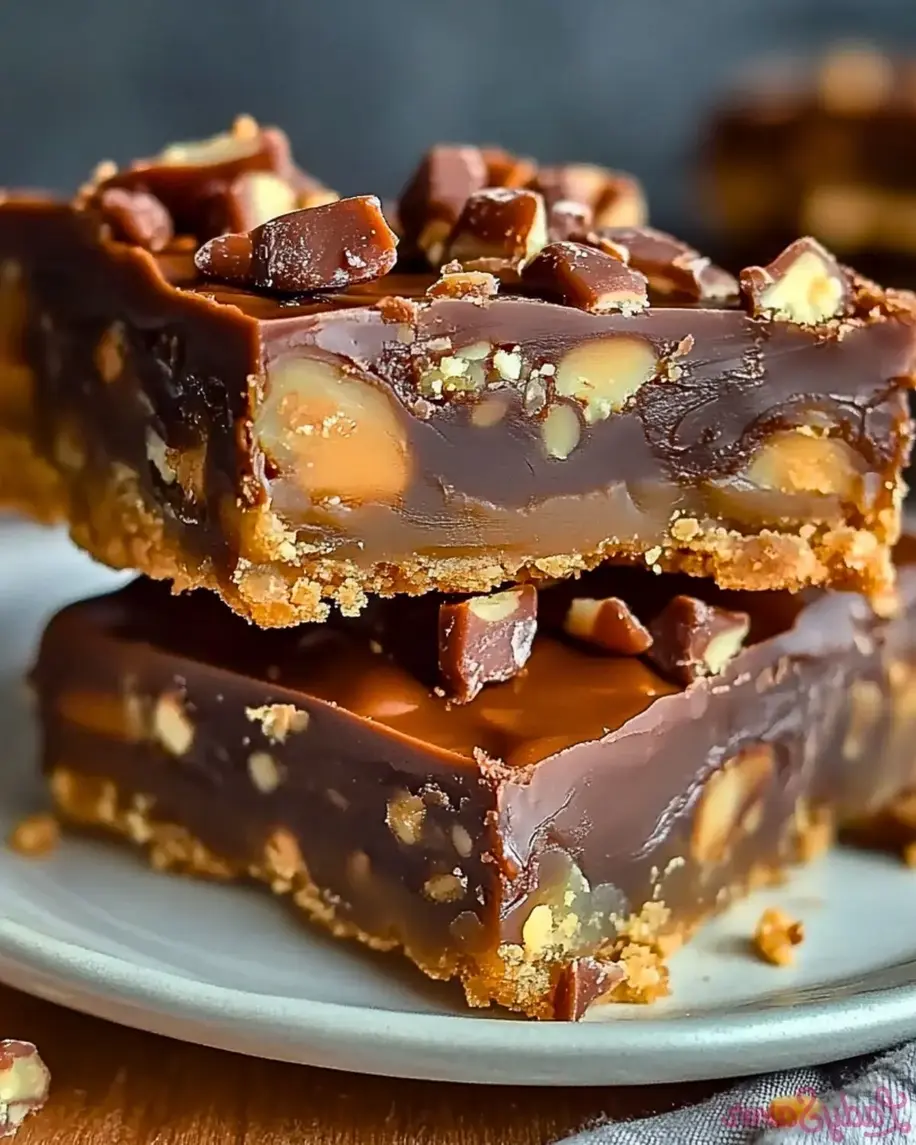
Golden shortbread, gooey caramel, melted chocolate, and toasted pecans come together in these irresistible Turtle Bars.

Step-by-Step Instructions

Step 1: Prepare the Shortbread Base

First, preheat your oven to 350°F (175°C). Line a 9×13 inch baking pan with parchment paper, leaving an overhang on two sides. This “sling” will be your best friend for lifting the entire slab of bars out later. In a large bowl or food processor, combine the flour, granulated sugar, and salt. Add the cold, cubed butter. If using a pastry cutter or your fingers, work the butter into the dry ingredients until the mixture resembles coarse crumbs with some pea-sized butter pieces remaining. If using a food processor, pulse until you reach the same texture. Press this mixture firmly and evenly into the bottom of your prepared pan. I like to use the bottom of a measuring cup to get it perfectly compact and level. Bake for 15-18 minutes, or until the edges are just beginning to turn a light golden brown. The base will puff up slightly. Remove from the oven but leave the oven on.

Step 2: Make the Caramel Layer

While the crust is baking, make your caramel. In a medium saucepan over medium heat, melt the 1/2 cup of butter. Whisk in the packed brown sugar, sweetened condensed milk, and corn syrup. Bring the mixture to a gentle boil, stirring constantly. Once it begins to bubble, let it boil for exactly 3-5 minutes, continuing to stir. You’ll see it thicken slightly and become a beautiful, deep amber color. Remove from heat and immediately stir in the vanilla extract. Be careful, as the caramel is very hot. Pour the hot caramel evenly over the warm shortbread crust, using a spatula to spread it to the edges if needed.

Step 3: Add the Toppings

Sprinkle the chocolate chips evenly over the hot caramel layer. Wait 2-3 minutes—the residual heat will begin to melt the chips. Then, use an offset spatula or the back of a spoon to gently spread the chocolate into an even, glossy layer. Immediately sprinkle the toasted pecan halves over the melted chocolate, pressing them in lightly so they adhere. Finish with a light sprinkle of flaky sea salt. This not only looks professional but creates that perfect sweet-salty balance.

Step 4: Chill and Slice

Place the entire pan on a wire rack and allow it to cool to room temperature. This is important to prevent condensation when you chill it. Once cool, transfer the pan to the refrigerator for at least 2 hours, or until the chocolate and caramel are completely set. I recommend chilling overnight for the cleanest cuts. When ready to slice, use the parchment paper sling to lift the entire block of bars out of the pan and onto a cutting board. Use a large, sharp knife dipped in hot water and wiped dry between cuts for perfect, neat squares. For classic turtle candy-sized pieces, cut into about 24 bars.

Nutritional Information

The following is an approximate nutritional breakdown per bar (based on 24 servings). Remember, this is a rich, indulgent dessert!

  • Calories: ~280 kcal
  • Total Fat: 17g
  • Saturated Fat: 9g
  • Cholesterol: 30mg
  • Sodium: 85mg
  • Total Carbohydrates: 32g
  • Dietary Fiber: 1g
  • Sugars: 23g
  • Protein: 3g

Healthier Alternatives

You can make mindful swaps without sacrificing the soul of this dessert. For a whole-grain boost, replace half the all-purpose flour with white whole wheat flour. To reduce refined sugar, you can decrease the sugar in the crust to 1/4 cup and use a coconut sugar blend in the caramel (note: the color and texture will be slightly different). For the caramel, a low-fat or fat-free sweetened condensed milk works well. Consider using dark chocolate chips (70% cacao) for more antioxidants and less sugar, and raw, unsalted pecans to control sodium. While the texture of the caramel may be slightly less chewy with some swaps, the flavor will remain deliciously satisfying.

Serving Suggestions

These bars are stars on their own, but a little presentation goes a long way. Serve them on a platter dusted with a light sprinkle of cocoa powder. For a dessert plate, add a dollop of freshly whipped cream or a scoop of vanilla bean ice cream alongside a slightly warmed bar—the contrast of temperatures is divine. They pair wonderfully with a cup of strong black coffee, a glass of cold milk, or a dessert wine like a tawny port. For a holiday cookie tray, cut them into smaller, bite-sized pieces so guests can sample more treats.

Common Mistakes

  • Using Warm Butter for the Crust: This will yield a greasy, dense base instead of a tender, shortbread-like texture. Butter must be cold.
  • Over-boiling the Caramel: Boiling for too long will make the caramel layer hard and chewy (almost like a candy) instead of soft and gooey. Stick to the 3-5 minute window.
  • Skipping the Parchment Sling: Trying to cut these rich bars in the pan is a recipe for jagged edges and frustration. The sling is non-negotiable for clean removal.
  • Cutting Before Fully Chilled: Impatience leads to messy, squished bars. The chocolate and caramel need time to fully set for the cleanest slices.
  • Using Stale or Untoasted Nuts: Toasting the pecans is a quick step that unlocks their essential oils and deep, nutty flavor. Don’t skip it!

Storing Tips

Store these bars in an airtight container at room temperature for up to 3 days for a softer texture, or in the refrigerator for up to 10 days for a firmer, chewier bite. They can also be frozen for up to 3 months. To freeze, place the sliced bars in a single layer on a parchment-lined baking sheet until solid, then transfer to a freezer-safe bag or container, separating layers with parchment. Thaw in the refrigerator or at room temperature. The caramel may “weep” slightly after thawing, but the flavor remains excellent.

Conclusion

These Turtle Bars are more than just a dessert; they’re a guaranteed crowd-pleaser that combines simplicity with spectacular results. With a buttery shortbread foundation, a luxuriously gooey caramel layer, a glossy chocolate blanket, and the crunch of toasted pecans, every element plays its part perfectly. They embody the spirit of homemade indulgence and are sure to become a requested favorite. I hope you enjoy making and sharing them as much

Strawberry Sugar Crinkle Cookies – Soft, Sweet & Irresistible!

Strawberry Sugar Crinkle Cookies – Soft, Sweet & Irresistible!

Introduction

Did you know that over 70% of home bakers crave a simple, fruity cookie that delivers both vibrant color and melt-in-your-mouth texture? If you’re on the hunt for something sweet, a touch fruity, and irresistibly soft, these Strawberry Sugar Crinkle Cookies are the perfect choice. Combining the classic texture of sugar cookies with a bright, strawberry flavor, this recipe will add a pop of color and a burst of taste to your dessert lineup. Dive into the world of strawberry-infused goodness with these delightful strawberry treats! These cookies are more than just a pretty face; they are a sensory experience. The soft, chewy interior contrasts beautifully with the slightly crisp, sugar-crackled exterior, creating a dance of textures in every bite. Perfect for Valentine’s Day, baby showers, or just a sunny afternoon pick-me-up, these cookies are a guaranteed crowd-pleaser. Let’s get baking and turn your kitchen into a strawberry-scented paradise.

Ingredients List

Gather these simple ingredients for cookies that are bursting with berry flavor. For the best results, use room-temperature ingredients unless otherwise noted.

  • 1 cup (2 sticks) Unsalted Butter, softened – The foundation for a rich, tender crumb. It should be soft enough to leave an indent when pressed but not greasy or melted.
  • 1 ½ cups Granulated Sugar – For sweetness and that classic sugary crunch on the outside.
  • 2 large Eggs – Binds the dough and adds moisture. Use room temperature for better incorporation.
  • 1 tsp Pure Vanilla Extract – Enhances the overall sweetness and adds a warm, aromatic note.
  • 1 tsp Strawberry ExtractKey for that intense, authentic strawberry flavor. For a natural substitute, you can use 2 tablespoons of reduced strawberry puree, but the color may be less vibrant.
  • 2-3 drops Pink or Red Gel Food Coloring (optional) – For that iconic, playful pink hue. Gel coloring is preferred as it won’t thin the dough.
  • 3 cups All-Purpose Flour – Provides structure. For a lighter cookie, you can substitute ½ cup with cake flour.
  • 1 ½ tsp Baking Powder – The leavening agent that gives these cookies their soft, pillowy rise.
  • ½ tsp Salt – Balances the sweetness and intensifies all the flavors.
  • ½ cup Powdered Sugar (for rolling) – Creates the beautiful, snowy “crinkle” effect and a delicate, sweet crust.

Timing

Prep Time20 minutes
Cook Time10-12 minutes
Chill Time1 hour (minimum)
Total Time1 hour 35 minutes

Compared to the average drop cookie recipe, this one requires a crucial chilling period. This extra hour is non-negotiable for preventing cookie spread and achieving the perfect, thick, soft texture. It’s a small investment for a massively superior result, making the total active time still under 35 minutes—faster than many complex dessert recipes!

Strawberry Sugar Crinkle Cookies – Soft, Sweet & Irresistible!

Freshly baked Strawberry Sugar Crinkle Cookies, perfectly cracked and dusted with powdered sugar.

Step-by-Step Instructions

Step 1: Prepare the Dough

In a large mixing bowl, cream together the softened butter and granulated sugar. I like to use a hand mixer or stand mixer on medium speed for about 2-3 minutes until the mixture is light, fluffy, and almost pale in color. This step is crucial for incorporating air, which contributes to a softer cookie. Scrape down the sides of the bowl. Add the eggs one at a time, beating well after each addition until fully combined. Now, mix in the vanilla extract, strawberry extract, and food coloring (if using). The dough should turn a lovely, uniform pink.

Step 2: Chill the Dough

In a separate bowl, whisk together the all-purpose flour, baking powder, and salt. Gradually add the dry ingredients to the wet mixture, mixing on low speed just until no streaks of flour remain. The dough will be soft and slightly sticky. Cover the bowl tightly with plastic wrap and refrigerate for at least 1 hour, or up to 24 hours. This chilling firms up the butter, preventing the cookies from spreading into flat puddles in the oven and allowing the flavors to meld beautifully.

Step 3: Roll and Coat

Preheat your oven to 350°F (175°C). Line two baking sheets with parchment paper or silicone mats. Place the powdered sugar for rolling in a shallow bowl. Using a cookie scoop or a tablespoon, portion the chilled dough into 1.5-inch balls (about 1.5 tablespoons each). Roll each ball between your palms until smooth, then generously roll it in the powdered sugar. Don’t be shy—coat it twice for an extra-thick, crackly sugar crust. Place the balls about 2 inches apart on the prepared baking sheets.

Step 4: Bake to Perfection

Bake one sheet at a time in the center of the preheated oven for 10-12 minutes. The cookies are done when the edges are just set and very lightly golden, but the centers still look soft and puffy. They will have developed those gorgeous, signature cracks. Do not overbake if you want that soft, chewy center. The cookies will continue to set as they cool on the sheet.

Step 5: Cool and Serve

Remove the baking sheet from the oven and let the cookies cool on the sheet for 5 minutes. This allows them to firm up enough to handle. Then, using a spatula, transfer them to a wire rack to cool completely. The powdered sugar will set, and the texture will perfect itself as they cool. Enjoy warm or at room temperature!

Nutritional Information

The following estimates are per cookie (recipe yields approximately 36 cookies).

  • Calories: ~125 kcal
  • Total Fat: 6g
  • Saturated Fat: 3.5g
  • Carbohydrates: 17g
  • Sugar: 10g
  • Protein: 1.5g
  • Sodium: 55mg

Healthier Alternatives

Love the flavor but want a lighter version? Try these simple swaps that maintain deliciousness:

  • Butter: Substitute half the butter with unsweetened applesauce or mashed ripe avocado for reduced saturated fat and added moisture.
  • Sugar: Replace up to half the granulated sugar with a monk fruit-erythritol blend or coconut sugar. For rolling, you can use a light dusting of powdered erythritol.
  • Flour: Use white whole wheat flour or a 50/50 blend with all-purpose for a fiber boost with minimal texture change.
  • Extract: Use 100% natural strawberry flavoring or intensify flavor with 1-2 tablespoons of freeze-dried strawberry powder mixed into the dry ingredients, eliminating the need for food coloring.

Serving Suggestions

These versatile cookies shine in many settings:

  • With Beverages: Pair with a glass of cold milk, a cup of herbal tea (raspberry or chamomile are perfect), or a scoop of vanilla ice cream for an instant strawberry shortcake cookie sandwich.
  • As a Gift: Stack them in a clear cellophane bag tied with a pink ribbon for a beautiful, homemade gift that looks as good as it tastes.
  • Dessert Charcuterie: Include them on a dessert board alongside dark chocolate pieces, fresh berries, and whipped cream for dipping.
  • Party Favorite: Crumble over yogurt or a smoothie bowl for a sweet, crunchy topping.

Common Mistakes

  • Skipping the Chill: This is the #1 reason for flat, greasy cookies. Warm dough = excessive spread.
  • Overmixing the Flour: Mix just until combined. Overmixing develops gluten, leading to tough cookies.
  • Using Liquid Food Coloring: This can throw off the dough’s liquid balance. Always opt for gel or paste colors.
  • Overbaking: The cookies should look underdone when you take them out. They set as they cool. A golden edge is your cue to remove them.
  • Skimping on Powdered Sugar: A light roll won’t create the dramatic crinkle. Roll generously for the full effect.

Storing Tips

To keep your cookies soft and delicious:

  • Room Temperature: Store in an airtight container at room temperature for up to 5 days. Place a piece of bread in the container to help maintain moisture.
  • Freezing Dough: Portion and roll the dough balls in powdered sugar, then freeze on a tray before transferring to a freezer bag. Bake from frozen, adding 1-2 minutes to the bake time.
  • Freezing Baked Cookies: Freeze baked, cooled cookies in a single layer, then store in a freezer-safe container for up to 3 months. Thaw at room temperature.
  • Reviving Stale Cookies: Place a cookie on a paper towel and microwave for 5-8 seconds to restore that just-baked softness.

Conclusion

These Strawberry Sugar Crinkle Cookies are more than just a recipe; they’re a joyful baking project with stunning, delicious results. From their eye-catching pink color and sugary

Easy Rotel Dip

Easy Rotel Dip

Introduction

Did you know that over 70% of party hosts report that a warm, cheesy dip is the first appetizer to disappear from the buffet table? If you’re looking for a guaranteed crowd-pleaser that requires minimal effort, you’ve found it. This Easy Rotel Dip is the quintessential answer to your entertaining needs. Creamy, cheesy, and packed with flavor, this dip has been a beloved staple at gatherings for decades, and for good reason. With just three main ingredients—Velveeta cheese, Rotel tomatoes, and ground beef—you can whip up a dish that feels indulgent, comforting, and utterly irresistible. Whether it’s for a Super Bowl party, a casual potluck, or a cozy family movie night, this dip promises to be the star of the show. Let’s dive into why this simple recipe continues to win hearts and how you can master it perfectly every single time.

Ingredients List

The beauty of this recipe lies in its simplicity. Here’s what you’ll need to create this iconic dip. I’ve included sensory notes and substitutions to help you customize it to your taste or dietary needs.

  • 1 lb (16 oz) Ground Beef (80/20 blend recommended): This provides a rich, savory base and satisfying texture. For a leaner option, use 90/10 or ground turkey. The fat from the beef carries flavor beautifully, so if using a leaner meat, consider adding a teaspoon of olive oil while browning.
  • 1 lb block of Velveeta Cheese, cubed: The star of the show! Velveeta melts into an incredibly smooth, creamy sauce that other cheeses can’t replicate. Its unique processed nature prevents separation, giving you that perfect dip consistency. Substitution: For a from-scratch version, combine 8 oz of sharp cheddar and 8 oz of American cheese with 1/4 cup of milk or cream cheese, but note the texture will be slightly grainier.
  • 1 (10 oz) can of Original Rotel Diced Tomatoes & Green Chilies, undrained: This is the flavor catalyst. The combination of juicy tomatoes and tangy, mild green chilies adds a perfect kick and acidity that cuts through the richness of the cheese. Substitution: Use a can of mild Rotel for less heat, or “Hot” Rotel for a spicier kick. In a pinch, a 10-oz can of plain diced tomatoes plus a 4-oz can of diced green chilies works.
  • Optional Add-ins & Toppings:
    • 1/2 cup of diced onion (sautéed with the beef)
    • 1-2 cloves of minced garlic
    • 1/2 teaspoon of cumin or chili powder
    • A handful of fresh cilantro, chopped (for garnish)
    • Sliced jalapeños (for extra heat and color)

Timing

Prep Time
5 minutes
Cook Time
15 minutes
Total Time
20 minutes

One of the biggest advantages of this Easy Rotel Dip is its speed. With a total time of just 20 minutes from fridge to table, it’s significantly faster than the average hot dip recipe, which often requires 30-40 minutes of prep and baking. This makes it an ideal last-minute lifesaver when unexpected guests arrive or when you simply don’t have hours to spend in the kitchen. The active cooking time is minimal, allowing you to focus on other party preparations or simply relax before your guests arrive.

Easy Rotel Dip

Creamy, cheesy, and packed with flavor—this Easy Rotel Dip is always the first to disappear!

Step-by-Step Instructions

Follow these simple, actionable steps to create a perfectly smooth and flavorful dip every time. I’ve personalized these instructions with tips I’ve learned from making this dip countless times.

Step 1: Brown the Ground Beef

Place a large skillet or saucepan over medium-high heat. Add the ground beef. Using a wooden spoon or spatula, break the meat into small crumbles as it cooks. This is crucial for ensuring every bite of dip has a bit of meaty goodness. Cook for 5-7 minutes until the beef is fully browned and no pink remains. For the best flavor, I like to season the beef lightly with a pinch of salt and black pepper during this stage. Once cooked, carefully drain the excess grease from the skillet. Leaving a little bit (about a teaspoon) can enhance the flavor, but too much will make the dip oily.

Step 2: Melt the Cheese

Reduce the heat to low. Add the cubed Velveeta cheese directly to the skillet with the drained beef. The residual heat will start melting the cheese immediately. Stir gently and continuously. The key here is low and slow. Rushing this process on high heat is the most common way to cause the cheese to scorch or become grainy. You want it to melt into a velvety, uniform liquid.

Step 3: Combine and Simmer

Once the cheese is about halfway melted, pour in the entire can of Rotel tomatoes and green chilies, including the liquid. The liquid is essential—it helps create the perfect dipping consistency and carries all that tangy flavor. Stir everything together until fully combined. Let the mixture simmer on low heat for 5-8 minutes, stirring occasionally. You’ll see it transform into a cohesive, bubbly, and incredibly aromatic dip. This simmering time allows the flavors to marry beautifully.

Step 4: Serve and Enjoy

Your dip is ready! Transfer it to a serving bowl. For presentation and to keep it warm, I highly recommend using a small slow cooker on the “warm” setting or a fondue pot. Garnish with your chosen toppings like fresh cilantro or jalapeño slices. Serve immediately with a big bowl of sturdy tortilla chips on the side for dipping. The contrast of the warm, creamy dip with the cool, crisp chip is pure perfection.

Nutritional Information

The following nutritional estimate is for a 1/4 cup serving of the dip, without additional chips or toppings. This recipe yields approximately 12 servings.

  • Calories: ~180 kcal
  • Total Fat: 12g
  • Saturated Fat: 6g
  • Cholesterol: 45mg
  • Sodium: 580mg
  • Total Carbohydrates: 5g
  • Dietary Fiber: 0g
  • Sugars: 3g
  • Protein: 12g

Note: Sodium content is primarily from the processed cheese and canned tomatoes. Values are approximate and may vary based on specific ingredient brands and any modifications.

Healthier Alternatives

Love the flavor but want a lighter version? You can easily adapt this classic without sacrificing taste. Here are my top tested swaps:

  • Leaner Protein: Swap the ground beef for 93% lean ground turkey or chicken. For a plant-based option, use a meatless crumble or a can of rinsed black beans (add with the Rotel).
  • Lower-Sodium Cheese: While traditional Velveeta is key for texture, you can use a “Reduced Fat” or “2% Milk” Velveeta block. Alternatively, combine 8 oz of low-fat cream cheese with 1 cup of freshly shredded sharp cheddar and 1/4 cup of milk for a slightly different, but still delicious, creamy base.
  • Boost Nutrition: Stir in 1 cup of finely chopped spinach or riced cauliflower during the simmer stage. They’ll blend right into the cheesy sauce, adding vitamins and fiber without changing the flavor profile significantly.
  • Serving Swap: Instead of tortilla chips, serve with sliced bell peppers, cucumber rounds, carrot sticks, or whole-grain pita chips for added nutrients and fiber.

Serving Suggestions

This dip is incredibly versatile. While tortilla chips are the classic vehicle, don’t limit yourself!

  • The Ultimate Game Day Spread: Serve this dip alongside buffalo wings, celery sticks, and a platter of nachos. It’s the perfect creamy counterpoint to spicy foods.
  • Baked Potato Topper: Spoon this warm Rotel dip over a baked potato for an incredibly satisfying and easy meal.
  • Loaded Nachos Base: Use it as the first layer on a sheet pan of tortilla chips, then top with black olives, green onions, and extra cheese before a quick broil.
  • Breakfast Twist: Serve it warm with soft pretzel bites or drizzle it over scrambled eggs for a hearty weekend breakfast.

Common Mistakes

Avoid these pitfalls to ensure your dip is flawless:

  • High Heat Melting: Adding cheese to high heat causes it to break, becoming oily and grainy. Always melt on low.
  • Draining All the Fat: While draining excess grease is good, removing every bit can leave the beef tasting dry and the dip lacking depth. Leave a teaspoon for flavor.
  • Using “No Salt Added” Rotel Without Adjusting: The salt in the standard Rotel and Velveeta is part of the flavor balance. If you use a no-salt version, you may need to add a pinch of salt to taste.
  • Letting It Sit Too Long: This dip is best served fresh and warm. If it cools and thickens, simply reheat it slowly with a splash of milk to restore the creamy consistency.

Storing Tips

Refrigeration: Allow the dip to cool completely, then transfer it to an airtight container. It will keep in the refrigerator for 3-4 days.
Freezing: While you can freeze this dip for up to 2 months, note that the texture of the dairy may change slightly upon thawing, becoming a bit grainier. Store in a freezer-safe container. To serve, thaw overnight in the fridge and reheat gently on the stove over low heat, adding a tablespoon or two of milk or water to help reconstitute the creamy texture.
Reheating: The best method is on the stovetop over low heat, stirring frequently. You can also use a microwave, heating in 30-second intervals and stirring well between each to prevent scorching.

Conclusion

This Easy Rotel Dip is more than just a recipe; it’s a ticket to stress-free entertaining and guaranteed compliments. Its magical combination of creamy Velveeta, zesty Rotel, and savory ground beef creates a flavor and texture that is universally loved. In just 20 minutes, you can create a centerpiece appetizer that feels indulgent and comforting. I encourage you to make it your own—try the healthier swaps, add your favorite spices, or serve

Orange Croissant Breakfast Bake

Orange Croissant Breakfast Bake

Introduction

Did you know that over 65% of people consider a warm, comforting breakfast the key to a perfect weekend? If you’re searching for a brunch showstopper that combines buttery indulgence with a burst of citrus sunshine, you’ve found it. This Orange Croissant Breakfast Bake is more than just a recipe; it’s a sensory experience designed to elevate your mornings. Imagine flaky, golden croissants soaked in a creamy, vanilla-kissed custard, infused with the bright, aromatic zest of fresh oranges. The result is a dish with a luxuriously soft, almost pudding-like center and irresistibly crisp, caramelized edges. It’s the ultimate cozy morning treat that feels both refreshing and decadently indulgent, proving that the best brunches are often the simplest to assemble.

Ingredients List

Gather these simple ingredients for a dish that sings with flavor. Using high-quality components makes a noticeable difference in the final bake.

  • 6 large day-old croissants (about 1 lb): Stale croissants absorb the custard better without falling apart, giving you that perfect custardy texture. Substitution: Brioche or challah bread, cut into 1-inch cubes.
  • 4 large eggs: The backbone of our rich custard, providing structure and a golden color.
  • 1 ½ cups whole milk: For a luscious, creamy base. Substitution: 2% milk works, but the custard will be slightly less rich. For extra decadence, use half-and-half.
  • 1 cup heavy cream: This is the secret to the luxurious, velvety mouthfeel. Substitution: For a lighter version, use an additional 1 cup of whole milk.
  • ¾ cup granulated sugar: Sweetens the custard and helps create those beautiful caramelized edges.
  • Zest of 2 large oranges (about 2 tablespoons): This is where the magic happens! The vibrant, aromatic oils in the zest provide the intense citrus flavor without adding liquid. Use organic oranges if possible.
  • ⅓ cup fresh orange juice: Amplifies the orange flavor and adds a subtle tang. Freshly squeezed is highly recommended over bottled.
  • 2 teaspoons pure vanilla extract: Adds a warm, fragrant depth that complements the citrus perfectly.
  • ¼ teaspoon salt: A crucial ingredient that balances all the sweetness and enhances every other flavor.
  • For the topping (optional but recommended):
    • Powdered sugar for dusting
    • Fresh orange segments or slices
    • A dollop of whipped cream or a drizzle of maple syrup

Timing

Prep Time
15 minutes
Cook Time
45-50 minutes
Total Time
60-65 minutes (plus optional 30-min soak)

Compared to many elaborate breakfast casseroles that require overnight soaking, this Orange Croissant Bake is remarkably quick from bowl to table. The active prep time is under 20 minutes, making it a fantastic last-minute option for weekend guests. The baking time is standard, but the optional 30-minute soak for the croissants (while the oven preheats) can lead to an even more integrated, custard-soaked interior. This efficient timeline means you can enjoy a gourmet-feeling brunch with minimal fuss.

Orange Croissant Breakfast Bake fresh from the oven, showing golden brown croissants in a creamy custard

Our Orange Croissant Breakfast Bake, fresh from the oven and ready to delight.

Step-by-Step Instructions

Step 1: Prepare the Croissants

Start by preheating your oven to 350°F (175°C). Lightly grease a 9×13 inch baking dish with butter or non-stick spray. Take your day-old croissants and tear them into large, rustic chunks—about 1.5 to 2 inches in size. Tearing, rather than cutting, creates more nooks and crannies for the custard to cling to, resulting in a better texture. Evenly distribute the croissant pieces in the prepared baking dish. If you have a few extra minutes, let them sit out on the counter to dry slightly further while you make the custard.

Step 2: Make the Orange Custard

In a large mixing bowl, whisk the 4 eggs vigorously until they are well beaten and slightly frothy. This initial aeration helps create a lighter custard. Add the granulated sugar and salt, and whisk for another minute until the mixture is pale and the sugar begins to dissolve. Slowly pour in the whole milk and heavy cream while continuously whisking to ensure everything combines smoothly. Now, add the star flavors: the fresh orange zest, orange juice, and vanilla extract. Whisk everything together until you have a beautifully fragrant, homogenous liquid. Take a moment to smell it—the bright citrus aroma is your first taste of the final dish!

Step 3: Assemble and Soak

Carefully and slowly pour the orange custard mixture over the croissant pieces in the baking dish. Using a spatula or your hands, gently press the croissants down into the custard to ensure every piece gets thoroughly soaked. You want them saturated but not completely submerged and mushy. For the best results, let the dish sit for 15-30 minutes at room temperature. This allows the croissants to drink up the custard, leading to a more uniform texture after baking. If you’re in a hurry, you can bake it immediately, but the soak is a game-changer for custard integration.

Step 4: Bake to Perfection

Place the baking dish on the center rack of your preheated oven. Bake for 45 to 50 minutes. You’re looking for a specific visual cue: the top should be a deep, golden brown with some crisp edges, and the center should be set but still have a slight jiggle (it will firm up as it cools). If the top is browning too quickly, you can loosely tent it with aluminum foil for the last 10-15 minutes of baking. The smell filling your kitchen will be absolutely divine—a mix of buttery pastry, caramelized sugar, and sweet orange.

Step 5: Serve and Garnish

Remove the bake from the oven and let it rest for 5-10 minutes. This rest period allows the custard to finish setting, making it easier to slice and serve. Just before serving, dust the top generously with powdered sugar using a fine-mesh sieve. Garnish with fresh orange segments or thin slices for a pop of color and extra freshness. Serve warm, offering whipped cream or a small pitcher of maple syrup on the side for those who want an extra touch of sweetness.

Nutritional Information

The following nutritional estimate is for one serving (based on 8 servings per bake). Please note that values can vary based on specific ingredients and portion sizes.

  • Calories: ~420 kcal
  • Total Fat: 24g
  • Saturated Fat: 14g
  • Cholesterol: 165mg
  • Sodium: 320mg
  • Total Carbohydrates: 42g
  • Dietary Fiber: 1g
  • Sugars: 25g
  • Protein: 9g

Healthier Alternatives

Love the flavor but want a lighter version? These simple swaps maintain the spirit of the dish while adjusting the nutritional profile:

  • Croissants: Use whole-grain croissants or a hearty whole-wheat brioche for added fiber.
  • Dairy: Substitute the whole milk and heavy cream with unsweetened almond milk or oat milk. For the cream, try using light coconut milk for richness without the dairy fat.
  • Sugar: Reduce the granulated sugar to ½ cup and consider using coconut sugar or a monk fruit blend for a lower glycemic index. The orange zest provides so much flavor that you can often get away with less sugar.
  • Eggs: For a slightly lighter option, use 2 whole eggs and 4 egg whites.
  • Topping: Skip the powdered sugar and top with a dollop of Greek yogurt sweetened with a touch of honey and extra orange zest.

Serving Suggestions

This bake is incredibly versatile and can anchor any meal from a casual family breakfast to an elegant holiday brunch.

  • Classic Brunch Spread: Pair it with crispy bacon or savory breakfast sausages to balance the sweetness. A simple arugula salad with a lemon vinaigrette adds a refreshing, peppery contrast.
  • Holiday Breakfast: Serve alongside a quiche Lorraine and a fruit platter for a complete and impressive buffet.
  • As a Dessert: Serve it warm in bowls with a scoop of vanilla bean ice cream or a bourbon-caramel sauce for a stunning dessert.
  • Beverage Pairings: A glass of cold, freshly squeezed orange juice, a mimosa, a hot cup of coffee, or a citrus-infused black tea all complement the flavors beautifully.

Common Mistakes

Avoid these pitfalls to ensure your breakfast bake turns out perfectly every time.

  • Using Fresh, Soft Croissants: This is the #1 mistake. Very fresh croissants will turn to mush in the custard. Day-old or slightly stale pastries hold their structure better and absorb liquid more effectively.
  • Overmixing the Custard: Whisk until just combined. Over-whisking can incorporate too much air, leading to a foamy, less creamy texture.
  • Skipping the Resting Soak: While you can bake immediately, not allowing the croissants to soak for at least 15 minutes often results in dry patches within the bake.
  • Overbaking: The bake is done when the center is set but still jiggly, not rock solid. It continues to cook from residual heat as it cools. Overbaking leads to a rubbery custard.
  • Using Bottled Orange Juice: The flavor of fresh-squeezed juice is brighter and less processed-tasting. Bottled juice can have a flat or metallic note.

Storing Tips

This dish is best served fresh, but leftovers can still be delicious with proper storage.

  • Refrigeration:

Baked Rice with Vegetables & Chicken – Cozy One-Pot Magic!

Baked Rice with Vegetables & Chicken – Cozy One-Pot Magic!

Introduction

Did you know that over 70% of home cooks report feeling stressed by weeknight dinners? If you’re looking for a hearty, satisfying meal with minimal fuss, then baked rice with vegetables and chicken is the recipe for you. This classic French-inspired dish, often reminiscent of a comforting pilaf or a simplified “riz au four,” combines the comforting flavors of rice, tender chicken, and a colorful array of vegetables—all baked to perfection in one dish. Not only is it easy to make, but it’s also healthy and full of nutrients to keep you and your family satisfied. Let’s dive into the ultimate recipe guide to prepare this delicious baked rice with vegetables and chicken that’s perfect for a cozy weeknight dinner or an inviting meal to impress guests. The magic lies in the layering of flavors and the hands-off baking method, which frees you up to set the table or simply relax.

Ingredients List

Gathering fresh, vibrant ingredients is the first step to culinary success. Here’s what you’ll need for this comforting one-pot wonder. I’ve included sensory notes and substitutions to make this recipe your own.

  • For the Chicken & Marinade:
    • 1.5 lbs (700g) boneless, skinless chicken thighs – Thighs stay incredibly juicy during baking. Substitution: Chicken breasts (cut into chunks) or even 4-6 bone-in, skin-on chicken pieces for extra flavor.
    • 2 tbsp olive oil – For richness and to prevent sticking.
    • 1 tsp smoked paprika – Adds a warm, smoky depth.
    • 1 tsp dried thyme – Earthy, aromatic notes.
    • 1 tsp garlic powder – For consistent, mellow garlic flavor.
    • Salt and freshly ground black pepper – To taste.
  • For the Baked Rice & Vegetables:
    • 1.5 cups long-grain white rice – Like Basmati or Jasmine. Note: Rinse until water runs clear to remove excess starch for fluffier results.
    • 1 large yellow onion, diced – The sweet, caramelized base of our dish.
    • 3 cloves garlic, minced – For that essential pungent, aromatic kick.
    • 1 large carrot, diced – Adds a subtle sweetness and vibrant orange color.
    • 1 red bell pepper, diced – Brings a sweet, slightly tangy flavor and beautiful red hue.
    • 1 cup broccoli florets – For a fresh, green crunch. Substitution: Green beans, zucchini, or peas.
    • 3 cups low-sodium chicken broth – The cooking liquid that infuses the rice with savory flavor. Substitution: Vegetable broth for a vegetarian version.
    • 1 (14.5 oz) can diced tomatoes, undrained – Adds acidity, moisture, and a beautiful red tint to the rice.
    • 2 tbsp tomato paste – Concentrated umami to deepen the sauce.
    • 1 bay leaf – A classic aromatic that whispers of French countryside cooking.
    • Fresh parsley, chopped (for garnish) – A bright, fresh finish.

Timing

One of the biggest advantages of this baked rice with vegetables and chicken is its efficient timeline. Unlike many casseroles that require lengthy prep and babysitting, this recipe maximizes flavor with minimal active time.

Prep Time20 minutes
Cook Time45 minutes
Total Time1 hour 5 minutes

Compared to the average one-pot recipe that might require 30+ minutes of stovetop stirring, the baking method here is largely hands-off. The 45-minute bake time is mostly inactive, allowing you to multitask. The total time is under 70 minutes from fridge to table—a significant win for busy weeknights.

Baked Rice with Vegetables & Chicken – Cozy One-Pot Magic!

Golden-brown chicken nestled in vibrant, fluffy baked rice with vegetables—the ultimate comfort food.

Step-by-Step Instructions

Follow these detailed, personalized steps to ensure your baked rice with vegetables and chicken turns out perfectly every single time.

Step 1: Prepare Your Ingredients

This is your “mise en place” moment, and it makes the cooking process seamless. Pat your chicken thighs dry with paper towels—this is crucial for getting a good sear. In a small bowl, combine the olive oil, smoked paprika, dried thyme, garlic powder, salt, and pepper. Rub this fragrant marinade all over the chicken and set it aside. Meanwhile, dice your onion, carrot, and bell pepper into similar-sized pieces for even cooking. Mince the garlic, rinse your rice in a fine-mesh strainer until the water runs clear, and measure out your broth. Having everything ready transforms cooking from a chore into a joyful, fluid experience.

Step 2: Brown the Chicken

Preheat your oven to 375°F (190°C). Grab a large, deep oven-safe skillet or Dutch oven (this is your one-pot hero!) and heat it over medium-high heat. Add a drizzle of oil. Once hot, add the marinated chicken thighs. Let them cook undisturbed for 4-5 minutes per side until they develop a beautiful, golden-brown crust. Don’t crowd the pan; work in batches if needed. This step isn’t about cooking the chicken through—it’s about building a foundation of flavor (fond) in the bottom of the pot. Once browned, transfer the chicken to a clean plate. The anticipation builds as your kitchen fills with the smell of smoky paprika and seared chicken.

Step 3: Sauté the Aromatics

In the same pot with all those delicious browned bits, add the diced onion. Sauté for 3-4 minutes until it becomes translucent and fragrant. Now, add the minced garlic and stir for just 30 seconds until its aroma blooms—be careful not to let it burn. Next, stir in the diced carrot and red bell pepper. Cook for another 4-5 minutes, allowing the vegetables to soften slightly and their natural sugars to start caramelizing. You’re building layers of flavor that will infuse the entire dish.

Step 4: Toast the Rice

Add the rinsed and drained rice to the pot with the sautéed vegetables. Stir constantly for 2-3 minutes. You’ll notice the rice grains becoming slightly opaque and maybe even making a faint clicking sound. This toasting step is a game-changer—it seals the rice grains, helping them stay separate and fluffy after baking, and it gives them a wonderful nutty undertone.

Step 5: Add Liquid and Vegetables

Pour in the chicken broth, the can of diced tomatoes (with their juices), and the tomato paste. Add the bay leaf. Stir everything thoroughly, scraping up any browned bits from the bottom of the pot—that’s pure flavor gold. Bring the mixture to a gentle simmer. Taste the liquid and season with salt and pepper. Now, nestle the browned chicken thighs back into the pot, pressing them down slightly into the rice mixture. Scatter the broccoli florets over the top. The vibrant colors at this stage are a promise of the delicious meal to come.

Step 6: Bake to Perfection

Cover the pot tightly with its lid (or use heavy-duty aluminum foil if your skillet doesn’t have one). Carefully transfer it to the preheated oven. Bake for 35-40 minutes. The magic happens here: the rice absorbs all the flavorful liquid, the chicken cooks through to tender perfection, and the vegetables steam gently. Resist the urge to peek before 30 minutes to keep the steam trapped inside.

Step 7: Rest and Serve

Once the time is up, remove the pot from the oven. Do not remove the lid yet! Let the dish rest, covered, for 10 full minutes. This is a non-negotiable step—it allows the rice to finish steaming and become perfectly tender, and it lets the juices redistribute throughout the chicken. After resting, remove the lid and the bay leaf. Fluff the rice gently with a fork. Garnish generously with freshly chopped parsley for a pop of color and freshness.

Nutritional Information

This dish is a balanced meal in one pot. The following estimates are per serving (assuming 6 servings) and are based on using low-sodium broth and skinless chicken thighs.

  • Calories: ~480 kcal
  • Protein: 32g – Excellent for muscle repair and satiety.
  • Carbohydrates: 55g – Primarily from rice and vegetables, providing sustained energy.
  • Dietary Fiber: 4g – Aids digestion and helps you feel full.
  • Sugars: 6g (naturally occurring from vegetables and tomatoes).
  • Fat: 14g – Mostly healthy unsaturated fats from olive oil and chicken.
  • Sodium: ~450mg (can be lower if you control added salt).

Healthier Alternatives

Want to tweak this baked rice with vegetables and chicken to fit specific dietary goals? Here are some flavorful, nutrition-conscious swaps that don’t sacrifice taste:

  • For Lower Carbs / Higher Protein: Swap white rice for cauliflower rice. Add it in the last 15 minutes of baking to prevent it from becoming mushy. You can also use quinoa (rinse well) and adjust liquid slightly (use 2.5 cups broth for 1.5 cups quinoa).
  • For a Leaner Option: Use skinless chicken breasts instead of thighs. To prevent dryness, cut them into large chunks and reduce the initial browning time to 2-3 minutes per side.
  • To Boost Fiber & Nutrients: Use brown rice. Increase the broth to 3.5 cups and extend the bake time