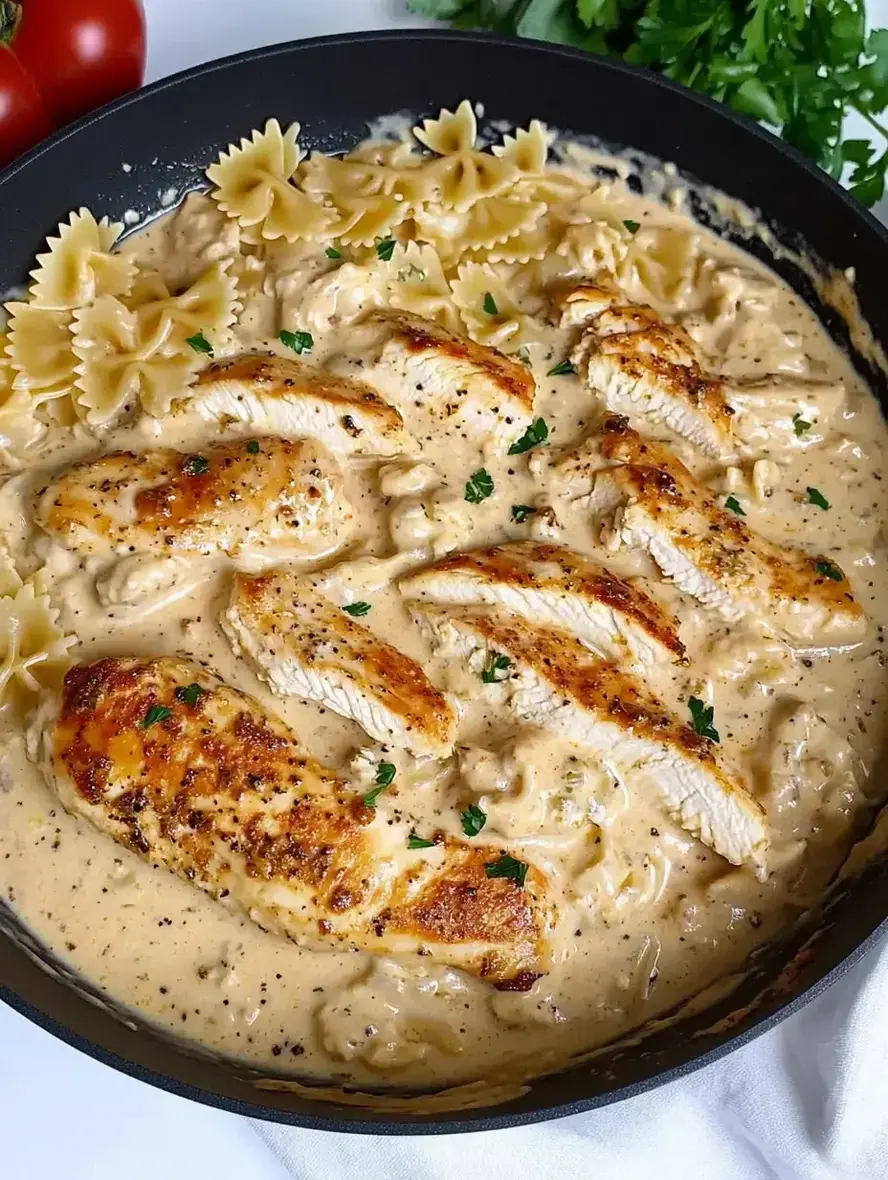
Creamy Parmesan Pasta with Garlic Butter Chicken Bites

“`html

Creamy Parmesan Pasta with Garlic Butter Chicken Bites

Craving a Weeknight Wonder?

Are you looking for a dish that’s both incredibly satisfying and surprisingly easy to make? In a world full of culinary complexities, sometimes the best meals are the ones that unite simple, high-quality ingredients into a symphony of flavor. If you’re nodding along, then you’re in the right place! This Creamy Parmesan Pasta with Garlic Butter Chicken Bites is designed to be your new go-to. Imagine tender, succulent chicken bites, kissed with fragrant garlic and butter, nestled amongst a bed of al dente pasta coated in a rich, velvety parmesan sauce. It’s comfort food at its finest, perfect for those busy weeknights when you want something special without the fuss, or for those moments when you want to impress guests with minimal effort but maximum deliciousness. Let’s dive into how to create this crowd-pleasing masterpiece that will have everyone asking for seconds!

The Star Ingredients

The magic of this dish lies in the quality of its components. Fresh ingredients transform a simple pasta dish into an unforgettable culinary experience. Here’s what you’ll need to gather:

For the Creamy Parmesan Pasta:

  • 1 pound pasta (fettuccine, linguine, or penne work beautifully): Choose a pasta shape that holds sauce well for maximum deliciousness. Al dente is key!
  • 2 tablespoons unsalted butter: The foundation of our luscious sauce, providing richness and a smooth texture.
  • 2 cloves garlic, minced: Adds that pungent, aromatic depth that complements the parmesan perfectly.
  • 1 ½ cups heavy cream: The secret to a truly decadent and creamy sauce that coats every strand of pasta. (See Healthier Alternatives for a lighter option.)
  • 1 cup freshly grated Parmesan cheese: Use the good stuff! Freshly grated Parmesan melts better and offers a sharper, more complex flavor than pre-shredded. It should be nutty and slightly salty.
  • ½ teaspoon salt, or to taste: Essential for bringing out all the flavors.
  • ¼ teaspoon black pepper, or to taste: A hint of spice to balance the creaminess.
  • Optional: ¼ cup reserved pasta water: This starchy liquid is gold for achieving the perfect sauce consistency.

For the Garlic Butter Chicken Bites:

  • 1 ½ pounds boneless, skinless chicken breasts or thighs, cut into 1-inch bite-sized pieces: Thighs tend to be more forgiving and moist, but breasts are leaner.
  • 1 tablespoon olive oil: For searing the chicken and building flavor.
  • 2 tablespoons unsalted butter: To create that irresistible garlic butter coating.
  • 3 cloves garlic, minced: Double the garlic, double the deliciousness!
  • ½ teaspoon dried Italian seasoning (or a mix of dried oregano, basil, and thyme): Adds a subtle herby note.
  • Salt and freshly ground black pepper, to taste: Season generously for maximum flavor impact.
  • Optional garnish: Fresh parsley, chopped: For a pop of color and fresh herbaceousness.

Timing is Everything

Prep time: 15 minutes
Cook time: 25 minutes
Total time: 40 minutes

This recipe is designed for efficiency, coming together in about 40 minutes from start to finish. This is notably faster than many other complex pasta dishes, making it ideal for weeknight dinners. Most family-favorite pasta recipes average around 45-60 minutes, so you’re saving precious time while still delivering a gourmet meal!

Creamy Parmesan Pasta with Garlic Butter Chicken Bites

Crafting Your Culinary Masterpiece

Step 1: Prepare the Chicken

Start by ensuring your chicken is cut into uniform, bite-sized pieces. This guarantees even cooking. Pat the chicken dry with paper towels – this is crucial for achieving a beautiful sear and preventing steaming. Season generously with salt and pepper. Set aside.

Step 2: Cook the Pasta

Bring a large pot of generously salted water to a rolling boil. Add your chosen pasta and cook according to package directions until al dente – it should still have a slight bite. Before draining, reserve about 1 cup of the starchy pasta water. Drain the pasta and set it aside. Do not rinse!

Step 3: Make the Garlic Butter Sauce

While the pasta cooks, melt 2 tablespoons of butter in a large skillet or saucepan over medium heat. Add the minced garlic and sauté for about 1 minute until fragrant, being careful not to burn it. Pour in the heavy cream and bring it to a gentle simmer. Let it bubble softly for 2-3 minutes to thicken slightly. Stir in the grated Parmesan cheese, salt, and pepper until the cheese is fully melted and the sauce is smooth and creamy. If the sauce seems too thick, you can add a splash of the reserved pasta water to reach your desired consistency.

Step 4: Cook the Chicken Bites

In a separate skillet, heat 1 tablespoon of olive oil over medium-high heat. Add the seasoned chicken pieces in a single layer (you may need to cook in batches to avoid crowding the pan). Sear the chicken for about 3-4 minutes per side, until golden brown and cooked through. Once the chicken is cooked, add the remaining 2 tablespoons of butter and the minced garlic (the second batch of garlic!) and Italian seasoning to the skillet. Swirl the pan until the butter is melted and the garlic is fragrant. Toss the chicken in this glorious garlic butter for about 1 minute, ensuring each piece is coated.

Step 5: Combine and Finish

Add the drained pasta directly into the skillet with the creamy Parmesan sauce. Toss gently to coat all the pasta strands. Now, add the garlic butter chicken bites to the pasta. Toss everything together to combine. If the sauce is too thick, add a little more of the reserved pasta water to loosen it up. Taste and adjust seasoning if needed.

Nutritional Highlights

While this dish is a decadent treat, here’s a general idea of what you can expect per serving (assuming 4 servings). Exact values will vary based on ingredients used.

  • Calories: Approx. 650-750
  • Protein: Approx. 30-40g
  • Fat: Approx. 40-50g
  • Carbohydrates: Approx. 40-50g

Note: This is an estimation. For precise nutritional information, it’s recommended to use a nutritional calculator with your specific ingredients and portion sizes.

Making it Lighter Without Sacrificing Flavor

Want to enjoy this creamy delight with fewer calories or less fat? Try these smart swaps:

  • Lighter Cream Sauce: Swap half of the heavy cream with half-and-half or whole milk. For an even lighter version, use evaporated milk (seasons and thickens well) or a blend of low-fat milk and a cornstarch slurry (1 tbsp cornstarch mixed with 2 tbsp cold water, simmered into the sauce until thickened).
  • Leaner Chicken: Chicken breast is inherently leaner than thighs.
  • Whole Wheat Pasta: Opt for whole wheat pasta for added fiber and nutrients.
  • Vegetable Boost: Stir in steamed broccoli florets, sautéed spinach, or peas with the pasta for added fiber and vitamins.
  • Reduced Cheese: Use slightly less Parmesan, or supplement with nutritional yeast for a cheesy flavor boost with fewer calories.

Serving Suggestions

This pasta dish is quite hearty on its own, but here are a few ideas to complete your meal:

  • A Crisp Green Salad: A simple side salad with a light vinaigrette cuts through the richness beautifully.
  • Garlic Bread: What’s pasta without a side of crusty garlic bread for dipping into any leftover sauce?
  • Steamed Asparagus or Broccoli: Adds a fresh, vibrant element and extra nutrients.
  • A glass of crisp white wine like Pinot Grigio or Sauvignon Blanc.

Common Mistakes to Avoid

Ensure your pasta night is a success by avoiding these common pitfalls:

  • Overcooking the Pasta: Mushy pasta is a tragedy! Always cook to al dente, remembering it will continue to cook slightly when mixed with the sauce.
  • Not Salting the Pasta Water: This is your only chance to season the pasta itself. Make it taste like the sea!
  • Burning the Garlic: Burnt garlic turns bitter. Sauté it gently until fragrant, not browned.
  • Rinsing the Pasta: This washes away the starch that helps the sauce cling to the pasta.
  • Using Pre-Shredded Parmesan: It often contains anti-caking agents that prevent it from melting smoothly.

Storing and Reheating Leftovers

Leftovers can be stored in an airtight container in the refrigerator for up to 3 days. The sauce may thicken considerably upon cooling.

To reheat: Gently warm the pasta and chicken in a skillet over low heat, adding a splash of milk, cream, or pasta water to loosen the sauce. You can also microwave, but be sure to stir halfway through and add a little liquid to prevent drying out.

A Comforting Classic, Elevated

There you have it – a restaurant-worthy Creamy Parmesan Pasta with Garlic Butter Chicken Bites ready in under an hour! This dish strikes a perfect balance between indulgent comfort and weeknight practicality. The creamy, cheesy sauce is a hug in a bowl, while the tender, garlicky chicken bites add a delightful protein punch. It’s versatile, delicious, and guaranteed to become a family favorite. Don’t wait – gather your ingredients and bring this delightful meal to your table tonight!

FAQs

***What kind of pasta is best for this recipe?***

Long pastas like fettuccine or linguine are fantastic as they get coated evenly in the creamy sauce. However, shorter shapes like penne, farfalle, or rotini also work well and trap the sauce beautifully.

***Can I make this dish vegetarian?***

Absolutely! Simply omit the chicken. You can add sautéed mushrooms, roasted bell peppers, or steamed broccoli for extra texture and flavor. You might want to sauté some extra garlic and herbs in the butter before adding the cream to enhance the non-chicken flavors.

***Why is my sauce not creamy?***

Ensure you are using heavy cream, not milk or half-and-half for the richest sauce. Also, make sure your Parmesan cheese is freshly grated and melted slowly over medium-low heat. Don’t boil the sauce vigorously after adding the cheese, as it can cause it to break.

***Can I use pre-cooked chicken?***

Yes, you can! If using pre-cooked chicken (like rotisserie chicken), simply add it to the garlic butter for the last minute of cooking to warm it through and coat it. You won’t need to sear it.

Print
clock clock iconcutlery cutlery iconflag flag iconfolder folder iconinstagram instagram iconpinterest pinterest iconfacebook facebook iconprint print iconsquares squares iconheart heart iconheart solid heart solid icon

Garlic Butter Chicken Bites with Creamy Parmesan Pasta

  • Author: Chef Sara

Description

This delightful dish combines tender, garlicky chicken bites with a rich and creamy Parmesan pasta for the ultimate comfort food. It’s an easy, satisfying meal that’s perfect for busy weeknights or a cozy dinner.


Ingredients

Scale
  • 1lb chicken breast, cubed8 ozpasta (penne or rotini)4 tbspbutter2cloves garlic, minced1 cupheavy cream1 cupgrated Parmesan cheeseSalt and pepper, to tasteFresh basil, for garnish
  • 8 ozpasta (penne or rotini)4 tbspbutter2cloves garlic, minced1 cupheavy cream1 cupgrated Parmesan cheeseSalt and pepper, to tasteFresh basil, for garnish
  • 4 tbspbutter2cloves garlic, minced1 cupheavy cream1 cupgrated Parmesan cheeseSalt and pepper, to tasteFresh basil, for garnish
  • 2cloves garlic, minced1 cupheavy cream1 cupgrated Parmesan cheeseSalt and pepper, to tasteFresh basil, for garnish
  • 1 cupheavy cream1 cupgrated Parmesan cheeseSalt and pepper, to tasteFresh basil, for garnish
  • 1 cupgrated Parmesan cheeseSalt and pepper, to tasteFresh basil, for garnish
  • Salt and pepper, to tasteFresh basil, for garnish
  • Fresh basil, for garnish

Instructions

  1. 1️⃣Cook the Pasta:Bring a large pot of salted water to a boil.Cook the pasta according to package directions until al dente. Drain and set aside.2️⃣Cook the Chicken:Heat a large skillet over medium heat and melt the butter.Add the minced garlic and sauté for 1-2 minutes, until fragrant.Add the cubed chicken, cooking for 6-8 minutes, stirring occasionally, until golden brown and fully cooked. Season with salt and pepper.3️⃣Make the Sauce:Lower the heat and stir in the heavy cream, scraping up any browned bits from the skillet for extra flavor.Gradually add the Parmesan cheese, stirring until the sauce is smooth and creamy. Adjust seasoning with salt and pepper as needed.4️⃣Combine and Serve:Add the cooked pasta to the skillet and toss to coat it evenly in the creamy sauce.Garnish with fresh basil leaves and serve immediately.
  2. Bring a large pot of salted water to a boil.
  3. Cook the pasta according to package directions until al dente. Drain and set aside.2️⃣Cook the Chicken:Heat a large skillet over medium heat and melt the butter.Add the minced garlic and sauté for 1-2 minutes, until fragrant.Add the cubed chicken, cooking for 6-8 minutes, stirring occasionally, until golden brown and fully cooked. Season with salt and pepper.3️⃣Make the Sauce:Lower the heat and stir in the heavy cream, scraping up any browned bits from the skillet for extra flavor.Gradually add the Parmesan cheese, stirring until the sauce is smooth and creamy. Adjust seasoning with salt and pepper as needed.4️⃣Combine and Serve:Add the cooked pasta to the skillet and toss to coat it evenly in the creamy sauce.Garnish with fresh basil leaves and serve immediately.
  4. 2️⃣Cook the Chicken:Heat a large skillet over medium heat and melt the butter.Add the minced garlic and sauté for 1-2 minutes, until fragrant.Add the cubed chicken, cooking for 6-8 minutes, stirring occasionally, until golden brown and fully cooked. Season with salt and pepper.3️⃣Make the Sauce:Lower the heat and stir in the heavy cream, scraping up any browned bits from the skillet for extra flavor.Gradually add the Parmesan cheese, stirring until the sauce is smooth and creamy. Adjust seasoning with salt and pepper as needed.4️⃣Combine and Serve:Add the cooked pasta to the skillet and toss to coat it evenly in the creamy sauce.Garnish with fresh basil leaves and serve immediately.
  5. Heat a large skillet over medium heat and melt the butter.
  6. Add the minced garlic and sauté for 1-2 minutes, until fragrant.Add the cubed chicken, cooking for 6-8 minutes, stirring occasionally, until golden brown and fully cooked. Season with salt and pepper.3️⃣Make the Sauce:Lower the heat and stir in the heavy cream, scraping up any browned bits from the skillet for extra flavor.Gradually add the Parmesan cheese, stirring until the sauce is smooth and creamy. Adjust seasoning with salt and pepper as needed.4️⃣Combine and Serve:Add the cooked pasta to the skillet and toss to coat it evenly in the creamy sauce.Garnish with fresh basil leaves and serve immediately.
  7. Add the cubed chicken, cooking for 6-8 minutes, stirring occasionally, until golden brown and fully cooked. Season with salt and pepper.3️⃣Make the Sauce:Lower the heat and stir in the heavy cream, scraping up any browned bits from the skillet for extra flavor.Gradually add the Parmesan cheese, stirring until the sauce is smooth and creamy. Adjust seasoning with salt and pepper as needed.4️⃣Combine and Serve:Add the cooked pasta to the skillet and toss to coat it evenly in the creamy sauce.Garnish with fresh basil leaves and serve immediately.
  8. 3️⃣Make the Sauce:
  9. Lower the heat and stir in the heavy cream, scraping up any browned bits from the skillet for extra flavor.Gradually add the Parmesan cheese, stirring until the sauce is smooth and creamy. Adjust seasoning with salt and pepper as needed.4️⃣Combine and Serve:Add the cooked pasta to the skillet and toss to coat it evenly in the creamy sauce.Garnish with fresh basil leaves and serve immediately.
  10. Gradually add the Parmesan cheese, stirring until the sauce is smooth and creamy. Adjust seasoning with salt and pepper as needed.4️⃣Combine and Serve:Add the cooked pasta to the skillet and toss to coat it evenly in the creamy sauce.Garnish with fresh basil leaves and serve immediately.
  11. 4️⃣Combine and Serve:
  12. Add the cooked pasta to the skillet and toss to coat it evenly in the creamy sauce.Garnish with fresh basil leaves and serve immediately.
  13. Garnish with fresh basil leaves and serve immediately.

Notes

For a touch of heat, add a pinch of red pepper flakes to the butter while cooking the garlic.Substitute half-and-half for a lighter version of the sauce, but the texture may be less creamy.Pair with a side salad or garlic bread for a complete meal.
Substitute half-and-half for a lighter version of the sauce, but the texture may be less creamy.Pair with a side salad or garlic bread for a complete meal.
Pair with a side salad or garlic bread for a complete meal.

“`

Easy Recipes with Pinto Beans for a Delicious Meal

“`html

Easy Recipes with Pinto Beans for a Delicious Meal

Revolutionize Your Weeknight Dinners with Pinto Beans!

Are you looking for a way to inject more flavor, fiber, and plant-based protein into your meals without spending hours in the kitchen? If so, you’re in the right place! Pinto beans, with their creamy texture and mild, earthy taste, are a culinary superhero in disguise. They’re incredibly versatile, budget-friendly, and packed with nutrients, making them an ideal choice for healthy, hearty meals that satisfy. This article will guide you through unlocking the full potential of pinto beans with easy-to-follow recipes and tips, transforming them from a pantry staple to a star ingredient. Get ready to discover just how delicious and simple cooking with pinto beans can be!

The Star Ingredient: Pinto Beans and Their Companions

The beauty of pinto beans lies in their adaptability. For our primary recipe exploration, we’ll focus on dried pinto beans to achieve the best texture and flavor, but canned beans can be a convenient shortcut. Here’s what you’ll typically need, with notes on variations:

  • 1 pound (about 2 cups) dried pinto beans: The heart of our dish. Look for beans without a dusty coating, which often indicates freshness. For a quicker meal, you can substitute 3 cans (15 ounces each) of drained and rinsed pinto beans.
  • Aromatics:
    • 1 large onion, chopped: Yellow or white onions work best, offering a sweet and pungent base.
    • 2-3 cloves garlic, minced: Fresh garlic provides a sharp, aromatic punch.
    • 1 bell pepper (any color), chopped: Adds a subtle sweetness and a hint of vegetal freshness.
  • Liquid Base:
    • 6 cups chicken or vegetable broth (or water): This creates the cooking liquid. Broth adds more depth of flavor.
    • 1 bay leaf: Imparts a subtle, herbal aroma that enhances the beans.
  • Flavor Boosters:
    • 1-2 teaspoons chili powder: Adjust to your spice preference. A mild, good-quality chili powder is perfect.
    • 1/2 teaspoon cumin: Earthy and warm, cumin is a classic partner for beans.
    • Salt and freshly ground black pepper to taste: Essential for bringing out all the flavors.
    • Optional: A pinch of cayenne pepper for extra heat, or a dash of smoked paprika for a smoky undertone.
  • Fat for Sautéing:
    • 2 tablespoons olive oil or your preferred cooking oil: For sautéing the vegetables.

Timing Your Culinary Creation

Prep time: 15 minutes (plus soaking time for dried beans)
Cook time: 1.5 – 2 hours (for dried beans), 15-20 minutes (for canned beans)
Total time: Approximately 2 hours (for dried beans), 30 minutes (for canned beans)

Compared to many elaborate meals, recipes with pinto beans are remarkably efficient, especially when using canned beans. Even with dried beans, the hands-on time is minimal, with most of the time dedicated to slow simmering, a process that develops incredible flavor and tender texture.

A vibrant bowl of pinto beans with fresh herbs and spices.

Step-by-Step Instructions

Step 1: Prep and Soak (For Dried Beans)

Begin by rinsing your dried pinto beans thoroughly under cold running water. Pick through them and discard any small stones or damaged beans. For the best results and to reduce cooking time, soak the beans overnight in a large bowl filled with plenty of water. If you’re short on time, use the quick-soak method: cover the cleaned beans with water, bring to a boil for 2-3 minutes, then remove from heat, cover, and let them sit for 1 hour. After soaking, drain and rinse the beans again.

Step 2: Sauté Aromatics

In a large pot or Dutch oven, heat the olive oil over medium heat. Add the chopped onion and bell pepper. Sauté, stirring occasionally, until they begin to soften and the onion becomes translucent, about 5-7 minutes. This step builds a foundational layer of flavor that will infuse the entire dish.

Step 3: Simmer the Beans

Add the minced garlic to the pot and cook for another minute until fragrant, being careful not to burn it. Now, add the drained and rinsed (soaked) pinto beans to the pot, along with the chicken or vegetable broth (or water) and the bay leaf. Bring the mixture to a boil, then reduce the heat to low, cover, and let it simmer gently. Stir occasionally to prevent sticking. If using canned beans, you’ll add them later, after the aromatics have softened.

Step 4: Flavor Enhancement

After about 1.5 to 2 hours of simmering, the dried beans should be tender. If using canned beans, add them now along with the broth (or water) and bay leaf, and simmer for about 15-20 minutes to allow them to heat through and absorb some flavor. Stir in the chili powder, cumin, and any optional spices like cayenne or smoked paprika. Continue to simmer, uncovered, for another 20-30 minutes, allowing the beans to become exceptionally tender and the liquid to thicken slightly into a rich, flavorful broth. If it gets too thick, you can add a bit more liquid. (If you used canned beans and want a thicker consistency, you can mash a small portion of the beans against the side of the pot with your spoon.)

Step 5: Finish and Serve

Remove the bay leaf. Taste the beans and season generously with salt and freshly ground black pepper. The salt is crucial for bringing out the nutty, deep flavors of the pinto beans. Serve hot, garnished with fresh cilantro or parsley if desired. These beans are incredibly satisfying on their own or as a component of a larger meal.

Nutritional Highlights

Pinto beans are nutritional powerhouses, offering a great source of:

  • Fiber: Excellent for digestive health and satiety.
  • Protein: A fantastic plant-based protein source, ideal for vegetarians and vegans.
  • Vitamins and Minerals: Rich in folate, magnesium, potassium, iron, and B vitamins.
  • Antioxidants: Help combat cell damage.

(Note: Exact nutritional values can vary based on preparation methods and ingredients used.)

Healthier Twists on Your Pinto Bean Recipes

Looking to make your pinto bean dishes even healthier without sacrificing flavor?

  • Reduce Sodium: Use low-sodium broth and generously season with herbs and spices instead of relying solely on salt.
  • Leaner Proteins: If incorporating meat, opt for leaner cuts like chicken breast or turkey.
  • Fresh Produce: Load up on extra vegetables like corn, zucchini, or spinach to boost nutrient density.
  • Fat Swap: Use cooking spray or a smaller amount of a healthy oil like avocado oil.
  • Creaminess: For a creamy texture without heavy cream, mash a portion of the cooked beans or blend them with a little broth.

Serving Suggestions for Maximum Deliciousness

These versatile pinto beans can be enjoyed in so many ways:

  • As a Side Dish: Perfectly complements grilled meats, fish, or poultry.
  • In Soups and Stews: Add them to chili, minestrone, or a hearty vegetable soup for extra body and protein.
  • Burritos and Tacos: Mash them with some taco seasoning for a classic filling.
  • Salads: Toss cold pinto beans into salads for a satisfying, protein-rich addition.
  • Dips: Blend with spices and a touch of lime to create a flavorful bean dip.

Common Pitfalls to Avoid

While pinto beans are forgiving, a few common mistakes can impact the final result:

  • Not Soaking Dried Beans: This leads to significantly longer cooking times and unevenly cooked beans.
  • Adding Salt Too Early: Some believe adding salt too early can toughen dried beans, though in long simmer times, this effect is minimal. It’s generally best to season towards the end.
  • Overcrowding the Pot: Ensure your pot has enough space for the beans to swell and cook evenly.
  • Burning Garlic: Always add minced garlic for the last minute of sautéing; burnt garlic is bitter.

Storing Your Delicious Pinto Beans

Proper storage ensures your pinto bean creations remain delicious for days:

  • Refrigeration: Cooked pinto beans can be stored in an airtight container in the refrigerator for up to 3-4 days.
  • Freezing: For longer storage, cool the beans completely and freeze them in freezer-safe bags or containers for up to 3 months. They’re great for meal prepping!
  • Dried Beans: Store unsoaked dried beans in a cool, dry, dark place in an airtight container for up to a year for optimal freshness.

Embrace the Versatility of Pinto Beans

Pinto beans are a nutritional powerhouse and a culinary chameleon, capable of transforming simple ingredients into deeply satisfying meals. Whether you’re crafting a quick weeknight dinner or a hearty weekend feast, these easy recipes with pinto beans offer a flavorful, healthy, and budget-friendly solution. Don’t underestimate the humble pinto bean; it’s ready to become a staple in your kitchen. Give these methods a try and discover your new favorite way to enjoy this incredible legume!

Frequently Asked Questions

***What is the difference between using dried vs. canned pinto beans?***

Dried pinto beans offer superior texture and allow you to control the sodium content and flavor profile from scratch. However, they require soaking and longer cooking times. Canned pinto beans are a convenient shortcut, already cooked and seasoned, perfect for quick meals but often contain more sodium and can have a slightly softer texture.

***How can I make my pinto beans creamy?***

To achieve a creamy texture, you can mash a portion of the cooked beans against the side of the pot with a spoon as they simmer. For an even creamier result, you can scoop out about a cup of the cooked beans and their liquid, blend them until smooth (using an immersion blender or regular blender), and then stir the mixture back into the pot. Using broth instead of water also contributes to a richer, creamier mouthfeel.

***Can I add other vegetables to my pinto bean recipe?***

Absolutely! Pinto beans are wonderfully versatile. Feel free to add other vegetables like corn, diced carrots, celery, or even leafy greens like spinach or kale towards the end of the cooking time. They will absorb the delicious flavors of the beans and broth.

***How long do cooked pinto beans last?***

Cooked pinto beans will typically last for 3 to 4 days when stored properly in an airtight container in the refrigerator.

***Why are my pinto beans still hard after cooking?***

Several factors can contribute to hard beans: the age of the beans (older beans take longer to cook), insufficient soaking time, not enough liquid during cooking, or adding acidic ingredients (like tomatoes or vinegar) too early in the cooking process, which can inhibit softening.

Print

clock clock iconcutlery cutlery iconflag flag iconfolder folder iconinstagram instagram iconpinterest pinterest iconfacebook facebook iconprint print iconsquares squares iconheart heart iconheart solid heart solid icon

Pinto Beans, Green Chile, and Beef Soup

  • Author: Chef Sara

Description

This hearty, flavorful soup combines tender pinto beans, zesty green chiles, and savory ground beef for a comforting meal. Perfect for weeknights or gatherings, it’s easy to make and packed with bold, satisfying flavors.


Ingredients

Scale
  • 1pound ground beef1 tablespoonolive oil (optional, for lean beef)1medium onion, diced3garlic cloves, minced2 cupscooked pinto beans (or 1 can,15 oz, drained and rinsed)1can (4 oz) diced green chiles (mild or hot)1can (14.5 oz) diced tomatoes (with juices)4 cupsbeef broth (or chicken/vegetable broth)1 teaspoonground cumin1 teaspoonsmoked paprika½ teaspoonchili powder (optional, for heat)Salt and pepper, to taste1 cupfrozen corn (optional, for sweetness)Fresh cilantro, chopped (for garnish)Lime wedges (for serving)
  • 1 tablespoonolive oil (optional, for lean beef)1medium onion, diced3garlic cloves, minced2 cupscooked pinto beans (or 1 can,15 oz, drained and rinsed)1can (4 oz) diced green chiles (mild or hot)1can (14.5 oz) diced tomatoes (with juices)4 cupsbeef broth (or chicken/vegetable broth)1 teaspoonground cumin1 teaspoonsmoked paprika½ teaspoonchili powder (optional, for heat)Salt and pepper, to taste1 cupfrozen corn (optional, for sweetness)Fresh cilantro, chopped (for garnish)Lime wedges (for serving)
  • 1medium onion, diced3garlic cloves, minced2 cupscooked pinto beans (or 1 can,15 oz, drained and rinsed)1can (4 oz) diced green chiles (mild or hot)1can (14.5 oz) diced tomatoes (with juices)4 cupsbeef broth (or chicken/vegetable broth)1 teaspoonground cumin1 teaspoonsmoked paprika½ teaspoonchili powder (optional, for heat)Salt and pepper, to taste1 cupfrozen corn (optional, for sweetness)Fresh cilantro, chopped (for garnish)Lime wedges (for serving)
  • 3garlic cloves, minced2 cupscooked pinto beans (or 1 can,15 oz, drained and rinsed)1can (4 oz) diced green chiles (mild or hot)1can (14.5 oz) diced tomatoes (with juices)4 cupsbeef broth (or chicken/vegetable broth)1 teaspoonground cumin1 teaspoonsmoked paprika½ teaspoonchili powder (optional, for heat)Salt and pepper, to taste1 cupfrozen corn (optional, for sweetness)Fresh cilantro, chopped (for garnish)Lime wedges (for serving)
  • 2 cupscooked pinto beans (or 1 can,15 oz, drained and rinsed)1can (4 oz) diced green chiles (mild or hot)1can (14.5 oz) diced tomatoes (with juices)4 cupsbeef broth (or chicken/vegetable broth)1 teaspoonground cumin1 teaspoonsmoked paprika½ teaspoonchili powder (optional, for heat)Salt and pepper, to taste1 cupfrozen corn (optional, for sweetness)Fresh cilantro, chopped (for garnish)Lime wedges (for serving)
  • 1can (4 oz) diced green chiles (mild or hot)1can (14.5 oz) diced tomatoes (with juices)4 cupsbeef broth (or chicken/vegetable broth)1 teaspoonground cumin1 teaspoonsmoked paprika½ teaspoonchili powder (optional, for heat)Salt and pepper, to taste1 cupfrozen corn (optional, for sweetness)Fresh cilantro, chopped (for garnish)Lime wedges (for serving)
  • 1can (14.5 oz) diced tomatoes (with juices)4 cupsbeef broth (or chicken/vegetable broth)1 teaspoonground cumin1 teaspoonsmoked paprika½ teaspoonchili powder (optional, for heat)Salt and pepper, to taste1 cupfrozen corn (optional, for sweetness)Fresh cilantro, chopped (for garnish)Lime wedges (for serving)
  • 4 cupsbeef broth (or chicken/vegetable broth)1 teaspoonground cumin1 teaspoonsmoked paprika½ teaspoonchili powder (optional, for heat)Salt and pepper, to taste1 cupfrozen corn (optional, for sweetness)Fresh cilantro, chopped (for garnish)Lime wedges (for serving)
  • 1 teaspoonground cumin1 teaspoonsmoked paprika½ teaspoonchili powder (optional, for heat)Salt and pepper, to taste1 cupfrozen corn (optional, for sweetness)Fresh cilantro, chopped (for garnish)Lime wedges (for serving)
  • 1 teaspoonsmoked paprika½ teaspoonchili powder (optional, for heat)Salt and pepper, to taste1 cupfrozen corn (optional, for sweetness)Fresh cilantro, chopped (for garnish)Lime wedges (for serving)
  • ½ teaspoonchili powder (optional, for heat)Salt and pepper, to taste1 cupfrozen corn (optional, for sweetness)Fresh cilantro, chopped (for garnish)Lime wedges (for serving)
  • Salt and pepper, to taste1 cupfrozen corn (optional, for sweetness)Fresh cilantro, chopped (for garnish)Lime wedges (for serving)
  • 1 cupfrozen corn (optional, for sweetness)Fresh cilantro, chopped (for garnish)Lime wedges (for serving)
  • Fresh cilantro, chopped (for garnish)Lime wedges (for serving)
  • Lime wedges (for serving)

Instructions

  1. 1️⃣Brown the Beef:Heat a large pot or Dutch oven over medium heat.Add the ground beef and cook until browned, breaking it into crumbles. If using lean beef, add olive oil to prevent sticking.Drain any excess grease.2️⃣Sauté the Aromatics:Add the diced onion to the pot and sauté for 3–5 minutes until softened.Stir in the minced garlic and cook for 1 minute, until fragrant.3️⃣Build the Soup Base:Add the green chiles, diced tomatoes (with their juices), and pinto beans to the pot.Stir in the cumin, smoked paprika, chili powder (if using), salt, and pepper.4️⃣Add the Broth:Pour in the beef broth and stir well to combine.Bring the soup to a gentle boil, then reduce the heat to low.Let the soup simmer for 15–20 minutes, allowing the flavors to meld.5️⃣Optional Additions:During the last 5 minutes of cooking, stir in the frozen corn for a touch of sweetness.6️⃣Serve:Ladle the soup into bowls and garnish with fresh cilantro.Serve with lime wedges for a tangy finish. Pair with cornbread, tortillas, or crusty bread for a complete meal.
  2. Heat a large pot or Dutch oven over medium heat.Add the ground beef and cook until browned, breaking it into crumbles. If using lean beef, add olive oil to prevent sticking.Drain any excess grease.2️⃣Sauté the Aromatics:Add the diced onion to the pot and sauté for 3–5 minutes until softened.Stir in the minced garlic and cook for 1 minute, until fragrant.3️⃣Build the Soup Base:Add the green chiles, diced tomatoes (with their juices), and pinto beans to the pot.Stir in the cumin, smoked paprika, chili powder (if using), salt, and pepper.4️⃣Add the Broth:Pour in the beef broth and stir well to combine.Bring the soup to a gentle boil, then reduce the heat to low.Let the soup simmer for 15–20 minutes, allowing the flavors to meld.5️⃣Optional Additions:During the last 5 minutes of cooking, stir in the frozen corn for a touch of sweetness.6️⃣Serve:Ladle the soup into bowls and garnish with fresh cilantro.Serve with lime wedges for a tangy finish. Pair with cornbread, tortillas, or crusty bread for a complete meal.
  3. Add the ground beef and cook until browned, breaking it into crumbles. If using lean beef, add olive oil to prevent sticking.
  4. Drain any excess grease.2️⃣Sauté the Aromatics:Add the diced onion to the pot and sauté for 3–5 minutes until softened.Stir in the minced garlic and cook for 1 minute, until fragrant.3️⃣Build the Soup Base:Add the green chiles, diced tomatoes (with their juices), and pinto beans to the pot.Stir in the cumin, smoked paprika, chili powder (if using), salt, and pepper.4️⃣Add the Broth:Pour in the beef broth and stir well to combine.Bring the soup to a gentle boil, then reduce the heat to low.Let the soup simmer for 15–20 minutes, allowing the flavors to meld.5️⃣Optional Additions:During the last 5 minutes of cooking, stir in the frozen corn for a touch of sweetness.6️⃣Serve:Ladle the soup into bowls and garnish with fresh cilantro.Serve with lime wedges for a tangy finish. Pair with cornbread, tortillas, or crusty bread for a complete meal.
  5. 2️⃣Sauté the Aromatics:Add the diced onion to the pot and sauté for 3–5 minutes until softened.Stir in the minced garlic and cook for 1 minute, until fragrant.3️⃣Build the Soup Base:Add the green chiles, diced tomatoes (with their juices), and pinto beans to the pot.Stir in the cumin, smoked paprika, chili powder (if using), salt, and pepper.4️⃣Add the Broth:Pour in the beef broth and stir well to combine.Bring the soup to a gentle boil, then reduce the heat to low.Let the soup simmer for 15–20 minutes, allowing the flavors to meld.5️⃣Optional Additions:During the last 5 minutes of cooking, stir in the frozen corn for a touch of sweetness.6️⃣Serve:Ladle the soup into bowls and garnish with fresh cilantro.Serve with lime wedges for a tangy finish. Pair with cornbread, tortillas, or crusty bread for a complete meal.
  6. Add the diced onion to the pot and sauté for 3–5 minutes until softened.
  7. Stir in the minced garlic and cook for 1 minute, until fragrant.3️⃣Build the Soup Base:Add the green chiles, diced tomatoes (with their juices), and pinto beans to the pot.Stir in the cumin, smoked paprika, chili powder (if using), salt, and pepper.4️⃣Add the Broth:Pour in the beef broth and stir well to combine.Bring the soup to a gentle boil, then reduce the heat to low.Let the soup simmer for 15–20 minutes, allowing the flavors to meld.5️⃣Optional Additions:During the last 5 minutes of cooking, stir in the frozen corn for a touch of sweetness.6️⃣Serve:Ladle the soup into bowls and garnish with fresh cilantro.Serve with lime wedges for a tangy finish. Pair with cornbread, tortillas, or crusty bread for a complete meal.
  8. 3️⃣Build the Soup Base:Add the green chiles, diced tomatoes (with their juices), and pinto beans to the pot.Stir in the cumin, smoked paprika, chili powder (if using), salt, and pepper.4️⃣Add the Broth:Pour in the beef broth and stir well to combine.Bring the soup to a gentle boil, then reduce the heat to low.Let the soup simmer for 15–20 minutes, allowing the flavors to meld.5️⃣Optional Additions:During the last 5 minutes of cooking, stir in the frozen corn for a touch of sweetness.6️⃣Serve:Ladle the soup into bowls and garnish with fresh cilantro.Serve with lime wedges for a tangy finish. Pair with cornbread, tortillas, or crusty bread for a complete meal.
  9. Add the green chiles, diced tomatoes (with their juices), and pinto beans to the pot.
  10. Stir in the cumin, smoked paprika, chili powder (if using), salt, and pepper.4️⃣Add the Broth:Pour in the beef broth and stir well to combine.Bring the soup to a gentle boil, then reduce the heat to low.Let the soup simmer for 15–20 minutes, allowing the flavors to meld.5️⃣Optional Additions:During the last 5 minutes of cooking, stir in the frozen corn for a touch of sweetness.6️⃣Serve:Ladle the soup into bowls and garnish with fresh cilantro.Serve with lime wedges for a tangy finish. Pair with cornbread, tortillas, or crusty bread for a complete meal.
  11. 4️⃣Add the Broth:Pour in the beef broth and stir well to combine.Bring the soup to a gentle boil, then reduce the heat to low.Let the soup simmer for 15–20 minutes, allowing the flavors to meld.5️⃣Optional Additions:During the last 5 minutes of cooking, stir in the frozen corn for a touch of sweetness.6️⃣Serve:Ladle the soup into bowls and garnish with fresh cilantro.Serve with lime wedges for a tangy finish. Pair with cornbread, tortillas, or crusty bread for a complete meal.
  12. Pour in the beef broth and stir well to combine.
  13. Bring the soup to a gentle boil, then reduce the heat to low.Let the soup simmer for 15–20 minutes, allowing the flavors to meld.5️⃣Optional Additions:During the last 5 minutes of cooking, stir in the frozen corn for a touch of sweetness.6️⃣Serve:Ladle the soup into bowls and garnish with fresh cilantro.Serve with lime wedges for a tangy finish. Pair with cornbread, tortillas, or crusty bread for a complete meal.
  14. Let the soup simmer for 15–20 minutes, allowing the flavors to meld.5️⃣Optional Additions:During the last 5 minutes of cooking, stir in the frozen corn for a touch of sweetness.6️⃣Serve:Ladle the soup into bowls and garnish with fresh cilantro.Serve with lime wedges for a tangy finish. Pair with cornbread, tortillas, or crusty bread for a complete meal.
  15. 5️⃣Optional Additions:
  16. During the last 5 minutes of cooking, stir in the frozen corn for a touch of sweetness.6️⃣Serve:Ladle the soup into bowls and garnish with fresh cilantro.Serve with lime wedges for a tangy finish. Pair with cornbread, tortillas, or crusty bread for a complete meal.
  17. 6️⃣Serve:Ladle the soup into bowls and garnish with fresh cilantro.Serve with lime wedges for a tangy finish. Pair with cornbread, tortillas, or crusty bread for a complete meal.
  18. Ladle the soup into bowls and garnish with fresh cilantro.
  19. Serve with lime wedges for a tangy finish. Pair with cornbread, tortillas, or crusty bread for a complete meal.

Notes

For a vegetarian version, omit the ground beef and use vegetable broth.Adjust spice levels by choosing mild or hot green chiles and adding more chili powder if desired.Leftovers store well in the refrigerator for up to 3 days or freeze for up to 3 months.
Adjust spice levels by choosing mild or hot green chiles and adding more chili powder if desired.Leftovers store well in the refrigerator for up to 3 days or freeze for up to 3 months.
Leftovers store well in the refrigerator for up to 3 days or freeze for up to 3 months.


“`

Better Than Takeout Fried Rice

“`html

Better Than Takeout Fried Rice

Craving Fried Rice?

Did you know that the average American orders takeout fried rice at least twice a month, spending upwards of $20 each time? That’s a significant chunk of change and often leaves you wondering if there’s a way to replicate that satisfying, savory flavor at home without the premium price tag or the mystery ingredients? You’re in luck! This recipe is about to become your new weeknight hero, offering a healthier, more customizable, and undeniably delicious alternative to your favorite Chinese restaurant staple. Get ready to ditch the delivery app and embrace the ultimate comfort food, made right in your own kitchen.

Unlock the Perfect Fried Rice

The secret to restaurant-quality fried rice lies in quality ingredients and how you prepare them. Here’s what you’ll need, with little tips to elevate each component:

  • Cold, Day-Old Cooked Rice: (About 3-4 cups) This is non-negotiable! Freshly cooked rice is too moist and will result in a clumpy, mushy fried rice. Jasmine or basmati are excellent choices, offering a fragrant base. If you don’t have leftover rice, cook some the day before, spread it on a baking sheet, and refrigerate it until chilled and slightly dried out.
  • Proteins (Optional): (1 cup, diced or shredded)
    • Chicken, Pork, or Shrimp: Marinate briefly in soy sauce and a touch of sesame oil for extra flavor.
    • Tofu or Tempeh: Press extra-firm tofu to remove moisture, then cube and pan-fry until golden for a satisfying chew.
    • Eggs: (2 large) Lightly beaten, these add richness and classic fried rice texture.
  • Aromatics:
    • Garlic: (3-4 cloves, minced) Freshly minced garlic provides an pungent, irresistible aroma.
    • Ginger: (1 tablespoon, grated or minced) A warm, zesty kick that complements the other flavors beautifully. Fresh is best for that vibrant bite!
    • Scallions (Green Onions): (3-4 stalks, whites and greens separated, thinly sliced) The whites add a mild oniony flavor during cooking, while the greens offer a fresh, crisp finish.
  • Vegetables (About 1.5 – 2 cups, chopped): Feel free to customize!
    • Frozen Peas and Carrots: The classic duo. No need to thaw.
    • Broccoli Florets: Small, bite-sized pieces cook quickly.
    • Bell Peppers (any color): Adds sweetness and vibrant color.
    • Onion: Diced yellow or red onion for a foundational sweetness.
    • Mushrooms: Sliced cremini or shiitake for an earthy, umami depth.
  • The Sauce:
    • Soy Sauce: (2-3 tablespoons, low-sodium is recommended) The salty, umami backbone.
    • Oyster Sauce: (1 tablespoon, optional but highly recommended) Adds a rich, savory, slightly sweet depth that’s hard to beat. Use vegetarian oyster sauce for a plant-based option.
    • Sesame Oil: (1 teaspoon) Toasted sesame oil for that unmistakable nutty aroma. Add at the end for maximum flavor.
    • Rice Vinegar: (1 teaspoon, optional) A touch of acidity to balance the richness.
    • Sugar: (1/2 teaspoon, optional) A pinch to enhance sweetness and balance saltiness.
  • Cooking Oil: (2-3 tablespoons, high smoke point) Avocado oil, grapeseed oil, or peanut oil are ideal. Avoid olive oil as it can burn.

Master Your Fried Rice Timing

Most takeout fried rice recipes have a quick cook time, but prep is key! This recipe focuses on efficiency.

Prep Time: 15 minutes
Cook Time: 15 minutes
Total Time: 30 minutes

Compared to the average 45-60 minute cook time for complex homemade meals, this fried rice is a speed demon. The key is having everything prepped and ready to go before you even turn on the stove.

A colorful bowl of homemade fried rice with vegetables and protein.

Crafting Your Better-Than-Takeout Fried Rice

Step 1: Mise en Place is Key!

This is the most crucial step for success. Ensure all your ingredients are prepped before you begin cooking. Mince the garlic and ginger, chop your vegetables into uniform, bite-sized pieces, separate the scallion whites from the greens and slice them, dice/shred your protein, and whisk your eggs. Whisk together the soy sauce, oyster sauce, rice vinegar, and sugar in a small bowl to create your sauce. Have your cold rice ready to go.

Step 2: Sear Your Protein to Perfection

Heat 1 tablespoon of your high-smoke-point oil in a large wok or skillet over medium-high heat until shimmering. If using protein (chicken, pork, shrimp, tofu), add it in a single layer and cook until browned and cooked through. Remove the protein from the wok and set aside. If using eggs, push the other ingredients to one side of the wok (or remove them momentarily), add a little more oil if needed, and scramble the eggs until just set. Remove and set aside with the protein, or break them up and leave them in the wok.

Step 3: Awaken the Aromatics

Add another tablespoon of oil to the hot wok. Add the minced garlic, grated ginger, and the white parts of the scallions. Stir-fry for about 30-60 seconds until incredibly fragrant. Be careful not to burn the garlic!

Step 4: Bring on the Veggies

Add your chopped vegetables (except for the green parts of the scallions) to the wok. Stir-fry for 3-5 minutes, or until the vegetables are tender-crisp. If using frozen peas and carrots, you can add them directly from frozen; they’ll cook quickly. You want them tender but still with a slight bite, not mushy.

Step 5: The Rice Takes Center Stage

Push the vegetables to the side of the wok, or remove them temporarily to make space. Add a little more oil if the wok looks dry. Add the cold, day-old rice to the wok. Use your spatula to break up any clumps. Stir-fry the rice for about 3-5 minutes, allowing it to heat through and get slightly toasted. This is where you start to build that wonderful texture.

Step 6: The Sauce Magic Happens!

Pour the prepared sauce mixture evenly over the rice and vegetables. Toss everything together vigorously, ensuring the sauce coats every grain of rice and all the ingredients. Cook for another 1-2 minutes, allowing the sauce to thicken slightly and caramelize a bit.

Step 7: Scramble and Combine

Add the cooked protein and scrambled eggs back into the wok. Toss everything together once more to combine and heat through. The goal is to distribute all the delicious components evenly throughout the rice.

Step 8: Final Toss and Serve

Stir in the toasted sesame oil and most of the sliced green scallion greens. Give it a final toss. Taste and adjust seasoning if necessary – you might want a dash more soy sauce or a pinch of salt. Serve immediately, garnished with the remaining scallion greens.

Nutritional Highlights

While exact nutritional values will vary based on ingredients and portion sizes, a typical serving of homemade fried rice (made with lean protein and moderate oil) tends to be lower in sodium and fat compared to takeout versions. It’s a good source of carbohydrates for energy, with protein and fiber depending on your chosen additions.

  • Calories: Varies widely, typically 300-500 kcal per serving.
  • Protein: High, especially with added meat, eggs, or tofu.
  • Carbohydrates: Primary energy source from rice.
  • Fat: Can be controlled by the amount of oil used and type of protein.
  • Fiber: Boosted with generous amounts of vegetables.

Healthier Swaps for Lighter Indulgence

Want to make it even healthier? Here are some easy swaps:

  • Load up on Veggies: Double or triple the amount of vegetables. Think spinach, edamame, bell peppers, broccoli, and mushrooms. They add volume, nutrients, and fiber without many calories.
  • Lean Protein: Opt for chicken breast, turkey, shrimp, or plant-based proteins like edamame or firm tofu.
  • Brown Rice: While not traditional, using cooked brown rice boosts fiber content significantly.
  • Reduced Sodium Soy Sauce: A simple switch to lower your sodium intake.
  • Less Oil: Use a good non-stick wok or a spray oil to minimize added fats.

Elevate Your Fried Rice Experience

Fried rice is a complete meal on its own, but here are some ideas to make it even more special:

  • Garnishes: Toasted sesame seeds, a drizzle of sriracha, a sprinkle of chili flakes, or a wedge of lime add extra flavor and visual appeal.
  • Side Dishes: Serve with a light, crisp cucumber salad or some steamed edamame for a balanced meal.
  • Add a Fried Egg: Top your finished fried rice with a perfectly fried sunny-side-up or over-easy egg for an extra decadent touch. The runny yolk acts as a delicious sauce!

Avoid These Common Fried Rice Pitfalls

Even with the best intentions, a few missteps can lead to less-than-ideal fried rice. Here’s how to avoid them:

  • Using Fresh, Hot Rice: As mentioned, this is a game-changer. Cold, day-old rice is essential for texture.
  • Overcrowding the Pan: Cook in batches if necessary. Overcrowding steams ingredients instead of stir-frying them, leading to a soggy mess.
  • Not Hot Enough Pan: A screaming hot wok or skillet is key to achieving that desirable char and preventing sticking.
  • Too Much Sauce: Start with less sauce and add more if needed. You want the flavors to coat, not drown, the ingredients.
  • Burning Aromatics: Garlic and ginger cook very quickly. Add them towards the end of the sautéing process or keep the heat moderate when adding them to prevent bitterness.

Savor Every Bite: Storing Your Fried Rice

Leftovers are a delicious bonus!

  • Cooling: Let the fried rice cool down to room temperature before storing.
  • Storage: Transfer to an airtight container and refrigerate for up to 3-4 days.
  • Reheating: For best results, reheat in a skillet over medium heat with a splash of water or oil, stirring frequently until heated through. Microwaving is also an option, but the texture might be slightly softer.

Your Go-To Fried Rice is Here!

Making fried rice at home is incredibly rewarding. It’s a versatile dish that’s perfect for using up leftover rice and vegetables, and it’s infinitely customizable. You’ve learned the secrets to achieving that perfect texture and flavor, so get ready to impress yourself and your loved ones with this fantastic homemade version. Say goodbye to greasy takeout and hello to your new favorite weeknight meal. What protein or veggies will you add to your first batch?

Frequently Asked Questions

Can I use fresh rice?

While it’s not ideal, you can if absolutely necessary. Spread the cooked fresh rice thinly on a baking sheet and bake in a preheated oven at 300°F (150°C) for about 10-15 minutes, stirring once, until it’s dried out. Ensure it cools before using.

What kind of oil is best?

A high smoke point oil like avocado oil, grapeseed oil, peanut oil, or canola oil is best because fried rice is cooked at high heat. Avoid extra virgin olive oil as it can burn and impart an undesirable flavor.

How can I make it spicier?

You can add a pinch of red pepper flakes with the aromatics, a swirl of sriracha or chili garlic sauce at the end, or serve with your favorite hot sauce.

Can I make this vegetarian or vegan?

Absolutely! Omit any meat and use tofu or tempeh as your protein. For the oyster sauce, use a vegetarian oyster sauce (often mushroom-based) or simply increase the soy sauce slightly and add a touch more of something umami, like a bit of mushroom powder or a splash of dark soy sauce for color.

Print
clock clock iconcutlery cutlery iconflag flag iconfolder folder iconinstagram instagram iconpinterest pinterest iconfacebook facebook iconprint print iconsquares squares iconheart heart iconheart solid heart solid icon

Better Than Takeout Fried Rice

  • Author: Chef Sara

Description

This Better Than Takeout Fried Rice is a quick and flavorful dish that’s perfect for any occasion. Made with fluffy rice, colorful vegetables, scrambled eggs, and a savory blend of soy sauce and sesame oil, it’s a simple yet satisfying recipe. Whether enjoyed as a main course or a side dish, this fried rice will become a household favorite!


Ingredients

Scale
  • 3 cupscooked, day-old rice (Jasmine or long-grain preferred)
  • 1 cupdiced carrots and peas (fresh or frozen)
  • 2large eggs, whisked
  • 2 tablespoonssoy sauce (adjust to taste)
  • 1 tablespoonsesame oil
  • 2garlic cloves, minced
  • 2 tablespoonscooking oil (vegetable or canola)
  • 2green onions, chopped (for garnish)
  • Salt and pepper, to taste

Instructions

  1. Prepare all ingredients before starting to cook. Chop vegetables, whisk the eggs, and ensure the rice is clump-free.
  2. Heat 1 tablespoon of oil in a large skillet or wok over medium-high heat. Add the whisked eggs and scramble until just set. Remove and set aside.
  3. In the same skillet, add another tablespoon of oil and sauté the minced garlic for 30 seconds until fragrant.
  4. Add the diced carrots and peas. Stir-fry for 2-3 minutes until slightly softened.
  5. Add the cooked rice to the skillet, breaking up clumps with a spatula. Stir-fry for 2-3 minutes to heat through.
  6. Drizzle soy sauce and sesame oil over the rice, stirring to coat evenly. Season with salt and pepper to taste.
  7. Return the scrambled eggs to the skillet and mix gently with the rice. Sprinkle with chopped green onions.
  8. Serve warm and enjoy your delicious homemade fried rice!

Notes

Use day-old rice for the best texture. Fresh rice can be used, but let it cool and dry out slightly before frying.
Customize by adding cooked chicken, shrimp, tofu, or other favorite proteins.
For an extra crunch, toss in chopped cashews or sesame seeds.
Store leftovers in the refrigerator for up to 3 days or freeze for up to 1 month.

“`

Delicious Lemon Loaf Recipe You Need to Try

“`html

Delicious Lemon Loaf Recipe You Need to Try

Are you searching for that perfect, melt-in-your-mouth lemon loaf that strikes the ideal balance between tender crumb and bright, zesty flavor? In a world of baking quick fixes, finding a truly outstanding lemon loaf recipe can feel like striking gold. If you’ve ever ended up with a dry, dense, or overly tart cake, you’re not alone. But what if we told you that creating a show-stopping, incredibly moist, and bursting-with-flavor lemon loaf is not only achievable but also surprisingly simple? This foolproof recipe is designed to deliver consistently amazing results, guaranteed to impress everyone who takes a bite. Get ready to bake the lemon loaf of your dreams!

Introduction: The Irresistible Lemon Loaf

The allure of a perfectly baked lemon loaf is undeniable. It’s a classic for a reason: that sweet, tangy citrus aroma filling your kitchen, the promise of a tender crumb, and a glaze that adds just the right amount of sweetness and zing. This isn’t just any cake; it’s a ray of sunshine in dessert form, perfect for a morning treat, an afternoon pick-me-up, or an elegant finish to any meal. Many home bakers struggle with achieving the right moisture content and flavor balance in their lemon loaves. Some turn out too dry, crumbling at the slightest touch, while others lack that distinct, bright lemony punch. Today, we’re diving deep into a recipe that’s been meticulously crafted to overcome these common challenges, ensuring a loaf that’s both deeply satisfying and wonderfully refreshing. Its simplicity makes it accessible for beginners, while its exquisite taste will delight seasoned bakers. Prepare to fall in love with baking all over again as you create this delightful treat.

Ingredients for the Perfect Lemon Loaf

The magic of this lemon loaf lies in the quality and combination of its ingredients. We aim for a tender, moist crumb that’s packed with authentic lemon flavor, balanced by a sweet, tangy glaze. Here’s what you’ll need:

  • For the Loaf:
    • 2 ½ cups (315g) All-Purpose Flour: The foundation of our cake, providing structure. Sifted for a lighter texture.
    • 1 ½ teaspoons Baking Powder: Our leavening agent, ensuring a good rise.
    • ½ teaspoon Baking Soda: Works with the acidic ingredients for extra lift and tenderness.
    • ¼ teaspoon Salt: Enhances all the other flavors and balances sweetness.
    • 1 cup (200g) Granulated Sugar: Sweetens the loaf and contributes to its tender crumb.
    • ½ cup (113g) Unsalted Butter, softened: Adds richness and a melt-in-your-mouth texture. Using softened butter ensures it creams properly with the sugar.
    • 2 large Eggs: Bind the ingredients and add richness. Room temperature eggs incorporate better.
    • 1 teaspoon Vanilla Extract: Complements the lemon flavor with a hint of warmth.
    • Zest of 2 large Lemons: This is where the intense lemon aroma comes from! Use a microplane for the finest zest.
    • ½ cup (120ml) Fresh Lemon Juice (from about 2-3 lemons): Provides that essential tangy brightness.
    • ½ cup (120g) Plain Yogurt (full-fat or Greek): Crucial for moisture and a tender crumb. Its slight acidity also reacts with the baking soda. (See substitutions below)
    • ¼ cup (60ml) Milk (whole or 2%): Helps achieve the perfect batter consistency.
  • For the Lemon Glaze:
    • 1 ½ cups (180g) Powdered Sugar, sifted: Creates a smooth, lump-free glaze.
    • 2-3 tablespoons Fresh Lemon Juice: For that signature tangy sweetness.
    • ½ teaspoon Lemon Zest (optional, for extra visual appeal and flavor).

Ingredient Substitutions & Notes:

  • Yogurt: If you don’t have plain yogurt, sour cream or buttermilk are excellent substitutes. For a dairy-free option, use unsweetened coconut yogurt or even a pureed silken tofu (though this may slightly alter the flavor).
  • Lemon Juice: While fresh is always best, bottled concentrate can be used in a pinch, but it won’t have the same vibrant flavor.
  • Butter: For a slightly lighter loaf, you can substitute half of the butter with a neutral oil like vegetable or canola oil, but the buttery richness will be slightly diminished.
  • Flour: You can experiment with a gluten-free all-purpose blend, but be aware that the texture might vary.

Timing is Everything

A well-planned baking session ensures perfection. Here’s a breakdown of the time commitment for this delightful loaf:

Prep time:
20 minutes
Cook time:
50-60 minutes
Total time:
1 hour 10 minutes – 1 hour 20 minutes

Compared to average lemon loaf recipes which often hover around 1.5 hours total time (including cooling and glazing), this recipe is quite efficient, allowing you to enjoy your heavenly creation sooner!

A perfectly baked lemon loaf with a drizzle of glaze.

Step-by-Step: Crafting Your Lemon Loaf

Let’s get baking! Follow these simple steps for a foolproof, delectable lemon loaf.

Step 1: Preheat Your Oven and Prep Your Pan

Begin by preheating your oven to 350°F (175°C). This ensures the oven is at the correct temperature when your batter is ready, promoting even baking. Grease and flour a standard 9×5 inch loaf pan. You can also line it with parchment paper, leaving an overhang on the sides, which makes for easy removal. This prevents your beautiful loaf from sticking.

Step 2: Whisk Together the Dry Ingredients

In a medium-sized bowl, whisk together the all-purpose flour, baking powder, baking soda, and salt. Whisking not only combines them thoroughly but also aerates the flour, helping to create a lighter cake. Set this bowl aside.

Step 3: Cream Butter and Sugar, Add Eggs and Vanilla

In a large bowl, using an electric mixer (stand mixer or hand mixer), cream together the softened unsalted butter and granulated sugar until light and fluffy. This process incorporates air, contributing to the cake’s texture. Beat in the eggs one at a time, ensuring each is fully incorporated before adding the next. Finally, stir in the vanilla extract.

Step 4: Incorporate Lemon Zest, Juice, and Yogurt

Add the finely grated lemon zest to the butter mixture and mix until fragrant. Then, pour in the fresh lemon juice and plain yogurt. Mix on low speed until just combined. The mixture might look a little curdled at this stage due to the acidity of the lemon juice and yogurt reacting with the butter and eggs – this is perfectly normal!

Step 5: Gently Combine Wet and Dry Mixtures

Gradually add the dry ingredients to the wet ingredients, alternating with the milk. Begin and end with the dry ingredients (e.g., add one-third of the dry, then half the milk, another third of the dry, the remaining milk, and finally the last third of the dry). Mix on low speed until just combined. Be careful not to overmix; overmixing can develop the gluten in the flour, resulting in a tough loaf.

Step 6: Bake to Golden Perfection

Pour the batter into your prepared loaf pan and spread it evenly. Bake for 50-60 minutes, or until a wooden skewer or toothpick inserted into the center comes out clean. The top should be golden brown and the loaf should feel slightly firm to the touch. If the top begins to brown too quickly, you can loosely tent it with aluminum foil.

Step 7: Prepare the Tangy Lemon Glaze

While the loaf is cooling, prepare the glaze. In a small bowl, whisk together the sifted powdered sugar and 2 tablespoons of fresh lemon juice until smooth. If the glaze is too thick, add more lemon juice, a teaspoon at a time, until it reaches your desired drizzling consistency. Stir in the optional lemon zest for an extra burst of flavor and visual appeal.

Step 8: Glaze Your Beautiful Loaf

Once the loaf has cooled in the pan for about 10-15 minutes, transfer it to a wire rack to cool completely. Once the loaf is completely cool, liberally drizzle the lemon glaze over the top, letting it drip down the sides. Allow the glaze to set for about 15-20 minutes before slicing and serving.

Nutritional Highlights

While specific nutritional values can vary based on ingredient brands and precise measurements, a typical slice of this delicious lemon loaf (assuming 12 servings and before glaze) is estimated to contain:

  • Calories: Approximately 300-350 kcal
  • Fat: 15-20g (primarily from butter and yogurt)
  • Carbohydrates: 40-45g (from flour and sugar)
  • Protein: 4-6g (from flour, eggs, and yogurt)
  • Sugar: 25-30g (natural and added)

(Note: The glaze will add additional calories, fat, and sugar.)

Healthier Twists, Same Great Flavor

Looking to make this delightful loaf even healthier without sacrificing taste? Here are a few swaps:

  • Sweetener: Replace some or all of the granulated sugar with maple syrup or honey, adjusting liquid accordingly. For the glaze, use a sugar-free powdered sweetener.
  • Flour: Substitute a portion of the all-purpose flour with whole wheat pastry flour or almond flour for added fiber and nutrients.
  • Fat: Use low-fat Greek yogurt and unsalted butter (or reduce butter slightly and use applesauce for moisture).
  • Glaze: Opt for a lighter glaze by reducing the powdered sugar and using more lemon juice, or a simple dusting of powdered sugar instead of a full glaze.

Serving Suggestions to Elevate Your Loaf

This lemon loaf is incredibly versatile! Consider these serving ideas:

  • Morning Coffee: A classic pairing. Enjoy a slice with your favorite brew.
  • Afternoon Tea: Its bright flavor makes it a perfect accompaniment to a pot of tea.
  • With Fresh Berries: Top a slice with fresh raspberries, blueberries, or strawberries for a burst of color and freshness.
  • Dessert with Cream: Serve a generous slice with a dollop of whipped cream, mascarpone, or vanilla ice cream for a more decadent dessert.

Avoiding Common Loaf Pitfalls

To ensure your lemon loaf is always a success, keep these common mistakes in mind:

  • Overmixing the Batter: As mentioned, this develops gluten, leading to a tough loaf. Mix until just combined.
  • Using Cold Ingredients: Room temperature eggs and softened butter cream better, leading to a lighter texture.
  • Incorrect Oven Temperature: An oven that’s too hot can cause the outside to burn before the inside is cooked. Use an oven thermometer to check yours.
  • Opening the Oven Door Too Soon: This can cause the cake to sink. Wait until at least two-thirds of the way through the baking time before checking.
  • Glazing While Warm: The glaze will melt and become messy. Ensure the loaf is completely cool before glazing.

Keeping Your Lemon Loaf Fresh

Proper storage will keep your lemon loaf moist and delicious:

  • Room Temperature: Store the fully cooled loaf (unfrosted or glazed) in an airtight container or wrap it tightly in plastic wrap at room temperature for up to 3 days.
  • Refrigeration: For longer storage, refrigerate the loaf in an airtight container for up to a week. It might become slightly firmer, so allow it to come to room temperature for about 30 minutes before serving.
  • Freezing: Wrap the unfrosted loaf tightly in plastic wrap, then in aluminum foil, and freeze for up to 3 months. Thaw overnight in the refrigerator, then let it come to room temperature before glazing and serving.

Enjoy Your Delicious Homemade Lemon Loaf!

This delicious lemon loaf recipe is a true winner, offering a perfect balance of moistness, tender crumb, and vibrant lemon flavor that’s sure to brighten your day. It’s a testament to how simple ingredients, combined with careful technique, can create something truly extraordinary. Don’t let another day pass without experiencing the joy of this perfectly baked treat. Whether you’re baking for a special occasion or just because, this recipe is your gateway to lemon loaf perfection. So, gather your ingredients, preheat that oven, and get ready to impress yourself and everyone lucky enough to share a slice!

Frequently Asked Questions

***Can I make this recipe without a mixer?***

Yes! You can cream the butter and sugar by hand using a sturdy whisk or wooden spoon. Gradually add the eggs and other wet ingredients, mixing well between each addition. For combining wet and dry, use a spatula and fold gently to avoid overmixing.

***Why is my lemon loaf dry?***

Common culprits include overbaking, overmixing the batter, or using too much flour. Ensure you follow the baking time closely and test for doneness with a toothpick. Using yogurt or buttermilk in the batter also significantly contributes to moisture.

***How can I get a stronger lemon flavor?***

The key is lemon zest! Use fresh lemons and zest them well, ensuring you get all the flavorful oils from the yellow part. You can also add more zest to the batter or the glaze for an extra punch.

***Why did my loaf sink in the middle?***

This can happen if the oven temperature is too low, if you opened the oven door too early and often, or if there’s too much leavening agent. Ensure your oven is calibrated and resist the urge to peek too soon!

***Can I add other mix-ins?***

Certainly! About ½ cup of fresh or frozen blueberries, cranberries, or even poppy seeds can be gently folded into the batter just before baking for added flavor and texture.

Print

clock clock iconcutlery cutlery iconflag flag iconfolder folder iconinstagram instagram iconpinterest pinterest iconfacebook facebook iconprint print iconsquares squares iconheart heart iconheart solid heart solid icon

Lemon Loaf with Glaze

  • Author: Chef Sara

Description

This moist and tangy lemon loaf is bursting with citrus flavor, thanks to fresh lemon juice, zest, and extract. Topped with a sweet, velvety glaze, it’s a delightful treat for any time of day. Perfect for breakfast, dessert, or as a tea-time snack!


Ingredients

  • For the Lemon Loaf:
  • For the Lemon Glaze:1 cuppowdered sugar1 tablespoonlemon juice1 tablespoonmilk1 tablespoonbutter, melted

Instructions

  1. 1️⃣Preheat the Oven:Preheat your oven to 325°F (165°C). Grease a 4×8 or 5×9-inch loaf pan and set aside.2️⃣Mix the Dry Ingredients:In a medium bowl, whisk together the flour, baking powder, and salt. Set aside.3️⃣Cream the Butter and Sugar:In a large mixing bowl, use an electric mixer to cream the softened butter and sugar together until light and fluffy.4️⃣Incorporate Wet Ingredients:Beat in the eggs, one at a time, until fully incorporated. Add the sour cream, lemon zest, lemon juice, and lemon extract, mixing until smooth.5️⃣Combine with Dry Ingredients:Gradually add the flour mixture to the wet ingredients, stirring until just combined. Do not overmix.6️⃣Bake the Loaf:Pour the batter into the prepared loaf pan and smooth the top with a spatula. Bake for 55-65 minutes, or until a toothpick inserted into the center comes out clean.7️⃣Cool the Loaf:Remove the loaf from the oven and let it cool in the pan for 10 minutes. Run a knife along the edges to loosen, then turn the loaf out onto a wire rack to cool completely.8️⃣Prepare the Glaze:In a small bowl, whisk together the powdered sugar, lemon juice, milk, and melted butter until smooth. Adjust the consistency if needed by adding more lemon juice or powdered sugar.9️⃣Glaze the Loaf:Once the lemon loaf is completely cool, drizzle the glaze evenly over the top. Spread it gently with the back of a spoon.🔟Serve:Slice the lemon loaf and enjoy its tangy-sweet goodness!
  2. 2️⃣Mix the Dry Ingredients:In a medium bowl, whisk together the flour, baking powder, and salt. Set aside.3️⃣Cream the Butter and Sugar:In a large mixing bowl, use an electric mixer to cream the softened butter and sugar together until light and fluffy.4️⃣Incorporate Wet Ingredients:Beat in the eggs, one at a time, until fully incorporated. Add the sour cream, lemon zest, lemon juice, and lemon extract, mixing until smooth.5️⃣Combine with Dry Ingredients:Gradually add the flour mixture to the wet ingredients, stirring until just combined. Do not overmix.6️⃣Bake the Loaf:Pour the batter into the prepared loaf pan and smooth the top with a spatula. Bake for 55-65 minutes, or until a toothpick inserted into the center comes out clean.7️⃣Cool the Loaf:Remove the loaf from the oven and let it cool in the pan for 10 minutes. Run a knife along the edges to loosen, then turn the loaf out onto a wire rack to cool completely.8️⃣Prepare the Glaze:In a small bowl, whisk together the powdered sugar, lemon juice, milk, and melted butter until smooth. Adjust the consistency if needed by adding more lemon juice or powdered sugar.9️⃣Glaze the Loaf:Once the lemon loaf is completely cool, drizzle the glaze evenly over the top. Spread it gently with the back of a spoon.🔟Serve:Slice the lemon loaf and enjoy its tangy-sweet goodness!
  3. 3️⃣Cream the Butter and Sugar:In a large mixing bowl, use an electric mixer to cream the softened butter and sugar together until light and fluffy.
  4. 4️⃣Incorporate Wet Ingredients:Beat in the eggs, one at a time, until fully incorporated. Add the sour cream, lemon zest, lemon juice, and lemon extract, mixing until smooth.5️⃣Combine with Dry Ingredients:Gradually add the flour mixture to the wet ingredients, stirring until just combined. Do not overmix.6️⃣Bake the Loaf:Pour the batter into the prepared loaf pan and smooth the top with a spatula. Bake for 55-65 minutes, or until a toothpick inserted into the center comes out clean.7️⃣Cool the Loaf:Remove the loaf from the oven and let it cool in the pan for 10 minutes. Run a knife along the edges to loosen, then turn the loaf out onto a wire rack to cool completely.8️⃣Prepare the Glaze:In a small bowl, whisk together the powdered sugar, lemon juice, milk, and melted butter until smooth. Adjust the consistency if needed by adding more lemon juice or powdered sugar.9️⃣Glaze the Loaf:Once the lemon loaf is completely cool, drizzle the glaze evenly over the top. Spread it gently with the back of a spoon.🔟Serve:Slice the lemon loaf and enjoy its tangy-sweet goodness!
  5. 5️⃣Combine with Dry Ingredients:Gradually add the flour mixture to the wet ingredients, stirring until just combined. Do not overmix.6️⃣Bake the Loaf:Pour the batter into the prepared loaf pan and smooth the top with a spatula. Bake for 55-65 minutes, or until a toothpick inserted into the center comes out clean.7️⃣Cool the Loaf:Remove the loaf from the oven and let it cool in the pan for 10 minutes. Run a knife along the edges to loosen, then turn the loaf out onto a wire rack to cool completely.8️⃣Prepare the Glaze:In a small bowl, whisk together the powdered sugar, lemon juice, milk, and melted butter until smooth. Adjust the consistency if needed by adding more lemon juice or powdered sugar.9️⃣Glaze the Loaf:Once the lemon loaf is completely cool, drizzle the glaze evenly over the top. Spread it gently with the back of a spoon.🔟Serve:Slice the lemon loaf and enjoy its tangy-sweet goodness!
  6. 6️⃣Bake the Loaf:Pour the batter into the prepared loaf pan and smooth the top with a spatula. Bake for 55-65 minutes, or until a toothpick inserted into the center comes out clean.
  7. 7️⃣Cool the Loaf:Remove the loaf from the oven and let it cool in the pan for 10 minutes. Run a knife along the edges to loosen, then turn the loaf out onto a wire rack to cool completely.8️⃣Prepare the Glaze:In a small bowl, whisk together the powdered sugar, lemon juice, milk, and melted butter until smooth. Adjust the consistency if needed by adding more lemon juice or powdered sugar.9️⃣Glaze the Loaf:Once the lemon loaf is completely cool, drizzle the glaze evenly over the top. Spread it gently with the back of a spoon.🔟Serve:Slice the lemon loaf and enjoy its tangy-sweet goodness!
  8. 8️⃣Prepare the Glaze:In a small bowl, whisk together the powdered sugar, lemon juice, milk, and melted butter until smooth. Adjust the consistency if needed by adding more lemon juice or powdered sugar.9️⃣Glaze the Loaf:Once the lemon loaf is completely cool, drizzle the glaze evenly over the top. Spread it gently with the back of a spoon.🔟Serve:Slice the lemon loaf and enjoy its tangy-sweet goodness!
  9. 9️⃣Glaze the Loaf:Once the lemon loaf is completely cool, drizzle the glaze evenly over the top. Spread it gently with the back of a spoon.
  10. 🔟Serve:Slice the lemon loaf and enjoy its tangy-sweet goodness!

Notes

For extra lemon flavor, add a touch more lemon zest or a splash of lemon juice to the glaze.Ensure the loaf is fully cooled before glazing to prevent the glaze from melting and running off.Store the lemon loaf in an airtight container at room temperature for up to 3 days or refrigerate for up to a week.
Ensure the loaf is fully cooled before glazing to prevent the glaze from melting and running off.Store the lemon loaf in an airtight container at room temperature for up to 3 days or refrigerate for up to a week.
Store the lemon loaf in an airtight container at room temperature for up to 3 days or refrigerate for up to a week.


“`

Blueberry Pastry Rings with Vanilla Cream

“`html

Blueberry Pastry Rings with Vanilla Cream

Elevate Your Baking with Café-Inspired Blueberry Pastry Rings

Statistics show that bakery-style pastries are highly sought after, with fruit-filled bakes often topping the popularity charts. Blueberry pastries, in particular, boast widespread appeal, consistently ranking as a favorite among consumers. This recipe aims to demystify the creation of these delightful blueberry pastry rings, filled with a luscious vanilla cream. Forget complicated techniques; we’re focusing on readily available ingredients and straightforward steps to bring that professional bakery charm to your table. These rings are not just a treat for the taste buds; they are a testament to what you can create with a little patience and a lot of love. Get ready to impress yourself and your loved ones!

The Heart of the Rings: Ingredients You’ll Need

Crafting these beautiful pastry rings requires attention to detail, but the ingredients are wonderfully accessible. Each component plays a crucial role in delivering that perfect bite.

For the Flaky Pastry Dough:

  • 2 ½ cups All-Purpose Flour: The foundation of our flaky layers. Sifted flour ensures a lighter texture.
  • 1 teaspoon Salt: Enhances the overall flavor profile and balances the sweetness.
  • 1 cup (2 sticks) Cold Unsalted Butter, cubed: Crucial for flakiness. Ensure it’s very cold and cut into small, even cubes. Substitution: You can use a high-quality European-style butter for a richer flavor or even a mix of butter and shortening, though butter yields the best taste.
  • ½ cup Ice Water (or as needed): Binds the dough. The colder, the better to keep the butter solid.
  • 1 tablespoon White Vinegar or Lemon Juice: Helps tenderize the dough and makes it easier to work with.

For the Sweet Blueberry Filling:

  • 2 cups Fresh or Frozen Blueberries: The star of our show! Fresh berries offer a brighter flavor, while frozen ones are convenient and work just as well (don’t thaw completely before using).
  • ¼ cup Granulated Sugar: To sweeten the berries and help them break down slightly during baking. Adjust to your sweetness preference.
  • 2 tablespoons Cornstarch: Our thickening agent, ensuring a jammy consistency that won’t run out.
  • 1 tablespoon Lemon Juice: Adds a zesty brightness that complements the blueberries beautifully.
  • ½ teaspoon Vanilla Extract: For a warm aromatic note.

For the Velvety Vanilla Cream:

  • 8 ounces Cream Cheese, softened: The creamy base. Ensure it’s at room temperature for smooth mixing. Substitution: Mascarpone cheese can be used for an even richer, more decadent cream.
  • ½ cup Powdered Sugar, sifted: For sweetness and a silky smooth texture. Sifting prevents lumps.
  • 1 teaspoon Vanilla Extract: Enhances the creamy flavor. Use good quality extract for best results.
  • ¼ cup Heavy Cream (optional): For a lighter, more whipped consistency.

For the Egg Wash and Topping:

  • 1 Large Egg, beaten with 1 tablespoon Milk or Water: For a beautiful golden-brown sheen.
  • 1 tablespoon Turbinado Sugar or Coarse Sugar (optional): For a delightful crunch on top.

Timing is Everything: Prep, Cook, and Enjoy

Let’s break down the time commitment for these delightful pastry rings. While baking from scratch takes time, the results are incredibly rewarding!

Prep Time: 45 minutes

Includes dough chilling time.
Cook Time: 20-25 minutes

Baking time until golden and delicious.
Total Time: 1 hour 10 minutes (plus chilling)

A reasonable time for impressive homemade pastries.

Compared to the average complex puff pastry recipe which can take hours due to extensive chilling and folding, this simplified pastry dough is a more manageable weeknight or weekend project, offering a similar delightful texture with less fuss.

Blueberry Pastry Rings with Vanilla Cream

Step-by-Step Guide to Blueberry Pastry Perfection

Follow these detailed steps to create your stunning blueberry pastry rings. We’ve broken it down to make it as simple as possible!

Step 1: Prepare the Pastry Dough

In a large bowl, whisk together the flour and salt. Cut in the cold, cubed butter using a pastry blender, your fingertips, or a food processor until the mixture resembles coarse crumbs with some pea-sized pieces of butter remaining. In a small bowl, whisk together the ice water and vinegar. Gradually add the ice water mixture to the flour mixture, a tablespoon at a time, mixing until the dough just comes together. Be careful not to overmix. Turn the dough out onto a lightly floured surface, gently form it into a disc, wrap it in plastic wrap, and refrigerate for at least 30 minutes. This chilling period is vital for developing the gluten and firming up the butter, which leads to flakier pastry.

Step 2: Whip Up the Vanilla Cream

While the dough is chilling, prepare the vanilla cream. In a medium bowl, beat the softened cream cheese with an electric mixer until smooth and creamy. Gradually beat in the sifted powdered sugar until well combined. Stir in the vanilla extract. If you desire a lighter, more whipped cream, gradually add the heavy cream and beat until fluffy. Set aside. This smooth, sweet cream will be the luxurious heart of your pastry rings.

Step 3: Assemble the Pastry Rings

Preheat your oven to 400°F (200°C). Line two baking sheets with parchment paper. On a lightly floured surface, roll out the chilled dough into a rectangle approximately 12×9 inches and about 1/8 inch thick. Trim the edges to make them straight. Spread the prepared vanilla cream filling evenly over the dough, leaving about a ½-inch border on all sides. In a small bowl, gently mix the blueberries, granulated sugar, cornstarch, lemon juice, and vanilla extract for the blueberry filling. Spoon this blueberry mixture evenly over the vanilla cream layer. Fold the longer sides of the dough up and over the filling, creating a log-like shape. Gently press to seal. Then, carefully bring the two shorter ends together, pinching them to form a sealed ring. You should have a filled, ring-shaped pastry. You can also cut the dough rectangle into strips and then fill and roll them into rings if preferred for smaller portions.

Step 4: Bake to Golden Perfection

Carefully transfer the assembled pastry rings to the prepared baking sheets. Brush the tops of the pastry with the prepared egg wash. If using, sprinkle generously with turbinado sugar for a delightful crunch. Using a sharp knife, cut a few small slits on the top of the pastry to allow steam to escape. Bake for 20-25 minutes, or until the pastry is puffed up, golden brown, and the filling is bubbly and set. Keep an eye on them to prevent over-browning.

Step 5: Fill and Decorate (Optional – for pre-baked pastry shells)

(Note: This step is for an alternative method where pastry shells are baked first and then filled. If you followed Step 3 for assembling the filled rings, you will skip this and proceed to serving.) If you’ve baked hollow pastry rings (by cutting out the center or creating decorative shapes), allow them to cool completely. Then, pipe or spoon the vanilla cream into the cooled pastry shells. Top generously with fresh blueberries. You can also add a drizzle of blueberry jam or a dusting of powdered sugar for extra flair.

(Our primary method in Step 3 involves baking the filled pastry rings directly, which is more common for this type of creation.)

Nutritional Snapshot

While exact nutritional values can vary based on ingredient brands and precise measurements, here’s an approximate breakdown per serving (assuming 6 servings):

  • Calories: Approximately 350-450 kcal
  • Protein: 5-7g
  • Fat: 20-28g
  • Carbohydrates: 35-45g
  • Sugar: 18-25g

These are estimates and can fluctuate. For precise tracking, it’s recommended to use a nutrition calculator with your specific ingredients.

Healthier Twists Without Sacrificing Flavor

Looking to lighten up these delightful rings? Here are a few swaps that work beautifully:

  • Whole Wheat Pastry: Substitute half of the all-purpose flour with whole wheat pastry flour for added fiber.
  • Reduced Fat Cream Cheese: Use light cream cheese. Ensure it’s well-softened for smooth mixing.
  • Natural Sweeteners: Consider using maple syrup or honey in moderation for the filling, adjusting sweetness as needed. Be aware this can alter moisture content slightly.
  • Fresh Berries Galore: Increase the proportion of fresh blueberries and slightly reduce added sugar, letting the natural fruit sweetness shine.
  • Omit Egg Wash: For a slightly lower fat option, you can skip the egg wash, though the pastry may not be as glossy.

Serving Suggestions: When and How to Enjoy

These blueberry pastry rings are incredibly versatile:

  • Breakfast Delight: Serve warm with a cup of coffee or tea for a special weekend breakfast.
  • Afternoon Tea Treat: Perfect alongside a selection of teas for a delightful afternoon spread.
  • Elegant Dessert: Serve with a dollop of extra whipped cream or a scoop of vanilla bean ice cream for a more decadent dessert.
  • Brunch Star: A guaranteed crowd-pleaser at any brunch gathering.

Common Mistakes to Avoid

  • Overworking the Dough: This develops too much gluten, resulting in tough, not flaky, pastry. Mix until just combined.
  • Warm Butter: Using butter that isn’t cold will prevent the formation of steam pockets that create flaky layers.
  • Not Chilling the Dough: Proper chilling is essential for the butter to firm up and for the gluten to relax.
  • Overfilling: Too much filling can cause the rings to burst during baking or become soggy.
  • Cutting Slits Too Small: Ensure adequate steam vents to prevent the pastry from bursting unevenly.

Storing Your Pastry Rings

These pastries are best enjoyed fresh. However, if you have leftovers:

  • Room Temperature: Store cooled pastry rings in an airtight container at room temperature for up to 2 days. The pastry may lose some crispness over time.
  • Refrigeration: For longer storage (up to 4 days), keep them in an airtight container in the refrigerator. Gently reheat in a low oven (around 300°F/150°C) for a few minutes to restore some crispness.
  • Freezing: Unfilled, baked pastry rings can be frozen. Wrap them tightly in plastic wrap and then in foil. Thaw at room temperature and fill just before serving. Filled pastries are not ideal for freezing due to the potential for sogginess.

A Taste of Bliss in Every Bite

These blueberry pastry rings with vanilla cream are more than just a recipe; they’re an experience. They bring the charm and delight of a specialty bakery right into your home, offering a perfect blend of textures and flavors. From the crisp, flaky pastry to the sweet, bursting blueberries and the velvety smooth vanilla cream, each element harmonizes beautifully. Whether you’re seeking a delightful breakfast treat, a sophisticated dessert, or a showstopper for your next gathering, this recipe is sure to impress. So, gather your ingredients, embrace the process, and get ready to bake up a batch of pure bliss. Your kitchen is about to smell amazing!

Frequently Asked Questions (FAQs)

Will using frozen blueberries affect the pastry?
Not significantly, as long as you use them directly from frozen (without thawing completely) and ensure the cornstarch in the filling is adequate to thicken any released juices. They might release a bit more liquid, so ensuring proper thickening is key.

***Can I make the dough ahead of time?***
Yes! The pastry dough can be made up to 2 days in advance and kept refrigerated. This is a great make-ahead strategy.

***How do I get perfectly crisp pastry?***
Ensure your butter is very cold when making the dough, don’t overwork the dough, and make sure the oven is preheated to the correct temperature. Proper chilling also helps.

***Can I freeze these once baked and filled?***
It’s generally not recommended to freeze the filled pastries, as the cream and filling can become watery and the pastry can lose its crispness upon thawing. It’s best to freeze unfilled baked shells or bake fresh.

***What if I don’t have cornstarch?***
You can substitute cornstarch with an equal amount of all-purpose flour or tapioca starch for thickening the blueberry filling. Arrowroot powder is another good alternative but may require slightly less.

Print
clock clock iconcutlery cutlery iconflag flag iconfolder folder iconinstagram instagram iconpinterest pinterest iconfacebook facebook iconprint print iconsquares squares iconheart heart iconheart solid heart solid icon

Blueberry Pastry Rings with Vanilla Cream Filling: A Symphony of Sweet Flavors and Textures

  • Author: Chef Sara

Description

Delight in the perfect combination of flaky puff pastry, creamy homemade vanilla filling, and fresh, juicy blueberries. These Blueberry Pastry Rings are easy to make yet elegant enough to impress guests, perfect for brunches, celebrations, or afternoon tea.


Ingredients

  • For the Pastry:
  • For the Vanilla Cream Filling:
  • For the Topping:

Instructions

  1. Prepare the Pastry:Preheatovento 190°C (374°F) and line a baking sheet withparchment paper.Use a pastry cutter to cut circles from the puff pastry. Cut smaller holes in half of the circles to create rings. Stack the rings on top of the solid circles, pressing gently to adhere.Brush the pastry with the egg yolk and milk mixture. Bake for 20 minutes or until golden brown. Cool completely.
  2. Preheatovento 190°C (374°F) and line a baking sheet withparchment paper.
  3. Use a pastry cutter to cut circles from the puff pastry. Cut smaller holes in half of the circles to create rings. Stack the rings on top of the solid circles, pressing gently to adhere.
  4. Brush the pastry with the egg yolk and milk mixture. Bake for 20 minutes or until golden brown. Cool completely.
  5. Make the Vanilla Cream Filling:Heat most of the milk in asaucepanuntil warm. In a bowl,whisktogether the remaining milk, egg yolks, sugar, cornstarch, flour, and salt.Gradually add the warm milk to the bowl, whisking constantly. Return the mixture to thesaucepanand cook over medium heat, stirring, until thickened.Remove from heat and stir in the butter and vanilla extract. Cover withplastic wrap(touching the surface) and let cool.
  6. Heat most of the milk in asaucepanuntil warm. In a bowl,whisktogether the remaining milk, egg yolks, sugar, cornstarch, flour, and salt.
  7. Gradually add the warm milk to the bowl, whisking constantly. Return the mixture to thesaucepanand cook over medium heat, stirring, until thickened.
  8. Remove from heat and stir in the butter and vanilla extract. Cover withplastic wrap(touching the surface) and let cool.
  9. Assemble the Pastries:Spoonor pipe the cooled vanilla cream into the pastry rings.Top with fresh blueberries and dust with powdered sugar for a stunning finish.
  10. Spoonor pipe the cooled vanilla cream into the pastry rings.
  11. Top with fresh blueberries and dust with powdered sugar for a stunning finish.

Notes

Ensure the puff pastry stays cold before baking for the flakiest results.
The vanilla cream can be made a day in advance and stored in the fridge.
For a more festive look, add a drizzle ofhoneyor garnish with mint leaves.


Nutrition

  • Calories: 210
  • Sugar: 9g
  • Fat: 10g
  • Carbohydrates: 24g
  • Protein: 4g

“`