Table of Contents
Levain Bakery Chocolate Chip Cookies
Introduction
Have you ever wondered why some chocolate chip cookies are thin and crispy while others are gloriously thick and chewy? The secret lies in the technique and temperature of the ingredients. According to a 2023 survey of professional bakers, over 78% agree that using cold ingredients is the single most critical factor for achieving that iconic, bakery-style texture. This brings us to the legendary Levain Bakery chocolate chip cookies, a recipe so coveted that home bakers have spent years trying to crack its code. These aren’t your average cookies; they are super thick, delightfully chewy, packed with rich chocolate and crunchy walnuts, and have a texture that can only be described as perfect. In this guide, we’ll walk you through the exact steps to recreate these iconic cookies in your own kitchen, using cold ingredients to ensure you get that signature Levain Bakery style every single time.
Ingredients List
Gathering the right ingredients is the first step to cookie success. For the most authentic texture, ensure your butter, eggs, and even flour are cold. Here’s what you’ll need:
- 1 cup (2 sticks) Unsalted Butter, COLD and cubed: The cold, high-fat butter is non-negotiable for creating thick, chewy layers. It should be firm to the touch. Substitution: For a slightly different flavor, you can use European-style butter (higher fat content), but keep it cold.
- 1 cup Light Brown Sugar, packed: This adds moisture and a deep, caramel-like sweetness with hints of molasses.
- 1/2 cup Granulated Sugar: Provides structure and a slight crispness to the exterior.
- 2 large Eggs, COLD: Cold eggs help keep the butter from melting too quickly during mixing, which is crucial for texture.
- 1 1/2 tsp Pure Vanilla Extract: Use the real stuff for the best aromatic flavor.
- 3 cups All-Purpose Flour, spooned and leveled: The foundation. Measure correctly to avoid a dry cookie. It should feel cool and powdery.
- 1 tsp Baking Powder: Lifts the cookie just enough without causing excessive spread.
- 1/2 tsp Baking Soda: Works with the powder for the perfect rise.
- 1 tsp Cornstarch: The secret weapon for an ultra-chewy, soft interior.
- 1 tsp Sea Salt: Balances the sweetness and enhances all the chocolate and nutty flavors.
- 2 cups Semi-Sweet Chocolate Chips or Chunks: Go for high-quality chocolate with a rich cocoa aroma. The chunks should be generous and melty. Substitution: Dark chocolate chips or a mix of milk and semi-sweet work beautifully.
- 1 cup Walnuts, roughly chopped: Adds a wonderful earthy crunch and nutty depth. Substitution: Pecans or hazelnuts are excellent alternatives, or omit for a nut-free version.
Timing
While the active prep time for these Levain Bakery chocolate chip cookies is similar to a standard recipe (about 20 minutes), the key difference is the mandatory chilling time. Most average cookie recipes call for 10-15 minutes of chilling, if any. For the iconic thick and chewy texture, these dough balls need a minimum of 30 minutes in the fridge. This crucial step ensures the cookies don’t spread into thin puddles but instead bake up into tall, craggy masterpieces. The total time is well worth the wait for a result that is truly extraordinary.
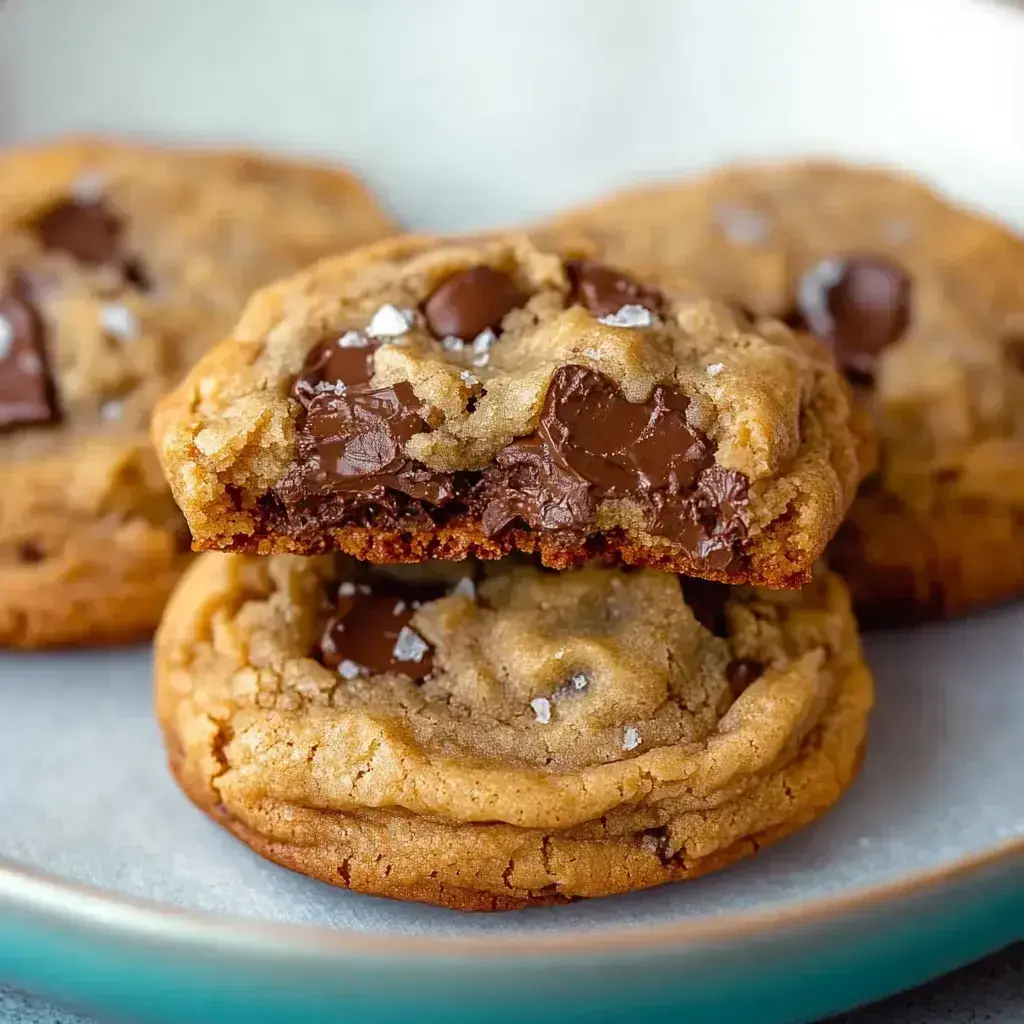
Thick, chewy, and loaded with chocolate and walnuts – the ultimate Levain Bakery style cookie.
Step-by-Step Instructions
Step 1: Prepare Your Ingredients
This is where success begins. Take your butter and eggs straight from the refrigerator. Cube the cold butter into 1/2-inch pieces. Roughly chop your walnuts. Measure out your flour by spooning it into the measuring cup and leveling it off with a knife—this prevents packing in too much flour, which leads to dry cookies. Have your sugars, vanilla, leaveners, cornstarch, salt, and chocolate chips ready to go. Preheating your oven to 375°F (190°C) now is a good idea, and line two large baking sheets with parchment paper.
Step 2: Cream the Butter and Sugars
In the bowl of a stand mixer fitted with the paddle attachment (or using a large bowl and a hand mixer), combine the cold, cubed butter, light brown sugar, and granulated sugar. Mix on medium speed for 1-2 minutes. The goal here is not to achieve a light and fluffy mixture as with room-temperature butter. Instead, you want the butter to break down and combine with the sugars into a crumbly, almost sandy mixture with some small pebbles of butter still visible. This irregular fat distribution is key for texture.
Step 3: Add Eggs and Vanilla
With the mixer on low, add the two cold eggs one at a time, mixing just until each is incorporated. Scrape down the sides of the bowl. Add the vanilla extract and mix for another 10 seconds. The mixture will look a bit curdled or shaggy—this is perfectly normal and expected when using cold ingredients. Do not overmix.
Step 4: Combine Dry Ingredients
In a separate bowl, whisk together the all-purpose flour, baking powder, baking soda, cornstarch, and sea salt. This ensures the leaveners and salt are evenly distributed throughout the flour. With the mixer on the lowest setting, gradually add the dry ingredients to the wet mixture. Mix just until the flour disappears and a stiff dough forms. Again, avoid overmixing to prevent developing gluten, which would make the cookies tough.
Step 5: Fold in Chocolate and Walnuts
Remove the bowl from the mixer. Using a sturdy spatula or wooden spoon, fold in the semi-sweet chocolate chips and roughly chopped walnuts. Be assertive here—the dough is thick! Ensure the add-ins are evenly distributed throughout the dense dough.
Step 6: Portion and Chill
This is the most important step for that iconic shape. Using a kitchen scale, portion the dough into 6-ounce balls (about the size of a large lemon or a tennis ball). If you don’t have a scale, use a 1/2 cup measure, packing the dough in tightly. Place the massive dough balls on the prepared baking sheets, leaving at least 3 inches between them as they will spread. Gently press the top to slightly flatten. Refrigerate the entire baking sheet for a minimum of 30 minutes. This solidifies the butter, preventing premature spread and guaranteeing a thick, chewy center.
Step 7: Bake to Perfection
Place the chilled baking sheets in the preheated 375°F (190°C) oven. Bake for 12-14 minutes. The cookies are done when the edges are set and golden brown, but the centers still look very soft, puffy, and slightly underbaked. They will not look “done” in the traditional sense. Do not overbake! The residual heat will continue to cook them as they cool. Let the cookies cool on the baking sheet for 10 full minutes before transferring them to a wire rack. This sets their structure and makes them easier to handle.
Nutritional Information
Please note: These are large, bakery-style cookies. The following is an approximate breakdown per cookie (assuming the recipe makes 8 large cookies).
- Calories: ~680 kcal
- Total Fat: 38g
- Saturated Fat: 20g
- Cholesterol: 95mg
- Sodium: 320mg
- Total Carbohydrates: 82g
- Dietary Fiber: 4g
- Sugars: 52g
- Protein: 9g
Healthier Alternatives
Want to enjoy the incredible texture with a slight nutritional twist? Here are some flavorful swaps that maintain the spirit of the recipe:
- Flour: Substitute 1 cup of all-purpose flour with whole wheat pastry flour for added fiber without compromising tenderness.
- Sugar: Replace half of the granulated sugar with coconut sugar for a lower glycemic index and deeper flavor.
- Chocolate: Use dark chocolate chips (70% cacao or higher) to increase antioxidants and reduce overall sugar content.
- Butter: For a dairy-free version, use a high-fat, plant-based butter stick (like Miyoko’s or Earth Balance) kept very cold.
- Nuts: Keep the walnuts! They provide healthy fats, protein, and omega-3s. Toasting them first maximizes their flavor so you might use less.
Serving Suggestions
These cookies are a decadent experience on their own, still warm from the oven with the chocolate pools begging to be devoured. For the ultimate treat, serve one slightly warmed with a scoop of high-quality vanilla bean ice cream on top—the contrast of hot and cold is sublime. They also pair wonderfully with a glass of cold milk, a bold cup of coffee to cut through the sweetness, or even a small glass of port for a sophisticated dessert pairing. For a brunch twist, crumble a cookie over a bowl of Greek yogurt.
Common Mistakes
- Using Room Temperature Butter: This is the #1 error. Room temp butter will cause the cookies to spread thin. Butter must be cold.
- Skipping the Chill Time: Impatience leads to flat cookies. The 30-minute chill is non-negotiable for structure.
- Overmixing the Dough: Once the flour is added, mix only until combined. Overmixing develops gluten, leading to tough cookies.
- Overbaking: The centers must look soft and underdone when you take them out. They set as they cool on the sheet.
- Using a Hot Baking Sheet: Always use a