Table of Contents
Luscious Pumpkin Roll with Cream Cheese Frosting The Ultimate Fall Treat!
Introduction: The Perfect Fall Dessert
Did you know that pumpkin-flavored food and beverage sales surge by over 30% every autumn? It’s no wonder everyone is searching for the ultimate pumpkin roll with cream cheese frosting to capture that cozy seasonal magic. Welcome to the world of delightful autumn flavors! If you’ve been searching for the perfect fall dessert, look no further than this Pumpkin Roll with Cream Cheese Frosting recipe. Whether you’re a pumpkin spice enthusiast or a lover of classic holiday treats, this recipe will surely become a staple in your dessert repertoire. The soft, spiced pumpkin cake paired with the rich and creamy frosting is a match made in heaven. Get ready to indulge in the cozy flavors of fall with every bite!
This iconic dessert isn’t just a treat; it’s a centerpiece. Its stunning spiral design, bursting with warm cinnamon and nutmeg, is guaranteed to impress at any gathering. While it looks like it came from a professional bakery, I promise you, with my detailed guide, it’s completely achievable in your own kitchen. Let’s dive into creating this luscious masterpiece.
Ingredients List
Gather these simple ingredients for a flawless pumpkin roll. Using room-temperature ingredients is key for a smooth, lump-free batter and frosting.
For the Pumpkin Sponge Cake:
- 3/4 cup all-purpose flour: The backbone of our cake, providing structure. For a lighter texture, sift it first.
- 1 teaspoon baking powder: Our leavening agent for that perfect, airy rise.
- 2 teaspoons ground cinnamon: The quintessential warm spice, offering a sweet, woody aroma.
- 1 teaspoon ground ginger: Adds a slightly sharp, peppery kick that complements the pumpkin beautifully.
- 1/2 teaspoon ground nutmeg: A little goes a long way! It provides a warm, nutty, and sweet flavor note.
- 1/2 teaspoon salt: Enhances all the other flavors and balances the sweetness.
- 3 large eggs, room temperature: They bind the batter and give the cake its signature sponge-like texture.
- 1 cup granulated sugar: Sweetens the cake and helps create a tender crumb.
- 2/3 cup pure pumpkin puree (not pie filling): The star of the show! Look for a deep orange, thick puree for the most vibrant flavor and color. Substitution: You can use homemade pureed butternut squash for a similar texture.
- 1 teaspoon pure vanilla extract: The aromatic finish that rounds out all the flavors.
- Powdered sugar, for dusting: Crucial for preventing the cake from sticking to the towel when rolling.
For the Cream Cheese Frosting:
- 1 (8-ounce) package full-fat cream cheese, softened: Full-fat is non-negotiable for a rich, stable, and spreadable frosting. It should be as soft as room-temperature butter.
- 1 cup powdered sugar, sifted: Sifting prevents a gritty texture and ensures a silky-smooth filling.
- 6 tablespoons unsalted butter, softened: Adds richness and helps the frosting hold its shape.
- 1 teaspoon pure vanilla extract: Adds a lovely depth to the creamy frosting.
- Pinch of salt: Cuts the sweetness and makes the cream cheese flavor pop.
Timing
Compared to many layered cakes that can take hours of active work, this pumpkin roll is surprisingly efficient. The active prep and bake time is under 40 minutes! The majority of the “total time” is hands-off chilling, which is essential for a clean slice. This makes it an ideal make-ahead dessert for stress-free entertaining.

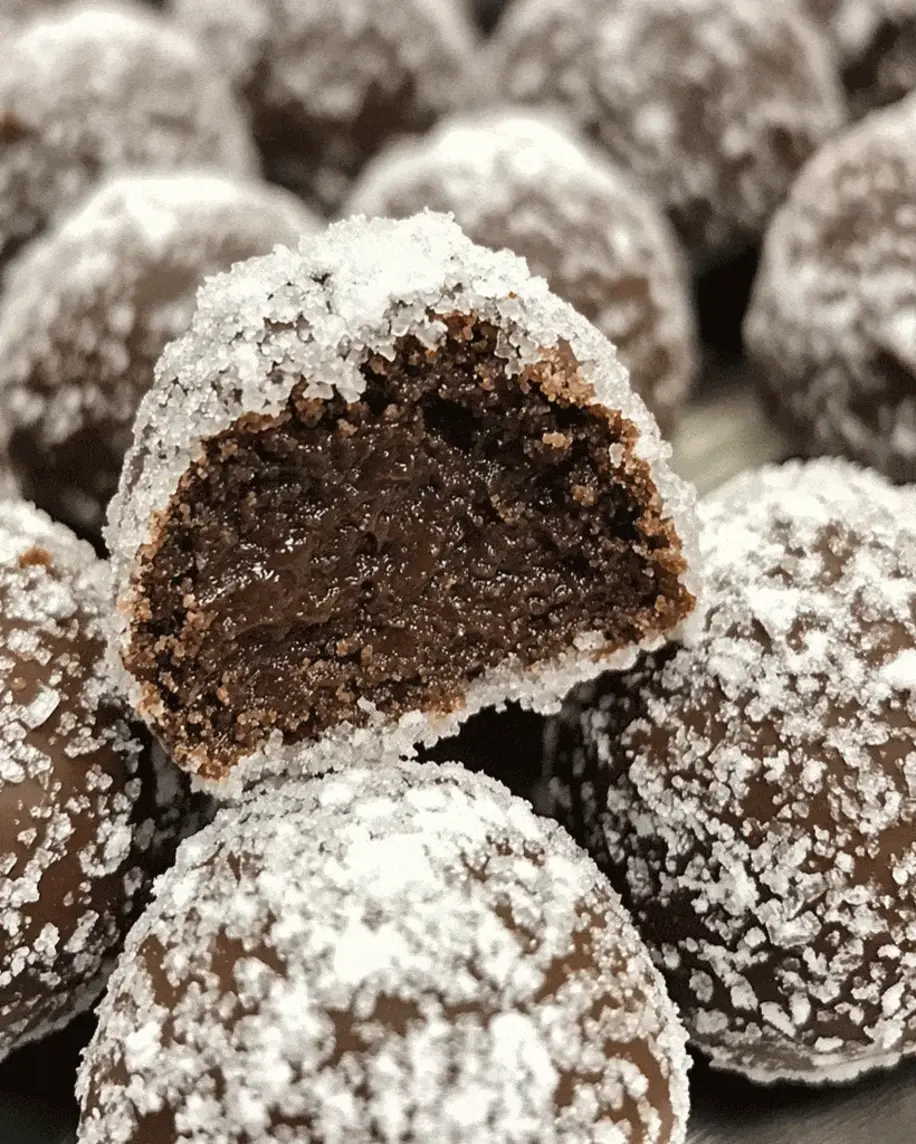
A stunning slice of our homemade Pumpkin Roll, revealing the perfect swirl of spiced cake and creamy frosting.
Step-by-Step Instructions
Step 1: Prepare the Pan and Oven
First, preheat your oven to 375°F (190°C). This slightly higher temperature helps the cake set quickly and maintain its flexibility. Line a standard 15×10-inch jelly roll pan with parchment paper, letting the paper overhang slightly on the short ends for easy removal. Lightly grease the parchment paper and the exposed sides of the pan with butter or non-stick spray. This is your insurance policy against sticking!
Step 2: Make the Pumpkin Cake Batter
In a medium bowl, whisk together the flour, baking powder, cinnamon, ginger, nutmeg, and salt. Set this fragrant dry mixture aside. In a large bowl, beat the eggs and granulated sugar on high speed with a hand mixer or stand mixer for 3-4 minutes. You’re looking for a pale yellow, thick, and ribbon-like consistency. This step incorporates air, which is vital for the cake’s sponge texture. Gently fold in the pumpkin puree and vanilla extract until just combined. Now, add the dry ingredients to the wet in two batches, folding gently with a spatula after each addition until no streaks of flour remain. Be careful not to overmix, as this can deflate the batter and lead to a tough cake.
Step 3: Bake and Roll the Cake
Pour and spread the batter evenly into your prepared pan, reaching all corners. Bake for 13-15 minutes. The cake is done when the top springs back lightly to the touch. While it bakes, lay a clean, thin kitchen towel (not terry cloth) on the counter and dust it generously with powdered sugar. As soon as the cake comes out of the oven, immediately run a knife around the edges to loosen it. Invert the hot cake onto the powdered sugar-dusted towel. Carefully peel off the parchment paper. Starting at one short end, use the towel to gently but firmly roll the cake into a log, rolling the towel inside it. Let it cool completely rolled up on a wire rack. This “training roll” is the secret to a crack-free final spiral.
Step 4: Prepare the Cream Cheese Frosting
While the cake cools, make the frosting. In a medium bowl, beat the softened cream cheese and butter together until completely smooth and creamy, about 2 minutes. Add the sifted powdered sugar, vanilla, and salt. Beat on low initially to incorporate the sugar, then increase to high and beat for another 1-2 minutes until light and fluffy. Avoid overbeating, as it can make the frosting too soft.
Step 5: Assemble the Pumpkin Roll
Once the cake is completely cool (this is crucial—warm cake will melt the frosting!), carefully unroll it onto a flat surface. It will lie flat with a slight curl. Spread the cream cheese frosting evenly over the entire surface, leaving a small border at one of the short ends to prevent squeezing out. Using the towel to guide you, gently re-roll the cake, this time without the towel inside. Don’t worry if it cracks a little; the frosting will hold it together.
Step 6: Chill and Slice
Place the seam side down on a platter or baking sheet. Wrap the entire roll tightly in plastic wrap. Refrigerate for at least 2 hours, or preferably overnight. This chilling step sets the frosting, firms up the cake, and makes slicing clean and easy. Before serving, you can dust the top with a little more powdered sugar or cinnamon for a beautiful finish. Use a sharp, serrated knife to slice into 1-inch pieces, wiping the blade clean between cuts for perfect presentation.
Nutritional Information
Nutritional values are approximate per slice (based on 10 slices).
- Calories: 320 kcal
- Total Fat: 16g
- Saturated Fat: 9g
- Cholesterol: 95mg
- Sodium: 220mg
- Total Carbohydrates: 42g
- Dietary Fiber: 1g
- Sugars: 34g
- Protein: 4g
Healthier Alternatives
You can enjoy this fall classic with a lighter touch using these simple swaps that don’t sacrifice flavor:
- Flour: Substitute half the all-purpose flour with whole wheat pastry flour for added fiber and a nuttier taste.
- Sugar: Reduce granulated sugar in the cake to 3/4 cup. In the frosting, use a monk fruit or erythritol-based powdered sugar substitute.
- Fat: Use Neufchâtel cheese (1/3 less fat) instead of full-fat cream cheese. For the butter in the frosting, try a whipped butter or a plant-based alternative.
- Eggs: For a cholesterol-free option, use a commercial egg replacer or a flax egg (1 tbsp ground flax + 3 tbsp water per egg). Note: this may slightly change the sponge texture.
Serving Suggestions
This pumpkin roll is spectacular on its own, but you can elevate it into a full dessert experience:
- Serve each slice with a dollop of freshly whipped cream and a sprinkle of toasted pecans or walnuts for a delightful crunch.
- Drizzle with a warm caramel or salted caramel sauce just before serving for a decadent touch.
- Pair with a scoop of vanilla bean ice cream or cinnamon ice cream for the ultimate à la mode treat.
- For a festive brunch, serve alongside a hot cup of spiced chai, pumpkin spice latte, or strong coffee.
Common Mistakes
- Using Cold Ingredients: Cold eggs and cream cheese won’t incorporate properly, leading to a dense cake and lumpy frosting. Plan ahead for room temperature.
-
Hamburger Steak with Onion Gravy | Easy & Flavorful Dinner Recipe!
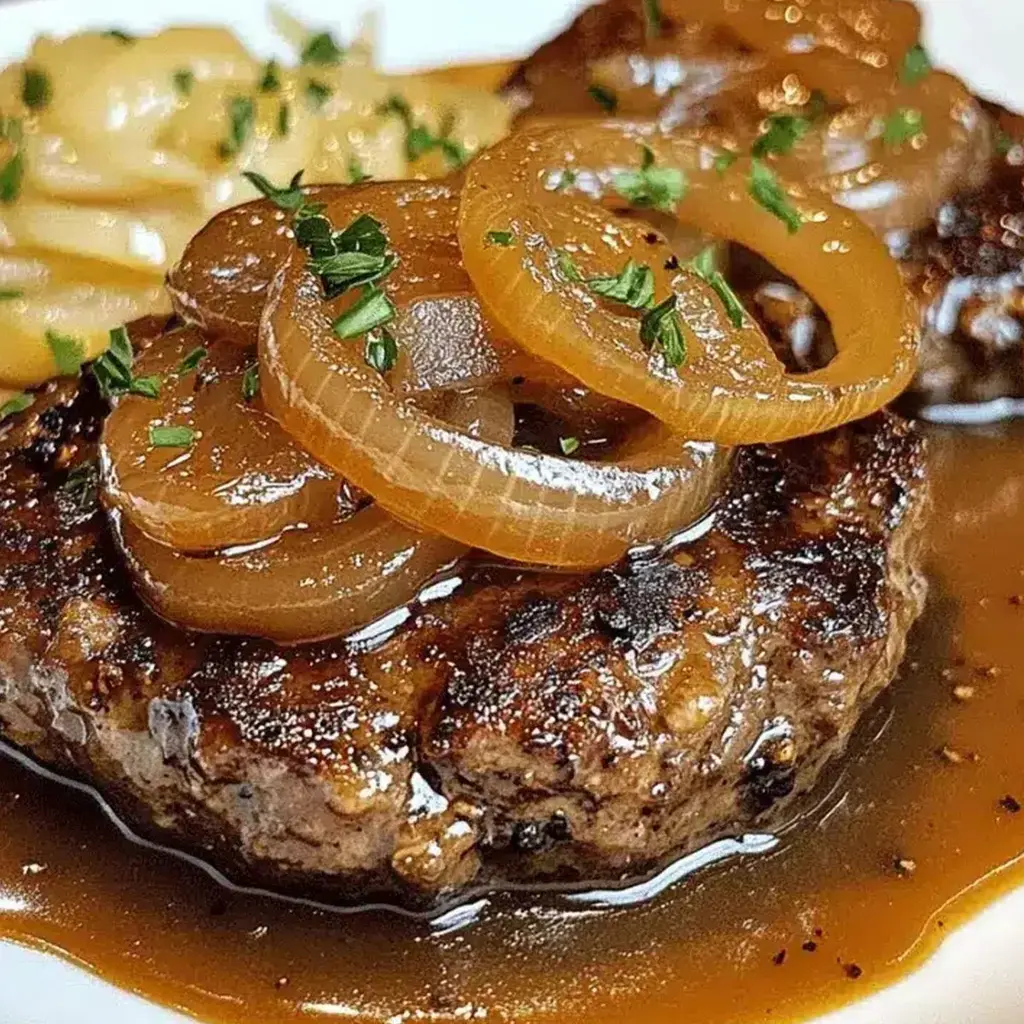
Table of Contents
Hamburger Steak with Onion Gravy | Easy & Flavorful Dinner Recipe!
Introduction
Did you know that over 70% of American home cooks crave hearty, comforting meals but feel short on time? This Hamburger Steak with Onion Gravy is the perfect answer. This Southern-style classic transforms simple ground beef into juicy, savory steaks smothered in a rich, caramelized onion gravy. It’s the ultimate easy & flavorful dinner recipe that delivers restaurant-quality comfort with minimal effort and maximum taste. Forget dry meatloaf or bland patties; this dish is all about deep, satisfying flavors that meld together in one pan. Whether you’re feeding a hungry family or just want a meal that feels like a hug, this recipe is your weeknight hero. Let’s dive into how you can create this beloved comfort food staple in your own kitchen.
Ingredients List
Gather these simple, flavorful ingredients. I’ve included substitutions and sensory notes to help you customize.
For the Hamburger Steaks:
- 1.5 lbs ground beef (80/20 blend): The 20% fat content is key for juicy, flavorful steaks that won’t dry out. For a leaner option, use 90/10 but add 1 tbsp olive oil to the mix.
- 1/3 cup breadcrumbs (Panko or plain): Creates a tender texture by absorbing juices. For a gluten-free swap, use crushed gluten-free crackers or rolled oats.
- 1 large egg: Acts as the binder, giving the patties structure.
- 2 tbsp Worcestershire sauce: Adds a deep, umami tang. Soy sauce or coconut aminos are great substitutes.
- 1 tsp garlic powder & 1 tsp onion powder: Provides a savory base flavor without chopping. Fresh minced garlic and onion work too.
- 1 tsp smoked paprika: Lends a subtle smokiness and beautiful color. Sweet paprika is a fine alternative.
- Salt and black pepper: Season generously—about 1 tsp salt and 1/2 tsp pepper.
For the Onion Gravy:
- 2 large yellow onions, thinly sliced: They will caramelize and sweeten, forming the gravy’s flavor foundation. Vidalia onions are sweeter; red onions add a sharper bite.
- 2 tbsp unsalted butter: For sautéing with rich flavor. Olive oil or beef drippings can be used.
- 2 tbsp all-purpose flour: The thickening agent for a luscious gravy. For a gluten-free gravy, use cornstarch or a gluten-free flour blend.
- 2 cups beef broth: Use low-sodium to control saltiness. The broth should be deeply colored and aromatic for the best gravy.
- 1 tbsp tomato paste (optional): Adds richness and a touch of sweetness. A dash of ketchup can work in a pinch.
- 1 tsp fresh thyme leaves (or 1/2 tsp dried): Herbal, earthy notes that complement the beef beautifully. Rosemary is a bold alternative.
- Salt and pepper to taste: Always taste and adjust at the end.
Timing
Prep Time15 minutesCook Time30 minutesTotal Time45 minutesAt just 45 minutes from start to finish, this recipe is significantly faster than many similar comfort food dishes. The average meatloaf or slow-cooked stew can take over 90 minutes, but our one-pan method and simple patty formation streamline the process. The active cook time is efficient, leaving you with a bubbling, gravy-smothered masterpiece in well under an hour. It’s the ideal timeline for a busy weeknight when you need something deeply satisfying without a long wait.
Juicy hamburger steaks smothered in a rich, savory onion gravy—a comforting one-pan wonder.
Step-by-Step Instructions
Step 1: Make the Hamburger Steak Patties
In a large mixing bowl, gently combine the ground beef, breadcrumbs, egg, Worcestershire sauce, garlic powder, onion powder, smoked paprika, salt, and pepper. My pro tip: use your hands! Mix just until combined—overworking will make the patties tough. Divide the mixture into 4 equal portions and shape them into oval-shaped patties, about 3/4-inch thick. Press a slight indentation into the center of each patty with your thumb. This prevents them from puffing up like a meatball in the middle as they cook, ensuring an even thickness.
Step 2: Brown the Patties
Heat a large skillet or cast-iron pan over medium-high heat. Add a drizzle of oil. Once hot, carefully add the patties. You should hear a satisfying sizzle. Cook for 4-5 minutes per side, without moving them, until a beautiful, deep brown crust forms. They will not be cooked through at this stage—that’s perfect! We’re building flavor and color. Transfer the browned patties to a clean plate. Those browned bits left in the pan? That’s flavor gold (fond). Do not wash the pan!
Step 3: Cook the Onions
Reduce the heat to medium. In the same skillet, melt the butter. Add the thinly sliced onions and a pinch of salt. Cook, stirring occasionally, for 10-12 minutes. Be patient here. You want the onions to soften, become translucent, and start to caramelize to a golden-brown color. This slow cooking unlocks their natural sweetness, which is the soul of the gravy. If the pan gets too dry, add a splash of beef broth to deglaze and scrape up more of that fond.
Step 4: Build the Gravy
Sprinkle the flour evenly over the caramelized onions. Stir constantly for 1-2 minutes. This cooks the raw flour taste out and creates a roux, which will thicken our gravy. It should smell nutty. Slowly pour in the beef broth while whisking or stirring vigorously to prevent any lumps. Add the tomato paste (if using) and thyme. Bring the mixture to a simmer. It will start to thicken noticeably within a couple of minutes. Taste and season with salt and pepper.
Step 5: Simmer and Serve
Nestle the browned hamburger steaks back into the skillet, spooning some of the onion gravy over the top. Reduce the heat to low, cover the skillet with a lid (or foil), and let it simmer gently for 10-12 minutes. This final simmer allows the patties to cook through to a safe 160°F internally and soak up all the incredible gravy flavors. The gravy will become rich, glossy, and perfectly coat the back of a spoon. Serve immediately, ladling plenty of onions and gravy over each steak.
Nutritional Information
The following estimates are for one hamburger steak with a generous portion of onion gravy, based on a 4-serving yield.
- Calories: ~480 kcal
- Protein: 32g
- Total Fat: 28g (Saturated Fat: 12g)
- Carbohydrates: 22g (Dietary Fiber: 2g, Sugars: 6g)
- Sodium: ~850mg (varies with broth saltiness)
Note: These values are approximate and can vary based on specific ingredient brands and portion sizes.
Healthier Alternatives
You can easily lighten up this dish without sacrificing the comforting, flavorful dinner experience.
- Leaner Meat: Use 93% lean ground turkey or chicken instead of beef. Add 1 tbsp of olive oil and an extra dash of Worcestershire or soy sauce to boost moisture and umami.
- Whole Grains: Swap regular breadcrumbs for whole-wheat Panko or oat flour.
- Lower-Sodium Gravy: Use no-salt-added beef broth and control the salt yourself. Increase herbs like thyme and rosemary for more flavor without sodium.
- Stealth Veggies: Finely grate a carrot or zucchini and mix it into the patty mixture. It adds moisture, nutrients, and a subtle sweetness.
- Thickening Swap: Instead of a flour roux, make a slurry with 1 tbsp cornstarch and 2 tbsp cold water. Stir it into the simmering broth at the end for a gluten-free, lower-carb thickener.
Serving Suggestions
This hearty dish pairs beautifully with sides that can soak up the delicious gravy.
- Classic Mashed Potatoes: Creamy, buttery potatoes are the ultimate gravy vehicle.
- Buttered Egg Noodles or Rice: Simple, starchy bases that let the steak and gravy shine.
- Green Veggie Side: Balance the richness with steamed green beans, roasted broccoli, or a simple arugula salad with a lemon vinaigrette.
- Southern Style: Serve with a side of sweet cornbread and collard greens for a full Southern comfort meal.
Common Mistakes
- Overmixing the Meat: This develops too much gluten from the breadcrumbs and makes patties dense and rubbery. Mix gently until just combined.
- Not Getting a Good Sear: If the pan isn’t hot enough, the patties will steam and turn gray instead of developing a flavorful brown crust. Wait for the oil to shimmer before adding the meat.
- Rushing the Onions: Cooking onions over too high a heat will burn them before they caramelize. Low and slow is the key to sweet, tender onions.
- Adding Cold Broth to a Hot Roux: This can cause the flour to clump instantly. Ensure your broth is at least room temperature, or add it very slowly while whisking constantly.
- Overcooking the Patties in the Simmer: After browning, they only need 10-12 minutes in the simmering gravy to finish. Longer cooking can make them dry.
Storing Tips
- Refrigeration: Let the dish cool completely. Store steaks and gravy together in an airtight container in the refrigerator for up to 3-4 days.
- Freezing: This dish freezes exceptionally well. Portion into freezer-safe containers or