The Ultimate Cheesy Ranch Chicken: A Culinary Delight

In the realm of comfort food, few dishes manage to hit all the right notes of flavor, simplicity, and heartiness quite like Cheesy Ranch Chicken. This dish, with its harmonious blend of creamy sauce, aromatic garlic, zesty ranch, and succulent chicken, not only promises a taste sensation but also offers a versatile canvas for culinary creativity. Whether you’re a seasoned chef or a home cook, this recipe is bound to become a staple in your kitchen repertoire.

The Origin of Ranch Flavor

The story of ranch begins in the heart of California, conceived as a dressing by a cowboy-turned-cook. It wasn’t long before its tangy taste captured the hearts of Americans, making it the nation’s favorite dressing. Its transition from a salad dressing to a beloved flavoring in various dishes exemplifies the versatility and universal appeal of ranch.

Ingredients: A Symphony of Flavors

Each component of the Cheesy Ranch Chicken plays a pivotal role in crafting the final dish. The mayonnaise (or cream cheese, if you prefer) introduces a creamy base that ensures the chicken remains moist and tender during baking. The minced garlic adds depth and warmth, creating a flavor profile that complements the tanginess of the ranch. The choice of cheese can vary according to personal preference, but it’s the ranch flavoring packet that ties all the elements together, imparting a unique zest that’s both refreshing and comforting.

Selecting the Best Chicken

The chicken breast, the star of the show, serves as the perfect backdrop for the rich and flavorful toppings. This section can delve into tips for selecting the best quality chicken and preparing it for baking to achieve the juiciest results.

Crafting the Perfect Cheesy Ranch Topping

Combining the ingredients to form the topping is more than a step in the recipe; it’s an opportunity to customize the dish to your taste. Whether you opt for a lighter version using mayonnaise or indulge in the richness of cream cheese, the key is achieving a balance of flavors that will enhance, rather than overpower, the chicken.

The Art of Baking Chicken

Baking is a cooking method that rewards patience and precision. This section can explore the nuances of baking chicken, from the importance of oven temperature to the timing required to ensure that the chicken is cooked through but remains succulent and tender.

Serving and Pairing Suggestions

While the Cheesy Ranch Chicken can undoubtedly stand alone as a sumptuous meal, the sides you choose can elevate it to a feast. Mashed potatoes and asparagus are recommended accompaniments that not only add color and texture to the plate but also harmonize with the dish’s flavors. This section can offer recipes for these sides and suggest other pairings that complement the chicken’s creamy richness.

Beyond the Recipe: Variations and Innovations

The beauty of the Cheesy Ranch Chicken lies in its adaptability. This part of the article can inspire readers to experiment with different ingredients, such as incorporating vegetables into the bake or using various cheeses for new flavor profiles. It can also suggest ways to repurpose leftovers, ensuring that the dish continues to delight long after the initial meal.

A Dish for All Seasons

Concluding the article, reflect on the enduring appeal of Cheesy Ranch Chicken. It’s a recipe that brings people together, offering comfort and joy with every bite. It’s suitable for any occasion, from casual weeknight dinners to special gatherings, proving that good food is a universal language of love and connection.

FAQs: Cheesy Ranch Chicken

Q: Can I use low-fat mayo or cream cheese in this recipe? A: Yes, you can substitute low-fat mayonnaise or cream cheese to reduce the calorie content. Keep in mind that it may slightly alter the richness and texture of the sauce, but the dish will still be delicious.

Q: What type of cheese works best for this recipe? A: Mozzarella is recommended for its meltability and mild flavor, which doesn’t overpower the ranch seasoning. However, feel free to experiment with other cheeses like cheddar for a sharper taste or a blend for added complexity.

Q: Can I make this dish ahead of time? A: Yes, you can assemble the chicken with the cheesy ranch topping and refrigerate it a few hours before baking. This can help the flavors meld together even more. However, add a few extra minutes to the cooking time if you’re baking it straight from the fridge.

Q: Is there a gluten-free option for this recipe? A: To make this recipe gluten-free, ensure that the ranch flavoring packet and any other ingredients used are certified gluten-free. The rest of the ingredients are naturally gluten-free, making it an easy adaptation.

Q: Can I add vegetables to this dish? A: Absolutely! Adding vegetables like bell peppers, onions, or mushrooms to the baking dish can turn this into a one-pan meal. Just ensure they are cut small enough to cook thoroughly within the baking time.

Q: How can I ensure the chicken doesn’t dry out in the oven? A: Keeping the chicken moist involves not overcooking it. Bake until the internal temperature reaches 165°F (74°C), and let it rest for a few minutes before serving. The creamy topping also helps lock in moisture.

Q: What can I use if I don’t have a ranch flavoring packet? A: If you don’t have a ranch flavoring packet, you can make a quick substitute with dried herbs and spices. Mix garlic powder, onion powder, dried dill, dried parsley, dried chives, salt, and pepper. Adjust the quantities to taste.

Q: Can this recipe be made with chicken thighs instead of breasts? A: Yes, chicken thighs can be used as a juicier alternative to breasts. Adjust the cooking time accordingly, as thighs may require a bit longer in the oven depending on their size.

Q: What are some serving suggestions for this dish? A: While mashed potatoes and asparagus are classic sides, this dish also pairs well with rice, quinoa, or a simple green salad. For a low-carb option, serve with roasted cauliflower or zucchini noodles.

Q: How should leftovers be stored and reheated? A: Store leftovers in an airtight container in the refrigerator for up to 3 days. Reheat in the oven or microwave until hot. If using the oven, cover with foil to prevent the chicken from drying out.

Print
clock clock iconcutlery cutlery iconflag flag iconfolder folder iconinstagram instagram iconpinterest pinterest iconfacebook facebook iconprint print iconsquares squares iconheart heart iconheart solid heart solid icon

Cheesy Ranch Chicken: A Simple and Flavorful Delight

  • Author: Chef Emy

Description

Elevate your dinner game with this irresistibly cheesy ranch chicken recipe, a dish that combines the creamy richness of mayo (or cream cheese, if you prefer) with the tangy zest of ranch flavoring. Topped with a generous amount of cheese and infused with the aromatic punch of garlic, this recipe turns ordinary chicken breasts into a mouthwatering meal that’s both easy to prepare and delightful to eat. Here’s how to make it, along with serving suggestions to complete your dining experience.


Ingredients

Scale
  • 1/2 cup mayonnaise or 1 block of cream cheese: Depending on your preference for creaminess. Mayo offers a lighter texture, while cream cheese provides a richer taste.
  • 3 cloves of garlic, minced: Adds a fragrant depth of flavor that complements the creamy and cheesy components beautifully.
  • 1 cup cheese: You can use cheddar for its sharpness, mozzarella for its meltiness, or a mix of your favorite cheeses.
  • 1 packet of ranch flavoring: This is the secret ingredient that gives the chicken its distinctive, zesty ranch taste.
  • Chicken breasts: The canvas for the delicious cheesy ranch topping.

Instructions

  1. Preheat your oven to 400°F (200°C) to ensure it’s ready for baking as soon as your chicken is prepared.

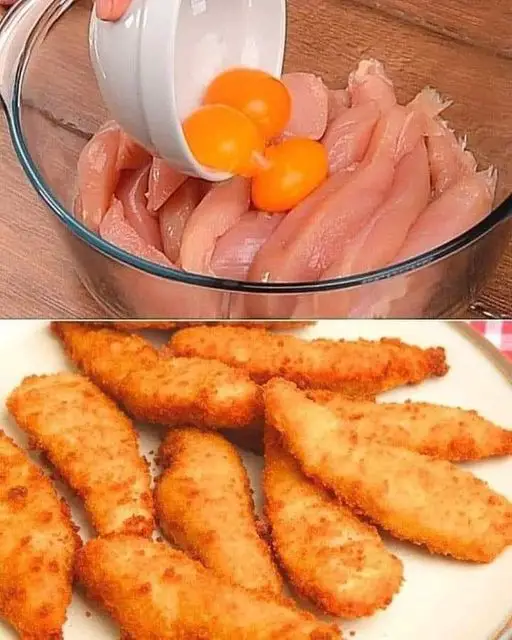
  2. Mix the Topping: In a bowl, combine the mayonnaise (or cream cheese, softened for easier mixing), minced garlic, cheese, and ranch flavoring. Stir until all the ingredients are thoroughly blended into a smooth mixture.

  3. Prepare the Chicken: If the chicken breasts are thick, you might want to butterfly them or pound them to an even thickness to ensure even cooking. Place them in a baking dish.

  4. Slather the Chicken: Spread the cheesy ranch mixture generously over the chicken breasts, making sure they are completely covered. This not only flavors the chicken but also helps keep it moist during baking.

  5. Bake: Place the chicken in the preheated oven and bake for about 30 minutes, or until the chicken is thoroughly cooked (internal temperature should reach 165°F or 75°C) and the topping is nicely browned and bubbly.

  6. Serving: Let the chicken rest for a few minutes after taking it out of the oven to allow the juices to redistribute. Serve hot alongside your favorite sides.


Notes

Serving Suggestions:

This cheesy ranch chicken pairs beautifully with a variety of sides. Here’s how to make the recommended mashed potatoes and asparagus for a complete meal:

  • Mashed Potatoes: Peel and boil potatoes until tender. Mash them with a bit of butter, milk, and salt to taste for a creamy and smooth side dish.

  • Asparagus: Trim the tough ends off the asparagus. Toss with olive oil, salt, and pepper, and roast in the oven at 400°F (200°C) for about 10-15 minutes, or until tender but still slightly crisp.

Variations:

Feel free to customize this dish to suit your taste:

  • Spice it up: Add chili flakes to the cheesy ranch mixture for a spicy kick.
  • Go green: Mix in some finely chopped spinach or kale with the ranch mixture for an added nutritional boost.

Spaghetti Stuffed Garlic Mozzarella Subs: A Culinary Adventure

In the landscape of comfort food, there’s always room for innovation—recipes that twist traditional elements into something unexpectedly delightful. Enter the Spaghetti Stuffed Garlic Mozzarella Subs, a dish that marries the hearty essence of Italian cuisine with the hands-on joy of an American sandwich. This dish is more than a meal; it’s a conversation starter, a statement on the fusion of cultures, and a testament to the creative spirit of home cooking.

The Genesis of an Idea

The journey begins with a simple question: What happens when you take two beloved comfort foods and combine them into one? The Spaghetti Stuffed Garlic Mozzarella Subs recipe is born from the desire to blend the comforting familiarity of spaghetti with the satisfying crunch of a garlic-seasoned sub. This section can explore the inspiration behind fusion cuisine and the endless possibilities it presents.

A Closer Look at the Ingredients

Each ingredient in this recipe plays a pivotal role in crafting the final dish. From the al dente spaghetti noodles that form the heart of the recipe to the rich, savory Prego spaghetti sauce and the ground beef that adds depth and substance, every component is selected for its contribution to the overall flavor profile. The choice of sub buns as the vessel introduces a textural contrast, while the spray butter and Lawry’s Garlic seasoning ensure each bite is infused with aromatic warmth. Finally, the mozzarella cheese acts as the culinary glue, melding the flavors together under a gooey, melted canopy.

The Art of Choosing Ingredients

This section can delve into tips for selecting high-quality ingredients, such as opting for fresh, locally-sourced produce and meats, and the difference these choices can make in the dish’s flavor and nutritional content.

The Process: From Preparation to Presentation

The preparation of Spaghetti Stuffed Garlic Mozzarella Subs is as much about the process as it is about the ingredients. This part of the article can walk readers through the steps, emphasizing the importance of each stage—from cooking the spaghetti to perfection and seasoning the ground beef, to the assembly of the subs and the final bake that brings the dish to golden, bubbling life.

Tips and Tricks for Perfect Execution

Offer readers insider tips on achieving the perfect consistency for the spaghetti, ensuring the sub buns are evenly toasted, and achieving the ideal melt for the mozzarella cheese. This section can also suggest variations on the recipe, like incorporating vegetables or using different types of cheese for those looking to experiment.

Beyond the Recipe: Serving and Pairing

A great dish is about more than just taste; it’s about the experience of sharing and enjoying food. Discuss how these spaghetti stuffed subs can be served at various occasions, from casual family dinners to game day gatherings. Suggest pairing options, such as side salads or roasted vegetables, to balance the meal and enhance the flavors.

The Cultural Significance of Fusion Cuisine

The Spaghetti Stuffed Garlic Mozzarella Subs stand as a symbol of culinary fusion, blending Italian and American food traditions into a single, harmonious dish. This section can explore the broader implications of such recipes on cultural exchange, innovation in the kitchen, and the way we think about and enjoy food from different parts of the world.

Reflections: What This Dish Teaches Us About Cooking and Creativity

Conclude the article with reflections on what this recipe teaches about creativity, flexibility, and the joy of cooking. It’s an invitation to readers to explore beyond traditional recipes and embrace the art of mixing cultures and flavors in their cooking endeavors.

FAQs: Spaghetti Stuffed Garlic Mozzarella Subs

Can I use homemade spaghetti sauce instead of Prego? Absolutely! Using homemade spaghetti sauce can add a personal touch to the recipe and allows you to control the flavors and ingredients. Just ensure it has a similar consistency to prevent the subs from becoming soggy.

What type of ground beef is best for this recipe? For the juiciest and most flavorful outcome, using ground beef with a higher fat content, such as 80/20, is recommended. The fat adds moisture and flavor, enhancing the overall taste of the subs.

Can I prepare the spaghetti mixture ahead of time? Yes, you can prepare the spaghetti and meat sauce mixture ahead of time and refrigerate it until you’re ready to assemble the subs. This can be a great time-saver for quick and easy meal preparation.

Is there a vegetarian option for this recipe? To make a vegetarian version, you can substitute the ground beef with a plant-based meat alternative or increase the variety of vegetables in the sauce, such as mushrooms, bell peppers, and zucchini.

How do I prevent the subs from getting soggy? To prevent sogginess, ensure that the spaghetti mixture is not overly wet and that you don’t overfill the buns. Applying spray butter and garlic seasoning to the interior of the sub buns can create a slight barrier that helps keep them crisp.

Can I use different types of cheese? Mozzarella cheese is chosen for its excellent melting qualities and mild flavor, but you’re welcome to experiment with other types of cheese. Provolone, cheddar, or a blend of Italian cheeses can also work well.

What are the best sides to serve with these subs? These subs pair wonderfully with a variety of sides. Consider serving them with a fresh salad, garlic Parmesan fries, or roasted vegetables for a well-rounded meal.

Can I freeze the stuffed subs for later? While you can freeze the spaghetti mixture, it’s best to enjoy the subs fresh once they’re assembled and baked. Freezing and reheating may affect the texture of the bread and the consistency of the filling.

Are there any tips for making this recipe healthier? For a healthier take, you could use whole wheat sub buns, lean ground turkey instead of beef, and low-fat mozzarella cheese. Additionally, incorporating more vegetables into the spaghetti sauce can boost the nutritional content.

How can I add more flavor to the subs? To enhance the flavor, consider adding fresh herbs to the spaghetti sauce, such as basil or oregano. A sprinkle of red pepper flakes can add a bit of heat, and finishing the subs with a drizzle of quality olive oil before serving can add a rich, flavorful touch.

Print
clock clock iconcutlery cutlery iconflag flag iconfolder folder iconinstagram instagram iconpinterest pinterest iconfacebook facebook iconprint print iconsquares squares iconheart heart iconheart solid heart solid icon

Spaghetti Stuffed Garlic Mozzarella Subs Recipe

  • Author: Chef Emy

Description

Indulge in a delightful twist on classic spaghetti with this mouthwatering Spaghetti Stuffed Garlic Mozzarella Subs recipe. This creative dish combines the comforting flavors of hearty spaghetti, rich ground beef, and tangy Prego spaghetti sauce, all nestled within a crispy, garlic-seasoned sub bun and topped with melted mozzarella cheese. It’s a perfect fusion of Italian pasta and the beloved American sandwich, baked to perfection for a crispy exterior and a warm, gooey center. Here’s how to make these irresistible subs that are sure to be a hit at any meal.


Ingredients

  • Spaghetti noodles: Cooked according to package instructions for the perfect al dente texture.
  • Ground beef: Browned and mixed with your favorite spaghetti sauce for a rich and meaty filling.
  • Prego spaghetti sauce: For enveloping the ground beef in a savory, herby tomato sauce.
  • Sub buns: The vessel for your spaghetti and cheese, providing a crispy, toasty crunch.
  • Spray butter: Used to add moisture and richness to the sub buns before seasoning.
  • Lawry’s Garlic seasoning: For giving the buns a bold garlic flavor that complements the spaghetti filling.
  • Mozzarella cheese: Generously sprinkled on top for a gooey, stretchy cheese layer.

Instructions

  1. Prepare the Spaghetti:

    • Cook the spaghetti noodles according to the package instructions until they reach your desired level of tenderness. Drain and set aside.
    • In a separate pan, brown the ground beef over medium heat until fully cooked. Drain any excess fat.
    • Combine the cooked ground beef with Prego spaghetti sauce and heat through. Mix the sauce with the cooked spaghetti noodles until well combined. Adjust seasoning to taste.
  2. Prep the Sub Buns:

    • Preheat your oven to 450°F (232°C).
    • Carefully cut the center out of the sub buns, creating a hollow space for the spaghetti filling.
    • Apply spray butter evenly on the inside and outside of the sub buns. Then, season all over with Lawry’s Garlic seasoning for a garlicky kick.
  3. Assemble the Subs:

    • Spoon the spaghetti and sauce mixture generously into the hollowed-out sub buns, ensuring they’re well-stuffed.
    • Sprinkle a liberal amount of mozzarella cheese on top of the spaghetti-filled buns.
  4. Bake:

    • Place the prepared subs on a baking sheet and bake in the preheated oven for about 5-7 minutes, or until the cheese is melted and bubbly, and the buns are toasted to your liking.
  5. Serve and Enjoy:

    • Remove the subs from the oven and let them cool for a few minutes. Serve warm and enjoy the melty cheese, flavorful spaghetti, and crispy garlic-seasoned bun in every bite.

Notes

Tips for Success:

  • Customize Your Filling: Feel free to add vegetables, such as bell peppers or mushrooms, to the ground beef and sauce mixture for added flavor and nutrition.
  • Cheese Varieties: Experiment with different cheeses, like provolone or Parmesan, for varied flavors and textures.
  • Serving Suggestions: Pair these spaghetti stuffed subs with a side salad or your favorite roasted vegetables for a complete, satisfying meal.

This Spaghetti Stuffed Garlic Mozzarella Subs recipe is not just a meal; it’s an experience. Combining the cozy familiarity of spaghetti with the novel presentation of a stuffed sub, it’s a dish that’s bound to impress and satisfy. Whether for a weeknight dinner, a game day feast, or a unique twist on pasta night, these subs offer a deliciously memorable way to enjoy two favorites in one.

Discover the Secret to Perfectly Crispy Seafood with This Long John Silver’s-Style Batter Recipe

In the culinary world, few pleasures surpass the delight of biting into perfectly fried seafood or chicken, enveloped in a golden, crispy batter that sings with flavor and texture. It’s a universal love affair that spans across cultures and continents, uniting food enthusiasts in their quest for that impeccable crunch. Today, we unlock the secrets behind the iconic Long John Silver’s-style batter, a recipe revered for its ability to produce the crispiest, most flavorful fried delicacies you’ve ever tasted.

The Quest for the Ultimate Crispy Batter

Long John Silver’s, a name synonymous with delectable fried seafood, has long been the standard for what a perfect batter should accomplish. Achieving that trademark lightness and crunch at home has been a quest for many. With this recipe, the search ends, offering you a way to recreate the magic in your own kitchen.

Ingredients: The Foundation of Flavor

The path to crispy perfection begins with understanding the components of the batter. Each ingredient plays a pivotal role in the final outcome:

  • Flour and Cornstarch: The duo that forms the base, providing the structure while ensuring a light, airy texture.
  • Baking Soda and Baking Powder: These leavening agents are crucial for achieving the desired puffiness, adding volume and lightness to the batter.
  • Salt: A simple yet essential flavor enhancer that balances the taste.
  • Water: The catalyst that brings the dry ingredients together into a smooth, cohesive batter.

The Art of Mixing: Technique Matters

Creating the batter is more than just combining ingredients; it’s about technique. The way you mix the batter can significantly affect its texture and the overall crunch of the fried product. A gentle hand is needed to ensure the ingredients are well-incorporated without overmixing, which can lead to a tough, chewy coating.

The Secret to a Perfect Fry

Diving deeper into the frying process, we uncover more secrets to achieving that coveted crispy exterior without compromising the tenderness of the seafood or chicken within. Key factors include:

  • Oil Temperature: Maintaining the right temperature ensures a quick seal, preventing the food from absorbing excess oil and becoming greasy.
  • Batch Size: Frying in small batches avoids overcrowding, allowing each piece to cook evenly and maintain the oil’s temperature.
  • Drainage: Proper drainage on paper towels removes any lingering oil, keeping the batter crisp and light.

Beyond Seafood: A Versatile Batter

While this batter finds its roots in seafood, its versatility knows no bounds. From chicken tenders to vegetable fritters, this recipe serves as a golden key that unlocks a world of crispy possibilities. Experimentation is encouraged, inviting you to explore the wide range of dishes that can benefit from this exquisite coating.

Serving Suggestions: Elevating Your Dish

The final step in our culinary journey is presentation and accompaniment. Crispy fried foods, while stellar on their own, are elevated to new heights with the right sides and sauces. From classic tartar sauce to innovative dips, and sides like coleslaw or fries, the right pairing can transform a simple meal into an unforgettable feast.

FAQs: Perfecting Your Long John Silver’s-Style Batter

Q: Can I use this batter for foods other than seafood? A: Absolutely! While this batter is inspired by Long John Silver’s seafood, it’s incredibly versatile. Try it with chicken strips, onion rings, or even vegetables for a delightful crunch. The light, crispy texture complements a wide variety of foods.

Q: How do I prevent my batter from becoming too thick or thin? A: Achieving the right consistency is key to the perfect batter. If your batter is too thick, it may result in a heavy coating that doesn’t cook evenly. Too thin, and it might not adhere well to your food. Start with the water amount specified in the recipe, then adjust by adding a little more flour if it’s too thin or a bit more water if too thick. The batter should resemble a thin pancake batter for the best results.

Q: What’s the best oil for frying with this batter? A: For frying, you want an oil with a high smoke point to prevent any burnt flavors. Vegetable oil, canola oil, and peanut oil are excellent choices for their neutral flavors and high smoke points, ensuring your battered foods fry to golden perfection without any unwanted aftertaste.

Q: How do I know when the oil is at the right temperature? A: Using a kitchen thermometer is the most accurate way to check oil temperature, which should be around 375°F (190°C) for optimal frying. If you don’t have a thermometer, you can test the oil by dropping a small amount of batter into it. If it sizzles and rises to the surface, the oil is ready.

Q: Can this batter be made ahead of time? A: For the best results, it’s recommended to use the batter immediately after mixing. However, if you need to prep in advance, you can mix the dry ingredients together and add the water just before you’re ready to fry. This helps maintain the leavening power of the baking powder and soda, ensuring a crispy finish.

Q: Why does my batter fall off the food while frying? A: There are a few reasons why batter might not adhere properly. Make sure the food is dry before dipping into the batter; moisture can prevent it from sticking. Also, ensure the oil is hot enough so the batter starts to cook immediately upon entering the oil, creating a seal around the food.

Q: How can I make this recipe gluten-free? A: To make a gluten-free version of this batter, substitute the all-purpose flour with your preferred gluten-free flour blend. Keep in mind that the texture might vary slightly, so you may need to adjust the amount of water to achieve the desired consistency.

Q: Is there a way to bake with this batter instead of frying? A: While this batter is designed for frying to achieve its signature crispiness, you can experiment with baking for a healthier alternative. For baked goods, spray or brush the battered items with oil and bake in a preheated oven until golden brown. Note that the texture will be different from frying.

In a culinary landscape constantly chasing the next trend, the appeal of crispy fried seafood and chicken remains timeless. This Long John Silver’s-style batter recipe stands as a testament to the enduring love for comfort food done right. It’s not just about recreating a taste from a beloved fast-food chain; it’s about mastering a technique that elevates your home cooking to new, delicious heights.

By embracing the tips and secrets shared in this guide, you’re not just making food; you’re crafting experiences, creating memories, and, most importantly, spreading joy through the universal language of crispy, flavorful fried delights.

Print
clock clock iconcutlery cutlery iconflag flag iconfolder folder iconinstagram instagram iconpinterest pinterest iconfacebook facebook iconprint print iconsquares squares iconheart heart iconheart solid heart solid icon

Long John Silver’s-Style Batter Recipe: A Must-Have for Seafood Lovers

  • Author: Chef Emy

Description

Unlock the secret to creating restaurant-quality fried seafood at home with this Long John Silver’s-style batter recipe. Perfectly crispy, light, and flavorful, this batter mimics the iconic taste of the beloved fast-food chain’s fried fish and chicken. Whether you’re craving crispy fish fillets, shrimp, or chicken planks, this batter will envelop your seafood or poultry in a golden crust, turning your kitchen into the next best thing to visiting Long John Silver’s. Here’s how to whip up this must-have recipe.


Ingredients

Scale
  • 3/4 cup flour: The base of the batter, providing structure and crispiness.
  • 2 tablespoons cornstarch: A secret ingredient for making the batter extra crispy and light.
  • 1/4 teaspoon baking soda: Helps to leaven and lighten the batter, creating a fluffy texture.
  • 1/4 teaspoon baking powder: Works with baking soda to aerate the batter, ensuring it puffs up beautifully when fried.
  • 1/4 teaspoon salt: Enhances the overall flavor of the batter.
  • 3/4 cup water: The liquid component that brings the batter together. The amount of water can slightly vary depending on the desired consistency.

Instructions

  1. Mix Dry Ingredients: In a large mixing bowl, whisk together the flour, cornstarch, baking soda, baking powder, and salt, ensuring they are well combined and free of lumps.

  2. Add Water: Gradually add the water to the dry ingredients, whisking continuously until the batter is smooth. The batter should be thick enough to coat the back of a spoon but not too thick. Adjust the water as necessary to achieve the right consistency.

  3. Let the Batter Rest: Allow the batter to sit for about 10-15 minutes before using. This resting time helps the ingredients fully integrate and results in a smoother batter.

  4. Prepare for Frying: Heat oil in a deep fryer or a large, deep skillet to 375°F (190°C). The oil should be deep enough to fully submerge the items you’re frying.

  5. Batter Your Seafood or Chicken: Dip your seafood or chicken pieces into the batter, ensuring they are fully coated. Allow any excess batter to drip off before gently lowering them into the hot oil.

  6. Fry to Perfection: Fry the battered items in batches to avoid overcrowding, which can lower the oil’s temperature and result in soggy food. Fry until golden brown and crispy, typically 3-4 minutes for fish fillets and shrimp, and 5-6 minutes for chicken pieces. The cooking time may vary depending on the size of the pieces.

  7. Drain and Serve: Once fried to a perfect golden brown, remove the items from the oil using a slotted spoon and drain on paper towels to remove excess oil. Serve hot with your favorite dipping sauces, lemon wedges, and sides.


Notes

Tips for the Perfect Fry:

  • Maintaining Oil Temperature: Keep a cooking thermometer handy to ensure the oil remains at the correct temperature throughout frying.
  • Avoiding Soggy Batter: Don’t let battered items sit before frying. Dip and fry immediately to prevent the batter from becoming soggy.
  • Serving Suggestions: Complement your crispy creations with sides like fries, coleslaw, or hush puppies for a complete seafood feast experience.

This Long John Silver’s-style batter recipe is not just a recipe; it’s a ticket to creating memorable, delicious meals that capture the essence of the sea. Whether you’re a fan of the fast-food chain or simply love crispy fried seafood and chicken, this batter is sure to become a go-to in your culinary repertoire.

The Ultimate Guide to Making Crispy Chicken Strips at Home

In the pantheon of comfort foods, crispy chicken strips hold a revered place. They’re the culinary equivalent of a warm hug, a dish that conjures memories of childhood dinners, game-day gatherings, and late-night snacks. This guide will take you through the art and science of making the perfect crispy chicken strips, ensuring that you can bring this beloved comfort food to your table, with a golden crust and tender, juicy interior every time.

The Origins of Crispy Chicken

Before we dive into the recipe itself, let’s take a moment to appreciate the journey of crispy chicken through history. While the exact origins of fried chicken are disputed, its roots can be traced back to various cultures, each adding its unique twist to the preparation. The version we know and love today—a marriage of seasoning, breading, and deep-frying—owes much to the culinary traditions of the American South, where fried chicken became a staple. The adaptation into strips or tenders is a more recent innovation, offering a boneless, snack-sized version that’s perfect for dipping and sharing.

Selecting Your Ingredients

The key to outstanding crispy chicken strips lies in the quality and preparation of your ingredients. This recipe calls for simple, everyday items, but each plays a crucial role in the final outcome.

  • Chicken: Opting for tender fillets ensures that each strip is easy to eat and cooks evenly.
  • Seasoning: The addition of garlic, paprika, salt, and pepper is not just about flavor—it’s about creating a depth of taste that complements the chicken and stands up to the frying process.
  • Breading: A triple-layer coat of flour, eggs, and breadcrumbs guarantees that irresistible crunch, while the eggs and garlic provide a layer of flavor that binds the breading to the chicken.

The Art of Breading

Breading is not just a step in the process—it’s an art form. It’s what separates the good from the great in the world of crispy chicken strips. Achieving the perfect breading is about more than just adhering to the recipe; it’s about ensuring each strip is evenly coated, creating a barrier that seals in the chicken’s moisture during frying. The sequential dredge in flour, egg wash, and breadcrumbs, each seasoned to perfection, builds up layers of texture and flavor.

Mastering the Fry

Frying, the most critical step in achieving the perfect crispy chicken strip, is all about temperature control and timing. The oil needs to be hot enough to immediately start crisping the breading upon contact, but not so hot as to burn the exterior before the chicken is cooked through. This section could delve into the science of frying, including how the Maillard reaction creates that golden-brown deliciousness and how to maintain the ideal frying temperature.

Serving and Enjoyment

Crispy chicken strips are more than just a dish; they’re an experience. This section can explore various ways to serve and enjoy them, from traditional dips to more inventive sauces, and how to pair them with sides to create a balanced meal. It could also discuss the communal joy of sharing crispy chicken strips, making them a staple for gatherings.

Beyond the Recipe

Incorporating crispy chicken strips into your culinary repertoire opens up a world of creativity. This section could offer variations on the basic recipe, such as adding different spices to the breading or experimenting with baking instead of frying for a healthier option. It could also explore the global appeal of crispy chicken, highlighting similar dishes from around the world and how they reflect their cultural origins.

FAQs: Crispy Chicken Strips

Can I use chicken breasts instead of fillets for this recipe? Yes, chicken breasts can be used. Simply slice them into thin strips. Keep in mind that cooking times may vary slightly based on the thickness of the strips.

How can I ensure my chicken strips are fully cooked without burning the coating? Maintaining the correct oil temperature is crucial. Aim for 350°F to 375°F (175°C to 190°C). Use a cooking thermometer to monitor the oil. Additionally, don’t overcrowd the pan, as this can lower the temperature. Cooking in batches ensures even cooking and browning.

What are the best breadcrumbs to use for extra crunch? Panko breadcrumbs are an excellent choice for achieving an extra crunchy texture. They’re larger and flakier than traditional breadcrumbs, providing a crispier finish to your chicken strips.

Can I bake these chicken strips instead of frying? Absolutely! To bake, preheat your oven to 400°F (200°C), place the breaded chicken strips on a baking sheet lined with parchment paper, and bake for 20-25 minutes, flipping halfway through, until golden brown and cooked through.

Is there a gluten-free alternative for breading? For a gluten-free version, you can use almond flour or coconut flour in place of all-purpose flour and crushed gluten-free cereal or breadcrumbs for the outer coating. Ensure all other ingredients used are gluten-free.

Can I make these chicken strips in an air fryer? Yes, air frying is a great alternative. Preheat your air fryer to 390°F (200°C), place the chicken strips in the basket, ensuring they don’t overlap, and cook for 10-12 minutes, flipping halfway through, until golden brown and cooked through.

How can I add more flavor to the breading? Feel free to experiment with spices and herbs. Adding Parmesan cheese, smoked paprika, garlic powder, onion powder, or dried herbs like oregano and thyme to your flour mixture can enhance the flavor profile.

What dipping sauces pair well with crispy chicken strips? The beauty of chicken strips is their versatility with dipping sauces. Classic options include ketchup, barbecue sauce, honey mustard, ranch dressing, and sweet and sour sauce. For something different, try a homemade garlic aioli or spicy buffalo sauce.

How should I store leftovers, and how do I reheat them? Leftover chicken strips can be stored in an airtight container in the refrigerator for up to 3 days. Reheat in the oven at 375°F (190°C) for 10-15 minutes, or until heated through and crispy. Microwaving is not recommended, as it can make the breading soggy.

Can I freeze cooked chicken strips? Yes, cooked chicken strips freeze well. Allow them to cool completely, then freeze them on a baking sheet before transferring to a freezer-safe bag or container. They can be frozen for up to 3 months. Reheat from frozen in the oven for best results.

Conclusion: Crispy Chicken Strips as a Culinary Journey

In closing, this article could reflect on crispy chicken strips not just as a recipe, but as a journey through history, culture, and personal memories. It could emphasize how, by mastering this dish, you’re not just feeding your body but also nourishing your soul with the warmth of shared experiences and the joy of cooking.

Print
clock clock iconcutlery cutlery iconflag flag iconfolder folder iconinstagram instagram iconpinterest pinterest iconfacebook facebook iconprint print iconsquares squares iconheart heart iconheart solid heart solid icon

Crispy Chicken Strips Recipe

  • Author: Chef Emy

Description

Crispy chicken strips are a universally loved treat, ideal for parties, family dinners, or simply as a delightful snack. The secret to the perfect chicken strip lies in its crispy exterior paired with tender, juicy chicken inside. This recipe takes you through a simple yet foolproof method to achieve just that, with a hint of garlic to add a depth of flavor that will have everyone asking for seconds. Here’s how to make them.


Ingredients

Scale
  • 3 eggs: The foundation of your wet batter, helping the coating stick to the chicken.
  • 2 chicken fillets: Sliced into strips. Choosing high-quality chicken is key to getting that tender, juicy bite.
  • 2 cloves of garlic: Minced. Garlic adds a punch of flavor that complements the chicken beautifully.
  • 1 cup all-purpose flour: For dredging. It creates the first layer of the crisp coating.
  • 1 cup breadcrumbs: For the outer layer. Breadcrumbs are the secret to achieving that satisfying crunch.
  • 1 teaspoon paprika: Adds a subtle heat and color to the chicken strips.
  • Salt and pepper to taste: For seasoning the chicken and enhancing its natural flavors.
  • Vegetable oil for frying: Choose an oil with a high smoke point to achieve a golden-brown finish without burning.

Instructions

  1. Prep the Chicken: Start by slicing the chicken fillets into strips, roughly the same size for even cooking. Season them with salt and pepper to taste.

  2. Create the Garlic-Egg Wash: In a shallow dish, beat the eggs and mix in the minced garlic. This mixture will not only add flavor but also ensure the flour and breadcrumbs adhere to the chicken strips.

  3. Dredge the Chicken: Set up your dredging station with two more dishes – one for the flour seasoned with paprika, salt, and pepper, and another for the breadcrumbs. Coat each chicken strip in the flour, dip it into the garlic-egg wash, and then roll it in the breadcrumbs until fully covered.

  4. Fry the Chicken Strips: Heat vegetable oil in a large frying pan over medium-high heat. Once hot, carefully add the chicken strips, making sure not to overcrowd the pan. Fry until golden brown and crispy, about 3-4 minutes per side, depending on the thickness of the strips.

  5. Drain and Serve: Once cooked, transfer the chicken strips to a plate lined with paper towels to drain any excess oil. Serve hot with your favorite dipping sauces, such as honey mustard, barbecue sauce, or a creamy garlic dip.


Notes

Tips for Perfect Crispy Chicken Strips:

  • Double Coating: For extra crunch, you can double-dip the chicken strips by repeating the flour and egg wash steps before coating them in breadcrumbs.
  • Resting Time: Let the coated chicken strips rest for about 5-10 minutes before frying. This helps the coating to set and reduces the chances of it falling off during frying.
  • Frying Temperature: Keep the oil at a consistent temperature of around 350°F (175°C) to ensure even cooking and browning. Using a thermometer can help monitor the oil’s temperature.

Serving Suggestions:

Crispy chicken strips are incredibly versatile. They can be served as a main course with sides of mashed potatoes and coleslaw, as a protein-rich salad topping, or as a snack with an assortment of dips. They’re also a hit with kids and adults alike, making them a great choice for family meals or gatherings.

The Art and Delight of Homemade Doughnuts

In a world where instant gratification is often the norm, taking the time to create something from scratch brings a unique sense of satisfaction and pride. Among the many delights that can be conjured up in the kitchen, homemade doughnuts hold a special place. These circular confections, often associated with comfort, celebration, and pure joy, offer a canvas for culinary creativity that few other sweets can match.

A Brief History of Doughnuts

The doughnut, or donut as it’s alternatively spelled, has a disputed history, with various forms of fried dough appearing in cuisines around the globe. From the Dutch settlers who brought over olykoeks (“oily cakes”) to America, to the purported invention of the ring-shaped doughnut by Hanson Gregory in 1847, the evolution of the doughnut is a fascinating journey through time and culture. Today, doughnuts are a global phenomenon, celebrated in their myriad forms, from the jelly-filled sufganiyot of Israel to the sugar-dusted beignets of France.

The Magic of Making Doughnuts at Home

There’s something almost magical about the process of making doughnuts at home. It starts with the simplest of ingredients—flour, sugar, milk, and yeast—transformed through the alchemy of kitchen science into something that transcends their humble beginnings. This recipe for Milk Brioche Doughnuts takes you through this magical transformation step by step, promising results that are as rewarding to make as they are to devour.

The Ingredients: Foundations of Flavor

Each ingredient in a doughnut recipe plays a pivotal role in the final product’s texture and taste. The choice of milk enriches the dough, lending it a tenderness and flavor that water alone could never achieve. The butter, sugar, and egg work in harmony to create a dough that’s rich yet light, sweet but not overpowering. The yeast, meanwhile, is the silent workhorse, driving the rise and airy texture that are hallmarks of a great doughnut.

The Process: A Labor of Love

Making doughnuts is a labor of love. From activating the yeast to kneading the dough, each step requires patience and care. The first rise is a testament to the power of time, as the dough doubles in size, filled with the promise of soft, fluffy doughnuts. The act of shaping the doughnuts, whether by hand or with cutters, is a moment of creativity, a chance to imprint a part of yourself into each piece. The second rise, then the sizzle of dough hitting hot oil, marks the final transformation, turning pale dough into golden, tempting treats.

Frying vs. Baking: A Textural Dilemma

While this recipe calls for frying, the traditional method for making doughnuts, there’s an ongoing debate about frying versus baking. Frying gives doughnuts their characteristic crispy exterior and soft interior, a textural contrast that’s hard to achieve with baking. However, baking offers a healthier alternative, producing doughnuts that are softer and lighter but lack the classic fried texture. The choice ultimately depends on personal preference and health considerations.

Glazing and Topping: The Final Flourish

The final step in making doughnuts—glazing and topping—offers endless possibilities for customization. A simple sugar glaze, rich chocolate, or tangy lemon icing can transform the flavor profile of your doughnuts. Toppings like sprinkles, nuts, or coconut add texture and visual appeal, making each doughnut a small work of art.

Sharing the Joy: Doughnuts as a Universal Language of Love

Homemade doughnuts are more than just a treat; they’re a gesture of love and generosity. Sharing them with family and friends is a joyous occasion, a way to connect and celebrate over something made with your own hands. Whether it’s a lazy Sunday morning or a special celebration, doughnuts have a way of making any moment sweeter.

FAQs: Homemade Doughnuts

Can I use all-purpose flour instead of bread flour for doughnuts? Yes, you can use all-purpose flour for making doughnuts. While bread flour has a higher protein content that contributes to a chewier texture, all-purpose flour is perfectly fine and will result in a softer, tender doughnut.

What can I do if I don’t have a doughnut cutter? If you don’t have a doughnut cutter, you can use two round cutters of different sizes or even improvise with household items. A large glass or cup can serve as the outer cutter, and a small bottle cap can cut out the doughnut hole.

How do I ensure my doughnuts are fluffy and not oily? To ensure fluffy doughnuts, make sure your oil is at the correct temperature (around 375°F or 190°C) before frying. If the oil is too cold, doughnuts will absorb too much oil and become greasy. If it’s too hot, they’ll brown too quickly on the outside without cooking through. Using a cooking thermometer can help maintain the right temperature.

Can I make the dough ahead of time? Yes, you can prepare the doughnut dough ahead of time. After kneading, place it in a greased bowl, cover, and refrigerate overnight. Allow the dough to come back to room temperature and proceed with the shaping and second rise before frying.

Why did my doughnuts turn out hard? Doughnuts can turn out hard if they’re over-kneaded or fried for too long. Over-kneading develops the gluten too much, making the dough tough, while over-frying can cause them to become crispy rather than soft. Keep a close eye on the frying time and gently knead the dough to avoid overworking it.

Can these doughnuts be baked instead of fried? Yes, for a healthier alternative, you can bake these doughnuts. Place the shaped dough on a baking sheet, let them rise as directed, and then bake in a preheated oven at 350°F (175°C) for about 10-15 minutes or until they’re lightly golden. Note that baked doughnuts will have a different texture compared to fried ones.

How should I store leftover doughnuts? Leftover doughnuts are best enjoyed fresh but can be stored in an airtight container at room temperature for up to 2 days. For longer storage, you can freeze them for up to 2 months. Reheat gently in the oven or microwave before serving.

Can I fill these doughnuts with jam or cream? Absolutely! To fill the doughnuts, use a piping bag fitted with a narrow nozzle. Insert the nozzle into the side of the doughnut and gently squeeze in your filling of choice, such as jam, custard, or whipped cream, until the doughnut feels slightly heavier.

Conclusion: The Timeless Appeal of Homemade Doughnuts

In the end, the appeal of homemade doughnuts lies in their ability to bring together the simple and the sublime, the everyday and the extraordinary. They remind us that taking the time to create something beautiful and delicious is not just about the end product but about the journey itself. So, the next time you’re looking for a way to add a little sweetness to your life, consider reaching for this Milk Brioche Doughnut recipe. It’s a journey well worth taking.

Print
clock clock iconcutlery cutlery iconflag flag iconfolder folder iconinstagram instagram iconpinterest pinterest iconfacebook facebook iconprint print iconsquares squares iconheart heart iconheart solid heart solid icon

Classic Homemade Doughnuts Recipe

  • Author: Chef Emy

Description

Dive into the world of homemade treats with this classic doughnut recipe. These doughnuts are fluffy, sweet, and irresistibly delicious, perfect for satisfying your sweet tooth any time of the day. Whether you’re a seasoned baker or new to the kitchen, this recipe is straightforward, promising delightful results that are sure to impress family and friends. Here’s how to make these heavenly pastries from scratch.


Ingredients

Scale
  • 3 cups of flour: The base of your dough, providing structure.
  • 2 tablespoons of butter: Adds richness and flavor to the dough.
  • 7 grams of baker’s yeast: The key leavening agent that helps the dough rise, creating light and airy doughnuts.
  • 5 tablespoons of sugar: Sweetens the dough to perfection.
  • 1 cup of milk: Moistens the dough and activates the yeast. Make sure it’s lukewarm to help the yeast thrive.
  • 1 egg: Binds the ingredients together and contributes to the dough’s richness.
  • ½ teaspoon of salt: Enhances the flavors of the other ingredients.

Instructions

  1. Prepare the Yeast Mixture:

    • In a small bowl, dissolve the baker’s yeast in a quarter cup of lukewarm milk. Add a teaspoon of sugar (from the 5 tablespoons) to help activate the yeast. Let it sit for about 5-10 minutes, or until frothy.
  2. Mix the Dough:

    • In a large mixing bowl, combine the flour, remaining sugar, and salt. Mix well.
    • Make a well in the center and add the activated yeast mixture, the rest of the milk, the egg, and softened butter. Mix everything together until a soft dough forms.
  3. Knead the Dough:

    • Transfer the dough to a floured surface and knead for about 8-10 minutes, or until smooth and elastic.
    • Place the kneaded dough back into a greased bowl, cover with a clean kitchen towel, and let it rise in a warm place for about 1 hour, or until it doubles in size.
  4. Shape the Doughnuts:

    • Once risen, punch down the dough to release any air bubbles.
    • Roll out the dough on a floured surface to about ½ inch thickness. Use a doughnut cutter (or two differently sized round cutters) to cut out doughnut shapes.
    • Place the cut doughnuts on a baking sheet, cover lightly, and let them rise again for about 30 minutes.
  5. Fry the Doughnuts:

    • Heat oil in a deep fryer or a large, deep pan to 375°F (190°C). Carefully place a few doughnuts at a time into the hot oil, frying each side until golden brown, about 1 minute per side.
    • Remove the doughnuts with a slotted spoon and drain on paper towels.
  6. Finish with a Glaze or Topping:

    • For a simple glaze, mix powdered sugar with a little milk or water until you achieve a runny consistency. Dip each doughnut into the glaze, letting the excess drip off, or roll them in granulated sugar or cinnamon sugar for a different finish.

Notes

Serving Suggestions:

Enjoy your homemade doughnuts fresh and warm for the best experience. They’re perfect as a decadent breakfast treat, a sweet snack, or a dessert to cap off any meal. Pair them with your favorite coffee or tea for a match made in heaven.

Conclusion:

Making doughnuts at home is a rewarding experience that brings a touch of bakery-style indulgence to your kitchen. With this classic recipe, you’re not just baking; you’re creating moments of joy to share. So, the next time you’re in the mood for something sweet, whip up a batch of these fluffy, delicious doughnuts and watch them disappear in no time.