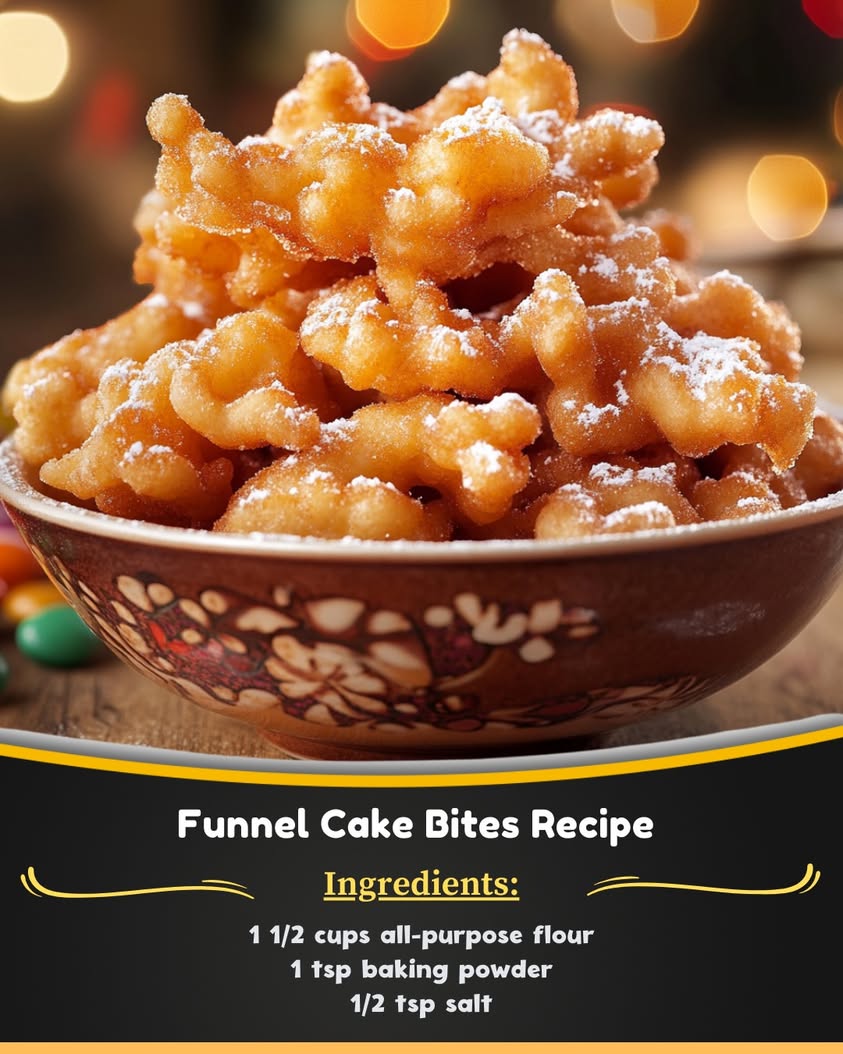
Delicious Funnel Cake Bites: Mini Sweet Treats for Every Occasion!
If you’re looking for a deliciously indulgent treat that’s perfect for any occasion, try these delightful Funnel Cake Bites. These mini sweet treats combine the classic flavors of funnel cakes into bite-sized pieces that everyone loves. With a crispy exterior and a fluffy interior, these mouthwatering bites are sure to meet your cravings for fairground favorites right at home.
Funnel Cake Bites are the ultimate dessert to impress your family and friends. Pair them with a dusting of powdered sugar or a drizzle of chocolate sauce, and you will have the perfect snack for gatherings or a fun family night. The best part? They’re surprisingly easy to make, allowing you to whip them up in no time and enjoy fresh, warm delights straight from your kitchen.
Quick Recipe Highlights
- Flavor Profile: Sweet and slightly nutty, these bites encapsulate the essence of traditional funnel cakes with a modern twist.
- Texture: Each bite offers a crispy outer layer, leading to a soft, fluffy interior that melts in your mouth.
- Aroma: The delicious aroma of fried dough wafts through your kitchen, reminiscent of fairs and carnivals.
- Visual Appeal: Golden-brown bites dusted with powdered sugar create an inviting visual that enhances every dessert table.
- Skill Level Needed: This recipe is beginner-friendly, making it perfect for cooks of all skill levels.
- Special Equipment: A deep frying pan or deep fryer is recommended for optimal results.
Recipe Overview
- Difficulty Level: This recipe is easy, as it requires basic frying techniques and simple ingredient combinations that even novice cooks can master.
- Category: These funnel cake bites fall under dessert, ideal for sweet cravings or casual snacking.
- Cuisine: Rooted in American fair food traditions, funnel cakes hold a special place at carnivals across the country.
- Cost: The ingredients for these bites are budget-friendly, making it an accessible treat for families.
- Season: Funnel cake bites are a delightful option year-round but are especially popular during summer fairs and festivals.
- Occasion: Perfect for birthdays, celebrations, or any festive gathering, these bites can elevate your dessert game.
Why You’ll Love This Recipe
The taste and texture of these Funnel Cake Bites are simply irresistible. Each bite takes you back to summer fairs, bringing a delightful nostalgia with every crunchy, sweet morsel. The combination of fluffy interiors and crispy edges creates an unforgettable mouthfeel that pairs beautifully with your favorite toppings. Dip them in chocolate, caramel, or your go-to sweet sauce for an indulgent experience.
Convenience is another major plus of this recipe. Preparing these bites requires minimal time, making it easy to satisfy those unexpected sweet cravings without the hassle of long wait times. Whether you want to treat yourself at midnight or whip up a fun dessert on a whim, these funnel cake bites fit perfectly into your schedule.
Nutritionally, while they are a treat, you can control the ingredients to some extent by choosing healthier oils or baking options, should you prefer. Even though indulging in treats is fun, it’s possible to make smarter choices while enjoying these crispy delights.
Funnel Cake Bites are a fantastic way to bring friends and family together. Share a platter at parties, and watch as they disappear in minutes. Their playful shape and sweet taste encourage sharing and laughter, making them a highlight of any gathering. The lightheartedness of this dessert has a way of fostering conversation and creating lasting memories.
Lastly, from a money-saving perspective, making these bites at home is far more economical than buying them at fairs or specialty shops. With easily accessible ingredient options and a simple preparation process, creating these delightful snacks allows you to enjoy them whenever you like without breaking the bank.
Historical Background and Cultural Significance
The origin of funnel cakes dates back to Medieval Europe, but they became an iconic American fair food in the 19th century. Initially prepared as a type of fried dough, funnel cakes have evolved with different recipes and toppings unique to various regions, showcasing their adaptability to local tastes. They were primarily made for large gatherings and celebrations, symbolizing festive occasions.
Culturally, funnel cakes represent joyous occasions such as fairs, carnivals, and seasonal festivals. They are often associated with the cheerful ambiance of these events, evoking happy memories for many who indulge in this delightful treat. Their presence at local fairs across America has solidified their status as a beloved snack.
Over the years, the funnel cake has evolved to include various adaptations and flavor variations. From adding fruits to incorporating unique sauces, cooks have creatively transformed this classic dish into an array of forms, further enhancing its appeal and flavor profile.
Regional variations also tell the story of culinary creativity. In some areas, you’ll find funnel cakes topped with fresh strawberries and whipped cream, while in others, a simple dusting of powdered sugar suffices. Each region proudly presents its own twist on this traditional favorite, making it a beloved dessert that transcends culinary boundaries.
Ingredient Deep Dive
– **Flour**: All-purpose flour is the star of the show in funnel cake bites, providing structure and stability. When selecting flour, look for a fine, unbleached type that can produce a light and fluffy texture. Whole wheat flour can be used for a healthier option, though it may slightly alter the flavor. Store flour in a cool, dry place to maintain freshness.
– **Eggs**: Eggs contribute to the richness and moisture of the batter. Choosing fresh, organic eggs can enhance the flavor and nutritional profile of your funnel cake bites. They can also be substituted with aquafaba or flaxseed meal for vegan adaptations. Properly store eggs in the refrigerator to ensure longevity.
– **Sugar**: White granulated sugar sweetens the batter and heightens the flavors of the other ingredients. If you are looking for an alternative, coconut sugar or maple syrup can be good substitutes, although it may alter the texture slightly. Store sugar in a cool, dry location to prevent clumping.
– **Baking Powder**: This essential leavening agent helps the batter rise and achieve that perfectly fluffy interior. Always check the expiration date to ensure its effectiveness, and store it in an airtight container to retain its potency.
– **Milk**: Adding milk creates a wetter batter that binds the ingredients and enriches the flavor. For a dairy-free version, almond or oat milk can be excellent alternatives. Store milk in the refrigerator and pay attention to the expiration date for freshness.
– **Oil**: The type of oil used for frying significantly impacts the flavor of your funnel cake bites. Canola or vegetable oil is commonly used due to their high smoke points and neutral flavors. Store oil in a cool, dark place to avoid rancidity and consider using fresh oil each time for the best results.
Common Mistakes to Avoid
- Overmixing the batter can lead to dense funnel cake bites instead of light and airy ones. Mix just until combined.
- Using too much oil can result in greasy bites. Make sure your oil is deep enough to submerge the bites completely, but not overly excessive.
- Frying at the wrong temperature will make your bites soggy or burnt. Maintaining a consistent temperature of around 350°F (175°C) is ideal.
- Not allowing the bites to drain properly after frying can cause them to absorb excess oil. Place them on a wire rack lined with paper towels.
- Skipping the sifting of dry ingredients can result in lumps and uneven textures. Always sift your flour to ensure smooth batter consistency.
- Do not overcrowd the frying pan. Frying too many at once can lower the oil temperature and lead to uneven cooking.
- Making the batter in advance and letting it sit can impact the lightness. It’s best to fry the batter immediately after mixing.
- Ignoring the importance of cooling the bites slightly before serving can lead to burned mouths. Always let them cool for a minute or two.
- Choosing low-quality ingredients can affect flavor and texture. Invest in good-quality flour and fresh eggs for the best results.
- Rushing through the cooking process might lead to undercooked or uneven bits. Patience is key for perfect funnel cake bites.
Essential Techniques
Frying is a crucial technique for creating delicious Funnel Cake Bites. Mastering this technique involves controlling oil temperature and timing the frying process. Ensure the oil is hot enough by testing with a small drop of batter. If it sizzles immediately, you’re ready to fry. Avoid overcrowding the pan while frying, as this can result in decreased heat and soggy bites.
Incorporating the right method for pouring the batter is also vital. Use a squeeze bottle or piping bag for a classic funnel cake pattern. Practice creating swirling motions while holding it over the hot oil. It’s essential to keep the pour consistent to avoid uneven cooking and achieve fluffy, delightful shapes.
Pro Tips for Perfect Funnel Cake Bites
1. Ensure your oil is at the correct temperature before frying for the ultimate crispy result. Use a thermometer to maintain a consistent heat level.
2. Allow your batter to sit for just a few minutes before frying. This will enhance the texture and create a fluffier bite.
3. Experiment with different toppings! Fresh fruits, whipped cream, or flavored syrups can elevate your funnel cake bites to a new level.
4. Make a flavored batter by adding vanilla extract or spices like cinnamon for unique tastes that stand out.
5. Place cooked bites in a single layer on a paper towel-lined plate to keep them crispy and prevent them from steaming.
6. Try adding a touch of nutmeg or cardamom to the batter for a warm, aromatic twist in flavor.
7. Use a mesh skimmer to flip the bites while they’re frying, ensuring they cook evenly and safely.
8. Don’t forget to dust with powdered sugar right before serving for that classic fairground touch.
Variations and Adaptations
For a fun twist, consider creating funnel cake bites with different flavors. Incorporate chocolate chips for a rich treat or cinnamon and sugar for a classic dessert flavor. Seasonal variations can be exciting too; try adding pumpkin puree during fall for a warm, spiced treat or peppermint extract in winter for a festive flavor.
Dietary modifications can also be seamless. For a gluten-free option, use a blend of gluten-free flour; ensure the baking powder is also gluten-free. Additionally, vegan adaptations can be made by swapping eggs with flaxseed meal or applesauce and using plant-based milk and oil.
Textural modifications can result in exciting variations. Consider making baked versions by using an oven instead of frying. This can reduce the calorie count while still retaining great taste. For presentation alternatives, serve your bites on skewers with dipping sauces for a fun, interactive dessert.
Serving and Presentation Guide
When serving Funnel Cake Bites, consider creative plating strategies. Arrange the bites on a large platter and dust them with powdered sugar as soon as they’re done to enhance the presentation. Additionally, serving them with dipping bowls filled with chocolate or strawberry sauce adds an appealing touch.
Garnishing can elevate the dessert further; consider topping your bites with fresh berries or a dollop of whipped cream. For modern presentation, consider serving them in small paper cones or adorned with colorful sprinkles for a festive feel. Keep serving temperature in mind: warm bites are often more delightful than cooled ones.
Portion control is also essential, especially during parties. Offer smaller serving sizes to allow guests to try multiple toppings and combinations without feeling overwhelmed. This makes for a fun interactive dessert experience, with plenty of opportunities for sharing and tasting different flavors.
Wine and Beverage Pairing
When pairing beverages with Funnel Cake Bites, consider sparkling wines such as Prosecco or Champagne. Their effervescence cuts through the sweetness of the bites beautifully, balancing flavors perfectly. For non-alcoholic options, freshly brewed iced tea or lemonade complement the sweet, fried flavors seamlessly.
If looking for a casual beverage, a sweet dessert wine like Moscato can also tie in nicely, enhancing the sugary elements of the bites. Temperature is important here; glasses should be served chilled for the best drinking experience. Lastly, consider serving with a warm cup of coffee or hot chocolate for a cozy touch.
Storage and Shelf Life
Funnel Cake Bites are best enjoyed fresh, but they can be stored if needed. Allow them to cool completely and store them in an airtight container at room temperature for up to two days. However, for longer storage, consider freezing them, which can extend their longevity significantly.
For freezing, lay the cooled bites on a baking sheet and freeze until solid, then transfer them to a freezer-safe bag. They can be kept frozen for up to a month. Reheating is simple; pop them in the oven at 350°F (175°C) for a few minutes until crispy again. Signs of spoilage include an off smell or a change in texture, so always check before serving.
Make Ahead Strategies
To make your preparation smoother, consider preparing the batter ahead of time and refrigerating it until you’re ready. This can save time during busy occasions, allowing you to focus on frying and serving. Alternatively, pre-measure your dry ingredients and store them in containers to streamline the process.
For a more hands-on approach, you can fry the bites in advance and keep them warm in a low-temperature oven until your event. However, be mindful that they are best served freshly fried. If you plan to reheat, remember to restore their crispiness in the oven instead of the microwave.
Scaling Instructions
Scaling the recipe for larger gatherings is easy. When doubling or tripling the ingredients, ensure you have sufficient frying space and oil quantity. It’s often recommended to fry in batches to maintain consistent cooking temperatures and avoid overcrowding.
If you wish to halve the recipe, simply divide all the ingredient quantities accordingly. The cooking time might remain roughly the same. Keep in mind that ingredient adjustments may require slight modifications in texture, particularly with wet ingredients; be cautious in making these changes work seamlessly.
Nutritional Deep Dive
Funnel Cake Bites are a treat to enjoy in moderation. Each serving provides essential macronutrients, primarily carbs from the flour and sugars, with little protein. The caloric value, while nothing to scoff at, can be balanced within an overall nutritional plan if you’re mindful of portion sizes.
Micronutrient-wise, while these bites don’t deliver significant vitamins or minerals, utilizing quality ingredients can enhance their profile. For example, using eggs or fortified dairy can introduce more nutrients to the bites. When considering health benefits, the satisfaction derived from the sweet treat can be part of a balanced approach to indulgence.
To keep weight management in check, practice portion control. Smaller servings or accompanied fruit can create a more balanced dessert. Opting to substitute whole ingredients where possible can introduce healthier options that maintain enjoyment without compromising flavor.
Dietary Adaptations
Creating gluten-free Funnel Cake Bites is as simple as swapping traditional flour with a gluten-free blend. Be sure to check that all other ingredients, like baking powder, adhere to gluten-free standards to avoid cross-contamination.
Dairy-free adaptations can be easily made by using plant-based milk and oil. For a vegan version, replace eggs with flaxseed meal, and substitute with dairy-free toppings, fostering inclusivity for various dietary needs.
Furthermore, for those on low-carb diets, explore almond or coconut flours as alternatives, though this may alter the taste and texture. Keto options might involve sugar substitutes to keep Glycemic Index levels down without sacrificing sweetness. Each of these variations allows more individuals to enjoy this classic treat.
Troubleshooting Guide
If your Funnel Cake Bites turn out too greasy, evaluate your frying oil temperature. Too low oil results in a saturated product, so ensuring proper heat is crucial for crispy bites.
For texture issues, if they come out dense, check your mixing technique; overmixing can lead to heavier bites. Always sift your flour to prevent lumps and keep the batter light.
If flavors are unbalanced, adjusting sugar levels or adding spices can enhance the overall experience. Tasting the batter before frying can assist in ensuring the right flavor balance.
When faced with ingredient substitutions, keep in mind the potential need for additional adjustments in the recipe. A different flour or egg replacement might change moisture content, so it’s important to adapt and adjust for consistency.
Timing concerns can arise; if the bites are unevenly cooked, pay attention to frying time in addition to temperature. A golden-brown exterior indicates doneness, so timing is essential for perfect results.
Recipe Success Stories
Community feedback on Funnel Cake Bites has been overwhelmingly positive. Many readers share their successes with different flavor variations and creative toppings, showcasing the versatility of this simple recipe. A popular adaptation involves infusing the batter with lemon zest, providing a bright, refreshing finish.
Adaptation stories often highlight how individuals have modified the recipe to suit dietary needs, like gluten-free or vegan versions, while still churning out delectable bites. Photography tips from readers have also inspired others, showcasing aesthetically pleasing plating ideas that elevate the experience.
Readers often share the thrill of making funnel cake bites for family gatherings, with delightful results leading to delightful stories and developing cherished memories. Encouraging community engagement through social media has opened conversations over their favorite ways to enjoy funnel cake bites.
Frequently Asked Questions
Additional Resources
For those who enjoyed making Funnel Cake Bites, check out related recipes that feature similar flavor profiles, such as churros or elephant ears. These have great fried elements that satisfy that sweet tooth. Additionally, technique guides on frying methods can deepen your culinary skills for perfecting these treats.
For ingredient information, investigating different types of flour will help you understand texture changes in frying. Equipment recommendations on deep fryers or thermometers will ensure you have the right tools for success during your cooking adventures.
Seasonal variations also bring a fresh touch to classic recipes. Join the journey of exploring festive flavors during holidays or special occasions, inspiring your baking creativity.
Join the Conversation
Engage with the community by sharing your experiences with Funnel Cake Bites on social media. Posting photos of your creations not only celebrates your cooking achievements but also allows others to be inspired.
Encourage recipe reviews, as sharing feedback enhances the recipe’s evolution, leading to new ideas and innovations. Participate in discussions about variations other cooks have tried, and you might discover a new favorite topping or ingredient blend.
Creating community support around these delicious treats fosters interaction and connection among food lovers and inspires everyone to try making and sharing this delightful dessert!
The Recipe
Funnel Cake Bites
Serves: 4-6 servings
Prep Time: 15 mins
Cook Time: 10 mins
Total Time: 25 mins
Kitchen Equipment Needed
- Deep frying pan or deep fryer
- Squeeze bottle or piping bag
- Thermometer
- Wire rack
- Mixing bowls
Ingredients
- 1 cup all-purpose flour
- 2 tbsp granulated sugar
- 1 tsp baking powder
- 1/2 tsp salt
- 1/2 cup milk
- 1 large egg
- Oil for frying
- Powdered sugar for dusting
Directions
- In a mixing bowl, combine flour, sugar, baking powder, and salt.
- In another bowl, whisk together milk and eggs until fully combined.
- Gradually add the wet ingredients into the dry ingredients, stirring until a smooth batter forms.
- Heat oil in a deep frying pan to 350°F (175°C).
- Using a squeeze bottle or piping bag, carefully pour the batter into the hot oil, creating spiral shapes.
- Fry for 2-3 minutes on each side until golden brown and crispy.
- Remove from oil and place on a wire rack lined with paper towels to drain excess oil.
- Dust with powdered sugar immediately before serving.
Recipe Notes
- For flavored batter, add vanilla extract or cinnamon.
- Store any leftovers in an airtight container for up to two days.
- Frying in batches helps maintain the oil temperature and ensures even cooking.