Table of Contents
Butternut Squash and Caramelized Onion Quiche: A Cozy, Flavorful Delight – A Parisian Technique with Moroccan Soul
I still remember the first time I made a proper French quiche in my Paris culinary school kitchen — the steam rising from the cream and eggs, the scent of butter and thyme filling the air. My instructor, a stern but brilliant chef from Lyon, insisted that a quiche must have a filling so silky it almost trembles on the fork. Years later, standing in my own NYC kitchen with a pile of farmers market butternut squash and sweet yellow onions, I knew exactly what I wanted to create: a butternut squash quiche that carried both the soul of my Moroccan upbringing and the precision of my French training. This caramelized onion quiche is that recipe — a cozy, flavor-packed fall quiche recipe that has become a staple in my home every autumn.
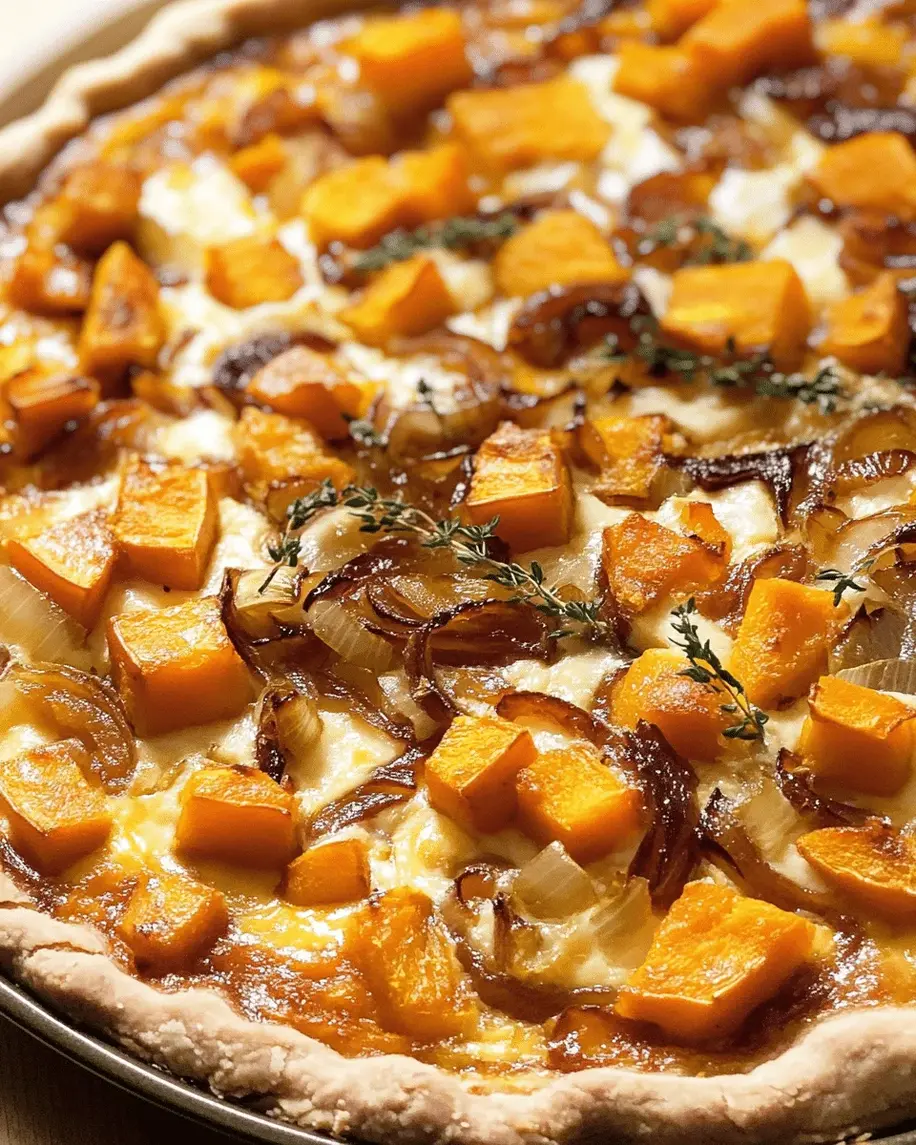
The beauty of this quiche lies in its contrasts. The butternut squash, roasted until its edges caramelize into little golden jewels, brings a sweet, almost nutty depth that pairs beautifully with the slow-cooked onions. Those onions — cooked low and slow for over half an hour — become jammy, savory, and impossibly rich, without a hint of sharpness. Fold in creamy Gruyère, a whisper of nutmeg, and a touch of Parmesan, and you have a filling that is custardy, decadent, and deeply comforting. The flaky pie crust cradles everything with a satisfying crunch, making every bite a study in texture and warmth.
What sets this version apart from other savory butternut squash recipes is the technique I brought back from Paris: roasting the squash separately before adding it to the custard. This prevents the quiche from becoming watery and concentrates the squash’s natural sugars. I also add a pinch of sugar to the onions — a trick my mother taught me in her Marrakech kitchen — to encourage deep, even caramelization. This is an easy quiche recipe that looks and tastes like something from a French bistro, yet it’s simple enough for a weekday brunch. I’ll walk you through every step, including the one mistake most home cooks make with squash quiche, so yours turns out perfect every time.
Why This Butternut Squash Quiche Recipe Is the Best
The Flavor Secret. Most quiche recipes treat squash as an afterthought — just another vegetable thrown into the custard. I roast the butternut squash first at high heat until it’s deeply caramelized, which unlocks its natural sweetness and adds a layer of complexity that you simply don’t get from raw or boiled squash. The caramelized onions, cooked with thyme and a touch of sugar until they’re practically melting, provide a savory backbone that makes every bite feel rich and complete. This is the kind of butternut squash quiche that even people who say they don’t like squash ask for seconds of.
Perfected Texture. A watery quiche is a tragedy, and I’ve seen it happen more times than I can count. By roasting the squash beforehand and cooking the onions until nearly all their moisture has evaporated, I eliminate the biggest culprit behind soggy quiche. The custard — a careful balance of eggs, heavy cream, and whole milk — sets into a silky, firm-yet-tender filling that slices cleanly and holds its shape beautifully. The crust stays crisp, the filling stays luscious, and every slice looks as good as it tastes.
Foolproof & Fast. Despite its elegant results, this is genuinely an easy quiche recipe that home cooks of any skill level can master. I use a store-bought pie crust to save time (though I’ll share my homemade crust tips too), and the active prep work is only about 30 minutes. The oven does the rest. Whether you’re hosting a fall brunch, a holiday breakfast, or a simple weeknight dinner, this quiche delivers consistently beautiful results with minimal effort. It’s the kind of recipe you’ll memorize and make on repeat all season long.
Butternut Squash Quiche Ingredients
I pick up my butternut squash from the Union Square Greenmarket in NYC every Saturday morning during fall — the ones with long, thick necks are the easiest to peel and dice. The yellow onions, always sweet and firm, come from a farm upstate. When I close my eyes, I can still hear my mother humming in her Marrakech kitchen as she slowly cooked onions until they turned the color of caramel. That memory guides every batch of this quiche I make. Here’s everything you’ll need.
Ingredients List
- 1 butternut squash, peeled, seeded, and diced into 1/2-inch cubes (about 2 cups)
- 2 tablespoons olive oil
- Salt and freshly ground black pepper, to taste
- 2 tablespoons unsalted butter
- 3 large yellow onions, thinly sliced
- 1 teaspoon fresh thyme leaves (or 1/2 teaspoon dried)
- 1/2 teaspoon granulated sugar
- 1 store-bought or homemade pie crust (9-inch), partially baked
- 4 large eggs
- 1 cup heavy cream
- 1/2 cup whole milk
- 1 cup shredded Gruyère cheese (or Swiss)
- 1/2 cup grated Parmesan cheese
- Pinch of ground nutmeg
- Fresh parsley, for garnish (optional)
Ingredient Spotlight
Butternut Squash. The star of this butternut squash quiche. Look for a squash with a long, straight neck — it’s much easier to peel and yields even cubes with less waste. The flesh should be deep orange, which indicates high beta-carotene content and better sweetness. If fresh squash isn’t available, frozen butternut squash cubes work in a pinch (see the FAQ section for tips on using frozen).
Gruyère Cheese. This Swiss-style cheese melts into a creamy, nutty layer that elevates the entire quiche. Its flavor is mild enough not to overpower the squash and onions but distinct enough to be noticed. Good-quality Gruyère makes a real difference here — I buy mine from a cheese shop in Chelsea Market. Substitute with Swiss or Emmental if needed, though the flavor will be slightly less complex.
Yellow Onions. I call for three large yellow onions because they have the best balance of sweetness and bite. When caramelized properly, they become almost jammy, adding an irreplaceable savory depth to this caramelized onion quiche. Red or white onions can be used, but yellow onions give the most reliable, deep results. The sugar you add is minimal — just enough to encourage the natural sugars to develop without making the filling sweet.
| Original Ingredient | Best Substitution | Flavor / Texture Impact |
|---|---|---|
| Gruyère cheese | Swiss or Emmental | Slightly milder, still melts well; less nutty depth |
| Heavy cream | Half-and-half (increase to 1.5 cups total liquid) | Less rich, slightly thinner custard; still creamy |
| Fresh thyme | 1 tsp dried thyme or 1/2 tsp dried herbes de Provence | More subtle herbal note; dried works well in quiche |
| Butternut squash | Kabocha or delicata squash | Sweeter, denser; similar texture when roasted |
| Pie crust | Gluten-free pie crust or puff pastry | GF works well; puff pastry creates a flakier, taller crust |
How to Make Butternut Squash and Caramelized Onion Quiche — Step-by-Step
Trust me — if you can roast squash and stir onions, you can make this stunning quiche. I’ve broken every step down with the exact visual cues and pro tips that will ensure your success from the very first try. Let’s get cooking!
Step 1: Roast the Butternut Squash
Preheat your oven to 400°F (200°C). On a large rimmed baking sheet, toss the diced butternut squash with olive oil, salt, and pepper. Spread it into a single, even layer — overcrowding will steam the cubes instead of roasting them. Roast for 20–25 minutes, flipping halfway through, until the cubes are tender when pierced with a fork and the edges are lightly browned and caramelized. Set the squash aside to cool slightly while you work on the onions.
💡 mia’s Pro Tip: To save time, you can roast the squash up to two days ahead and refrigerate it. Let it come to room temperature before adding it to the quiche so it doesn’t cool down the custard.
Step 2: Caramelize the Onions
In a large, heavy-bottomed skillet (I use a 12-inch stainless steel pan), melt the butter over medium-low heat. Add the sliced onions, fresh thyme, sugar, and a generous pinch of salt. Cook, stirring only every 5 to 7 minutes at first, then more frequently as they darken, for 30–35 minutes total. The onions should turn a deep golden brown, become very soft, and smell intensely sweet and savory. If they start sticking to the bottom of the pan, add a tablespoon of water and scrape up the browned bits — that’s pure flavor.
⚠️ Common Mistake to Avoid: Don’t rush the onions by turning up the heat! High heat will brown the outside before the inside has softened, leaving you with bitter, undercooked onions. Patience is the only shortcut to truly caramelized onions for this caramelized onion quiche.
Step 3: Assemble the Quiche
Reduce the oven temperature to 350°F (175°C). Place your partially baked pie crust on a baking sheet (this makes it easy to move in and out of the oven). Spread the caramelized onions evenly across the bottom of the crust, then scatter the roasted butternut squash pieces on top. In a medium mixing bowl, whisk together the eggs, heavy cream, whole milk, nutmeg, 1/2 teaspoon salt, and 1/4 teaspoon pepper until completely smooth. Stir in the shredded Gruyère and grated Parmesan, then pour the mixture gently over the squash and onions. Shake the pan gently to help the custard settle into every crevice.
💡 mia’s Pro Tip: Pour the custard slowly and in a circular motion to avoid displacing the squash and onions. If some pieces poke above the custard surface, gently push them down with a fork so they stay moist during baking.
Step 4: Bake and Rest
Bake the quiche for 35–45 minutes, until the center is just set and the top is a beautiful golden brown. You’ll know it’s done when a knife inserted into the center comes out clean, or when the quiche jiggles slightly in the center but not in a liquid way — like a firm custard. Let it cool on a wire rack for at least 15 minutes before slicing. This resting period is crucial: it allows the custard to finish setting and makes for clean, beautiful slices. Garnish with fresh parsley if desired, and serve warm or at room temperature.
⚠️ Common Mistake to Avoid: Slicing into the quiche while it’s still hot will result in a runny, messy cut. The custard needs those 15 minutes to relax and firm up. I know it’s tempting, but patience pays off here!
| Step | Action | Duration | Key Visual Cue |
|---|---|---|---|
| 1 | Roast butternut squash | 20–25 min | Edges lightly browned; fork-tender |
| 2 | Caramelize onions | 30–35 min | Deep golden brown; soft and jammy |
| 3 | Assemble quiche | 10 min | Custard fills crust evenly |
| 4 | Bake quiche | 35–45 min | Center set; knife comes out clean |
| 5 | Rest before slicing | 15 min | Custard firms up; no longer steaming |
Serving & Presentation
I love serving this butternut squash quiche as the centerpiece of a fall brunch table. Slice it into eight generous wedges and arrange them on a large wooden board or a white platter — the contrast of the golden crust, the deep orange squash, and the caramelized onions peeking through the custard is absolutely stunning. A sprinkle of fresh parsley adds a bright green pop that makes the dish look even more inviting. In my NYC kitchen, I often pair it with a simple arugula salad dressed with lemon and olive oil, or a bowl of roasted apple slices for a touch of sweetness.
For a truly memorable meal, serve the quiche warm (not hot) alongside a cup of butternut squash soup or a light tomato bisque. The quiche also shines at room temperature, which makes it ideal for potlucks, picnics, or holiday buffets. My Parisian chef instructor would always say that a quiche should be “comfort in every bite,” and this one delivers exactly that. Whether you’re hosting a cozy brunch or a casual dinner, this quiche feels special without being fussy.
💡 mia’s Pro Tip: For the cleanest slices, use a long, sharp chef’s knife and wipe it clean between cuts. This prevents the custard from smearing and keeps each wedge picture-perfect. A microplane grating of Parmesan over the top just before serving adds a salty, nutty finish that guests always notice.
| Pairing Type | Suggestions | Why It Works |
|---|---|---|
| Side Dish | Arugula salad with lemon vinaigrette; roasted apple slices; simple green beans | Bright acidity cuts through the rich custard; apples echo the fall theme |
| Sauce / Dip | Dijon mustard; fig jam; balsamic reduction | Mustard adds tang; fig jam enhances sweetness; balsamic adds depth |
| Beverage | Dry white wine (Sauvignon Blanc); sparkling apple cider; hot herbal tea | Wine cuts richness; cider complements fall flavors; tea is soothing |
| Garnish | Fresh parsley; microgreens; extra Parmesan shavings | Adds color, freshness, and a salty finish |
Make-Ahead, Storage & Reheating
One of the things I love most about this fall quiche recipe is how beautifully it works into a busy schedule. As a food blogger and cook living in NYC, my weeks are packed — but I never have to sacrifice a homemade meal. I often caramelize the onions on a Sunday afternoon while I’m prepping other things, and I’ll roast the squash at the same time. Then on a weekday morning, I can assemble and bake the quiche in under 15 minutes of active work. It’s a game-changer for entertaining too.
| Method | Container | Duration | Reheating Tip |
|---|---|---|---|
| Refrigerator | Airtight container or tightly wrapped in foil | Up to 4 days | Reheat in 300°F oven for 10–15 minutes; avoid microwave (soggy crust) |
| Freezer | Double-wrap in plastic wrap then foil; or vacuum seal | Up to 2 months | Thaw overnight in fridge; reheat in 300°F oven for 15–20 minutes |
| Make-Ahead | Refrigerate caramelized onions and roasted squash separately | Up to 3 days in advance | Assemble and bake fresh; add 5 minutes to bake time if filling is cold |
If you’re reheating a slice for a quick lunch, I recommend using a toaster oven set to 300°F for about 8–10 minutes. The gentle heat warms the custard through without drying it out or making the crust soggy. A microwave will work in a pinch, but the crust will lose its flakiness, so save that method for emergencies only. And here’s a little secret from my French training: quiche often tastes even better the next day, after the flavors have had time to meld. So don’t hesitate to make it a day ahead — your future self will thank you.
Variations & Easy Swaps
This recipe is wonderfully adaptable, and I’ve tested each of these variations in my own kitchen so you can trust the results. Whether you’re cooking for dietary needs or just want to shake things up, here are my favorite ways to make this savory butternut squash recipe your own.
| Variation | Key Change | Best For | Difficulty Impact |
|---|---|---|---|
| Spiced Moroccan Twist | Add 1 tsp ras el hanout and 1/2 tsp cinnamon to the squash before roasting | Adding warm North African depth | No change — simple addition |
| Gluten-Free Version | Use a gluten-free pie crust (store-bought or homemade) | Gluten-sensitive guests | No change — same process |
| Dairy-Free Option | Replace cream with full-fat oat cream; use dairy-free cheese shreds | Dairy-free diets | Slightly less rich; may need extra salt |
Spiced Moroccan Twist
This variation is closest to my heart. Before roasting the butternut squash, toss it with a teaspoon of ras el hanout — the iconic Moroccan spice blend that typically includes cumin, coriander, ginger, cinnamon, and a hint of saffron. Add a half-teaspoon of cinnamon as well. The warm, fragrant spices transform this quiche into something utterly unique, with a sweetness that echoes the caramelized onions beautifully. It’s the version I make when I’m feeling homesick for my mother’s kitchen in Marrakech, and it never fails to transport me. If you can’t find ras el hanout, a mix of cumin, cinnamon, and a pinch of cayenne works beautifully.
Gluten-Free Version
I’ve made this quiche with several gluten-free pie crusts, and my top recommendation is a store-bought frozen gluten-free crust from brands like Wholly Gluten Free or a homemade almond flour crust. The key is to partially bake the crust before adding the filling, just as you would with a regular crust, to ensure it stays crisp. The filling itself is naturally gluten-free, so this swap is seamless. The texture of the crust will be slightly more crumbly and less flaky than traditional pastry, but the flavor is still excellent. This is a perfect option for serving guests with celiac disease or gluten sensitivity.
Dairy-Free Option
For a dairy-free version, I’ve had the best results using full-fat oat cream (Oatly makes a great one) in place of the heavy cream and whole milk. For the cheese, I recommend a dairy-free shredded mozzarella or cheddar-style alternative — look for brands like Violife or Miyoko’s that melt well. The custard will be slightly thinner and less rich than the original, so I add an extra egg yolk to help with setting. The flavor is still delicious, though it leans more savory than buttery. I tested this version for a friend’s dairy-free brunch, and it disappeared just as fast as the original.
Can you use frozen butternut squash instead of fresh in a butternut squash and caramelized onion quiche?
Yes, you can use frozen butternut squash, but there are a few important steps to follow for the best results. Frozen squash contains more water than fresh, so it needs extra attention to prevent a watery quiche. Thaw the frozen squash completely in the refrigerator overnight, then drain it in a colander and gently press out as much moisture as you can with a clean kitchen towel or paper towels. Toss the thawed and dried squash with olive oil, salt, and pepper, then roast it at 400°F for 20–25 minutes just as you would fresh squash. The roasting step is essential — it concentrates the flavor and drives off additional moisture. While fresh squash will give you a slightly firmer, sweeter result, frozen squash works perfectly well and makes this an easy quiche recipe you can make year-round.
How do you prevent a quiche with butternut squash from becoming watery?
The number one cause of watery quiche is moisture released from the vegetables during baking. To prevent this in a butternut squash quiche, there are two critical steps. First, roast the squash before adding it to the quiche rather than using it raw or boiled. Roasting at 400°F caramelizes the edges and evaporates much of the internal moisture, while also concentrating the squash’s natural sweetness. Second, cook the caramelized onions thoroughly until they are deep golden brown and most of their liquid has evaporated — this usually takes 30–35 minutes over medium-low heat. If the onions still look wet in the pan, continue cooking them for another 5–10 minutes. I also recommend using a partially baked pie crust, which creates a barrier that prevents the crust from absorbing moisture from the filling. These techniques together ensure a firm, silky custard every time.
What is the best cheese to pair with butternut squash and caramelized onion in a quiche?
Gruyère is absolutely the best cheese for pairing with butternut squash and caramelized onion in a quiche. It has a nutty, slightly sweet flavor that complements the roasted squash and the deep savory notes of the onions without overpowering either. Gruyère also melts beautifully into a creamy, cohesive custard with a subtle richness that feels luxurious. If you can’t find Gruyère, Swiss cheese or Emmental are excellent substitutes with a similar melting profile and mild flavor. I also like to add a small amount of grated Parmesan (about 1/2 cup) to the custard for an extra salty, savory kick that enhances all the other ingredients. For a bolder twist, you could use a sharp aged cheddar, but keep in mind it will bring a more assertive flavor that changes the character of the quiche. A creamy goat cheese would also work well, though it will make the filling tangier and slightly less smooth.
How long should you caramelize onions before adding them to a butternut squash quiche?
You should caramelize the onions for 30 to 35 minutes over medium-low heat before adding them to the quiche. This timing ensures the onions become deep golden brown, very soft, and intensely sweet without turning bitter. The process requires patience — if you cook them over high heat, the outsides will brown before the insides have softened, resulting in an uneven texture and a harsh flavor. I use a heavy-bottomed skillet (stainless steel or cast iron works best) and melt 2 tablespoons of butter, then add the sliced onions with a pinch of salt, a teaspoon of fresh thyme, and half a teaspoon of sugar. The sugar helps the onions caramelize more evenly and deepens their color. Stir every 5 to 7 minutes at the beginning, then more frequently as they darken. If the onions start to stick to the pan, add a tablespoon of water and scrape up the brown bits — this incorporates all that flavor back into the onions. When they’re ready, they should look like a rich, glossy jam and smell intensely savory and sweet.
Can I make this butternut squash quiche ahead of time and reheat it?
Absolutely — this quiche is perfect for making ahead, and in fact, the flavors often deepen and improve after a day in the refrigerator. You can bake the quiche completely, let it cool to room temperature, then cover it tightly with foil or plastic wrap and refrigerate for up to 4 days. To reheat, place the quiche in a 300°F oven for 10–15 minutes until warmed through. I do not recommend using a microwave, as it will make the crust soggy and the custard rubbery. You can also freeze the fully baked quiche for up to 2 months — double-wrap it in plastic wrap and foil, then thaw overnight in the refrigerator before reheating. For an even quicker make-ahead option, you can caramelize the onions and roast the squash up to 3 days in advance and store them separately in the refrigerator. Then on the day you want to serve the quiche, you can assemble and bake it in about an hour.
What can I serve with butternut squash and caramelized onion quiche for a complete meal?
This quiche is hearty enough to stand on its own, but it pairs beautifully with a few simple sides to round out a meal. For brunch, I love serving it with a bright arugula salad dressed with lemon juice, olive oil, and shaved Parmesan — the peppery greens and acidic dressing cut through the richness of the custard. A bowl of roasted apple slices or a simple fruit salad adds a sweet contrast that complements the fall flavors. For dinner, a cup of butternut squash soup or a light tomato bisque makes a wonderful starter, and roasted green beans or steamed asparagus work well on the side. For beverages, a dry Sauvignon Blanc or a sparkling apple cider are excellent choices. The quiche also pairs well with a crisp green salad and a crusty baguette for a French-inspired meal that feels both elegant and comforting.
Do you need to peel butternut squash for quiche?
Yes, you do need to peel butternut squash for quiche. The skin of butternut squash is tough and fibrous, and it does not soften enough during baking to become pleasant to eat. When left on, it creates a chewy, unpleasant texture in the otherwise creamy custard. To peel butternut squash easily, start by cutting off the top and bottom ends with a sharp chef’s knife. Then use a vegetable peeler or a sharp paring knife to remove the skin in long, downward strokes, following the curve of the squash. The long neck section is the easiest to peel, while the bulbous bottom can be a bit trickier — I find it helpful to cut the bulb in half vertically first, then peel each half. Once peeled, cut the squash in half lengthwise, scoop out the seeds with a spoon, and dice it into even 1/2-inch cubes for roasting.
Can I use a store-bought pie crust for this easy quiche recipe?
Absolutely — I actually recommend a store-bought pie crust for this recipe to keep it accessible and quick. A high-quality refrigerated pie crust from the grocery store (I like the ones in the dairy section near the biscuit dough) works beautifully and saves you significant prep time. Just make sure to partially bake the crust before adding the filling, which prevents it from becoming soggy. To partially bake, prick the bottom of the crust with a fork, line it with parchment paper, fill it with pie weights or dried beans, and bake at 375°F for 12–15 minutes until the edges are lightly golden and the bottom is set. Remove the weights and parchment, then proceed with the recipe. If you prefer to make your own crust, a simple all-butter pie crust will give you an even flakier, more flavorful result. Either way, the quiche will be delicious. This is truly an easy quiche recipe that works for both beginners and experienced home cooks.
How do you know when a butternut squash quiche is done baking?
A butternut squash quiche is done baking when the center is set but still has a slight jiggle — like a firm custard rather than a liquid one. The best way to check is to insert a knife into the center of the quiche; if it comes out clean, the quiche is ready. The edges should be puffed and golden brown, and the top should have an even, light golden color. Baking time typically ranges from 35 to 45 minutes at 350°F, but ovens vary, so start checking at the 35-minute mark. If the edges are browning too quickly but the center is still loose, you can tent the quiche loosely with aluminum foil for the remaining baking time. One important tip: the quiche will continue to set as it cools, so don’t overbake it waiting for the center to become completely firm. Let it rest for at least 15 minutes on a wire rack after baking — this allows the custard to finish setting and makes for clean, beautiful slices.
Can I add other vegetables to this butternut squash and caramelized onion quiche?
Yes, you can absolutely add other vegetables to this quiche, and I’ve experimented with several combinations in my kitchen. Spinach or kale works well — sauté them briefly with the onions until wilted, then squeeze out any excess moisture before adding them to the crust. Roasted red peppers, mushrooms, or leeks also complement the butternut squash and caramelized onions beautifully. If you add extra vegetables, keep a few things in mind: first, make sure any high-moisture vegetables (like mushrooms or zucchini) are cooked and drained well to avoid watering down the custard. Second, don’t overload the quiche — you want a balanced ratio of vegetables to custard for proper setting. I recommend replacing no more than half of the squash with other vegetables. Finally, you may need to add a few minutes to the bake time if the quiche is very full. This is a wonderfully adaptable fall quiche recipe that welcomes creativity.
Share Your Version!
I absolutely love hearing how my recipes come to life in your kitchens. If you make this Butternut Squash and Caramelized Onion Quiche, please leave a star rating and a comment below — tell me if you tried any of the variations, or if you discovered your own twist! Did you add a pinch of ras el hanout? Swap in a different cheese? I want to know all about it. The best part of being a food blogger in NYC is connecting with home cooks who bring their own stories to the table.
Tag me in your quiche photos on Instagram or Pinterest @exorecipe — I always share my favorites on my stories. And if you’re new to savory quiche baking, I’d love to hear how this one turned out for you. Was there a step that surprised you? A flavor combination that wowed your family? Drop your questions and wins in the comments, and I’ll personally answer them. From my NYC kitchen to yours — I hope this recipe brings as much warmth to your table as it does to mine. — mia 🧡
Love This Recipe? Save It to Pinterest!
If you enjoyed this Butternut Squash and Caramelized Onion Quiche recipe, don’t let it get lost in your browser tabs! 😄 Pin it now so you can find it again anytime — and explore hundreds more tried-and-tested recipes waiting for you on my Pinterest boards.
👉 Follow mia on Pinterest @exorecipe
📌 Pin this recipe · 🔁 Re-pin your favorites · 💬 Tag me when you make it — I love seeing your creations!
Did you make this recipe? I’d love to hear from you!
⭐ Leave a star rating & comment below — your feedback helps other home cooks!
📸 Tag @exorecipe on Instagram or Pinterest for a chance to be featured in my stories.

Butternut Squash and Caramelized Onion Quiche: A Cozy, Flavorful Delight
- Prep Time: 30 minutes
- Cook Time: 1 hour 15 minutes
- Total Time: 1 hour 45 minutes
- Yield: 8 1x
- Method: Brunch, Main Course
- Cuisine: French-American
Description
A rich and savory quiche featuring sweet roasted butternut squash and deeply caramelized onions in a flaky crust, perfect for a cozy brunch or light dinner.
Ingredients
- 1 butternut squash, peeled, seeded, and diced into 1/2-inch cubes (about 2 cups)
- 2 tablespoons olive oil
- Salt and freshly ground black pepper, to taste
- 2 tablespoons unsalted butter
- 3 large yellow onions, thinly sliced
- 1 teaspoon fresh thyme leaves (or 1/2 teaspoon dried)
- 1/2 teaspoon granulated sugar
- 1 store-bought or homemade pie crust (9-inch), partially baked
- 4 large eggs
- 1 cup heavy cream
- 1/2 cup whole milk
- 1 cup shredded Gruyère cheese (or Swiss)
- 1/2 cup grated Parmesan cheese
- Pinch of ground nutmeg
- Fresh parsley, for garnish (optional)
Instructions
- Preheat oven to 400°F (200°C).
- On a baking sheet, toss butternut squash cubes with olive oil and season with salt and pepper. Roast for 20–25 minutes until tender and lightly caramelized. Set aside to cool slightly.
- Meanwhile, in a large skillet over medium-low heat, melt butter. Add sliced onions, thyme, sugar, and a pinch of salt. Cook, stirring occasionally, for 30–35 minutes until the onions are deep golden brown and very soft. Add a tablespoon of water if they start to stick.
- Reduce oven temperature to 350°F (175°C).
- Place the partially baked pie crust on a baking sheet. Spread the caramelized onions evenly over the bottom, then top with roasted butternut squash pieces.
- In a medium bowl, whisk together eggs, heavy cream, milk, nutmeg, 1/2 teaspoon salt, and 1/4 teaspoon pepper. Stir in the grated Gruyère and Parmesan.
- Pour the egg mixture over the squash and onions in the crust. Gently shake the pan to settle the filling.
- Bake for 35–45 minutes, until the center is set and the top is golden brown. A knife inserted in the center should come out clean.
- Let cool on a wire rack for at least 15 minutes before slicing. Garnish with parsley if desired.
Notes
Make ahead: Caramelized onions can be prepared up to 3 days in advance and refrigerated. The quiche can be baked a day ahead and reheated in a 300°F oven for 10–15 minutes. For a gluten-free option, use a gluten-free pie crust.
Nutrition
- Calories: 420
- Sugar: 8g
- Fat: 30g
- Carbohydrates: 30g
- Protein: 14g

Tried This Recipe? Leave a Comment!
Did you make this recipe? I’d love to hear how it turned out! Please leave a comment and a rating below. Your feedback helps other home cooks and supports cheerychop.com!