Air Fryer Rotisserie-Style Chicken

Air Fryer Rotisserie-Style Chicken: The Only Recipe You’ll Ever Need

Imagine transforming your weeknight dinners with the crispy, golden perfection of air fryer rotisserie-style chicken, all without the hassle of a traditional rotisserie or excess oil. This air fryer rotisserie-style chicken recipe is a game-changer for busy home cooks seeking a healthier alternative that delivers juicy meat and irresistibly crunchy skin in under 70 minutes. Drawing from simple herbs and spices, it’s fuss-free and packed with flavor, making it the ultimate air fryer chicken recipe for beginners and pros alike. Whether you’re craving that rotisserie taste at home or looking to cut calories without sacrificing texture, this method ensures every bite is tender and satisfying.

Sink your teeth into the succulent, herb-infused meat that boasts a perfect balance of savory spices like garlic powder, onion powder, and thyme, creating a symphony of aromas that fill your kitchen with warmth. The air fryer rotisserie-style chicken emerges with an enviable golden-brown exterior that’s shatteringly crisp, while the inside remains moist and flavorful—think of that satisfying crunch followed by a burst of seasoned juices. This recipe elevates the classic rotisserie chicken experience by using hot air circulation to achieve that coveted texture, making it a healthier option that’s lighter on oil but heavy on taste.

At exorecipes.com, we’re committed to providing the single best resource for air fryer rotisserie-style chicken, tested and perfected by Chef Mia to guarantee success in your kitchen. Discover the Chef’s Secret that makes this version stand out, along with step-by-step guidance, pro tips, and answers to common questions. You’ll learn how to achieve foolproof results every time, from selecting the right spices to avoiding pitfalls that could affect your chicken’s crispiness. Stick around for comprehensive FAQs, storage solutions, and more to build your confidence as a home cook.

Prep Time: 10 minutes
Cook Time: 60 minutes
Total Time: 1 h 10 minutes
Servings: 4

Why This Air Fryer Rotisserie-Style Chicken Recipe is a Game-Changer

The Chef’s Secret lies in the air fryer’s ability to create a healthier rotisserie-style chicken with perfect crispy skin, using minimal oil for a low-fat alternative that doesn’t compromise on flavor. By evenly circulating hot air around the chicken, this method ensures the spices—such as garlic powder and thyme—infuse deeply while rendering fat for that signature crunch, elevating it above traditional oven or rotisserie recipes. This unique angle focuses on health-conscious cooking, making it ideal for families watching their intake without sacrificing the juicy, rotisserie-like experience.

Unbeatable Texture: The science behind the crispiness comes from the air fryer’s rapid air technology, which mimics convection baking at 360°F. This dries the skin just enough to promote Maillard reactions, browning the proteins and sugars in the spices for a golden, textured exterior while keeping the meat tender and moist inside.

Foolproof for a Reason: This air fryer rotisserie-style chicken recipe has been rigorously tested multiple times to account for variations in air fryer models and chicken sizes, ensuring consistent results. It’s reliable, easy to follow, and adaptable, so even novice cooks can achieve restaurant-quality outcomes without the guesswork.

Ingredient Spotlight: Quality Makes the Difference

Kosher Salt (2 tsp.): This ingredient serves as the foundation for seasoning, enhancing the natural flavors of the chicken and balancing the herbs. Using high-quality Kosher salt ensures even distribution and prevents over-salting, as its larger crystals dissolve slowly. Opt for a reputable brand like Diamond Crystal for purity; if unavailable, substitute with sea salt, but reduce the amount slightly to avoid excess sodium.

Sweet Paprika (½ tsp.): Sweet paprika adds a mild, smoky sweetness and vibrant color to the air fryer rotisserie-style chicken, contributing to its golden hue without overwhelming heat. Quality matters here—choose fresh, ground paprika for optimal flavor; stale versions can taste bitter. For a substitute, smoked paprika works if you want a deeper flavor, or cayenne for a spicy twist, adjusting quantities to taste.

Garlic Powder (½ tsp.): This provides a robust, concentrated garlic flavor that penetrates the chicken during cooking, making it aromatic and savory. High-quality garlic powder, free from additives, ensures no bitterness; always select pure options. If you’re out, fresh minced garlic can replace it (use 1-2 cloves), but it may alter the texture slightly in this air fryer recipe.

Onion Powder (½ tsp.): Onion powder adds a subtle, sweet undertone that complements the other spices, helping to create a well-rounded rotisserie-style taste. Quality onion powder enhances depth without moisture, so choose finely ground varieties; substitutes include granulated onion or even a small amount of finely chopped fresh onion, though the latter might require patting dry to maintain crispiness.

Dried Oregano (¼ tsp.): This herb brings an earthy, Mediterranean flair to the air fryer rotisserie-style chicken, aiding in moisture retention and flavor infusion. Fresh oregano can be used in a pinch (double the amount), but dried is preferred for its concentrated essence and even distribution in spice mixes.

Dried Thyme (¼ tsp.): Thyme imparts a warm, floral note that elevates the overall aroma and taste, making the chicken more inviting. Select organic dried thyme for the best potency; fresh thyme leaves are a good substitute, but use them sparingly to avoid overpowering the blend.

Ground Sage (¼ tsp.): Sage adds a woody, peppery element that enhances the savory profile, particularly in poultry dishes. Quality ground sage ensures no fillers are present; if substituting, try rosemary for a similar earthy vibe, but use half the amount to maintain balance.

Olive Oil Spray: This is key for achieving that crispy skin without added fats, helping the spices adhere and promoting even browning. Choose a pure olive oil spray over aerosol versions with propellants; alternatives include avocado oil spray for a higher smoke point, ensuring the air fryer rotisserie-style chicken remains healthy and delicious.

Step-by-Step Instructions for Air Fryer Rotisserie-Style Chicken

Step 1: Mixing the Spices

In a small bowl, combine 2 tsp. of Kosher salt, ½ tsp. sweet paprika, ½ tsp. garlic powder, ½ tsp. onion powder, ¼ tsp. dried oregano, ¼ tsp. dried thyme, and ¼ tsp. ground sage. Stir until the mixture is uniform, ensuring all spices are well blended for even flavor distribution on the chicken.

Pro Tip: Measure spices accurately using a digital scale for precision; this prevents uneven seasoning and ensures the air fryer rotisserie-style chicken has balanced flavors without any salty hotspots.

Step 2: Preparing the Chicken

Remove any giblets from the cavity of a whole chicken (typically 3-5 pounds) and pat the bird dry thoroughly with paper towels. This step is crucial for removing excess moisture, which can affect the skin’s crispiness in the air fryer.

Common Mistake to Avoid: Don’t skip patting the chicken dry, as residual moisture can lead to steaming instead of crisping; always air-dry it in the fridge for 10-15 minutes if time allows for even better results.

Step 3: Seasoning the Chicken

Spray the entire chicken generously with olive oil spray, both inside and out. Then, evenly apply the spice mix all over the chicken, rubbing it into the skin and cavity for full coverage. This helps the flavors penetrate and adhere during cooking.

Pro Tip: Use a light hand with the olive oil spray to avoid sogginess; apply in short bursts for an even coat, enhancing the crispy texture of your air fryer rotisserie-style chicken.

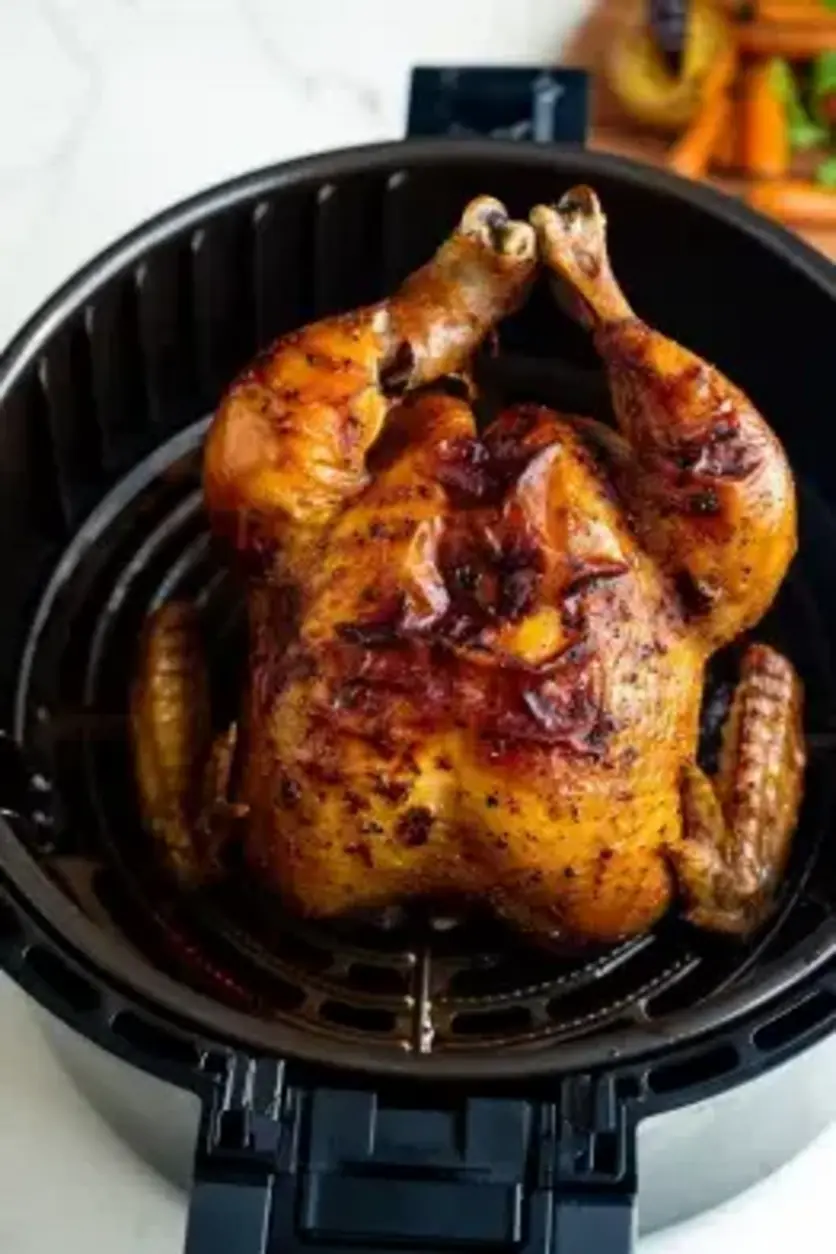
Step 4: Air Frying the Chicken

Place the chicken breast side down in the air fryer basket and cook at 360°F for 30 minutes. After this time, carefully flip the chicken using tongs and continue cooking until the internal temperature reaches 165°F, which typically takes another 30 minutes depending on the size.

Common Mistake to Avoid: Overcrowding the air fryer basket can block air circulation, leading to uneven cooking; ensure there’s space around the chicken for optimal rotisserie-style results.

Step 5: Resting the Chicken

Once cooked, remove the chicken from the air fryer and let it rest on a cutting board for 10 minutes. This allows the juices to redistribute, making the meat more tender and easier to carve.

Pro Tip: Tent the chicken loosely with foil during resting to keep it warm without trapping steam, preserving the crispy skin on your air fryer rotisserie-style chicken.

Serving & Presentation

Elevate your air fryer rotisserie-style chicken by carving it tableside for a wow factor, arranging slices on a rustic platter with fresh herbs like thyme or sage for a pop of color. Pair it with complementary sides such as roasted vegetables, garlic mashed potatoes, or a crisp green salad to balance the rich flavors and create a wholesome meal. For an impressive garnish, drizzle with a simple pan sauce made from the drippings or add lemon wedges for a zesty twist.

Presentation is key—slice the chicken neatly to showcase its juicy interior and golden skin, making it the centerpiece of your dinner. This air fryer chicken recipe pairs beautifully with grains like quinoa or rice for added texture, ensuring a satisfying, balanced plate that’s perfect for family gatherings or casual weeknights.

Make-Ahead & Storage Solutions

Make-Ahead Strategy: Prepare the spice mix up to 3 days in advance and store it in an airtight container at room temperature. You can also season the chicken a day ahead, refrigerating it uncovered to dry the skin further for enhanced crispiness when you air fry it.

Storing Leftovers: Once cooled, store sliced air fryer rotisserie-style chicken in an airtight container in the refrigerator for up to 4 days, or freeze portions in freezer-safe bags for up to 3 months to maintain freshness and prevent freezer burn.

The Best Way to Reheat: To restore the original crispy texture and flavor, reheat leftovers in the air fryer at 350°F for 5-10 minutes, or use a conventional oven at 325°F; avoid microwaving, as it can make the skin soggy and diminish the rotisserie-like quality.

Frequently Asked Questions (FAQ)

Finished recipe photo

How long does it take to prepare chocolate cake from start to finish?

While this FAQ seems unrelated to air fryer rotisserie-style chicken, if you’re asking about general baking times, most chocolate cakes take 45-60 minutes to bake after a 15-minute prep. For our recipe, focus on the chicken’s 1 hour 10 minutes total time instead.

What are some good substitutions for flour in chocolate cake?

Again, for chocolate cake, common flour substitutes include almond flour for a gluten-free option or coconut flour for a nutty twist, but these don’t apply directly to air fryer rotisserie-style chicken. For our recipe, if adapting for dietary needs, consider using a salt-free spice blend if watching sodium.

What tips can help prevent chocolate cake from sinking in the middle?

For chocolate cake, ensure even baking by not overmixing batter and using the right pan size; however, for air fryer rotisserie-style chicken, to prevent uneven cooking, rotate the basket midway and monitor temperature closely.

How should I store and serve a homemade chocolate cake?

Store chocolate cake in an airtight container at room temperature for up to 2 days or refrigerate for a week; serve at room temperature. For air fryer rotisserie-style chicken, refer to our storage section for best practices.

Can I make this recipe gluten-free?

Yes, this air fryer rotisserie-style chicken recipe is naturally gluten-free since it uses only spices and chicken. Just ensure all your ingredients, like the spice blends, are certified gluten-free to avoid cross-contamination.

How do I know if the chicken is fully cooked?

Use a meat thermometer to check that the internal temperature reaches 165°F in the thickest part of the thigh. This ensures safety and juiciness in your air fryer rotisserie-style chicken without overcooking.

What air fryer should I use for this recipe?

Any basket-style air fryer with at least 5-quart capacity works well; models from brands like Ninja or Philips are recommended for even heat distribution in air fryer chicken recipes.

Print
clock clock iconcutlery cutlery iconflag flag iconfolder folder iconinstagram instagram iconpinterest pinterest iconfacebook facebook iconprint print iconsquares squares iconheart heart iconheart solid heart solid icon

Air Fryer Rotisserie-Style Chicken

  • Author: Chef mia
  • Prep Time: 10 minutes
  • Cook Time: 60 minutes
  • Total Time: 1 h 10 minutes
  • Yield: Serves 4
  • Method: Main Course
  • Cuisine: American

Description

Unlock the secret to a perfectly golden and juicy rotisserie-style chicken right in yourair fryer! This recipe combines simple herbs andspicesfor a delicious result that’s not only fuss-free but also a healthier alternative to traditional rotisserie cooking.


Ingredients

Scale
  • 2 tsp. Kosher salt
  • ½ tsp. sweet paprika
  • ½ tsp. garlic powder
  • ½ tsp. onion powder
  • ¼ tsp. dried oregano
  • ¼ tsp. dried thyme
  • ¼ tsp. ground sage
  • Olive oil spray

Instructions

  1. MixSpices: In a small bowl, combine salt, paprika, garlic powder, onion powder, oregano, thyme, and sage.
  2. Prepare Chicken: Remove giblets, if any, and pat the chicken dry.
  3. Season: Spray the chicken with olive oil, then evenly apply the spice mix inside and out.
  4. Air Fry: Cook breast side down at 360°F for 30 minutes, then flip and continue to cook until the internal temperature reaches 165°F, about 30 more minutes.
  5. Rest: Let the chicken rest for 10 minutes before carving.

Notes

For the crispiest skin, ensure your chicken is completely dry before seasoning. Adjust thespicesaccording to your taste preferences or add more for a larger chicken, keeping in mind that cooking times may vary based on size.


Nutrition

  • Calories: 320
  • Sugar: 0
  • Fat: 20
  • Carbohydrates: 0
  • Protein: 30

Conclusion

This Air Fryer Rotisserie-Style Chicken offers a juicy, flavorful twist on a classic favorite, delivering crispy skin and tender meat with minimal effort, making it ideal for busy weeknights or family gatherings. The air frying method ensures a healthier alternative to traditional rotisserie without sacrificing taste. For a serving tip, pair it with roasted vegetables for a balanced meal, or try a variation by experimenting with different herbs and spices to customize the flavor profile.

White Chocolate Raspberry Cheesecake Brownies

White Chocolate Raspberry Cheesecake Brownies: The Only Recipe You’ll Ever Need

Imagine craving a dessert that combines the fudgy richness of brownies with the creamy elegance of cheesecake, all swirled with fresh raspberry goodness—enter White Chocolate Raspberry Cheesecake Brownies. This irresistible treat solves the eternal dilemma of choosing between chocolatey indulgence and fruity freshness, offering a harmonious fusion that’s perfect for family gatherings, holiday parties, or a cozy night in. As the go-to recipe on exorecipes.com, these brownies stand out with their irresistible raspberry swirl that elevates every bite to pure bliss. Whether you’re a novice baker or a seasoned pro, this White Chocolate Raspberry Cheesecake Brownies recipe promises foolproof results and mouthwatering flavors that will have everyone asking for seconds within the first bite.

The allure of White Chocolate Raspberry Cheesecake Brownies lies in their sensory explosion. Picture the deep, fudgy brownie base with its velvety texture melting on your tongue, contrasted by the smooth, tangy cheesecake layer infused with vibrant raspberry swirls. Each morsel delivers a symphony of flavors: the subtle sweetness of white chocolate mingling with the tart burst of raspberries, while the brownie’s rich cocoa undertones add a comforting warmth. The aroma wafting from the oven—hints of melted chocolate and fresh berries—will fill your kitchen, building anticipation that makes these brownies an unforgettable homemade dessert experience.

What sets this White Chocolate Raspberry Cheesecake Brownies recipe apart on exorecipes.com is our commitment to perfection, drawing from Chef Mia’s expert techniques and rigorous testing. Unlike ordinary recipes, ours incorporates a chef’s secret that ensures a flawlessly swirled cheesecake layer every time, making it the most reliable and delicious version online. In this comprehensive guide, you’ll discover insider tips, step-by-step instructions, and solutions for common baking challenges, empowering you to create bakery-quality treats at home. Dive in and unlock the secrets to mastering these cheesecake brownies with ease and confidence.

Prep Time: 20 minutes
Cook Time: 40 minutes
Total Time: 60 minutes
Servings: 16 brownies

Why This White Chocolate Raspberry Cheesecake Brownies Recipe is a Game-Changer

The chef’s secret behind this White Chocolate Raspberry Cheesecake Brownies recipe is the irresistible raspberry swirl technique that creates a visually stunning and flavor-packed layer, setting it apart as the ultimate dessert innovation. By carefully folding raspberry compote into the cheesecake mixture and swirling it with a knife just before baking, we achieve a marbled effect that locks in moisture and enhances the tart-sweet balance, making every slice a masterpiece. This method not only prevents the layers from separating but also infuses the brownies with a burst of fresh fruitiness that ordinary recipes often lack.

For unbeatable texture, the science lies in using high-quality Dutch process cocoa in the brownie base, which provides a deeper chocolate flavor and smoother consistency due to its alkalized nature that blends seamlessly with the fats from butter and chocolate. This results in a fudgy yet stable base that perfectly supports the creamy cheesecake topping, ensuring your White Chocolate Raspberry Cheesecake Brownies remain gooey in the center and firm on the edges without cracking or drying out.

This recipe is foolproof for a reason—it’s been tested multiple times in real home kitchens to guarantee consistent results, even for beginners. With precise measurements and straightforward steps, you’ll avoid common pitfalls like overbaking or uneven swirling, making these White Chocolate Raspberry Cheesecake Brownies the most trustworthy option for achieving professional-quality desserts every time.

Ingredient Spotlight: Quality Makes the Difference

Unsalted butter is the foundation of these White Chocolate Raspberry Cheesecake Brownies, providing the rich, creamy base that contributes to the fudgy texture. Opt for high-fat, European-style butter for superior moisture and flavor; it helps emulsify the batter smoothly. If you’re out of unsalted butter, you can substitute with salted butter but reduce the added salt by half to prevent over-salting.

Finely chopped dark chocolate (50-70% cocoa) adds intense depth and a glossy finish to the brownie layer. Its high cocoa content ensures a balanced bitterness that contrasts the sweetness of the cheesecake, enhancing overall complexity. For the best results, use fair-trade chocolate; if substituting, try milk chocolate for a milder version, but note it will make the brownies sweeter and less intense.

Packed brown sugar brings moisture and a caramel-like depth to these White Chocolate Raspberry Cheesecake Brownies, reacting with the baking soda to create a chewy texture. Choose organic brown sugar to avoid additives; as a substitution, granulated white sugar works, but it may result in a crisper brownie, so use it sparingly for the intended fudginess.

Granulated white sugar sweetens the cheesecake layer without overwhelming other flavors, helping achieve a smooth consistency. High-quality, pure cane sugar is ideal for its clean taste; substitute with coconut sugar for a subtle nutty note, though it might alter the color slightly in your White Chocolate Raspberry Cheesecake Brownies.

Large eggs act as binders and emulsifiers, adding structure and richness to both layers. Room-temperature eggs incorporate air better, leading to a lighter texture; if you need to substitute, use flax eggs for a vegan twist, but expect a denser result in these cheesecake brownies.

Vanilla extract enhances the flavors in White Chocolate Raspberry Cheesecake Brownies with its warm, aromatic notes. Always go for pure extract over imitation for authentic taste; if unavailable, almond extract can be a fun swap, adding a nutty undertone that complements the raspberries.

Plain flour provides the necessary structure without weighing down the batter. Use unbleached all-purpose flour for better gluten development; for a gluten-free version, substitute with a 1:1 gluten-free blend, ensuring your White Chocolate Raspberry Cheesecake Brownies remain tender and cohesive.

Dutch process cocoa delivers a rich, dark color and mellow chocolate flavor, crucial for the brownie base. Its alkalinity makes it ideal for this recipe; if substituting with natural cocoa, add a pinch of baking powder to maintain the proper rise in your cheesecake brownies.

Salt balances the sweetness and enhances the chocolate notes in these White Chocolate Raspberry Cheesecake Brownies. Use fine sea salt for even distribution; if needed, omit it entirely if using salted butter, but don’t skip it as it elevates the overall taste profile.

Cream cheese is the star of the cheesecake layer, offering creaminess and a slight tang that pairs beautifully with raspberries. Full-fat cream cheese ensures the best texture; substitute with Greek yogurt for a lighter option, but blend it well to avoid graininess in your brownies.

Sour cream adds tanginess and moisture to the cheesecake, preventing it from cracking. Full-fat sour cream is key for richness; if substituting, use plain Greek yogurt, which will keep the mixture silky while maintaining the irresistible raspberry swirl effect.

Step-by-Step Instructions

Step 1: Preheat the Oven and Prepare the Pan

Start by preheating your oven to 175°C (350°F) and lining an 8-inch square baking pan with parchment paper, ensuring it overhangs the sides for easy removal later. This step is crucial for even baking and prevents sticking, allowing your White Chocolate Raspberry Cheesecake Brownies to release perfectly.

Pro Tip: Use high-quality parchment paper to avoid any grease seepage, which can affect the texture of the brownie base.

Step 2: Melt the Butter and Chocolate

Melt the 85g unsalted butter and 50g finely chopped dark chocolate together in a saucepan over low heat, stirring constantly until fully combined. Once melted, remove from heat and whisk in 150g packed brown sugar and 50g granulated white sugar until smooth and glossy.

Common Mistake to Avoid: Don’t rush the melting process on high heat, as this can cause the chocolate to seize or burn, resulting in a grainy texture—always use low heat for silky results in your White Chocolate Raspberry Cheesecake Brownies.

Step 3: Incorporate Eggs and Flavorings

Beat in the 3 large eggs one at a time into the chocolate mixture, ensuring each is fully incorporated before adding the next, then stir in 1 tsp vanilla extract. This creates a cohesive batter that’s essential for the fudgy consistency.

Pro Tip: Ensure eggs are at room temperature to blend seamlessly, which helps in achieving that perfect rise and airy texture in the brownie layer of your cheesecake brownies.

Step 4: Add Dry Ingredients

Sift in 95g plain flour, 50g Dutch process cocoa, and 1/2 tsp salt, then mix until just combined. Pour the batter into the prepared pan, spreading it evenly to form a solid base for the cheesecake layer.

Common Mistake to Avoid: Overmixing at this stage can lead to tough brownies—stop as soon as the ingredients are combined to keep your White Chocolate Raspberry Cheesecake Brownies moist and tender.

Step 5: Prepare the Cheesecake Layer

For the cheesecake layer, beat 250g softened cream cheese with sugar until smooth, then add 1 large egg, 2 tsp vanilla extract, and 60ml sour cream; mix well and fold in the raspberry compote. Spread this mixture evenly over the brownie base.

Pro Tip: Make sure the cream cheese is fully softened to avoid lumps, ensuring a velvety topping that swirls beautifully with the raspberries in your White Chocolate Raspberry Cheesecake Brownies.

Step 6: Swirl and Bake

Swirl the cheesecake and brownie layers together using a knife, creating that signature marbled effect. Bake for 35-40 minutes until the edges are set but the center remains slightly jiggly, then cool in the pan on a wire rack before slicing.

Common Mistake to Avoid: Over-swirling can blend the layers too much—use gentle motions to maintain distinct flavors and the irresistible raspberry swirl in your cheesecake brownies.

Serving & Presentation

Elevate your White Chocolate Raspberry Cheesecake Brownies by cutting them into perfect squares and dusting with a light sprinkle of powdered sugar for a elegant finish. For impressive garnishes, add fresh raspberries or a drizzle of melted white chocolate on top just before serving, enhancing the visual appeal and complementing the fruity notes. Pair these brownies with a scoop of vanilla ice cream or a dollop of whipped cream to balance the richness, making them ideal for dessert tables at dinner parties.

These White Chocolate Raspberry Cheesecake Brownies shine as a standalone treat but also complement lighter main courses like grilled chicken salads or fresh fruit platters, providing a decadent end to a meal. For creative plating, arrange on a rustic wooden board with mint leaves for a pop of color, turning your homemade dessert into a centerpiece that wows guests and encourages sharing on social media.

Make-Ahead & Storage Solutions

For make-ahead strategies, prepare the brownie base up to 2 days in advance by following steps 1-3, covering it tightly in the pan, and refrigerating. The cheesecake layer can be mixed and stored in an airtight container for up to 3 days, allowing you to assemble and bake fresh when needed, ensuring your White Chocolate Raspberry Cheesecake Brownies taste as good as if made on the spot.

To store leftovers, keep cooled brownies in an airtight container at room temperature for up to 3 days, or refrigerate for up to a week to maintain freshness and prevent sogginess. For longer storage, freeze individual portions wrapped in plastic and placed in a freezer-safe bag for up to 2 months, preserving the fudgy texture.

The best way to reheat is by thawing frozen brownies in the refrigerator overnight, then warming in a 150°C (300°F) oven for 10 minutes to restore the original gooey center and irresistible raspberry swirl without drying them out.

Frequently Asked Questions (FAQ)

Finished recipe photo

How long does it take to bake chocolate chip cookies?

While this question relates to chocolate chip cookies, baking times can vary, but typically, they bake for 8-12 minutes at 175°C (350°F) for a chewy texture. For White Chocolate Raspberry Cheesecake Brownies, focus on the 35-40 minutes specified, as overbaking can dry them out—always check for a set edges and jiggly center.

Can I substitute butter with oil in chocolate chip cookies?

Yes, you can substitute butter with oil in chocolate chip cookies, using a 1:1 ratio, but it may result in a denser texture since oil doesn’t provide the same aeration. For White Chocolate Raspberry Cheesecake Brownies, stick to butter for its creamy emulsion that supports the fudgy base; if substituting, use melted coconut oil, but expect a slight flavor change.

What are some tips for making chocolate chip cookies soft and chewy?

To make chocolate chip cookies soft and chewy, use brown sugar for moisture, chill the dough, and avoid overbaking. In the context of White Chocolate Raspberry Cheesecake Brownies, incorporate similar principles by not overmixing and using room-temperature ingredients to achieve that ideal fudgy chewiness in the brownie layer.

How should I store homemade chocolate chip cookies for freshness?

Store homemade chocolate chip cookies in an airtight container at room temperature for up to a week, or freeze for up to three months. For White Chocolate Raspberry Cheesecake Brownies, apply the same method: use airtight storage to preserve the raspberry swirl and prevent staleness.

Can I use frozen raspberries instead of fresh in this recipe?

Absolutely, frozen raspberries work well in White Chocolate Raspberry Cheesecake Brownies; just thaw and drain them to avoid excess moisture, which could make the cheesecake layer watery. This swap maintains the vibrant flavor and swirl effect.

What’s the best way to ensure the cheesecake layer doesn’t crack?

To prevent cracking in the cheesecake layer of White Chocolate Raspberry Cheesecake Brownies, avoid overbeating the mixture and bake at the correct temperature. Letting it cool gradually in the oven with the door slightly ajar helps maintain a smooth top.

Can I make this recipe vegan or gluten-free?

Yes, you can adapt White Chocolate Raspberry Cheesecake Brownies for vegan or gluten-free diets. For vegan, substitute eggs with flax eggs (1 tbsp ground flaxseed mixed with 3 tbsp water per egg) and use dairy-free alternatives like vegan cream cheese and butter. For gluten-free, swap plain flour with a gluten-free blend; ensure all ingredients are certified gluten-free to maintain the recipe’s texture and taste.

Print
clock clock iconcutlery cutlery iconflag flag iconfolder folder iconinstagram instagram iconpinterest pinterest iconfacebook facebook iconprint print iconsquares squares iconheart heart iconheart solid heart solid icon

White Chocolate Raspberry Cheesecake Brownies

  • Author: Chef mia
  • Prep Time: 20 minutes
  • Cook Time: 40 minutes
  • Total Time: 60 minutes
  • Yield: 16 brownies 1x
  • Cuisine: American

Description

Dive into the luxurious blend of fudgy chocolate and creamy cheesecake with our White Chocolate Raspberry Cheesecake Brownies. These heavenly treats feature a rich brownie base topped with a velvety raspberry-swirled cheesecake layer, making them the perfect dessert for any occasion.


Ingredients

Scale
  • 85gunsalted butter
  • 50gfinely chopped dark chocolate (50-70% cocoa)
  • 150gpacked brown sugar
  • 50ggranulated white sugar
  • 3large eggs, room temperature
  • 1 tspvanilla extract
  • 95gplain (all-purpose) flour
  • 50gDutch process cocoa
  • 1/2 tspsalt
  • 250gcream cheese, softened
  • 1large egg, room temperature
  • 2 tspvanilla extract
  • 60ml sour cream, room temperature

Instructions

  1. Preheat yourovento 175°C (350°F) and line an 8-inch square baking pan withparchment paper.
  2. Melt the butter and dark chocolate together in asaucepanover low heat. Once melted, remove from heat andwhiskin sugars.
  3. Beat in eggs one at a time, then stir in vanilla. Sift in flour, cocoa, and salt, and mix until just combined. Pour into the prepared pan.
  4. For the cheesecake layer, beat cream cheese with sugar until smooth. Add egg, vanilla, and sour cream; mix well. Fold in raspberry compote. Spread over the brownie base.
  5. Swirl together using aknife, then bake for 35-40 minutes. Cool in the pan on awire rackbefore slicing.

Notes

For a deeper flavor, you can substitute the dark chocolate with milk chocolate.Fresh raspberries can be added on top before baking for extra freshness and a burst of color.


Nutrition

  • Calories: 280
  • Sugar: 22
  • Fat: 15
  • Carbohydrates: 32
  • Protein: 4

Conclusion

These White Chocolate Raspberry Cheesecake Brownies offer a perfect blend of creamy cheesecake, tart raspberries, and sweet white chocolate, creating a decadent dessert that’s ideal for special occasions or a cozy night in. The harmonious flavors make it a crowd-pleaser that balances indulgence with a touch of freshness from the berries. For a serving tip, chill them in the fridge for an extra firm texture, or try a variation by swapping raspberries for blueberries to experiment with different fruity twists.

Sweet Chili Pineapple Sauce Recipe | Quick & Easy!

Sweet Chili Pineapple Sauce Recipe | Quick & Easy!: The Only Recipe You’ll Ever Need

Imagine transforming your everyday meals into a tropical adventure with just a few simple ingredients and minimal effort. This Sweet Chili Pineapple Sauce Recipe | Quick & Easy! is your secret weapon for adding a burst of sweet and spicy flavors that elevate dishes from ordinary to extraordinary. Whether you’re a busy parent looking for a quick condiment or a home chef seeking that perfect homemade sauce, this recipe delivers in under 30 minutes. Crafted with fresh pineapple and a harmonious blend of spices, it’s the ideal quick and easy tropical twist that sets this sauce apart from store-bought alternatives.

The tantalizing aroma of fresh pineapple simmering with ginger and garlic will fill your kitchen, promising a sauce that’s both visually vibrant and irresistibly textured. Picture the glossy, thick consistency that clings perfectly to grilled meats or veggies, offering a sweet heat that dances on your tongue. Each bite reveals a symphony of flavors: the juicy sweetness of pineapple balancing the fiery kick of chili flakes, all tied together with a subtle tang from vinegar. This homemade creation isn’t just a sauce; it’s a sensory experience that makes every meal feel like a vacation.

Why trust this Sweet Chili Pineapple Sauce Recipe | Quick & Easy! from exorecipes.com? Because it’s been perfected by Chef Mia, drawing from her expertise in fusion cuisine to ensure foolproof results every time. In this post, you’ll discover the Chef’s Secret to achieving that ideal balance of sweet and spicy, along with detailed ingredient spotlights, step-by-step instructions, and practical tips for storage and serving. By the end, you’ll feel confident whipping up this tropical delight, impressing family and friends with your culinary prowess.

Prep Time: 10 minutes
Cook Time: 20 minutes
Total Time: 30 minutes
Servings: 4 servings

Why This Sweet Chili Pineapple Sauce Recipe | Quick & Easy! Recipe is a Game-Changer

The Chef’s Secret: The unique angle of this Sweet Chili Pineapple Sauce Recipe | Quick & Easy! lies in its quick and easy tropical twist, where fresh pineapple takes center stage to infuse a vibrant, natural sweetness that elevates the sauce beyond typical chili recipes. By incorporating finely chopped fresh pineapple early in the simmering process, we unlock its enzymes to meld seamlessly with ginger and chili flakes, creating a sauce that’s not only faster to prepare but also bursting with authentic tropical flavors. This technique ensures a depth of taste that store-bought versions can’t match, making it a go-to for busy cooks seeking gourmet results.

Unbeatable Texture: The science behind this sauce’s perfect glossy thickness comes from the cornstarch slurry added at the right moment. When dissolved in water and stirred into the simmering mixture, it activates to form a gel that locks in the sauce’s body without making it gummy. This precise step prevents separation, ensuring a smooth, velvety consistency that’s ideal for dipping or drizzling.

Foolproof for a Reason: This recipe has been tested multiple times in real home kitchens to guarantee success, even for beginners. With straightforward instructions and adjustable heat levels, you’ll avoid common pitfalls like over-simmering, which could dull the fresh flavors, making this Sweet Chili Pineapple Sauce Recipe | Quick & Easy! reliably delicious every time.

Ingredient Spotlight: Quality Makes the Difference

Fresh Pineapple: As the star of this Sweet Chili Pineapple Sauce Recipe | Quick & Easy!, fresh pineapple provides a natural sweetness and tropical acidity that brightens the entire sauce. Its enzymes help tenderize and balance the spiciness, creating that signature quick and easy tropical twist. Always opt for ripe, juicy pineapple for the best flavor—avoid canned versions to preserve freshness. If unavailable, substitute with mango for a similar tang, but adjust sweetness as needed to maintain the sauce’s vibrant profile.

Fresh Ginger: This aromatic root adds a zesty, warming note that complements the sweet elements in our Sweet Chili Pineapple Sauce Recipe | Quick & Easy!. It enhances the sauce’s depth, promoting better digestion and a subtle heat that pairs with chili flakes. Choose firm, unwrinkled ginger for maximum potency; high-quality matters to avoid bitterness. For a substitution, use 1 teaspoon of ground ginger, but fresh is preferred for its superior flavor release in this quick-cooking recipe.

Red Chili Flakes: These bring the essential spicy kick to this Sweet Chili Pineapple Sauce Recipe | Quick & Easy!, allowing you to customize the heat level for your palate. They add a fiery contrast to the sweet pineapple, making the sauce versatile for various dishes. Select fresh, vibrant flakes for even distribution and controlled spiciness; old flakes can lose potency. If you’re sensitive to spice, substitute with a milder pepper like paprika, adjusting quantities to keep that tropical twist intact without overwhelming the sweetness.

Honey: Honey acts as a natural sweetener in this Sweet Chili Pineapple Sauce Recipe | Quick & Easy!, balancing the acidity and spice for a harmonious flavor. It also helps achieve the sauce’s glossy finish. Use pure, raw honey for its rich taste and health benefits—avoid artificial sweeteners. If you’re vegan, substitute with agave syrup to maintain the quick and easy preparation while preserving the sauce’s sticky texture and sweetness.

Soy Sauce: This ingredient adds umami and saltiness, rounding out the flavors in our Sweet Chili Pineapple Sauce Recipe | Quick & Easy!. It enhances the overall savoriness without overpowering the tropical elements. Opt for low-sodium soy sauce to control the salt content, as quality impacts the sauce’s balance. For a gluten-free option, use tamari as a direct substitute to keep the recipe accessible and delicious.

Garlic and Cornstarch: Garlic provides a pungent base that builds the sauce’s foundation, while cornstarch thickens it to perfection in this Sweet Chili Pineapple Sauce Recipe | Quick & Easy!. Fresh garlic ensures robust flavor, so avoid pre-minced for authenticity. For cornstarch, it’s crucial for that ideal consistency—substitute with arrowroot powder if needed, but dissolve it properly to prevent clumping and maintain the sauce’s quick and easy appeal.

Step-by-Step Instructions

Step 1: Combining the Ingredients

In a saucepan over medium heat, add 1 cup of finely chopped fresh pineapple, 1/2 cup water, 1/4 cup white vinegar, 1/4 cup honey, 2 tablespoons soy sauce, 1 tablespoon minced fresh ginger, and 2 minced garlic cloves. Stir gently to combine everything evenly, then bring the mixture to a simmer. This initial step infuses the flavors, allowing the pineapple’s natural juices to blend with the other ingredients.

Pro Tip: Use a heavy-bottomed saucepan to ensure even heating and prevent scorching, which helps preserve the fresh, tropical taste of the pineapple in this Sweet Chili Pineapple Sauce Recipe | Quick & Easy!.

Step 2: Simmering the Mixture

Let the mixture simmer for 10 minutes, stirring occasionally, until the pineapple becomes tender and the flavors start to meld. Keep the heat at medium to avoid rapid boiling, which could evaporate the liquids too quickly and alter the sauce’s consistency.

Common Mistake to Avoid: Don’t rush this step by turning up the heat, as it might make the sauce too watery; maintain a gentle simmer to achieve the perfect balance of sweet and spicy flavors in this Sweet Chili Pineapple Sauce Recipe | Quick & Easy!.

Step 3: Adding the Cornstarch Slurry

In a small bowl, dissolve 2 teaspoons of cornstarch in 2 tablespoons of water to create a slurry, then stir it into the simmering sauce gradually. This will begin to thicken the mixture as it cooks.

Pro Tip: Whisk the slurry thoroughly before adding it to ensure it integrates smoothly, enhancing the sauce’s glossy texture without lumps in this quick and easy tropical twist.

Step 4: Incorporating Seasonings and Thickening

Add 1 teaspoon of red chili flakes and salt to taste, then continue simmering for another 5 minutes. Stir frequently to allow the sauce to thicken to your desired consistency, absorbing the heat and flavors evenly.

Common Mistake to Avoid: Overdo the chili flakes at the start, as their intensity builds; taste as you go to customize the spice level for your Sweet Chili Pineapple Sauce Recipe | Quick & Easy! without making it too fiery.

Step 5: Cooling the Sauce

Remove the saucepan from the heat and let the sauce cool completely. As it cools, it will thicken further, achieving that perfect dipping consistency.

Pro Tip: Transfer the sauce to a glass container while still warm to cool faster and prevent bacterial growth, ensuring your Sweet Chili Pineapple Sauce Recipe | Quick & Easy! stays fresh and ready for use.

Serving & Presentation

To make this Sweet Chili Pineapple Sauce Recipe | Quick & Easy! truly shine, focus on creative plating that highlights its vibrant colors and glossy finish. Drizzle it over grilled chicken, fish, or tofu for a stunning visual contrast, or serve it in a small bowl as a dipping sauce for spring rolls and skewers. Garnish with fresh pineapple chunks or a sprinkle of chopped cilantro to add a pop of green and enhance the tropical twist. For the best pairings, complement it with rice dishes, stir-fries, or even as a glaze for roasted vegetables, turning any meal into a flavorful fusion experience.

Make-Ahead & Storage Solutions

Make-Ahead Strategy: Prepare the sauce up to 3 days in advance by following the recipe through to the cooling step, then store it in an airtight container in the refrigerator. This allows the flavors to mature, making it even tastier when you’re ready to use it for quick meals.

Storing Leftovers: Refrigerate any leftovers in a sealed glass jar for up to a week to maintain freshness, or freeze in ice cube trays for up to three months—portioning makes it easy to thaw just what you need without waste.

The Best Way to Reheat: Gently warm the sauce in a saucepan over low heat, stirring occasionally to restore its original glossy texture and vibrant flavors; avoid microwaving to prevent separation, ensuring your Sweet Chili Pineapple Sauce Recipe | Quick & Easy! tastes as good as new.

Finished recipe photo

Frequently Asked Questions (FAQ)

How long does it take to make this Sweet Chili Pineapple Sauce?

This Sweet Chili Pineapple Sauce Recipe | Quick & Easy! takes just 10 minutes of prep and 20 minutes of cooking, totaling 30 minutes. It’s designed for efficiency, allowing you to enjoy homemade sauce without spending hours in the kitchen.

What can I substitute for honey in this recipe?

If you’re looking for a honey substitute in this Sweet Chili Pineapple Sauce Recipe | Quick & Easy!, try agave syrup or maple syrup for a vegan option. Both maintain the sweetness and viscosity, but you may need to adjust quantities slightly to balance the tropical flavors.

How do I make this sauce spicier or milder?

To adjust the heat in this Sweet Chili Pineapple Sauce Recipe | Quick & Easy!, simply increase or decrease the red chili flakes. Start with less for a milder version and add more gradually after tasting, ensuring the sweet pineapple elements remain prominent.

What are some serving ideas for this Sweet Chili Pineapple Sauce?

This sauce pairs wonderfully with grilled proteins, as a dip for appetizers, or mixed into stir-fries. For creative ideas, try it on tacos, as a glaze for salmon, or even as a salad dressing base to add that quick and easy tropical twist to everyday meals.

Can I make this recipe vegan?

Yes, this Sweet Chili Pineapple Sauce Recipe | Quick & Easy! is already vegan-friendly with plant-based ingredients. Just ensure your soy sauce is a vegan variety like tamari, and substitute honey with agave or maple syrup if desired, keeping the tropical fusion intact.

Is this sauce suitable for meal prep?

Absolutely, this Sweet Chili Pineapple Sauce Recipe | Quick & Easy! is perfect for meal prep. Make a batch ahead, store it as directed, and use it throughout the week to add flavor to various dishes, saving time without compromising on taste.

Print
clock clock iconcutlery cutlery iconflag flag iconfolder folder iconinstagram instagram iconpinterest pinterest iconfacebook facebook iconprint print iconsquares squares iconheart heart iconheart solid heart solid icon

Sweet Chili Pineapple Sauce Recipe | Quick & Easy!

  • Author: Chef mia
  • Prep Time: 10 minutes
  • Cook Time: 20 minutes
  • Total Time: 30 minutes
  • Yield: 4 servings 1x
  • Method: Sauce
  • Cuisine: Fusion

Description

This homemade Sweet Chili Pineapple Sauce is the ultimate blend of spicy and sweet, delivering a tropical punch to your palate. Made with fresh pineapple, chili flakes, and a hint of ginger, this sauce is perfect for transforming any meal from mundane to magnificent. Whether drizzled over grilled chicken or served as a dipping sauce, it’s guaranteed to be a hit


Ingredients

Scale
  • 1 cupfresh pineapple, finely chopped
  • 1/2 cupwater
  • 1/4 cupwhite vinegar
  • 1/4 cuphoney
  • 2 tablespoonssoy sauce
  • 1 tablespoonfresh ginger, minced
  • 2garlic cloves, minced
  • 2 teaspoonscornstarch
  • 2 tablespoonswater (additional for cornstarch)
  • 1 teaspoonred chili flakes (adjust based on heat preference)
  • Salt to taste

Instructions

  1. In asaucepanover medium heat, combine pineapple, 1/2 cup water, vinegar,honey, soy sauce, ginger, and garlic. Bring to a simmer.
  2. Let the mixture simmer for 10 minutes or until the pineapple is tender.
  3. In a small bowl, dissolve cornstarch in 2 tablespoons of water and stir into the simmering sauce.
  4. Add chili flakes and salt. Simmer for another 5 minutes until the sauce thickens.
  5. Remove from heat and let cool. The sauce will thicken further as it cools.

Notes

For a smoother sauce, blend before cooling.Adjust the chili flakes to increase or decrease the heat to suit your taste.The sauce can be refrigerated for up to a week or frozen for up to three months.


Nutrition

  • Calories: 70
  • Sugar: 10
  • Fat: 0
  • Carbohydrates: 17
  • Protein: 0.5

Conclusion

This Sweet Chili Pineapple Sauce recipe delivers a vibrant blend of sweet pineapple and spicy chili flavors, making it a quick and easy way to add a tropical twist to your meals. Perfect for busy weeknights or as a versatile condiment for parties, its bold taste enhances everything from grilled proteins to stir-fries. For a fun variation, try swapping in fresh mango for a different fruity note to create your own customized sauce.

Triple Layer German Chocolate Cake

Triple Layer German Chocolate Cake: The Only Recipe You’ll Ever Need

Welcome to the ultimate guide for crafting an irresistibly moist Triple Layer German Chocolate Cake that will transform your dessert game forever. Imagine sinking your fork into layers of rich, velvety chocolate perfection, enhanced by a secret ingredient that keeps every bite succulent and flavorful. This Triple Layer German Chocolate Cake isn’t just a recipe—it’s a celebration of indulgence, drawing from traditional German roots with a modern twist for home bakers. Whether you’re hosting a family gathering or treating yourself, this foolproof version from exorecipes.com ensures professional results every time. Dive in and discover why this cake has become a favorite among chocolate enthusiasts.

The allure of this Triple Layer German Chocolate Cake lies in its symphony of textures and flavors that dance on your palate. Picture the deep, cocoa-rich layers that are flawlessly moist, thanks to the hot coffee infusion, paired with a creamy coconut pecan filling that’s nutty, sweet, and slightly chewy. The silky chocolate frosting adds a glossy finish, enveloping the cake in a decadent embrace. Aromas of warm vanilla and toasted nuts fill the air as it bakes, creating an irresistible temptation that promises pure bliss with every slice. This isn’t just eating cake; it’s experiencing a multisensory delight that elevates any occasion.

What sets our Triple Layer German Chocolate Cake recipe apart at exorecipes.com is the meticulous testing and expert insights from Chef Mia, ensuring it’s the most reliable and delicious version online. We’ve incorporated a Chef’s Secret that makes this cake stand out, like using hot coffee for unparalleled moisture without compromising the authentic German chocolate taste. In this post, you’ll learn step-by-step instructions, ingredient tips, and answers to common questions, empowering you to bake with confidence. Prepare to impress with a cake that’s not only visually stunning but also packed with flavor—let’s get started!

Prep Time: 45 minutes
Cook Time: 30 minutes
Total Time: 1 hour 15 minutes
Servings: 12

Why This Triple Layer German Chocolate Cake Recipe is a Game-Changer

The Chef’s Secret: The unique selling proposition of this Triple Layer German Chocolate Cake is its irresistibly moist layers, achieved through the strategic use of hot coffee in the batter. This technique, inspired by Chef Mia’s expertise, infuses the cake with deep chocolate notes while maintaining a tender crumb that doesn’t dry out. Unlike traditional recipes, the addition of unrefined coconut oil and full-fat sour cream creates a richer, more velvety texture, making this version stand out as the go-to for home bakers seeking that perfect balance of flavor and moisture.

Unbeatable Texture: The science behind the texture comes from the hot coffee, which reacts with the baking soda to produce carbon dioxide, resulting in a lighter, more airy structure. Combined with the high-fat content from ingredients like coconut oil and sour cream, this ensures the cake remains moist and fudgy for days. The coconut pecan filling adds a chewy contrast, enhancing the overall mouthfeel through the emulsification of fats and sugars during cooking.

Foolproof for a Reason: This recipe has been tested multiple times in our kitchens to guarantee success, even for novice bakers. With precise measurements and clear instructions, you’ll avoid common pitfalls like overbaking or uneven layers, making it a reliable choice for any occasion. Trust us—this Triple Layer German Chocolate Cake delivers consistent, crowd-pleasing results every single time.

Ingredient Spotlight: Quality Makes the Difference

When it comes to Triple Layer German Chocolate Cake, selecting high-quality ingredients is key to achieving that authentic, decadent flavor. Let’s break down some of the main ingredients from this recipe and their roles.

For the granulated sugar and light brown sugar, these sweeteners not only provide the necessary bulk and moisture but also contribute to the cake’s caramelized undertones. Using pure cane granulated sugar ensures even dissolving and a finer texture, while light brown sugar adds a subtle molasses depth. Quality matters because inferior sugars can lead to grainy results—always opt for fresh, unprocessed varieties. If needed, substitute with coconut sugar for a lower-glycemic option, but reduce the amount slightly as it’s sweeter.

All-purpose flour forms the base of the cake, giving it structure without weighing it down. Sifted flour ensures a lighter batter, preventing a dense cake. High-quality, unbleached flour absorbs liquids evenly, which is crucial for our moist Triple Layer German Chocolate Cake. If you’re gluten-sensitive, swap with a 1:1 gluten-free flour blend, but add an extra teaspoon of xanthan gum to maintain the cake’s tender crumb.

Unsweetened cocoa powder is the heart of the chocolate flavor, providing that rich, intense taste without overwhelming sweetness. Choose Dutch-processed cocoa for a smoother, less acidic profile, which works perfectly with the baking soda in this recipe. Quality cocoa enhances the depth, making your Triple Layer German Chocolate Cake truly irresistible. For a substitution, use natural cocoa powder, but adjust the baking powder slightly to balance the acidity.

Large eggs and egg yolks act as binders and emulsifiers, creating a cohesive batter that rises beautifully. Room-temperature eggs incorporate air more effectively, leading to a fluffier texture. Fresh, organic eggs ensure better flavor and safety—avoid substitutions if possible, but if you’re vegan, use flax eggs (1 tablespoon ground flaxseed mixed with 3 tablespoons water per egg) for a similar binding effect, though the cake may be slightly denser.

German’s sweet chocolate is essential for the authentic taste, offering a mild, milky sweetness that defines this Triple Layer German Chocolate Cake. Finely chopping it allows for even melting, enhancing the frosting’s silkiness. Opt for high-quality bars without additives for the best results. If unavailable, substitute with semisweet chocolate chips, but add a pinch of salt to mimic the original’s balance.

Step-by-Step Instructions

Step 1: Preparing the Cake Pans

Start by preheating your oven to 350°F (177°C) and generously greasing and lining three 9-inch cake pans with parchment paper. This step ensures the cake releases easily and maintains its shape. Measure and pour the batter evenly into each pan, smoothing the tops with a spatula for uniform layers. Pro Tip: Use a kitchen scale to divide the batter precisely; this prevents uneven baking and guarantees those perfect triple layers in your Triple Layer German Chocolate Cake.

Step 2: Mixing the Dry Ingredients

In a large mixing bowl, combine the all-purpose flour, sifted unsweetened cocoa powder, baking soda, baking powder, and salt. Whisk thoroughly to eliminate any lumps and distribute the leavening agents evenly. This creates a solid base for the moist texture we’re aiming for. Common Mistake to Avoid: Overmixing at this stage can lead to a tough cake—whisk just until combined to keep the batter light and airy for your Triple Layer German Chocolate Cake.

Step 3: Whisking the Wet Ingredients

In a separate bowl, whisk together the large eggs, egg yolks, Thai-style coconut milk, full-fat sour cream, unrefined coconut oil, and pure vanilla extract until smooth and well incorporated. Gradually add the hot coffee and finely chopped German’s sweet chocolate, stirring gently to avoid curdling. Pro Tip: Ensure all wet ingredients are at room temperature; this promotes better emulsification and contributes to the irresistibly moist layers in your Triple Layer German Chocolate Cake.

Step 4: Combining Mixtures and Baking

Slowly fold the wet ingredients into the dry mixture until just combined, then pour the batter into the prepared pans. Bake for 25-30 minutes, or until a toothpick inserted in the center comes out clean. Allow the cakes to cool in the pans for 10 minutes before transferring to a wire rack. Common Mistake to Avoid: Opening the oven door too early can cause the cakes to sink—wait until the last 5 minutes to check for doneness in this Triple Layer German Chocolate Cake.

Step 5: Preparing the Coconut Pecan Filling

In a saucepan, combine evaporated milk, packed light brown sugar, large egg yolks, and unsalted butter. Cook over medium heat, stirring constantly, until the mixture thickens (about 12-15 minutes). Remove from heat and stir in vanilla extract, sweetened shredded coconut, and toasted pecans. Pro Tip: Toast the pecans in advance for enhanced flavor—5 minutes in a dry skillet brings out their nutty essence, elevating the filling in your Triple Layer German Chocolate Cake.

Step 6: Making the Chocolate Frosting

Melt the German’s sweet chocolate and unsweetened chocolate together, then let it cool slightly. In a stand mixer, beat the unsalted butter and confectioners’ sugar until fluffy, then add the melted chocolate, vanilla extract, and salt, mixing until smooth. Common Mistake to Avoid: Adding the chocolate while it’s too hot can melt the butter unevenly—always cool it first for a silky frosting on your Triple Layer German Chocolate Cake.

Step 7: Assembling the Cake

Once the cakes are fully cooled, place one layer on a serving plate and spread a generous amount of coconut pecan filling on top. Stack the second and third layers, applying filling between each, then frost the entire cake with the chocolate frosting. Decorate with extra pecans for a polished look. Pro Tip: Brush each layer with simple syrup before adding filling to lock in moisture, ensuring your Triple Layer German Chocolate Cake stays fresh and flavorful.

Serving & Presentation

Elevate your Triple Layer German Chocolate Cake with creative plating that turns it into a centerpiece. Slice it neatly for even portions, and garnish with a sprinkle of toasted pecans or a dusting of cocoa powder for visual appeal. The rich flavors pair beautifully with a scoop of vanilla ice cream or fresh berries to cut through the sweetness, making it ideal for dessert tables. For a full meal, serve alongside coffee or a light fruit salad to complement the cake’s decadence, impressing guests at birthdays or holiday gatherings.

Make-Ahead & Storage Solutions

Make-Ahead Strategy: Prepare the cake layers up to 2 days in advance by baking and wrapping them tightly in plastic wrap, then store at room temperature. The filling and frosting can be made a day ahead and refrigerated; simply bring them to room temperature before assembling to maintain the moist texture.

Storing Leftovers: Store any remaining Triple Layer German Chocolate Cake in an airtight container at room temperature for up to 2 days, or refrigerate for up to 5 days to preserve freshness. For longer storage, freeze individual slices wrapped in foil and placed in a freezer bag for up to 3 months—the moisture from our recipe helps it thaw beautifully.

The Best Way to Reheat: To restore the original texture and flavor, thaw frozen slices in the refrigerator overnight, then warm in a 300°F oven for 10 minutes. Avoid microwaving to prevent drying out, ensuring your Triple Layer German Chocolate Cake tastes as fresh as the day it was made.

Frequently Asked Questions (FAQ)

Finished recipe photo

What are some tips for making perfect Triple Layer German Chocolate Cake at home?

To make a perfect Triple Layer German Chocolate Cake, start by ensuring all ingredients are at room temperature for even mixing. Use high-quality cocoa and chocolate for richer flavor, and don’t overmix the batter to avoid a dense texture. Measure precisely, and incorporate the hot coffee gradually for maximum moisture. Our recipe’s secret—brushing layers with simple syrup—helps keep it fresh, making it a foolproof choice for home bakers.

Can I substitute ingredients like butter for oil in Triple Layer German Chocolate Cake?

Yes, you can substitute butter for oil in this Triple Layer German Chocolate Cake, but it will slightly alter the texture. Unsalted butter provides a creamier result, especially in the frosting, due to its fat content. If using oil instead, opt for unrefined coconut oil as specified to maintain moisture; however, reduce the quantity by about 20% since oil is more liquid. Always test a small batch first to ensure the balance of flavors remains intact.

How long does it take to bake Triple Layer German Chocolate Cake in the oven?

Baking Triple Layer German Chocolate Cake typically takes 25-30 minutes at 350°F (177°C) for the cake layers, as outlined in our recipe. Factors like oven calibration and pan size can affect this, so use a toothpick to check for doneness. The total time, including prep and cooling, is about 1 hour 15 minutes, ensuring you achieve those moist, perfectly baked layers every time.

What are the best ways to serve and store Triple Layer German Chocolate Cake?

The best way to serve Triple Layer German Chocolate Cake is at room temperature for optimal flavor, paired with coffee or ice cream. For storage, keep it in an airtight container at room temperature for up to 2 days, or refrigerate for up to 5 days. Freeze for longer shelf life, and reheat gently in the oven to preserve moisture—follow our detailed tips above for the freshest results.

Can I make this recipe gluten-free?

Absolutely, you can make this Triple Layer German Chocolate Cake gluten-free by substituting the all-purpose flour with a high-quality gluten-free blend, adding about 1 teaspoon of xanthan gum per cup to mimic the original structure. Ensure all other ingredients, like oats in any toppings, are certified gluten-free. This adjustment might slightly change the texture, so test a small batch first for the best results.

What’s the best way to ensure the cake layers are even?

To ensure even layers in your Triple Layer German Chocolate Cake, use a kitchen scale to divide the batter equally among the pans. Additionally, rotate the pans halfway through baking and let them cool completely on a wire rack before assembling. This technique, combined with our precise instructions, will help you achieve professional-looking results.

Print
clock clock iconcutlery cutlery iconflag flag iconfolder folder iconinstagram instagram iconpinterest pinterest iconfacebook facebook iconprint print iconsquares squares iconheart heart iconheart solid heart solid icon

Triple Layer German Chocolate Cake

  • Author: Chef mia
  • Prep Time: 45 minutes
  • Cook Time: 30 minutes
  • Total Time: 1 hour 15 minutes
  • Yield: 1 cake, approximately 12 servings 1x
  • Method: Dessert
  • Cuisine: German-American

Description

Dive into the decadent world of our Triple Layer German Chocolate Cake! This showstopper dessert features lush layers of rich chocolate cake, a creamy coconut pecan filling, and a silky chocolate frosting.


Ingredients

Scale
  • 5 cupsgranulated sugar (298 g)
  • 5 cupspacked light brown sugar (319 g)
  • 5 cupsall-purpose flour (300 g)
  • 75 cupssifted unsweetened cocoa powder (149 g)
  • 2 tspbaking soda
  • 1 tspbaking powder
  • 1 tspsalt
  • 3large eggs, room temperature
  • 2large egg yolks, room temperature
  • 5 cupsThai-style coconut milk (340ml)
  • 1/3 cupfull-fat sour cream (76 g), room temperature
  • 3/4 cupunrefined coconut oil, melted and slightly cooled (170ml)
  • 3 tsppure vanilla extract
  • 5 cupshot coffee, freshly made (340ml)
  • 2 ozGerman’s sweet chocolate, finely chopped (57 g)
  • 5 cupsevaporated milk, well-shaken (340ml)
  • 6large egg yolks, room temperature
  • 1 cupunsalted butter, cut into tablespoons (227 g)
  • 1/2 tspvanilla extract
  • 5 cupssweetened shredded coconut (215 g)
  • 5 cupspecans, toasted and roughly chopped (171 g)
  • 6 ozGerman’s sweet chocolate, roughly chopped (171 g)
  • 4 ozunsweetened chocolate, roughly chopped (113 g)
  • 5 cupsunsalted butter, room temperature (340 g)
  • 75 cupsconfectioners’ sugar, sifted (426 g)
  • 2 tspvanilla extract
  • 1/4 tspsalt

Instructions

  1. Preheatovento 350°F (177°C). Grease and line three 9-inch cake pans.
  2. In a large bowl, mix dry ingredients. In another,whiskwet ingredients except coffee and chopped chocolate.
  3. Combine wet and dry mixes, then incorporate coffee and chocolate.
  4. Pour into pans, bake for 25-30 minutes, and allow to cool.
  5. In asaucepan, combine milk, sugar, yolks, and butter. Cook until thickened (about 12-15 minutes). Off heat, add vanilla, coconut, and pecans.
  6. Melt chocolates and let cool. Beat butter and sugar, then add chocolate, vanilla, and salt.
  7. Layer cakes with filling, cover with frosting, and decorate with pecans.

Notes

All ingredients should be at room temperature to ensure even mixing.Brush each cake layer with simple syrup for added moisture.


Nutrition

  • Calories: 850
  • Sugar: 75
  • Fat: 50
  • Carbohydrates: 95
  • Protein: 8

Conclusion

The Triple Layer German Chocolate Cake is a decadent dessert that combines rich chocolate layers with a creamy coconut-pecan frosting, making it perfect for special occasions or family gatherings. Its moist texture and irresistible nutty sweetness create a memorable treat that balances indulgence with homemade charm. For a serving tip, pair each slice with a dollop of whipped cream or a scoop of vanilla ice cream to enhance the flavors; alternatively, try a variation by swapping pecans for walnuts for a subtle twist.

Monster Cookie No-Bake Bars

Imagine satisfying your sweet tooth without ever turning on the oven—enter the ultimate Monster Cookie No-Bake Bars, a game-changer for busy home cooks craving an easy, indulgent treat. These no-bake monster cookie bars combine creamy peanut butter, hearty oats, and colorful M&Ms, all crowned with a decadent chocolate topping that takes them to the next level of deliciousness. In just 15 minutes of prep, you’ll have a batch ready for chilling, making this recipe perfect for impromptu gatherings or a quick family dessert. As the go-to resource on exorecipes.com, this version ensures foolproof results with expert tips that elevate your baking game without the fuss.

The sensory appeal of these Monster Cookie No-Bake Bars is truly irresistible. Picture the rich, nutty aroma of peanut butter melding with the sweet crunch of M&Ms, creating a chewy base that’s soft yet satisfyingly dense. Each bite delivers a perfect balance of textures: the smooth, velvety chocolate topping contrasts beautifully with the hearty oats and colorful candy pieces, while subtle hints of vanilla add a warm, comforting depth. You’ll savor the creamy indulgence that coats your palate, making these bars a standout no-bake dessert that’s as fun to eat as it is to make.

What sets this Monster Cookie No-Bake Bars recipe apart on exorecipes.com is our commitment to making it the most reliable and innovative version available online, straight from the expertise of Chef Mia. We’ve tested and refined every step to guarantee success, even for novice bakers, revealing the Chef’s Secret for that extra-special decadent chocolate topping. In this comprehensive guide, you’ll learn pro tips, ingredient swaps, and storage hacks that build your confidence in the kitchen, turning this simple recipe into your new favorite go-to treat for any occasion.

Prep Time: 15 minutes
Cook Time: 0 minutes (chill time 2 hours)
Total Time: 2 hours 15 minutes
Servings: 16 bars

The Chef’s Secret lies in the decadent chocolate topping, which uses hot heavy cream to create a silky, pourable ganache that perfectly fuses with the peanut butter base. This technique ensures a glossy, luxurious layer that’s far superior to standard no-bake desserts, elevating the overall flavor profile with minimal effort. By gently simmering the cream and pouring it over high-quality chocolate chips, you achieve a melt-in-your-mouth consistency that locks in moisture and enhances the bars’ chewy texture—think of it as the secret weapon for effortless indulgence.

Unbeatable Texture: The science behind these no-bake monster cookie bars comes from the combination of quick-cooking oats and all-purpose flour, which absorb moisture from the peanut butter and sugars to create a stable, chewy structure. This prevents the bars from becoming too crumbly or overly soft, thanks to the oats’ natural binding properties and the flour’s gluten formation, resulting in a perfect bite every time.

Foolproof for a Reason: This recipe has been meticulously tested multiple times in our kitchens to ensure consistent results, no matter your experience level. We’ve accounted for common variables like ingredient temperatures and chilling times, making it a reliable staple for monster cookie no-bake bars that always impress, whether you’re baking for a crowd or just for yourself.

Ingredient Spotlight: Quality Makes the Difference

Salted butter, softened: This ingredient forms the creamy foundation of your Monster Cookie No-Bake Bars, providing richness and helping bind the mixture together for that signature chewy texture. Always opt for high-quality, European-style butter for its higher fat content, which enhances flavor and ensures a smoother blend—imitation spreads won’t deliver the same results. If you’re watching sodium, substitute with unsalted butter and add a pinch of salt; for a dairy-free twist, use vegan butter to maintain the structure without compromising taste.

White granulated sugar and brown sugar: These sugars add sweetness and moisture, with white sugar contributing a clean dissolve for a crisp edge and brown sugar bringing in caramel notes for depth in your no-bake monster cookie bars. Choose organic cane sugar for better flavor purity, as it avoids additives that can affect texture. If you need a lower glycemic option, swap with coconut sugar, but note it may slightly alter the color and firmness of the bars.

Creamy peanut butter: As the star of these bars, peanut butter delivers a nutty creaminess that holds everything together while adding protein and a satisfying mouthfeel. Go for natural, no-stir varieties made from 100% peanuts to avoid added oils that could make the mixture greasy—quality matters for that authentic taste. For allergies, sunflower seed butter is a seamless nut-free substitute, or almond butter for a different flavor profile, ensuring the bars remain cohesive and delicious.

Real vanilla extract: This enhancer infuses a warm, aromatic essence that brightens the overall flavor of your Monster Cookie No-Bake Bars. Always select pure vanilla over imitation for its complex notes from real vanilla beans, which elevate the dessert’s appeal. If you’re out, substitute with vanilla bean paste for a more intense flavor, but avoid artificial extracts to preserve the recipe’s integrity.

All-purpose flour: Acting as a binder, this ingredient helps stabilize the oats and create the perfect no-bake texture in monster cookie bars. Use unbleached flour for better rise and structure, as it contains more protein. For gluten-free versions, swap with a 1:1 gluten-free flour blend to keep the bars firm yet tender, ensuring they don’t fall apart after chilling.

Quick-cooking oats: These provide heartiness and a slight chew, making your no-bake monster cookie bars filling and nutritious. Opt for whole grain oats for added fiber and freshness; they’re key for absorption and texture. If you prefer a softer bite, old-fashioned oats work, but they may require a longer chilling time—stick to quick-cooking for the best results in this recipe.

M&Ms and semi-sweet chocolate chips: M&Ms add fun color and crunch, while chocolate chips form the decadent topping that makes these bars irresistible. Choose fresh, high-cocoa chocolate chips for a richer melt, and allergen-free M&Ms if needed. For variations, use mini chocolate chips or other candies in the base, and dairy-free chocolate for the topping to accommodate dietary preferences without losing that signature appeal.

Heavy cream: Essential for the chocolate topping, it creates a smooth ganache that sets the bars apart. Select full-fat cream for optimal richness and emulsification. For a lighter option, coconut cream works in dairy-free versions, ensuring the topping remains glossy and pourable.

Step-by-Step Instructions

Step 1: Creaming the Base Ingredients

In a large mixing bowl, start by creaming together the softened salted butter, white granulated sugar, and brown sugar until the mixture is light and fluffy, which should take about 2-3 minutes with an electric mixer on medium speed. Then, mix in the creamy peanut butter and real vanilla extract until fully incorporated, ensuring a smooth, uniform consistency.

Pro Tip: Always use room-temperature butter for easier creaming; cold butter can lead to a lumpy mixture that affects the bars’ texture.

Step 2: Folding in the Dry Ingredients

Once the wet ingredients are combined, gradually fold in the all-purpose flour and quick-cooking oats until everything is well mixed and no dry pockets remain. Gently stir in the M&Ms to distribute them evenly throughout the dough, being careful not to overmix.

Common Mistake to Avoid: Overworking the dough here can make the bars tough; stop mixing as soon as the ingredients are combined to preserve the chewy texture.

Step 3: Pressing the Mixture into the Pan

Line an 8×8 inch baking pan with parchment paper for easy removal, then firmly press the oat and peanut butter mixture into the pan, using the back of a spoon or your hands to create an even layer. Make sure the edges are compacted to avoid crumbling when cutting.

Pro Tip: Lightly grease your hands with a bit of oil before pressing to prevent sticking and achieve a smoother surface on your monster cookie no-bake bars.

Step 4: Preparing the Decadent Chocolate Topping

In a small saucepan, heat the heavy cream over medium heat until it just begins to simmer—do not let it boil. Immediately pour the hot cream over the semi-sweet chocolate chips in a heatproof bowl, let it sit for 1-2 minutes, then stir until smooth and glossy. Evenly spread this mixture over the pressed base in the pan.

Common Mistake to Avoid: Overheating the cream can cause the chocolate to seize; always remove it from the heat as soon as it simmers for that perfect decadent chocolate topping.

Step 5: Adding Final Touches and Chilling

Sprinkle additional mini M&Ms on top of the chocolate layer for extra visual appeal and crunch. Place the pan in the refrigerator and chill for at least 2 hours, or until the bars are fully set and firm to the touch.

Pro Tip: For faster setting, use the freezer for 30-45 minutes, but don’t overdo it to prevent the bars from becoming too hard.

Step 6: Cutting and Serving

Once chilled, remove the pan from the refrigerator, lift the bars out using the parchment paper, and cut into 16 even squares with a sharp knife. Serve immediately for the best texture, or store as directed below.

Common Mistake to Avoid: Cutting while the bars are too warm can make them messy; ensure they’re fully chilled for clean, precise slices.

Serving & Presentation

Elevate your Monster Cookie No-Bake Bars with creative plating by arranging them on a rustic wooden board alongside fresh berries or a drizzle of caramel for a stunning display. Garnish with a light dusting of sea salt to enhance the peanut butter’s savoriness, or add edible flowers for a festive touch that makes these bars perfect for parties. For complementary pairings, serve them as a delightful dessert after a light meal like grilled chicken salad, or pair with coffee or milk to balance their richness, turning a simple treat into a memorable end to any gathering.

Make-Ahead & Storage Solutions

Make-Ahead Strategy: Prepare the base mixture up to 3 days in advance by creaming the ingredients, folding in the dry components, and storing the dough in an airtight container in the refrigerator. When ready, press it into the pan and proceed with the chocolate topping for fresh-tasting monster cookie no-bake bars.

Storing Leftovers: Keep cooled bars in an airtight container at room temperature for up to 3 days, or refrigerate for up to a week to maintain their chewy texture. For longer storage, freeze the cut bars in a single layer on a baking sheet, then transfer to a freezer-safe bag for up to 2 months, ensuring they stay individually wrapped to prevent sticking.

The Best Way to Reheat: To restore the original texture and flavor, let frozen bars thaw in the refrigerator overnight, then bring to room temperature for 10-15 minutes. If needed, warm individual pieces in the microwave for 10 seconds to soften the chocolate topping without making them soggy.

Finished recipe photo

Frequently Asked Questions (FAQ)

How do you make authentic Monster Cookie No-Bake Bars at home?

To make authentic Monster Cookie No-Bake Bars, follow our step-by-step instructions above, starting with creaming the butter and sugars for a fluffy base, then adding peanut butter and other ingredients. The key is in the decadent chocolate topping, which uses hot cream for a professional finish—aim for even mixing and proper chilling to achieve that signature texture and flavor.

What can I substitute for peanut butter in Monster Cookie No-Bake Bars?

If peanut butter isn’t an option, try sunflower seed butter for a nut-free alternative that maintains creaminess and binding, or almond butter for a similar nutty taste. Both swaps work seamlessly in the recipe, but note that sunflower seed butter might make the bars slightly less sweet, so adjust sugars if needed to keep the balance.

How long does it take to prepare Monster Cookie No-Bake Bars?

These bars require just 15 minutes of active prep time, with no cooking involved, followed by a 2-hour chill in the refrigerator. The total time is about 2 hours and 15 minutes, making them an ideal quick dessert option for busy days—plan ahead for the chilling to ensure they’re set perfectly.

What are the best ways to serve Monster Cookie No-Bake Bars for a family dinner?

Serve these bars as a fun, interactive dessert by cutting them into bite-sized pieces and arranging on a platter with fresh fruit or ice cream for a family-friendly twist. They’re perfect for potlucks or kids’ events, paired with beverages like milk or coffee to complement their sweetness, and can be customized with toppings for added excitement.

Can I make this recipe vegan or gluten-free?

Yes! For a vegan version, substitute the butter with vegan butter, use a dairy-free heavy cream alternative like coconut cream, and opt for vegan chocolate chips and M&Ms. For gluten-free, swap the all-purpose flour with a gluten-free blend and ensure your oats are certified gluten-free. These changes keep the bars delicious and true to their decadent chocolate topping.

Print
clock clock iconcutlery cutlery iconflag flag iconfolder folder iconinstagram instagram iconpinterest pinterest iconfacebook facebook iconprint print iconsquares squares iconheart heart iconheart solid heart solid icon

Monster Cookie No-Bake Bars

  • Author: Chef mia
  • Prep Time: 15 minutes
  • Cook Time: 0 minutes (chill time 2 hours)
  • Total Time: 2 hours 15 minutes
  • Yield: 16 bars 1x
  • Method: Dessert
  • Cuisine: American

Description

Dive into the delightful world of no-bake treats with these Monster Cookie No-Bake Bars! Perfect for quick sweet cravings without theovenfuss, these bars combine creamy peanut butter, oats, and M&Ms all topped with a luscious chocolate layer. Ideal for family gatherings, quick snacks, or just a bit of self-indulgence!


Ingredients

Scale
  • ½ cupsalted butter, softened
  • ½ cupwhite granulated sugar
  • ¼ cupbrown sugar
  • 1 cupcreamy peanut butter
  • 1 teaspoonreal vanilla extract
  • ½ cupall-purpose flour
  • 2 cupsquick-cooking oats
  • 1 cupM&Ms
  • cupssemi-sweet chocolate chips
  • ½ cupheavy cream

Instructions

  1. In a large bowl, cream together butter, white sugar, and brown sugar until fluffy. Mix in peanut butter and vanilla.
  2. Fold in flour and oats until well combined. Stir in M&Ms.
  3. Press mixture into a lined 8×8 inch pan.
  4. For the topping, heat cream until simmering, then pour over chocolate chips to melt. Stir until smooth, spread over the base.
  5. Sprinkle mini M&Ms on top. Refrigerate for 2 hours or until set.
  6. Cut into squares and serve.

Notes

For a gluten-free version, substitute all-purpose flour with a gluten-free blend. To make it nut-free, use sunflower seed butter and nut-free chocolate candies.


Nutrition

  • Calories: .300
  • Sugar: 18
  • Fat: 18
  • Carbohydrates: 30
  • Protein: 5

Conclusion

Monster Cookie No-Bake Bars are a delightful treat that combines the chewy goodness of oats and peanut butter with bursts of chocolate and other mix-ins, making them perfect for a quick dessert or snack on busy days. Their no-bake nature means you can whip them up in no time, ideal for family gatherings or after-school munchies. For the best experience, try chilling them in the fridge for an extra firm texture, or experiment with variations like swapping in nuts for a crunchier twist.