Best Chocolate Chip Muffins – Easy Homemade Recipe
Introduction
There’s something magical about biting into a warm, freshly baked muffin—especially when it’s packed with melty chocolate chips. Whether you’re craving a cozy breakfast treat or a sweet afternoon pick-me-up, these Irresistible Chocolate Chip Muffins deliver every time. They’re soft, fluffy, and loaded with just the right amount of chocolatey goodness. Plus, they fill your kitchen with a scent so inviting, you’ll have everyone gathering around the oven before they’re even done baking.
Irresistible Chocolate Chip Muffins are more than just a simple baked good. They’re a nostalgic comfort food that brings people together, whether you’re sharing them with family, friends, or sneaking one (or two) for yourself. What makes this recipe stand out is its perfect balance of sweetness and texture. The muffins rise beautifully, thanks to a carefully tested batter, while the chocolate chips stay gooey even after cooling. If you’ve ever struggled with dry or dense muffins, this recipe solves those problems effortlessly.
For those who love easy yet impressive baking projects, these muffins fit right into your routine. They take less than 30 minutes to prepare, and you likely already have all the ingredients in your pantry. If you’re looking for more quick and delicious baking ideas, check out our favorite quick baking recipes. Alternatively, if you’re a chocolate lover, you’ll adore our decadent chocolate desserts collection.
This recipe also aligns perfectly with our blog’s mission: making home cooking approachable, fun, and downright delicious. Whether you’re a beginner or a seasoned baker, these Irresistible Chocolate Chip Muffins promise consistent results and endless smiles.
Why I Love This Recipe
These muffins hold a special place in my heart because they were the first thing I ever baked successfully as a kid. I remember standing on a stool, carefully stirring the batter, and feeling so proud when they came out golden and perfect. Now, whenever I make them, that same joy comes rushing back. They’re my go-to for potlucks, lazy Sundays, or just because—and every time, they disappear faster than I can blink. That’s the power of a truly Irresistible Chocolate Chip Muffin.
Health and Nutrition
Why it’s good for your body
Irresistible Chocolate Chip Muffins pack more than just delicious flavor. First, they offer a satisfying energy boost thanks to balanced carbohydrates and natural sugars. Additionally, dark chocolate chips provide antioxidants, which support heart health and reduce inflammation. Meanwhile, whole wheat flour or oat flour options add fiber, keeping digestion steady and hunger at bay.
Moreover, Irresistible Chocolate Chip Muffins can be a smart choice for mindful indulgence. By using quality ingredients like Greek yogurt or applesauce, they often contain less fat than traditional recipes. Furthermore, these muffins deliver small bursts of joy, which actually help curb cravings for less nutritious sweets. Finally, when you bake them at home, you control the sugar and salt, making them a healthier alternative to store-bought treats.
Beyond taste, Irresistible Chocolate Chip Muffins also contribute to mental well-being. Comfort foods like these can lift your mood while still fitting into a nutrient-conscious diet. Whether enjoyed as a breakfast treat or an afternoon pick-me-up, they strike a perfect balance between health and happiness.
How it fits in a healthy lifestyle
Irresistible Chocolate Chip Muffins fit seamlessly into balanced eating habits. For example, pair one with a protein-rich snack like Greek yogurt or a handful of nuts to create a satisfying mini-meal. If you follow a gluten-free diet, simply swap in almond or coconut flour for a delicious alternative. You can also explore our gluten-free baking guide for more adaptable recipes.
These muffins also support heart-healthy choices when made with ingredients like olive oil or flaxseed. For those tracking macros, they can be tweaked to include extra protein powder or reduced sugar. Craving more wholesome dessert ideas? Check out our healthy dessert swaps for inspiration. Whether you need a quick breakfast or a guilt-free dessert, Irresistible Chocolate Chip Muffins keep your goals on track without sacrificing flavor.
Soft, fluffy muffins packed with melty chocolate chips for the perfect sweet treat.
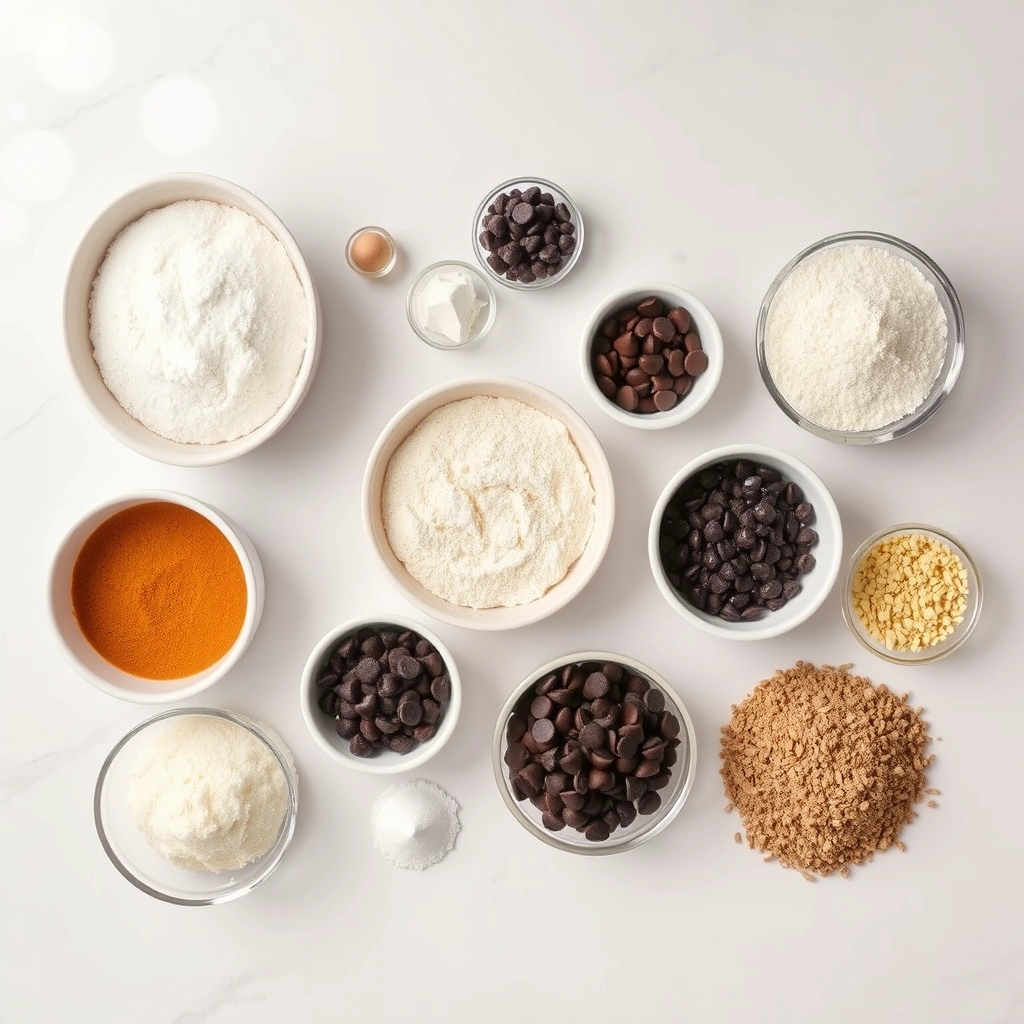
Ingredients
Scale
For the Crust:
2 cups all-purpose flour
1/2 cup granulated sugar
1 tbsp baking powder
1/2 tsp salt
1 cup milk
1/3 cup vegetable oil
1 large egg
1 tsp vanilla extract
1 cup semi-sweet chocolate chips
Instructions
1. Prepare the Crust:
Preheat oven to 375°F (190°C) and line a muffin tin with paper liners.
In a large bowl, whisk together flour, sugar, baking powder, and salt.
In another bowl, mix milk, oil, egg, and vanilla until well combined.
Pour wet ingredients into dry ingredients and stir until just combined (do not overmix).
Fold in chocolate chips.
Divide batter evenly among muffin cups (about 3/4 full).
Bake for 18-20 minutes or until a toothpick comes out clean.
Notes
You can customize the seasonings to taste.
“`html
="how-to-prepare-this-dish">How to Prepare This Dish
Steps and time-saving tips
Start by preheating your oven to 375°F to ensure it reaches the perfect temperature by the time your batter is ready. Meanwhile, line a muffin tin with paper liners or lightly grease each cup to prevent sticking. In a large bowl, whisk together the flour, baking powder, and salt until evenly combined. Next, grab another bowl and beat the softened butter with sugar until fluffy, then mix in the eggs one at a time followed by vanilla extract. Gradually fold the dry ingredients into the wet mixture, but avoid overmixing—just stir until no flour streaks remain. Gently fold in the chocolate chips for that irresistible burst of flavor in every bite. Spoon the batter evenly into the muffin cups, filling each about two-thirds full. For an extra touch, sprinkle a few extra chocolate chips on top before baking. Pop the tray into the oven and bake for 18-20 minutes, or until a toothpick comes out clean. Let the muffins cool slightly before serving, though I won’t judge if you sneak one warm!
Mistakes I’ve made and learned from
Early on, I learned the hard way that overmixing the batter leads to dense, tough muffins instead of the light, fluffy texture we all crave. Now, I stop stirring as soon as the ingredients combine, and the difference is night and day. Another rookie mistake? Skipping the step of creaming the butter and sugar properly—this creates tiny air pockets that give the muffins their lift. If your butter isn’t soft enough, try my quick butter-softening hack to save time without sacrificing quality. Oh, and don’t forget to check your baking powder’s freshness! Once, my muffins barely rose, and I traced it back to expired leavening. Now, I test it with this simple trick before starting. Trust me, these small tweaks make all the difference in achieving bakery-worthy results every time.
Irresistible Chocolate Chip Muffins feel like a warm hug from childhood, no matter where you grew up. While the classic version traces back to American home baking in the mid-20th century, bakers worldwide have put their own spin on them. In France, for instance, they might use dark chocolate chunks and a hint of sea salt for a sophisticated twist. Meanwhile, in Australia, you’ll often find them studded with macadamia nuts for extra crunch.
My family’s vers
ion of Irresistible Chocolate Chip Muffins always included a dash of cinnamon, a trick my grandma swore by. She claimed it brought out the sweetness of the chocolate. Across the South, bakers might swap in buttermilk for a tangier bite, while New Englanders could fold in wild blueberries for a seasonal summer treat. No matter the variation, these muffins carry a universal appeal—simple, comforting, and endlessly adaptable.
How it fits in today’s cooking
Today, Irresistible Chocolate Chip Muffins remain a staple for busy mornings, lunchboxes, and cozy weekend brunches. Modern cooks love tweaking them—like using oat flour for a gluten-free version or adding a swirl of peanut butter for extra protein. They’ve also become a star in holiday baking, especially when paired with festive add-ins like peppermint chips or orange zest. For more inspiration, check out our guide to quick breakfast ideas or our tips for baking with kids.
What keeps them relevant? Their versatility. Whether you’re meal prepping for the week or craving a midnight snack, these muffins deliver. Bakers today also experiment with vegan butter or coconut sugar, proving that even a classic can evolve. No wonder they’ve earned their spot in kitchens everywhere—simple, satisfying, and always irresistible.
>Taste and Texture
What makes it delicious
Irresistible Chocolate Chip Muffins deliver a heavenly balance of rich, buttery sweetness and deep chocolatey goodness. The first bite reveals a tender, moist crumb that practically melts in your mouth, while the gooey chocolate chips add bursts of indulgent flavor. Warm from the oven, the muffins release a fragrant vanilla aroma with hints of caramelized sugar. Every bite offers a satisfying contrast—soft cake meets slightly crisp edges, and the chocolate chips stay luxuriously melty. Thanks to high-quality cocoa and real butter, Irresistible Chocolate Chip Muffins taste like a cozy bakery treat with just the right amount of decadence.
Boosting the flavor
For an extra flavor twist, try folding in a handful of toasted walnuts or pecans to add crunch and nutty depth. A sprinkle of flaky sea salt on top before baking enhances the sweetness and creates a gourmet touch. If you love warm spices, a dash of cinnamon or a swirl of homemade caramel sauce pairs beautifully with the chocolate. For a fruity twist, mix in dried cherries or orange zest—their bright tang cuts through the richness. Craving more chocolate? Drizzle cooled muffins with easy chocolate ganache for a glossy, irresistible finish.
Tips for Success
Best practices for results
Always measure your flour correctly by spooning it into the measuring cup and leveling it off. This prevents dense Irresistible Chocolate Chip Muffins. Additionally, use room-temperature eggs and butter for even mixing. For extra flavor, toast the walnuts lightly before folding them into the batter. Finally, avoid overmixing the dough to keep the muffins tender and fluffy.
Mistakes to avoid
One common mistake is baking the Irresistible Chocolate Chip Muffins at too high a temperature, which can cause uneven browning. Instead, check your oven calibration with an oven thermometer for accuracy. Another error is skipping the muffin liner or greasing step, leading to sticking. For foolproof release, try our favorite non-stick baking spray. Remember, underbaked centers sink, so test with a toothpick before pulling them out.
Serving and Pairing Suggestions
How to serve this dish
Serve Irresistible Chocolate Chip Muffins warm for the ultimate gooey chocolate experience. For a brunch spread, arrange them on a rustic wooden board with fresh berries and a dusting of powdered sugar. Meanwhile, during holidays, wrap them in festive parchment paper and tie with twine for a charming homemade gift. If you want to impress guests, slice them in half and add a dollop of whipped cream or a scoop of vanilla ice cream for an indulgent dessert.
h-it">What goes well with it
Pair Irresistible Chocolate Chip Muffins with a cold glass of milk for a classic combo that highlights their rich flavor. Alternatively, try them alongside a creamy vanilla latte to balance the sweetness with a hint of espresso. For a heartier option, serve them with a fresh fruit salad or our berry yogurt parfait to add a refreshing contrast to the decadent muffins.
What makes chocolate chip muffins moist and fluffy?
The secret to moist and fluffy Irresistible Chocolate Chip Muffins lies in using buttermilk or yogurt for acidity, which reacts with baking soda to create lift. Properly creaming butter and sugar, plus not overmixing the batter, also ensures a tender crumb packed with melty chocolate chips.
ank-math-faq-item">
Can I substitute oil for butter in chocolate chip muffins?
Yes, you can swap melted butter for neutral oils like vegetable or canola oil in Irresistible Chocolate Chip Muffins—this often makes them even moister. However, butter adds richer flavor, so consider using browned butter for a nutty depth that complements the chocolate.
How do you keep chocolate chips from sinking in muffins?
Toss your chocolate chips in 1 tbsp of flour before folding them into the Irresistible Chocolate Chip Muffin batter—this helps suspend them evenly. Chilling the batter for 15 minutes before baking also prevents sinking by thickening the mixture.
Why are my chocolate chip muffins dry?
Overbaking is the top culprit for dry Irresistible Chocolate Chip Muffins—check for doneness 2-3 minutes early with a toothpick test. Using too much flour (always spoon-and-level) or skipping moisture-rich ingredients like sour cream can also lead to dryness.
div>
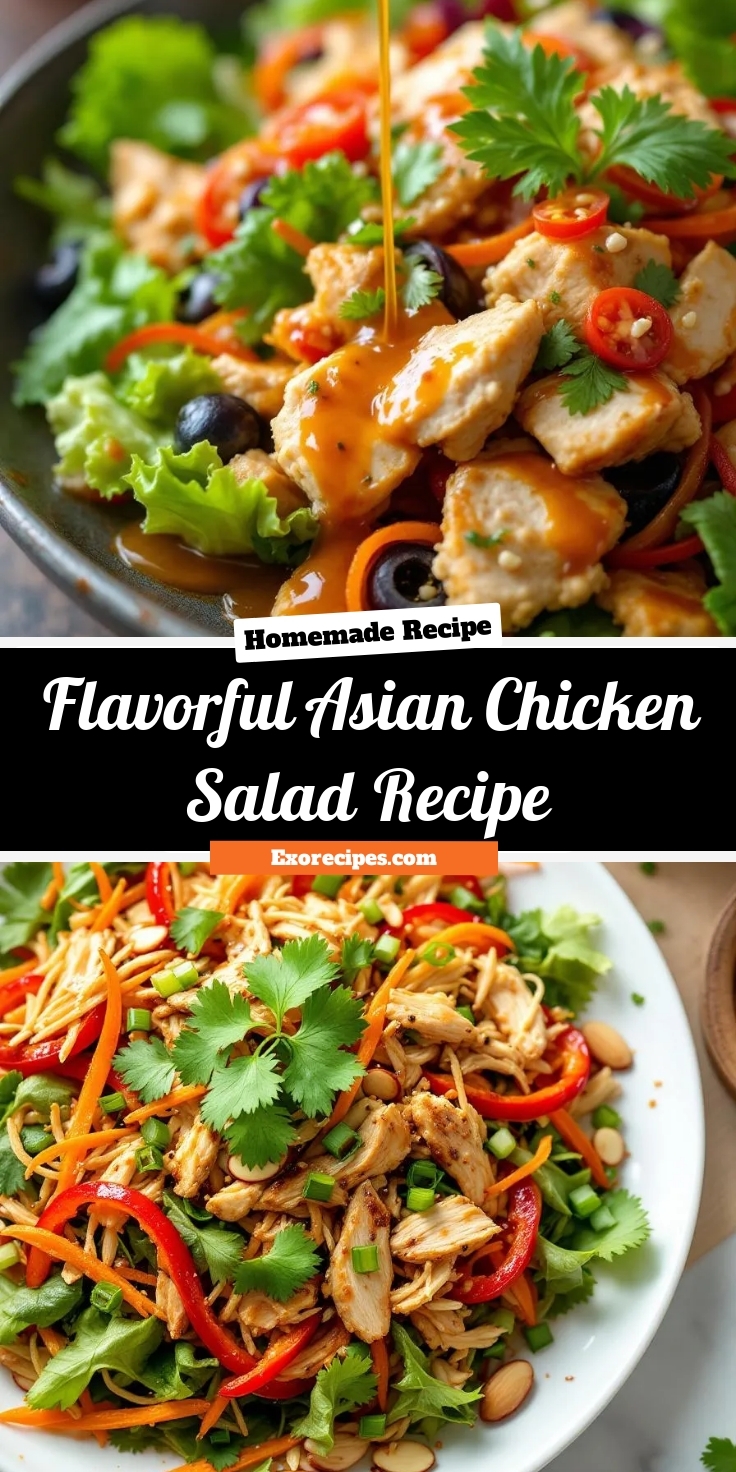
Best Asian Chicken Salad – Flavorful & Easy Recipe
Introduction
Craving a dish that bursts with vibrant flavors yet feels light and refreshing? Look no further than this Flavorful Asian Chicken Salad Recipe. Whether you need a quick lunch, a crowd-pleasing potluck dish, or a healthy dinner option, this salad delivers. Imagine tender chicken, crisp veggies, and a tangy-sweet dressing all coming together in one bowl. Best of all, it takes minimal effort for maximum reward. Let’s dive into why this recipe deserves a spot in your weekly rotation.
The Flavorful Asian Chicken Salad Recipe combines the bold tastes of sesame, ginger, and soy with fresh ingredients like cabbage, carrots, and cilantro. Unlike heavy, mayo-laden salads, this version keeps things bright and balanced. It’s perfect for meal prep, since the flavors meld beautifully overnight. Plus, it’s versatile—swap in tofu for chicken or add crunchy noodles for extra texture. If you love dishes that marry convenience with excitement, you’ll adore this recipe. For more inspiration, check out our Healthy Meal Prep Ideas or explore Quick Asian-Inspired Dishes to round out your menu.
This salad fits our blog’s ethos of simple, globally inspired cooking. We prioritize recipes that respect your time without sacrificing taste. The Flavorful Asian Chicken Salad Recipe embodies that balance. It’s a gateway to exploring Asian flavors at home, whether you’re a beginner or a seasoned cook. With its mix of protein, veggies, and crave-worthy dressing, it’s a meal that satisfies on every level.
Why I Love This Recipe
This Flavorful Asian Chicken Salad Recipe holds a special place in my heart because it reminds me of family gatherings. My aunt used to make a similar version for picnics, and the first bite always transports me back to those sunny afternoons. Beyond nostalgia, I love how adaptable it is. Some days I load it with extra peanuts for crunch, other times I skip the chicken for a vegan twist. No matter how I tweak it, the result never disappoints. It’s the kind of recipe that feels both familiar and exciting—exactly what home cooking should be.
Health and Nutrition
Why it’s good for your body
The Flavorful Asian Chicken Salad Recipe packs a nutritious punch while delighting your taste buds. First, lean chicken breast provides high-quality protein to support muscle repair and keep you full longer. Meanwhile, fresh vegetables like cabbage, carrots, and bell peppers add fiber, vitamins, and antioxidants to boost immunity and digestion. Additionally, the sesame oil and rice vinegar dressing offers healthy fats and a tangy flavor without excessive calories.
Moreover, this salad includes ingredients like ginger and garlic, which have anti-inflammatory properties. These not only enhance the taste of the Flavorful Asian Chicken Salad Recipe but also promote gut health. Furthermore, the crunch from nuts or seeds adds omega-3s and texture, making each bite satisfying. Because it balances protein, fiber, and healthy fats, this dish helps stabilize blood sugar levels and curb cravings.
Finally, the Flavorful Asian Chicken Salad Recipe is a versatile meal you can customize for extra nutrition. For example, swapping in quinoa or edamame boosts plant-based protein. Whether you enjoy it for lunch or dinner, this salad delivers flavor and nourishment in every serving.
How it fits in a healthy lifestyle
The Flavorful Asian Chicken Salad Recipe fits seamlessly into a balanced diet, whether you’re focusing on weight management, heart health, or simply eating cleaner. Its lean protein and fiber-rich veggies make it a great option for meal prep, keeping you energized without heavy carbs. If you’re following a gluten-free lifestyle, this recipe naturally avoids gluten while still delivering bold flavors.
For those tracking macros, the dish offers a high-protein, low-carb base that pairs well with other healthy sides. You can also explore our meal prep guide to streamline your weekly routine. Plus, if you love vibrant, nutrient-dense meals, check out our balanced bowl ideas for more inspiration. With its fresh ingredients and customizable options, this salad supports both your health goals and your busy schedule.
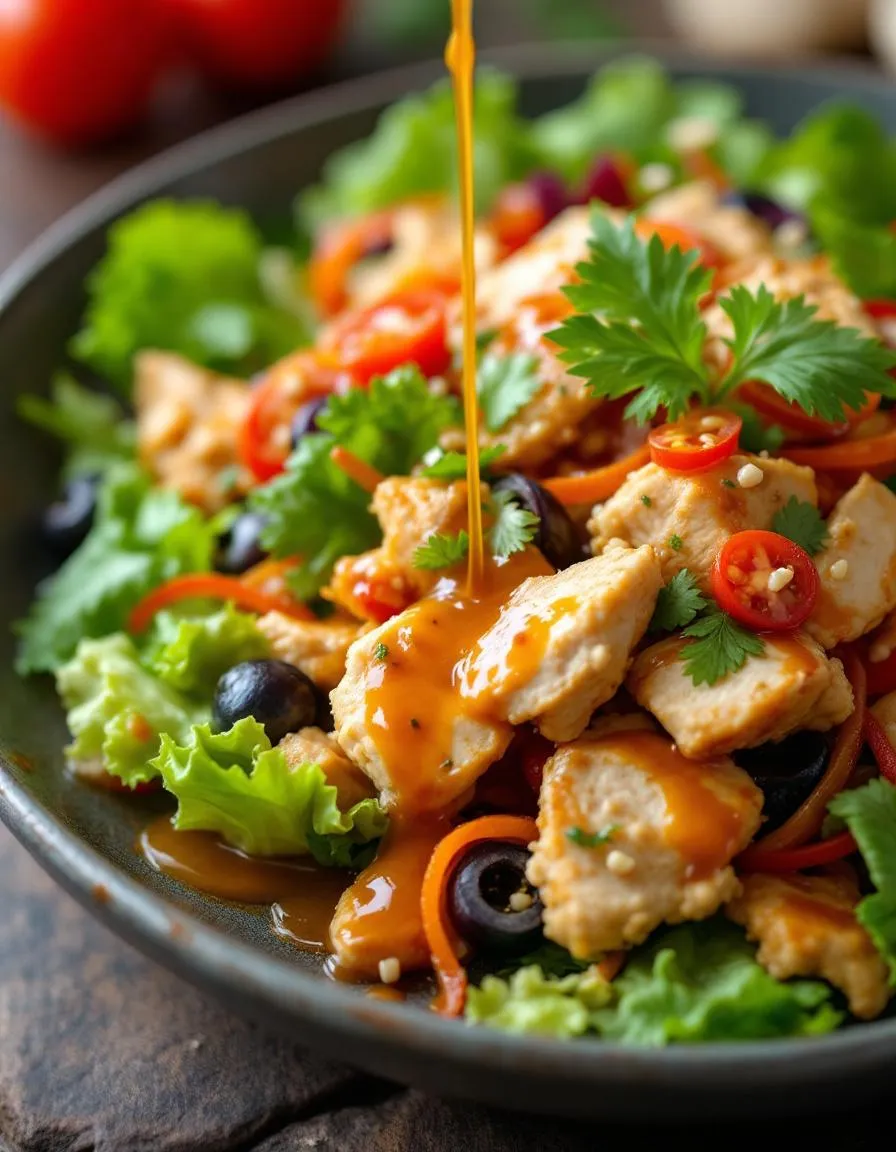
A vibrant and crunchy salad with tender chicken, crisp vegetables, and a tangy Asian-inspired dressing.
Ingredients
Scale
For the Crust:
2 cups cooked chicken, shredded
4 cups mixed greens (romaine, cabbage, spinach)
1 cup shredded carrots
1 red bell pepper, thinly sliced
1/2 cup sliced almonds
1/4 cup chopped cilantro
2 green onions, sliced
1/4 cup soy sauce
2 tbsp honey
1 tbsp rice vinegar
1 tsp sesame oil
1 clove garlic, minced
1 tsp grated ginger
Instructions
1. Prepare the Crust:
In a large bowl, combine the mixed greens, shredded chicken, carrots, bell pepper, almonds, cilantro, and green onions.
In a small bowl, whisk together the soy sauce, honey, rice vinegar, sesame oil, garlic, and ginger to make the dressing.
Drizzle the dressing over the salad and toss gently to combine. Serve immediately.
Notes
You can customize the seasonings to taste.
How to Prepare This Dish
Steps and time-saving tips
Start by prepping your ingredients for the Flavorful Asian Chicken Salad Recipe to save time later. Shred cooked chicken into bite-sized pieces and set aside. Then, whisk together the dressing—combine soy sauce, rice vinegar, sesame oil, honey, and a pinch of red pepper flakes in a small bowl. Meanwhile, toast the slivered almonds in a dry skillet over medium heat until golden, stirring frequently to prevent burning. Next, chop the Napa cabbage, carrots, and green onions into thin strips for the perfect crunch. Toss the shredded chicken, veggies, and toasted almonds in a large bowl. Drizzle the dressing over the salad and gently fold everything together until evenly coated. For the best flavor, let the salad chill in the fridge for at least 15 minutes before serving. If you’re short on time, use a store-bought rotisserie chicken and pre-shredded coleslaw mix to cut prep in half. Garnish with extra green onions and sesame seeds for a fresh finish.
and-learned-from">Mistakes I’ve made and learned from
When I first made the Flavorful Asian Chicken Salad Recipe, I overlooked the importance of toasting the almonds—they turned out bland and chewy instead of crisp and nutty. Now, I always toast them lightly and let them cool before adding them to the salad. Another mistake? Over-dressing the salad, which made it soggy. I learned to start with half the dressing, toss, and add more as needed. If you’re new to balancing flavors, check out my guide on perfecting salad dressings for foolproof tips. Also, don’t skip the chilling step—it’s key for letting the flavors meld, just like I discovered in my make-ahead meal prep experiments. Trust me, these small tweaks make all the difference!
Cultural Connection and Variations
Where this recipe comes from
The Flavorful Asian Chicken Salad Recipe has roots in the vibrant street food culture of Southeast Asia, where vendors toss fresh ingredients with bold dressings for a quick, satisfying meal. While the exact origin is hard to pin down, many trace its inspiration to Thai yam salads or Vietnamese goi ga, which balance sweet, sour, and spicy flavors. Families across the region often adapt the dish with local produce—think mangoes in Thailand or green papaya in Laos.
In my own kitchen, the
Flavorful Asian Chicken Salad Recipe became a weeknight staple after a trip to Bangkok, where I tasted a version with crispy shallots and lime-chili dressing. Back home, I swapped in shredded rotisserie chicken for convenience, but the spirit of the dish stayed the same. Some versions skip the chicken entirely, loading up on herbs and toasted rice powder for crunch. Others, like Japanese adaptations, might add sesame oil or swap fish sauce for soy.
How it fits in today’s cooking
Today, the Flavorful Asian Chicken Salad Recipe thrives as a go-to for busy cooks who crave bright, healthy flavors without the fuss. Meal preppers love it because it keeps well in the fridge, and fitness enthusiasts appreciate its lean protein and veggie-packed profile. For a heartier twist, some add quinoa or edamame—perfect alongside these vegetarian meal prep ideas.
It’s also a hit at potlucks and summer gatherings, where its colorful presentation steals the show. Modern twists include using leftover grilled chicken or even tossing in spiralized veggies for extra texture. Whether you serve it as a light lunch or pair it with these quick weeknight dinners, this salad bridges tradition and convenience effortlessly.
>Taste and Texture
What makes it delicious
The Flavorful Asian Chicken Salad Recipe delivers a vibrant explosion of tastes and textures in every bite. First, tender shredded chicken mingles with crisp Napa cabbage and crunchy carrots, creating a satisfying contrast. Next, a tangy-sweet sesame dressing coats each ingredient, offering a rich umami depth with hints of garlic and ginger. Meanwhile, toasted sesame seeds add a nutty aroma, while fresh cilantro brightens the dish with a herbal freshness. The Flavorful Asian Chicken Salad Recipe balances savory, sweet, and zesty flavors, making it irresistibly refreshing yet hearty.
Boosting the flavor
Elevate your Flavorful Asian Chicken Salad Recipe with a few easy tweaks. For extra heat, toss in sliced jalapeños or a drizzle of sriracha. Alternatively, swap the sesame dressing for a creamy peanut sauce to add richness. Crushed peanuts or crispy wonton strips introduce another layer of crunch. If you love bold flavors, marinate the chicken in a teriyaki glaze before shredding. Finally, a squeeze of lime just before serving enhances the brightness, making each forkful even more dynamic.
Tips for Success
Best practices for results
Always shred the chicken while it’s warm for the best texture in your Flavorful Asian Chicken Salad Recipe. Meanwhile, toast the sesame seeds lightly to enhance their nutty flavor before adding them to the dish. For maximum crispness, toss the salad with the dressing just before serving. Additionally, use fresh lime juice instead of bottled for a brighter, more vibrant taste. Finally, chill the serving bowls beforehand to keep the salad refreshingly cool.
Mistakes to avoid
Avoid overdressing the salad, as too much liquid will make the ingredients soggy. Instead, start with half the dressing and add more as needed. Many cooks also skip tasting the dressing first, which can lead to unbalanced flavors. For guidance on perfecting dressings, check out our homemade sauces guide. Another common error is using tough, overcooked chicken. For tender results, follow our poached chicken tutorial before adding it to your Flavorful Asian Chicken Salad Recipe.
Serving and Pairing Suggestions
How to serve this dish
Bring your Flavorful Asian Chicken Salad Recipe to life with vibrant presentation. First, layer the salad in a large, shallow bowl to showcase its colorful mix of crunchy veggies and tender chicken. For a restaurant-worthy touch, top it with extra sesame seeds, chopped cilantro, or a sprinkle of crispy wonton strips. Alternatively, serve it in individual mason jars for a fun, portable lunch option. This dish shines at summer picnics, potlucks, or even as a light yet satisfying weeknight dinner. If you want to impress guests, pair it with our Easy Spring Rolls for a complete Asian-inspired spread.
h-it">What goes well with it
Elevate your Flavorful Asian Chicken Salad Recipe with refreshing pairings. A chilled glass of jasmine iced tea balances the dish’s tangy-sweet dressing, while a crisp Pinot Grigio enhances its bright flavors. For heartier meals, serve it alongside steamed jasmine rice or our Garlic Ginger Noodles for extra texture. Finally, a side of spicy sriracha mayo adds a creamy kick for those who love extra heat. Each pairing highlights the salad’s versatility and keeps every bite exciting.
What dressing goes best with a Flavorful Asian Chicken Salad?
A sesame-ginger or peanut dressing pairs perfectly with a Flavorful Asian Chicken Salad Recipe. These dressings enhance the salad’s savory and tangy flavors while adding a creamy texture. For a lighter option, try a rice vinegar and soy sauce-based dressing.
ank-math-faq-item">
Can I make Flavorful Asian Chicken Salad ahead of time?
Yes, you can prepare the Flavorful Asian Chicken Salad Recipe up to a day in advance. Store the dressing separately and toss it with the salad just before serving to keep the ingredients crisp. This makes it a great option for meal prep or gatherings.
What protein alternatives work in an Asian Chicken Salad?
For a twist on the Flavorful Asian Chicken Salad Recipe, try grilled shrimp, tofu, or thinly sliced beef. These proteins absorb the Asian-inspired flavors well and maintain the salad’s texture. Adjust cooking times based on your protein choice.
How do I keep my Asian Chicken Salad from getting soggy?
To prevent sogginess in your Flavorful Asian Chicken Salad Recipe, pat dry all ingredients thoroughly and add crunchy elements like wonton strips or peanuts last. Keep the dressing separate until ready to serve, and avoid overdressing the salad.
div>
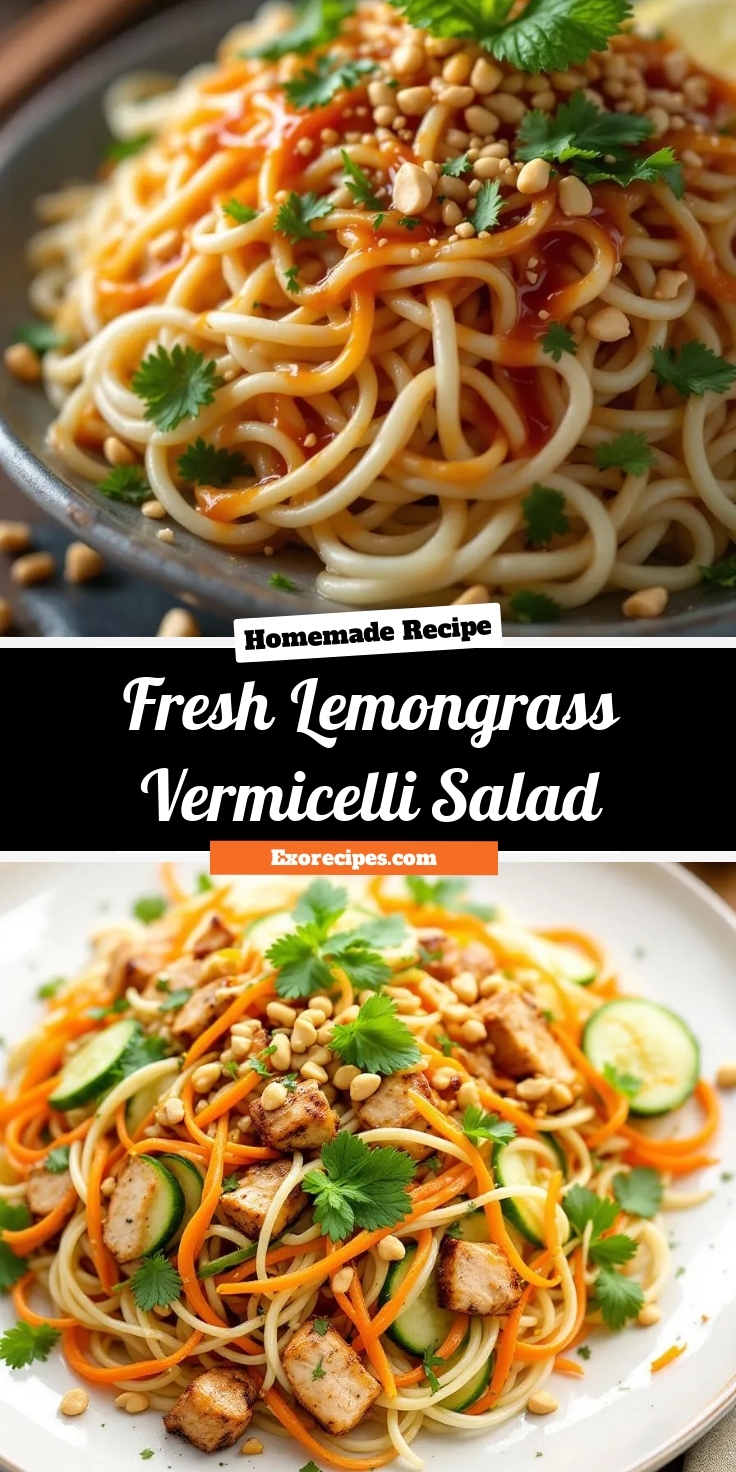
Best Fresh Lemongrass Vermicelli Salad Recipe
Introduction
There’s something magical about a dish that balances bright, zesty flavors with fresh, crunchy textures—and that’s exactly what you’ll find in this Fresh Lemongrass Vermicelli Salad. Whether you’re craving a light yet satisfying meal or a vibrant side dish to impress guests, this recipe delivers. Plus, it’s packed with herbs and vegetables that make every bite feel like a celebration of freshness. If you love dishes that are as nourishing as they are delicious, you’re in the right place.
Fresh Lemongrass Vermicelli Salad is a Vietnamese-inspired dish that combines tender rice noodles with crisp vegetables, fragrant herbs, and a tangy lemongrass dressing. Unlike heavy, calorie-laden meals, this salad feels light but still keeps you full, thanks to its balanced mix of protein, carbs, and healthy fats. It’s perfect for warm weather, meal prep, or anytime you want a burst of flavor without the guilt. What sets it apart is the lemongrass—its citrusy, slightly floral notes elevate the entire dish, making it unforgettable. If you enjoy fresh, herb-forward recipes like our Vietnamese Spring Rolls, you’ll adore this salad too.
This blog focuses on approachable, globally inspired recipes that anyone can make, and Fresh Lemongrass Vermicelli Salad fits perfectly. It’s simple enough for weeknights but impressive enough for gatherings. Plus, it’s versatile—swap ingredients based on what’s in season or what you have on hand. For more noodle-based inspiration, check out our Thai Glass Noodle Salad, another reader favorite. Whether you’re new to Vietnamese cuisine or a seasoned pro, this dish will quickly become a staple in your kitchen.
Why I Love This Recipe
I first tried Fresh Lemongrass Vermicelli Salad at a tiny family-run restaurant in Saigon, and it instantly became my go-to order. The way the lemongrass mingled with the fish sauce and lime juice hooked me, and I knew I had to recreate it at home. After countless tweaks, I landed on this version—it’s bright, herbaceous, and just as satisfying as the original. Every time I make it, I’m transported back to those bustling streets, and that’s the beauty of food. It’s not just fuel; it’s a memory, a feeling, and sometimes, a little escape.
Health and Nutrition
Why it’s good for your body
Fresh Lemongrass Vermicelli Salad packs a powerful nutritional punch while delighting your taste buds. First, the vermicelli noodles provide a light yet satisfying base, offering complex carbohydrates for steady energy. Meanwhile, the fresh herbs and vegetables deliver a burst of vitamins, especially vitamin C from the lemongrass and lime juice, which supports immunity.
Additionally, this dish includes lean protein from ingredients like shrimp or tofu, helping you stay full and maintain muscle health. The lemongrass itself brings digestive benefits, as it may soothe bloating and support gut health. Plus, the minimal use of oil keeps the dish light, making Fresh Lemongrass Vermicelli Salad a great choice for those watching their fat intake.
Finally, the vibrant mix of textures and flavors ensures you enjoy every bite without heavy sauces or excessive salt. Whether you need a post-workout meal or a refreshing lunch, Fresh Lemongrass Vermicelli Salad nourishes your body without weighing you down.
How it fits in a healthy lifestyle
Fresh Lemongrass Vermicelli Salad fits effortlessly into a balanced diet. If you follow gluten-free eating, the rice vermicelli makes it a safe and delicious option. For heart-healthy goals, the dish relies on fresh ingredients and lean proteins, avoiding processed additives. It’s also perfect for meal prep, as the flavors deepen when stored, making healthy eating convenient.
Pair this salad with other nutrient-dense dishes like our Grilled Lemongrass Chicken for extra protein, or enjoy it alongside our Vietnamese Spring Rolls for a light yet satisfying spread. Whether you’re fueling a busy day or winding down with a wholesome dinner, Fresh Lemongrass Vermicelli Salad keeps your health goals on track.
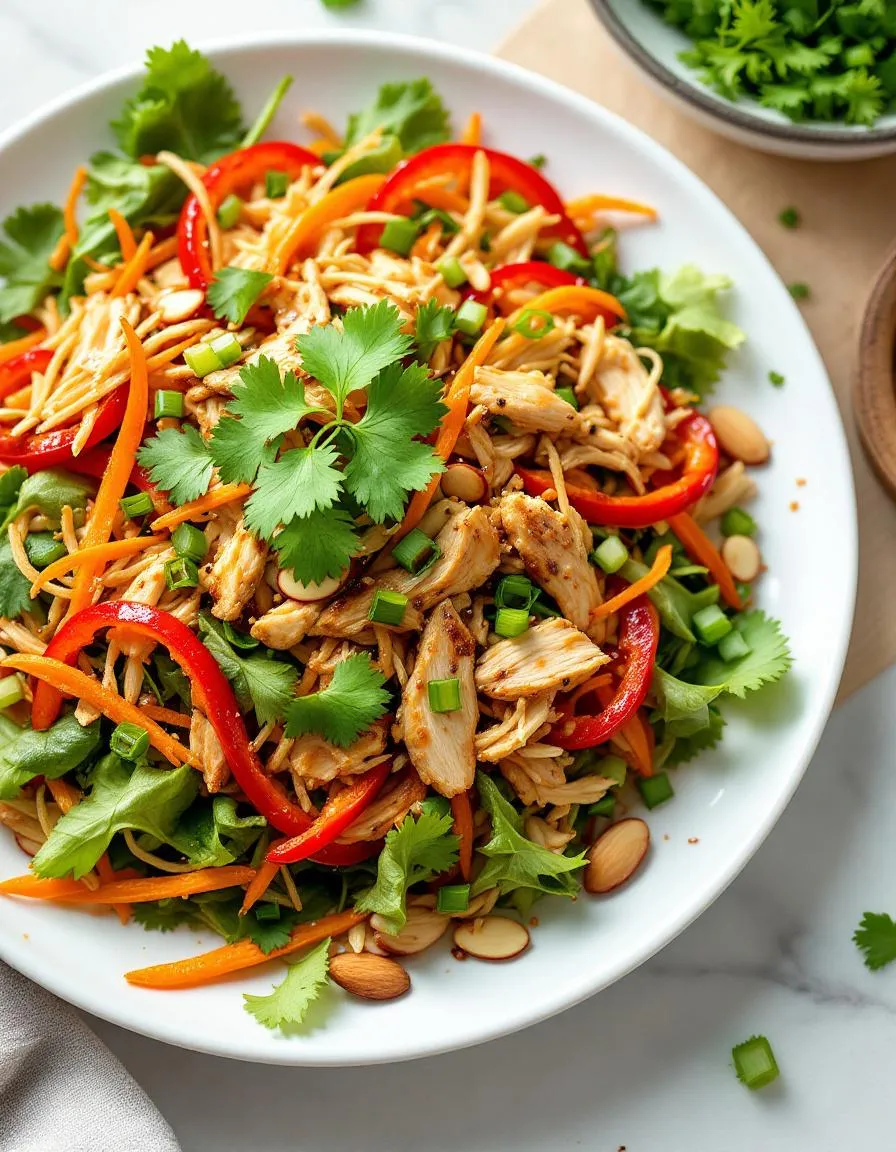
A refreshing and aromatic Vietnamese-inspired salad with vermicelli noodles, lemongrass-marinated protein, and crisp vegetables.
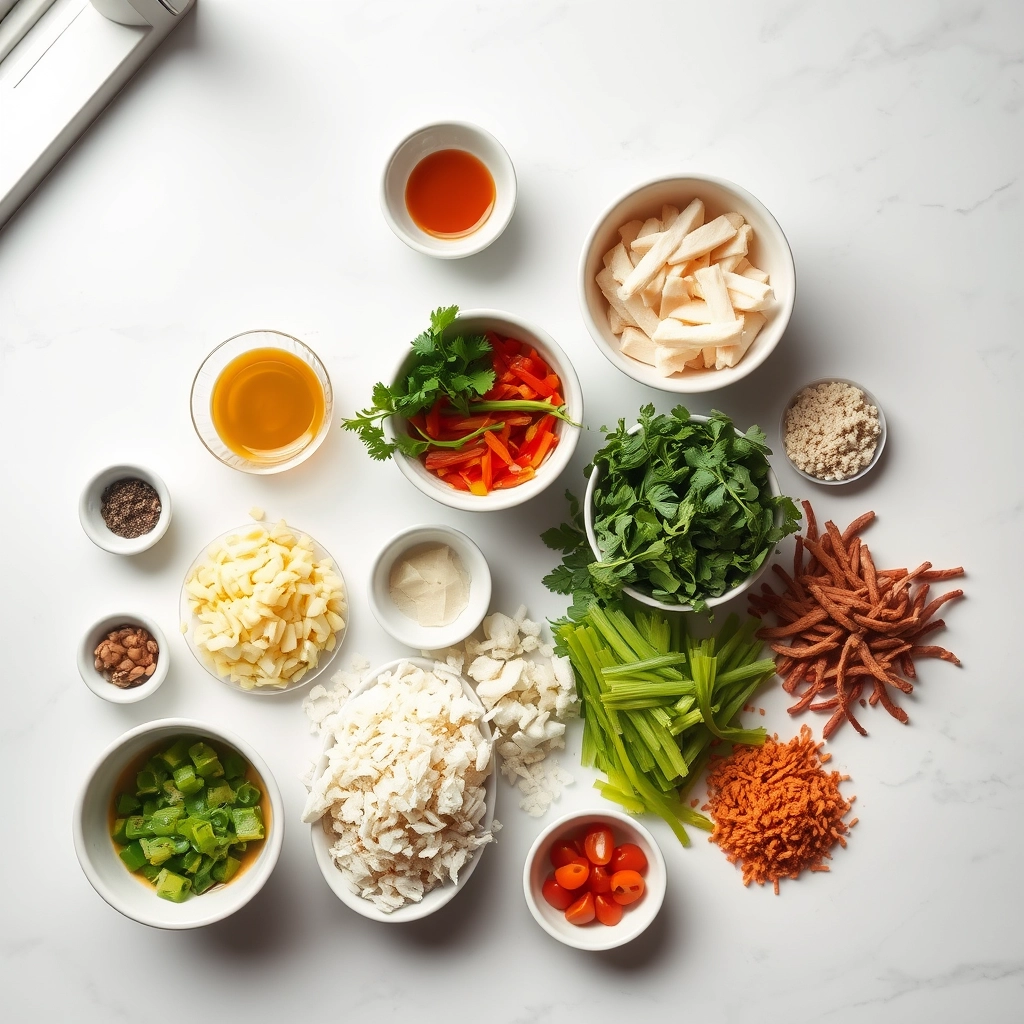
Ingredients
Scale
For the Crust:
200g rice vermicelli noodles
300g chicken breast or tofu (for vegetarian option)
2 stalks lemongrass, finely minced
2 tbsp fish sauce (or soy sauce for vegetarian)
1 tbsp sugar
1 lime, juiced
1 clove garlic, minced
1 carrot, julienned
1 cucumber, julienned
1 cup bean sprouts
1/4 cup fresh mint leaves
1/4 cup fresh cilantro leaves
2 tbsp roasted peanuts, crushed
Instructions
1. Prepare the Crust:
Cook vermicelli noodles according to package instructions, rinse with cold water, and drain well.
Slice chicken or tofu into thin strips. Marinate with lemongrass, fish sauce, sugar, lime juice, and garlic for 15 minutes.
Stir-fry marinated protein in a pan over medium heat until cooked through (about 5-7 minutes for chicken).
Assemble salad by dividing noodles among bowls. Top with cooked protein, carrot, cucumber, bean sprouts, and fresh herbs.
Garnish with crushed peanuts and serve with additional lime wedges if desired.
Notes
You can customize the seasonings to taste.
“`html
How to Prepare This Dish
Steps and time-saving tips
Start by soaking the vermicelli noodles in hot water for about 5 minutes until they soften, then drain and rinse them under cold water to stop the cooking process. Meanwhile, finely chop fresh lemongrass and toss it with shredded carrots, cucumber, and mint leaves in a large bowl. Whisk together fish sauce, lime juice, sugar, and a pinch of chili flakes for the dressing—adjust the sweetness or tang to your taste. Next, gently fold the cooled noodles into the veggie mix, then drizzle the dressing evenly over everything. For extra crunch, sprinkle roasted peanuts on top just before serving. If you’re short on time, prep the veggies and dressing the night before and store them separately; assemble the Fresh Lemongrass Vermicelli Salad right before eating to keep the noodles from getting soggy. Chilling the salad for 15 minutes before serving also helps the flavors meld beautifully.
and-learned-from">Mistakes I’ve made and learned from
I once over-soaked the vermicelli noodles, leaving them mushy and clumpy—now I set a timer for 5 minutes and test a strand early. Another time, I skipped rinsing the noodles under cold water, and they kept cooking into a sticky mess. Lesson learned: always shock them with cold water to lock in the perfect texture. If you’re new to working with lemongrass, check out my guide on chopping lemongrass to avoid tough, fibrous bits in your salad. Also, don’t drown the dish in dressing right away; start with half, toss, and add more as needed. For more balancing tricks, my post on balancing flavors in Southeast Asian dishes can help you tweak the sweet, salty, and sour notes like a pro.
“`
n-and-variations">Cultural Connection and Variations
Where this recipe comes from
Fresh Lemongrass Vermicelli Salad carries the vibrant spirit of Southeast Asia, where street vendors and home cooks alike celebrate its bright, herbaceous flavors. Originating in Vietnam, this dish often stars in summer meals, thanks to its refreshing mix of tangy lime, crisp vegetables, and fragrant lemongrass. Families might tweak the recipe by adding grilled shrimp or tofu, while some regions toss in mango or green papaya for extra sweetness. In my kitchen, I love doubling the fresh herbs—cilantro, mint, and Thai basil—to make each bite pop.
Travel further south to Thailand, and you’ll find a similar dish with bolder chili heat and crushed peanuts. Meanwhile, in Cambodia, they might swap rice noodles for thinner vermicelli or add a splash of coconut milk for richness. No matter the variation, Fresh Lemongrass Vermicelli Salad always brings people together, whether at a bustling market or a quiet family dinner. It’s a dish that adapts effortlessly, yet never loses its soul.
How it fits in today’s cooking
Today, Fresh Lemongrass Vermicelli Salad shines as a go-to for healthy, quick meals that don’t skimp on flavor. Busy cooks appreciate how easily it comes together, especially when prepping meal-prep lunches for the week. Plus, its light yet satisfying profile makes it perfect for summer picnics or as a side dish at barbecues. Many modern twists include quinoa or spiralized veggies for extra nutrition, proving this salad evolves with the times.
It’s also a star
during holidays like Lunar New Year, where its fresh ingredients symbolize prosperity and renewal. For those craving comfort food without the guilt, this dish delivers—especially when paired with flavor-packed mains. Whether you stick to tradition or experiment with new ingredients, Fresh Lemongrass Vermicelli Salad remains a timeless favorite.
Taste and Texture
What makes it delicious
Fresh Lemongrass Vermicelli Salad bursts with bright, zesty flavors and a satisfying crunch in every bite. The tangy-sweet dressing, infused with fresh lemongrass and lime, dances on your tongue while the crisp julienned vegetables add a refreshing snap. Meanwhile, the tender rice noodles soak up the fragrant, citrusy notes, creating a perfect balance of chewy and light textures. A sprinkle of toasted peanuts lends a rich, nutty contrast, making Fresh Lemongrass Vermicelli Salad an irresistible harmony of flavors and mouthfeel.
Boosting the flavor
For an extra flavor kick, try tossing in a handful of fresh herbs like Thai basil or cilantro—their aromatic punch elevates the dish instantly. Alternatively, drizzle a spicy-sweet chili garlic sauce for a bold twist. If you love texture, crispy shallots or pickled carrots add a delightful crunch. For more inspiration, explore our guide to perfect herb pairings or discover how to craft a homemade chili garlic sauce. With these tweaks, Fresh Lemongrass Vermicelli Salad becomes even more unforgettable.
Always soak the vermicelli noodles in hot water for exactly five minutes to achieve the perfect tender texture without sogginess. Meanwhile, finely chop the fresh lemongrass to release its bright, citrusy flavor evenly throughout the Fresh Lemongrass Vermicelli Salad. For maximum crispness, toss the vegetables in ice water for ten minutes before assembling. Additionally, whisk the dressing thoroughly and let it sit for at least 15 minutes so the flavors meld beautifully.
Mistakes to avoid
Overcooking the noodles is a common issue, which turns them mushy. Instead, set a timer and drain them immediately once they reach al dente texture. Another mistake is skipping the step of massaging the lemongrass with salt, which mellows its fibrous bite. For more tips on balancing bold flavors, check out our guide on balancing Asian flavors. Finally, avoid overdressing the salad—start with half the amount and add more as needed. If you’re unsure about portioning, our salad dressing ratios explain how to nail the perfect consistency every time.
g-suggestions">Serving and Pairing Suggestions
How to serve this dish
Fresh Lemongrass Vermicelli Salad shines when served in a large, shallow bowl to showcase its vibrant colors and textures. For a stunning presentation, layer the vermicelli noodles first, then arrange the fresh herbs, vegetables, and protein on top. Alternatively, serve it family-style with all the components separated, letting everyone build their own bowls. This dish works beautifully for summer picnics, light lunches, or even as a refreshing side at holiday gatherings. To elevate the visual appeal, garnish with extra lime wedges, crushed peanuts, or a sprinkle of red pepper flakes for a pop of color.
What goes well with it
Pair Fresh Lemongrass Vermicelli Salad with a crisp, citrusy white wine like Sauvignon Blanc to highlight its bright flavors. If you prefer non-alcoholic options, try a tangy passionfruit iced tea for a tropical twist. For sides, consider serving it alongside crispy spring rolls or a light cucumber salad for extra crunch. If you love bold flavors, drizzle some of our homemade peanut sauce over the top or serve it with a side of spicy chili garlic dip. For more inspiration, check out our guide to refreshing summer salads or explore our favorite Asian-inspired appetizers to complete the meal.
math-faq-block">
What are the key ingredients in Fresh Lemongrass Vermicelli Salad?
Fresh Lemongrass Vermicelli Salad typically includes rice vermicelli noodles, fresh lemongrass, herbs like mint and cilantro, crunchy vegetables, and a tangy fish sauce or lime dressing. Protein options like grilled shrimp, chicken, or tofu make it a complete meal. The lemongrass adds a bright, citrusy flavor that defines this refreshing dish.
How do you prepare lemongrass for Fresh Lemongrass Vermicelli Salad?
Trim the woody top and base of the lemongrass stalk, then peel away the tough outer layers. Thinly slice the tender inner core or pound it into a paste to release its aroma. Fresh Lemongrass Vermicelli Salad benefits from this fragrant prep, giving the dish its signature zesty kick.
Can I make Fresh Lemongrass Vermicelli Salad ahead of time?
Yes, but store components separately—assemble just before serving to keep textures crisp. The noodles, proteins, and dressing can be prepped 1-2 days ahead. Fresh Lemongrass Vermicelli Salad tastes best when the herbs and vegetables are added fresh for maximum vibrancy.
ank-math-faq-item">
Is Fresh Lemongrass Vermicelli Salad gluten-free?
Yes, if you use rice vermicelli (naturally gluten-free) and gluten-free fish sauce or tamari. Always check labels on sauces and proteins. Fresh Lemongrass Vermicelli Salad is easily adaptable for gluten-free diets while keeping its authentic Southeast Asian flavors.
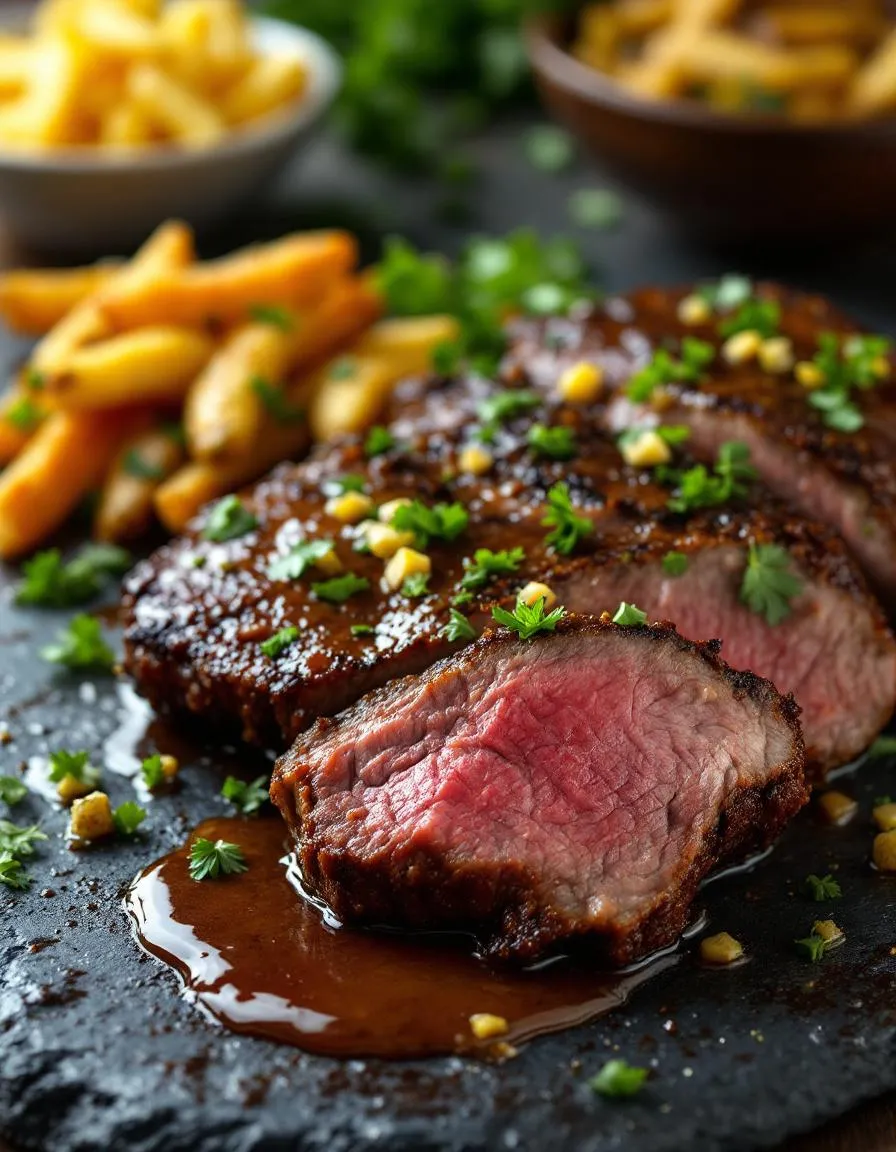
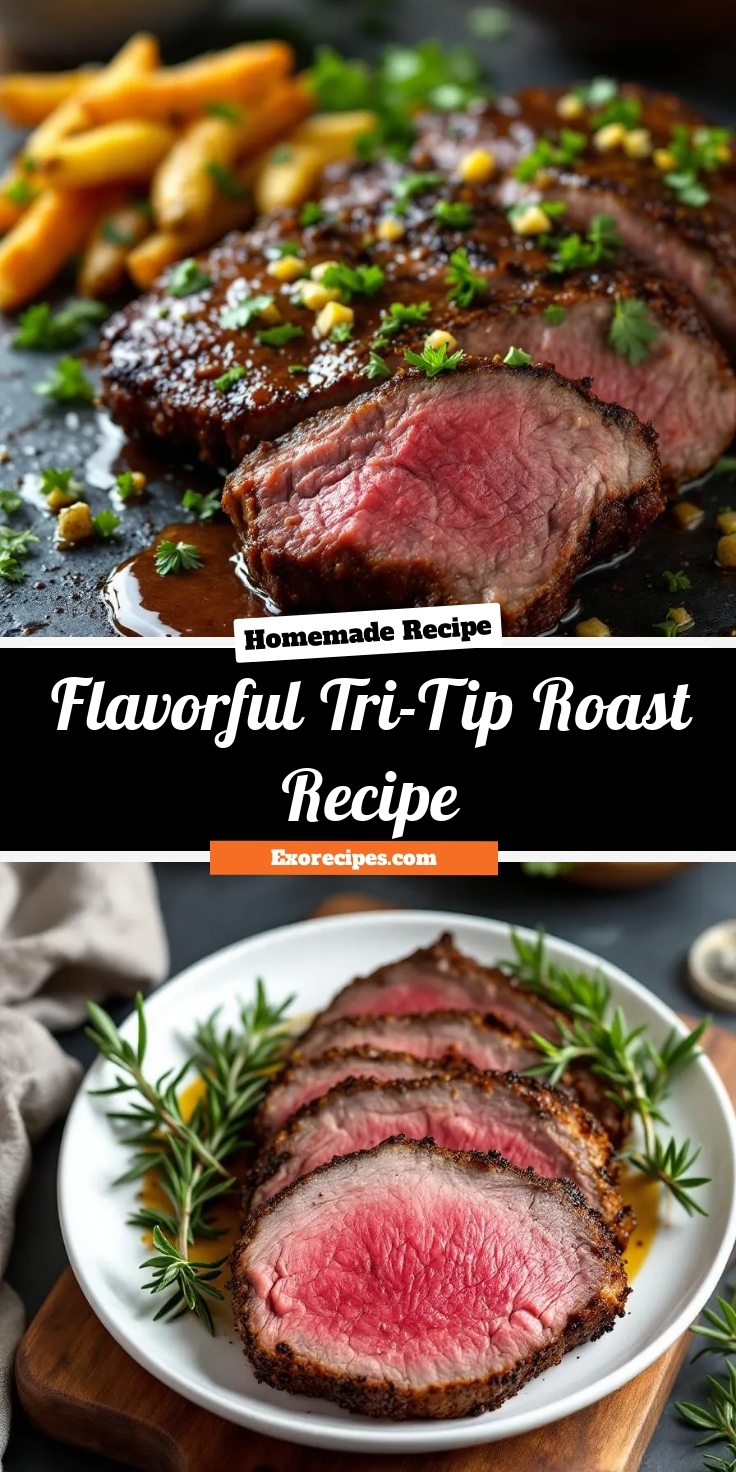
Best Flavorful Tri-Tip Roast Recipe – Juicy & Tender
Introduction
There’s something undeniably special about a perfectly cooked roast—especially when it’s a Flavorful Tri-Tip Roast Recipe that fills your kitchen with irresistible aromas. Whether you’re hosting a family dinner or simply craving a hearty meal, this dish delivers tender, juicy bites with every slice. Plus, it’s surprisingly easy to make, even for beginners. Let’s dive into why this recipe deserves a spot in your culinary rotation.
The Flavorful Tri-Tip Roast Recipe centers around a well-marbled cut of beef, seasoned to perfection and roasted until it’s melt-in-your-mouth delicious. Unlike tougher cuts, tri-tip stays remarkably tender when cooked right, making it a standout choice for weeknight dinners or weekend gatherings. What sets this recipe apart is its balance of simplicity and bold flavor. With just a handful of ingredients, you can create a dish that feels gourmet without the fuss. If you love hearty meals, you’ll appreciate how this roast pairs beautifully with sides like garlic mashed potatoes or a crisp Caesar salad.
This recipe fits perfectly with our blog’s mission: delivering approachable yet impressive dishes that anyone can master. Tri-tip roast might sound fancy, but it’s incredibly forgiving, making it ideal for cooks of all levels. Whether you’re a seasoned chef or just starting out, you’ll love how this dish rewards minimal effort with maximum flavor. Plus, leftovers (if you have any) make fantastic sandwiches or salads the next day. It’s the kind of meal that brings people together—simple, satisfying, and packed with taste.
Why I Love This Recipe
This Flavorful Tri-Tip Roast Recipe holds a special place in my heart because it reminds me of Sunday dinners with my family. My dad used to grill tri-tip for special occasions, and the smell alone would bring everyone to the table. When I started cooking it myself, I loved how effortlessly it impressed guests while still feeling like comfort food. Even now, every time I make it, I’m transported back to those cozy, laughter-filled evenings. It’s more than just a meal—it’s a tradition worth sharing.
Health and Nutrition
Why it’s good for your body
The Flavorful Tri-Tip Roast Recipe packs a nutritious punch while delivering rich, satisfying flavors. First, tri-tip roast serves as an excellent source of lean protein, which helps build muscle and keeps you full longer. Additionally, this cut of beef contains essential nutrients like iron, zinc, and B vitamins, all of which support energy levels and immune function. Since the recipe relies on simple, wholesome ingredients, you avoid unnecessary additives while still enjoying a hearty meal.
Moreover, the Flavorful Tri-Tip Roast Recipe includes herbs and spices that offer their own health perks. For example, garlic and rosemary not only enhance taste but also provide antioxidants that combat inflammation. Meanwhile, olive oil in the marinade contributes heart-healthy fats, which promote better cholesterol levels. By balancing protein, healthy fats, and natural seasonings, this dish becomes a smart choice for anyone seeking both flavor and nourishment.
Finally, the cooking method matters too. Roasting the tri-tip allows excess fat to drip away, resulting in a leaner final product. Whether you pair it with roasted vegetables or a fresh salad, the Flavorful Tri-Tip Roast Recipe fits seamlessly into a nutrient-dense diet. With every bite, you get a satisfying meal that fuels your body without compromising on taste.
How it fits in a healthy lifestyle
The Flavorful Tri-Tip Roast Recipe aligns perfectly with balanced eating habits, whether you focus on high-protein meals, heart-healthy choices, or gluten-free diets. Since tri-tip is naturally low in carbs and free of gluten, it works well for those managing dietary restrictions. Pair it with fiber-rich sides like quinoa or roasted Brussels sprouts for a well-rounded plate that keeps you energized.
If you follow a high-protein diet for fitness goals, this recipe delivers plenty of muscle-building amino acids without excessive calories. For heart-conscious eaters, the lean cut and olive oil marinade support cardiovascular health. Plus, the simplicity of the Flavorful Tri-Tip Roast Recipe makes it easy to prepare on busy weeknights, helping you stick to wholesome meals even when time is tight. For more protein-packed ideas, check out our high-protein meal prep guide, or explore gluten-free dinner ideas to keep your meals varied and exciting.
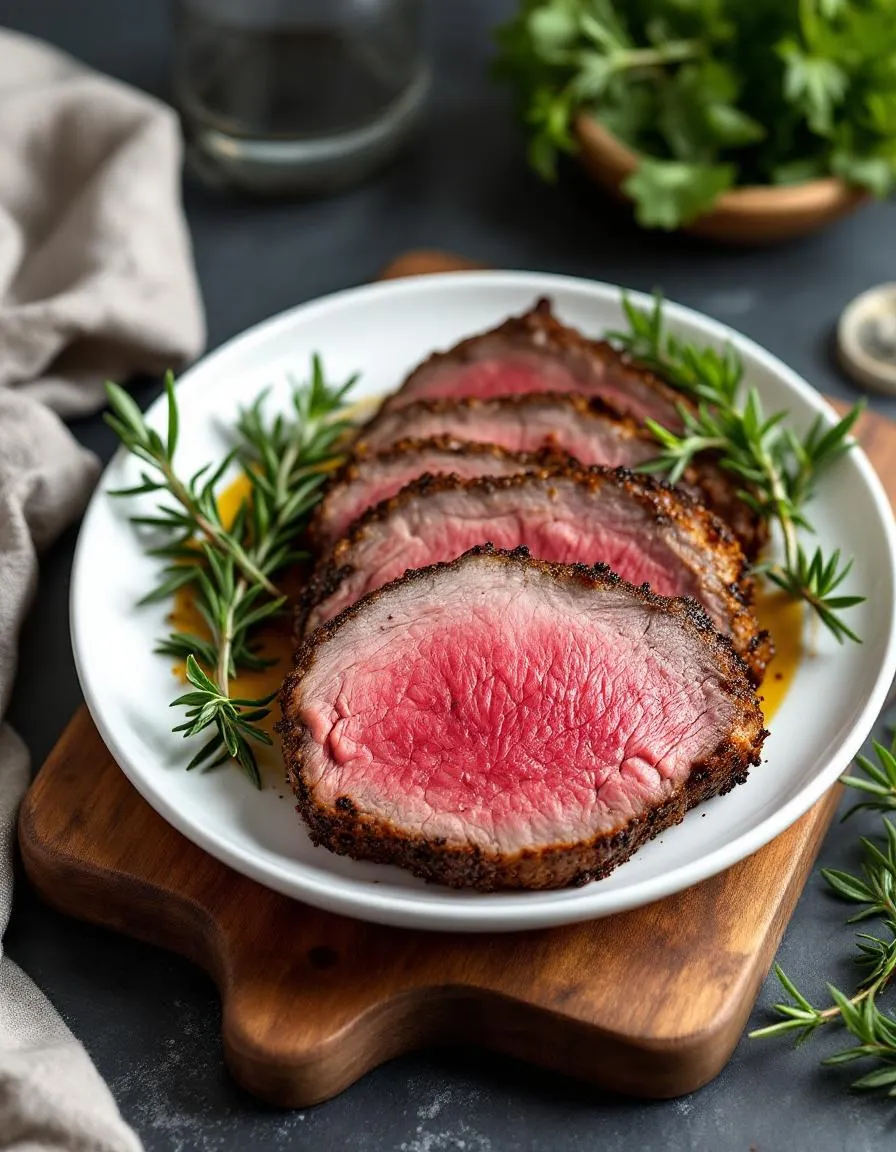
A juicy and flavorful tri-tip roast seasoned with a savory spice blend and roasted to perfection.
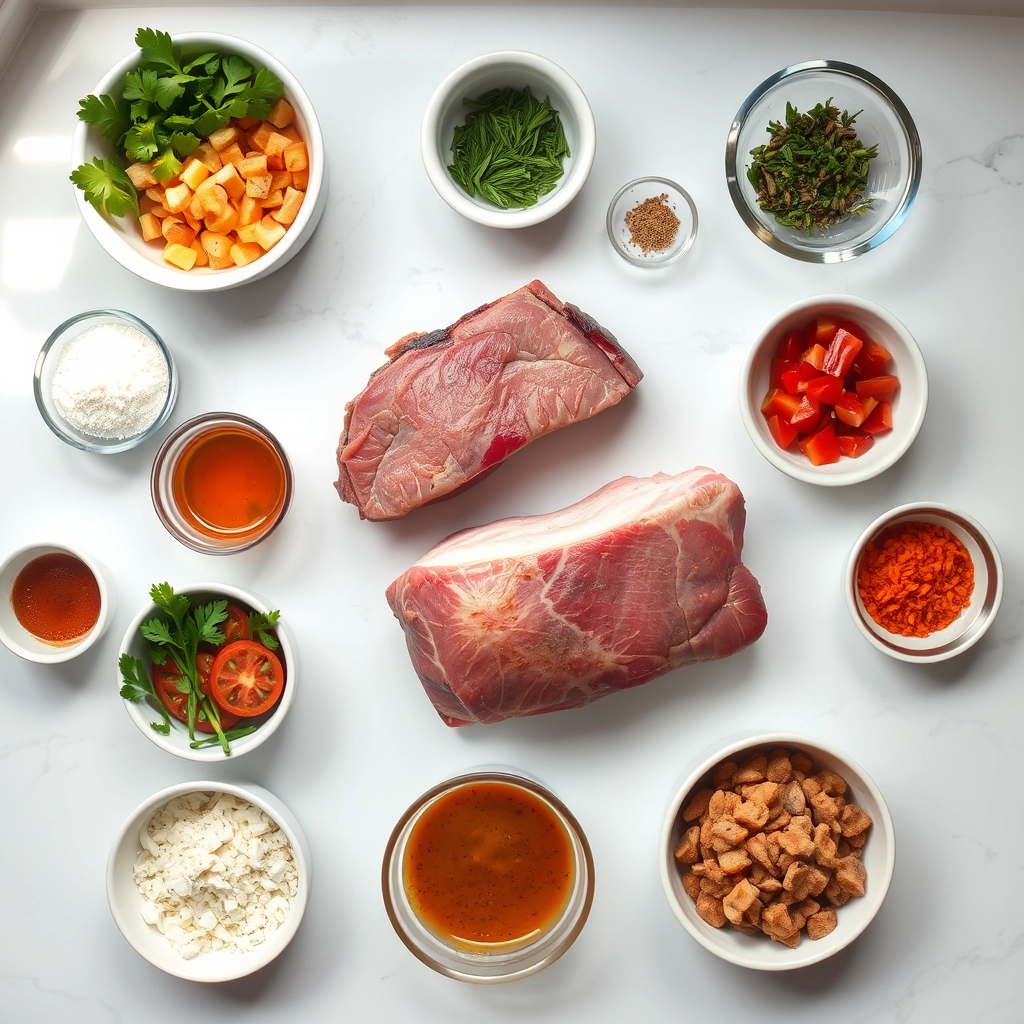
Ingredients
Scale
For the Crust:
2.5 lb tri-tip roast
2 tbsp olive oil
1 tbsp kosher salt
1 tbsp black pepper
1 tbsp garlic powder
1 tbsp onion powder
1 tbsp smoked paprika
1 tsp dried rosemary
1 tsp dried thyme
Instructions
1. Prepare the Crust:
Preheat oven to 425°F (220°C).
In a small bowl, mix together salt, pepper, garlic powder, onion powder, smoked paprika, rosemary, and thyme.
Rub the tri-tip roast with olive oil, then coat evenly with the spice mixture.
Place the roast on a rack in a roasting pan and roast for 15 minutes.
Reduce oven temperature to 350°F (175°C) and continue roasting for 20-25 minutes, or until internal temperature reaches 135°F (57°C) for medium-rare.
Remove from oven, tent with foil, and let rest for 10 minutes before slicing against the grain.
Notes
You can customize the seasonings to taste.
“`html
How to Prepare This Dish
Steps and time-saving tips
Start by preheating your oven to 425°F to ensure it reaches the right temperature while you prep the Flavorful Tri-Tip Roast Recipe. Pat the tri-tip dry with paper towels, then generously season it with salt, pepper, and your favorite herbs. Meanwhile, heat a cast-iron skillet over medium-high heat and drizzle in a bit of oil. Sear the roast for 3-4 minutes per side until it develops a rich, golden crust. Transfer the skillet directly to the oven and roast for 15-20 minutes, or until the internal temperature hits 135°F for medium-rare. Let the meat rest for 10 minutes before slicing against the grain. For a time-saving tip, prep your seasoning mix ahead and store it in an airtight container. If you’re short on time, use a meat thermometer to avoid overcooking and ensure perfect results every time.
and-learned-from">Mistakes I’ve made and learned from
I once rushed the searing process for my Flavorful Tri-Tip Roast Recipe, and the lack of a proper crust left the meat tasting bland. Now, I always pat the roast dry and get the skillet smoking hot before adding it. Another mistake? Skipping the rest time. Slicing too soon let all those precious juices escape, leaving the meat dry. Trust me, those 10 minutes make all the difference. If you’re new to cooking roasts, check out my guide on perfect sear techniques to avoid these pitfalls. Also, if you’re unsure about seasoning blends, my herb pairing guide can help you nail the flavors every time.
“`
n-and-variations">Cultural Connection and Variations
Where this recipe comes from
The Flavorful Tri-Tip Roast Recipe has deep roots in California’s Central Coast, where ranchers and pitmasters perfected this cut over open flames. Originally a humble butcher’s secret, tri-tip gained fame in the 1950s thanks to Santa Maria-style barbecue, where cooks seasoned it simply with salt, pepper, and garlic before slow-grilling over red oak. Today, families across the U.S. put their own spin on it—some marinate it in bold spices like chimichurri, while others, like my Texan cousins, smoke it low and slow with a sweet-and-smoky rub.
Meanwhile, in Argentina, they might swap the roast for flank steak but keep the communal spirit alive with asado gatherings. In Brazil, picanha (a similar cut) stars in churrascarias, sliced thin and served with farofa. Even at home, the Flavorful Tri-Tip Roast Recipe adapts easily. My aunt adds coffee grounds to her rub for depth, while a neighbor swears by a citrusy mojo marinade. Whether it’s a weekend cookout or a holiday centerpiece, this dish bridges traditions.
How it fits in today’s cooking
The Flavorful Tri-Tip Roast Recipe still shines in modern kitchens because it’s versatile and crowd-pleasing. Busy cooks love it for meal prep—sliced thin, it elevates grain bowls or quick weeknight dinners. During holidays, it’s a lighter alternative to ham or turkey, especially when paired with seasonal sides like roasted squash or cranberry-studded salads. Plus, it’s a keto and paleo favorite, proving that comfort food can fit today’s diets.
Social media has sparke
d new twists, too. Home chefs share air-fryer versions or pair leftovers with eggs for brunch. Others, inspired by global flavors, layer it into tacos or banh mi. For more inspiration, check out these global flavor mashups. Whether you stick to tradition or experiment, the tri-tip roast stays timeless—just like the stories around the table.
Taste and Texture
What makes it delicious
The Flavorful Tri-Tip Roast Recipe delivers a bold, savory experience with every bite. Juicy and tender, the meat melts in your mouth, thanks to a perfect balance of marbling and slow roasting. A smoky, garlicky crust adds a satisfying crunch, while the interior stays buttery-soft. Fragrant rosemary and cracked black pepper infuse the roast with earthy warmth, and a hint of tangy Worcestershire sauce brightens the richness. When you slice into the Flavorful Tri-Tip Roast Recipe, the aroma of caramelized spices fills the air, making it impossible to resist.
Boosting the flavor
For an extra flavor kick, try rubbing the roast with a blend of smoked paprika and brown sugar before cooking. The sweetness caramelizes into a sticky, savory crust. Alternatively, serve it with a zesty chimichurri sauce or a drizzle of homemade balsamic glaze to cut through the richness. If you love heat, add a pinch of cayenne to the seasoning mix. Pair the roast with garlic herb roasted potatoes for a meal that’s hearty and harmonious. Small tweaks can elevate the Flavorful Tri-Tip Roast Recipe from great to unforgettable.
Always let your Flavorful Tri-Tip Roast Recipe rest at room temperature for 30 minutes before cooking. This ensures even cooking and juicier results. Meanwhile, preheat your oven or grill to the right temperature so the meat sears properly. For extra flavor, generously season the roast with a dry rub at least an hour ahead. Additionally, use a meat thermometer to check for doneness instead of guessing. Finally, let the roast rest for 10 minutes after cooking to lock in those delicious juices.
Mistakes to avoid
Avoid overcooking the Flavorful Tri-Tip Roast Recipe by checking the internal temperature early and often. Many cooks skip this step and end up with dry meat. Similarly, don’t slice the roast immediately after cooking—this lets all the juices escape. Instead, follow our guide on how to rest meat for perfect results every time. Another common mistake is using a dull knife, which tears the meat rather than slicing it cleanly. For tips on choosing the right tools, check out our essential kitchen knives article.
g-suggestions">Serving and Pairing Suggestions
How to serve this dish
Slice the Flavorful Tri-Tip Roast Recipe against the grain for tender, juicy pieces that showcase its rich marbling. For a stunning presentation, arrange the slices on a wooden board or platter with fresh rosemary sprigs and roasted garlic cloves. Meanwhile, this dish shines at weekend gatherings or holiday feasts, especially when paired with warm, crusty bread to soak up the juices. If you want to elevate the experience, drizzle a bit of herb-infused olive oil over the top just before serving.
What goes well with it
Pair the Flavorful Tri-Tip Roast Recipe with a bold red wine like Cabernet Sauvignon, which enhances its smoky, savory notes. For sides, try creamy garlic mashed potatoes or a crisp arugula salad with shaved Parmesan—both balance the roast’s richness perfectly. Additionally, a tangy chimichurri sauce adds a bright contrast, and you can find an easy recipe for it in our herb sauces guide. Finally, if you’re planning a full menu, our roasted vegetables make a hearty, flavorful companion.
math-faq-block">
What’s the best way to season a tri-tip roast for maximum flavor?
For a Flavorful Tri-Tip Roast Recipe, use a simple yet robust rub of kosher salt, black pepper, garlic powder, smoked paprika, and a touch of brown sugar. Let the seasoning sit on the meat for at least 30 minutes before cooking to enhance the flavors. This combination creates a perfect crust while keeping the interior juicy.
How long should I cook a tri-tip roast to keep it tender?
A Flavorful Tri-Tip Roast Recipe typically requires about 25–30 minutes per pound in a 375°F oven, or until the internal temperature reaches 135°F for medium-rare. Rest the meat for 10–15 minutes before slicing against the grain to ensure tenderness. Overcooking can make the roast tough, so use a meat thermometer for accuracy.
Can I grill a tri-tip roast instead of using the oven?
Absolutely! Grilling adds a smoky depth to your Flavorful Tri-Tip Roast Recipe. Sear the roast over high heat for 5–7 minutes per side, then move it to indirect heat and cook until it reaches 135°F internally. Let it rest before slicing to lock in the juices and flavors.
ank-math-faq-item">
What sides pair well with a tri-tip roast?
A Flavorful Tri-Tip Roast Recipe pairs beautifully with roasted vegetables, garlic mashed potatoes, or a fresh arugula salad. For a California-inspired meal, serve it with grilled asparagus and crusty bread. The rich flavors of the roast complement both hearty and light sides.
Best Creamy Vanilla Coffee Recipe – Easy & Delicious
Introduction
There’s something magical about wrapping your hands around a warm mug of coffee, especially when it’s rich, smooth, and infused with the comforting sweetness of vanilla. Whether you’re starting your morning or need an afternoon pick-me-up, this Creamy Vanilla Coffee Recipe delivers a luxurious twist on your daily brew. It’s the kind of drink that feels like a hug in a cup—simple enough for busy days yet special enough to savor slowly. If you’ve ever craved café-quality flavor without leaving home, you’re in the right place.
Creamy Vanilla Coffee Recipe combines bold coffee, velvety milk, and pure vanilla for a drink that’s both indulgent and effortless. Unlike store-bought versions packed with artificial flavors, this recipe lets you control the ingredients, ensuring a fresher, richer taste. For coffee lovers, it’s a game-changer—elevating your routine cup into something worthy of a slow sip. Plus, it pairs perfectly with breakfast pastries or a quiet moment alone. If you enjoy our Homemade Caramel Latte, you’ll adore this vanilla variation. It fits right into our blog’s mission: approachable recipes that feel gourmet without the fuss. Whether you’re a seasoned home barista or just learning, this recipe meets you where you are. And if you’re looking for more ways to upgrade your coffee game, our Cold Brew Techniques guide offers more inspiration.
Why I Love This Recipe
This Creamy Vanilla Coffee Recipe holds a special place in my heart because it reminds me of lazy Sunday mornings with my grandmother. She’d stir vanilla extract into her coffee, and the aroma would fill the entire kitchen. Now, every time I make it, I’m transported back to those cozy moments. Beyond nostalgia, I love how versatile it is—adjust the sweetness, swap the milk, or add a dash of cinnamon, and it’s brand new. It’s more than a drink; it’s a canvas for creativity and comfort.
Health and Nutrition
Why it’s good for your body
The Creamy Vanilla Coffee Recipe delivers more than just a delicious morning pick-me-up. First, coffee provides a natural energy boost while enhancing mental focus, thanks to its caffeine content. Additionally, when you prepare it with high-quality ingredients like almond milk or oat milk, you add essential vitamins and minerals to your drink. For example, almond milk offers calcium and vitamin E, which support bone health and skin vitality.
Moreover, the vanilla in this recipe brings its own perks. Pure vanilla extract contains antioxidants that help combat oxidative stress in the body. Since the Creamy Vanilla Coffee Recipe avoids excessive sugar, it keeps blood sugar levels stable while still satisfying your sweet tooth. Furthermore, if you opt for a dairy-free version, you make it easier to digest and suitable for lactose-sensitive individuals.
Finally, this recipe encourages mindful consumption. Instead of relying on store-bought flavored coffees packed with artificial additives, you control what goes into your cup. Whether you enjoy it hot or iced, the Creamy Vanilla Coffee Recipe fuels your day without compromising nutrition.
How it fits in a healthy lifestyle
The Creamy Vanilla Coffee Recipe fits seamlessly into a balanced diet. If you follow a gluten-free or dairy-free lifestyle, simply swap regular milk for alternatives like coconut or almond milk. For those focused on heart health, using unsweetened plant-based milk reduces saturated fat intake while keeping the drink creamy and satisfying.
Pairing this coffee with a protein-rich breakfast, like our High-Protein Pancakes, creates a well-rounded meal that keeps you full longer. Meanwhile, if you’re watching your caffeine intake, you can easily adjust the strength of the brew. For more ideas on balancing indulgences with nutrition, check out our guide to Healthy Dessert Swaps.
Ultimately, the Creamy Vanilla Coffee Recipe proves that small, intentional choices add up. Whether you savor it as a morning ritual or an afternoon treat, it complements a mindful approach to eating and drinking.
A rich and smooth vanilla-infused coffee perfect for a cozy morning or afternoon pick-me-up.
Ingredients
Scale
For the Crust:
1 cup freshly brewed coffee
1/2 cup milk
1 tbsp heavy cream
1 tsp vanilla extract
1 tbsp sugar (adjust to taste)
Whipped cream (optional)
Ground cinnamon (optional)
Instructions
1. Prepare the Crust:
Brew a fresh cup of coffee using your preferred method.
In a small saucepan, heat the milk and heavy cream over medium heat until warm but not boiling.
Stir in the vanilla extract and sugar until fully dissolved.
Pour the warm milk mixture into the brewed coffee and stir well.
Top with whipped cream and a sprinkle of ground cinnamon if desired.
Serve immediately and enjoy.
Notes
You can customize the seasonings to taste.
How to Prepare This Dish
Steps and time-saving tips
Start by brewing a strong cup of your favorite coffee and let it cool slightly while you gather the other ingredients. Meanwhile, warm the milk in a small saucepan over low heat, but don’t let it boil. Stir in the vanilla extract and a touch of sugar or sweetener to taste. For a richer flavor, swap regular milk for half-and-half or even a splash of heavy cream. Next, slowly pour the warm milk mixture into the coffee, whisking gently to combine everything smoothly. If you love froth, use a handheld milk frother or blend the milk for a few seconds before adding it to the coffee. To save time, prep the vanilla syrup ahead and store it in the fridge—just reheat it slightly before mixing. Finally, top your creamy vanilla coffee with a sprinkle of cinnamon or a drizzle of caramel for an extra indulgent touch. Serve immediately and enjoy the velvety smoothness.
and-learned-from">Mistakes I’ve made and learned from
When I first tried making this creamy vanilla coffee recipe, I rushed the brewing process and ended up with weak coffee that got lost in the milk. Now, I always use a bold brew or even a double shot of espresso for a stronger base. Another mistake? Overheating the milk, which made it taste scalded instead of sweet and creamy. A kitchen thermometer helps, but if you don’t have one, heat the milk just until tiny bubbles form around the edges. For more tips on perfecting coffee drinks, check out my guide on common coffee brewing mistakes. And if you’re experimenting with flavors, my vanilla syrup variations post will help you customize this recipe like a pro.
Cultural Connection and Variations
Where this recipe comes from
The Creamy Vanilla Coffee Recipe whispers of cozy European cafes and bustling American breakfast tables alike. While coffee cultures vary globally, the love for a smooth, vanilla-infused cup bridges continents. In France, they might swirl in a touch of crème fraîche for extra richness, while in Mexico, a sprinkle of cinnamon often joins the mix. My grandmother, however, swore by a dash of nutmeg in her Creamy Vanilla Coffee Recipe, turning every sip into a nostalgic hug.
Across the Middle East,
cardamom pods often steep alongside coffee grounds, adding a fragrant twist. Meanwhile, in Scandinavia, they might lighten the cream with frothy milk for a breezier version. No matter the variation, the heart of this recipe remains the same: comfort in a cup. Whether you’re savoring it during a snowy morning or as an afternoon pick-me-up, the Creamy Vanilla Coffee Recipe adapts effortlessly to local tastes and traditions.
How it fits in today’s cooking
Today, the Creamy Vanilla Coffee Recipe thrives as both a ritual and a modern convenience. Busy home cooks lean on it for slow Sunday brunches or quick weekday indulgences, often pairing it with easy breakfast ideas like almond croissants or avocado toast. Thanks to plant-based trends, many now swap dairy for oat or coconut milk, proving this classic’s versatility.
It’s also a star during holidays, where spiced versions shine alongside seasonal desserts. Coffee shops worldwide reinvent it with syrups and toppings, but the homemade version keeps its charm. Whether you’re a purist or an innovator, the Creamy Vanilla Coffee Recipe fits seamlessly into today’s kitchens, blending tradition with personal flair.
>Taste and Texture
What makes it delicious
The Creamy Vanilla Coffee Recipe wraps you in warmth with its rich, velvety texture and comforting aroma. Each sip delivers a smooth, buttery mouthfeel, thanks to the lush combination of fresh cream and real vanilla extract. The coffee’s bold depth balances the sweet, floral notes of vanilla, while a hint of caramelized sugar lingers on the palate. Whether hot or iced, the Creamy Vanilla Coffee Recipe feels indulgent yet perfectly balanced—like a dessert in a cup.
Boosting the flavor
Elevate your Creamy Vanilla Coffee Recipe by stirring in a dash of cinnamon or nutmeg for a cozy spice kick. For extra richness, swap regular cream with homemade vanilla almond milk, adding a subtle nutty sweetness. Top with whipped cream and a sprinkle of crushed vanilla bean sugar for a decadent finish. Experiment with cold brew for a smoother, less acidic base, or drizzle caramel sauce for a dessert-worthy twist.
Tips for Success
Best practices for results
Always use freshly brewed coffee for the best flavor in your Creamy Vanilla Coffee Recipe. Meanwhile, warm your milk slightly before frothing to achieve a smooth, velvety texture. Additionally, measure your vanilla extract precisely—too much can overpower the drink. For extra richness, opt for whole milk or barista-style oat milk. Finally, stir gently after combining ingredients to maintain the perfect balance of flavors.
Mistakes to avoid
Avoid over-heating your milk, as it can scorch and ruin the creamy texture of your Creamy Vanilla Coffee Recipe. Instead, heat it just until steam rises. Also, skip artificial vanilla substitutes, which often leave a chemical aftertaste. For more frothing tips, check out our guide on how to froth milk like a pro. Another common mistake? Using stale coffee beans. Freshly ground beans make all the difference, as explained in our coffee brewing basics post.
Serving and Pairing Suggestions
How to serve this dish
Elevate your Creamy Vanilla Coffee Recipe by serving it in clear glass mugs to showcase its rich, velvety texture. For a cozy morning treat, top it with a dollop of whipped cream and a sprinkle of cinnamon or cocoa powder. Meanwhile, if you’re hosting a brunch, pair it with a side of fresh pastries for a delightful spread. During the holidays, serve it in festive mugs with a cinnamon stick stirrer for extra warmth and charm. No matter the occasion, this drink always feels indulgent.
h-it">What goes well with it
For a perfect match, enjoy your Creamy Vanilla Coffee Recipe with a slice of moist banana bread. The sweet, nutty flavors complement the coffee’s creamy vanilla notes beautifully. Alternatively, try it alongside a buttery croissant for a classic café-style breakfast. If you prefer something savory, balance the sweetness with a fluffy buttermilk biscuit. Each pairing enhances the drink’s comforting vibe, making every sip even more satisfying.
How do you make creamy vanilla coffee at home?
To make a creamy vanilla coffee recipe, brew your favorite coffee and add steamed milk, a splash of vanilla extract, and a sweetener like sugar or syrup. For extra creaminess, top it with frothed milk or whipped cream. This simple method delivers café-quality flavor in minutes.
ank-math-faq-item">
What’s the best vanilla to use for vanilla coffee?
Pure vanilla extract works best for a creamy vanilla coffee recipe because it offers rich, authentic flavor. Avoid imitation vanilla for the best results. You can also use vanilla bean paste or scrape fresh vanilla beans for an even more luxurious taste.
Can I make creamy vanilla coffee without dairy?
Yes! Substitute dairy milk with oat milk, almond milk, or coconut milk in your creamy vanilla coffee recipe. These alternatives froth well and add natural sweetness. For extra richness, try barista-style non-dairy creamers.
How many calories are in creamy vanilla coffee?
A basic creamy vanilla coffee recipe with 8 oz coffee, 1/4 cup whole milk, and 1 tsp sugar contains about 80-100 calories. Use skim milk or sugar-free syrup to reduce calories while keeping the delicious vanilla flavor.