“`html
Table of Contents
Caramelized Beef Peanut Noodles with Lime & Ginger: A Bold Weeknight Favorite – The 30-Minute Dinner That Tastes Like Pure Magic
I still remember the first time I made these caramelized beef peanut noodles. It was a Tuesday night in my tiny NYC apartment — the kind of evening where you need something fast, but your soul is craving something extraordinary. I had just come back from the Union Square Greenmarket with a bunch of fresh limes and a knob of ginger, and I thought back to the peanut sauces my mother used to make in our kitchen in Morocco. She would crush roasted peanuts by hand with garlic and a splash of lemon, then toss it with whatever protein we had. That memory met my French culinary training in Paris — where I learned the art of caramelization, the patience of a good sear — and this recipe was born. These caramelized beef peanut noodles are everything I love about cooking: fast, bold, deeply satisfying, and rooted in memory.
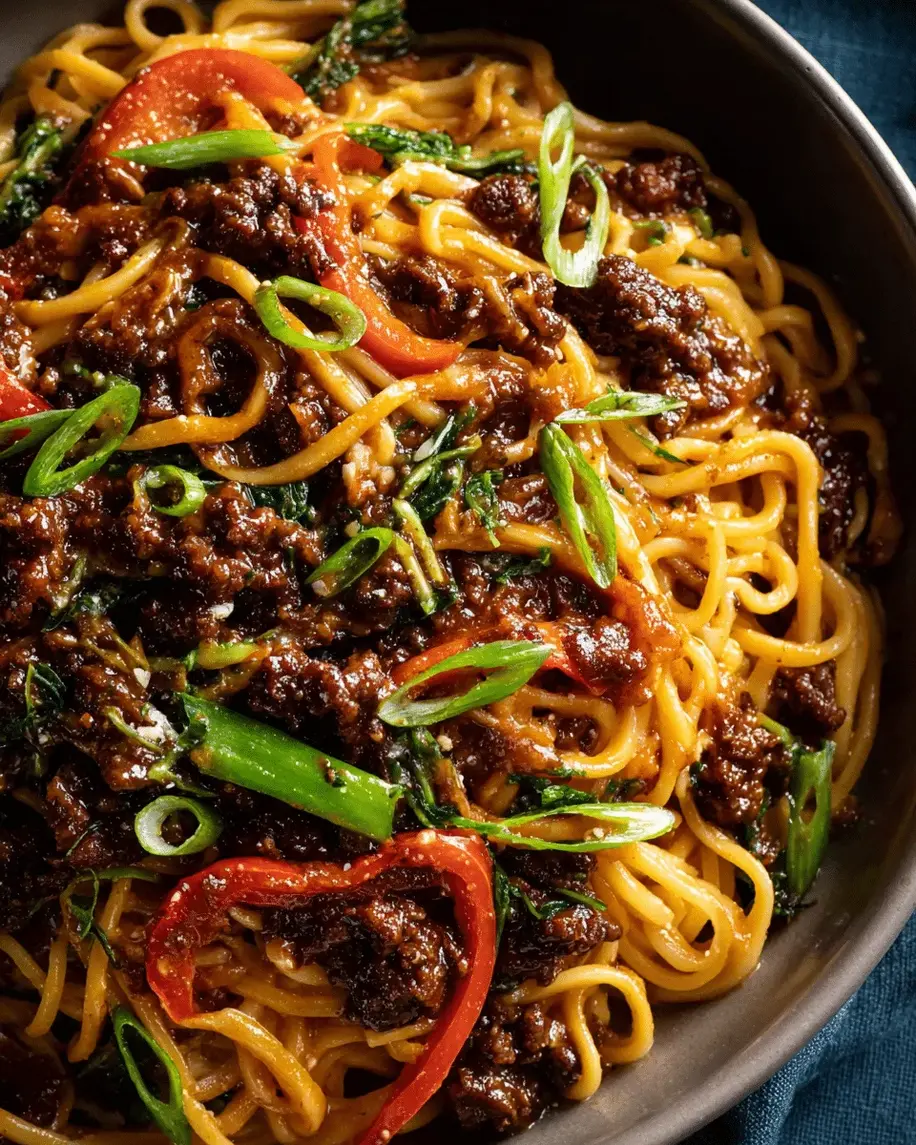
Imagine this: tender slices of flank steak, seared until the edges are dark and caramelized, then tossed with chewy rice noodles in a sauce that hits every note — savory from soy sauce, sweet from brown sugar, nutty from creamy peanut butter, bright from fresh lime, and warm from grated ginger. The aromas alone will make your kitchen feel like the best street food stall in Bangkok, the coziest bistro in Paris, and your mother’s home all at once. Each bite is a tangle of noodles and beef, coated in a glossy, rich sauce that clings to every strand. The chopped peanuts add crunch, the cilantro adds freshness, and a squeeze of lime at the end makes everything sing.
What sets my version apart is the technique: I marinate the beef briefly in a ginger-lime-soy mixture, then sear it in batches over high heat to get that deep caramelization without steaming the meat. The same pan builds the sauce — so you get all the browned bits (the fond) incorporated into the peanut sauce. It’s a 30-minute dinner that tastes like you spent an hour and a half. And I’m going to share my best pro tip for keeping the beef tender, plus a common mistake that can make the sauce clumpy. Let’s get cooking.
Why This Caramelized Beef Peanut Noodles Recipe Is the Best
The flavor secret is in the layering. Most peanut noodle recipes throw everything into one bowl and call it a day. But I use a two-step caramelization process: first, the beef gets a quick marinade with soy, brown sugar, fish sauce, lime, ginger, and garlic — those sugars are key for the sear. Then I cook the beef in batches over high heat, letting it develop a dark, almost sticky crust. That caramelized exterior is pure umami. The peanut sauce, made separately with creamy peanut butter and hot water, gets whisked into the same pan with the reserved marinade. The result is a sauce that’s complex, balanced, and deeply savory — not just sweet and nutty.
Perfected texture is everything in a noodle dish, and I’ve tested this with five different noodle types. The best are flat rice noodles (the kind you’d use for pad see ew) or fresh ramen noodles. They’re sturdy enough to hold up to the sauce without turning mushy. I also rinse the cooked noodles under cold water to stop the cooking and remove excess starch — that way they stay chewy and separate, not clumpy. When you toss them with the sauce and beef, every strand is evenly coated. No dry bites, no gloppy patches.
Foolproof and fast — this recipe comes together in 30 minutes from start to finish, and it’s forgiving enough for a beginner. The biggest risk? Overcooking the beef. But I’m going to show you exactly how to avoid that. Whether you’re cooking for your family on a busy weeknight or impressing a date with minimal effort, these caramelized beef peanut noodles deliver restaurant-quality results with home-cooked heart.
Caramelized Beef Peanut Noodles Ingredients
I love sourcing ingredients for this dish. The ginger and limes come from the farmers market near my apartment in Brooklyn — I can practically smell them from a block away. The peanut butter I use is the natural kind, no added sugar, from the bulk bins at my local co-op. And the fish sauce? That’s the brand I discovered in Chinatown years ago, and I’ve never switched. Each ingredient plays a role, and I want you to feel confident picking them out at your local grocery store.
Ingredients List
- 8 oz (225 g) dried rice noodles or ramen noodles
- 1 lb (450 g) flank steak or sirloin, thinly sliced against the grain
- 3 tablespoons soy sauce
- 2 tablespoons brown sugar
- 1 tablespoon fish sauce
- 2 tablespoons lime juice (from about 1 large lime)
- 1 tablespoon grated fresh ginger (from a 2-inch knob)
- 3 cloves garlic, minced
- 2 tablespoons vegetable oil
- 1/4 cup creamy peanut butter
- 1/4 cup hot water
- 2 green onions, sliced (white and green parts)
- 1/4 cup chopped peanuts (unsalted or lightly salted)
- Fresh cilantro leaves for garnish
- Lime wedges for serving
Ingredient Spotlight
Flank steak is my go-to for this dish because it’s lean, flavorful, and slices beautifully into thin strips. Look for a piece that’s deep red with even thickness. At the store, choose one that’s about 1 inch thick. If flank steak is unavailable, sirloin or skirt steak works wonderfully. The key is slicing against the grain — that means cutting perpendicular to the muscle fibers — so every bite is tender, not chewy. If you’re using a tougher cut, give it an extra 5 minutes in the marinade.
Peanut butter is the soul of the sauce. I use natural creamy peanut butter with no added sugar or hydrogenated oils. The only ingredients should be peanuts and maybe salt. If you use a sweetened commercial peanut butter, the sauce will be too sweet and may separate. For a nut-free version, sunflower seed butter or tahini are excellent substitutes — they change the flavor but keep the creamy texture. I’ve tested both, and they’re delicious in their own right.
Fresh ginger is non-negotiable in my kitchen. The dried powder won’t give you the same bright, slightly spicy warmth that fresh ginger does. Look for ginger that’s firm, smooth-skinned, and fragrant. To grate it easily, peel the skin with a spoon, then use a microplane or the small side of a box grater. One tablespoon is about a 2-inch knob. If you love ginger as much as I do, feel free to add an extra teaspoon.
Rice noodles (flat or thin) are traditional, but this recipe also works beautifully with fresh ramen noodles or even udon. The texture changes slightly — rice noodles are more delicate, while ramen is chewier. If you’re gluten-free, stick with rice noodles or gluten-free ramen. Cook them just until al dente, then rinse with cold water. That rinse is a game-changer: it stops the cooking and removes surface starch, so the noodles don’t clump together in the pan.
| Original Ingredient | Best Substitution | Flavor / Texture Impact |
|---|---|---|
| Flank steak | Sirloin, skirt steak, or chicken thighs | Sirloin is slightly leaner; chicken thighs add juiciness |
| Creamy peanut butter | Sunflower seed butter, tahini, or almond butter | Less nutty, more earthy; still creamy and rich |
| Fish sauce | Soy sauce + 1 tsp anchovy paste (optional) | Less umami depth; still savory |
| Rice noodles | Ramen, udon, or soba noodles | Ramen is chewier; soba adds earthy buckwheat flavor |
| Brown sugar | Coconut sugar, maple syrup (use 1.5 tbsp) | Coconut sugar: same caramelization; maple: thinner sauce |
How to Make Caramelized Beef Peanut Noodles — Step-by-Step
Trust me when I say this is one of those recipes that looks impressive but is secretly simple. Follow these steps, and you’ll have a restaurant-worthy dinner on the table in half an hour. I’ve added my pro tips and the most common mistakes to watch out for — learn from my years of testing!
Step 1: Cook the Noodles
Bring a large pot of water to a boil. Add the noodles and cook according to package directions until al dente — usually 4–6 minutes for rice noodles, 3–4 minutes for ramen. Drain in a colander, then rinse thoroughly with cold water to stop the cooking and remove excess starch. Shake off the excess water and set aside. Do not add oil to the noodles — the rinse is enough to keep them from sticking.
💡 mia’s Pro Tip: Rinse the noodles with cold water until they feel cool to the touch. Then toss them with a splash of the peanut sauce later — they’ll absorb the flavor better than if you oil them.
Step 2: Make the Marinade
In a medium bowl, whisk together the soy sauce, brown sugar, fish sauce, lime juice, grated ginger, and minced garlic until the sugar dissolves. It should smell bright, savory, and slightly sweet. Add the thinly sliced beef and toss with your hands or a spoon so every piece is coated. Let it sit at room temperature for 10 minutes — no longer, or the acid from the lime will start to cook the beef and make it tough.
⚠️ Common Mistake to Avoid: Marinating longer than 20 minutes with lime juice can make the beef mushy on the surface. Set a timer!
Step 3: Prepare the Peanut Sauce
In a small bowl, whisk together the creamy peanut butter and hot water until smooth and pourable. The hot water helps the peanut butter loosen up without separating. Set this aside. If your peanut butter is thick, add an extra tablespoon of hot water — you want a consistency similar to heavy cream.
💡 mia’s Pro Tip: Use hot tap water, not boiling. If the water is too hot, the peanut butter can seize and become grainy. Warm water (around 140°F) is perfect.
Step 4: Sear the Beef in Batches
Heat a large skillet or wok over high heat until it’s smoking hot. Add 1 tablespoon of vegetable oil. Using tongs, lift the beef from the marinade (reserve the marinade!) and lay it in a single layer in the pan. Do not overcrowd — cook in 2 or 3 batches. Sear for 2–3 minutes per side without moving the pieces, until the edges look dark and caramelized. Transfer to a plate. Repeat with remaining beef, adding more oil as needed.
⚠️ Common Mistake to Avoid: If you move the beef around too soon, it won’t develop that deep caramelized crust. Let it sit! The meat will release naturally from the pan when it’s ready.
Step 5: Build the Sauce
Reduce the heat to medium. Pour the reserved marinade into the skillet — it will sizzle and bubble immediately. Use a wooden spoon to scrape up all the browned bits from the bottom of the pan. Let it simmer for 30 seconds, then whisk in the peanut butter mixture. Stir continuously for about 1 minute, until the sauce thickens slightly and becomes glossy. If it looks too thick, add a splash of hot water.
💡 mia’s Pro Tip: The browned bits (fond) are pure flavor — they’re concentrated beef and caramelized sugar. Don’t skip scraping them up; that’s the secret to a deeply savory sauce.
Step 6: Toss Everything Together
Add the cooked noodles and the caramelized beef back to the skillet. Toss with tongs or two spoons for about 2 minutes, until everything is well coated and heated through. The sauce should cling to every strand of noodle and every piece of beef. Taste and adjust — add a squeeze of lime if you want more brightness, or a pinch of salt if needed.
⚠️ Common Mistake to Avoid: Over-tossing can break the noodles. Use a gentle folding motion instead of aggressive stirring, especially with delicate rice noodles.
Step 7: Serve Immediately
Divide among four bowls. Top each with sliced green onions, chopped peanuts, fresh cilantro leaves, and a lime wedge on the side. The garnishes add freshness, crunch, and color — don’t skip them. Serve right away while the noodles are warm and the sauce is glossy.
💡 mia’s Pro Tip: For an extra pop of flavor, sprinkle a tiny pinch of flaky sea salt on top — it balances the sweetness and makes the caramelized beef flavor even more pronounced.
| Step | Action | Duration | Key Visual Cue |
|---|---|---|---|
| 1 | Cook noodles | 4–6 min | Al dente, chewy, no hard white center |
| 2 | Marinate beef | 10 min | Beef is evenly coated; marinade is aromatic |
| 3 | Prepare peanut sauce | 30 sec | Smooth, pourable, no lumps |
| 4 | Sear beef in batches | 2–3 min per batch | Dark brown edges, caramelized crust |
| 5 | Build sauce | 1–2 min | Browned bits dissolve; sauce thickens |
| 6 | Toss noodles + beef | 2 min | Evenly coated, glossy, heated through |
| 7 | Serve with garnishes | Immediately | Bright green, crunchy, fresh |
Serving & Presentation
I love serving these caramelized beef peanut noodles in wide, shallow bowls — the kind that let the noodles and garnishes shine. Start with a generous swirl of noodles, then arrange the beef on top so the caramelized edges are visible. Sprinkle the sliced green onions, chopped peanuts, and cilantro leaves over the top in a loose, natural way — not too neat, this is comfort food. Place a lime wedge on the rim of each bowl so everyone can squeeze their own at the table.
In my NYC kitchen, I often serve this with a side of quick-pickled cucumbers or a simple Asian slaw with sesame dressing. The acidity and crunch balance the richness of the peanut sauce. If I’m feeling nostalgic for Morocco, I might add a small dish of harissa on the side — a tiny spoonful stirred into the sauce adds a smoky, spicy depth that works beautifully with the ginger and lime. For drinks, a cold beer (like a crisp lager) or a ginger-lime sparkling water is perfect.
When I’m hosting friends, I set up a garnish bar with extra peanuts, cilantro, lime wedges, sliced chili, and maybe some crispy fried shallots. Everyone customizes their own bowl. It’s interactive, it’s fun, and it always gets people talking. This dish is bold enough to stand alone but flexible enough to pair with your favorite sides.
| Pairing Type | Suggestions | Why It Works |
|---|---|---|
| Side Dish | Quick-pickled cucumbers, Asian sesame slaw, edamame | Crunchy, acidic, and refreshing — cuts through the rich sauce |
| Sauce / Dip | Extra lime wedges, chili garlic sauce, sambal oelek | Adds brightness or heat to suit personal taste |
| Beverage | Crisp lager, ginger-lime sparkling water, iced green tea | Light, effervescent, and palate-cleansing |
| Garnish | Green onions, chopped peanuts, cilantro, lime wedges, sliced chili | Adds freshness, crunch, color, and a pop of heat |
Make-Ahead, Storage & Reheating
As a busy NYC food blogger, I know the value of a recipe that works for meal prep. This one is fantastic for making ahead — the flavors actually deepen overnight as the sauce soaks into the noodles and beef. I often double the batch on Sunday and enjoy it for lunches throughout the week. Here’s how to store and reheat it properly so it stays delicious.
| Method | Container | Duration | Reheating Tip |
|---|---|---|---|
| Refrigerator | Airtight container | Up to 3 days | Reheat in a skillet over medium heat with a splash of water or lime juice to refresh the sauce |
| Freezer | Freezer-safe container or zip-top bag | Up to 1 month | Thaw in fridge overnight; reheat in skillet with a splash of water. Noodles may be softer. |
| Make-Ahead | Separate containers for noodles, beef, and sauce | Up to 2 days in advance | Assemble and toss just before serving for freshest texture |
My favorite way to reheat leftovers is in a cast-iron skillet over medium heat. Add a tablespoon of water or a squeeze of lime juice, then toss the noodles and beef until warmed through — about 3–4 minutes. The water helps rehydrate the sauce and prevents the noodles from drying out. If the sauce seems too thick, add another splash of water. Avoid the microwave if possible — it tends to make the noodles rubbery and the beef tough. But if you’re in a hurry, microwave in 30-second bursts, stirring in between, with a damp paper towel over the bowl.
One more thing: if you’re meal-prepping, store the garnishes separately. Green onions, peanuts, and cilantro should be added fresh just before serving. That way every bowl tastes as vibrant as the first one.
Variations & Easy Swaps
| Variation | Key Change | Best For | Difficulty Impact |
|---|---|---|---|
| Chicken & Coconut | Chicken thighs instead of beef; add 1/4 cup coconut milk to the sauce | Milder flavor, extra creaminess | Same — easy |
| Spicy Thai Basil | Add 1–2 Thai bird chilies (sliced) with the garlic; replace cilantro with Thai basil | Lovers of bold, spicy flavors | Same — easy |
| Vegetarian / Vegan | Replace beef with cubed firm tofu (pan-seared); use soy sauce instead of fish sauce | Plant-based dinner | Same — easy |
Chicken & Coconut Variation
This variation is inspired by the creamy coconut sauces I learned to make in Paris, but with a Moroccan warmth from a pinch of cinnamon. Use boneless, skinless chicken thighs (about 1 lb), sliced thin. Replace the beef in the marinade with the chicken. When you build the sauce, whisk in 1/4 cup of full-fat coconut milk along with the peanut butter. The coconut milk adds a luscious, silky texture that pairs beautifully with the ginger and lime. The chicken stays juicy, and the sauce becomes even more luxurious. Serve with a sprinkle of toasted coconut flakes on top for extra texture.
Spicy Thai Basil Variation
This one is for the heat seekers. When I’m craving something that really wakes up my taste buds, I add 1–2 Thai bird chilies, thinly sliced, to the pan when I cook the garlic. The chilies infuse the oil and the sauce with a fruity, lingering heat. Then I swap the cilantro for a generous handful of Thai basil — its anise-like flavor is incredible with the peanut sauce and lime. If you can’t find Thai basil, regular sweet basil works too, but the flavor will be milder. This version is my go-to when I want a bowl that’s bold, fiery, and unforgettable.
Vegetarian / Vegan Variation
I developed this version for my sister who’s been vegan for years, and it’s become one of my most-requested recipes. Replace the beef with 14 oz of extra-firm tofu, pressed for 15 minutes and cubed. Sear the tofu in the same way as the beef — it gets beautifully golden and crispy on the outside. For the marinade and sauce, use soy sauce or tamari instead of fish sauce (or use a vegan fish sauce substitute). The tofu soaks up the sauce beautifully, and the texture contrast between crispy tofu and chewy noodles is absolutely satisfying. Add extra vegetables like bell pepper strips or snap peas for more color and nutrition.
Share Your Version!
I absolutely love hearing how this recipe turns out in your kitchen. Did you go with the classic version, or did you try one of the variations? Maybe you added a twist of your own — a sprinkle of sesame seeds, a drizzle of sriracha, or a handful of crispy shallots. Drop a comment below and let me know! I read every single one, and your feedback helps me create even better recipes for you.
If you snap a photo of your caramelized beef peanut noodles, tag me on Instagram or Pinterest @exorecipes — I love seeing your beautiful bowls and sharing them with the community. And if you’re feeling extra generous, leave a star rating ⭐⭐⭐⭐⭐. It helps other home cooks find this recipe and gives my little food blog a boost. Thank you for being here, for cooking with me, and for bringing these bold flavors to your table.
From my NYC kitchen to yours — I hope this recipe brings as much warmth to your table as it does to mine. — mia 🧡
What is the best way to caramelize the beef for this noodle recipe without drying it out?
The key to caramelizing beef without drying it out is a combination of high heat, a sugar-based marinade, and batch cooking. First, slice the flank steak thinly against the grain — this shortens the muscle fibers so they stay tender. Marinate the beef for exactly 10 minutes in a mixture that includes brown sugar, soy sauce, fish sauce, lime juice, ginger, and garlic. The sugar promotes caramelization, while the acid and salt help tenderize. When you’re ready to cook, heat your skillet or wok over high heat until it’s smoking hot, then add oil. Sear the beef in a single layer without moving it for 2–3 minutes per side — this creates a deep, dark crust while the interior stays juicy. Most importantly, cook in batches. If you overcrowd the pan, the beef will steam instead of sear, and you’ll lose that caramelized texture. Let the pan reheat between batches. The total cook time per batch is only 4–6 minutes, which keeps the beef perfectly medium and tender.
Can I substitute the peanut butter with another nut butter in caramelized beef peanut noodles?
Absolutely, and I’ve tested several alternatives. Sunflower seed butter is my top recommendation for a nut-free version — it has a similar creamy texture and a mild, earthy flavor that pairs well with the ginger and lime. Tahini (sesame paste) is another excellent choice; it adds a slightly bitter, nutty depth that’s wonderful with the soy and brown sugar. Almond butter works too, but it’s thinner and less rich, so you may want to reduce the hot water by a tablespoon. Keep in mind that each substitute will change the flavor profile slightly — sunflower seed butter is the most neutral, while tahini adds a distinct sesame note. For the best results, use a creamy, unsweetened, and unsalted nut or seed butter. Avoid any brand with added sugar or hydrogenated oils, as they can make the sauce grainy or overly sweet. If your substitute is very thick, add an extra tablespoon of hot water when whisking.
How long does it take to cook this caramelized beef peanut noodles with lime and ginger?
From start to finish, this recipe takes about 30 minutes total. The prep time is 15 minutes, which includes slicing the beef, grating the ginger, mincing the garlic, juicing the lime, and measuring the other ingredients. The cook time is also about 15 minutes broken down as follows: 4–6 minutes to cook the noodles, 10 minutes to marinate the beef (this happens while the noodles cook and you prepare the sauce), 4–6 minutes to sear the beef in batches, 1–2 minutes to build the sauce, and 2 minutes to toss everything together. The active cooking time is only about 15 minutes, and the marinating happens passively. It’s one of the fastest and most rewarding weeknight dinners in my repertoire. If you prep the ingredients in advance — slice the beef, grate the ginger, and measure the sauces — the active time drops to under 20 minutes.
What type of noodles work best for caramelized beef peanut noodles with lime and ginger?
I’ve tested this recipe with five different noodle types, and my top recommendations are flat rice noodles (like the ones used for pad see ew) or fresh ramen noodles. Flat rice noodles are wide, chewy, and have a neutral flavor that lets the sauce shine — they hold up well to tossing without breaking. Fresh ramen noodles are bouncy, slightly curly, and excellent at holding onto the peanut sauce. Other good options include thin rice noodles (vermicelli-style), which are more delicate and cook faster, or udon noodles for a thicker, chewier bite. If you’re gluten-free, stick with rice noodles or gluten-free ramen. Whatever you choose, cook the noodles just until al dente, then rinse them under cold water to stop the cooking and remove excess starch. This step is crucial — it prevents the noodles from clumping together and ensures they absorb the sauce evenly.
Can I make caramelized beef peanut noodles ahead of time for meal prep?
Yes, this recipe is excellent for meal prep! The flavors actually deepen and meld together after a day in the fridge. For the best results, store the components separately: keep the cooked noodles, caramelized beef, and peanut sauce in separate airtight containers in the refrigerator for up to 3 days. When you’re ready to eat, reheat a skillet over medium heat, add a splash of water or lime juice, and toss the noodles, beef, and sauce together until warmed through — about 3–4 minutes. If you store everything together, the noodles will absorb too much sauce and become soft. Always add the garnishes (green onions, peanuts, cilantro, and lime wedges) fresh just before serving. For longer storage, you can freeze the beef and sauce together for up to 1 month, but note that the noodles will become softer upon thawing and reheating.
Can I use a different protein instead of beef in this peanut noodle recipe?
Absolutely! This recipe is very versatile when it comes to protein. My top substitutions are boneless, skinless chicken thighs (sliced thin), which stay juicy and take on the caramelization beautifully. Shrimp is another fantastic option — use large shrimp (peeled and deveined), and sear them for just 1–2 minutes per side until pink and slightly charred. For a plant-based version, extra-firm tofu is my go-to: press it for 15 minutes, cube it, and sear until golden and crispy on all sides. If you’re using chicken or tofu, the cooking time remains similar — just make sure your protein is in thin, even pieces for quick cooking. The marinade works well with any of these options, and the sauce complements them all. Adjust the cooking time based on your protein: chicken and tofu need about 3–4 minutes per batch, while shrimp needs only 1–2 minutes.
What can I use instead of fish sauce if I don’t have any on hand?
Fish sauce adds a distinct umami depth that’s hard to replicate exactly, but you can substitute it with a combination of soy sauce and a small amount of anchovy paste or Worcestershire sauce. For this recipe, use 1 tablespoon of soy sauce (or tamari for gluten-free) plus 1/2 teaspoon of anchovy paste or 1 teaspoon of Worcestershire sauce. This combination provides the savory, salty, slightly funky note that fish sauce brings. Alternatively, you can simply use an extra tablespoon of soy sauce and add a tiny pinch of sea salt — the flavor will be less complex but still delicious. If you’re cooking for someone with a fish allergy, skip the anchovy paste and use soy sauce with a few drops of lime juice and a pinch of salt. The lime and ginger are strong enough to carry the dish even without fish sauce, so don’t worry — it will still be incredibly flavorful.
How do I keep the peanut sauce from becoming too thick or clumpy?
The secret to a smooth, glossy peanut sauce is in the technique and the temperature of your ingredients. Start with creamy peanut butter that’s at room temperature — if it’s cold from the fridge, it will be harder to whisk smooth. Whisk the peanut butter with hot water (not boiling, just hot tap water around 140°F) until completely smooth before adding it to the pan. This creates a base that incorporates easily into the sauce. When you add the peanut butter mixture to the skillet, whisk continuously over medium heat — don’t let it sit still or it can separate. If the sauce becomes too thick, add a tablespoon of hot water at a time until it reaches your desired consistency. If it clumps, it’s usually because the heat was too high or the peanut butter was too cold. To fix a clumpy sauce, whisk in a splash of warm water or lime juice vigorously until smooth. The sauce should be thick enough to coat the back of a spoon but still pourable.
💬 I’d love to hear from you!
Did you try this recipe? What variation did you make? Drop a star rating ⭐⭐⭐⭐⭐ and a comment below — your feedback helps me create better recipes and helps other home cooks find this dish. Tag me on Instagram @exorecipes when you make it!
Love This Recipe? Save It to Pinterest!
If you enjoyed this Caramelized Beef Peanut Noodles with Lime & Ginger recipe, don’t let it get lost in your browser tabs! 😄 Pin it now so you can find it again anytime — and explore hundreds more tried-and-tested recipes waiting for you on my Pinterest boards.
👉 Follow mia on Pinterest @exorecipe
📌 Pin this recipe · 🔁 Re-pin your favorites · 💬 Tag me when you make it — I love seeing your creations!
“`
Print
Caramelized Beef Peanut Noodles with Lime & Ginger: A Bold Weeknight Favorite
- Prep Time: 15 minutes
- Cook Time: 15 minutes
- Total Time: 30 minutes
- Yield: 4 1x
- Method: Main Course
- Cuisine: Asian Fusion
Description
Tender caramelized beef and chewy noodles are tossed in a savory-sweet peanut sauce with fresh lime and ginger, creating a quick and flavorful weeknight dinner.
Ingredients
- 8 oz (225 g) dried rice noodles or ramen noodles
- 1 lb (450 g) flank steak or sirloin, thinly sliced against the grain
- 3 tablespoons soy sauce
- 2 tablespoons brown sugar
- 1 tablespoon fish sauce
- 2 tablespoons lime juice
- 1 tablespoon grated fresh ginger
- 3 cloves garlic, minced
- 2 tablespoons vegetable oil
- 1/4 cup creamy peanut butter
- 1/4 cup hot water
- 2 green onions, sliced
- 1/4 cup chopped peanuts
- Fresh cilantro leaves for garnish
- Lime wedges for serving
Instructions
- Cook the noodles according to package directions until al dente. Drain, rinse with cold water, and set aside.
- In a medium bowl, whisk together soy sauce, brown sugar, fish sauce, lime juice, grated ginger, and minced garlic. Add the sliced beef and toss to coat. Let marinate for 10 minutes.
- In a small bowl, whisk together peanut butter and hot water until smooth. Set aside.
- Heat a large skillet or wok over high heat. Add vegetable oil. Remove beef from marinade (reserve marinade) and sear in batches until well browned and caramelized, about 2-3 minutes per batch. Transfer to a plate.
- Reduce heat to medium. Pour the reserved marinade into the skillet and bring to a simmer. Whisk in the peanut butter mixture. Cook for 1 minute until thickened slightly.
- Add the cooked noodles and caramelized beef to the skillet. Toss everything together until well coated and heated through, about 2 minutes.
- Serve immediately topped with sliced green onions, chopped peanuts, cilantro, and lime wedges.
Notes
For extra heat, add a teaspoon of sambal oelek or chili garlic sauce to the sauce. You can substitute chicken or tofu for the beef. Leftovers keep in the refrigerator for up to 2 days.
Nutrition
- Calories: 520
- Sugar: 12 g
- Fat: 24 g
- Carbohydrates: 52 g
- Protein: 32 g

k">
Tried This Recipe? Leave a Comment!
Did you make this recipe? I’d love to hear how it turned out! Please leave a comment and a rating below. Your feedback helps other home cooks and supports cheerychop.com!
For more delicious inspiration, follow me on Pinterest!