“`html
Table of Contents
- Why Sticky BBQ Ribs Are a Crowd-Pleaser
- The Symphony of Flavors: Ingredients
- Timing is Everything: Prep, Cook, and Enjoy
- Mastering the Art: Step-by-Step Instructions
- Nutritional Snapshot
- Healthier Twists on Classic Ribs
- Perfect Pairings: Serving Suggestions
- Avoiding Pitfalls: Common Mistakes to Dodge
- Savoring the Flavor: Storing Your Ribs
- Frequently Asked Questions
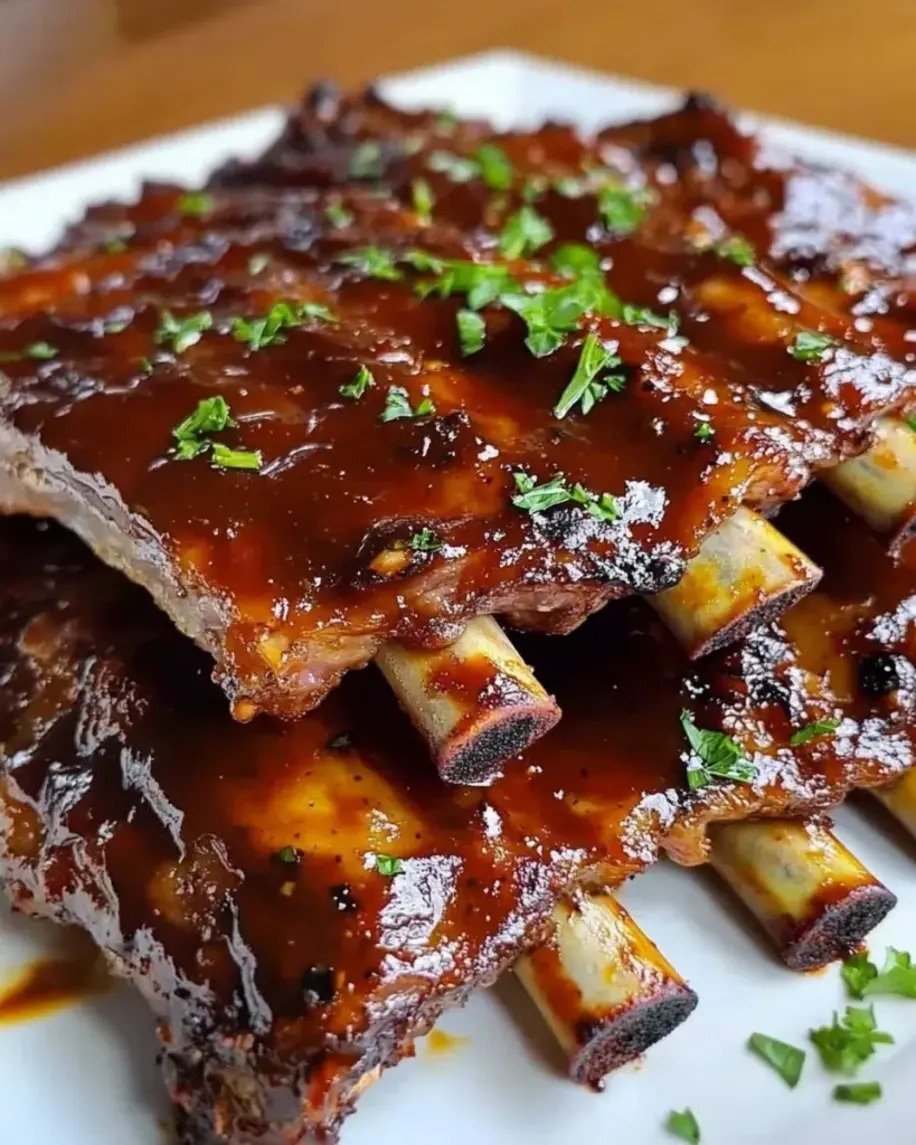
Sticky BBQ Ribs Recipe – Sweet, Smoky, and Fall-Off-the-Bone
There’s something about Sticky BBQ Ribs that screams comfort food—tender, smoky, sweet, and savory all at once. These ribs are the perfect addition to a weekend cookout or a cozy night in. Let me walk you through the steps to create this deliciously sticky, fall-off-the-bone masterpiece that will have your taste buds dancing!
Why Sticky BBQ Ribs Are a Crowd-Pleaser
Did you know that the average American consumes over 60 pounds of pork per year, with ribs being a significant contributor to that number? It’s no surprise, really. Sticky BBQ Ribs are more than just a meal; they’re an experience. The irresistible combination of a sweet and tangy glaze clinging to impossibly tender, slow-cooked meat is a culinary siren song. This recipe is designed to deliver that perfect balance of smoky depth, sweet indulgence, and a melt-in-your-mouth texture that’s simply unforgettable. Whether you’re a seasoned grill master or a novice in the kitchen, these instructions will guide you to Sticky BBQ Rib perfection.
The Symphony of Flavors: Ingredients
Crafting truly exceptional sticky BBQ ribs involves a harmonious blend of spices, a touch of sweetness, and, of course, the star of the show: the ribs themselves. Here’s what you’ll need to gather:
For the Ribs
- 2 Racks of Pork Spare Ribs or Baby Back Ribs: Look for racks that are uniformly thick and have a good amount of meat. Baby back ribs are leaner and cook faster, while spare ribs offer a richer, more marbled flavor.
- 1 tablespoon Olive Oil: This helps the dry rub adhere to the ribs.
For the Dry Rub
- 1/4 cup Brown Sugar (packed): Provides a foundational sweetness and helps with caramelization. Substitution: Coconut sugar or maple sugar for a slightly different flavor profile.
- 2 tablespoons Smoked Paprika: The backbone of smoky flavor. Substitution: Sweet paprika if smoked isn’t available, but you’ll lose some depth.
- 1 tablespoon Chili Powder: Adds a mild warmth and complexity. Substitution: A mix of ancho chili powder and a pinch of cayenne for more heat.
- 1 tablespoon Garlic Powder: Essential for that savory aroma.
- 1 teaspoon Onion Powder: Complements the garlic and adds another layer of savory goodness.
- 1 teaspoon Black Pepper (freshly ground): For a sharp, pungent kick.
- 1 teaspoon Kosher Salt: Enhances all the flavors.
- 1/2 teaspoon Cayenne Pepper (optional): For a touch of heat. Adjust to your preference.
For the Sticky BBQ Sauce
- 1.5 cups Ketchup: The rich, tomato base of our sauce. Substitution: Tomato paste mixed with a bit of water (though ketchup offers more complex flavor).
- 1/4 cup Apple Cider Vinegar: Provides tanginess to cut through the richness. Substitution: White vinegar or red wine vinegar.
- 1/4 cup Molasses: The secret to that deep, sticky sweetness and color. Substitution: Dark corn syrup, though it will alter the molasses notes.
- 2 tablespoons Worcestershire Sauce: Adds umami and a complex savory depth.
- 2 tablespoons Brown Sugar: For extra caramelized sweetness.
- 1 tablespoon Dijon Mustard: Adds a subtle zesty kick and emulsifies the sauce. Substitution: Yellow mustard, but use a bit less as it’s more pungent.
- 1 teaspoon Smoked Paprika: To echo the rub’s smoky notes.
- 1/2 teaspoon Garlic Powder: For aromatic depth.
- Pinch of Black Pepper: To finish.
Timing is Everything: Prep, Cook, and Enjoy
Compared to the average grilling time for ribs which can often exceed 5-6 hours, this recipe offers a more streamlined approach, especially if using an oven or pressure cooker while still achieving that coveted fall-off-the-bone tenderness. The key is allowing ample time for slow cooking, which renders the fat and breaks down the connective tissues, resulting in incredibly tender meat.

Mastering the Art: Step-by-Step Instructions
Let’s get cooking! Follow these steps for ribs that are guaranteed to impress.
Step 1: Prepare and Season the Ribs
Start by preparing your ribs. If your ribs have a membrane on the bone side (this is common for spare ribs), carefully remove it. You can do this by sliding a butter knife under the membrane at one end and then gripping it with a paper towel to pull it off. Pat the ribs completely dry with paper towels; this is crucial for the rub to adhere properly and for achieving a nice crust. Lightly brush the ribs with olive oil.
Step 2: Apply the Flavorful Dry Rub
In a small bowl, whisk together all the ingredients for the dry rub. Generously coat both sides of the ribs with this delicious mixture. Don’t be shy – you want a good, even layer.
Step 3: Low and Slow Cooking Method
Oven Method: Preheat your oven to 275°F (135°C). Place the seasoned ribs on a baking sheet lined with foil (for easier cleanup), bone-side down. Cover tightly with another layer of foil. Bake for 2.5 to 3 hours, or until the meat is tender and pulling away from the bone. You can test this by gently probing the meat with a fork; it should be very tender but not quite falling apart yet.
Smoker Method: If you’re using a smoker, aim for a temperature of 225-250°F (107-121°C). Smoke the ribs for 3-4 hours, or until tender. You can wrap them in foil (the “Texas crutch”) for the last hour or so if you want to speed up the process and ensure maximum tenderness.
Pressure Cooker Method: For a much faster approach, you can use a pressure cooker. Cut the ribs into manageable sections (e.g., 3-4 rib pieces). Place them on a trivet above 1 cup of liquid (water, broth, or even a bit of BBQ sauce). Cook on high pressure for about 35-45 minutes, followed by a natural release for 10-15 minutes.
Step 4: Craft the Sticky BBQ Sauce
While the ribs are cooking (or after they come out of the pressure cooker), prepare your BBQ sauce. In a medium saucepan, combine all the sauce ingredients. Bring to a simmer over medium heat, stirring occasionally. Let it simmer gently for about 10-15 minutes, or until it thickens to your desired consistency. Taste and adjust seasonings if needed.
Step 5: Glaze and Finish the Ribs
Once the ribs are tender, remove them from the oven or smoker. Drain off any excess liquid. Brush them generously with your homemade BBQ sauce. Return the ribs to the oven (uncovered) or to the grill/smoker at a higher heat (around 350-400°F or 175-200°C) for about 15-20 minutes, brushing with more sauce every 5-7 minutes. This allows the sauce to caramelize and become wonderfully sticky and slightly charred.
Step 6: Rest and Serve Your Masterpiece
Remove the glazed ribs from the heat and let them rest for about 10 minutes before slicing. This allows the juices to redistribute, ensuring moist and tender meat. Slice between the bones and serve immediately. Prepare for applause!
Nutritional Snapshot
- Calories: Approximately 450-650 per serving (depending on rib cut and amount of glaze).
- Protein: High.
- Fat: Moderate to high (can vary greatly with cut).
- Carbohydrates: Moderate (from sugars in the rub and sauce).
*Nutritional values are estimates and can vary based on ingredients and portion sizes.
Healthier Twists on Classic Ribs
- Leaner Cuts: Opt for baby back ribs, which tend to be leaner than spare ribs.
- Reduced Sugar Rub: Cut down on the brown sugar in the rub and consider using more spices like chili powder or smoked paprika for flavor.
- Homemade Sauce Control: Make your BBQ sauce from scratch using a sugar-free ketchup or tomato paste base. Substitute molasses with a small amount of date paste or a sugar-free sweetener.
- Grilling Over Baking: Grilling allows some of the fat to drip away. If baking, ensure you drain excess fat before glazing.
- Portion Control: Be mindful of serving sizes.
Perfect Pairings: Serving Suggestions
- Classic BBQ Sides: Coleslaw, potato salad, baked beans, cornbread.
- Freshness: A simple green salad or grilled corn on the cob.
- Hearty Meals: Serve alongside mashed potatoes or mac and cheese for a truly indulgent meal.
- Sandwiches: Shred the leftover meat and use it for pulled pork sandwiches!
Avoiding Pitfalls: Common Mistakes to Dodge
- Not Removing the Membrane: This tough layer can make ribs chewy.
- Cooking Too Hot and Fast: This results in tough, dry ribs instead of tender, fall-off-the-bone meat. Patience is key!
- Skipping the Rest: Allowing the ribs to rest after cooking is crucial for juicy results.
- Over-Saucing too Early: Applying the BBQ sauce too soon can cause it to burn before the ribs are fully cooked. Glaze in the final stages.
- Not Patting Dry: Water on the surface prevents the rub from sticking and inhibits crust formation.
Savoring the Flavor: Storing Your Ribs
- Refrigeration: Once cooled completely, store leftover ribs in an airtight container or wrap them tightly in plastic wrap and then foil, refrigerated for up to 3-4 days.
- Reheating: To reheat, you can gently warm them in the oven at a low temperature (around 275°F or 135°C), covered with foil, or even in a skillet with a little extra sauce. Avoid microwaving, as it can dry out the meat.
- Freezing: For longer storage, freeze portions wrapped tightly, for up to 2-3 months. Thaw overnight in the refrigerator before reheating.
Frequently Asked Questions
What are the best types of ribs for this recipe?
Both spare ribs and baby back ribs work wonderfully. Baby back ribs are leaner and cook a bit faster, while spare ribs tend to be richer and more flavorful due to higher fat content. Choose based on your preference!
Can I make the BBQ sauce ahead of time?
Absolutely! The BBQ sauce can be made up to 3 days in advance and stored in an airtight container in the refrigerator. It may thicken, so you might need to add a tablespoon or two of water or apple cider vinegar when reheating.
How do I know when my ribs are truly fall-off-the-bone tender?
The meat should pull away easily from the bone when gently nudged with a fork. You can also try the “bend test”: carefully lift a rack of ribs with tongs; if the meat cracks and shows a bend, they’re likely ready.
My BBQ sauce is too thin. How can I thicken it?
Simmer the sauce uncovered for a bit longer over low heat, stirring frequently, until it reaches your desired consistency. You can also create a slurry with 1 teaspoon of cornstarch and 1 tablespoon of cold water, stir it into the simmering sauce, and cook for another minute until thickened.
Can I use a grill instead of an oven or smoker?
Yes! You can grill ribs using indirect heat. Bank your coals or turn off one burner on a gas grill and place the ribs on the cooler side. Cook with the lid closed, aiming for a consistent temperature, and glaze in the last 30-40 minutes of cooking.
Ready to impress your friends and family with the most succulent, flavor-packed BBQ ribs? Give this recipe a try and let us know how it turns out in the comments below! We love hearing from you!

Sticky BBQ Ribs Recipe – Sweet, Smoky, and Fall-Off-the-Bone
Description
There’s something about Sticky BBQ Ribs that screams comfort food—tender, smoky, sweet, and savory all at once. These ribs are the perfect addition to a weekend cookout or a cozy night in. Let me walk you through the steps to create this deliciously sticky, fall-off-the-bone masterpiece that will have your taste buds dancing!
Ingredients
- 2racks of beef ribs????
- 1 tablespoonsalt????
- 1 tablespoonblack pepper
- 1 tablespoonsmoked paprika
- 1 teaspoongarlic powder
- 1 teaspoononion powder
- 1 cupBBQ sauce????
- 2 tablespoonshoney????
- 1 tablespoonWorcestershire sauce
- Fresh parsley????
Instructions
- Set your oven to275°F (135°C)to ensure the ribs cook low and slow.
- Remove the membrane from the back of the ribs. This step ensures the ribs are tender and the flavors seep in beautifully. Generously season both sides with salt, pepper, smoked paprika, garlic powder, and onion powder.
- Wrap each rack tightly in aluminum foil to trap moisture and keep the ribs juicy. Place the foil packets on a baking sheet and bake for2.5 to 3 hoursuntil tender.
- In a small bowl, whisk together the BBQ sauce, honey, and Worcestershire sauce. This glaze will take your ribs to the next level!
- Increase the oven temperature to400°F (200°C). Unwrap the ribs, brush them generously with the BBQ sauce mixture, and place them back in the oven uncovered. Let them bake for10-15 minutes, or until the sauce caramelizes and gets sticky.
- Sprinkle freshly chopped parsley over the ribs for a pop of color and serve warm.
“`