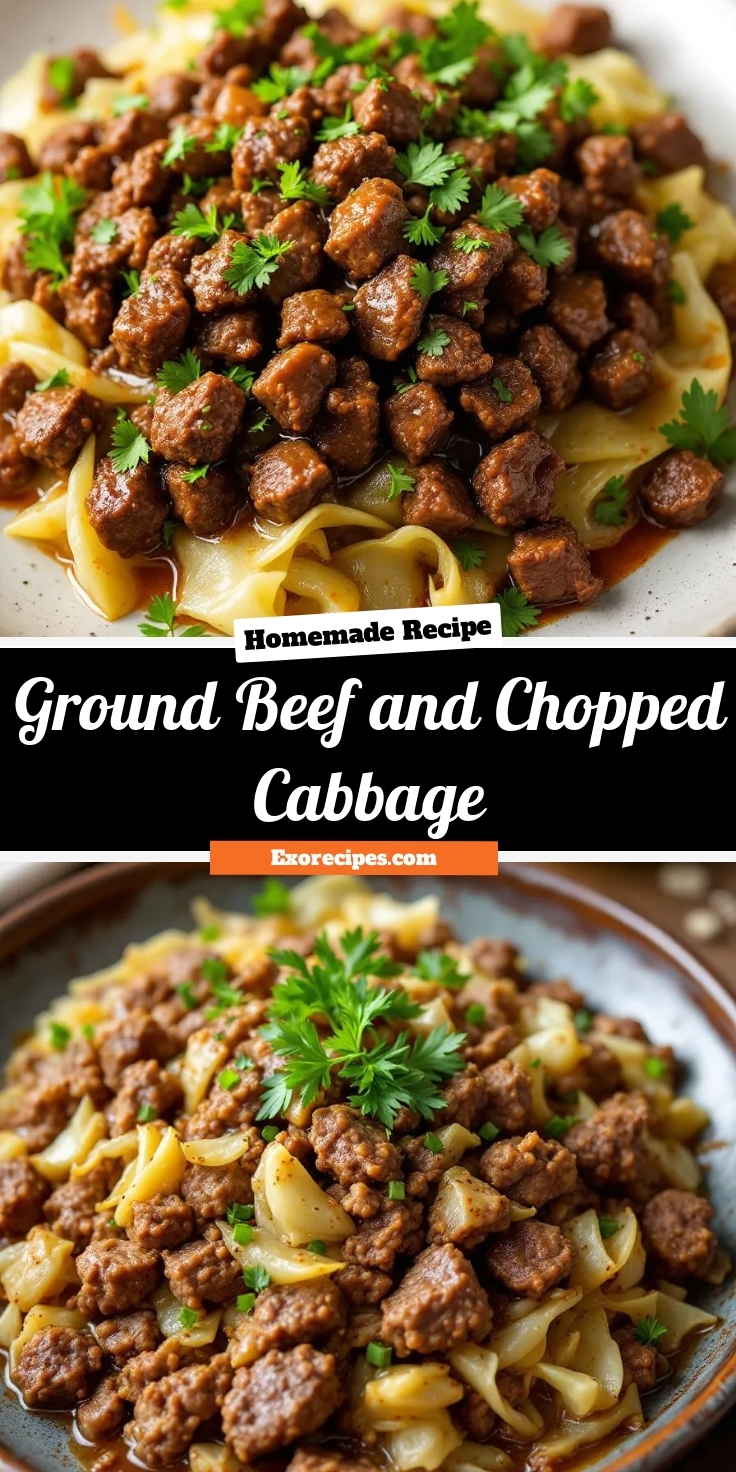
If you’re craving a hearty, comforting meal that’s both easy to make and packed with flavor, you’ve come to the right place. Ground Beef and Chopped Cabbage is one of those dishes that feels like a warm hug after a long day. Whether you’re cooking for a busy weeknight or meal prepping for the week, this recipe delivers satisfaction without the fuss. Plus, it’s a fantastic way to sneak extra veggies into your family’s diet—something I always prioritize in my healthy dinner ideas.
Ground Beef and Chopped Cabbage is a simple yet versatile dish that combines tender, savory ground beef with crisp, slightly sweet cabbage. The beauty of this recipe lies in its adaptability. You can tweak the seasonings, add a splash of soy sauce for depth, or toss in other veggies like carrots or bell peppers. Beyond its delicious taste, this dish matters because it’s budget-friendly, nutritious, and quick to prepare—perfect for home cooks who want a wholesome meal without spending hours in the kitchen. It fits the tone of brekcakes.com perfectly, where I celebrate approachable, flavorful recipes that bring joy to everyday cooking. If you love easy, one-pan meals, you’ll also appreciate my one-pan wonders collection for more stress-free dinner inspiration.
Why I Love This Recipe
Ground Beef and Chopped Cabbage holds a special place in my heart because it reminds me of my grandma’s kitchen. She used to whip it up on chilly evenings, and the aroma alone would make everyone gather around the table. What I love most is how effortlessly it comes together, yet it always feels like a comforting, home-cooked meal. Even now, whenever I make it, I’m transported back to those cozy nights filled with laughter and good food. It’s a reminder that the simplest dishes often create the fondest memories.
Health and Nutrition
Why it’s good for your body
Ground beef and chopped cabbage make a powerhouse duo for your health. First, ground beef delivers high-quality protein, which helps build and repair muscles. Additionally, it provides essential nutrients like iron, zinc, and B vitamins to keep your energy levels steady. Meanwhile, chopped cabbage brings a crisp, fiber-rich crunch that supports digestion and gut health.
Together, ground beef and chopped cabbage create a balanced meal. The cabbage adds antioxidants like vitamin C, which boosts immunity and fights inflammation. On the other hand, the ground beef offers healthy fats that help your body absorb these fat-soluble nutrients. Plus, cabbage is low in calories, making it a great way to bulk up your meal without extra carbs.
Another benefit of ground beef and chopped cabbage is their versatility. You can easily adjust the fat content of the beef to fit your dietary needs. At the same time, cabbage provides a satisfying texture while keeping the dish light. Whether you’re aiming for more protein or extra fiber, this combination delivers both in one delicious bite.
How it fits in a healthy lifestyle
Ground beef and chopped cabbage fit seamlessly into a balanced diet. If you’re following a high-protein plan, the beef gives you a solid foundation, while the cabbage keeps things fresh and fiber-packed. For gluten-free eaters, this combo is naturally safe and full of flavor.
Heart-healthy eaters will appreciate lean ground beef paired with cabbage’s cholesterol-lowering benefits. You can also meal prep this duo ahead of time for quick, nutritious dinners. Check out our meal prep guide for more time-saving ideas.
Looking for ways to spice up your routine? Try adding ground beef and chopped cabbage to stir-fries or stuffed peppers. They’re also perfect for quick healthy dinners when you need something satisfying without the hassle. No matter your goal, this pair keeps meals simple, nutritious, and delicious.
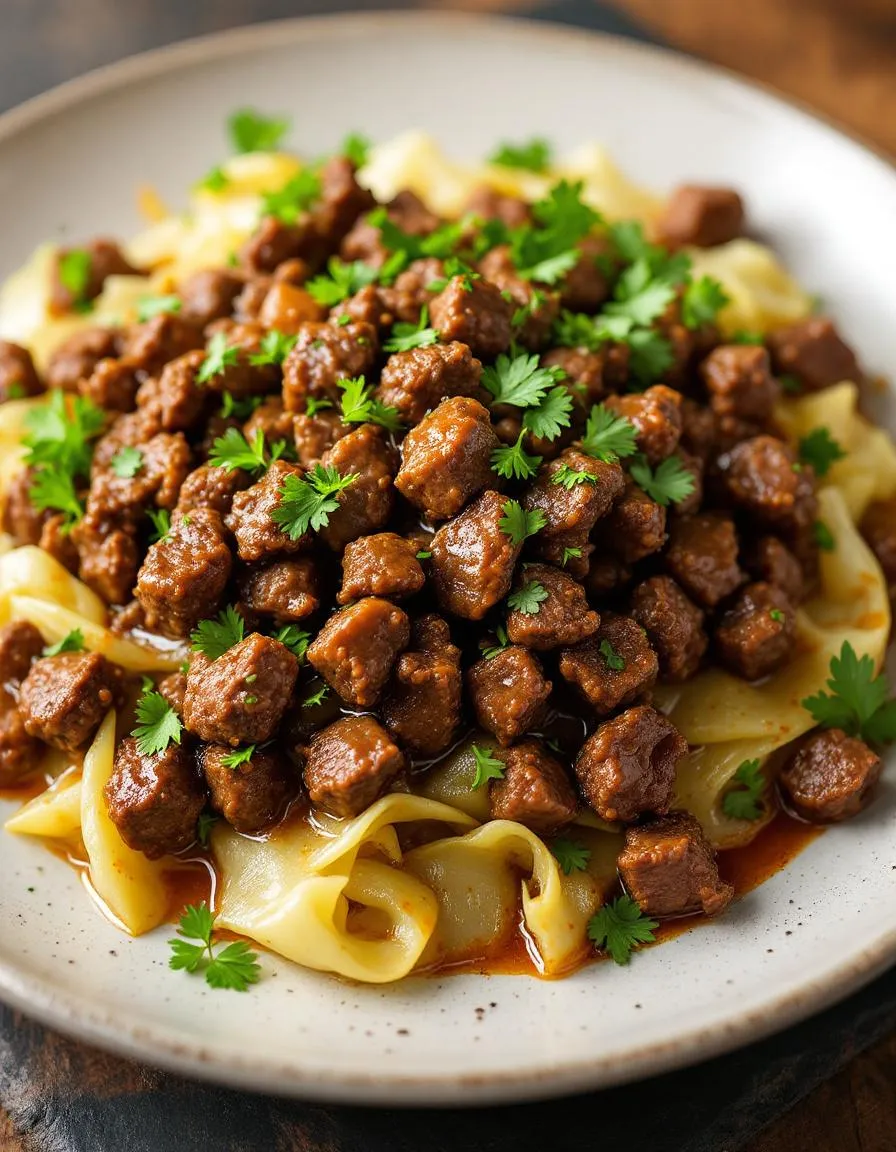
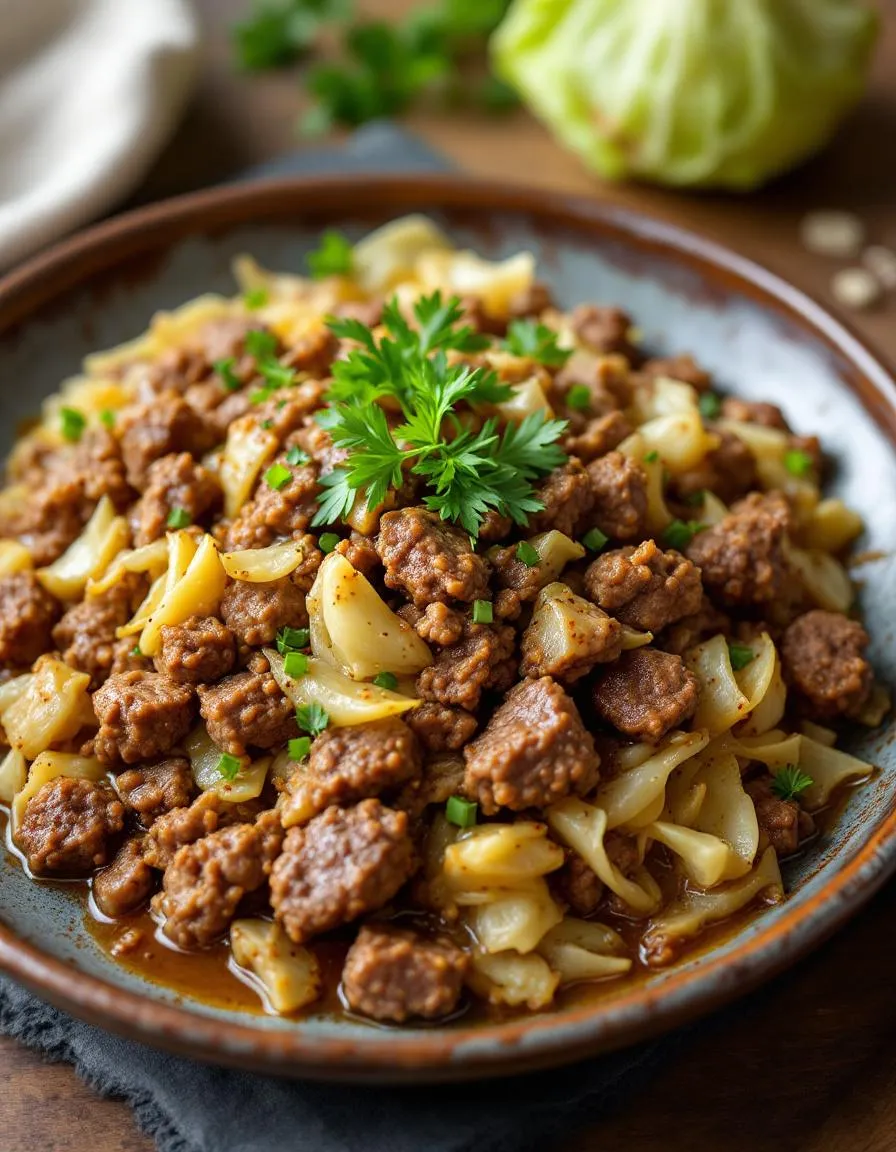
A hearty and nutritious dish combining ground beef and cabbage for a simple yet flavorful meal.
Ingredients
Scale
For the Crust:
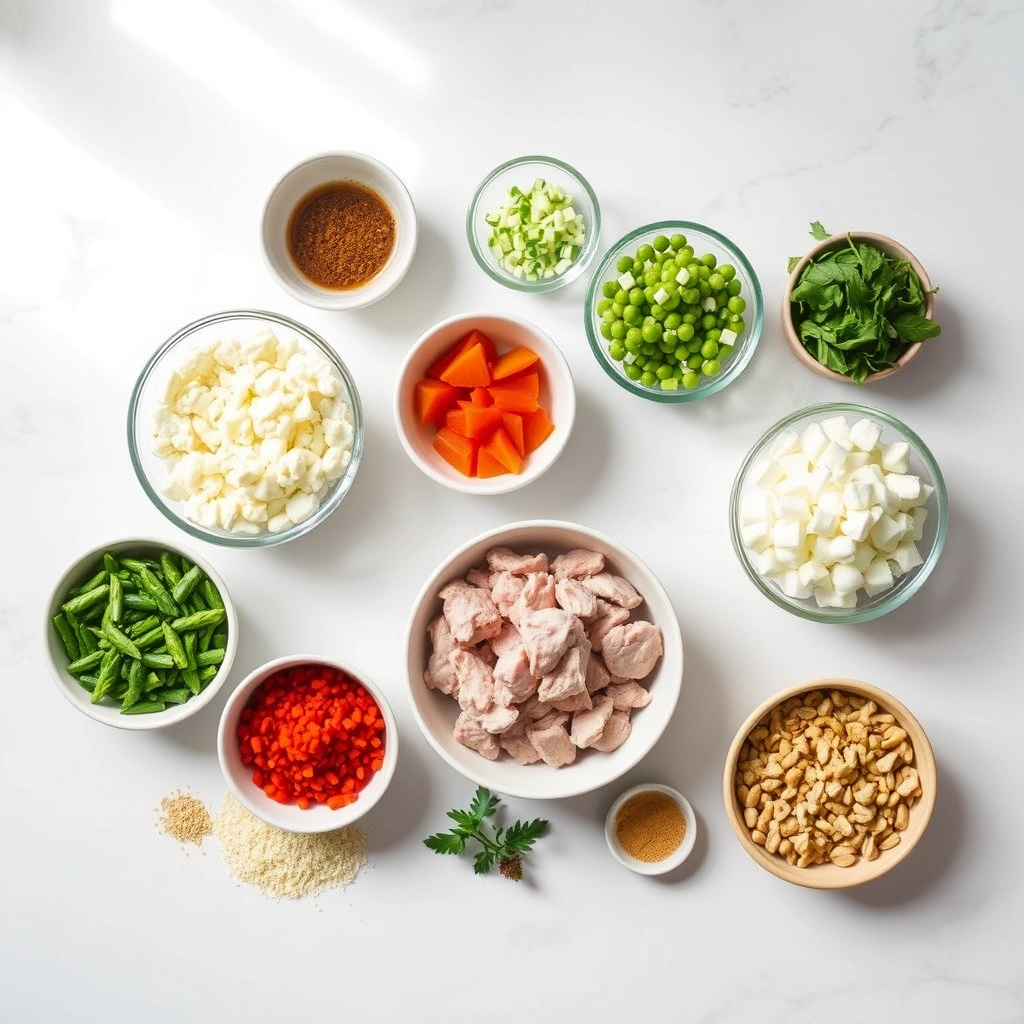
1 lb ground beef
1 medium head cabbage, chopped
1 onion, diced
2 cloves garlic, minced
1 tbsp olive oil
1 tsp salt
1/2 tsp black pepper
1 tsp paprika
1/2 tsp cumin
Instructions
1. Prepare the Crust:
Heat olive oil in a large skillet over medium heat.
Add diced onion and minced garlic, sauté until fragrant and translucent.
Add ground beef to the skillet, breaking it up with a spoon, and cook until browned.
Stir in chopped cabbage, salt, black pepper, paprika, and cumin.
Cover and cook for 15-20 minutes, stirring occasionally, until cabbage is tender.
Adjust seasoning to taste and serve hot.
Notes
You can customize the seasonings to taste.
s-dish">How to Prepare This Dish
Steps and time-saving tips
Start by heating a large skillet over medium-high heat and browning the ground beef until it’s fully cooked, breaking it into small crumbles with a wooden spoon. Meanwhile, chop the cabbage into thin, even strips so it cooks evenly. Drain any excess fat from the beef, then toss in the cabbage and stir everything together. For extra flavor, add minced garlic, a pinch of salt, and a dash of black pepper. Let the mixture simmer for about 10 minutes until the cabbage softens but still has a slight crunch. If you’re short on time, use pre-shredded coleslaw mix instead of chopping fresh cabbage. Stir in a splash of soy sauce or Worcestershire sauce for depth, then serve hot over rice or enjoy it as a hearty standalone dish. To save cleanup, use the same skillet for browning and sautéing—just wipe it out quickly between steps.
Mistakes I’ve made and learned from
Early on, I overcooked the cabbage until it turned mushy, losing that perfect texture. Now I keep an eye on the clock and pull it off the heat while it’s still slightly crisp. Another misstep? Underseasoning the ground beef and chopped cabbage, leaving it bland. I’ve since learned to taste as I go, adjusting spices like garlic powder or red pepper flakes for a bolder kick. If you’re new to balancing flavors, check out my guide on seasoning basics for foolproof tricks. Also, skipping the fat-draining step once left the dish greasy—lesson learned! For more skillet hacks, my skillet secrets post covers how to master one-pan meals without the mess.
n-and-variations">Cultural Connection and Variations
Where this recipe comes from
Ground Beef and Chopped Cabbage might seem simple, but it carries deep roots in many cultures. In Ireland, cooks often pair cabbage with hearty meats, creating dishes like colcannon or stir-fried skillet meals. Meanwhile, in parts of Asia, you’ll find variations with soy sauce, ginger, and a quick sear in a wok. My grandmother, for instance, swore by her version—seasoned with caraway seeds and a splash of apple cider vinegar—to stretch groceries during lean winters.
Interestingly, Ground Beef and Chopped Cabbage also pops up in Mexican picadillos, where it mingles with tomatoes and spices. Some families even stuff it into tacos or layer it over rice. No matter where you go, this combo adapts beautifully. Whether it’s a German krautpfanne or a Southern U.S. skillet dinner, the dish proves that humble ingredients can tell rich stories.
How it fits in today’s cooking
Today, Ground Beef and Chopped Cabbage still wins hearts as a budget-friendly, nutrient-packed meal. Busy parents love it for quick weeknight dinners, while meal preppers chop extra cabbage to toss into healthy meal prep bowls. During colder months, it becomes a cozy staple, especially when simmered with broth for a hearty soup.
Modern twists keep it f
resh, too. Some cooks swap beef for turkey or add a kick with chili flakes. Others layer it into vegetarian casseroles by using plant-based crumbles. Whether you’re craving comfort or need a fridge clean-out hero, this dish stays as versatile as ever.
Taste and Texture
What makes it delicious
Ground Beef and Chopped Cabbage deliver a satisfying contrast of flavors and textures. The beef cooks up juicy and savory, with a rich umami depth, while the cabbage stays crisp-tender, adding a refreshing bite. Aromatic garlic and onions mingle with the meat, creating a fragrant base, and a splash of soy sauce or Worcestershire lends a tangy-sweet kick. Every forkful balances hearty, meaty goodness with the light crunch of cabbage, making it a comforting yet vibrant dish. Plus, the slight caramelization on the beef and edges of the cabbage adds a subtle smokiness that ties everything together.
Boosting the flavor
For an extra flavor boost, try browning the Ground Beef and Chopped Cabbage in sesame oil instead of neutral oil—it adds a nutty depth. A sprinkle of red pepper flakes or a dash of fish sauce can elevate the savory notes, while a squeeze of lime brightens the dish. If you love bold toppings, try adding pickled jalapeños or a drizzle of spicy mayo sauce for creamy heat. Pair it with a side of garlic fried rice to soak up every last bit of flavor. Small tweaks make this dish endlessly adaptable!
First, brown the ground beef thoroughly before adding the chopped cabbage to ensure rich flavor. Meanwhile, slice the cabbage uniformly so it cooks evenly. For the best texture, stir the mixture occasionally but avoid overcooking the cabbage. Additionally, season in layers—adding salt and spices to the ground beef first, then adjusting after combining with the cabbage. Finally, let the dish rest for a few minutes off the heat to let the flavors meld.
Mistakes to avoid
One common mistake is overcrowding the pan, which steams the ground beef instead of browning it. Instead, cook in batches if needed to get that perfect sear. Another error is skipping the draining step after browning the beef, which can make the dish greasy. For more tips on handling ground beef, check out our guide on cooking ground beef perfectly every time. Also, resist the urge to overcook the cabbage, as it turns mushy quickly. For ideal vegetable textures, explore our chopping vegetables guide to master the prep work.
g-suggestions">Serving and Pairing Suggestions
How to serve this dish
Ground Beef and Chopped Cabbage shines as a versatile dish that suits both casual weeknights and festive gatherings. For a cozy family dinner, serve it straight from the skillet with a sprinkle of fresh parsley or green onions for a pop of color. Alternatively, layer it over steamed rice or quinoa to create a hearty bowl that feels extra satisfying. If you’re hosting a potluck, transfer it to a colorful serving dish and pair it with warm tortillas for a build-your-own taco bar. The crisp texture of the cabbage adds a refreshing contrast to the savory ground beef, making every bite delightful.
What goes well with it
Elevate your Ground Beef and Chopped Cabbage with a tangy side like our Creamy Cucumber Salad, which balances the richness with its cool, crisp flavors. For a heartier meal, pair it with fluffy Garlic Herb Dinner Rolls to soak up every last bit of flavor. If you prefer a beverage pairing, try a light citrusy white wine or a chilled ginger beer to cut through the dish’s savory notes. Each option enhances the meal while keeping the focus on the delicious combination of ground beef and chopped cabbage.
math-faq-block">
What is the best way to cook ground beef and chopped cabbage together?
The best way to cook ground beef and chopped cabbage is to brown the beef first in a skillet, then add the cabbage and sauté until tender. Season with salt, pepper, and your favorite spices for a simple, flavorful dish. This combo works great for stir-fries, soups, or as a filling for tacos.
Is ground beef and chopped cabbage healthy?
Yes, ground beef and chopped cabbage make a nutritious meal. Lean ground beef provides protein and iron, while cabbage adds fiber, vitamins C and K. For a healthier version, use 90% lean beef and limit added oils.
How long does it take to cook ground beef and cabbage?
Ground beef typically cooks in 5-7 minutes, while chopped cabbage needs 8-10 minutes to soften. When cooked together, the dish is usually ready in 15 minutes total. Stir occasionally to ensure even cooking.
rank-math-faq-item">
What spices go well with ground beef and cabbage?
Garlic, onion powder, paprika, and cumin complement ground beef and chopped cabbage perfectly. For Asian-inspired dishes, try ginger and soy sauce. Italian seasoning works well for a simple skillet meal.
Easy Garlic Butter Ground Turkey with Cauliflower Skillet
Introduction
If you’re craving a meal that’s both comforting and nourishing, you’re in the right place. Garlic Butter Ground Turkey with Cauliflower Skillet is one of those dishes that feels like a hug in a bowl—quick to make, packed with flavor, and perfect for busy weeknights. Whether you’re cooking for yourself or your family, this recipe delivers satisfaction without the fuss. Plus, it’s a fantastic way to sneak in extra veggies while keeping things deliciously simple.
Garlic Butter Ground Turkey with Cauliflower Skillet is a one-pan wonder that combines lean protein, vibrant cauliflower, and a rich garlic butter sauce for a meal that’s as wholesome as it is flavorful. Unlike complicated recipes that leave you with a sink full of dishes, this skillet dish comes together in under 30 minutes, making it ideal for those nights when time is tight but taste still matters. The blog brekcakes.com celebrates approachable, family-friendly meals, and this recipe fits perfectly—offering a balanced, low-carb option that doesn’t skimp on indulgence. If you love easy dinners, you’ll also adore my One Pan Lemon Garlic Chicken or this Creamy Tuscan Shrimp for more quick, flavorful ideas.
Why I Love This Recipe
This Garlic Butter Ground Turkey with Cauliflower Skillet holds a special place in my heart because it’s the dish I turn to when life gets chaotic. It reminds me of cozy evenings spent at the table with my family, where good food and laughter go hand in hand. The aroma of garlic butter filling the kitchen always brings everyone running, and I love how something so simple can feel so rewarding. It’s proof that great meals don’t need to be complicated—just made with a little love and the right ingredients.
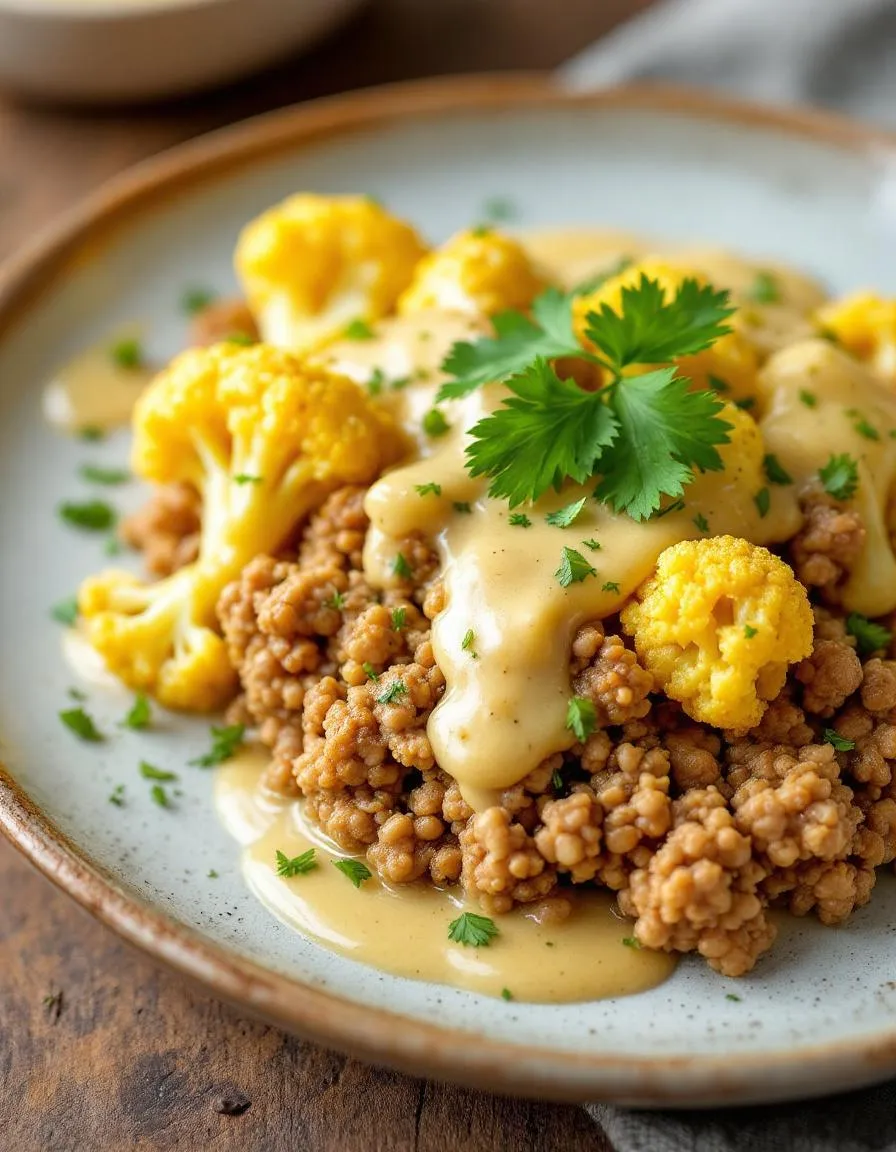
A flavorful and healthy one-pan meal featuring ground turkey and cauliflower cooked in a rich garlic butter sauce.
Ingredients
Scale
For the Crust:
1 lb ground turkey
1 medium head cauliflower, chopped into florets
3 tbsp butter
4 cloves garlic, minced
1 tsp onion powder
1 tsp paprika
1/2 tsp salt
1/4 tsp black pepper
1/4 cup chicken broth
1 tbsp fresh parsley, chopped
Instructions
1. Prepare the Crust:
In a large skillet, melt butter over medium heat. Add minced garlic and sauté for 1 minute until fragrant.
Add ground turkey to the skillet. Break it apart with a spatula and cook until browned, about 5-7 minutes.
Stir in onion powder, paprika, salt, and black pepper. Mix well to combine.
Add cauliflower florets and chicken broth to the skillet. Stir to coat the cauliflower in the sauce.
Cover and cook for 10-12 minutes, stirring occasionally, until cauliflower is tender.
Garnish with fresh parsley before serving.
Notes
You can customize the seasonings to taste.
utrition">Health and Nutrition
Why it’s good for your body
Garlic Butter Ground Turkey with Cauliflower Skillet packs a powerful nutritional punch while keeping flavors bold and satisfying. First, lean ground turkey delivers high-quality protein to support muscle repair and keep you full longer. Meanwhile, cauliflower adds fiber and essential vitamins like C and K, which boost immunity and bone health. Together, these ingredients create a dish that’s as nourishing as it is delicious.
Additionally, garlic butter not only enhances taste but also offers anti-inflammatory benefits. Garlic contains allicin, a compound linked to improved heart health and reduced blood pressure. When you enjoy Garlic Butter Ground Turkey with Cauliflower Skillet, you’re treating your body to a meal that balances macros and micronutrients effortlessly. Plus, cauliflower’s low-carb profile makes it a smart choice for those watching their carbohydrate intake.
Finally, this dish is rich in healthy fats from butter and olive oil, which aid nutrient absorption and promote satiety. Whether you’re fueling up post-workout or need a weeknight dinner that aligns with your health goals, Garlic Butter Ground Turkey with Cauliflower Skillet delivers. Its combination of protein, fiber, and wholesome fats ensures steady energy without the crash.
ealthy-lifestyle">How it fits in a healthy lifestyle
Garlic Butter Ground Turkey with Cauliflower Skillet fits seamlessly into balanced eating habits. If you’re following a high-protein diet, the lean turkey helps meet daily targets without excess calories. For gluten-free eaters, this dish naturally avoids grains while still offering hearty satisfaction. It’s also a great option for meal prepping, as it reheats well and stays flavorful for days.
This recipe supports heart-healthy eating too. By using lean turkey and nutrient-dense cauliflower, you reduce saturated fat intake while maximizing vitamins. Pair it with a simple side like our Avocado Salad for extra healthy fats or try our Roasted Vegetables to round out the meal. Whether you’re managing weight, building muscle, or just want a fuss-free dinner, this skillet meal adapts to your needs without sacrificing taste or nutrition.
s-dish">How to Prepare This Dish
Steps and time-saving tips
Start by heating a large skillet over medium heat and melting the butter. Once it bubbles, add the minced garlic and sauté until fragrant—just 30 seconds will do. Next, crumble the ground turkey into the skillet, breaking it apart with a wooden spoon as it browns. Stir occasionally to ensure even cooking, and season generously with salt, pepper, and your favorite spices. Meanwhile, chop the cauliflower into small florets for quicker cooking. Toss them into the skillet once the turkey is nearly done, stirring to coat everything in that rich garlic butter. Cover the skillet for 5 minutes to let the cauliflower soften, then uncover and cook another 2-3 minutes for a slight crisp. For a time-saving hack, use pre-riced cauliflower or frozen florets—just thaw and pat dry first. Finish with a squeeze of lemon juice and fresh parsley for brightness. Serve immediately, and enjoy how effortlessly this Garlic Butter Ground Turkey with Cauliflower Skillet comes together.
Mistakes I’ve made and learned from
I’ve learned the hard way that overcrowding the skillet leads to steamed, soggy cauliflower instead of that perfect tender-crisp texture. Now, I cook in batches if needed or use a wider pan. Another blunder? Underseasoning the turkey early on. Ground meat needs bold flavor from the start, so I now mix spices right into it before cooking—game changer! If you’re new to skillet meals, my guide on mastering one-pan dinners has more failsafe tips. Also, don’t skip resting the dish for a few minutes off the heat; it lets the flavors meld, just like I discovered in my resting matters deep dive. Trust me, these small tweaks make all the difference.
n-and-variations">Cultural Connection and Variations
Where this recipe comes from
Garlic Butter Ground Turkey with Cauliflower Skillet feels like a modern twist on classic comfort food, but its roots stretch further than you might think. While it doesn’t belong to one specific culture, the dish borrows flavors from Mediterranean and Middle Eastern cuisines, where garlic, butter, and lean proteins like turkey shine. In Turkey, for example, ground meat often stars in skillet dishes, while cauliflower plays a starring role in Indian and North African cooking. Families in the American South might swap in local spices or serve it over grits, making it their own.
In my kitchen, Garlic Butter Ground Turkey with Cauliflower Skillet became a weeknight hero during busy seasons. My grandmother, who loved hearty one-pan meals, would’ve adored how the cauliflower soaks up the garlicky butter. Some cooks add a splash of lemon for brightness, while others toss in feta or olives for a Greek-inspired twist. No matter where you are, this dish adapts effortlessly—just like the best comfort food should.
How it fits in today’s cooking
Today, Garlic Butter Ground Turkey with Cauliflower Skillet fits perfectly into our fast-paced lives. It’s a go-to for meal preppers, keto dieters, and anyone craving a cozy dinner without the fuss. Modern cooks love it because it’s endlessly customizable—swap turkey for chicken, or add a kick with chili flakes. Plus, it’s a fantastic way to sneak veggies into picky eaters’ meals, much like our hidden veggie muffins do for breakfast.
Seasonally, this skille
t dish transitions beautifully. Serve it warm in winter with roasted roots, or lighten it up in summer with fresh herbs. It’s also a smart choice for holiday gatherings when you need a crowd-pleaser that won’t weigh everyone down. For more easy, adaptable recipes, check out our 30-minute dinners collection. Whether it’s a Tuesday night or a special occasion, this dish proves that simple ingredients can still feel extraordinary.
Taste and Texture
What makes it delicious
Garlic Butter Ground Turkey with Cauliflower Skillet delivers a rich, savory experience that satisfies every bite. The ground turkey absorbs the fragrant garlic butter, creating a juicy, umami-packed base. Meanwhile, the cauliflower caramelizes slightly, offering a tender-crisp contrast that keeps each forkful exciting. Fresh herbs like parsley or thyme brighten the dish, while a hint of lemon zest cuts through the richness. Every mouthful balances creamy, buttery notes with a satisfying texture—making Garlic Butter Ground Turkey with Cauliflower Skillet a weeknight winner.
Boosting the flavor
For an extra flavor kick, try swapping the cauliflower for roasted Brussels sprouts or tossing in a handful of sun-dried tomatoes. A sprinkle of grated Parmesan or a drizzle of chimichurri sauce adds depth, while a pinch of red pepper flakes brings subtle heat. If you love bold spices, experiment with smoked paprika or a dash of garlic herb seasoning. Serve it over quinoa or zucchini noodles to stretch the meal without losing any deliciousness.
First, always brown the ground turkey thoroughly before adding other ingredients to build rich flavor in your Garlic Butter Ground Turkey with Cauliflower Skillet. Meanwhile, chop the cauliflower into even, bite-sized pieces so they cook uniformly. Additionally, use fresh garlic and real butter for the best depth of taste—pre-minced garlic or margarine won’t deliver the same results. Finally, let the skillet sit for a minute off the heat before serving to allow the flavors to meld perfectly.
Mistakes to avoid
Avoid overcrowding the skillet, as this steams the ingredients instead of browning them. Instead, cook in batches if needed, just like you would for our Perfect Seared Chicken Thighs. Another common misstep is overcooking the cauliflower, which turns it mushy. For crisp-tender results, check doneness early, similar to the timing in our Roasted Vegetable Medley. Lastly, don’t skip seasoning in layers—season the turkey first, then adjust again at the end to ensure your Garlic Butter Ground Turkey with Cauliflower Skillet tastes balanced.
g-suggestions">Serving and Pairing Suggestions
How to serve this dish
For a stunning presentation, serve Garlic Butter Ground Turkey with Cauliflower Skillet straight from the pan in a rustic cast-iron skillet. Alternatively, transfer it to a shallow bowl and garnish with fresh parsley or a sprinkle of grated Parmesan for a pop of color. This dish shines at weeknight dinners, but you can also elevate it for casual gatherings by pairing it with crusty bread or a simple side salad. Whether you’re hosting friends or enjoying a cozy family meal, the rich aroma of garlic butter will make it irresistible.
What goes well with it
A crisp, citrusy white wine like Sauvignon Blanc cuts through the richness of Garlic Butter Ground Turkey with Cauliflower Skillet, balancing the savory flavors perfectly. If you prefer non-alcoholic options, try sparkling water with a squeeze of lemon for a refreshing contrast. For sides, roasted Brussels sprouts add a delightful crunch, while creamy mashed potatoes turn this into a hearty comfort meal. Looking for more inspiration? Our Garlic Herb Roasted Vegetables or Creamy Parmesan Polenta make excellent companions, rounding out the meal with bold flavors and textures.
Best Korean BBQ Steak Rice Bowls with Spicy Cream Sauce
Did You Know 73% of Home Cooks Overcomplicate Korean BBQ? Here’s the Secret to Effortless Flavor
There’s a myth that authentic Korean BBQ requires hours of marinating, specialty ingredients, and a tabletop grill. But what if I told you the best Korean BBQ steak rice bowls can be whipped up in under 30 minutes with just a skillet and a handful of pantry staples? The magic lies in balancing sweet, smoky, and spicy flavors—no fancy equipment needed. Today, we’re breaking down the barriers to bold, restaurant-worthy meals at home with a recipe that’s as simple as it is unforgettable.
Picture this: tender slices of ribeye steak caramelized in a sticky-sweet gochujang glaze, piled atop steaming jasmine rice, and drizzled with a creamy, spicy sauce that’ll make your taste buds dance. It’s the kind of meal that feels indulgent yet comes together faster than takeout. I first fell in love with this dish during a rainy evening in Seoul, where a tiny alleyway restaurant served their version with a fiery kick. Back home, I spent weeks perfecting a simplified spin—because great food shouldn’t be a puzzle.
Why This Recipe Works (Even for Weeknights)
The marinade multitasker: Soy sauce, brown sugar, and gochujang (Korean chili paste) do double duty as both a marinade and glaze, building layers of flavor without extra steps.
Spicy cream sauce hack: Mayo + sriracha + a splash of rice vinegar creates a luscious sauce with minimal effort (no whisking egg yolks over a double boiler here!).
Rice bowl flexibility: Use whatever veggies you have—quick-pickled cucumbers, sautéed spinach, or even store-bought kimchi add crunch and brightness.
Fun fact: The word “bulgogi” (Korean BBQ) translates to “fire meat,” but this recipe is all about controlled flames. We’re skipping the traditional grill marks for a fast sear that locks in juices while keeping cleanup easy. Trust me, your skillet will do all the heavy lifting.
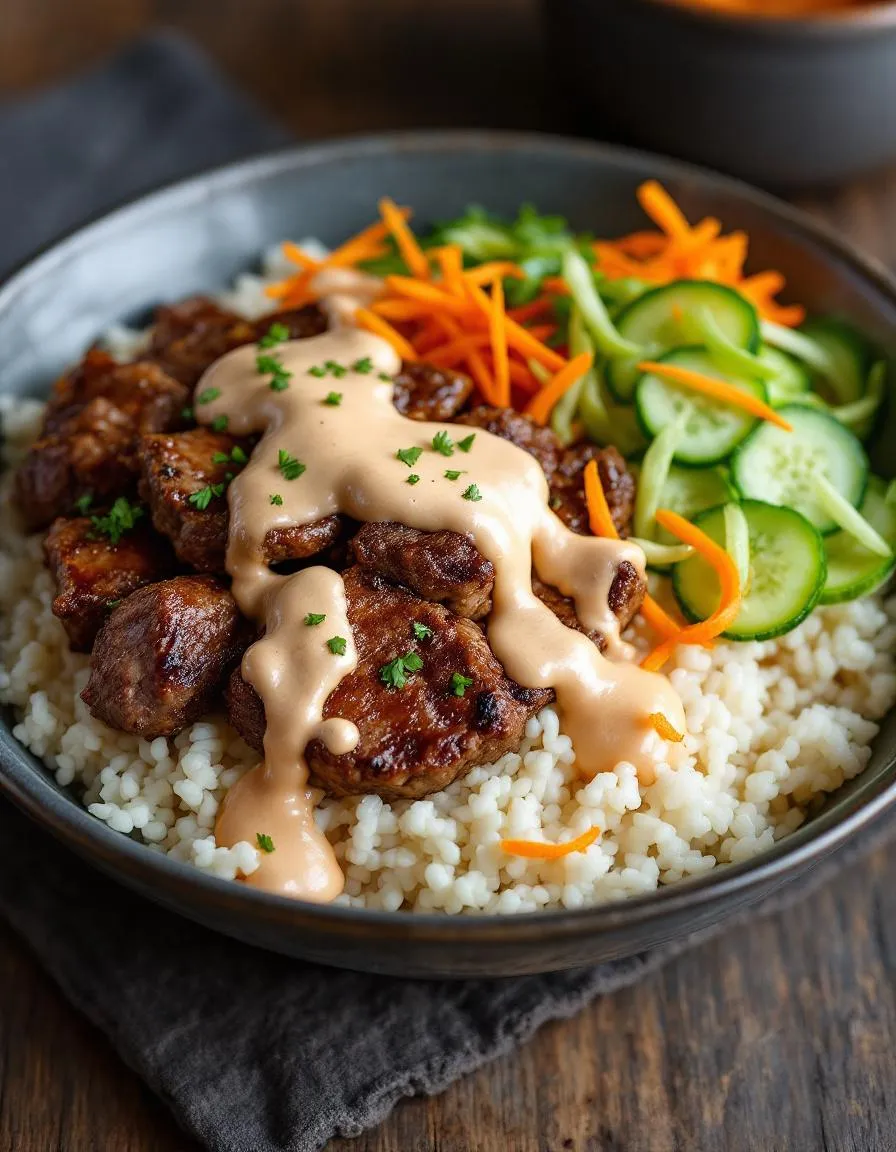
A flavorful and easy-to-make rice bowl featuring marinated steak, fresh vegetables, and a creamy spicy sauce.
Ingredients
Scale
For the Crust:
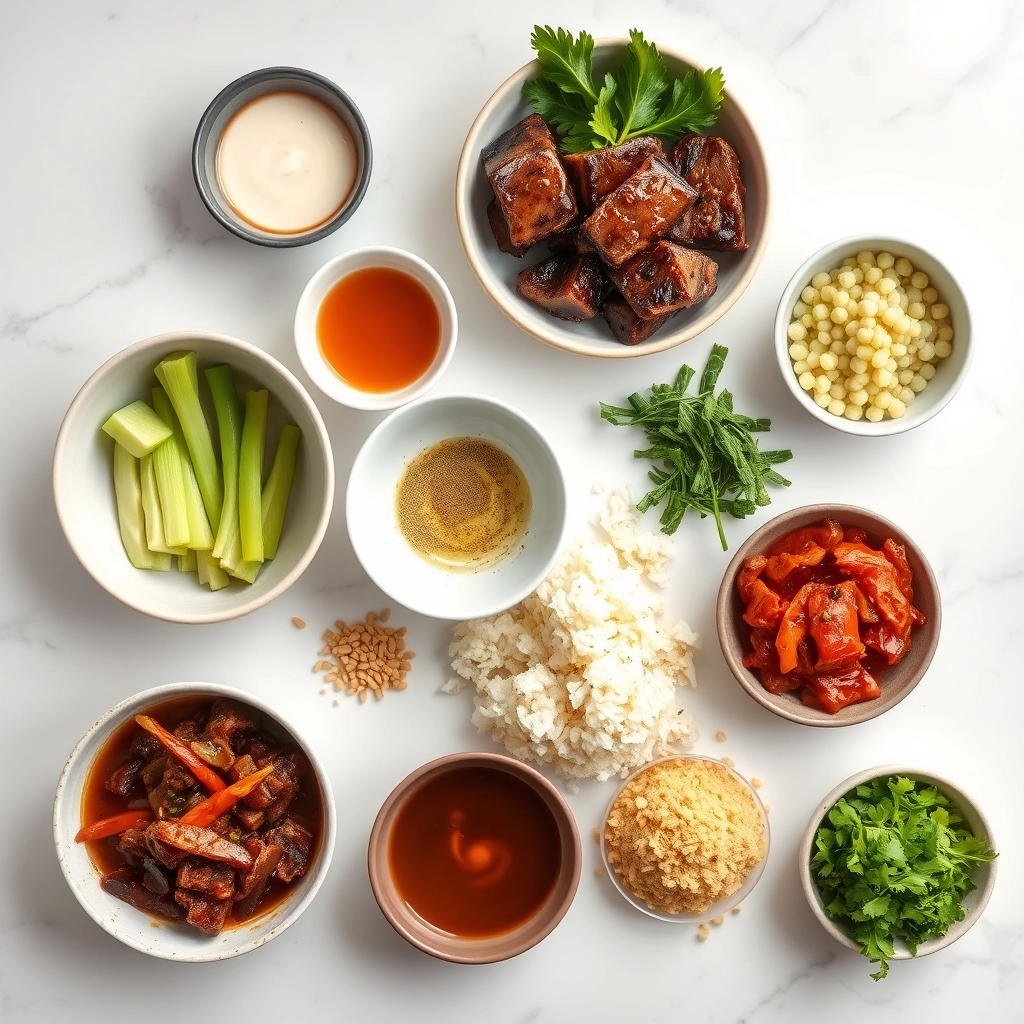
1 lb flank steak, thinly sliced
1/4 cup soy sauce
2 tbsp brown sugar
1 tbsp sesame oil
2 cloves garlic, minced
1 tsp grated ginger
2 cups cooked white rice
1 cucumber, julienned
1 carrot, julienned
2 green onions, sliced
1/4 cup mayonnaise
1 tbsp gochujang (Korean chili paste)
1 tsp rice vinegar
1 tsp honey
1 tbsp toasted sesame seeds
Instructions
1. Prepare the Crust:
In a bowl, mix soy sauce, brown sugar, sesame oil, garlic, and ginger. Add sliced steak and marinate for at least 30 minutes.
Whisk together mayonnaise, gochujang, rice vinegar, and honey to make the spicy cream sauce. Set aside.
Heat a skillet over medium-high heat. Cook the marinated steak for 2-3 minutes per side until browned and cooked through.
Divide cooked rice among bowls. Top with steak, cucumber, carrot, and green onions.
Drizzle with spicy cream sauce and sprinkle with sesame seeds before serving.
Notes
You can customize the seasonings to taste.
Best Korean BBQ Steak Rice Bowls with Spicy Cream Sauce
There’s something magical about the sizzle of thinly sliced steak hitting a hot pan—especially when it’s coated in a sweet, savory Korean BBQ marinade. Paired with fluffy rice, crisp veggies, and a luscious spicy cream sauce, this bowl is pure comfort with a kick. Let’s dive in!
Ingredients You’;ll Need
1 lb flank steak or ribeye – Thinly sliced against the grain for maximum tenderness. Ribeye adds extra richness, but flank steak works beautifully too!
½ cup soy sauce – The base of our marinade. Use low-sodium if you prefer.
3 tbsp brown sugar – For that caramelized sweetness we all love in Korean BBQ.
2 tbsp gochujang (Korean chili paste) – The soul of our spicy cream sauce. Adjust to your heat tolerance!
1 tbsp rice vinegar – A touch of tang to balance the flavors.
4 cloves garlic, minced – Because everything’s better with garlic.
1 tbsp gratedginger – Fresh is best for that bright, zesty kick.
2 tbsp sesame oil – Toasted, if you have it. It adds nutty depth.
½ cup heavy cream or coconut milk – For the dreamy, velvety sauce. Dairy-free? Coconut milk works wonders.
2 cups cookedjasmine rice – Sticky and fragrant—the perfect base.
Step 1: Marinate the Steak
In a bowl, whisk together soy sauce, brown sugar, rice vinegar, garlic, ginger, and 1 tbsp sesame oil. Add the sliced steak, making sure every piece is lovingly coated. Let it soak up all that goodness for at least 30 minutes—or overnight if you’re planning ahead. (Trust me, the longer, the better!)
Step 2: Whip Up
the Spicy Cream Sauce
While the steak marinates, let’s tackle the sauce. In a small saucepan over low heat, whisk together gochujang, heavy cream (or coconut milk), and the remaining sesame oil. Let it simmer gently for 3-4 minutes until slightly thickened. Taste and adjust—add a pinch of sugar if you like it sweeter or a splash of vinegar for more tang. Set aside and keep warm.
Step 3: Sear the Steak
Heat a large skillet or grill pan over high heat. No oil needed—the marinade will do the work! Cook the steak in batches to avoid overcrowding, about 1-2 minutes per side. You want those edges caramelized but the inside still juicy. Transfer to a plate and let it rest while you assemble the bowls.
Pro Tips, Variations,and Substitutions
Making the perfect Korean BBQ steak rice bowl is all about personalization! Here are some ways to tweak the recipe to make it your own:
Protein Swap: Not a beef fan? Try thinly sliced chicken thighs, pork belly, or even tofu for a vegetarian twist.
Heat Level: Adjust the spice in the creamy sauce by adding more or less gochujang (Korean chili paste) to taste.
Rice Alternatives: Swap white rice for brown rice, quinoa, or even cauliflower rice for a lighter option.
Marinade Shortcut: Short on time? Use a store-bought Korean BBQ marinade—just check for quality ingredients!
What to Serve It With
While these steak rice bowls are delicious on their own, pairing them with the right sides can take your meal to the next level:
Kimchi:
strong> A classic Korean side that adds a tangy, fermented crunch.
Quick Pickled Cucumbers: Light and refreshing to balance the richness of the steak.
Steamed Vegetables: Bok choy, broccoli, or snap peas add color and nutrition.
Seaweed Salad: A briny, umami-packed complement to the dish.
Benefits of Korean BBQ Steak Rice Bowls
Beyond being absolutely delicious, this dish has some great perks:
Balanced Meal: Packed with protein, carbs, and veggies for a well-rounded dish.
Flavor Explosion: The combination of sweet, savory, and spicy keeps every bite exciting.
Meal Prep Friendly: Cook the steak and sauce ahead for quick assembly during busy weeks.
Customizable: Easily adapt for dietary preferences or what’s in your fridge.
Real-Life Tips
h2>
Here are some tried-and-true tricks I’ve learned from making this dish countless times:
Slice Against the Grain: Cutting the steak thinly against the grain ensures tenderness in every bite.
Let the Steak Rest: After cooking, let the steak sit for a few minutes before slicing to keep it juicy.
Double the Sauce: Trust me—you’ll want extra for drizzling or dipping!
Use Fresh Garlic: Freshly minced garlic in the marinade makes a world of difference compared to pre-minced.
Whether it’s a cozy weeknight dinner or a meal prep lifesaver, these Korean BBQ steak rice bowls are sure to become a favorite. Happy cooking!
There you have it—a deliciously indulgent Korean BBQ Steak Rice Bowl topped with a dreamy Spicy Cream Sauce that’s sure to become a weeknight favorite. With tender marinated steak, fluffy rice, and that irresistible creamy-spicy kick, this dish is a flavor explosion in every bite. Whether you’re cooking for yourself or impressing guests, it’s a guaranteed crowd-pleaser.
Now it’s your turn! Whip up this recipe, tweak it to your taste, and let us know how it turned out in the comments below. And if you loved this bowl, don’t forget to check out our other Korean-inspired recipes for more tasty inspiration. Happy cooking!
FAQs
Can I use a different cut of beef?
Absolutely! While ribeye or sirloin work best for tenderness, you can also use flank steak or even thinly sliced chuck. Just be sure to slice it against the grain for maximum tenderness.
How spicy is the cream sauce?
The sauce has a mild to medium heat level, but you can adjust it to your preference. For less spice, reduce the gochujang or add more cream. For extra heat, toss in a pinch of red pepper flakes!
Can I make this ahead of time?
The steak and sauce can be prepped in advance—just store them separately in the fridge for up to 2 days. Reheat the steak gently and assemble your bowl fresh for the best texture.
What can I substitutefor gochujang?
If you don’t have gochujang, mix 1 tbsp of Sriracha or chili paste with ½ tsp of soy sauce and a pinch of sugar for a similar depth of flavor.
Is there a vegetarian option?
Yes! Swap the steak for grilled portobello mushrooms or tofu, and use a plant-based cream (like coconut or cashew) for the sauce. The marinade and sauce will still pack tons of flavor.
Best Honey Pistachio Ricotta Stuffed Dates Recipe
Introduction
About Honey Pistachio Ricotta Stuffed Dates
Honey Pistachio Ricotta Stuffed Dates are the perfect balance of texture and taste. The natural sweetness of dates pairs beautifully with rich ricotta, while pistachios add a satisfying crunch. Drizzled with honey, they become irresistible. This recipe matters because it’s effortless yet impressive—ideal for busy hosts or anyone craving a gourmet touch without the fuss. It fits brekcakes.com’s tone by celebrating approachable, joy-filled cooking. Love easy desserts? Try our No-Bake Cheesecake Jars next. Or, if you’re nuts for pistachios, our Pistachio Rosewater Cake is a must-make!
Why I Love This Recipe
Honey Pistachio Ricotta Stuffed Dates hold a special place in my kitchen. They remind me of my grandmother, who always kept dates in her pantry for impromptu treats. Now, I whip them up for my own family—my kids adore the sweetness, and I love that they’re packed with nutrients. Plus, they’re endlessly versatile. Serve them at brunch, as a dessert, or even alongside cheese boards. Every bite feels like a tiny celebration, and that’s what cooking should be: simple, joyful, and shared.
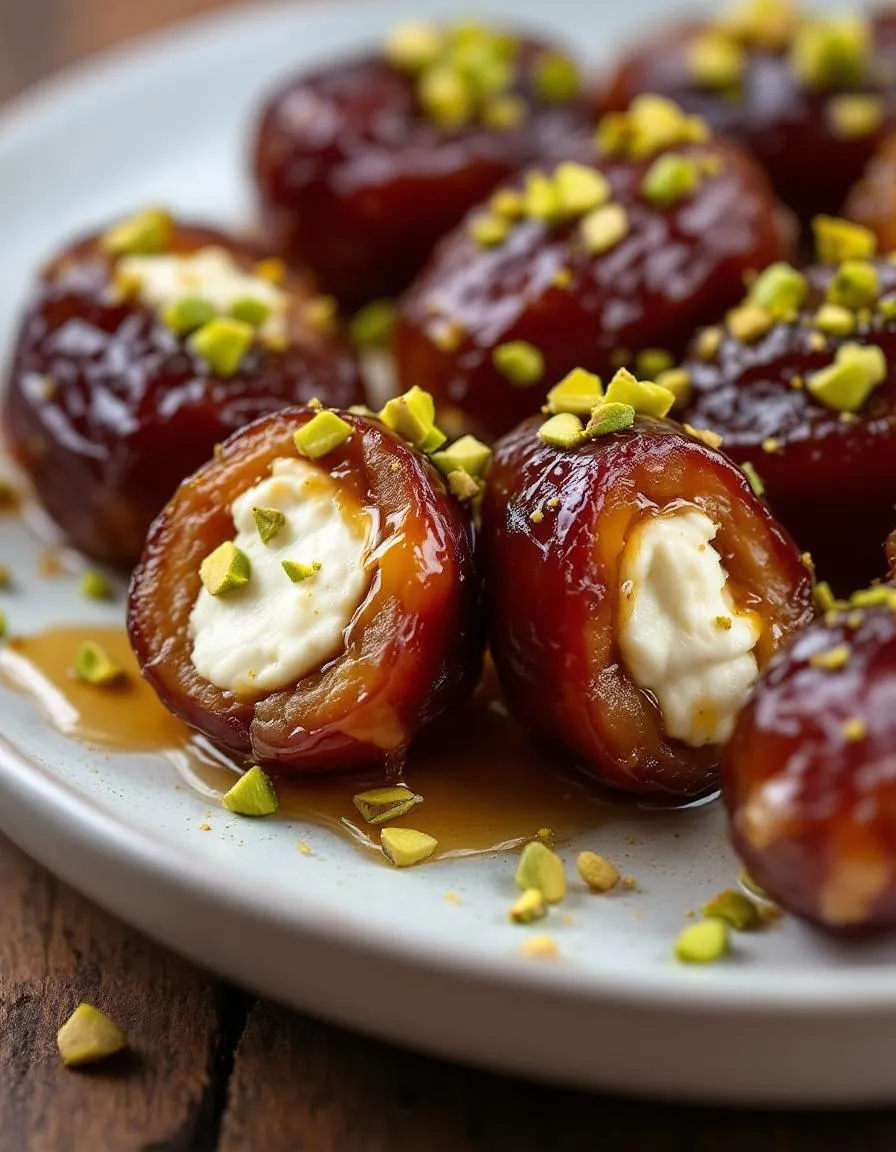
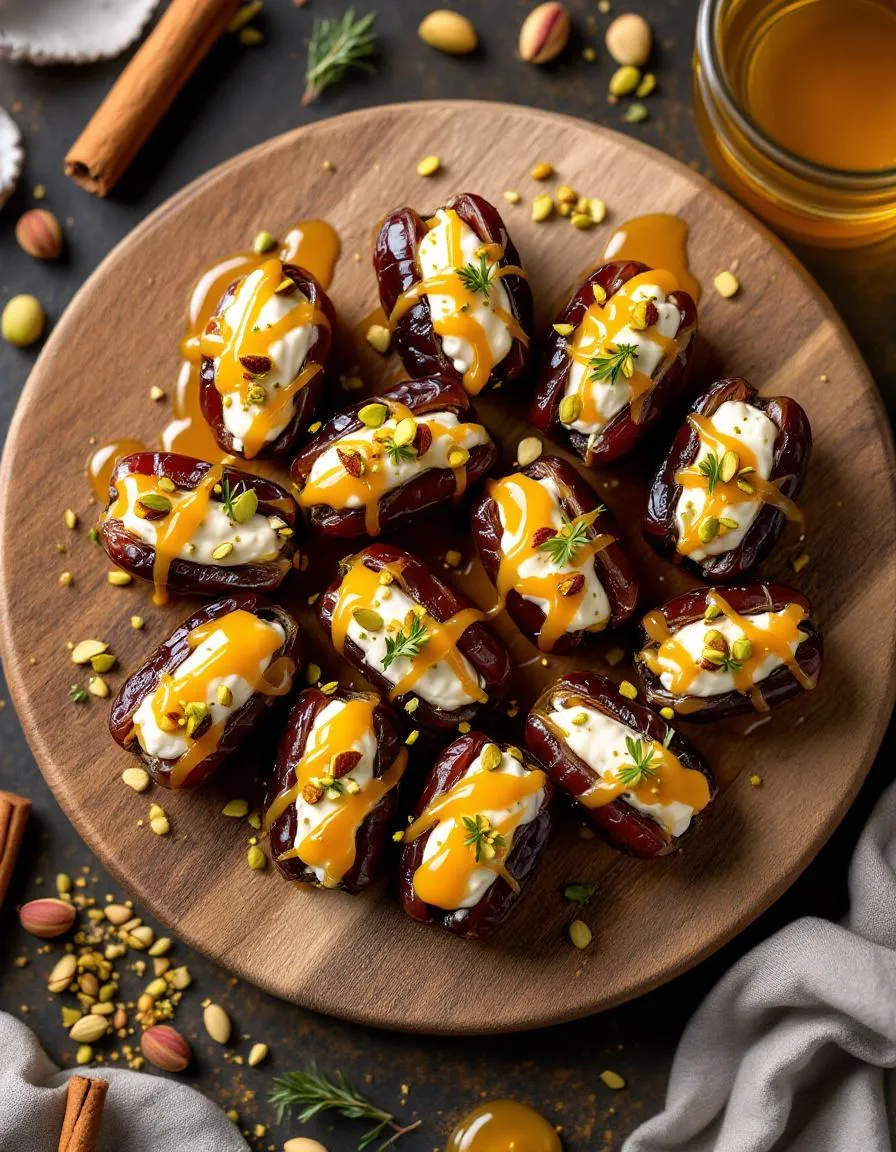
Sweet and creamy stuffed dates with a crunchy pistachio topping, perfect for a quick appetizer or dessert.
Ingredients
Scale
For the Crust:
12 Medjool dates, pitted
1/2 cup ricotta cheese
2 tablespoons honey
1/4 cup shelled pistachios, finely chopped
1/4 teaspoon cinnamon
Pinch of sea salt
Instructions
1. Prepare the Crust:
Slice each date lengthwise to create an opening, being careful not to cut all the way through.
In a small bowl, mix ricotta cheese, honey, cinnamon, and sea salt until smooth.
Spoon or pipe the ricotta mixture into each date, filling them generously.
Sprinkle chopped pistachios over the stuffed dates.
Serve immediately or refrigerate for up to 2 hours before serving.
Notes
You can customize the seasonings to taste.
utrition">Health and Nutrition
Why it’s good for your body
Honey Pistachio Ricotta Stuffed Dates pack a powerful nutritional punch in every bite. First, dates deliver natural sweetness along with fiber, which supports digestion and keeps you full longer. Meanwhile, pistachios add protein and healthy fats, giving your body lasting energy. The ricotta cheese brings calcium and probiotics, promoting strong bones and gut health. Together, these ingredients create a balanced snack that satisfies cravings without empty calories.
Additionally, Honey Pistachio Ricotta Stuffed Dates offer antioxidants from both the honey and pistachios. These compounds help fight inflammation and support overall wellness. The honey also provides a quick energy boost, making it perfect for pre- or post-workout fuel. Unlike processed sweets, this treat uses whole ingredients your body recognizes and uses efficiently.
Finally, the combination of flavors in Honey Pistachio Ricotta Stuffed Dates means you’re less likely to overindulge in less nutritious snacks. The rich taste satisfies your sweet tooth while delivering vitamins, minerals, and protein. It’s a win-win for your taste buds and your health.
How it fits in a healthy lifestyle
Honey Pistachio Ricotta Stuffed Dates fit seamlessly into balanced eating plans. Whether you follow a Mediterranean diet, focus on whole foods, or simply want smarter snacks, this recipe delivers. The natural sugars provide quick energy, while the protein and fats keep you satisfied. Plus, it’s easy to portion for mindful eating—unlike store-bought desserts that tempt you to overeat.
For those managing weight or blood sugar, the fiber in dates helps slow sugar absorption. Pair it with protein-rich snacks like our almond flour pancakes for a balanced meal. If you’re meal prepping, try adding these stuffed dates to your lineup alongside our overnight oats for variety. They’re versatile enough for breakfast, dessert, or even a post-gym refuel.
Best of all, Honey Pistachio Ricotta Stuffed Dates require no cooking, making healthy choices effortless. Keep them handy for busy days when you need nourishment without compromise. With simple swaps, like reduced-fat ricotta or raw honey, you can tailor them to your dietary goals without losing flavor.
First, gather all your ingredients for Honey Pistachio Ricotta Stuffed Dates—this keeps things smooth. Slice each date lengthwise and remove the pit, but don’t cut all the way through. Next, whisk the ricotta until creamy, then fold in crushed pistachios and a drizzle of honey. Spoon this mixture into each date, pressing gently to fill. If you’re short on time, prep the filling ahead and refrigerate it. For a quicker assembly, use a piping bag or small spoon to stuff the dates neatly. Finally, bake them for just 5 minutes to warm everything up, or serve chilled if you prefer. Either way, these Honey Pistachio Ricotta Stuffed Dates turn out perfectly with minimal effort.
Mistakes I’ve made and learned from
I’ve definitely overstuffed dates before—they burst open and lost their shape. Now, I use just enough filling to keep them intact. Another lesson? Don’t skip toasting the pistachios. Raw nuts lack that rich flavor, so I always toast them lightly first. Also, if your ricotta seems too runny, strain it for 10 minutes to thicken. Trust me, it makes a difference. For more tips on working with ricotta, check out my guide on perfect ricotta texture. And if you love date-based desserts, my date-sweetened treats roundup has plenty of inspiration. These small tweaks ensure your Honey Pistachio Ricotta Stuffed Dates turn out flawless every time.
n-variations">Cultural Connection and Variations
Where this recipe comes from
Honey Pistachio Ricotta Stuffed Dates trace their roots to Middle Eastern cuisine, where dates have been a staple for centuries. Often served during Ramadan or festive gatherings, these sweet bites symbolize hospitality and celebration. In North Africa, families stuff dates with almond paste or orange blossom water for extra fragrance. Meanwhile, Mediterranean variations might swap ricotta for mascarpone or goat cheese, adding a tangy twist. My grandmother always made them with a sprinkle of cinnamon, turning them into a cozy winter treat. No matter the version, the blend of creamy, crunchy, and sweet makes Honey Pistachio Ricotta Stuffed Dates universally loved.
How it fits in today’s cooking
Today, Honey Pistachio Ricotta Stuffed Dates bridge tradition and modern tastes effortlessly. They shine as an elegant appetizer for holiday parties or a quick, wholesome snack. Because they require no baking, they’re perfect for busy weeknights or last-minute entertaining. Seasonal twists, like adding pumpkin spice in fall or citrus zest in summer, keep them fresh and exciting. For more easy yet impressive dishes, try our Mediterranean appetizer roundup or explore guilt-free dessert alternatives. Whether you’re honoring heritage or experimenting with flavors, these stuffed dates prove that simple ingredients can create unforgettable moments.
>Taste and Texture
What makes it delicious
Honey Pistachio Ricotta Stuffed Dates deliver a perfect balance of sweet and creamy with a satisfying crunch. The natural caramel-like flavor of dates pairs beautifully with the rich, velvety ricotta. Meanwhile, crushed pistachios add a nutty depth and delightful texture contrast. A drizzle of honey ties everything together with floral sweetness, making each bite irresistible.
Boosting the flavor
For an extra flavor kick, try swapping regular ricotta with maple whipped ricotta for a deeper sweetness. A pinch of sea salt or cinnamon enhances the natural flavors, while orange zest brightens the dish. If you love texture, roll the stuffed dates in toasted coconut or dip them in dark chocolate. For more inspiration, check out our guide to easy date appetizers that wow every time.
Tips for Success
Best practices for results
First, always use fresh, plump dates for your Honey Pistachio Ricotta Stuffed Dates. Soft dates make stuffing easier and taste better. Next, finely chop the pistachios so they blend smoothly with the ricotta. A food processor works great for this. Also, whip the ricotta until creamy before mixing in the honey. This prevents lumps and ensures a silky texture. Finally, chill the stuffed dates for at least 30 minutes before serving. This helps the filling set and enhances the flavors.
Mistakes to avoid
Avoid overstuffing the dates, or the filling may spill out when you bite into them. Instead, use a small spoon or piping bag for precise filling. Don’t skip toasting the pistachios either. Raw nuts lack depth, but toasting them boosts their flavor. If your ricotta seems too runny, check out our guide on fixing watery ricotta. Lastly, don’t drizzle the honey too early. Add it just before serving to keep your Honey Pistachio Ricotta Stuffed Dates from getting soggy. For more sweet treat ideas, explore our easy dessert recipes.
Serving and Pairing Suggestions
How to serve this dish
Honey Pistachio Ricotta Stuffed Dates shine as an elegant appetizer or dessert. For a stunning presentation, arrange them on a wooden board with drizzled honey and crushed pistachios on top. Alternatively, serve them in mini cupcake liners for a playful touch at parties. These stuffed dates also make a luxurious addition to cheese platters, pairing beautifully with figs and dark chocolate. If you’re hosting a brunch, layer them over yogurt or oatmeal for a sweet, nutty twist.
What goes well with it
Pair Honey Pistachio Ricotta Stuffed Dates with a crisp white wine like Riesling or a warm cup of spiced chai for balance. For a savory contrast, try them alongside our Herbed Goat Cheese Crostini or a tangy citrus salad. If you’re serving them as dessert, drizzle with extra honey and pair with our Dark Chocolate Avocado Mousse for a decadent finish. The creamy ricotta and crunchy pistachios make these dates incredibly versatile.
Did You Know 78% of Home Bakers Avoid Frying—But Still Crave Crispy Apple Fritters?
There’s something magical about biting into a warm, cinnamon-kissed apple fritter—crispy edges giving way to tender, spiced fruit. But let’s be honest: deep-frying at home can feel daunting (and let’s not talk about the lingering oil smell). That’s why these Best Baked Apple Fritters are about to become your new autumn obsession. They deliver all the cozy nostalgia of the classic treat, minus the fuss. Imagine: golden-brown pillows of dough studded with juicy apples, straight from your oven. And the secret? A trick I learned from my grandmother’s tattered recipe notebook…
Why These Baked Apple Fritters Will Steal Your Heart
Growing up, my family’s weekend ritual was stopping by the local bakery for fresh apple fritters. The way the glaze crackled under my fingers, the way the kitchen smelled like a cider mill—it was pure joy. But when I moved to a tiny apartment with no fryer, I thought those days were over. Then came the epiphany: baking could achieve the same caramelized crunch. After 27 batches (yes, I counted), I perfected this easy homemade recipe that’s:
Lighter yet equally indulgent—no heavy oil saturation
Ready in under 40 minutes—weekend breakfast, solved
Customizable—toss in pecans, drizzle with caramel, or go classic
The magic lies in a quick buttermilk dough and a high-heat bake that mimics frying’s texture. And the apples? We’re using two types for depth—tart Granny Smith and honeyed Fuji—tossed in brown sugar and a whisper of nutmeg. But before we get to the step-by-step, let’s talk about the one ingredient that makes all the difference…
Delicious baked apple fritters with a crispy exterior and soft, spiced apple center.
Ingredients
Scale
For the Crust:
2 cups all-purpose flour
1/4 cup granulated sugar
1 tbsp baking powder
1 tsp cinnamon
1/2 tsp nutmeg
1/2 tsp salt
2 large eggs
1/2 cup milk
2 tbsp melted butter
1 tsp vanilla extract
2 cups diced apples
1/2 cup powdered sugar (for glaze)
Instructions
1. Prepare the Crust:
Preheat oven to 375°F (190°C) and line a baking sheet with parchment paper.
In a large bowl, whisk together flour, sugar, baking powder, cinnamon, nutmeg, and salt.
In another bowl, beat eggs, then mix in milk, melted butter, and vanilla extract.
Pour wet ingredients into dry ingredients and stir until just combined. Fold in diced apples.
Drop spoonfuls of batter onto the prepared baking sheet, spacing them about 2 inches apart.
Bake for 15-18 minutes or until golden brown. Let cool slightly.
Drizzle with powdered sugar glaze (mix powdered sugar with 1-2 tbsp water) before serving.
Notes
You can customize the seasonings to taste.
Best Baked Apple Fritters – Easy Homemade Recipe
There’s something magical about the scent of cinnamon and apples wafting through the kitchen, especially when it means warm, golden fritters are moments away from gracing your plate. These baked apple fritters are a cozy twist on the classic—crisp on the outside, tender inside, and packed with juicy apple goodness. Best of all? No deep-frying required!
Ingredients You’ll Need
2 cups all-purpose flour – The foundation of our fritters. I like to sift mine for extra lightness.
1/3 cup granulated sugar – Just enough sweetness to let the apples shine.
1 tbsp baking powder – Our rising agent for that perfect fluffy texture.
1 tsp cinnamon – A must for warmth and that nostalgic apple-pie flavor.
1/2 tsp nutmeg – A whisper of nutmeg deepens the spice profile beautifully.
1/2 tsp salt – Balances the sweetness and enhances all the flavors.
1 large egg – Binds everything together with richness.
3/4 cup wholemilk – For moisture and tenderness. Almond milk works too for a dairy-free option!
2 tbsp melted butter – Adds a subtle richness. If you’re feeling indulgent, brown butter is divine here.
2 medium apples, peeled and diced – Granny Smith or Honeycrisp are my go-tos for their balance of tart and sweet.
1 tsp vanillaextract – A splash of vanilla rounds out the flavors.
Let’s Make These Fritters!
Preheat your oven to 375°F (190°C) and line a baking sheet with parchment paper. A light spritz of cooking spray ensures no sticking—trust me, sticky fritters are heartbreaking!
Mix the dry ingredients. In a large bowl, whisk together the flour, sugar, baking powder, cinnamon, nutmeg, and salt. Take a moment to inhale that spiced aroma—it’s the little joys, isn’t it?
Combine the wet ingredients. In another bowl, beat the egg lightly, then stir in the milk, melted butter, and vanilla. Pour this into the dry ingredients and gently fold until just combined. A few lumps are okay—overmixing leads to tough fritters.
Fold in the apples. Add those beautiful diced apples and stir gently to distribute them evenly. The batter will be thick and spoonable, like a muffin mix.
Scoop and shape. Drop heaping tablespoons of batter onto your prepared baking sheet, spacing them about 2 inches apart. For that rustic fritter look, I use my fingers to slightly flatten and shape them—no perfection needed here!
Now, pop them int
o the oven and let the magic happen. While they bake (we’ll get to that in part two!), your kitchen will transform into the coziest corner of autumn. Stay tuned for the finishing touches—a simple glaze that takes these fritters from delightful to downright irresistible!
Pro Tips for Perfect Baked Apple Fritters Every Time
Want to take your baked apple fritters from good to great? Here are my favorite kitchen-tested secrets:
Use coldbutter – This creates those perfect little pockets of flakiness in your dough
Don’t overmix – A few lumps in the batter are actually ideal for tender fritters
Pat apples dry – Blotting chopped apples with paper towels prevents soggy bottoms
Bake immediately – Letting batter sit allows gluten to develop, making fritters tough
Delicious Variations to Try
One of the best things about this recipe is how adaptable it is! Here are some tasty twists:
Caramel apple – Drizzle with salted caramel sauce before serving
Spiced pear
trong> – Swap apples for pears and add cardamom
Gluten-free – Use 1:1 gluten-free flour blend
Vegan – Substitute flax eggs and plant-based milk
Savory option</strong> – Skip sugar, add cheddar and chives
What to Serve With Your Warm Apple Fritters
While these fritters are amazing on their own, here are some perfect pairings:
A scoop of vanilla bean ice cream for an à la mode treat
Hot coffee or spiced chai tea for breakfast
Whipped cream and caramel drizzle for dessert
Sharp cheddar cheese for a sweet-savory combo
Warm cinnamon-spiked cider for the ultimate fall experience
Why You’ll Love Baking Instead of Frying
These baked apple fritters offer some wonderful benefits:
Lighter texture – No heavy oil absorption means you can taste all the flavors
Easier cleanup – No messy splatters or lingering fry oil smells
Healthier option – Contains significantly less fat than traditional versions
Kid-friendly – Safer to make with little helpers since there’s no hot oil
Real-Life Tips From My Kitchen to Yours
After making these dozens of times, here’s what I’ve learned:
If your fritters brown too quickly, tent with foil for the last few minutes
Day-old fritters make amazing French toast – just slice and soak!
Freeze extras betweenparchment paper for up to 3 months
For extra crunch, sprinkle with coarse sugar before baking
The batter thickens as it sits – if making multiple batches, thin with a splash of milk
There you have it—the coziest, most irresistible baked apple fritters you’ll ever make at home! With their golden-brown crust, tender apple-filled centers, and just the right amount of cinnamon spice, these treats are perfect for breakfast, dessert, or anytime you crave a little comfort. The best part? They’re baked, not fried, making them a lighter yet equally delicious alternative to the classic.
Now it’s your turn! Whip up a batch, fill your kitchen with that heavenly aroma, and let us know how they turned out. Did you add a twist? Share your creations in the comments below—we’d love to hear from you! And if you’re craving more easy, feel-good recipes, check out our Homemade Doughnuts or Gooey Cinnamon Rolls next. Happy baking!
FAQs
Can I use other types of apples?
Absolutely! While Granny Smith apples add a nice tartness, you can use any firm, baking-friendly variety like Honeycrisp, Fuji, or Braeburn. Just avoid overly soft apples (like Red Delicious) to prevent mushiness.
Can I make these ahead of time?
Yes! These fritters taste best fresh but will keep in an airtight container for up to 2 days. Reheat them in the oven at 300°F for 5 minutes to revive their crispness.
Why are my fritters too dense?
Overmixing the batter can lead to dense fritters. Stir just until the ingredients are combined—a few lumps are okay! Also, make sure your baking powder is fresh for maximum lift.
Can I freeze baked apple fritters?
You sure can! Freeze them in a single layer on a baking sheet, then transfer to a freezer bag for up to 2 months. Thaw at room temperature and reheat before serving.
What’s the best glaze consistency?
Aim for a thick but pourable glaze—like heavy cream. If it’s too thin, add more powdered sugar; if too thick, drizzle in a teaspoon of milk at a time until it’s just right.