Best Refreshing Lemonade Pie – Easy No-Bake Dessert
Introduction
There’s something undeniably special about desserts that bring back childhood memories while still feeling fresh and exciting. That’s exactly why I’m thrilled to share my Refreshing Lemonade Pie with you today. Whether you’re craving a tangy-sweet treat for summer gatherings or just need a little pick-me-up after a long day, this recipe delivers pure joy in every bite. Plus, it’s incredibly easy to make, so you can focus on savoring the moment rather than stressing over complicated steps.
Refreshing Lemonade Pie is the perfect blend of creamy, citrusy, and downright delightful. Imagine a velvety filling bursting with bright lemon flavor, nestled in a buttery graham cracker crust and topped with a cloud of whipped cream. It’s the kind of dessert that instantly lifts your mood and makes any occasion feel special. At brekcakes.com, we celebrate recipes that strike the perfect balance between nostalgia and innovation, and this pie fits right in. If you love no-bake desserts like our Easy Strawberry Cheesecake, you’ll adore this twist on a classic. And for more summer-inspired treats, check out our Tropical Mango Sorbet—it’s another crowd-pleaser!
Why I Love This Recipe
This Refreshing Lemonade Pie holds a special place in my heart because it reminds me of lazy summer afternoons spent with my grandma. She always had a way of turning simple ingredients into something magical, and this pie captures that same spirit. Every time I make it, I’m transported back to her kitchen, where the air smelled like citrus and laughter. It’s more than just a dessert—it’s a little slice of happiness that I’m honored to share with you.
Health and Nutrition
Why it’s good for your body
Refreshing Lemonade Pie packs a delightful punch of nutrients while satisfying your sweet tooth. First, the lemon juice delivers a hefty dose of vitamin C, which boosts immunity and supports glowing skin. Additionally, the citrusy flavor naturally enhances hydration, making this dessert a smart choice on warm days. Unlike heavy, sugar-laden treats, Refreshing Lemonade Pie offers a lighter alternative without sacrificing taste.
Moreover, the creamy filling often includes yogurt or condensed milk, providing a source of calcium and protein. These ingredients help maintain strong bones and keep you feeling full longer. Meanwhile, the graham cracker crust adds a touch of fiber, aiding digestion. Because Refreshing Lemonade Pie balances sweetness with tanginess, it curbs cravings without overwhelming your palate.
Finally, the antioxidants in lemons fight inflammation, promoting overall wellness. Whether you enjoy a slice as an afternoon pick-me-up or a post-dinner treat, Refreshing Lemonade Pie nourishes your body while delighting your taste buds. With its combination of vitamins, minerals, and satisfying texture, this dessert proves that indulgence and nutrition can go hand in hand.
How it fits in a healthy lifestyle
Refreshing Lemonade Pie fits seamlessly into a balanced diet when enjoyed mindfully. For those watching their gluten intake, simply swap the traditional crust for a gluten-free alternative, keeping the dessert just as delicious. The pie also works well for heart-healthy eating, especially if you use low-fat dairy options to reduce saturated fat.
If you prioritize portion control, slice Refreshing Lemonade Pie into smaller servings and pair it with fresh berries for added fiber. This approach aligns with balanced eating tips that emphasize variety and moderation. Whether you serve it at gatherings or savor it solo, this dessert proves that healthy living doesn’t mean skipping the sweeter moments in life.
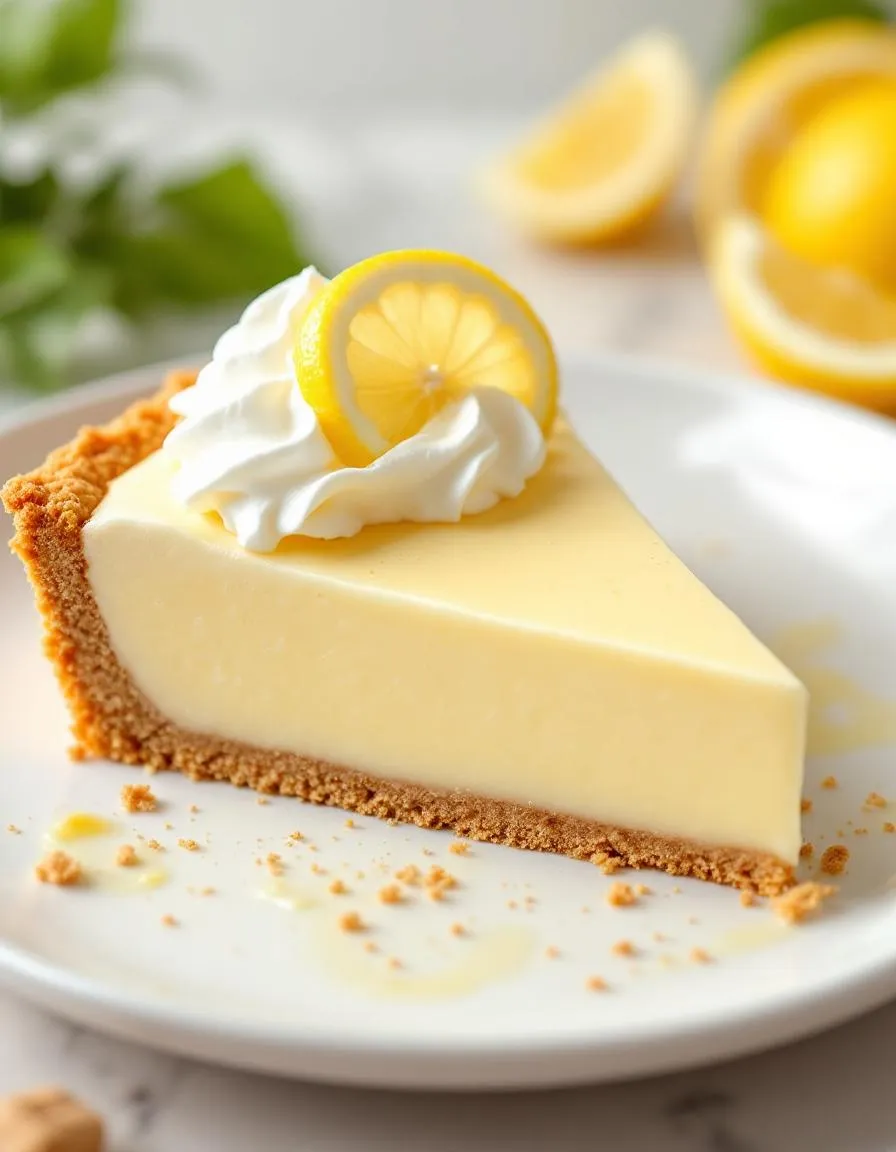
A tangy and sweet no-bake pie with the refreshing taste of lemonade.
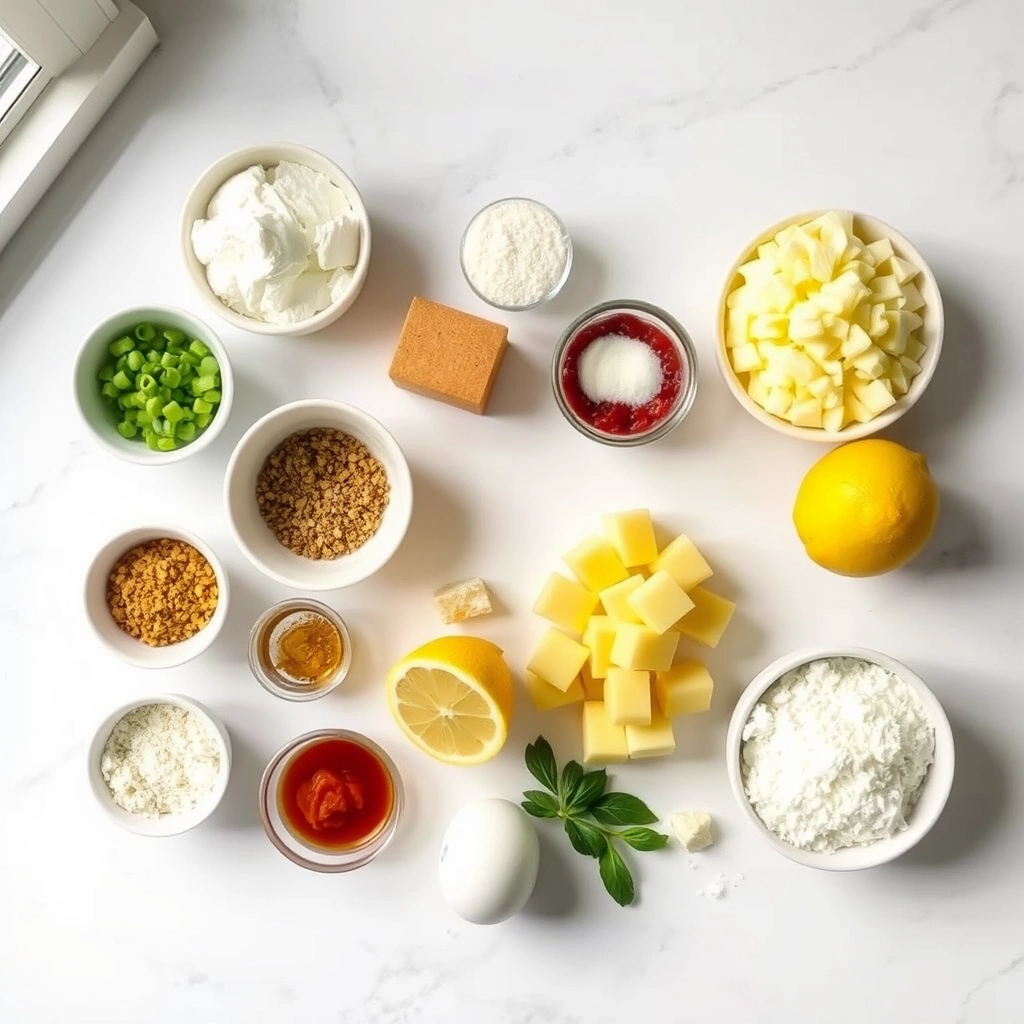
Ingredients
Scale
For the Crust:
1 9-inch graham cracker crust
1 14-oz can sweetened condensed milk
1 6-oz can frozen lemonade concentrate, thawed
1 8-oz container whipped topping, thawed
Yellow food coloring (optional)
Lemon slices for garnish (optional)
Instructions
1. Prepare the Crust:
In a large bowl, whisk together sweetened condensed milk and lemonade concentrate until smooth.
Fold in whipped topping until fully combined. Add a few drops of yellow food coloring if desired.
Pour mixture into graham cracker crust and smooth the top with a spatula.
Refrigerate for at least 4 hours or until set. Garnish with lemon slices before serving if desired.
Notes
You can customize the seasonings to taste.
s-dish">How to Prepare This Dish
Steps and time-saving tips
Start by crushing graham crackers into fine crumbs for the crust. Meanwhile, melt butter and mix it with the crumbs until they hold together. Press the mixture firmly into a pie dish, then chill it for 10 minutes to set. While the crust cools, whisk sweetened condensed milk, lemon juice, and lemon zest in a bowl until smooth. For extra creaminess, fold in whipped topping gently to keep the filling light. Pour the lemonade mixture over the chilled crust, spreading it evenly with a spatula. Cover the pie and refrigerate it for at least 4 hours, though overnight works even better. Before serving, top with fresh whipped cream and a sprinkle of lemon zest for a bright finish. To save time, use store-bought graham cracker crust or pre-made whipped topping. Just remember, fresh lemon juice makes all the difference in flavor.
Mistakes I’ve made and learned from
I once rushed the chilling step and ended up with a runny Refreshing Lemonade Pie that wouldn’t slice neatly. Now I always plan ahead—patience is key for that perfect firm texture. Another time, I overmixed the filling and lost the airy lightness. A gentle fold, like when making no-bake desserts, keeps it fluffy. If your crust sticks to the pan, try lining it with parchment like I learned from my pie crust tips post. Small tweaks make all the difference!
n-and-variations">Cultural Connection and Variations
Where this recipe comes from
Refreshing Lemonade Pie feels like a sweet slice of summer, no matter where you enjoy it. While its exact origins are a bit hazy, many tie it to Southern U.S. potlucks and backyard barbecues, where creamy, citrusy desserts always steal the show. Some say it evolved from classic lemon icebox pies, while others credit creative home cooks who wanted to capture the tangy kick of lemonade in a no-bake treat.
Across the globe, similar desserts pop up with local twists. In Italy, they might swap lemonade for limoncello in a chilled tart, while Mexican cooks often add a sprinkle of chili powder for a sweet-and-spicy contrast. Even within the U.S., Refreshing Lemonade Pie adapts easily. Some families fold in whipped cream for extra fluffiness, while others layer it over a graham cracker crust or a buttery shortbread base.
Personally, I love how this pie bridges generations. My grandma made hers with fresh-squeezed lemons and a touch of vanilla, but my cousin modernized it by using store-bought lemonade concentrate for a quicker fix. Either way, it always brings everyone together—just like a cold glass of lemonade on a hot day.
ays-cooking">How it fits in today’s cooking
Refreshing Lemonade Pie still shines as a go-to dessert because it’s effortlessly versatile. Busy parents love it for its no-fuss prep, while food bloggers dress it up with berry compotes or toasted meringue for Instagram-worthy flair. It’s a staple at Fourth of July parties, but honestly, it works just as well for a random Tuesday when you crave something bright and creamy.
Modern twists keep it exciting, too. Some bakers mix in coconut milk for a tropical vibe, while others sneak in basil or thyme for an herby surprise. If you’re looking for more summer-ready treats, check out our Easy Summer Desserts roundup. And for those who adore citrus flavors, our Citrus Cake Recipes collection offers even more zesty inspiration.
Ultimately, Refreshing Lemonade Pie sticks around because it’s nostalgic yet adaptable—a dessert that feels both familiar and fresh, no matter how you slice it.
>Taste and Texture
What makes it delicious
Refreshing Lemonade Pie bursts with bright, tangy flavors that dance on your tongue. The creamy filling melts smoothly, while the zesty lemonade cuts through with a lively punch. Each bite delivers a perfect balance of sweet and tart, thanks to fresh lemon juice and a touch of honey. Meanwhile, the buttery graham cracker crust adds a satisfying crunch, creating a delightful contrast. The aroma alone—citrusy and slightly floral—will make your mouth water before you even take a bite. Whether you serve it chilled or slightly softened, Refreshing Lemonade Pie always feels like a cool, sunny treat.
Boosting the flavor
For an extra flavor boost, try swirling in a spoonful of raspberry puree or topping your Refreshing Lemonade Pie with toasted coconut flakes. A sprinkle of lemon zest right before serving amps up the citrusy fragrance, while a drizzle of homemade berry sauce adds a juicy sweetness. If you love a richer texture, fold whipped cream into the filling or swap the graham crust for a no-bake cookie crust. Experiment with fresh herbs like basil or mint for a surprising, refreshing twist. Every little tweak makes this pie even more irresistible.
Tips for Success
Best practices for results
Always chill your crust for at least 30 minutes before baking to prevent shrinking. Meanwhile, use fresh lemon juice for the filling to give your Refreshing Lemonade Pie its signature bright flavor. For a silky texture, whisk the filling constantly while heating it on the stove. Additionally, let the pie set fully in the fridge for four hours before slicing. Finally, garnish with whipped cream just before serving to keep it light and airy.
Mistakes to avoid
Avoid overmixing the crust dough, as this can make it tough instead of tender. If your filling seems too runny, check out our guide to troubleshooting pie fillings for quick fixes. Another common mistake is skipping the blind-baking step, which leads to a soggy bottom crust. For more crust tips, explore our perfect pie crust secrets. Lastly, don’t rush the chilling time—your Refreshing Lemonade Pie needs patience to slice cleanly.
Serving and Pairing Suggestions
How to serve this dish
For a stunning presentation, slice Refreshing Lemonade Pie into neat wedges and plate them on chilled dessert plates. Meanwhile, garnish each slice with a twist of lemon zest or a dollop of whipped cream for extra flair. Alternatively, serve it family-style on a decorative pie stand to let guests help themselves. This pie shines at summer gatherings, potlucks, or even as a light finish to a holiday meal. To make it even more inviting, pair it with fresh berries or mint sprigs for a pop of color.
h-it">What goes well with it
Refreshing Lemonade Pie pairs beautifully with a crisp iced tea or a sparkling lemon-lime soda, balancing its tangy sweetness with a refreshing sip. For a richer contrast, try serving it alongside a scoop of vanilla bean ice cream from our homemade vanilla ice cream recipe. Additionally, a side of buttery shortbread cookies adds a delightful crunch. If you love citrus desserts, our tangy lemon bars make a fantastic companion for a zesty dessert spread.
What is Refreshing Lemonade Pie made of?
Refreshing Lemonade Pie typically combines lemonade concentrate, sweetened condensed milk, whipped topping, and a graham cracker crust for a tangy yet creamy dessert. Some recipes add lemon zest or fresh lemon juice for extra zing, making it perfect for summer gatherings.
rank-math-faq-item">
How do you keep Refreshing Lemonade Pie from getting watery?
To prevent a watery texture, ensure your whipped topping is fully thawed and drained, and avoid overmixing the filling. Chilling the pie for at least 4 hours (or overnight) helps the Refreshing Lemonade Pie set properly for clean slices.
Can you freeze Refreshing Lemonade Pie?
Yes! Freeze Refreshing Lemonade Pie for up to 2 weeks—wrap it tightly in plastic wrap or aluminum foil. Thaw in the fridge for 1-2 hours before serving to maintain the creamy texture.
What’s the best way to serve Refreshing Lemonade Pie?
Serve chilled with a dollop of whipped cream, fresh berries, or a sprinkle of graham cracker crumbs. For extra flair, garnish Refreshing Lemonade Pie with thin lemon slices or mint leaves.
>
Best Strawberry Shortcake Cookies – Easy Recipe
Introduction
There’s something undeniably special about desserts that capture the essence of summer, and Strawberry Shortcake Cookies do exactly that. Whether you’re craving a nostalgic treat or need a crowd-pleasing dessert for your next gathering, these cookies deliver buttery sweetness with bursts of fresh strawberry flavor. Plus, they’re easier to make than traditional strawberry shortcake but just as delightful. If you love simple yet impressive bakes, you’ll adore this recipe as much as I do.
Strawberry Shortcake Cookies combine the classic flavors of strawberry shortcake—juicy berries, tender crumb, and a hint of vanilla—into a portable, bite-sized form. Unlike fussy layered desserts, these cookies come together quickly, making them perfect for busy bakers or last-minute cravings. They’re also versatile: enjoy them as an afternoon snack, pack them for picnics, or serve them with whipped cream for an extra-indulgent twist. Here at brekcakes.com, we celebrate recipes that balance simplicity and flavor, just like our Easy Vanilla Cupcakes or Classic Chocolate Chip Cookies. These Strawberry Shortcake Cookies fit right in, offering a fresh take on a beloved dessert while keeping the process fun and approachable.
Why I Love This Recipe
Strawberry Shortcake Cookies remind me of lazy summer afternoons at my grandmother’s house, where she’d let me sneak berries from the bowl before baking. Now, every time I make them, the smell of strawberries and vanilla takes me back to those sunny days. I also love how they bring people together—whether it’s my kids fighting over the last cookie or friends asking for the recipe after one bite. It’s the kind of treat that feels like a hug in dessert form, and that’s exactly what I want to share with you.
Health and Nutrition
Why it’s good for your body
Strawberry Shortcake Cookies pack a surprising nutritional punch while satisfying your sweet tooth. First, fresh strawberries add a dose of vitamin C, which supports immune health and skin vitality. Additionally, the natural sweetness of strawberries means you can reduce added sugars without sacrificing flavor. Moreover, these cookies often include whole grains or oats, providing fiber to keep you full longer and support digestion.
Furthermore, Strawberry Shortcake Cookies deliver antioxidants from real fruit, helping combat oxidative stress in the body. Unlike heavily processed desserts, these cookies use simple ingredients that offer more nutritional value. For instance, butter or yogurt in the recipe contributes calcium and healthy fats, which are essential for bone strength and energy. Meanwhile, the combination of protein and fiber helps stabilize blood sugar levels, preventing energy crashes.
Finally, Strawberry Shortcake Cookies make indulging feel guilt-free. By balancing wholesome ingredients with delightful flavors, they turn a treat into a smarter choice. Whether you enjoy them as a snack or dessert, you’re nourishing your body while treating your taste buds.
How it fits in a healthy lifestyle
Strawberry Shortcake Cookies fit seamlessly into a balanced diet when enjoyed mindfully. Pair them with a protein-rich snack like Greek yogurt or nuts to create a satisfying, well-rounded treat. They also work well as a post-workout reward, offering quick energy from carbs and recovery support from natural fruit sugars.
For those with dietary preferences, you can easily adapt the recipe to meet gluten-free or heart-healthy needs. Swap in almond flour or oat flour for a gluten-free version, or use coconut oil instead of butter for a plant-based twist. If you’re exploring more wholesome dessert ideas, check out our guides on healthy dessert swaps and gluten-free baking for inspiration. With simple tweaks, Strawberry Shortcake Cookies can align with almost any eating plan while keeping flavor front and center.
Delicious, soft cookies with fresh strawberries and a hint of vanilla, perfect for summer treats.
Ingredients
Scale
For the Crust:
1 cup fresh strawberries, diced
2 cups all-purpose flour
1/2 teaspoon baking powder
1/4 teaspoon salt
1/2 cup unsalted butter, softened
3/4 cup granulated sugar
1 large egg
1 teaspoon vanilla extract
1/4 cup heavy cream
Instructions
1. Prepare the Crust:
Preheat oven to 375°F (190°C) and line a baking sheet with parchment paper.
In a bowl, whisk together flour, baking powder, and salt. Set aside.
In another bowl, cream together butter and sugar until light and fluffy. Beat in the egg and vanilla extract.
Gradually mix in the dry ingredients, alternating with the heavy cream, until just combined.
Gently fold in the diced strawberries.
Drop tablespoon-sized dough onto the prepared baking sheet, spacing them about 2 inches apart.
Bake for 12-15 minutes or until the edges are lightly golden. Let cool on the baking sheet for 5 minutes before transferring to a wire rack.
Notes
You can customize the seasonings to taste.
“`html
="how-to-prepare-this-dish">How to Prepare This Dish
Steps and time-saving tips
First, preheat your oven to 350°F and line a baking sheet with parchment paper. While the oven heats, whisk together the dry ingredients—flour, baking powder, and a pinch of salt—in a large bowl. In another bowl, cream the butter and sugar until light and fluffy, then beat in the egg and vanilla. Gradually fold the dry mixture into the wet ingredients, but don’t overmix. Gently stir in diced strawberries and white chocolate chips for extra sweetness. Scoop tablespoon-sized portions of dough onto the baking sheet, spacing them about two inches apart. Bake for 12-14 minutes until the edges turn golden. Let the Strawberry Shortcake Cookies cool on the sheet for five minutes before transferring them to a wire rack. For a time-saving hack, use a cookie scoop to ensure even sizing and quicker cleanup. If the dough feels sticky, chill it for 15 minutes to make handling easier. These cookies taste best fresh, but you can store them in an airtight container for up to three days.
Mistakes I’ve made and learned from
When I first made Strawberry Shortcake Cookies, I made the classic mistake of using overly juicy strawberries, which turned the dough soggy and spread too much during baking. Now, I pat them dry with a paper towel before folding them in. Another lesson? Don’t skip chilling the dough if it’s warm—your cookies will hold their shape better. If you’re new to baking, check out my guide on avoiding common cookie mistakes for more tips. I also learned the hard way that overmixing leads to tough cookies, so I stir just until the flour disappears. For extra confidence, my perfect cookie texture post breaks down the science behind tender results. Trust me, a few small tweaks make all the difference!
Strawberry Shortcake Cookies carry the sweet nostalgia of summer picnics and family gatherings. Originally inspired by classic strawberry shortcake, this portable twist captures the same juicy berries and tender crumb but in a handheld treat. In the South, bakers often add a touch of buttermilk for extra tang, while New England versions might lean into vanilla bean for depth. Across the pond, British bakers sometimes swap shortbread-style dough for a sturdier base, proving how versatile Strawberry Shortcake Cookies can be.
My grandmother made her
version with a hint of lemon zest, claiming it brightened the strawberries just right. Meanwhile, in Japan, you might find these cookies with a matcha-infused dough for a earthy contrast. Whether served at tea time or packed into lunchboxes, Strawberry Shortcake Cookies adapt to local tastes while keeping their charm. Some families even freeze them for winter holidays, turning a summer staple into year-round joy.
How it fits in today’s cooking
Today, Strawberry Shortcake Cookies bridge tradition and modern convenience. Busy bakers love them for quick dessert prep, while meal preppers stash batches alongside healthy breakfast ideas for a sweet start. Social media has sparked trends like gluten-free almond flour versions or vegan swaps, proving how adaptable the recipe remains. Even cafes feature them as seasonal specials, pairing with iced teas or homemade lattes for afternoon pick-me-ups.
What keeps them relevant? Their simplicity. Whether you’re reviving childhood memories or experimenting with new twists, Strawberry Shortcake Cookies fit effortlessly into today’s kitchens. They’re as welcome at a backyard BBQ as they are in a lunchbox—proof that some classics only get better with time.
>Taste and Texture
What makes it delicious
Strawberry Shortcake Cookies deliver a burst of sweet, juicy strawberry flavor in every bite, balanced by the buttery richness of shortcake-inspired dough. The fresh strawberries add a natural tanginess, while a hint of vanilla elevates the aroma, making each cookie irresistibly fragrant. As you take a bite, the texture surprises you—soft and slightly chewy in the center, with delicate golden edges that offer a subtle crispness. Meanwhile, pockets of strawberry jam or diced fruit create little bursts of moisture, keeping every mouthful exciting. Whether warm from the oven or cooled, Strawberry Shortcake Cookies taste like a handheld dessert dream.
Boosting the flavor
For an extra layer of indulgence, drizzle melted white chocolate over the cooled Strawberry Shortcake Cookies or sprinkle them with toasted coconut flakes. If you love a deeper berry flavor, fold in a handful of freeze-dried strawberries for concentrated sweetness and a satisfying crunch. Pairing these cookies with a dollop of homemade whipped cream mimics the classic shortcake experience, while a pinch of lemon zest brightens the overall taste. Craving more fruity twists? Try adding a swirl of raspberry compote to the batter for a vibrant, tangy contrast. With these tweaks, your cookies will shine even brighter.
Tips for Success
Best practices for results
Always chill the dough for at least 30 minutes before baking your Strawberry Shortcake Cookies. This step prevents spreading and keeps the texture perfect. Additionally, use fresh strawberries for the best flavor, but pat them dry to avoid soggy dough. For even baking, rotate the tray halfway through and check for golden edges. Finally, let the cookies cool completely before serving so they hold their shape.
Mistakes to avoid
Avoid overmixing the dough, as this can make your Strawberry Shortcake Cookies tough instead of tender. Instead, gently fold ingredients until just combined. Many bakers also forget to preheat the oven, which leads to uneven baking. For more baking basics, check out our guide on essential baking tools. Another common mistake is using frozen strawberries without thawing and draining them first. For tips on handling fruit in desserts, see our fruit baking tips.
Serving and Pairing Suggestions
How to serve this dish
Strawberry Shortcake Cookies shine when you serve them with a touch of elegance. For a beautiful presentation, arrange them on a rustic wooden board or a pastel-colored plate. Meanwhile, dust them lightly with powdered sugar or add fresh strawberry slices on top for a pop of color. These cookies make a delightful addition to brunch spreads, afternoon tea parties, or even as a sweet finale to summer picnics. If you want to elevate the experience, serve them warm with a dollop of whipped cream for an extra indulgent treat.
h-it">What goes well with it
Pair Strawberry Shortcake Cookies with a chilled glass of homemade lemonade for a refreshing contrast to their sweet, buttery flavor. Alternatively, try them alongside a scoop of vanilla bean ice cream to create a simple yet irresistible dessert. For a cozy twist, serve them with a cup of Earl Grey tea, as the bergamot notes beautifully complement the strawberries. If you love fruity desserts, you might also enjoy our Berry Cheesecake Bars or Classic Vanilla Cupcakes for a full dessert spread.
How do you make strawberry shortcake cookies from scratch?
To make Strawberry Shortcake Cookies from scratch, combine flour, sugar, baking powder, and cold butter to create a crumbly dough. Fold in diced strawberries and a splash of vanilla, then bake until golden for a tender, fruity treat that captures the classic dessert flavor.
rank-math-faq-item">
Can I use frozen strawberries for strawberry shortcake cookies?
Yes, frozen strawberries work for Strawberry Shortcake Cookies, but thaw and drain them thoroughly to avoid excess moisture. Pat them dry before chopping and folding into the dough to prevent soggy cookies while keeping the vibrant berry taste.
What’s the best way to store strawberry shortcake cookies?
Store Strawberry Shortcake Cookies in an airtight container at room temperature for up to 2 days or refrigerate for 5 days. For longer freshness, freeze them in a single layer and thaw before serving to maintain their soft texture.
Can I add whipped cream to strawberry shortcake cookies?
Absolutely! Add a dollop of whipped cream between two Strawberry Shortcake Cookies for a sandwich-style treat, or top them individually for extra decadence. Serve immediately to prevent sogginess, and enjoy the classic strawberry shortcake experience in cookie form.
>
Best Chicken Salad – Classic and Easy Recipe
Introduction
There’s something undeniably comforting about a well-made Chicken Salad. Whether you’re packing it for a picnic, serving it at a brunch, or simply enjoying it as a quick lunch, this dish brings both nostalgia and freshness to the table. Moreover, it’s versatile enough to suit any season, making it a staple in my kitchen year-round. If you’ve ever craved a dish that’s light yet satisfying, easy yet flavorful, then you’re in the right place.
Chicken Salad is more than just a mix of shredded chicken and mayo—it’s a canvas for creativity. You can keep it classic with crisp celery and a hint of lemon, or jazz it up with grapes, nuts, or even a touch of curry powder. What makes it special is its adaptability. Busy weeknights call for quick fixes, and this recipe delivers without sacrificing taste. Plus, it pairs beautifully with everything from flaky croissants to fresh greens. If you’re looking for more inspiration, check out my Easy Weeknight Dinners or explore my Healthy Lunch Ideas for more ways to enjoy simple, wholesome meals.
Why I Love This Recipe
Chicken Salad holds a special place in my heart because it reminds me of summer afternoons spent with my grandmother. She taught me how to balance textures and flavors, turning humble ingredients into something memorable. To this day, every bite takes me back to her sunlit kitchen. It’s a recipe that feels like home, and I hope it becomes a favorite in your household too.
Health and Nutrition
Why it’s good for your body
Chicken Salad packs a powerful nutritional punch while keeping flavors fresh and satisfying. First, lean chicken breast provides high-quality protein to support muscle repair and keep you full longer. Additionally, the mix of vegetables like celery and carrots adds fiber, which aids digestion and promotes gut health. Moreover, healthy fats from ingredients like avocado or olive oil help your body absorb essential vitamins.
Beyond protein and fiber, Chicken Salad delivers key vitamins and minerals. For example, leafy greens often included in the recipe offer iron and vitamin K for strong bones and energy. Meanwhile, nuts or seeds sprinkled on top contribute heart-healthy omega-3s. Because it’s so versatile, you can easily customize Chicken Salad to boost specific nutrients without sacrificing taste.
Finally, Chicken Salad makes a smart choice for balanced eating. Unlike heavy, creamy dishes, a well-made version keeps calories in check while maximizing nutrition. Whether you enjoy it as a light lunch or a post-workout meal, it fuels your body efficiently. With so many benefits, it’s no wonder Chicken Salad remains a go-to for health-conscious eaters.
How it fits in a healthy lifestyle
Chicken Salad fits seamlessly into almost any dietary plan. If you’re focusing on high-protein meals, simply add extra chicken or Greek yogurt for creaminess. For gluten-free eaters, it’s naturally safe when paired with lettuce wraps or gluten-free crackers. Even those following heart-healthy guidelines can enjoy it by using olive oil instead of mayo.
Meal preppers love Chicken Salad because it stays fresh for days, making healthy eating convenient. Pair it with a quick healthy side for a complete meal in minutes. Plus, it’s perfect for portion control, helping you avoid overeating while staying satisfied. If you need more low-carb ideas, check out these low-carb lunch options to keep your routine varied and exciting.
Whether you’re fueling up after a workout or packing a nutritious lunch, Chicken Salad adapts to your needs. Its balance of protein, veggies, and healthy fats makes it a reliable staple for anyone prioritizing wellness.
Start by gathering all your ingredients for the Chicken Salad—this saves time and keeps the process smooth. Chop cooked chicken into bite-sized pieces, then toss them into a large mixing bowl. Next, add diced celery, red onion, and any crunchy veggies you love for extra texture. In a separate bowl, whisk together mayonnaise, a squeeze of lemon juice, Dijon mustard, and a pinch of salt and pepper. Drizzle this creamy dressing over the chicken mixture, then gently fold everything together until well coated. For a fresh twist, toss in halved grapes or sliced almonds. Finally, cover the bowl and chill the Chicken Salad for at least 30 minutes to let the flavors meld. If you’re short on time, use pre-cooked rotisserie chicken or leftover grilled chicken. Serve it on a bed of greens, in a sandwich, or with crackers for a quick, satisfying meal.
Mistakes I’ve made and learned from
Early on, I made the mistake of over-mixing the Chicken Salad, which turned the chicken mushy. Now, I gently fold the ingredients just until combined. Another blunder? Skipping the chilling time. The salad tasted bland until I learned that resting it in the fridge lets the flavors deepen. If you’re unsure about seasoning, start light—you can always adjust later. For more tips on balancing flavors, check out my guide on perfect seasoning. Also, if your dressing feels too thick, thin it with a splash of broth or water. I’ve found that prepping veggies ahead of time speeds things up, as detailed in my meal prep hacks post. Trust me, these small tweaks make a big difference!
Chicken Salad has roots that stretch across continents, blending comfort and versatility. In the American South, it often stars at picnics and bridal showers, mixed with mayo, celery, and a hint of sweetness. Meanwhile, in Southeast Asia, cooks might toss shredded chicken with lime juice, fish sauce, and fresh herbs for a bright, tangy twist. Even in Europe, you’ll find versions with yogurt or tarragon, proving Chicken Salad adapts to local tastes effortlessly.
My grandmother made her Chicken Salad with grapes and pecans, a recipe she swore by for church potlucks. Over time, I’ve seen friends add curry powder or swap mayo for avocado—each tweak telling its own story. Whether served on croissants, over greens, or straight from the bowl, Chicken Salad bridges traditions and personal touches. It’s a dish that invites creativity while staying rooted in shared moments.
ays-cooking">How it fits in today’s cooking
Today, Chicken Salad thrives as a meal-prep hero and a crowd-pleaser. Busy families lean on it for quick lunches, while food bloggers reinvent it with keto-friendly swaps or global spices. During summer, it’s a staple at backyard gatherings, pairing perfectly with pasta salads or grilled corn. Even holiday tables feature it, especially when lighter sides balance richer dishes.
Modern cooks also embrace shortcuts, like using rotisserie chicken or meal-prep hacks to save time. Yet the heart of Chicken Salad remains the same: simple, satisfying, and endlessly adaptable. Whether you crave nostalgia or a fresh spin, this dish fits seamlessly into today’s kitchens—no matter the season or occasion.
Taste and Texture
What makes it delicious
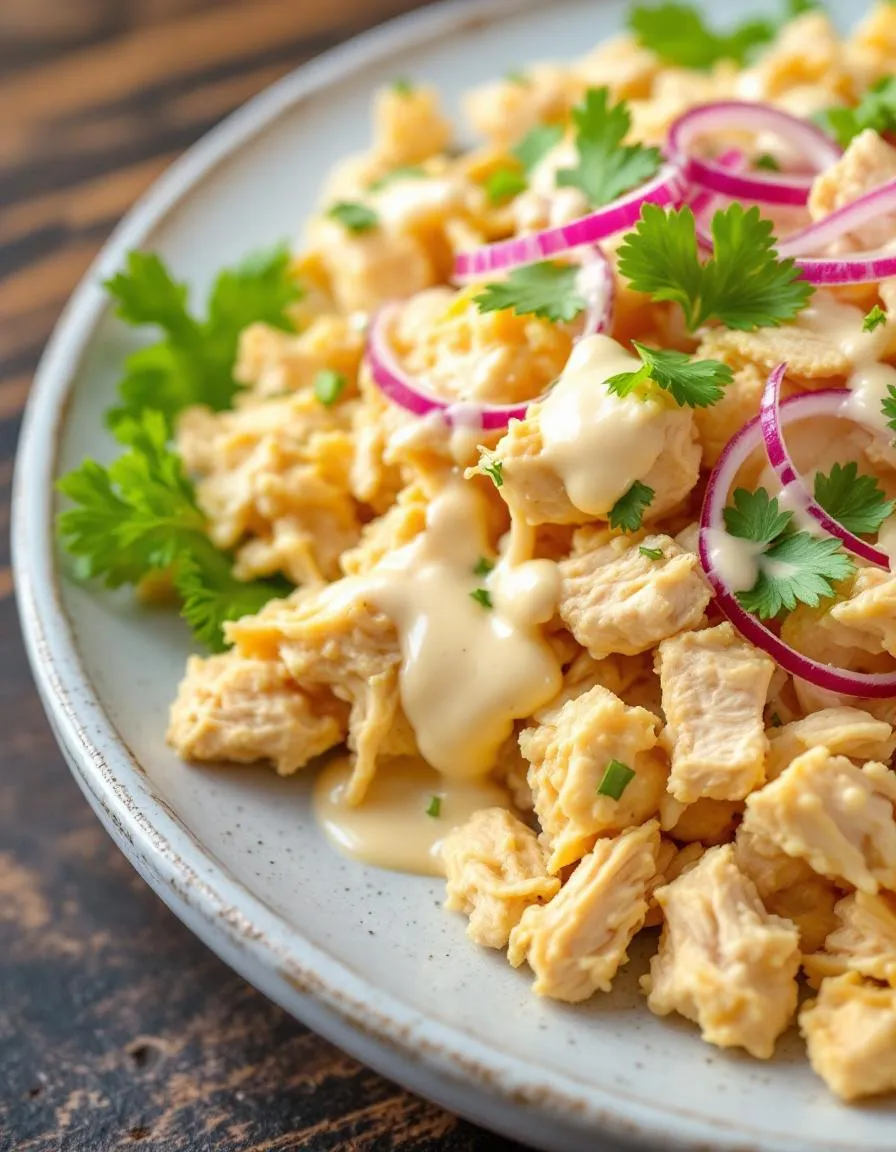
Chicken Salad delivers a satisfying mix of creamy, crunchy, and fresh flavors in every bite. Tender, juicy chicken blends with crisp celery and onions, while a rich mayo or yogurt dressing adds a velvety smoothness. Fresh herbs like dill or parsley bring a fragrant brightness, and a squeeze of lemon lifts the whole dish. The contrast between the soft chicken and the snap of crunchy mix-ins makes Chicken Salad irresistibly textured. Whether piled on toast or eaten straight from the bowl, it’s a balanced, comforting meal that never feels heavy.
r">Boosting the flavor
For a bolder twist, swap mayo with Greek yogurt and a dash of Dijon mustard for tangy depth. Toasted almonds or pecans add nutty crunch, while dried cranberries or grapes lend sweet-tart pops. If you love heat, a pinch of smoked paprika or cayenne pepper wakes up the flavors. Serve Chicken Salad on a flaky croissant or over a bed of peppery arugula for extra flair. Craving more inspiration? Try pairing it with our herb focaccia or a refreshing cucumber mint salad to round out the meal.
Tips for Success
Best practices for results
Always use fresh, high-quality chicken for your Chicken Salad to ensure the best flavor and texture. Additionally, chop your ingredients evenly so every bite has a balanced mix. For extra creaminess, fold in the mayonnaise gently instead of stirring aggressively. Meanwhile, chill the Chicken Salad for at least 30 minutes before serving to let the flavors meld. Finally, taste and adjust the seasoning just before serving for a perfectly balanced dish.
>Mistakes to avoid
Avoid overcooking the chicken, as it can make your Chicken Salad dry and tough. Instead, cook it just until tender and let it cool completely before mixing. Also, don’t skip the chilling step—serving it too soon can result in a bland flavor. For more tips on cooking chicken perfectly, check out our guide on how to cook chicken breasts. Another common mistake is using too much mayonnaise, which can overpower the other ingredients. If you need help with portioning, our perfect dressing ratios article has great advice.
Serving and Pairing Suggestions
How to serve this dish
For a fresh and inviting presentation, serve Chicken Salad in crisp butter lettuce cups or atop a bed of mixed greens. Alternatively, layer it between flaky croissants for an elegant lunch option. If you’re hosting a summer gathering, consider filling hollowed-out tomatoes or avocado halves for a colorful twist. Garnish with fresh herbs like dill or parsley to enhance both flavor and visual appeal. Whether you’re preparing it for a picnic, brunch, or a light weekday meal, Chicken Salad adapts effortlessly to any occasion.
What goes well with it
Pair Chicken Salad with a chilled glass of lemonade or iced tea for a refreshing contrast to its creamy texture. For heartier meals, try serving it alongside warm, buttery flaky biscuits or a tangy summer fruit salad. The biscuits add a comforting crunch, while the fruit salad balances the richness with a burst of sweetness. If you prefer a bit of heat, a side of spicy pickles or a drizzle of sriracha mayo elevates the dish with a bold kick.
What is the best way to keep chicken salad from getting soggy?
To prevent soggy chicken salad, pat the cooked chicken dry before mixing and avoid overdressing. Store it in an airtight container with a paper towel to absorb excess moisture. These steps help maintain the perfect texture for your chicken salad.
Can you freeze chicken salad?
Freezing chicken salad isn’t recommended because mayonnaise-based dressings separate and vegetables become mushy when thawed. For best results, enjoy your chicken salad fresh or store it in the fridge for up to 3 days.
rank-math-faq-item">
What goes well with chicken salad for a meal?
Chicken salad pairs perfectly with croissants, crackers, or fresh greens for a light lunch. For heartier meals, serve it alongside soup, fruit, or a baked potato. The versatility of chicken salad makes it easy to customize your meal.
How long does homemade chicken salad last in the fridge?
Homemade chicken salad stays fresh for 3-5 days when stored properly in the refrigerator. Always check for off smells or textures before eating. For food safety, discard any chicken salad left unrefrigerated for over 2 hours.
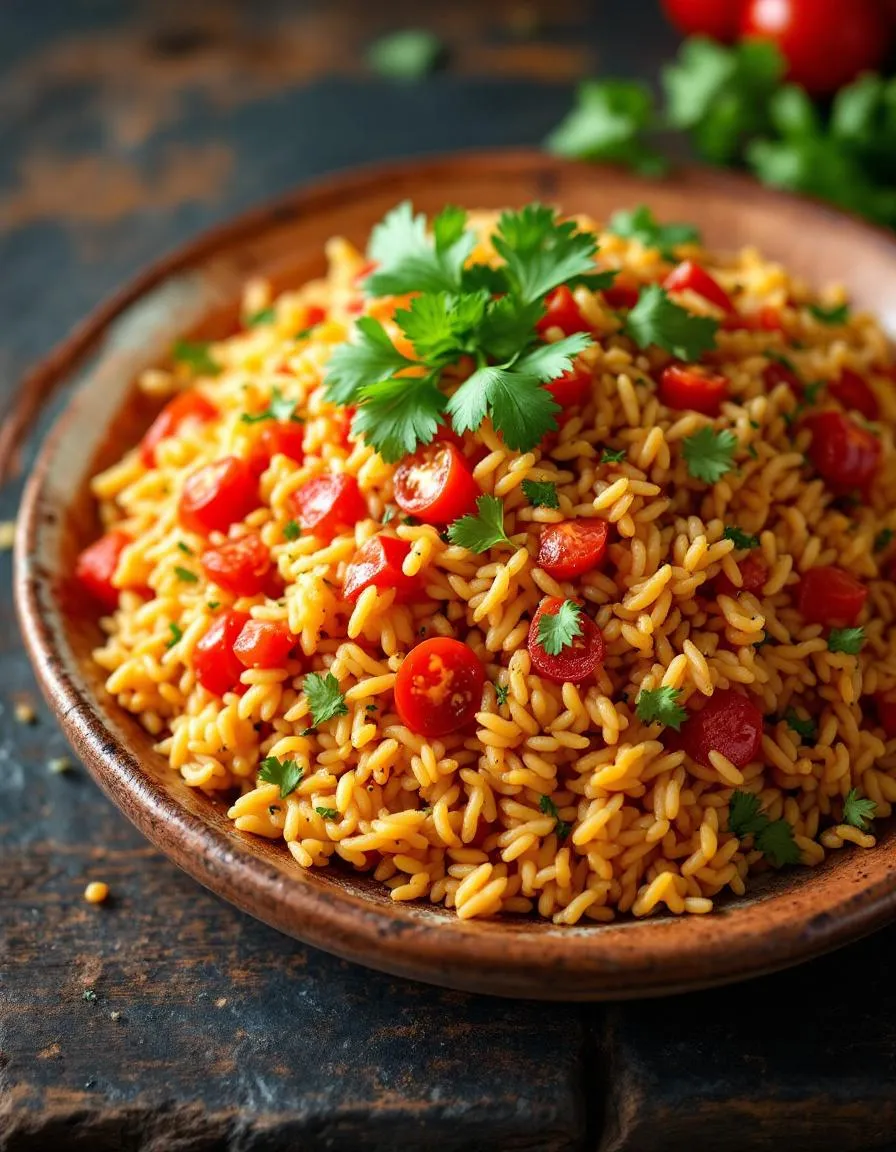
Authentic Spanish Rice – Classic and Flavorful Recipe
Introduction
There’s something deeply comforting about a dish that brings both flavor and nostalgia to the table. That’s exactly why Spanish Rice holds a special place in my kitchen. Whether you grew up with it or are discovering it for the first time, this vibrant, savory dish has a way of wrapping you in warmth. Plus, it’s incredibly versatile—pair it with your favorite protein, serve it as a side, or enjoy it all on its own. No matter how you savor it, Spanish Rice delivers a taste of tradition with every bite.
Spanish Rice, often called Mexican Rice, is a staple in many households for good reason. At its core, it’s a simple yet flavorful blend of rice, tomatoes, onions, and spices, but the result is anything but ordinary. The tomatoes give it that signature reddish hue, while garlic, cumin, and broth infuse it with rich, aromatic depth. Unlike plain white rice, Spanish Rice stands out because it carries bold, savory notes that elevate any meal. For busy home cooks, it’s also a lifesaver—quick to prepare, budget-friendly, and endlessly adaptable. Whether you’re whipping up a weeknight dinner or prepping for a gathering, this dish fits seamlessly into any plan. And here at brekcakes.com, we celebrate recipes that balance ease and flavor, just like our Easy Weeknight Dinners collection. Speaking of crowd-pleasers, if you love dishes that bring people together, you’ll adore our Comfort Food Classics too.
Why I Love This Recipe
Spanish Rice reminds me of family—specifically, the Sunday dinners my abuela used to make. She’d simmer it low and slow, letting the flavors meld until the kitchen smelled like heaven. Every time I make it now, I’m transported back to those moments of laughter and shared stories around the table. It’s more than just a dish to me; it’s a reminder that food connects us, not just to our roots but to the people we love. That’s why I’m so excited to share my version with you—it’s packed with the same heart and soul.
Health and Nutrition
Why it’s good for your body
Spanish Rice packs a nutritious punch while delivering bold flavors. First, it combines fiber-rich ingredients like tomatoes, onions, and bell peppers, which support digestion and keep you feeling full longer. Additionally, the dish often includes olive oil, a heart-healthy fat that may help reduce inflammation. Since Spanish Rice typically features long-grain rice, it provides steady energy without causing sharp blood sugar spikes when enjoyed in moderation.
Moreover, the spices in Spanish Rice, such as cumin and garlic, offer antioxidant benefits. These ingredients may boost immunity and even aid in fighting off common illnesses. Furthermore, the tomatoes contribute lycopene, a compound linked to improved heart health. Whether you use brown or white rice, Spanish Rice remains a versatile way to incorporate veggies and wholesome fats into your meals.
Finally, this dish adapts easily to dietary preferences. For instance, you can swap white rice for quinoa or cauliflower rice to increase protein or reduce carbs. With its balance of nutrients and vibrant taste, Spanish Rice proves that healthy eating doesn’t have to be bland.
How it fits in a healthy lifestyle
Spanish Rice fits seamlessly into a balanced diet, whether you’re aiming for gluten-free meals or simply want a satisfying side dish. Since it’s naturally gluten-free, it’s a great option for those with sensitivities. Pair it with grilled chicken or black beans for a protein boost, making it a complete meal. If you’re watching sodium intake, simply reduce the salt and let the herbs and spices shine.
For meal preppers, Spanish Rice stores well and reheats beautifully, saving time on busy weeknights. Try pairing it with our Easy Vegetable Stir Fry for a veggie-packed dinner. If you’re focused on heart health, use brown rice and extra-virgin olive oil to maximize fiber and healthy fats. Check out our Balanced Diet Tips for more ways to make nutritious choices without sacrificing flavor. With simple tweaks, Spanish Rice can align with almost any health goal while keeping meals exciting.
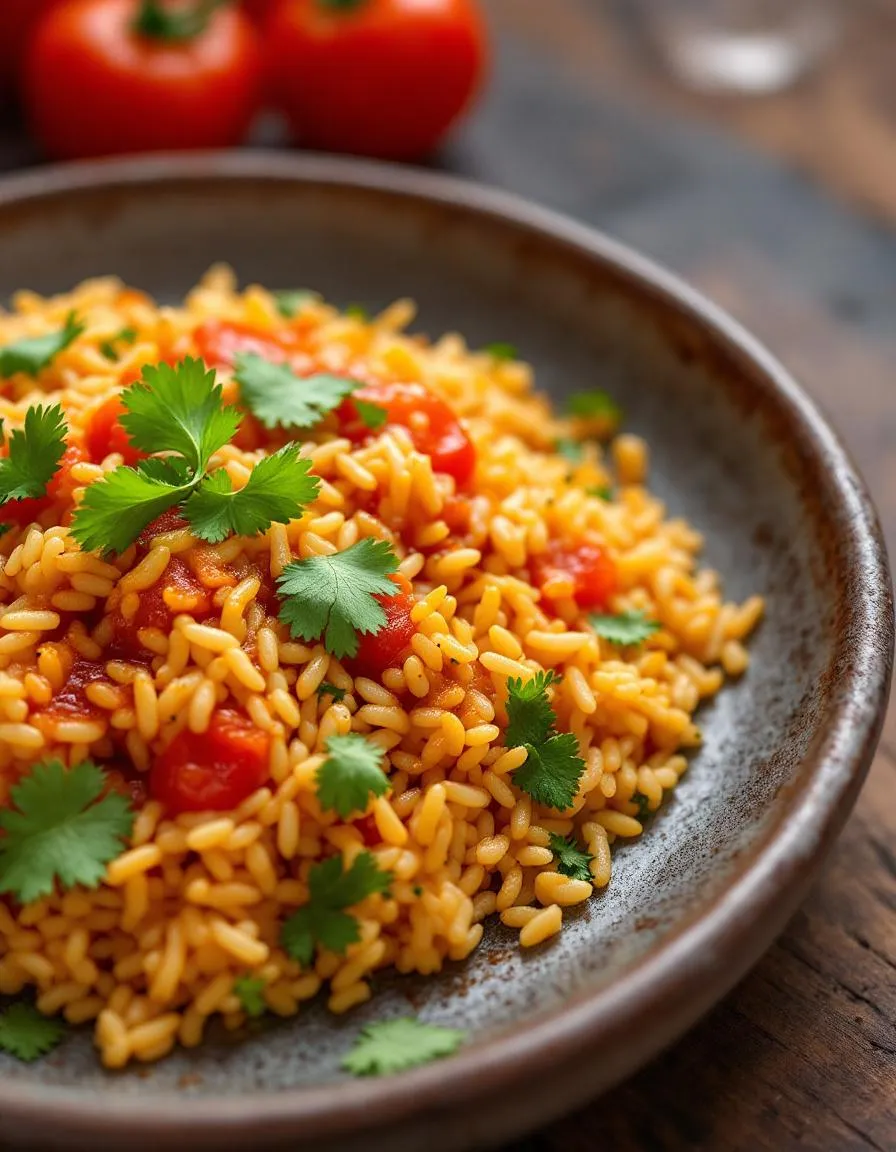
A flavorful and aromatic Spanish-style rice dish cooked with tomatoes, onions, and spices.
Ingredients
Scale
For the Crust:
1 cup long-grain white rice
2 tablespoons olive oil
1 small onion, diced
2 cloves garlic, minced
1 can (14.5 oz) diced tomatoes
2 cups chicken or vegetable broth
1 teaspoon paprika
1/2 teaspoon cumin
1/2 teaspoon salt
1/4 teaspoon black pepper
1/4 cup chopped fresh cilantro (optional)
Instructions
1. Prepare the Crust:
Rinse the rice under cold water until the water runs clear. Drain well.
Heat olive oil in a large skillet over medium heat. Add the onion and cook until softened, about 3 minutes.
Add the garlic and cook for another 30 seconds until fragrant.
Stir in the rice and cook for 2 minutes, stirring frequently, until lightly toasted.
Add the diced tomatoes, broth, paprika, cumin, salt, and black pepper. Stir well.
Bring the mixture to a boil, then reduce heat to low. Cover and simmer for 20 minutes, or until the rice is tender and the liquid is absorbed.
Remove from heat and let it sit covered for 5 minutes. Fluff with a fork and garnish with cilantro if desired.
Notes
You can customize the seasonings to taste.
How to Prepare This Dish
Steps and time-saving tips
Start by heating olive oil in a large skillet over medium heat. Toss in diced onions and bell peppers, then sauté until they soften—about 3 minutes. Stir in minced garlic and let it bloom for 30 seconds to deepen the flavor. Next, add long-grain rice and toast it lightly for 2 minutes, stirring constantly to prevent burning. Pour in tomato sauce, chicken broth, and a pinch of saffron or turmeric for that signature Spanish rice color. Bring everything to a gentle boil, then reduce the heat to low and cover the skillet tightly. Let the rice simmer undisturbed for 18-20 minutes. Meanwhile, chop fresh cilantro and slice green onions for garnish. Once the rice absorbs all the liquid, fluff it with a fork and fold in the herbs. For a time-saving hack, use pre-chopped frozen onions and peppers or swap fresh garlic for jarred minced garlic. Serve your Spanish rice warm with a squeeze of lime for brightness.
and-learned-from">Mistakes I’ve made and learned from
I once rushed the toasting step and ended up with bland Spanish rice—now I never skip sautéing the rice until it turns slightly golden. Another time, I lifted the lid too often to check progress, which let steam escape and left the rice undercooked. Lesson learned: trust the process! If your rice turns out sticky, try rinsing it before cooking to remove excess starch, as I explain in my guide to perfect rice. And if you’re out of saffron, don’t stress—a dash of smoked paprika works wonders, just like in my pantry swaps for Spanish dishes. These small tweaks make all the difference.
Cultural Connection and Variations
Where this recipe comes from
Spanish Rice, or “arroz rojo,” carries the vibrant spirit of Mexican home cooking. While many assume it hails from Spain, this tomato-infused dish actually evolved in Mexico, where cooks transformed simple ingredients into something unforgettable. Families often pass down their own versions, tweaking the balance of spices or adding local touches like chorizo or roasted peppers. In some regions, they toast the rice first for extra depth, while others stir in peas and carrots for color.
Across the border in Te
xas, Spanish Rice becomes a hearty side for barbecue, soaking up smoky flavors. Meanwhile, in coastal areas, seafood lovers might toss in shrimp or clams. My abuela always insisted on frying the rice golden-brown before simmering it—a trick that made her Spanish Rice the star of every potluck. Whether served alongside enchiladas or scooped straight from the pan, this dish bridges generations and geographies with every flavorful bite.
How it fits in today’s cooking
Today, Spanish Rice thrives as a weeknight hero and a fiesta favorite. Meal preppers love it because it reheats beautifully, and plant-based cooks easily adapt it by swapping in vegetable broth. During summer, it pairs perfectly with grilled chicken fajitas, soaking up those zesty marinades. Come winter, it brings warmth to holiday tables alongside tamales and posole.
Modern twists keep it exciting—think quinoa instead of rice or a dash of chipotle for heat. Busy parents lean on Spanish Rice to stretch meals, while food bloggers dress it up with avocado crema for Instagram flair. Craving a sweet contrast? Serve it with churro cupcakes for a playful dessert pairing. However you spin it, this dish proves that tradition and innovation can share the same plate.
>Taste and Texture
What makes it delicious
Spanish Rice delivers a vibrant, savory experience with every bite. The fluffy grains soak up a rich tomato-infused broth, creating a slightly smoky, umami depth. Garlic and onions add a fragrant sweetness, while spices like cumin and paprika bring warmth without overpowering. Each forkful offers a satisfying chew, with tender rice and occasional crisp edges from the pan. For extra texture, toss in bell peppers or peas—their fresh crunch contrasts beautifully. Whether served as a side or main, Spanish Rice comforts with its hearty, aromatic appeal.
Boosting the flavor
Elevate your Spanish Rice with a few easy tweaks. Stir in a spoonful of chimichurri sauce for a herby, tangy kick, or top with creamy avocado slices for buttery contrast. Swap water for chicken or vegetable broth to deepen the savoriness. If you love heat, a dash of smoked chili powder or a drizzle of homemade sriracha adds fiery complexity. For a fresh finish, sprinkle chopped cilantro or a squeeze of lime over the dish. Small changes make big differences, so experiment and savor the results!
Tips for Success
Best practices for results
Always toast the rice in oil before adding liquid—this step deepens the flavor of your Spanish Rice and prevents mushiness. Use a heavy-bottomed pot to distribute heat evenly, and stir occasionally to avoid sticking. For the best texture, let the Spanish Rice rest covered for 5 minutes after cooking so the grains absorb any remaining moisture. Finally, taste and adjust the seasoning before serving, as the flavors develop further once the dish sits.
Mistakes to avoid
Avoid overcooking the rice, which turns it gummy—set a timer and check for doneness early. Additionally, don’t skip toasting the rice, or your Spanish Rice will lack depth. If you’re unsure about liquid ratios, check our guide on perfect rice ratios for foolproof measurements. Lastly, resist the urge to stir too often, as this breaks the grains and releases excess starch. For more troubleshooting tips, explore our article on fixing soggy rice to salvage any mishaps.
Serving and Pairing Suggestions
How to serve this dish
Spanish Rice shines as a vibrant centerpiece or a hearty side dish. For a festive touch, serve it in a colorful ceramic bowl and top it with fresh cilantro or lime wedges. Alternatively, layer it in a cast-iron skillet for a rustic family-style presentation. This dish works beautifully at potlucks, weeknight dinners, or even as part of a Cinco de Mayo spread. To make it extra inviting, pair it with warm tortillas or arrange it alongside grilled veggies for a visually stunning plate.
h-it">What goes well with it
Complement Spanish Rice with a refreshing mango margarita for a tropical twist—the sweetness balances the savory spices perfectly. For a protein-packed meal, try pairing it with our smoky black bean tacos, which add a satisfying crunch. If you prefer something lighter, a crisp avocado salad with lime dressing enhances the dish’s flavors. Don’t forget to check out our zesty chipotle lime sauce for an extra kick that ties everything together.
What is the difference between Spanish rice and Mexican rice?
Spanish rice typically uses saffron for its signature yellow color and has a milder flavor, while Mexican rice is tomato-based, giving it a reddish hue and bolder taste. Both are delicious, but Spanish rice often pairs better with Mediterranean dishes, whereas Mexican rice complements Tex-Mex meals.
rank-math-faq-item">
How do you keep Spanish rice from getting mushy?
The key to perfect Spanish rice is using the right rice-to-liquid ratio (usually 1:2) and avoiding over-stirring. Let the rice simmer uncovered for the last few minutes to evaporate excess moisture. Spanish rice should be fluffy with distinct grains, not sticky like risotto.
Can I make Spanish rice without tomatoes?
Absolutely! Authentic Spanish rice gets its flavor from saffron, garlic, and chicken broth rather than tomatoes. For a classic version, simply omit tomatoes and focus on toasting the rice with aromatics before adding liquid. This creates the traditional golden Spanish rice served in Spain.
What protein goes well with Spanish rice?
Spanish rice pairs beautifully with chicken, shrimp, or chorizo for a complete meal. The rice’s subtle saffron flavor complements grilled meats, while its starchy texture balances saucy dishes. For vegetarian options, try serving Spanish rice with roasted peppers or white beans.
>
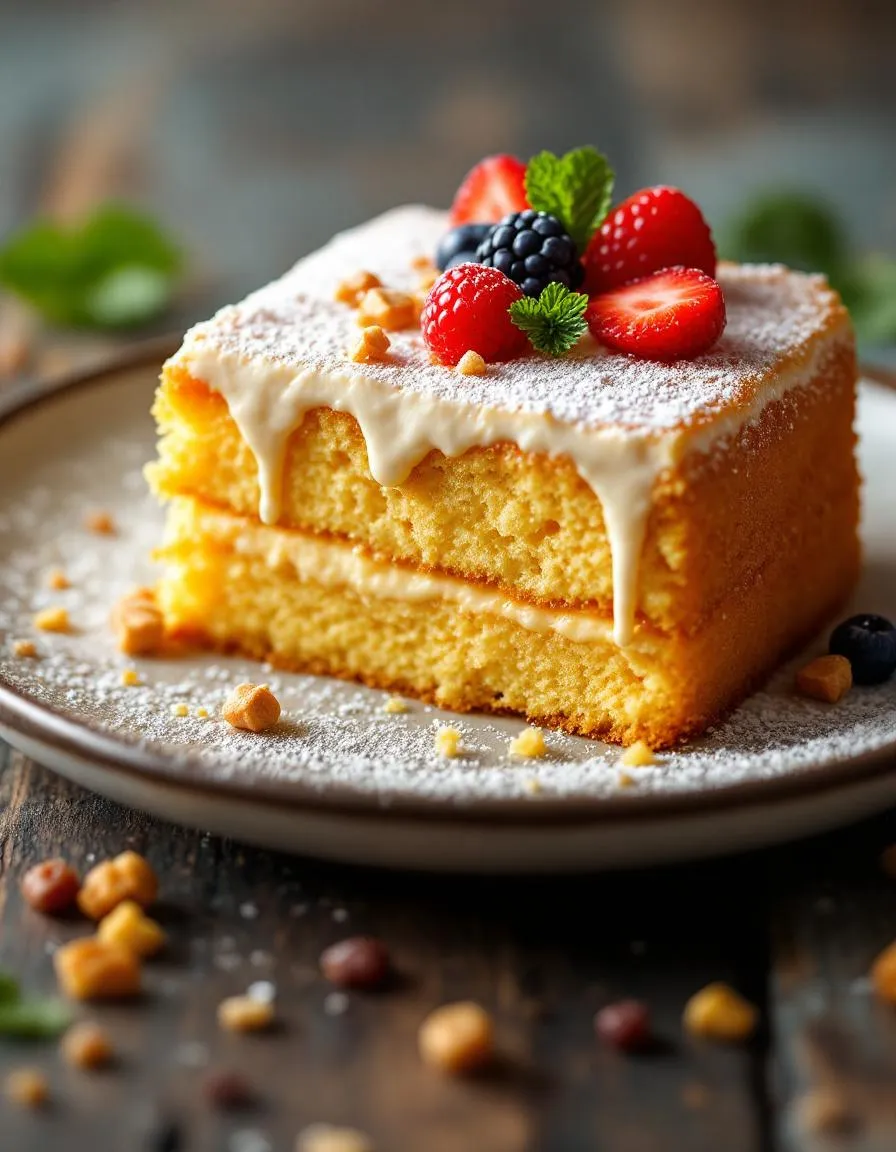
Best Twinkie Cake – Classic Homemade Recipe
Introduction
There’s something undeniably comforting about a dessert that brings back childhood memories, and that’s exactly what Twinkie Cake does. Whether you grew up sneaking these golden treats from the pantry or simply adore their light, creamy texture, this recipe will transport you straight to those carefree days. Moreover, it’s a fun, nostalgic twist on a classic that’s perfect for birthdays, potlucks, or just because you deserve a sweet escape.
Twinkie Cake is a playful, crowd-pleasing dessert that combines the iconic flavors of the beloved snack cake with the decadence of a homemade layer cake. Instead of relying on store-bought Twinkies, this recipe recreates their signature sponge cake and creamy filling from scratch, resulting in a richer, more satisfying treat. Not only does it capture the essence of nostalgia, but it also elevates it with fresh ingredients and a touch of creativity. For anyone who loves easy dessert recipes, this cake strikes the perfect balance between simplicity and indulgence. Plus, it fits right in with the breezy, approachable vibe of brekcakes.com, where we celebrate food that’s as fun to make as it is to eat. If you’re looking for more inspiration, check out our baking tips to ensure your Twinkie Cake turns out flawless every time.
Why I Love This Recipe
Twinkie Cake holds a special place in my heart because it reminds me of baking with my grandma, who always had a box of Twinkies tucked away for emergencies. She taught me that desserts should be joyful, and this cake embodies that spirit. Every time I make it, I’m flooded with memories of her laughter and the way she’d sneak me an extra slice. It’s more than just a recipe—it’s a little piece of love, wrapped in sponge cake and cream.
Health and Nutrition
Why it’s good for your body
Twinkie Cake brings more than just nostalgia to the table. For starters, it contains essential carbohydrates that give you quick energy. Whether you need a midday pick-me-up or a post-workout treat, Twinkie Cake delivers a satisfying boost. Additionally, its creamy filling provides a small dose of calcium, which supports strong bones and teeth.
Moreover, Twinkie Cake includes trace amounts of iron, a mineral crucial for healthy blood circulation. While it’s not a superfood, enjoying it in moderation can complement a varied diet. The cake’s light texture also makes it an easy option for those with smaller appetites or sensitive stomachs. Plus, the simple ingredients mean fewer artificial additives compared to some heavily processed desserts.
Finally, Twinkie Cake offers a mental health perk—comfort. Sometimes, a small indulgence lifts your mood and reduces stress. After all, balanced eating includes room for joy. So while Twinkie Cake isn’t a health food, it fits neatly into an overall nutritious lifestyle when enjoyed mindfully.
How it fits in a healthy lifestyle
Twinkie Cake works well in moderation as part of a balanced diet. Pair it with protein-rich foods like Greek yogurt or nuts to stabilize blood sugar. If you’re watching your gluten intake, check out our gluten-free dessert alternatives for similar treats that align with dietary needs.
For active lifestyles, Twinkie Cake can serve as a convenient carb source before or after workouts. Just balance it with nutrient-dense meals throughout the day. Craving more healthy dessert ideas? Explore our guide to balanced sweet treats for smarter indulgences. Remember, enjoying Twinkie Cake occasionally keeps your diet flexible and fun without derailing your goals.
Start by preheating your oven to 350°F and greasing a 9×13-inch baking pan. Meanwhile, whisk together the flour, sugar, and baking powder in a large bowl. In a separate bowl, beat the eggs, milk, and vanilla until smooth. Gradually pour the wet ingredients into the dry mixture, stirring gently to avoid overmixing. For a lighter texture, fold in the whipped topping at the end. Next, spread the batter evenly in the pan and bake for 25-30 minutes, or until a toothpick comes out clean. While the cake cools, prepare the creamy filling by blending softened butter, marshmallow fluff, and heavy cream. Once the cake reaches room temperature, poke holes across the surface and drizzle the filling over it, letting it soak in. Finally, top with a generous layer of whipped cream and chill for at least an hour before serving. To save time, use a boxed cake mix as a base, but don’t skip the homemade filling—it’s what makes this Twinkie Cake unforgettable.
Mistakes I’ve made and learned from
My first attempt at Twinkie Cake turned out dry because I overbaked it by 10 minutes. Now I set a timer for 25 minutes and check early—it’s better to underbake slightly than overdo it. Another blunder? Skipping the chilling step. I once served it too soon, and the filling oozed everywhere. Lesson learned: patience pays off. If you’re new to layered desserts, my guide on avoiding common cake mistakes will help. Also, if your filling seems too thin, try my trick from this frosting consistency fixes post—a tablespoon of powdered sugar thickens it perfectly. Trust me, these small tweaks make all the difference.
Twinkie Cake holds a special place in American dessert culture, blending nostalgia with irresistible sweetness. Originally inspired by the iconic Hostess snack, this cake became a homemade favorite for families who craved its creamy filling and golden sponge in a larger, shareable form. In the South, bakers often add a drizzle of caramel or a sprinkle of pecans, while Midwest versions might lean into extra vanilla for a richer flavor. Meanwhile, some coastal regions experiment with tropical twists, like coconut flakes or citrus zest.
My grandmother used to make Twinkie Cake for birthdays, claiming it brought everyone together with its playful charm. Over time, I’ve seen friends adapt it too—swapping the classic filling for chocolate ganache or even layering it with fresh berries. Internationally, similar treats exist, like Japan’s fluffy kasutera cake or Mexico’s tres leches, but Twinkie Cake stands out for its distinct texture and whimsical roots. Whether served at potlucks or as a late-night treat, it’s a dessert that sparks joy and creativity.
ays-cooking">How it fits in today’s cooking
Twinkie Cake remains a beloved comfort food, especially for those who grew up with its boxed counterpart. Today, home bakers reinvent it with healthier swaps, like almond flour or Greek yogurt fillings, proving it’s adaptable to modern tastes. It’s also a star at themed parties, where colorful variations—think pumpkin spice for fall or peppermint for winter—steal the show. For busy cooks, our easy dessert recipes offer shortcuts without sacrificing flavor.
Seasonal twists keep Twinkie Cake relevant year-round. In summer, lighter versions with lemon curd or whipped cream pair perfectly with backyard barbecues. Meanwhile, holiday bakers might layer it with eggnog custard for festive flair. If you’re exploring new takes, our modern baking trends guide highlights how classics like this evolve. Whether you stick to tradition or experiment, Twinkie Cake’s charm lies in its ability to feel both familiar and fresh.
Taste and Texture
What makes it delicious
Twinkie Cake delivers a nostalgic yet irresistible treat with its fluffy, golden sponge cake and luscious cream filling. Each bite melts in your mouth, offering a perfect balance of sweet vanilla notes and a hint of buttery richness. The cake itself stays moist and tender, while the creamy center adds a smooth, velvety contrast. Fragrant vanilla and a touch of caramelized sugar linger on the palate, making Twinkie Cake a crowd-pleaser. Whether served chilled or at room temperature, its light yet satisfying texture keeps you coming back for more.
r">Boosting the flavor
Elevate your Twinkie Cake by drizzling it with warm caramel or a dusting of cinnamon sugar for extra depth. For a fruity twist, layer fresh strawberries or a dollop of homemade whipped cream between slices. If you love bold flavors, swap the vanilla extract for almond or coconut extract in the batter. A scoop of vanilla bean ice cream alongside a slice also turns it into a decadent dessert. Experiment with these easy tweaks to make your Twinkie Cake even more memorable.
Tips for Success
Best practices for results
Always preheat your oven before baking Twinkie Cake to ensure even cooking. For the best texture, use room-temperature ingredients, especially butter and eggs, since they blend more smoothly. Additionally, lightly grease your baking pan and line it with parchment paper to prevent sticking. Finally, let the Twinkie Cake cool completely before slicing to maintain its perfect shape and moisture.
>Mistakes to avoid
Avoid overmixing the batter, as this can make your Twinkie Cake dense instead of light and fluffy. Instead, gently fold the ingredients until just combined. Another common mistake is skipping the cooling step, which can cause the cake to crumble when cut. For more baking tips, check out our guide on perfect cake texture. Also, if your cake sinks in the middle, you might have opened the oven door too soon. Learn how to troubleshoot this issue in our cake baking mistakes article.
Serving and Pairing Suggestions
How to serve this dish
For a fun twist, slice your Twinkie Cake into thick layers and stack them high on a vintage cake stand. Meanwhile, drizzle extra frosting between each layer for a decadent touch. If you prefer individual servings, cut the cake into squares and top each piece with a dollop of whipped cream and fresh berries. This dessert shines at birthday parties, potlucks, or even as a sweet finale to a weekend brunch. To make it extra festive, sprinkle colorful sprinkles or edible glitter on top before serving.
What goes well with it
Pair your Twinkie Cake with a cold glass of vanilla milkshake for a nostalgic treat that enhances its creamy texture. Alternatively, serve it alongside a warm cup of spiced chai latte to balance the sweetness with aromatic spices. For a refreshing contrast, try a scoop of tangy lemon sorbet, which cuts through the richness of the cake. If you love pairing desserts with baked goods, our cinnamon roll bites make a delightful companion for a cozy dessert spread.
A Twinkie Cake typically includes Twinkies as the base layer, layered with pudding or whipped cream, and topped with chocolate or caramel drizzle. Some variations add strawberries, bananas, or crushed cookies for extra flavor. This no-bake dessert mimics the classic Twinkie taste while offering a fun, shareable treat.
How do you keep a Twinkie Cake from getting soggy?
To prevent sogginess, assemble the Twinkie Cake just before serving or use a thicker filling like stabilized whipped cream or cheesecake pudding. Avoid over-soaking the Twinkies—lightly coat them with the filling instead. Refrigerating the cake for more than 4 hours can soften the spongy texture, so timing is key.
rank-math-faq-item">
Can you freeze a Twinkie Cake?
Freezing a Twinkie Cake isn’t recommended because the cream filling and pudding layers may separate or become icy. Twinkies themselves freeze well, but the assembled cake’s texture changes after thawing. For best results, store leftovers in the fridge and enjoy within 2 days.
Is Twinkie Cake the same as a Twinkie trifle?
While similar, a Twinkie Cake is usually layered like a traditional cake, whereas a trifle features cubed Twinkies stacked in a bowl with alternating fillings. Both desserts highlight Twinkies as the star ingredient but differ in presentation. A Twinkie Cake often has cleaner slices, while a trifle is scoopable.