Nothing brings people together quite like a comforting bowl of soup, and today, I’m sharing a recipe that holds a special place in my heart—Marry Me Chicken Soup. Whether you’re craving a cozy night in or want to impress someone with a dish as unforgettable as its name suggests, this recipe delivers. With every spoonful, you’ll taste the richness of tender chicken, sun-dried tomatoes, and a creamy broth that feels like a warm hug. Trust me, this soup lives up to its romantic reputation.
Marry Me Chicken Soup takes inspiration from the viral Marry Me Chicken pasta but transforms it into a heartwarming, spoonable delight. The dish combines juicy chicken, aromatic garlic, and tangy sun-dried tomatoes in a velvety broth infused with herbs and a touch of cream. What makes it stand out? First, it’s incredibly versatile—perfect for weeknight dinners or special occasions. Second, it carries the same irresistible flavors that made the original dish a hit, but in a format that’s even more comforting. If you’ve tried my Creamy Tuscan Chicken, you’ll adore this soup’s similar depth of flavor. Plus, it aligns perfectly with brekcakes.com’s mission of creating approachable yet impressive recipes that bring joy to every kitchen.
Why I Love This Recipe
Marry Me Chicken Soup reminds me of the first time I cooked for my now-husband—a moment that turned an ordinary dinner into a memory I’ll always cherish. The way the flavors meld together mirrors how the best relationships grow richer over time. Every time I make it, I’m transported back to that cozy evening, proving that food isn’t just nourishment—it’s a storyteller. If you’re looking for more recipes that blend simplicity with soul, my One-Pot Wonders collection is full of dishes that deliver big flavors with minimal fuss.
Health and Nutrition
Why it’s good for your body
Marry Me Chicken Soup packs a nutritious punch while delivering rich, comforting flavors. First, the lean chicken breast provides high-quality protein to support muscle repair and keep you full longer. Additionally, the garlic and herbs like thyme and rosemary offer antioxidants that help fight inflammation. Plus, the creamy broth, often made with a touch of heavy cream or Parmesan, adds healthy fats for sustained energy.
Because Marry Me Chicken Soup includes vegetables like spinach or sun-dried tomatoes, it also boosts your fiber and vitamin intake. For example, spinach delivers iron and vitamin K, while sun-dried tomatoes contribute lycopene, a heart-healthy compound. Moreover, the slow-simmered broth hydrates and soothes, making it a great choice when you need an immune boost.
Finally, this dish balances indulgence and nourishment. While it feels decadent, the ingredients work together to promote digestion, immunity, and overall wellness. Whether you enjoy it as a cozy dinner or a lunchtime pick-me-up, Marry Me Chicken Soup fuels your body without sacrificing flavor.
How it fits in a healthy lifestyle
Marry Me Chicken Soup fits seamlessly into balanced eating habits. If you follow a high-protein diet, the chicken and dairy ingredients help you meet your goals. For gluten-free eaters, this recipe naturally avoids grains, especially when paired with a side like roasted vegetables or a crisp salad. The soup also works well for meal prep, so you can enjoy wholesome lunches all week.
Heart-healthy eaters will appreciate the moderate use of olive oil and the absence of processed ingredients. Pair it with a light, fiber-rich dish like our quinoa salad for a complete meal. If you’re watching calories, simply adjust the cream or cheese slightly without losing the creamy texture. For more ways to keep meals nutritious, explore our healthy dinner ideas to round out your routine.
Overall, Marry Me Chicken Soup proves that comfort food can be both delicious and nourishing. It’s versatile enough for special occasions or simple weeknights, making healthy eating effortless and enjoyable.
A rich and creamy chicken soup with a hint of spice, perfect for cozy nights.
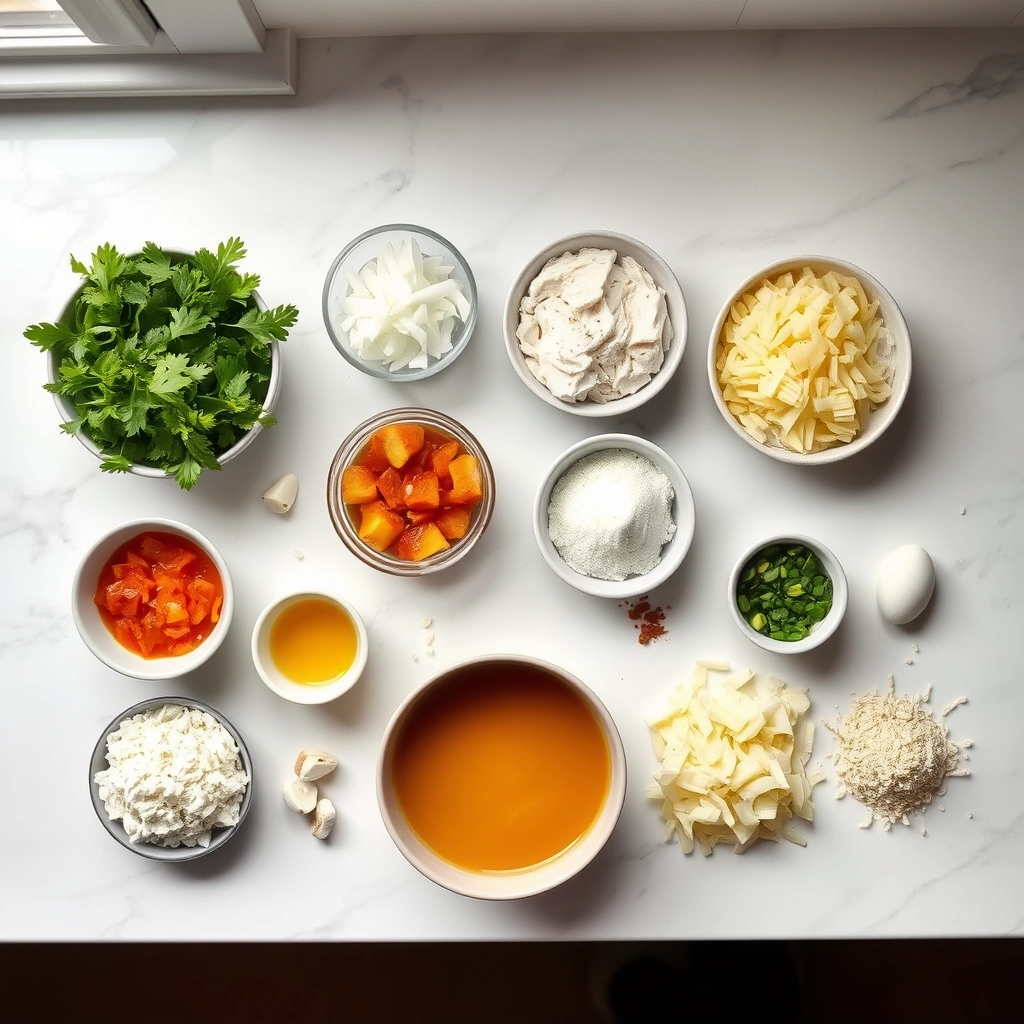
Ingredients
Scale
For the Crust:
2 boneless, skinless chicken breasts
1 tbsp olive oil
1 small onion, diced
3 garlic cloves, minced
1 tsp red pepper flakes
4 cups chicken broth
1 cup heavy cream
1/2 cup sun-dried tomatoes, chopped
1 tsp dried basil
1 tsp dried oregano
1/2 cup grated parmesan cheese
Salt and pepper to taste
Instructions
1. Prepare the Crust:
Heat olive oil in a large pot over medium heat. Add chicken breasts and cook until browned on both sides, about 5 minutes per side. Remove and set aside.
In the same pot, sauté onion and garlic until softened, about 3 minutes. Add red pepper flakes and stir for 30 seconds.
Pour in chicken broth and bring to a simmer. Return chicken to the pot and cook for 15 minutes or until fully cooked. Remove chicken and shred it.
Stir in heavy cream, sun-dried tomatoes, basil, and oregano. Simmer for 5 minutes.
Add shredded chicken back to the pot along with parmesan cheese. Stir until cheese melts. Season with salt and pepper.
Serve hot with crusty bread.
Notes
You can customize the seasonings to taste.
s-dish">How to Prepare This Dish
Steps and time-saving tips
Start by heating a large pot over medium heat and drizzle in olive oil. Once the oil shimmers, add diced onions and minced garlic, stirring until fragrant and golden. Next, toss in bite-sized chicken pieces, seasoning them with salt, pepper, and a pinch of Italian herbs. Let the chicken brown lightly, then pour in chicken broth and a splash of heavy cream for richness. Meanwhile, whisk together sun-dried tomatoes, grated Parmesan, and a touch of red pepper flakes for a subtle kick. Stir this mixture into the pot, letting the flavors meld as the soup simmers gently. If you’re short on time, use pre-cooked rotisserie chicken and skip the browning step—just shred the meat and add it later. For extra depth, toss in a handful of fresh spinach or kale during the last few minutes. Finally, garnish with fresh basil and an extra sprinkle of Parmesan before serving. The result? A luscious Marry Me Chicken Soup that feels indulgent yet comes together effortlessly.
Mistakes I’ve made and learned from
Early on, I rushed the browning step, leaving the chicken bland and rubbery. Now, I patiently let it develop a golden crust—trust me, it makes all the difference. Another blunder? Overloading the soup with sun-dried tomatoes, which overpowered the other flavors. I’ve since learned to balance them with creamy elements, like the technique I use in my Creamy Tuscan Chicken. Also, skipping the Parmesan rind was a missed opportunity; it adds unmatched umami depth, just like in my Parmesan Risotto. These tweaks transformed my Marry Me Chicken Soup from mediocre to unforgettable.
n-and-variations">Cultural Connection and Variations
Where this recipe comes from
Marry Me Chicken Soup has roots in Italian-American kitchens, where rich flavors and hearty ingredients take center stage. Originally inspired by the creamy, indulgent Marry Me Chicken dish, this soup version wraps you in warmth like a cozy blanket. Families often tweak the recipe—some add a splash of white wine for depth, while others throw in extra garlic for a bolder kick. In the South, you might find it with a sprinkle of Cajun seasoning, and in the Midwest, a handful of wild mushrooms often makes an appearance.
My grandmother used to say Marry Me Chicken Soup was her secret weapon for bringing people together. She’d simmer it all afternoon, letting the aromas fill the house before Sunday dinners. Across the globe, similar dishes pop up with local twists. In Greece, cooks might add feta and olives, while in Thailand, a touch of coconut milk and lemongrass transforms it into something entirely new. No matter where it’s made, though, the soul of the dish stays the same: comfort in every spoonful.
How it fits in today’s cooking
Today, Marry Me Chicken Soup fits perfectly into our fast-paced lives while still feeling special. Busy home cooks love it for meal prep—it reheats beautifully, making weekday lunches feel luxurious. Others save it for cozy weekend gatherings, pairing it with crusty bread or a light salad. Modern twists, like using an Instant Pot or swapping heavy cream for coconut milk, keep it fresh and adaptable. Plus, it’s a star during chilly months, rivaling classics like butternut squash soup for seasonal spotlight.
What really keeps it re
levant? Its versatility. Whether you’re cooking for a date night or prepping freezer-friendly dinners, Marry Me Chicken Soup delivers. For those craving more comfort food inspiration, creamy tomato soup offers another delicious option. At its core, this dish proves that some traditions—like a pot of soup simmering on the stove—never go out of style.
Taste and Texture
What makes it delicious
Marry Me Chicken Soup wraps you in warmth with its rich, velvety broth and tender chunks of chicken. The creamy texture melts on your tongue, while sun-dried tomatoes add a sweet-tangy pop and fresh spinach brings a subtle earthiness. Fragrant garlic and herbs like thyme and rosemary infuse every spoonful with cozy, aromatic depth. Meanwhile, a touch of Parmesan cheese lends a salty, nutty finish that keeps you coming back for more. Whether you savor it slowly or dive right in, Marry Me Chicken Soup delivers comfort in every bite.
Boosting the flavor
For an extra flavor kick, try swapping heavy cream with coconut milk for a subtly sweet twist. Crispy bacon bits or toasted pine nuts add crunch, while a drizzle of homemade chili oil brings gentle heat. If you love bold herbs, stir in fresh basil or a sprinkle of Italian seasoning blend just before serving. A squeeze of lemon brightens the dish, balancing the richness of the broth. With these easy tweaks, Marry Me Chicken Soup becomes even more irresistible.
First, always use fresh, high-quality ingredients for the best Marry Me Chicken Soup flavor. Next, simmer the soup on low heat to let the flavors meld perfectly without overcooking the chicken. Additionally, stir in the cream just before serving to keep it smooth and velvety. Finally, taste and adjust the seasoning at the end, as flavors intensify while cooking. These simple steps ensure your Marry Me Chicken Soup turns out rich and delicious every time.
Mistakes to avoid
One common mistake is rushing the sauté step—take time to caramelize the onions and garlic for deeper flavor. Another error is adding the cream too early, which can cause it to curdle. Instead, follow our guide on perfect soup bases for foolproof techniques. Also, avoid overcrowding the pot with chicken, as it won’t brown evenly. For more tips on balancing flavors, check out our seasoning secrets post. With these fixes, your Marry Me Chicken Soup will shine.
g-suggestions">Serving and Pairing Suggestions
How to serve this dish
For a cozy family dinner, serve Marry Me Chicken Soup in rustic bread bowls to soak up every last drop of the creamy broth. Alternatively, elevate it for special occasions by ladling it into elegant white bowls topped with fresh parsley and a sprinkle of grated Parmesan. Meanwhile, if you’re hosting a casual gathering, set up a toppings bar with crispy bacon bits, chopped chives, and crusty bread slices for guests to customize their bowls. No matter how you present it, this soup shines as a comforting centerpiece.
What goes well with it
Pair Marry Me Chicken Soup with a crisp green salad like our Spring Mix Salad to balance its rich flavors. For heartier meals, serve it alongside warm garlic knots or a slice of our Rosemary Focaccia, which perfectly dips into the creamy broth. Finally, a chilled glass of Sauvignon Blanc or sparkling water with lemon complements the dish without overpowering its savory notes.
math-faq-block">
What makes Marry Me Chicken Soup so special?
Marry Me Chicken Soup gets its name from the irresistible combination of creamy sauce, tender chicken, and bold flavors like sun-dried tomatoes and garlic. The dish is so delicious that it’s said to inspire marriage proposals—hence the playful name. This soup version keeps the same rich taste but in a comforting, broth-based form.
Can I make Marry Me Chicken Soup in a slow cooker?
Absolutely! Marry Me Chicken Soup adapts well to slow cookers—just add chicken, broth, and seasonings, then cook on low for 6-8 hours. Stir in cream, Parmesan, and sun-dried tomatoes during the last 30 minutes to maintain their texture. This method makes the soup even more flavorful with minimal effort.
What sides go best with Marry Me Chicken Soup?
Crusty bread or garlic toast perfectly soaks up the creamy broth of Marry Me Chicken Soup. For lighter options, try a crisp green salad or roasted vegetables. The soup’s rich flavor also pairs well with buttery pasta or a simple risotto.
rank-math-faq-item">
How do I store leftover Marry Me Chicken Soup?
Store Marry Me Chicken Soup in an airtight container in the fridge for up to 3 days. Reheat gently on the stove, adding a splash of broth or cream if the soup thickens. Avoid freezing, as the dairy may separate and alter the creamy texture.
Best Energy Balls – Easy No-Bake Snack Recipe
Introduction
Life gets busy, and sometimes we all need a little boost to keep going. That’s why I adore Energy Balls—they’re tiny powerhouses of flavor and nutrition, perfect for hectic days or whenever you crave a wholesome treat. Whether you’re rushing out the door or need a midday pick-me-up, these no-bake bites deliver joy in every bite. Plus, they’re endlessly customizable, so you can tailor them to your cravings or dietary needs. Trust me, once you try them, you’ll wonder how you ever lived without them.
Energy Balls are bite-sized snacks packed with nutrient-dense ingredients like nuts, seeds, dried fruit, and oats. Unlike processed snacks, they offer natural sweetness and sustained energy without the crash. What makes them special is their simplicity—just blend, roll, and enjoy. They fit perfectly into my philosophy of creating approachable, nourishing recipes that don’t compromise on taste. For example, my no-bake desserts collection celebrates effortless treats, and Energy Balls shine as a star player. They’re also ideal for meal prep, making them a staple in my healthy snacks lineup. Whether you’re a parent, athlete, or just someone who loves good food, these little gems will quickly become your go-to.
Why I Love This Recipe
Energy Balls hold a special place in my heart because they remind me of my grandmother’s kitchen. She always had a jar of homemade snacks ready for us kids, and now I carry on that tradition. Every time I make a batch, I feel connected to those cherished moments. They’re not just food—they’re a reminder that taking care of ourselves can be simple, delicious, and deeply satisfying.
Health and Nutrition
Why it’s good for your body
Energy Balls pack a powerful nutritional punch in every bite. First, they deliver a steady boost of energy thanks to their blend of natural ingredients like oats, nuts, and dried fruit. Unlike processed snacks, Energy Balls provide complex carbs and healthy fats that keep you full longer without crashing.
Additionally, these little powerhouses support digestion because they often contain fiber-rich ingredients like chia seeds or flaxseeds. Fiber not only aids gut health but also helps regulate blood sugar levels. Meanwhile, the nuts and seeds in Energy Balls offer plant-based protein, making them a smart choice for muscle recovery or post-workout refueling.
Finally, Energy Balls brim with antioxidants from ingredients like dark chocolate or goji berries. Antioxidants fight inflammation and support overall immunity. Whether you need a quick breakfast or an afternoon pick-me-up, Energy Balls give your body the nutrients it craves without artificial additives.
How it fits in a healthy lifestyle
Energy Balls effortlessly fit into a balanced diet because they’re versatile and customizable. For gluten-free eaters, simply swap regular oats for certified gluten-free oats. If you’re focused on heart health, ingredients like almonds and walnuts provide monounsaturated fats that support cholesterol levels.
These snacks also align with high-protein diets when you add a scoop of nut butter or protein powder. For busy lifestyles, Energy Balls are a practical grab-and-go option that beats sugary convenience foods. Pair them with a smoothie bowl for a complete meal or enjoy them as a pre-workout snack.
Craving something sweet without derailing your goals? Energy Balls satisfy that urge naturally. Explore more healthy dessert ideas to keep your eating habits both enjoyable and nourishing.
Quick and nutritious no-bake energy balls packed with oats, nuts, and natural sweetness.
Ingredients
Scale
For the Crust:
1 cup rolled oats
1/2 cup almond butter
1/4 cup honey
1/4 cup ground flaxseed
1/4 cup mini chocolate chips
1 tsp vanilla extract
1/2 tsp cinnamon
Pinch of salt
Instructions
1. Prepare the Crust:
In a large bowl, mix all ingredients until well combined.
Roll the mixture into 1-inch balls using your hands.
Place the balls on a baking sheet lined with parchment paper and refrigerate for at least 30 minutes to set.
Store in an airtight container in the fridge for up to 2 weeks.
Notes
You can customize the seasonings to taste.
s-dish">How to Prepare This Dish
Steps and time-saving tips
Start by gathering all your ingredients for Energy Balls in one place to save time. Measure out the oats, nut butter, and honey so everything is ready to go. Combine the dry ingredients first—oats, chia seeds, and a pinch of salt—in a large mixing bowl. Stir them well to distribute the flavors evenly. Next, add the wet ingredients like almond butter and honey, then mix everything until it forms a sticky, cohesive dough. If the mixture feels too dry, drizzle in a little extra honey or a splash of milk to help it bind.
Roll the dough into small, bite-sized Energy Balls using your hands. For a quicker process, lightly wet your palms to prevent sticking. If you’re adding extras like chocolate chips or coconut flakes, fold them in before shaping. Once rolled, chill the Energy Balls in the fridge for at least 30 minutes to firm them up. This step is crucial for the perfect texture. Meanwhile, clean your workspace so you’re not left with a mess later. For a time-saving hack, double the batch and freeze half for later—they thaw beautifully.
Mistakes I’ve made and learned from
When I first made Energy Balls, I didn’t measure the honey precisely, and the mixture turned out too wet. The balls wouldn’t hold their shape, so I had to add more oats to balance it. Now, I always measure liquids carefully. Another mistake? Skipping the chilling step. I learned the hard way that rushing leads to crumbly Energy Balls. For best results, patience is key. If you’re new to no-bake snacks, check out my guide on perfect no-bake treats for more tips. Also, if your Energy Balls are too dense, try fluffier oats like the ones I recommend in my best oats for energy bites post. Small tweaks make all the difference!
Energy Balls trace their roots back to the Middle East, where date-based sweets like ma’amoul and halwa inspired their creation. Over time, travelers and home cooks adapted the concept, blending nuts, dried fruits, and spices into portable, nutrient-packed bites. In Scandinavia, for instance, they mix oats and lingonberries for a tart twist, while Australian versions often feature macadamia nuts and coconut. Every culture adds its own flair, making Energy Balls a global favorite.
My grandmother used to whip up her own version with walnuts and honey, calling them “little power moons.” She’d pack them in my lunchbox, and soon, my friends begged for their own. Today, I see the same excitement when I share Energy Balls at potlucks or hiking trips. Whether you prefer them with chia seeds, cacao, or a dash of cardamom, these no-bake treats bridge traditions and tastes effortlessly.
ays-cooking">How it fits in today’s cooking
Energy Balls thrive in modern kitchens because they’re fast, flexible, and freezer-friendly. Busy parents stash them in lunchboxes, while fitness lovers rely on them as pre-workout fuel. They’ve even become a staple in meal prep routines, pairing perfectly with overnight oats for a balanced breakfast. Plus, their no-bake nature makes them ideal for hot summer days when turning on the oven feels unbearable.
Seasonal twists keep them fresh year-round. In winter, cinnamon and ginger add warmth, while summer batches burst with lemon zest or berry powder. Whether you’re honoring family recipes or experimenting with new flavors, Energy Balls fit seamlessly into today’s on-the-go lifestyle. No wonder they’ve earned a permanent spot in pantries worldwide.
Taste and Texture
What makes it delicious
Energy Balls deliver a burst of rich, satisfying flavors with every bite. The chewy texture, thanks to sticky dates and nut butter, contrasts perfectly with crunchy add-ins like chia seeds or chopped nuts. Sweet hints of honey or maple syrup balance earthy cocoa or vanilla, while a touch of sea salt elevates the whole experience. These little bites smell irresistible too—warm, nutty, and slightly caramelized from the natural sugars. Whether you crave something decadent or subtly sweet, Energy Balls hit all the right notes.
r">Boosting the flavor
For an extra flavor kick, try rolling Energy Balls in shredded coconut or crushed freeze-dried berries. A dash of cinnamon or cardamom amps up warmth, while a drizzle of healthy chocolate sauce turns them into dessert. Swap almond butter for tahini if you love savory-sweet depth, or mix in cacao nibs for crunch. Pair them with a creamy cashew milk to balance their richness. Small tweaks make these bites even more addictive!
Tips for Success
Best practices for results
Always chill the dough for at least 30 minutes before rolling your Energy Balls—this prevents stickiness and helps them hold their shape. Use a small cookie scoop for evenly sized portions, and press firmly when shaping to avoid crumbly results. For extra flavor, lightly toast nuts or seeds before blending them into the mix. If the mixture feels too dry, add a teaspoon of honey or nut butter to bind it smoothly. Finally, store Energy Balls in an airtight container to keep them fresh for up to two weeks.
>Mistakes to avoid
Avoid over-processing dates in the food processor, as this can turn them into a paste instead of a textured base for your Energy Balls. Instead, pulse just until finely chopped. Many cooks also skip the chilling step, but this leads to messy, misshapen bites—patience pays off here. If your mixture feels too wet, check out our guide on fixing sticky dough for quick solutions. For more inspiration on flavor variations, explore our healthy snack swaps to keep your Energy Balls exciting every time.
Serving and Pairing Suggestions
How to serve this dish
Energy balls shine as a versatile treat for any occasion. For a brunch spread, arrange them on a wooden board alongside fresh fruit and yogurt. Alternatively, stack them in a glass jar for a charming picnic or potluck display. During the holidays, roll them in crushed nuts or coconut flakes for a festive touch. If you want to impress guests, drizzle melted dark chocolate over the top and sprinkle with sea salt. Either way, these bite-sized delights always look as good as they taste.
What goes well with it
Pair energy balls with a creamy latte or cold brew coffee for a satisfying mid-morning snack. The rich flavors of coffee balance the natural sweetness perfectly. For a refreshing combo, try them with our blueberry smoothie, which adds a tangy contrast. If you prefer something heartier, serve them alongside our almond flour pancakes to create a balanced breakfast. Finally, a dollop of Greek yogurt or nut butter makes an excellent dipping partner for extra protein.
Energy balls typically consist of nutrient-dense ingredients like oats, nut butter, honey, and seeds. Many recipes also include add-ins like chocolate chips, dried fruit, or protein powder for extra flavor and energy. These no-bake snacks are perfect for a quick boost.
Are energy balls healthy?
Yes, energy balls can be a healthy snack when made with wholesome ingredients. They provide sustained energy from complex carbs, healthy fats, and protein. However, watch portion sizes since some recipes can be calorie-dense.
rank-math-faq-item">
How long do homemade energy balls last?
Most energy balls stay fresh for 1-2 weeks in the refrigerator when stored in an airtight container. For longer storage, freeze them for up to 3 months. The shelf life depends on ingredients—those with fresh nut butters may spoil faster.
Can you make energy balls without dates?
Absolutely! While dates are common in energy ball recipes, you can substitute them with honey, maple syrup, or other sticky sweeteners. Some recipes use bananas or applesauce as natural binders. Energy balls are very adaptable to different dietary needs.
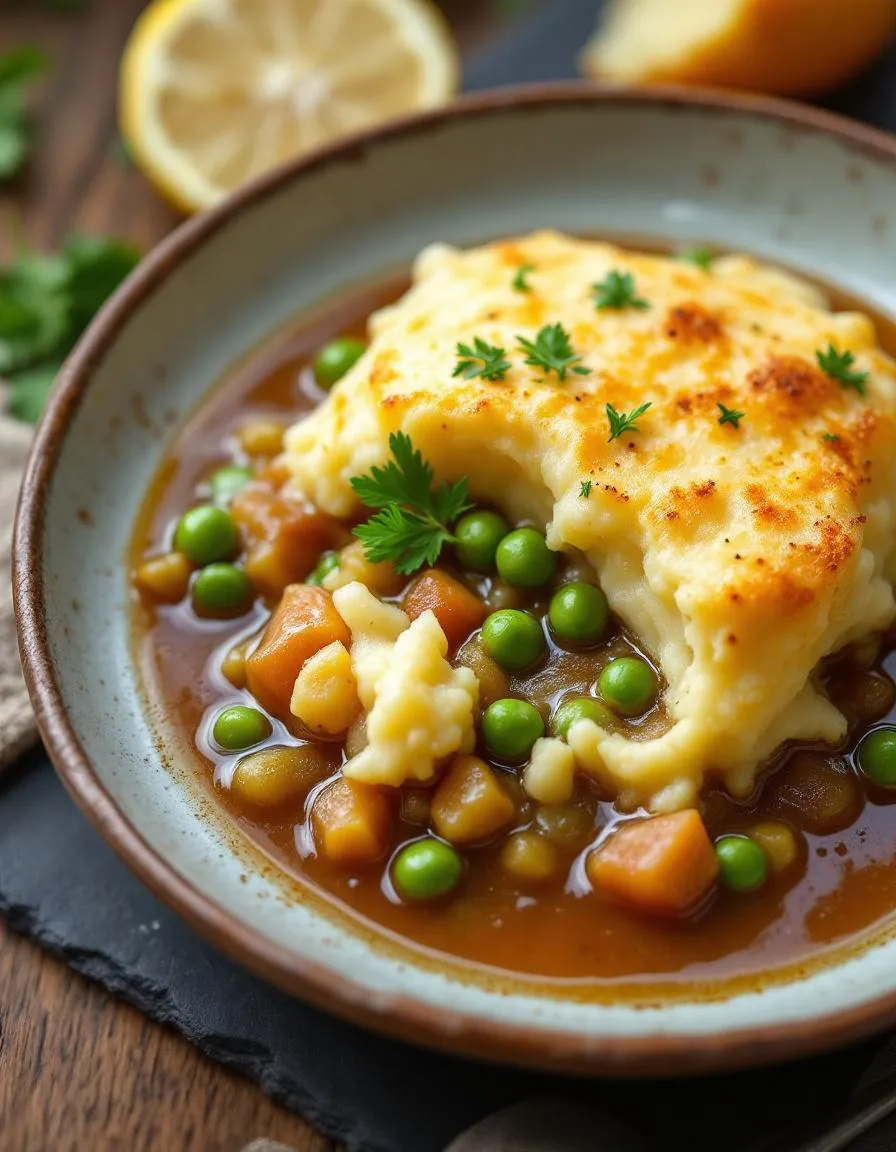
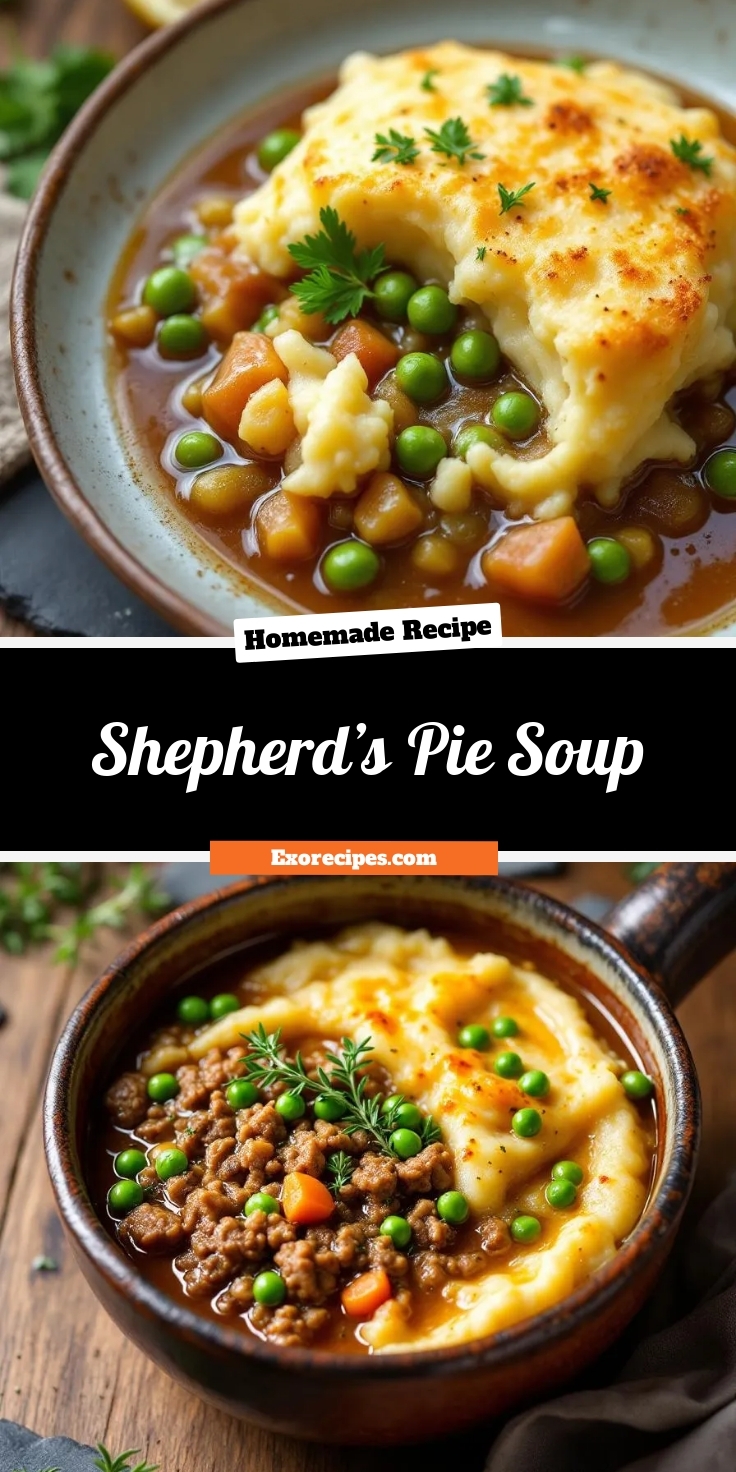
Best Shepherd’s Pie Soup – Comforting & Easy Recipe
Introduction
There’s something undeniably comforting about a bowl of hearty soup, especially when it reminds you of a classic family favorite. That’s exactly why I created this Shepherd’s Pie Soup—a cozy twist on the beloved dish that warms you from the inside out. Whether you’re craving nostalgia or simply need a nourishing meal on a chilly evening, this recipe delivers all the rich flavors you love, with a spoonable twist. Plus, it’s incredibly easy to make, even on your busiest days.
Shepherd’s Pie Soup takes everything you adore about the traditional casserole—tender ground meat, savory vegetables, and creamy mashed potatoes—and transforms it into a luscious, broth-based delight. Unlike the oven-baked original, this version comes together in one pot, making it perfect for weeknight dinners or meal prep. The soup captures the essence of comfort food while offering a lighter, more versatile approach. If you’ve ever wondered how to enjoy the flavors of shepherd’s pie without the lengthy assembly, this recipe is your answer. For more cozy dinner ideas, check out my Comfort Food Classics collection. And if you’re new to one-pot meals, my One-Pot Wonders guide will become your go-to resource.
Why I Love This Recipe
Shepherd’s Pie Soup holds a special place in my heart because it bridges the gap between tradition and convenience. My grandmother used to spend hours layering her famous shepherd’s pie, and while I cherish those memories, life doesn’t always allow for slow-cooked meals. This soup lets me savor those same flavors in half the time, without sacrificing the soul-soothing goodness. Every spoonful feels like a hug, and I love how adaptable it is—whether I’m adding extra veggies or swapping the protein. It’s the kind of recipe that never fails to bring everyone to the table, just like Grandma’s cooking did.
“`html
Health and Nutrition
Why it’s good for your body
Shepherd’s Pie Soup packs a nutritious punch while delivering classic comfort food flavors. First, it combines lean protein from ground meat with fiber-rich vegetables like carrots, peas, and potatoes. Together, these ingredients keep you full longer and support muscle repair. Additionally, the broth base hydrates your body and aids digestion, unlike heavier cream-based soups.
Moreover, Shepherd’s Pie Soup offers a balanced mix of vitamins and minerals. Potatoes provide potassium for heart health, while carrots contribute vitamin A for immune support. Since the soup simmers slowly, it preserves more nutrients than frying or overcooking. Plus, you can easily customize it with extra veggies like spinach or kale for an antioxidant boost.
Finally, this soup delivers warmth and satisfaction without excessive calories. By using wholesome ingredients and minimal processed additives, Shepherd’s Pie Soup becomes a guilt-free meal. Whether you need post-workout recovery or a cozy dinner, it fuels your body efficiently.
How it fits in a healthy lifestyle
Shepherd’s Pie Soup fits seamlessly into balanced eating habits. For gluten-free diets, simply swap traditional flour thickeners for cornstarch or omit them entirely. If you follow a high-protein plan, increase the lean meat or add lentils for plant-based power. The soup also aligns with heart-healthy goals when you use low-sodium broth and lean turkey instead of beef.
Meal preppers love Shepherd’s Pie Soup because it reheats beautifully and stays flavorful for days. Pair it with a crisp side salad for extra greens, or enjoy it solo as a satisfying lunch. For more gluten-free meal ideas, explore our gluten-free dinner options. If protein-packed soups inspire you, check out these high-protein comfort foods to keep your energy steady all day.
A comforting twist on the classic Shepherd’s Pie, this hearty soup combines ground meat, vegetables, and creamy mashed potatoes in a rich broth.
Ingredients
Scale
For the Crust:
1 lb ground lamb or beef
1 onion, diced
2 carrots, diced
2 celery stalks, diced
3 cloves garlic, minced
4 cups beef broth
1 cup frozen peas
2 cups mashed potatoes
1 tsp Worcestershire sauce
1 tsp dried thyme
Salt and pepper to taste
2 tbsp olive oil
Instructions
1. Prepare the Crust:
Heat olive oil in a large pot over medium heat. Add ground meat and cook until browned, breaking it into small pieces.
Add onion, carrots, celery, and garlic. Sauté until vegetables soften, about 5 minutes.
Pour in beef broth, Worcestershire sauce, and thyme. Bring to a boil, then reduce heat and simmer for 15 minutes.
Stir in frozen peas and mashed potatoes, mixing well until the soup thickens slightly.
Season with salt and pepper to taste. Simmer for another 5 minutes before serving.
Notes
You can customize the seasonings to taste.
s-dish">How to Prepare This Dish
Steps and time-saving tips
Start by heating a large pot over medium heat and drizzling in olive oil. Toss in diced onions, carrots, and celery, then sauté until they soften—about 5 minutes. Next, add ground lamb or beef, breaking it apart with a wooden spoon as it browns. Sprinkle in flour and stir well to coat the meat, which helps thicken the Shepherd’s Pie Soup later. Pour in beef broth and a splash of Worcestershire sauce, then bring everything to a gentle simmer. Meanwhile, peel and cube potatoes before boiling them until fork-tender. Drain the potatoes, mash them with butter and warm milk, and set aside. Once the soup base has simmered for 15 minutes, fold in frozen peas and corn for a pop of color and sweetness. Ladle the soup into oven-safe bowls, top with a generous layer of mashed potatoes, and broil until golden. For a time-saving twist, use leftover mashed potatoes or pre-chopped veggies from the store.
Mistakes I’ve made and learned from
I once rushed the browning step, leaving the meat unevenly cooked and the Shepherd’s Pie Soup tasting bland. Now I take an extra minute to break up every clump for perfect texture. Another time, I skipped the flour, and the soup turned out watery—lesson learned! Thickening the meat mixture first makes all the difference. If you’re new to broiling, watch the potatoes closely; I’ve scorched a batch by multitasking. For more foolproof tips, check out my guide on avoiding soup disasters. And if you love cozy meals, try my comfort food hacks to simplify weeknight cooking.
n-and-variations">Cultural Connection and Variations
Where this recipe comes from
Shepherd’s Pie Soup takes inspiration from the classic British dish, but with a twist that makes it perfect for cozy nights. Traditionally, shepherd’s pie features a hearty layer of minced meat and veggies topped with mashed potatoes. However, this soup version transforms those same flavors into a spoonable comfort food. In Ireland, you might find similar stews with lamb, while in the U.S., beef often takes center stage. Either way, the soul-warming essence remains.
Families around the world put their own spin on it. For instance, some add a splash of Guinness for depth, while others toss in root vegetables like parsnips or turnips. My grandma always sneaked in extra peas and carrots because she believed they made the broth sweeter. Meanwhile, in Australia, they might top it with a dollop of cheesy mashed potatoes, keeping that iconic pie vibe. No matter the variation, Shepherd’s Pie Soup always feels like a hug in a bowl.
How it fits in today’s cooking
Today, Shepherd’s Pie Soup fits seamlessly into modern kitchens. Busy cooks love it because it’s a one-pot wonder, and meal preppers swear by its freezer-friendly nature. Plus, it’s a fantastic way to use leftover mashed potatoes or roasted veggies, reducing food waste. During fall and winter, it becomes a star at holiday gatherings, especially when paired with crusty bread or a fresh simple green salad for balance.
Health-conscious tweaks
keep it relevant too. Some swap in turkey or lentils for a lighter take, while others load it up with kale for extra nutrients. And let’s not forget the Instant Pot fans who whip it up in under 30 minutes. Whether you’re serving it after a long day or as part of a cozy dinner party, Shepherd’s Pie Soup proves that comfort food never goes out of style.
Taste and Texture
What makes it delicious
Shepherd’s Pie Soup wraps you in warmth with its rich, savory flavors and velvety texture. The tender ground meat mingles with earthy carrots and peas, while the creamy mashed potato swirl adds a comforting, buttery finish. Each spoonful bursts with fragrant herbs like rosemary and thyme, deepening the cozy aroma. Meanwhile, the broth balances hearty and smooth, making it irresistibly satisfying. Shepherd’s Pie Soup transforms classic comfort into a spoonable delight, perfect for chilly nights.
Boosting the flavor
Elevate your Shepherd’s Pie Soup by stirring in a splash of Worcestershire sauce for a tangy kick or topping it with crispy fried onions for crunch. For extra depth, try smoked paprika or a dollop of garlic butter melted into the broth. If you love bold flavors, swap the ground beef for lamb and pair it with a drizzle of herb-infused olive oil. Whether you tweak the spices or add toppings, small changes make this soup even more memorable.
Always brown the ground meat well before adding liquids to deepen the flavor of your Shepherd’s Pie Soup. Meanwhile, stir the potatoes frequently while mashing to prevent lumps and ensure a creamy texture. For the best consistency, simmer the soup uncovered for the last 10 minutes to thicken it slightly. Additionally, taste and adjust the seasoning just before serving, as flavors develop while cooking. Finally, top each bowl with fresh parsley for a bright finish that complements the rich soup.
Mistakes to avoid
Avoid overcooking the vegetables, or they’ll turn mushy in your Shepherd’s Pie Soup. Instead, add them in stages—firmer veggies like carrots first, softer ones like peas last. Also, don’t skip deglazing the pan after browning the meat; those browned bits add tons of flavor. If your soup seems too thin, check out our guide on how to thicken soups for easy fixes. Lastly, resist the urge to over-season early on—wait until the end, as our seasoning tips explain, since salt intensifies during cooking.
g-suggestions">Serving and Pairing Suggestions
How to serve this dish
For a cozy family dinner, ladle Shepherd’s Pie Soup into rustic bread bowls to add a fun, edible twist. Alternatively, serve it in deep bowls with a sprinkle of fresh parsley or chives for a pop of color. During colder months, this hearty soup shines as the star of holiday gatherings or game-day spreads. To elevate the presentation, top each serving with a dollop of sour cream or a handful of crispy fried onions for extra texture.
What goes well with it
Pair Shepherd’s Pie Soup with a crisp green salad like our Garlic Parmesan Salad to balance its rich flavors. For a heartier meal, add warm, buttery rolls or a slice of crusty sourdough. Meanwhile, a glass of full-bodied red wine or a cold stout beer enhances the savory notes of the soup. If you prefer non-alcoholic options, try our Homemade Lemonade for a refreshing contrast.
math-faq-block">
What is Shepherd’s Pie Soup?
Shepherd’s Pie Soup is a cozy, deconstructed version of the classic comfort dish. It combines all the flavors of traditional Shepherd’s Pie—like ground meat, vegetables, and gravy—in a hearty soup form, often topped with creamy mashed potatoes or crumbled biscuits for texture.
Can I make Shepherd’s Pie Soup vegetarian?
Absolutely! Swap the ground meat for lentils, mushrooms, or plant-based crumbles to create a delicious vegetarian Shepherd’s Pie Soup. The rich gravy and mashed potato topping keep it just as satisfying as the original.
How do you thicken Shepherd’s Pie Soup?
For a thicker consistency, stir in a cornstarch slurry, mashed potato flakes, or a roux (butter and flour mixture) while simmering. Shepherd’s Pie Soup should be hearty but still pourable, so adjust gradually to your preference.
rank-math-faq-item">
What’s the best way to serve Shepherd’s Pie Soup?
Serve Shepherd’s Pie Soup hot in bowls, topped with a dollop of buttery mashed potatoes, shredded cheese, or fresh herbs. Pair it with crusty bread or a side salad for a complete meal.
Best Pot Baked Potatoes – Easy Homemade Recipe
Introduction
There’s something undeniably comforting about a dish that feels like a warm hug, and Pot Baked Potatoes deliver exactly that. Whether you’re craving a cozy weeknight dinner or a crowd-pleasing side dish, this recipe wraps simplicity and flavor into one irresistible package. Plus, it’s incredibly versatile—perfect for busy families, solo cooks, or anyone who appreciates hearty, homemade goodness. Let me show you why Pot Baked Potatoes deserve a permanent spot in your recipe rotation.
Pot Baked Potatoes are the ultimate comfort food, combining tender potatoes with rich, melty toppings for a dish that’s as satisfying as it is easy to make. Unlike traditional baked potatoes, this version cooks in a single pot, locking in moisture and flavor while minimizing cleanup. It’s a game-changer for anyone who loves rustic, hearty meals without the fuss. At brekcakes.com, we celebrate recipes that balance simplicity with bold taste, and Pot Baked Potatoes fit perfectly into that philosophy. They’re also a fantastic way to use pantry staples, making them a practical choice for budget-friendly cooking. If you’re looking for more easy, flavorful ideas, check out our One-Pan Wonders collection or explore Comfort Food Classics for timeless favorites.
Why I Love This Recipe
Pot Baked Potatoes remind me of Sunday dinners at my grandma’s house, where the aroma of buttery potatoes filled the kitchen and everyone gathered around the table. Even now, every bite takes me back to those cherished moments. I also love how this recipe adapts to whatever ingredients I have on hand—whether it’s sharp cheddar, crispy bacon, or fresh herbs from the garden. It’s a dish that feels both nostalgic and endlessly customizable, which is why I keep coming back to it year after year.
Health and Nutrition
Why it’s good for your body
Pot Baked Potatoes pack a nutritious punch while delivering hearty comfort. First, they provide a rich source of potassium, which helps regulate blood pressure and supports muscle function. Additionally, their natural fiber content keeps digestion smooth and promotes long-lasting fullness. Because they’re baked, Pot Baked Potatoes retain more nutrients than fried alternatives, making them a smarter choice for sustained energy.
Moreover, Pot Baked Potatoes offer a versatile base for healthy toppings. For instance, loading them with Greek yogurt instead of sour cream boosts protein while cutting saturated fat. Their skin also contains antioxidants like vitamin C, which strengthens immunity and fights inflammation. Whether you enjoy them plain or dressed up, Pot Baked Potatoes deliver essential vitamins like B6, crucial for brain health and metabolism.
Finally, Pot Baked Potatoes fit seamlessly into balanced meals. Pair them with lean proteins and veggies for a well-rounded plate. Their complex carbs provide steady fuel, preventing energy crashes. With so many benefits, it’s easy to see why Pot Baked Potatoes deserve a regular spot in your diet.
How it fits in a healthy lifestyle
Pot Baked Potatoes adapt effortlessly to various dietary needs. If you follow a gluten-free lifestyle, they’re a naturally safe and satisfying option. For heart-healthy eating, skip heavy toppings and opt for olive oil or avocado instead. Their high fiber content also supports weight management by curbing cravings.
Including Pot Baked Potatoes in meal prep saves time without sacrificing nutrition. Bake a batch ahead and pair them with proteins like grilled chicken or plant-based options for quick, balanced dinners. Looking for more wholesome sides? Try our Roasted Vegetable Medley for added color and nutrients. If you’re exploring high-protein meals, our Garlic Herb Chicken complements Pot Baked Potatoes perfectly. Simple, nourishing, and delicious—they make healthy eating easy.
A simple and delicious way to bake potatoes in a pot, resulting in tender and fluffy insides with a perfectly crisp skin.
Ingredients
Scale
For the Crust:
4 large russet potatoes
2 tablespoons olive oil
1 teaspoon salt
1/2 teaspoon black pepper
1/2 teaspoon garlic powder
1/2 teaspoon paprika
2 tablespoons butter (optional)
2 tablespoons chopped fresh parsley (optional)
Instructions
1. Prepare the Crust:
Preheat your oven to 400°F (200°C).
Scrub the potatoes clean and pat them dry. Pierce each potato several times with a fork.
In a small bowl, mix together the olive oil, salt, black pepper, garlic powder, and paprika.
Rub the seasoned oil mixture evenly over each potato, ensuring they are fully coated.
Place the potatoes in a large pot with a tight-fitting lid. Cover and bake in the preheated oven for 45-60 minutes, or until the potatoes are tender when pierced with a fork.
Remove the pot from the oven and let the potatoes sit for 5 minutes. Carefully remove the lid.
Serve hot, optionally topped with butter and chopped parsley.
Notes
You can customize the seasonings to taste.
How to Prepare This Dish
Steps and time-saving tips
Start by preheating your oven to 400°F so it’s ready when you are. Meanwhile, scrub the Pot Baked Potatoes thoroughly under running water to remove any dirt, then pat them dry with a clean towel. Poke each potato several times with a fork to allow steam to escape during baking, which prevents them from bursting. Next, drizzle the potatoes with olive oil and rub it evenly over the skins. Sprinkle generously with salt and any other seasonings you love—garlic powder or smoked paprika work wonders here. Place the potatoes directly on the oven rack or on a baking sheet lined with foil for easy cleanup. Bake for 45-60 minutes, depending on size, until the skins crisp and the insides feel tender when pierced with a fork. For a time-saving twist, microwave the potatoes for 5 minutes before baking to cut oven time in half. Once done, slice them open and fluff the insides with a fork before adding your favorite toppings like butter, sour cream, or chives.
and-learned-from">Mistakes I’ve made and learned from
I used to skip poking holes in my Pot Baked Potatoes, assuming it wasn’t necessary—until one exploded in my oven. Now I never forget this step! Another lesson? Underseasoning. Salting just the outside isn’t enough; I’ve learned to lightly season the flesh after slicing for deeper flavor. If you’re new to baking potatoes, check out my guide on perfect baked potatoes for more troubleshooting tips. And if you’re short on time, my quick kitchen hacks post has tricks to streamline prep without sacrificing taste. Trust me, a little patience and these tweaks make all the difference.
Cultural Connection and Variations
Where this recipe comes from
Pot Baked Potatoes trace their roots to rustic European kitchens, where families cooked them in cast-iron pots over open fires. In Ireland, they often stuffed the potatoes with butter and herbs, while in Germany, cooks layered them with bacon and caraway seeds. My grandmother made her version with a splash of broth and a handful of thyme, turning Pot Baked Potatoes into a cozy Sunday supper.
Today, you’ll fi
nd variations worldwide. In Peru, they might add ají peppers for heat, while in Japan, miso paste lends a savory twist. Some cultures bake them whole in clay pots, while others slice them thin for quicker cooking. No matter the method, Pot Baked Potatoes always deliver hearty comfort. Even in my home, we tweak the recipe—sometimes with cheese, other times with smoked paprika—depending on the season.
How it fits in today’s cooking
Modern cooks love Pot Baked Potatoes for their versatility. They fit perfectly into meal prep routines, and you can easily pair them with dishes like garlic herb chicken or a crisp salad. During holidays, they become a nostalgic side dish, especially when topped with sour cream and chives.
Today’s adaptations keep the tradition alive. Some use air fryers for a crispier texture, while others add plant-based toppings for a vegan twist. Whether you’re making a weeknight dinner or hosting a gathering, Pot Baked Potatoes adapt effortlessly. For more inspiration, check out these comfort food classics to round out your menu.
>Taste and Texture
What makes it delicious
Pot Baked Potatoes deliver a symphony of comforting flavors and textures. The exterior crisps up golden-brown, giving way to a fluffy, buttery interior that melts in your mouth. Each bite carries a rich, earthy sweetness, heightened by the caramelized edges and a hint of smokiness. Meanwhile, the aroma of roasted garlic and herbs fills the air, making every forkful irresistible. Whether you load them with toppings or enjoy them plain, Pot Baked Potatoes strike the perfect balance between hearty and indulgent.
Boosting the flavor
Elevate your Pot Baked Potatoes with a few creative tweaks. For a tangy twist, swirl in a dollop of homemade sour cream or sprinkle with sharp cheddar for extra richness. Fresh herbs like rosemary or thyme add a fragrant punch, while a dash of smoked paprika brings depth. If you love bold flavors, try pairing them with a zesty garlic aioli for dipping. The possibilities are endless, so don’t hesitate to experiment!
Tips for Success
Best practices for results
Always scrub your potatoes thoroughly before baking to remove dirt, since leaving residue can affect texture. For extra fluffy Pot Baked Potatoes, poke several holes in the skin with a fork to let steam escape evenly. Additionally, rub the skins with a little oil and salt for a crispier finish. If you want perfectly tender insides, bake them at 400°F for about 50-60 minutes, depending on size. Finally, let them rest for 5 minutes after baking to lock in moisture before serving.
Mistakes to avoid
Avoid wrapping potatoes in foil before baking, as this traps moisture and leads to soggy skins instead of crispy ones. Instead, place them directly on the oven rack for even heat distribution. Another common mistake is skipping the oil coating, which helps achieve that golden, crunchy exterior. For more tips on perfecting oven-baked dishes, check out our guide on oven temperature control. Also, resist cutting into Pot Baked Potatoes too soon—letting them rest ensures they stay fluffy. If you’re unsure about doneness, learn how to test baked goods properly with our doneness testing guide.
Serving and Pairing Suggestions
How to serve this dish
Pot Baked Potatoes shine when you serve them straight from the pot for a rustic, family-style presentation. For a special touch, top them with a dollop of sour cream, fresh chives, or crispy bacon bits. Alternatively, transfer them to a wooden board for a charming farmhouse vibe, perfect for holiday gatherings or cozy weekend brunches. Since Pot Baked Potatoes have crispy skins and fluffy interiors, slice them open slightly to showcase their texture. Pair them with colorful veggies or a sprinkle of paprika for a vibrant plate.
h-it">What goes well with it
For a hearty meal, pair Pot Baked Potatoes with a tangy homemade ranch dip or a smoky barbecue sauce—both enhance their earthy flavors. If you’re serving them as a side, try our Garlic Herb Chicken for a protein-packed combo. Meanwhile, a crisp green salad with lemon vinaigrette balances the richness. For drinks, a chilled glass of iced tea or a light beer complements the dish perfectly. Craving something sweet afterward? Our Cinnamon Apple Crisp makes a delightful follow-up.
How long does it take to bake Pot Baked Potatoes?
Pot Baked Potatoes typically take 45–60 minutes at 400°F (200°C), depending on size. For crispier skins, rub them with oil and bake directly on the oven rack. Always test doneness by piercing with a fork—they’re ready when tender all the way through.
rank-math-faq-item">
Do you wrap Pot Baked Potatoes in foil?
Wrapping Pot Baked Potatoes in foil steams them, resulting in softer skins. For classic crispy skins, skip the foil and bake uncovered. Foil-wrapped potatoes cook slightly faster but lose the desirable texture contrast.
What toppings go best with Pot Baked Potatoes?
Classic toppings for Pot Baked Potatoes include sour cream, chives, cheddar cheese, and bacon bits. For healthier options, try Greek yogurt, steamed broccoli, or avocado. The neutral flavor makes them perfect for both savory and creative sweet combinations.
Can you make Pot Baked Potatoes ahead of time?
Yes! Bake Pot Baked Potatoes as usual, let them cool completely, then refrigerate for up to 3 days. Reheat in a 350°F (175°C) oven for 15–20 minutes. The skins stay crispier when reheated uncovered.
>
Best Slow Cooker Cowboy Casserole Recipe
Introduction
There’s something incredibly comforting about a meal that simmers all day, filling your home with irresistible aromas. That’s exactly why I adore this Slow Cooker Cowboy Casserole—it’s hearty, flavorful, and practically cooks itself. Whether you’re juggling a busy schedule or simply craving a taste of home, this dish delivers warmth and satisfaction in every bite. Plus, it’s a crowd-pleaser that brings everyone to the table, just like my favorite weeknight dinners.
The Slow Cooker Cowboy Casserole is a rustic, no-fuss dish packed with ground beef, tender potatoes, and a rich, smoky sauce. It’s the kind of meal that reminds you of campfire cooking but with the convenience of your trusty slow cooker. Perfect for chilly evenings or potluck gatherings, this recipe embodies the down-to-earth, family-friendly vibe of brekcakes.com. If you love hearty comfort food, you’ll appreciate how effortlessly it comes together, much like my go-to comfort food classics. What sets it apart is its versatility—you can customize it with your favorite veggies or spices, making it a staple in any home cook’s rotation.
Why I Love This Recipe
This Slow Cooker Cowboy Casserole holds a special place in my heart because it reminds me of cozy family dinners after long days. My dad used to make a similar dish over the campfire during our summer trips, and recreating that flavor at home feels like a warm hug. It’s also the recipe I turn to when friends drop by unexpectedly—it’s forgiving, filling, and always earns rave reviews. Most importantly, it proves that great food doesn’t have to be complicated, just made with care.
Health and Nutrition
Why it’s good for your body
Slow Cooker Cowboy Casserole packs a nutritious punch while delivering hearty comfort. First, it combines lean protein from ground beef and beans, which helps build muscle and keeps you full longer. Additionally, the fiber-rich beans and vegetables support digestion and stabilize blood sugar levels. Because the dish simmers slowly, it retains more nutrients than faster cooking methods.
Moreover, Slow Cooker Cowboy Casserole includes tomatoes, which provide lycopene, a powerful antioxidant linked to heart health. The dish also features onions and garlic, both known for their immune-boosting properties. Since it relies on wholesome ingredients, you avoid excessive processed additives. Plus, the slow cooking process enhances flavors naturally, reducing the need for extra salt or unhealthy fats.
Finally, this casserole offers a balanced mix of carbs, protein, and healthy fats, making it a satisfying meal. Whether you need energy for the day or a recovery dish after activity, Slow Cooker Cowboy Casserole delivers. Its nutrient density makes it a smart choice for anyone seeking both taste and nourishment.
How it fits in a healthy lifestyle
Slow Cooker Cowboy Casserole fits effortlessly into a balanced diet. For those focusing on high-protein meals, the combination of beef and beans provides a solid foundation. If you prefer gluten-free options, simply ensure your ingredients meet those standards, as the dish naturally avoids gluten-heavy additives.
This casserole also aligns with heart-healthy eating when you opt for lean ground beef and minimal added salt. Pair it with a fresh side salad or steamed greens for a well-rounded plate. For busy households, it’s a practical solution because you can prep it ahead and let the slow cooker do the work. Check out our meal prep guide for more time-saving tips.
If you’re watching portions, Slow Cooker Cowboy Casserole freezes well for future meals. It’s also versatile enough to tweak for dietary preferences, like adding extra veggies or swapping in turkey. For more ideas on balancing comfort food with nutrition, explore our healthy comfort food roundup.
A hearty and comforting casserole with ground beef, beans, and a crispy topping, perfect for a family meal.
Ingredients
Scale
For the Crust:
1 lb ground beef
1 onion, diced
2 cloves garlic, minced
1 can (15 oz) baked beans
1 can (15 oz) corn, drained
1 can (10.5 oz) condensed tomato soup
1 tsp chili powder
1/2 tsp smoked paprika
1/2 tsp salt
1/4 tsp black pepper
2 cups shredded cheddar cheese
1 package (30 oz) frozen tater tots
Instructions
1. Prepare the Crust:
Brown the ground beef in a skillet over medium heat. Add the onion and garlic, cooking until softened. Drain excess fat.
Transfer the beef mixture to the slow cooker. Stir in the baked beans, corn, tomato soup, chili powder, smoked paprika, salt, and pepper.
Sprinkle the shredded cheddar cheese evenly over the mixture. Arrange the frozen tater tots in a single layer on top.
Cover and cook on low for 4-5 hours or on high for 2-3 hours, until the tater tots are golden and crispy.
Let stand for 5 minutes before serving.
Notes
You can customize the seasonings to taste.
“`html
s-dish">How to Prepare This Dish
Steps and time-saving tips
Start by browning the ground beef in a skillet over medium heat, breaking it into small crumbles as it cooks. Drain any excess grease, then stir in diced onions and minced garlic for extra flavor. Meanwhile, whisk together cream of mushroom soup, milk, and a dash of Worcestershire sauce in a bowl until smooth. Layer half the cooked beef mixture in the slow cooker, followed by a generous sprinkle of shredded cheddar cheese and a handful of crispy tater tots. Repeat the layers, then drizzle the soup mixture evenly over the top. Cover and cook on low for 4-5 hours or until the tater tots turn golden and the cheese melts into gooey perfection. For a time-saving hack, use frozen diced onions and pre-shredded cheese to cut prep time in half. If you’re short on time, swap the slow cooker for a baking dish and bake at 375°F for 30 minutes instead. Let the Slow Cooker Cowboy Casserole rest for 10 minutes before serving to allow the flavors to meld.
Mistakes I’ve made and learned from
Early on, I made the mistake of overcrowding the slow cooker, which left the tater tots soggy instead of crispy. Now I spread the layers evenly and avoid overfilling. Another lesson? Skipping the grease-draining step led to a greasy casserole—trust me, it’s worth the extra minute. If you’re new to slow cooking, check out my guide on slow cooker basics to avoid common pitfalls. Also, don’t forget to season each layer lightly; I once relied solely on the soup’s saltiness and ended up with bland bites. For more flavor-boosting tricks, my seasoning hacks post has you covered. These small tweaks transformed my Slow Cooker Cowboy Casserole from mediocre to mouthwatering.
Slow Cooker Cowboy Casserole carries the spirit of hearty, no-fuss meals that cowboys and pioneers relied on during long cattle drives. Rooted in the American West, this dish blends simplicity with bold flavors, often featuring beans, ground beef, and a smoky kick. Families across Texas and the Southwest still tweak the recipe, sometimes adding jalapeños for heat or cornbread topping for extra comfort. Meanwhile, in other parts of the world, similar dishes emerge under different names—like British “shepherd’s pie” or Mexican “frijoles charros”—yet Slow Cooker Cowboy Casserole keeps its rugged charm.
In my family, we’ve made this casserole a camping staple, swapping slow cookers for Dutch ovens over open flames. Friends from the Midwest toss in shredded cheese or tater tots, while Southern cooks might layer in collard greens for a twist. No matter the variation, Slow Cooker Cowboy Casserole always delivers warmth and nostalgia, tying generations together over a single pot.
ays-cooking">How it fits in today’s cooking
Today, Slow Cooker Cowboy Casserole thrives as a weeknight hero for busy families and a star at potlucks. Modern cooks love its dump-and-go ease, often pairing it with quick weeknight sides for a balanced meal. Others reinvent it with plant-based meat or quinoa for a healthier spin, proving its versatility. During holidays, it’s a cozy alternative to heavy roasts, especially when served alongside timeless comfort dishes.
Thanks to its crowd-pleasing flavors and adaptability, Slow Cooker Cowboy Casserole remains a kitchen favorite. Whether you’re meal-prepping or hosting a casual gathering, this dish bridges tradition and modern convenience effortlessly.
Taste and Texture
What makes it delicious
Slow Cooker Cowboy Casserole delivers a hearty, comforting bite with layers of rich, smoky flavor. Tender ground beef mingles with creamy beans and melted cheese, while the slow-cooked onions and peppers add a sweet, caramelized depth. Every spoonful offers a satisfying contrast—soft, velvety potatoes against the slight chew of perfectly seasoned meat. The aroma alone will draw everyone to the kitchen, thanks to fragrant spices like paprika and garlic. Whether you crave warmth or crave boldness, Slow Cooker Cowboy Casserole hits all the right notes.
r">Boosting the flavor
For an extra kick, stir in a dash of chipotle powder or top with crispy bacon bits right before serving. If you love tangy flavors, a dollop of homemade sour cream balances the dish beautifully. Alternatively, swap regular cheese for pepper jack to turn up the heat. Pair it with a side of buttery garlic bread to soak up every last bite. With these tweaks, Slow Cooker Cowboy Casserole becomes even more irresistible.
Tips for Success
Best practices for results
Always brown the ground beef before adding it to the slow cooker for richer flavor in your Slow Cooker Cowboy Casserole. Meanwhile, layer the ingredients evenly to ensure everything cooks uniformly. Additionally, stir the mixture once halfway through cooking to distribute flavors. For the best texture, use fresh potatoes instead of frozen ones. Finally, let the casserole rest for 10 minutes after cooking so the sauce thickens perfectly.
>Mistakes to avoid
Avoid overfilling your slow cooker, as this can lead to uneven cooking in your Slow Cooker Cowboy Casserole. Instead, leave at least an inch of space at the top. Also, resist the urge to lift the lid frequently, as this slows down cooking time. For more slow cooker tips, check out our guide on slow cooker basics. Another common mistake is skipping the cheese topping—it adds a delicious finish, so don’t hold back! If you’re unsure about ingredient substitutions, our ingredient swaps article can help.
Serving and Pairing Suggestions
How to serve this dish
Slow Cooker Cowboy Casserole shines when you serve it family-style in a rustic cast-iron skillet or a colorful ceramic dish. For a cozy weeknight dinner, top it with a handful of fresh chopped cilantro or green onions to add a pop of color. Alternatively, layer it over crispy tortilla chips for a fun twist on comfort food. Since this dish packs hearty flavors, it works perfectly for potlucks, game day gatherings, or even a comforting Sunday supper. To make it extra inviting, pair it with warm cornbread or buttery biscuits right out of the oven.
What goes well with it
For a refreshing contrast, serve Slow Cooker Cowboy Casserole with a crisp Southwest Avocado Salad, which balances the richness with creamy avocado and tangy lime. If you prefer something warm, try a side of honey-glazed carrots for a touch of sweetness that complements the savory notes. To wash it all down, a cold glass of iced tea or a light beer enhances the meal without overpowering the bold flavors. Whether you choose sides or drinks, each pairing elevates the heartiness of this classic dish.
What ingredients are in Slow Cooker Cowboy Casserole?
Slow Cooker Cowboy Casserole typically includes ground beef, beans, corn, diced tomatoes, and tater tots as the base. You can also add onions, garlic, cheese, and spices like chili powder or cumin for extra flavor. This hearty dish combines classic comfort food ingredients for a filling meal.
How long does it take to cook Slow Cooker Cowboy Casserole?
Slow Cooker Cowboy Casserole usually takes 4-6 hours on low heat or 2-3 hours on high heat in a crockpot. The cooking time ensures the flavors meld together and the tater tots become crispy on top. Always check that the internal temperature reaches 165°F for food safety.
rank-math-faq-item">
Can I make Slow Cooker Cowboy Casserole ahead of time?
Yes! You can assemble Slow Cooker Cowboy Casserole a day in advance and store it covered in the refrigerator. Just add the tater tots right before cooking to prevent sogginess. This dish also freezes well for up to 3 months if you need a future meal solution.
What sides go well with Slow Cooker Cowboy Casserole?
Slow Cooker Cowboy Casserole pairs perfectly with simple sides like a green salad, garlic bread, or steamed vegetables. For a heartier meal, try cornbread or coleslaw. The dish is already packed with protein and carbs, so lighter sides balance it nicely.