“`html
Table of Contents
Cowboy Butter Lobster Tails 🦞 | A Flavor-Packed, Easy Recipe!
Welcome, food enthusiasts! If you’re on the lookout for a delightful recipe that will elevate your seafood game, you’ve landed at the right place. Today, we’re diving into a truly mouthwatering dish — Cowboy Butter Lobster Tails. This easy yet decadent recipe brings the smoky, buttery flavors of cowboy cuisine to succulent lobster tails, creating a culinary experience that’s perfect for any special occasion. If you love bold flavors and seafood that’s packed with zest and spice, you’re going to want to bookmark this recipe!
Elevate Your Seafood Night with Cowboy Butter Lobster Tails
Are you searching for a restaurant-quality seafood dish that you can recreate in your own kitchen with minimal fuss? Many home cooks find that elaborate seafood preparations are intimidating, leading them to stick to simpler, often less exciting, options. However, the allure of tender, flavorful lobster is undeniable, and with our Cowboy Butter Lobster Tails recipe, we’re proving that culinary excellence can be both approachable and incredibly rewarding. This dish masterfully combines the richness of butter, the zest of citrus, the warmth of spices, and the luxuriousness of lobster tails, creating a symphony of flavors that will impress even the most discerning palates. Imagine a perfectly cooked lobster tail, bathed in a vibrant, herb-infused butter, with just a hint of spice – it’s a dream for any seafood lover. We’re not just talking about a meal; we’re talking about an experience that transports you to a rustic, yet elegant, dining adventure.
Ingredients for Cowboy Butter Lobster Tails
The magic of this recipe lies in the balance of simple, high-quality ingredients. Here’s what you’ll need:
- 4-6 Lobster Tails (6-8 oz each): Fresh or frozen and thawed. Look for tails with a vibrant red shell and firm flesh. They should smell clean and briny, not fishy.
- 1 cup (2 sticks) Unsalted Butter: The richer, the better! High-quality butter will provide a superior mouthfeel and flavor base.
- 4 cloves Garlic, minced: Freshly minced garlic offers a pungent aroma and a sharp, savory depth.
- 1/4 cup Fresh Parsley, chopped: For a burst of freshness and a beautiful green contrast. Italian flat-leaf parsley is preferred for its robust flavor.
- 2 tablespoons Fresh Chives, chopped: Adds a subtle oniony, garlicky note that complements the other herbs.
- 1 teaspoon Smoked Paprika: This is key to the “cowboy” flavor, lending a smoky sweetness and a lovely reddish hue. Use sweet smoked paprika for a milder flavor, or hot smoked paprika if you dare!
- 1/2 teaspoon Red Pepper Flakes: Adjust to your spice preference. For a mild warmth, use 1/4 teaspoon. For a spicier kick, increase to 3/4 teaspoon.
- 1 tablespoon Lemon Juice (freshly squeezed): Brightens up the rich butter and seafood. The acidity cuts through the richness beautifully.
- Salt and freshly ground Black Pepper: To taste. Season generously to enhance all the flavors.
- Optional: A splash of dry white wine or seafood broth: For thinning the butter slightly if desired, adding another layer of savory complexity.
Timing is Everything
This recipe is remarkably quick, especially compared to other gourmet seafood dishes. Most recipes for lobster can take upwards of 30 minutes of prep and cooking, but the simplicity of the cowboy butter and the direct cooking method for lobster tails makes this dish a weeknight-friendly option for a special meal.

Step-by-Step Instructions
Step 1: Prepare the Lobster
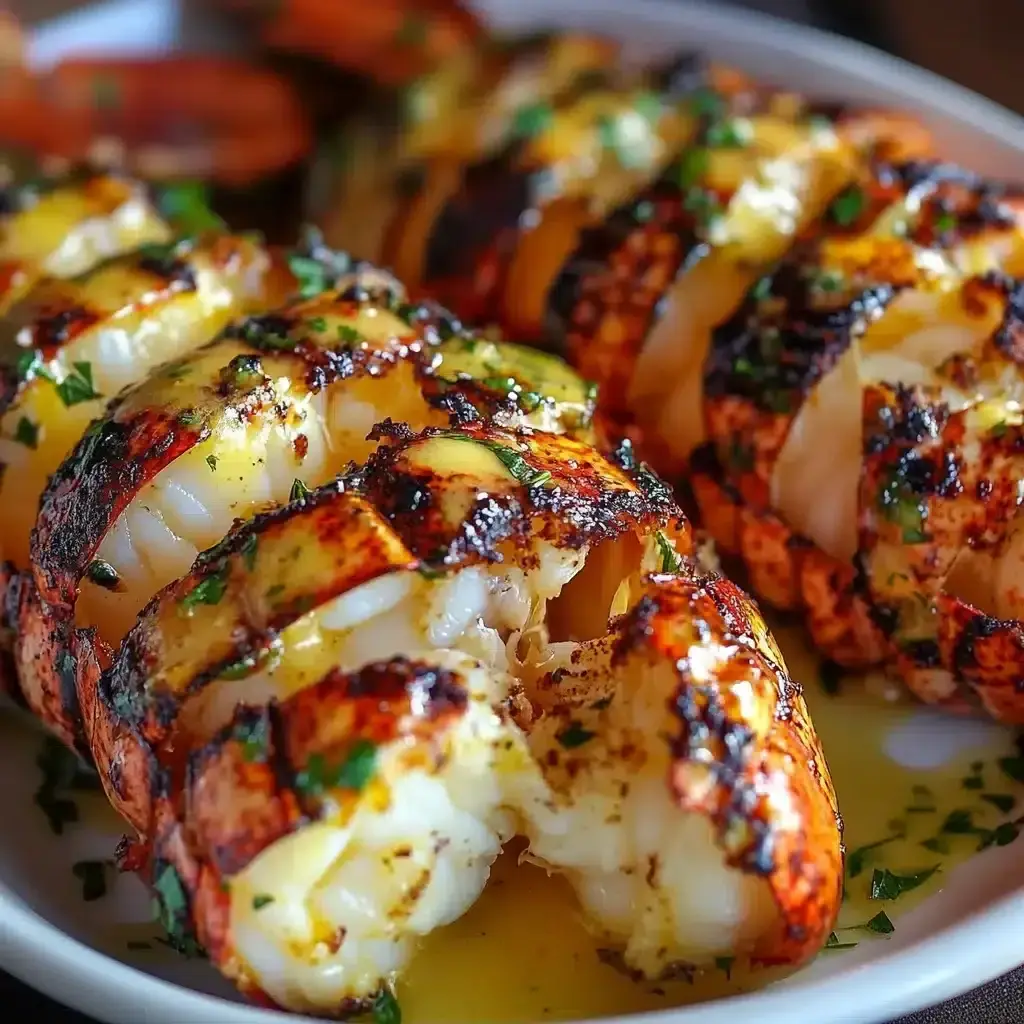
To get your lobster tails ready, you’ll want to “butterfly” them. This means cutting through the top of the shell lengthwise, exposing the meat. Be careful not to cut all the way through the bottom shell. Gently pull the meat up and out of the shell, resting it on top. This presentation is elegant and ensures the delicious cowboy butter has direct contact with the succulent lobster meat. Pat the lobster tails dry with paper towels; this helps them cook evenly and prevents steaming.
Step 2: Mix the Cowboy Butter
In a medium bowl, melt the unsalted butter. You can do this in the microwave in 30-second increments or gently on the stovetop. Once melted, stir in the minced garlic, chopped parsley, chopped chives, smoked paprika, red pepper flakes, fresh lemon juice, salt, and black pepper. If you’re using white wine or broth, whisk it in now. Taste the butter mixture and adjust seasonings as needed. It should be fragrant, slightly spicy, and bright with citrus.
Step 3: Melt and Add
Preheat your oven to 400°F (200°C). Arrange the prepared lobster tails on a baking sheet lined with parchment paper or foil for easier cleanup. Generously spoon or brush the cowboy butter mixture all over the exposed lobster meat. Make sure to get plenty of the herbs and spices onto the top of each tail.
Step 4: Bake to Perfection
Place the baking sheet in the preheated oven. Bake for 12-15 minutes, or until the lobster meat is opaque and cooked through. The internal temperature should reach 140-145°F (60-63°C). Be careful not to overcook, as this can make the lobster tough. The butter should be bubbly and fragrant.
Step 5: Finish and Serve
Once cooked, remove the lobster tails from the oven. You can spoon some of the extra melted cowboy butter from the pan over the lobster for an extra decadent touch. Garnish with a little extra fresh parsley or chives, and a squeeze of lemon if desired. Serve immediately and enjoy the cheers!
Nutritional Information
Nutritional information can vary based on the size of the lobster tails and the exact measurements used. A general estimate per serving (assuming 4 servings):
- Calories: Approximately 450-550 kcal
- Protein: 30-40g
- Fat: 30-45g (mostly from butter)
- Carbohydrates: 2-5g
- Cholesterol: ~150-200mg
Note: This is an approximation. For precise values, consult a nutritional calculator with your specific ingredients.
Healthier Alternatives
Looking to lighten up this decadent dish without sacrificing flavor? Here are a few swaps:
- Reduced Fat Butter/Olive Oil: Substitute half of the butter with light butter or a good quality olive oil. While it changes the classic cowboy butter profile slightly, it significantly cuts down on saturated fat.
- Less Butter, More Broth: Use less butter (e.g., 1/2 cup) and increase the amount of low-sodium seafood broth or vegetable broth to create a flavorful sauce base.
- Herbs and Spices Focus: Double up on the fresh herbs like parsley and chives, and strategically use spices like paprika and red pepper flakes. These add immense flavor without added fat.
- Grilling Instead of Baking: Grilling can allow some of the butter to drip away, resulting in a slightly lighter dish.
Serving Suggestions
Cowboy Butter Lobster Tails are a star on their own, but they pair beautifully with a variety of sides:
- Garlic Mashed Potatoes: The creamy potatoes are perfect for soaking up any extra cowboy butter.
- Roasted Asparagus or Broccoli: A light, crisp green vegetable is a perfect counterpoint to the rich lobster.
- Crusty Bread: Essential for mopping up every last drop of that incredible butter sauce.
- Simple Side Salad: A refreshing salad with a light vinaigrette balances the richness.
- Lemon Wedges: Always a welcome addition for an extra touch of acidity.
Common Mistakes to Avoid
Here are a few pitfalls to watch out for:
- Overcooking the Lobster: This is the biggest enemy of tender lobster. Keep a close eye on it and cook just until opaque.
- Using Pre-ground Spices that have lost their potency: Freshly ground spices and vibrant paprika make a noticeable difference in flavor.
- Not Seasoning Enough: Lobster is delicate; don’t be afraid to season the butter mixture well with salt and pepper.
- Skipping the Lemon Juice: The acidity balances the richness of the butter and makes the lobster taste brighter.
Storing Tips
While best enjoyed fresh, leftover cooked lobster tails can be stored:
- In the refrigerator: Place cooled lobster tails in an airtight container or wrap them tightly. They will keep for 1-2 days.
- Reheating: Gently reheat the lobster tails in a warm oven (around 300°F/150°C) for about 5-10 minutes, or until just warmed through. You can also gently warm them in a skillet with a little extra butter or broth. Avoid microwaving if possible, as it can make the lobster rubbery.
Conclusion
There you have it – a sensational Cowboy Butter Lobster Tail recipe that is as impressive as it is easy to make. The bold, smoky, and buttery flavors are perfectly balanced with the delicate sweetness of lobster, creating a dish that’s sure to become a favorite. Whether you’re celebrating a special occasion or simply treating yourself to an extraordinary seafood dinner, these lobster tails are guaranteed to delight. So, fire up your ovens, gather your ingredients, and get ready to experience a taste of the West Coast meets the rustic charm of cowboy cuisine. Don’t forget to share your culinary triumphs in the comments below!
FAQs
What kind of lobster tails work best?
Both cold-water and warm-water lobster tails can be used. Cold-water tails (like from Maine) tend to be more tender and flavorful, but warm-water tails (like from the Caribbean or Australia) are often more readily available and can be delicious when prepared properly.
Can I make the cowboy butter ahead of time?
Yes! The cowboy butter mixture can be made a day or two in advance and stored in an airtight container in the refrigerator. Let it soften slightly at room temperature or gently warm it before spooning over the lobster to ensure even distribution.
What if I don’t have smoked paprika?
If you don’t have smoked paprika, you can substitute with sweet paprika. However, you’ll miss out on the characteristic smoky depth. You could also add a tiny pinch of liquid smoke to the butter for a smoky hint, but use it very sparingly!
Is it better to bake or grill lobster tails?
Both baking and grilling are excellent methods. Baking is incredibly simple and yields consistent results. Grilling imparts a wonderful smoky flavor and char, but requires more attention to prevent overcooking. For this recipe, baking is very straightforward and highlights the cowboy butter.
How do I know when lobster is fully cooked?
Lobster meat turns opaque white and firm when cooked. The tails will also usually start to curl tightly. The most accurate way is to use an instant-read thermometer; it should register 140-145°F (60-63°C) in the thickest part of the meat.

Cowboy Butter Lobster Tails Recipe | Flavorful & Easy Meal
Description
Welcome, food enthusiasts! If you’re on the lookout for a delightful recipe that will elevate your seafood game, you’ve landed at the right place. Today, we’re diving into a truly mouthwatering dish —Cowboy Butter Lobster Tails. This easy yet decadent recipe brings the smoky, buttery flavors of cowboy cuisine to succulent lobster tails, creating a culinary experience that’s perfect for any special occasion. If you love bold flavors and seafood that’s packed with zest and spice, you’re going to want to bookmark this recipe!
Ingredients
- 4lobster tails(medium-sized, approximately6 ozeach)
- 1/2 cupunsalted butter, melted
- 2cloves garlic, minced
- 1 tablespoonfresh lemon juice
- 1 tablespoonWorcestershire sauce
- 1 tablespoonfresh parsley, chopped
- 1 teaspoonsmoked paprika
- 1/2 teaspooncayenne pepper(adjust according to heat preference)
- Salt and pepper to taste
- Lemon wedges, for serving
- Garlic:Substitute with 1 teaspoon of garlic powder.
- Butter:Use ghee or a dairy-free butter alternative for a lactose-free option.
Instructions
- Preheat your grill or ovento 375°F (190°C).
- Usingkitchen shears, carefully cut down the top of each lobster tail, stopping at the tail fan.
- Gently pull the lobster meat out of the shell, leaving it attached at the base. This will help it cook evenly and enhance presentation.
- In a medium-sized bowl, mix themelted butter,minced garlic,lemon juice,Worcestershire sauce,parsley,smoked paprika,cayenne pepper,salt, andpepperuntil well combined.
- Place the prepared lobster tails on the grill or in a baking dish if using the oven.
- Brush each lobster generously with thecowboy buttermixture.
- Grillfor about 6-8 minutes, basting with more butter halfway through, until the lobster meat is opaque and cooked through.
Notes
Selecting Fresh Lobster:Always choose fresh, live lobsters when possible. If frozen, ensure they are fully thawed before cooking.
Avoid Overcooking:Lobster tails cook quickly; remove them from heat as soon as they turn opaque to prevent a rubbery texture.
Customizing the Butter:Add your favorite herbs like thyme or rosemary to the cowboy butter for a unique twist.
“`