Ever crave a lunch that feels both incredibly satisfying and refreshingly simple? You are not alone. Furthermore, we all need a reliable, delicious meal that we can whip up without a fuss. This classic Club Sandwich Recipe delivers exactly that. It promises layers of flavor and texture in every single bite. Ultimately, it is the timeless answer to your midday hunger pangs.
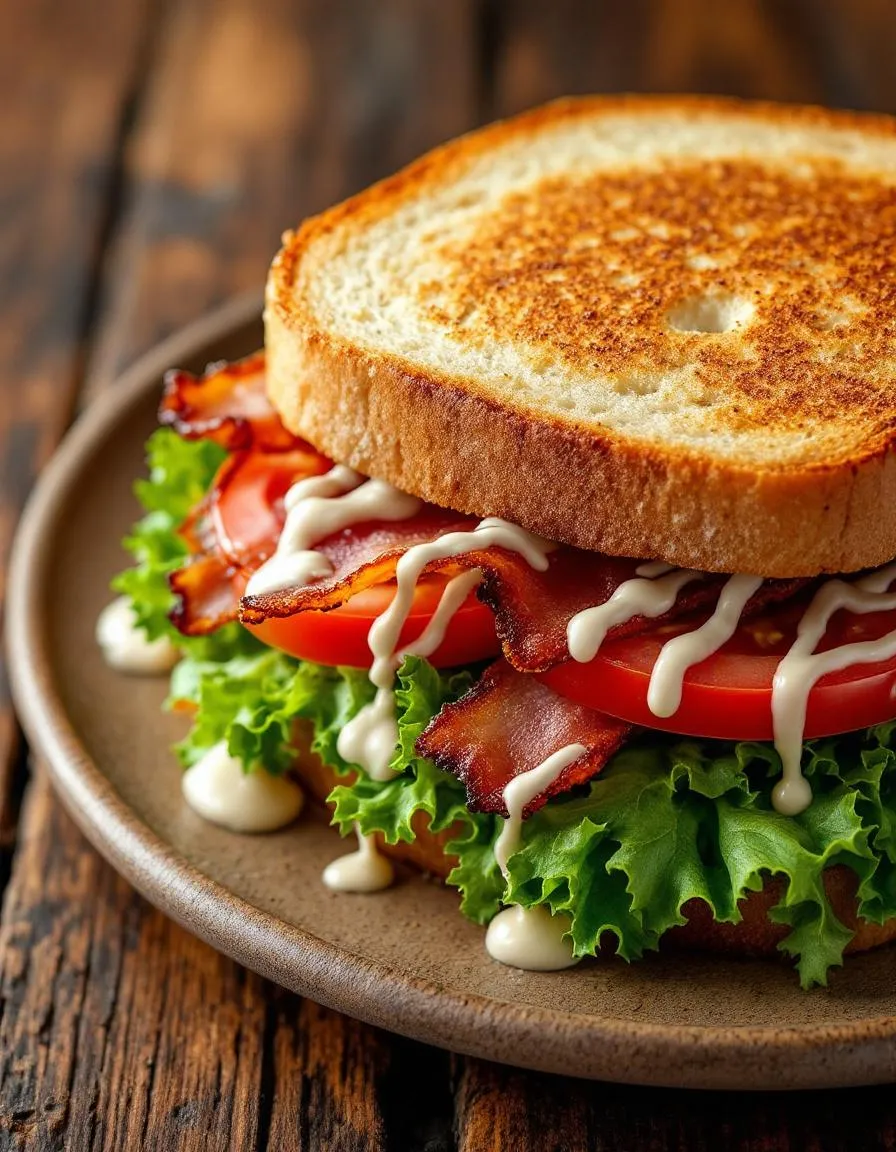
The Club Sandwich Recipe stands as a true icon of American lunch counters and hotel menus. Essentially, it is a triple-decker marvel that expertly stacks toasted bread with chicken, bacon, lettuce, tomato, and mayonnaise. This specific combination matters because it creates a perfect harmony of savory, crispy, fresh, and creamy elements in every single layer. For anyone seeking a hearty yet balanced meal, this recipe provides a fantastic solution. It fits our blog’s tone perfectly because we champion approachable, crowd-pleasing dishes that truly work. This sandwich is a masterpiece of simplicity. Moreover, its structure is key to its success. The toasted bread provides a sturdy foundation, while the juicy tomato and crisp lettuce offer a refreshing contrast to the rich bacon and tender chicken. You can easily customize your Club Sandwich Recipe with ingredients like avocado or a different spread. For another fantastic lunch idea, consider our popular Classic Turkey Club Sandwich. Ultimately, mastering this recipe means you always have a impressive, no-fail option for a quick lunch or a light dinner. It is a skill that will serve you for years to come.
Why I Love This Recipe
This Club Sandwich Recipe holds a special place in my heart because it reminds me of lazy weekend lunches with my family. We would assemble all the ingredients on the counter and everyone would build their own perfect version. I love the audible crunch you get with every bite and the way the creamy mayonnaise binds all the flavors together. It feels both indulgent and wholesome, a rare combination that always hits the spot. Making this sandwich is my go-to comfort food ritual, and sharing it always brings people together around the table. For a different but equally satisfying experience, our Ultimate Grilled Chicken Sandwich is another favorite.
Health and Nutrition
Why it’s good for your body
This Club Sandwich Recipe delivers a powerful combination of lean protein and essential nutrients. For instance, the turkey breast provides a fantastic source of high-quality protein, which actively supports muscle repair and keeps you feeling full. Furthermore, the bacon, when baked until crispy, offers a satisfying crunch without excessive grease.
Moreover, the whole wheat bread contributes valuable complex carbohydrates and fiber. Consequently, this helps to maintain steady energy levels and promotes a healthy digestive system. Additionally, the fresh lettuce and tomato slices add crucial vitamins like vitamin C and vitamin K, along with a burst of hydration.
Ultimately, this Club Sandwich Recipe creates a genuinely balanced meal. Therefore, you get a complete package of macronutrients and micronutrients in every single bite. Finally, the healthy fats from the mayonnaise or avocado spread aid in the absorption of fat-soluble vitamins, making this a truly efficient and nutritious choice.
How it fits in a healthy lifestyle
This Club Sandwich Recipe fits perfectly into a balanced eating plan. You can easily customize it to meet specific health goals without sacrificing an ounce of flavor. For a high-protein version, simply double up on the turkey or add a hard-boiled egg slice to each layer.
If you follow a gluten-free diet, swapping the bread for your favorite gluten-free alternative makes this a safe and delicious option. For those focusing on heart-healthy choices, using low-sodium turkey and a light avocado spread instead of mayo works wonderfully. This kind of flexible recipe supports everyday healthy habits because it comes together quickly and satisfies those lunchtime cravings with real, wholesome ingredients. For more ideas on building nutritious meals, explore our guide to meal prep for weight loss. You can also discover how to boost your metabolism naturally with other smart food choices.
A triple-decker sandwich with layers of turkey, bacon, lettuce, tomato, and mayo on toasted bread.
Ingredients
Scale
For the Crust:
12 slices white or wheat bread, toasted
1/2 cup mayonnaise
8 slices cooked turkey breast
8 slices cooked bacon
4 leaves romaine lettuce
1 large tomato, sliced
Salt and pepper to taste
Instructions
1. Prepare the Crust:
Toast the bread slices until golden brown and let cool slightly.
Spread mayonnaise on one side of each bread slice.
Layer 4 slices with turkey, bacon, lettuce, and tomato. Season with salt and pepper.
Top with another bread slice, mayo-side down. Repeat layering with remaining ingredients.
Place the final bread slice on top, mayo-side down. Secure with toothpicks if needed.
Cut each sandwich into quarters and serve immediately.
Notes
You can customize the seasonings to taste.
How to Prepare This Dish
Steps and time-saving tips
First, gather all your ingredients and equipment. This simple step, called mise en place, saves you so much time and stress later. Next, toast your bread slices to a perfect golden brown. Meanwhile, cook your bacon until it is wonderfully crispy. Then, slice your tomatoes and wash your lettuce leaves, patting them completely dry with a paper towel. After that, spread a generous layer of mayonnaise on one side of each toasted bread slice. Now, begin your Club Sandwich Recipe assembly on a clean cutting board. Place your first slice of bread down, mayo-side up. Layer on a piece of lettuce, followed by a few tomato slices and a sprinkle of salt. Add two or three slices of crispy bacon. Carefully place your second piece of bread on top, mayo-side down. Press down gently. Then, spread mayonnaise on the top of this second slice. Repeat the layering process with more lettuce, turkey or chicken, and finally, that last piece of bread. Secure the entire majestic tower with four cocktail picks, one near the center of each side. Finally, use a very sharp serrated knife to slice your sandwich diagonally into four perfect triangles. Serve immediately with a dill pickle spear and some potato chips.
Mistakes I’ve made and learned from
I used to assemble my Club Sandwich Recipe with warm, just-toasted bread, which made the mayonnaise melt and the entire structure soggy and unstable. I learned the hard way that you must let the toast cool completely before you start building. Another big mistake was overloading the layers; less is truly more here to prevent everything from squishing out with the first bite. I also once used flimsy, thin-cut bacon that just didn’t provide the necessary crunch and structural integrity. Now, I always opt for a thicker cut. Getting the right bread is crucial too; a soft loaf simply won’t hold up. For more tips on building the perfect sandwich, my guide on how to make the perfect breakfast sandwich covers the fundamentals of structural integrity. And if your bacon never turns out quite right, my secrets to perfectly crispy bacon will change your kitchen game forever.
We can trace the iconic Club Sandwich recipe back to the bustling men’s clubs of late 19th-century New York. Consequently, its three-story architecture and hearty fillings quickly satisfied the appetites of wealthy socialites. However, this classic dish soon traveled far beyond its elite origins. For instance, you might find a British version that swaps turkey for chicken and often includes a fried egg. Meanwhile, in India, local chefs might add a layer of spicy chutney or use tandoori chicken to create a vibrant twist on the traditional Club Sandwich Recipe.
My own family, on the other hand, has its own cherished variation. Therefore, we always toast the bread in a skillet with a little butter for extra crunch. Additionally, we layer thick-cut bacon right next to the juicy tomato, letting the flavors meld together perfectly. Ultimately, this simple act makes our version of the Club Sandwich Recipe a beloved weekend lunch ritual. Every culture and every kitchen seems to put its own unique stamp on this timeless combination.
ays-cooking">How it fits in today’s cooking
This sandwich absolutely thrives in modern cooking because of its incredible versatility. Today, health-conscious cooks often adapt it by using whole wheat bread, turkey bacon, or even air fryer chicken breast for a lighter take. Furthermore, its no-fuss assembly makes it a perfect solution for quick weeknight dinners or impressive last-minute entertaining. You can easily find it on upscale gastropub menus and in school lunchboxes alike.
Its relevance also continues through its role as a comforting, familiar favorite. For a delightful pairing, many people serve it alongside a simple, refreshing side. In fact, a cool, crisp cucumber tomato salad perfectly complements the sandwich’s rich flavors. Ultimately, the club sandwich remains a staple because it effortlessly fits into our fast-paced lives while still delivering a satisfying and delicious meal every single time.
Taste and Texture
What makes it delicious
This Club Sandwich Recipe delivers a symphony of textures and tastes in every single bite. You immediately notice the crisp, buttery toast giving way to layers of creamy mayonnaise and juicy, tender chicken. Next, the salty, smoky bacon and the sharp, tangy Swiss cheese create a rich and savory depth. Meanwhile, the fresh lettuce and ripe tomato provide a cool, crisp crunch and a burst of bright acidity that cuts through the richness perfectly. Ultimately, the entire experience is hearty, satisfying, and incredibly balanced, making this Club Sandwich Recipe a true classic for good reason.
r">Boosting the flavor
For an even more flavorful experience, consider a few simple upgrades. Firstly, spread a layer of creamy avocado or a zesty garlic aioli instead of plain mayonnaise for extra richness. Secondly, adding a few slices of crispy, fried shallots introduces a wonderful savory crunch. If you enjoy a bit of heat, a sprinkle of smoked paprika or a dash of hot sauce on the chicken works wonderfully. For a truly next-level sandwich, serve it with a side of seasoned fries or sweet potato wedges to complete the meal. A cool, creamy dipping sauce like our classic Ranch Dressing also pairs beautifully. Furthermore, marinating your chicken in this easy Chicken Marinade before cooking will guarantee it is packed with flavor from the inside out.
Tips for Success
Best practices for results
First, always use high-quality, fresh bread for your Club Sandwich Recipe as it provides the essential structural foundation. Furthermore, toast the bread slices lightly to prevent any sogginess from the fillings. Subsequently, spread your mayonnaise and condiments from edge to edge on each slice for maximum flavor in every single bite. Moreover, pat your lettuce completely dry with a paper towel before assembling to keep everything crisp. Finally, always insert frill picks or long toothpicks into each quarter to hold the impressive layers of your Club Sandwich Recipe securely together before slicing.
>Mistakes to avoid
A common mistake is overloading the sandwich, which consequently makes it impossible to eat neatly. Instead, aim for a balanced ratio of fillings to bread for the perfect structure and flavor. Additionally, many people forget to season their tomatoes, which really makes a significant difference. For more guidance on prepping your ingredients, read our guide on how to slice tomatoes evenly. Another error is using warm bacon; always drain your bacon on paper towels so it stays crispy and doesn’t wilt the lettuce. For a flawless cooking technique every time, our tips on how to cook bacon in the oven are a great resource.
Serving and Pairing Suggestions
How to serve this dish
Presenting your Club Sandwich Recipe beautifully makes it even more special. For instance, always slice it diagonally to showcase the colorful layers inside. Then, secure each half with a stylish toothpick or skewer to keep everything tidy. Furthermore, you can add a vibrant garnish like a crisp pickle spear, a handful of kettle-cooked chips, or a small cup of coleslaw on the side. This classic Club Sandwich Recipe truly shines at a weekend brunch or a casual summer gathering. Ultimately, serving it on a wooden board or a classic checkered plate enhances its comforting, timeless appeal.
What goes well with it
A crisp, cold side salad perfectly cuts through the rich flavors of this hearty meal. Alternatively, a bowl of creamy tomato soup makes for an iconic and comforting pairing. For drinks, an iced tea or a light lager complements the sandwich without overwhelming it. Moreover, you must try our popular crispy French fries for the ultimate diner-style experience. Finally, cool off with a refreshing strawberry milkshake to complete this delicious and satisfying combination.
The classic club sandwich has three distinct layers of toasted bread. The traditional fillings are sliced chicken or turkey, crispy bacon, lettuce, tomato, and mayonnaise. This triple-decker structure is a hallmark of an authentic club sandwich recipe.
How do you keep a club sandwich from getting soggy?
Toasting the bread is the most important step to prevent a soggy club sandwich. You should also pat your tomato slices and lettuce completely dry with a paper towel before assembling. Applying a thin layer of mayonnaise on the inside of each toast slice acts as a moisture barrier.
ank-math-faq-item">
What is the best bread to use for a club sandwich?
White toast is the traditional and best choice for an authentic club sandwich recipe, as it provides a sturdy, neutral base that holds up to the fillings. Whole wheat, sourdough, or rye bread are also excellent options for a different flavor profile. The key is to use a bread that toasts well and won’t fall apart.
Can I make a club sandwich ahead of time?
It’s best to assemble a club sandwich just before serving to maintain its texture. You can prepare the individual components ahead of time—cook the bacon, slice the vegetables, and toast the bread. Store everything separately in airtight containers in the fridge, then assemble your club sandwich recipe when you’re ready to eat.
Best Double Chocolate Banana Bread Recipe
Introduction
Is there anything more comforting than the smell of warm chocolate and ripe bananas wafting through your kitchen? Honestly, we think not. This Double Chocolate Banana Bread recipe is your ultimate answer to those overripe bananas sitting on your counter, transforming them into a decadent, moist, and deeply satisfying treat. It feels like a warm hug in loaf form, promising to turn a mundane day into something a little more special and a whole lot sweeter.
So what exactly is Double Chocolate Banana Bread? Essentially, it is a classic banana bread that we have elevated into a supremely chocolatey experience. We achieve this by incorporating rich cocoa powder into the batter and then generously folding in high-quality chocolate chips. The result is an incredibly moist, tender crumb with deep banana flavor and pockets of melted chocolate in every single slice. This recipe matters because it perfectly bridges the gap between a quick bread you can enjoy for breakfast and a legitimate dessert that feels indulgent yet somewhat wholesome. Furthermore, it fits our blog’s tone of creating approachable, crowd-pleasing recipes that deliver consistent, bakery-quality results right in your own home. You do not need any special equipment or advanced skills to master this beloved treat. Moreover, this recipe is incredibly versatile. For instance, you can easily adapt it to be gluten-free by using a reliable gluten-free flour blend. Additionally, if you find yourself with a bounty of ripe fruit, this bread pairs beautifully with other creative uses, much like our popular banana ice cream. Ultimately, this loaf is a guaranteed hit for potlucks, a thoughtful gift for a neighbor, or simply a secret stash for your own midnight snack cravings.
Why I Love This Recipe
This Double Chocolate Banana Bread holds a special place in my heart because it is the recipe that made my youngest nephew finally admit that he actually likes bananas. He would turn his nose up at them in their natural state, but the moment he tried a warm slice of this chocolate-packed loaf, he was completely sold. Now, he specifically asks me to “make the chocolate bread” whenever he visits. That small victory brings me so much joy. Furthermore, I love how the simple process of mashing the bananas and mixing the batter is almost therapeutic, providing a few quiet moments of baking therapy that always center me. It is my go-to recipe for using up fruit and spreading a little bit of homemade happiness.
Health and Nutrition
Why it’s good for your body
Double Chocolate Banana Bread offers more than just incredible flavor. For instance, its main ingredient, ripe bananas, provides a significant dose of potassium. This essential mineral actively supports healthy blood pressure and proper muscle function. Furthermore, the natural sweetness from the bananas means you can often use less added sugar in the recipe.
Additionally, cocoa powder delivers powerful antioxidants called flavonoids. These compounds help combat oxidative stress in your body. Moreover, when you use whole wheat flour, this treat contributes valuable fiber to your diet. This fiber promotes good digestive health and helps you feel satisfied longer.
Ultimately, enjoying a slice of Double Chocolate Banana Bread gives you a wholesome energy boost. Consequently, it makes for a far more nutritious snack than many processed alternatives. Therefore, you can feel good about indulging in this delicious baked good.
How it fits in a healthy lifestyle
This Double Chocolate Banana Bread fits beautifully into a balanced eating plan. You can easily enjoy a slice as a satisfying afternoon snack that curbs sweet cravings without derailing your goals. Consider pairing it with a source of protein, like a handful of almonds or a glass of milk, for a more complete and sustaining treat.
If you follow a specific dietary approach, you can easily adapt this recipe. For those exploring gluten-free options, simply swap the regular flour for a quality gluten-free flour blend. You can also boost the protein content by stirring in a scoop of your favorite protein powder or some chopped nuts. For more inspiration on creating healthier versions of your favorite desserts, check out our guide on smart baking substitutions. Remember, mindful indulgence is key to a sustainable and enjoyable healthy lifestyle.
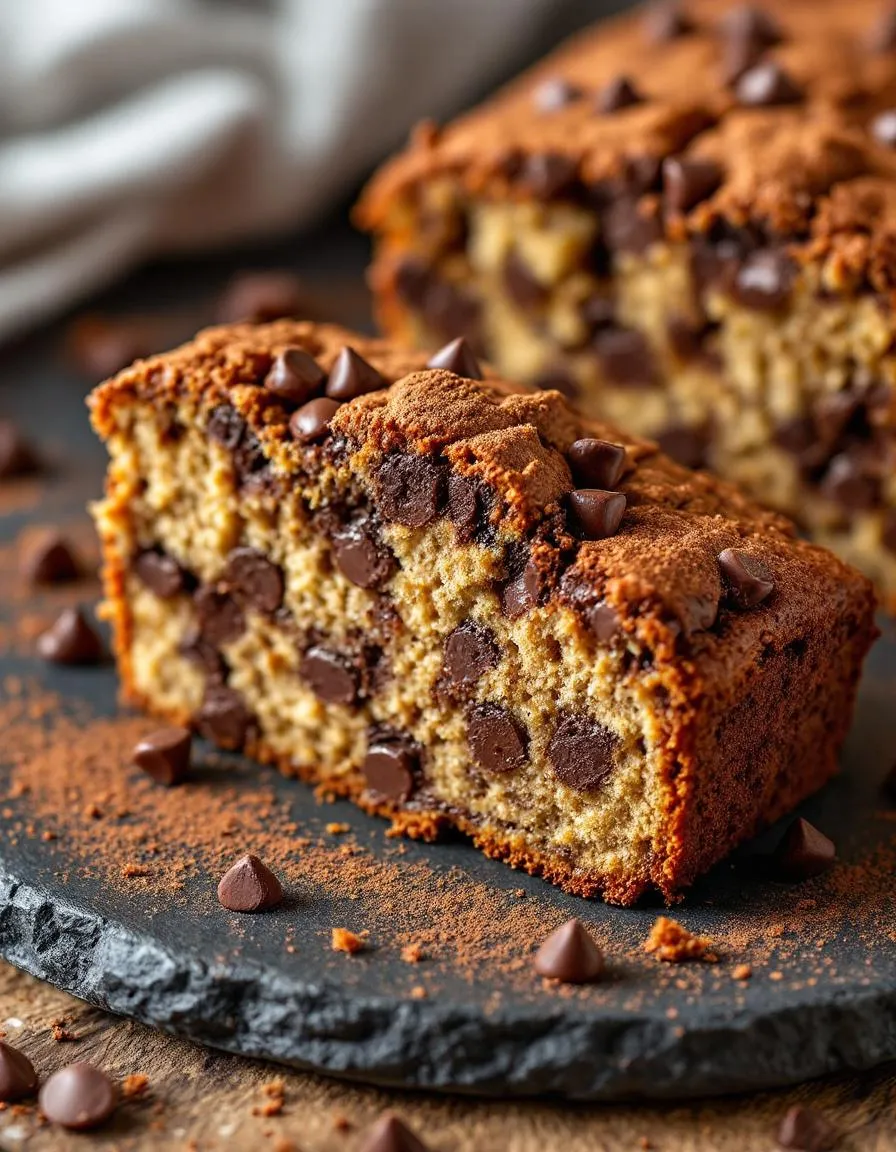
A rich and moist banana bread loaded with cocoa and chocolate chips for the ultimate chocolate lover’s treat.
Ingredients
Scale
For the Crust:
3 ripe bananas, mashed
1/2 cup unsalted butter, melted
3/4 cup granulated sugar
1 large egg
1 teaspoon vanilla extract
1 cup all-purpose flour
1/2 cup cocoa powder
1 teaspoon baking soda
1/2 teaspoon salt
1 cup semi-sweet chocolate chips
Instructions
1. Prepare the Crust:
Preheat oven to 350°F (175°C) and grease a 9×5 inch loaf pan.
In a bowl, mix mashed bananas, melted butter, sugar, egg, and vanilla until combined.
In another bowl, whisk together flour, cocoa powder, baking soda, and salt.
Gradually add dry ingredients to wet ingredients, mixing until just combined. Fold in chocolate chips.
Pour batter into prepared pan and bake for 50-60 minutes, or until a toothpick comes out clean. Cool before slicing.
Notes
You can customize the seasonings to taste.
s-dish">How to Prepare This Dish
Steps and time-saving tips
First, preheat your oven to 350°F and generously grease a 9×5-inch loaf pan. This initial step is crucial for a perfect bake. Meanwhile, mash your very ripe bananas in a large bowl until they are almost smooth. Consequently, you can use a fork, potato masher, or even the paddle attachment on your stand mixer for this task. Next, whisk in the melted butter, sugars, egg, and vanilla until the mixture is wonderfully smooth and well combined. In a separate bowl, whisk together the flour, cocoa powder, baking soda, and salt. Gradually add these dry ingredients to the wet banana mixture, stirring gently until just combined. Finally, fold in the chocolate chips, reserving a handful for the top.
Pour the thick batter into your prepared loaf pan and smooth the top with a spatula. Then, sprinkle those reserved chocolate chips on top for a beautiful, bakery-style finish. Immediately place the pan in the preheated oven and bake for 55 to 65 minutes. You will know your Double Chocolate Banana Bread is done when a toothpick inserted into the center comes out with just a few moist crumbs attached. Allow the loaf to cool in the pan for at least 15 minutes before transferring it to a wire rack. This patience prevents it from breaking apart. For an extra treat, drizzle melted chocolate over the cooled loaf.
Mistakes I’ve made and learned from
I have absolutely overmixed this batter in a rush, which resulted in a tough, dense loaf instead of the tender crumb we all want. The key is to stir until the flour streaks just disappear, even if the batter looks a little lumpy. Furthermore, I once used bananas that were not quite ripe enough, and my Double Chocolate Banana Bread lacked that deep, sweet banana flavor. Now I wait for them to be heavily speckled or even black for the best results. Another lesson learned the hard way was slicing the bread while it was still too warm. It crumbled everywhere! Now I use a serrated knife and wait until it’s nearly completely cool for those perfect, clean slices. For more tips on avoiding common pitfalls, check out my guide on common baking mistakes. And if you find yourself with extra ripe bananas, my collection of banana recipes has plenty of delicious ideas.
Banana bread itself tells a story of ingenuity. During the Great Depression, resourceful home bakers refused to waste overripe fruit. They created something beautiful from necessity. Eventually, we took this humble, comforting classic and gave it a decadent twist by adding not one, but two types of chocolate. My grandmother always made her version with a handful of chocolate chips. However, my ultimate Double Chocolate Banana Bread recipe, with its rich cocoa base, is my own personal homage to her.
Around the world, people put their own spin on this concept. For instance, bakers in Australia might stir in desiccated coconut for extra texture. Meanwhile, many European versions feature a hint of warm spice like cinnamon or cardamom. Some bakers even swirl in a ribbon of peanut butter or top it with a creamy cheese layer. Ultimately, this versatility is its magic. You can personalize a loaf of Double Chocolate Banana Bread to match any taste or tradition, making it a truly global treat.
ays-cooking">How it fits in today’s cooking
This recipe absolutely thrives in modern kitchens. Busy home cooks adore it because it turns leftover bananas into a spectacular treat with minimal effort. Furthermore, it fits perfectly into today’s flexible eating routines. You can enjoy a slice for a quick breakfast, an afternoon snack, or even as a simple dessert. Its crowd-pleasing nature also makes it a superstar at potlucks and bake sales.
Many bakers now adapt it for specific dietary needs. They might use a flax egg for a vegan version or swap in gluten-free flour. Some even sneak in vegetables like zucchini for an extra nutrient boost. If you love this kind of adaptable baking, you will definitely want to explore our guide on perfect baking substitutions for more ideas. Ultimately, a warm slice of this bread provides a much-needed moment of comfort. It pairs wonderfully with a cup of coffee, making it the ideal treat for any cozy gathering, much like our beloved classic coffee cake.
Taste and Texture
What makes it delicious
This Double Chocolate Banana Bread delivers an incredibly moist and tender crumb that practically melts in your mouth. Ripe bananas infuse every bite with a sweet, fruity depth that perfectly balances the rich, dark cocoa. Furthermore, pockets of gooey chocolate chips create delightful bursts of decadence. The aroma alone is intoxicating, filling your kitchen with the warm, comforting scent of chocolate and baked bananas. Ultimately, each slice of this Double Chocolate Banana Bread feels like an indulgent, yet wholesome, treat.
r">Boosting the flavor
You can easily elevate this treat with a few creative twists. For instance, a sprinkle of flaky sea salt on top before baking creates a wonderful sweet-and-salty contrast. Alternatively, try folding in a handful of toasted walnuts or pecans for a satisfying crunch. A dollop of our whipped cream cheese frosting transforms a simple slice into a decadent dessert. Moreover, a cup of coffee or a glass of cold milk makes the perfect pairing, much like the combinations we suggest for our classic coffee cake.
Tips for Success
Best practices for results
For the best Double Chocolate Banana Bread, always use very ripe bananas with brown spots because they mash easily and add natural sweetness. Furthermore, use room temperature eggs and dairy to ensure your batter blends together smoothly without overmixing. Additionally, line your loaf pan with parchment paper for easy removal and perfectly even baking. Finally, let the Double Chocolate Banana Bread cool completely in the pan before slicing it for clean, beautiful pieces.
>Mistakes to avoid
Avoid using underripe bananas as they lack sweetness and moisture, which can make your bread dry. Conversely, do not overmix the batter after adding the dry ingredients; instead, gently fold everything until just combined to keep the texture tender. Moreover, ensure you do not overbake the loaf. You can check for doneness properly with a simple toothpick test, a method we detail in our guide on how to tell when baked goods are done. Remember, the residual heat will continue to cook the bread as it cools. If your bananas aren’t quite ripe enough, you can quickly solve that problem using our tips for how to ripen bananas fast.
Serving and Pairing Suggestions
How to serve this dish
Serve your Double Chocolate Banana Bread warm for a truly decadent experience. Furthermore, a light dusting of powdered sugar or a drizzle of vanilla glaze creates a beautiful, bakery-style finish. For special occasions, top each slice with a dollop of freshly whipped cream and a few raspberries. This Double Chocolate Banana Bread also makes a fantastic gift; simply wrap a cooled loaf in parchment paper and tie it with baker’s twine. Ultimately, it shines as the star of any brunch spread or holiday dessert table.
What goes well with it
A cold glass of milk perfectly complements the rich, fudgy notes of this Double Chocolate Banana Bread. Alternatively, a robust cup of coffee cuts through the sweetness for a truly balanced bite. For an extra indulgent treat, serve a slice alongside a scoop of vanilla bean ice cream. The creamy, cool ice cream melts into the warm bread, creating a sensational dessert. If you enjoy this, you will absolutely love our classic Banana Bread Recipe. Moreover, a simple Berry Salad offers a refreshing, tart contrast that cleanses the palate between each delicious mouthful.
Can I use frozen bananas for Double Chocolate Banana Bread?
Absolutely! Thaw frozen bananas completely and drain any excess liquid before mashing them. Using previously frozen bananas often makes this Double Chocolate Banana Bread even more moist and flavorful.
What is the best cocoa powder to use?
For a rich, deep chocolate flavor, use natural unsweetened cocoa powder. Dutch-processed cocoa also works well and yields a slightly milder taste. The choice depends on your preference for the ultimate Double Chocolate Banana Bread experience.
ank-math-faq-item">
How do I know when my banana bread is done baking?
Insert a toothpick into the center of the loaf; it should come out with a few moist crumbs attached, but not wet batter. The edges of the Double Chocolate Banana Bread will also start to pull away from the sides of the pan.
Can I add nuts or chocolate chips to the recipe?
Yes, adding mix-ins is a great way to customize your loaf. Fold in up to one cup of walnuts, pecans, or extra chocolate chips into the batter before baking for added texture and flavor in your Double Chocolate Banana Bread.
Best Pumpkin Scones Recipe – Easy & Homemade
Introduction
Is there anything more comforting than the warm, spiced aroma of freshly baked goods filling your kitchen? Honestly, that feeling of cozy contentment is what we all crave, especially as the seasons change. Today, we are bringing that exact feeling to life with the ultimate autumn treat: incredibly soft and flavorful Pumpkin Scones. This recipe promises to deliver that coffee shop quality experience right in your own home, and it is far easier than you might think.
Pumpkin Scones are a quintessential fall pastry, offering a perfect balance of warm spices, rich pumpkin flavor, and a delightfully tender texture. They matter because they transform a simple morning or afternoon into a special occasion, providing a homemade touch that store-bought versions simply cannot match. Furthermore, this recipe fits our blog’s tone perfectly, as we always strive to share approachable, reliable, and utterly delicious bakes that empower every home cook. For instance, if you love mastering classic baked goods, you will appreciate our guide on creating the ultimate Flaky Buttermilk Biscuits, which shares the same fundamental principles of handling dough for perfect layers. Ultimately, a great scipe, like a great Hearty Beef Stew, provides deep comfort and satisfaction, making it a cherished part of your cooking repertoire.
Why I Love This Recipe
This particular Pumpkin Scones recipe holds a special place in my heart because it reminds me of cool, crisp Saturday mornings with my family. I vividly remember testing batch after batch until I finally achieved that ideal crumb—dense yet soft, and not at all dry. The moment I perfected the spice blend and achieved that beautiful, crackly glaze on top, I knew I had created something truly memorable. Now, baking these scones has become my favorite autumn ritual, a simple act that fills my home with warmth and never fails to bring smiles to the faces of everyone who tries one.
Health and Nutrition
Why it’s good for your body
Pumpkin scones offer a surprisingly wholesome treat. Primarily, they pack a powerful nutritional punch from their main ingredient. Pumpkin provides a fantastic source of beta-carotene, which your body converts into immune-boosting Vitamin A. Furthermore, this vibrant squash contributes a healthy dose of fiber, aiding in digestion and promoting a feeling of fullness.
Consequently, enjoying a pumpkin scone can help you manage your appetite more effectively between meals. Additionally, pumpkin delivers essential antioxidants that combat oxidative stress in your body. Many recipes also incorporate warming spices like cinnamon and nutmeg, which themselves possess anti-inflammatory properties. Therefore, each bite supports your overall well-being in multiple ways.
Unlike many pastries, a well-made pumpkin scone often contains less sugar, relying on the natural sweetness of the pumpkin itself. Ultimately, this makes for a more balanced indulgence. You can feel good about serving your family these delicious pumpkin scones, knowing they are getting real food benefits. Finally, the inclusion of whole wheat flour in some versions adds even more fiber and nutrients, making every pumpkin scone a genuinely smart choice.
How it fits in a healthy lifestyle
Pumpkin scones can absolutely find a place in your balanced eating plan. Think of them as a nourishing snack or a component of a complete breakfast, perhaps paired with a source of protein like Greek yogurt or a handful of nuts. This combination helps stabilize your energy levels and keeps you satisfied for hours. For those mindful of specific dietary needs, you can easily adapt the recipe to be gluten-free by using a one-to-one baking flour.
If you are exploring more ways to incorporate wholesome ingredients into your baking, our guide on healthy baking substitutions offers fantastic tips. Embracing a healthy lifestyle does not mean sacrificing flavor or joy. It is about making mindful choices that nourish your body and soul. A warm pumpkin scone, enjoyed with a cup of tea, fits perfectly into this philosophy. For more inspiration on creating a balanced approach to eating, check out our thoughts on mindful eating practices that can transform your relationship with food.
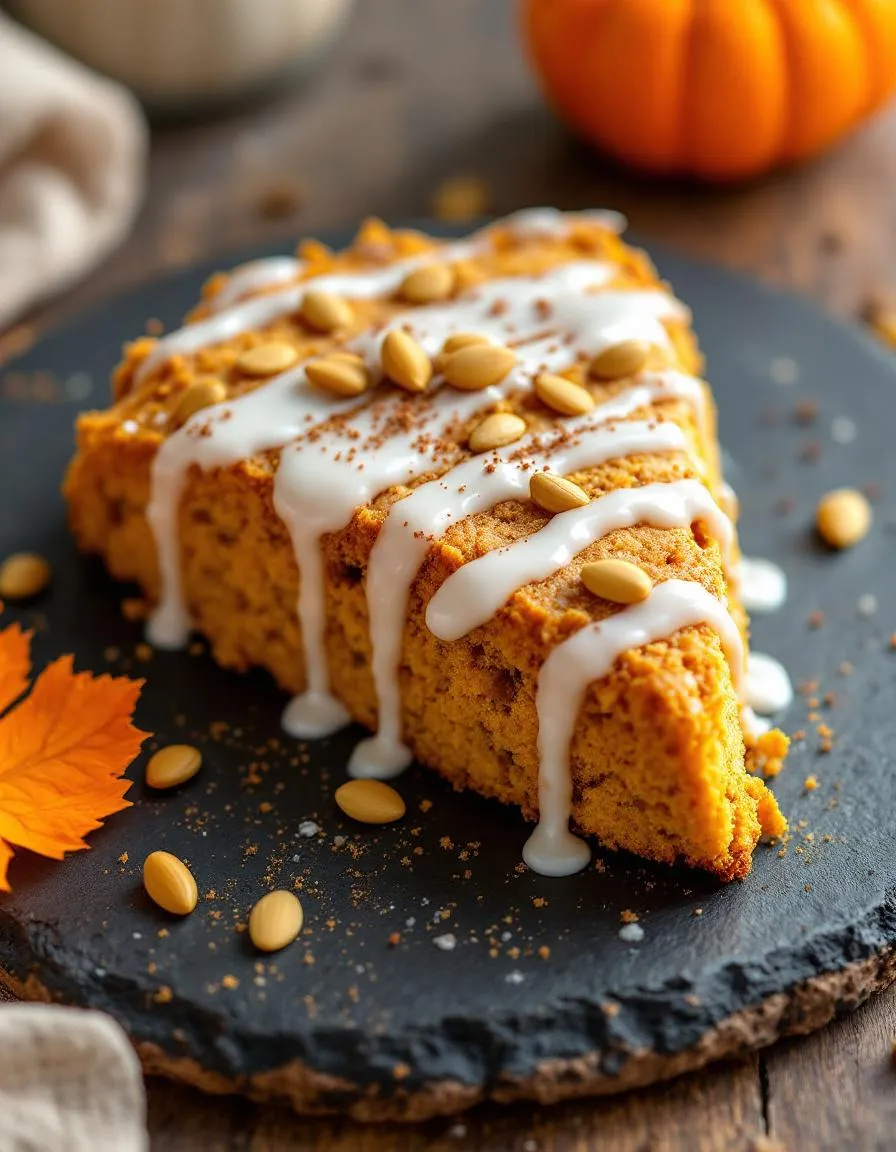
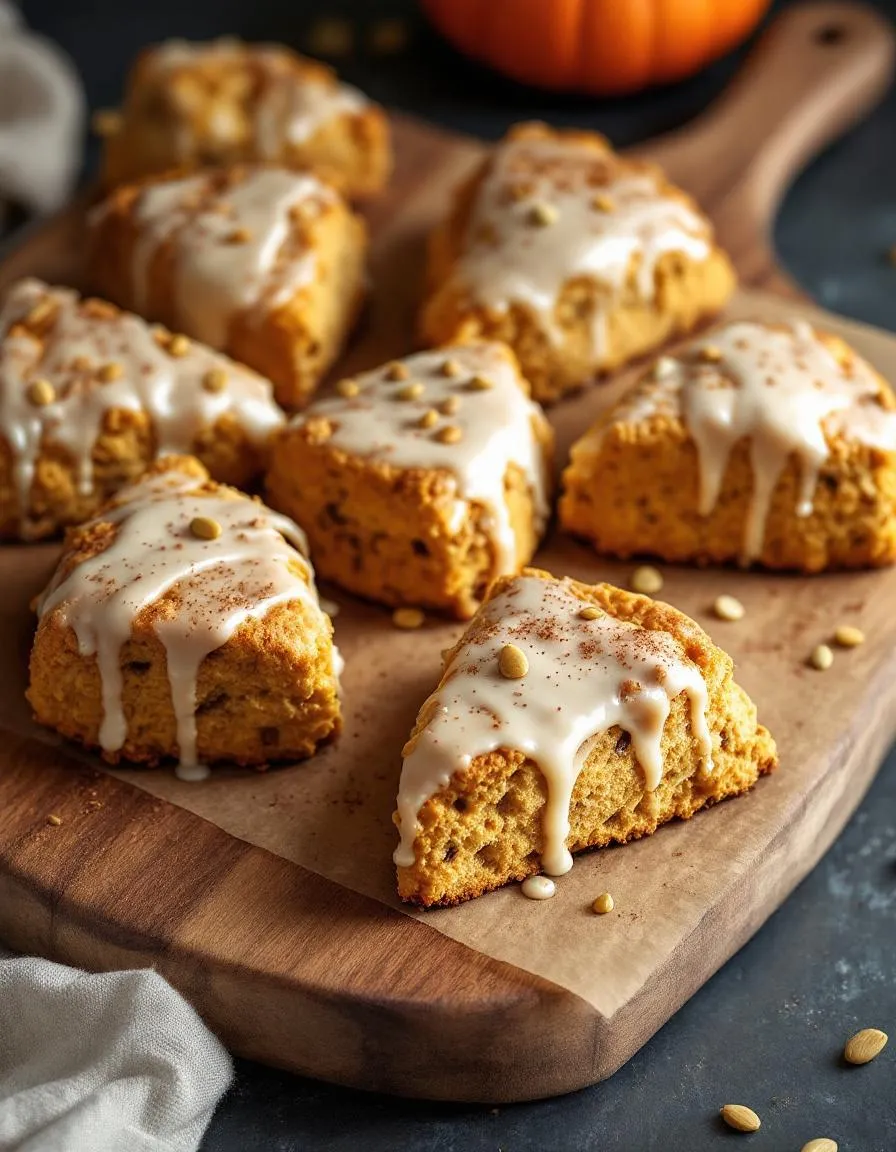
Warm, spiced pumpkin scones perfect for autumn mornings, with a sweet glaze drizzle.
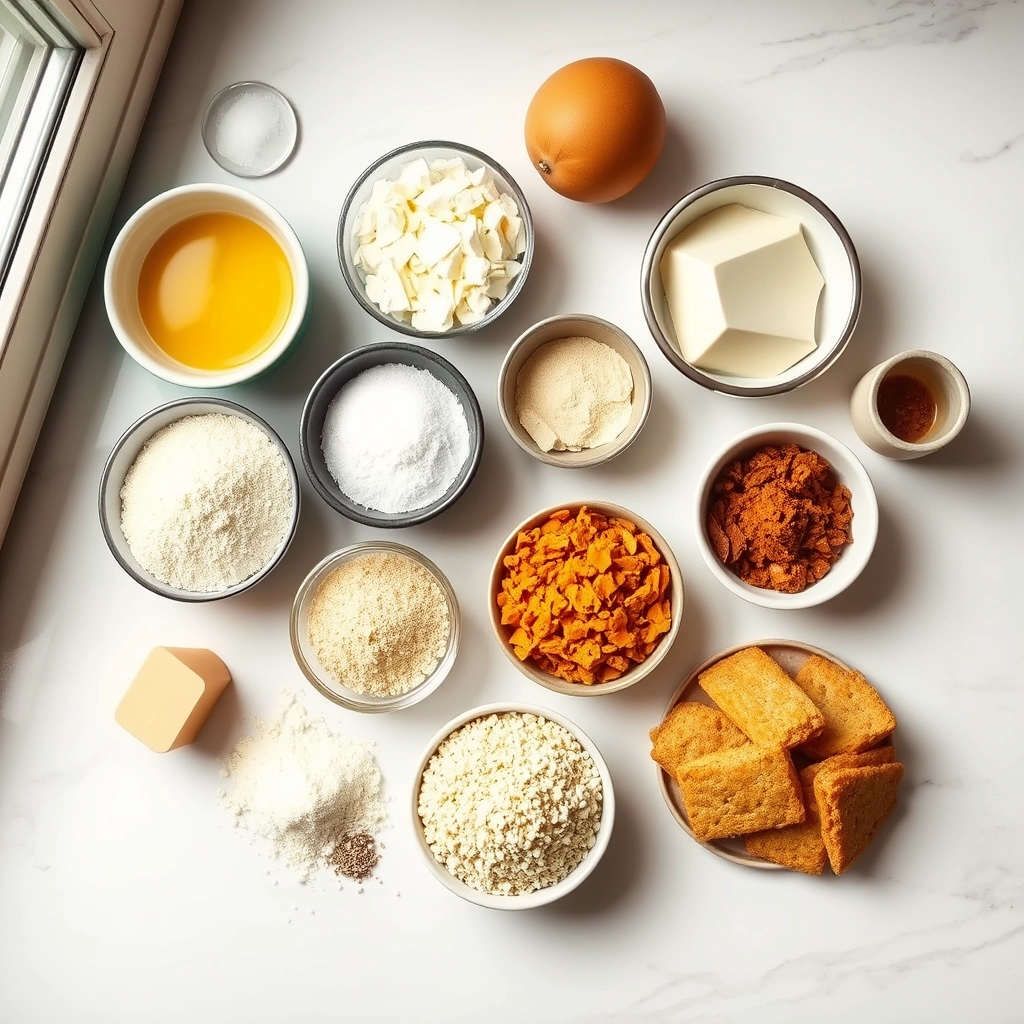
Ingredients
Scale
For the Crust:
2 cups all-purpose flour
1/3 cup brown sugar
1 tbsp baking powder
1/2 tsp salt
1 tsp cinnamon
1/2 tsp nutmeg
1/4 tsp ginger
1/4 tsp cloves
1/2 cup cold unsalted butter, cubed
1/2 cup pumpkin puree
1/3 cup heavy cream
1 large egg
1 tsp vanilla extract
Instructions
1. Prepare the Crust:
Preheat oven to 400°F (200°C) and line a baking sheet with parchment paper.
In a large bowl, whisk together flour, brown sugar, baking powder, salt, and spices. Cut in butter until mixture resembles coarse crumbs.
In another bowl, mix pumpkin puree, cream, egg, and vanilla. Pour into dry ingredients and stir until just combined.
Turn dough onto a floured surface, knead gently, and pat into a 1-inch thick circle. Cut into 8 wedges.
Place scones on prepared sheet and bake for 15-18 minutes until golden. Cool slightly before glazing.
Notes
You can customize the seasonings to taste.
s-dish">How to Prepare This Dish
Steps and time-saving tips
First, whisk your dry ingredients together in a large bowl. Next, use a pastry cutter or your fingertips to quickly work the cold butter into the flour mixture until it resembles coarse crumbs. This step is crucial for flaky layers. Meanwhile, in a separate bowl, combine the wet ingredients like pumpkin puree, egg, and cream. Then, make a well in the center of your dry ingredients and pour the wet mixture in. Gently fold everything together with a spatula until a shaggy dough just forms. Overmixing is the enemy of tender Pumpkin Scones, so a few dry spots are perfectly fine. Turn the dough out onto a floured surface and pat it into a circle about one-inch thick. Finally, cut your circle into eight wedges, brush the tops with a little cream, and bake until golden. For a time-saving tip, measure your dry ingredients the night before and keep them covered on the counter.
Mistakes I’ve made and learned from
I have absolutely overmixed the dough in a rush, which resulted in tough, dense scones that nobody wanted. I learned the hard way that a light hand is non-negotiable. Another common error was using warm butter instead of ice-cold butter; it simply melts too fast and doesn’t create those steam pockets necessary for a perfect rise. Now, I even chill my bowl beforehand on a hot day. If your dough feels too sticky, don’t panic and add more flour, as this can also lead to dryness. Instead, lightly flour your hands and work surface. For more guidance on getting your ingredients just right, my post on measuring ingredients breaks it all down. And if you love the classic base recipe, you must try my classic scones for another fantastic, flaky option.
n-and-variations">Cultural Connection and Variations
Where this recipe comes from
My love affair with Pumpkin Scones began in my grandmother’s kitchen every October. She would declare it officially “pumpkin season” and fill her tiny house with the warmest spices. Consequently, her recipe was a cherished secret, passed down from her own mother who settled in New England. Historically, bakes like these were a practical way for home cooks to use up their autumn harvest. Meanwhile, on the other side of the world, Australian bakers were creating their own famous version for a popular coffee chain. Their take is often sweeter and topped with a thick glaze. Alternatively, some Southern U.S. versions incorporate pecans or a dash of bourbon for a richer flavor. Ultimately, every family seems to have their own twist, making each batch of Pumpkin Scones a unique little piece of personal history.
How it fits in today’s cooking
Pumpkin Scones absolutely remain a beloved staple in modern kitchens. They perfectly bridge the gap between nostalgic tradition and contemporary convenience. For instance, busy home bakers now often use canned puree to whip up a quick batch for a cozy weekend breakfast. Furthermore, they have become a non-negotiable part of many fall and holiday spreads. Many modern cooks also love adapting them into different treats; sometimes they transform the dough into a stunning Pumpkin Coffee Cake for a larger gathering. Moreover, their warm spice profile makes them an ideal pairing for your favorite seasonal drink. Honestly, enjoying a warm Pumpkin Scone with a cup of our recommended Salted Caramel Mocha is a quintessential autumn moment. Therefore, this humble bake continues to create new memories while honoring old ones.
Taste and Texture
What makes it delicious
These Pumpkin Scones deliver a wonderfully warm and cozy flavor experience. First, you notice the fragrant aroma of pumpkin pie spice, which fills your kitchen with an autumnal hug. Consequently, each bite offers a tender, cake-like crumb that practically melts in your mouth. The pumpkin puree ensures these scones stay incredibly moist, while brown sugar adds a deep, caramel-like sweetness. Ultimately, the flavor is perfectly balanced; it is not overly sweet but instead highlights the earthy, comforting essence of pumpkin. Moreover, the optional glaze provides a sweet, creamy finish that beautifully complements the spiced pastry.
r">Boosting the flavor
You can easily elevate these Pumpkin Scones with a few creative twists. For instance, try swapping the vanilla glaze for a rich cream cheese frosting to add a delightful tangy contrast. Alternatively, a handful of toasted pecans or walnuts mixed into the dough introduces a satisfying crunch. Furthermore, a drizzle of warm salted caramel sauce right before serving makes them truly decadent. Finally, a dusting of extra cinnamon or a pinch of nutmeg on top amplifies the warm spice notes beautifully.
Tips for Success
Best practices for results
Always chill your dough for at least 30 minutes before shaping it, because this step prevents your scones from spreading too thin in the oven. Furthermore, use a sharp pastry cutter or a cold metal bench scraper to cleanly slice the dough into triangles for the best rise. For a truly spectacular finish, generously brush the tops of your Pumpkin Scones with heavy cream before baking. Additionally, handle the dough as little as possible to ensure your final product stays incredibly tender and flaky.
>Mistakes to avoid
A common error involves overmixing the dough, which unfortunately develops too much gluten and leads to a tough texture. Instead, gently fold the wet and dry ingredients together until they just form a shaggy dough. Moreover, never skip the step of properly preheating your oven, as a hot environment is crucial for that perfect initial lift. For more guidance on this, our article on common baking mistakes dives deeper. Also, avoid using warm butter; otherwise, it will melt too quickly and compromise the flaky layers you want in your Pumpkin Scones. If you are unsure about your butter’s consistency, our guide on how to measure ingredients includes great tips for checking temperature.
Serving and Pairing Suggestions
How to serve this dish
Present your warm Pumpkin Scones on a rustic wooden board for a cozy, inviting feel. Furthermore, drizzle them with a simple powdered sugar glaze for a touch of elegance. Serve these scones at your next holiday brunch or as a special weekend treat. For a beautiful finish, garnish the plate with a sprinkle of cinnamon or a few toasted pecans. Ultimately, these small touches make your Pumpkin Scones absolutely irresistible.
What goes well with it
A hot cup of coffee perfectly complements the warm spices in these Pumpkin Scones. Alternatively, a chilly glass of milk also makes a fantastic pairing. For a truly decadent experience, slather your scone with our creamy Homemade Vanilla Bean Butter. Moreover, you can complete your autumn spread by serving them alongside a bowl of our savory Roasted Butternut Squash Soup. Consequently, each pairing enhances the delicious flavor of your Pumpkin Scones.
For the most tender and flaky texture, use cold all-purpose flour. Its moderate protein content provides the perfect structure without making your Pumpkin Scones tough. Some bakers also like to substitute a small portion with pastry flour for an even lighter crumb.
How do you keep pumpkin scones moist?
The key to moist Pumpkin Scones is using enough pure pumpkin puree and not overmixing the dough. Be sure to use canned pumpkin puree, not pumpkin pie filling, as it adds natural moisture and flavor. Also, avoid over-baking them, as just a few minutes too long can dry them out.
ank-math-faq-item">
Can you freeze pumpkin scones?
Absolutely! Pumpkin Scones freeze beautifully for up to 3 months. Let them cool completely after baking, then wrap them tightly in plastic wrap and place them in a freezer-safe bag. Thaw at room temperature or warm them up in the oven for a fresh-from-the-oven taste.
Why are my pumpkin scones dense?
Dense scones are often the result of overworking the dough, which develops too much gluten. Handle the dough as little as possible and use very cold butter to create steam pockets during baking. Ensuring your baking powder is fresh will also help your Pumpkin Scones achieve a proper rise.
Easy Creamy Tomato Pasta Recipe
Introduction
There is something profoundly comforting about a bowl of pasta that just feels like a hug. Moreover, on those days when you crave something luxurious yet effortless, this Creamy Tomato Pasta answers the call. It transforms simple, pantry staples into a rich and velvety sauce that coats every strand of pasta perfectly. Ultimately, this dish promises a restaurant-quality experience without any of the fuss, making it the ultimate weeknight hero.
So what exactly is Creamy Tomato Pasta? Fundamentally, it is a beautiful hybrid of a classic marinara and a rich Alfredo. Unlike a standard tomato sauce, we build a luxurious base with butter, garlic, and cream, then we simmer it with crushed tomatoes and Italian herbs. The result is a sauce that boasts the bright, tangy flavor of tomatoes while also delivering an incredibly smooth and silky mouthfeel. This Creamy Tomato Pasta matters because it solves the eternal dilemma of choosing between a light tomato sauce and a indulgent cream sauce. You truly get the best of both worlds in a single, breathtaking dish. Furthermore, this recipe fits our blog’s mission perfectly: it uses straightforward techniques to create extraordinary results. Whether you are a novice cook or a seasoned pro, you will appreciate how the method guarantees a flawless, non-curdled sauce every single time. For more inspiration on using simple ingredients, explore our guide to essential pantry staples. This Creamy Tomato Pasta is also incredibly versatile. You can easily customize it with your favorite protein, such as grilled chicken or shrimp, or keep it vegetarian and load it with fresh spinach or mushrooms. It is the kind of reliable, crowd-pleasing recipe that earns a permanent spot in your dinner rotation, much like our beloved one-pan lemon herb chicken.
Why I Love This Recipe
This Creamy Tomato Pasta recipe holds a special place in my heart because it was my go-to meal in college. I vividly remember trying to impress my roommates with my limited cooking skills, and this dish always made me feel like a gourmet chef. The simplicity of the ingredients and the sheer elegance of the final result created a sense of accomplishment and joy that I still feel every time I make it. It is more than just food; it is a delicious reminder of friendship and those first steps into a lifelong love of cooking.
Health and Nutrition
Why it’s good for your body
This Creamy Tomato Pasta delivers a powerful nutritional punch. For instance, the lycopene in cooked tomatoes is a superstar antioxidant. Furthermore, your body absorbs this compound more easily when you cook the tomatoes with a little fat, like olive oil. Consequently, this process supports your body’s fight against inflammation.
Moreover, this dish provides a fantastic energy source. The complex carbohydrates from the pasta fuel your brain and muscles throughout the day. Additionally, you can easily boost the protein content by adding lean ground turkey or chickpeas. Therefore, a bowl of Creamy Tomato Pasta keeps you feeling full and satisfied for hours.
Ultimately, this meal supports heart health in several ways. Olive oil contributes monounsaturated fats, which are beneficial for cholesterol levels. Likewise, garlic and onions offer allicin, a compound known for its cardiovascular benefits. Enjoying this Creamy Tomato Pasta means you are treating yourself to a meal that truly loves you back.
How it fits in a healthy lifestyle
This Creamy Tomato Pasta fits beautifully into a balanced eating plan. You can easily tailor it to meet specific dietary needs without sacrificing flavor. For a gluten-free version, simply swap regular pasta for your favorite gluten-free alternative. If you are focusing on heart health, use whole wheat pasta and ensure you measure your cheese and cream.
This dish also exemplifies practical, wholesome cooking for busy weeknights. It comes together with pantry staples, helping you avoid less nutritious takeout options. Pair it with a simple side salad to create a perfectly rounded meal. For more inspiration on building balanced plates, explore our guide to meal prepping for beginners. Remember, healthy eating is about consistency and enjoying what you eat. If you are looking for other satisfying pasta dishes, our healthy comfort food recipes offer plenty of delicious ideas.
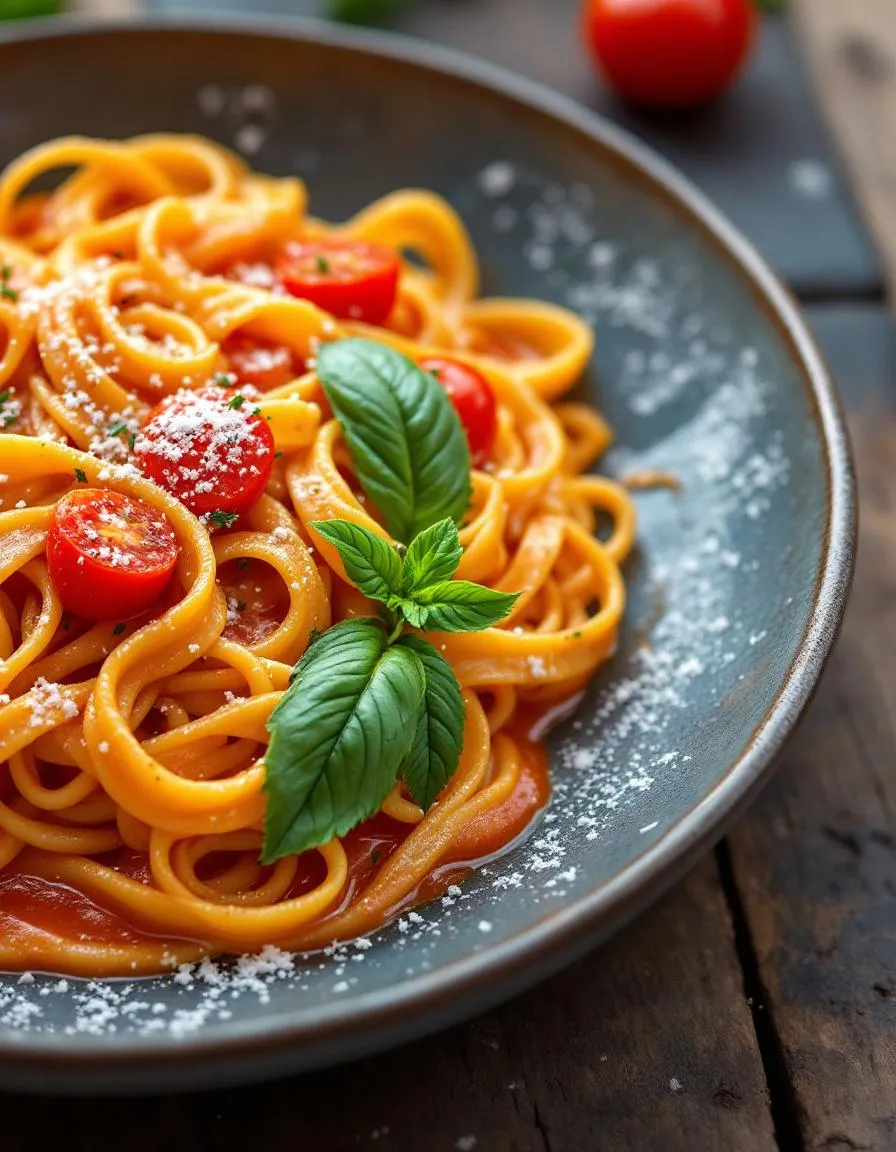
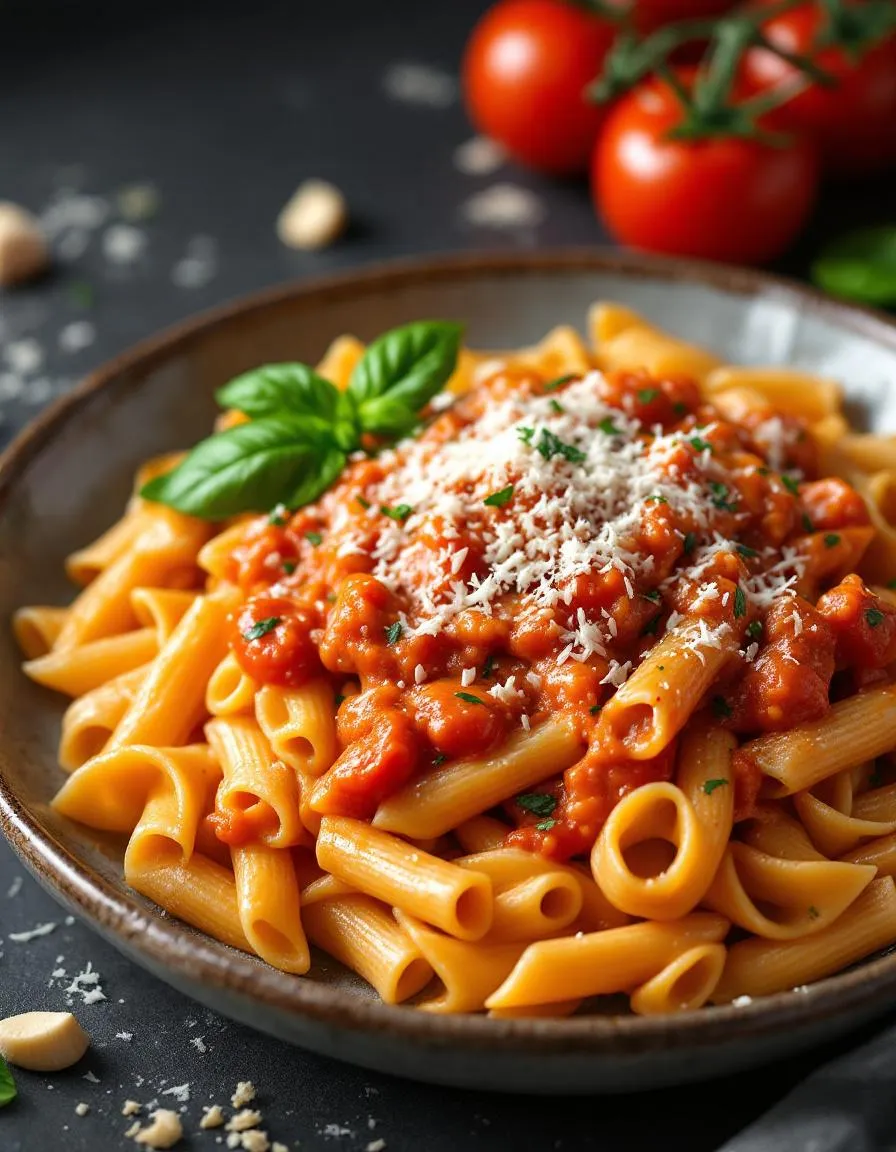
A rich and comforting pasta dish featuring a velvety tomato cream sauce with garlic and herbs.
Ingredients
Scale
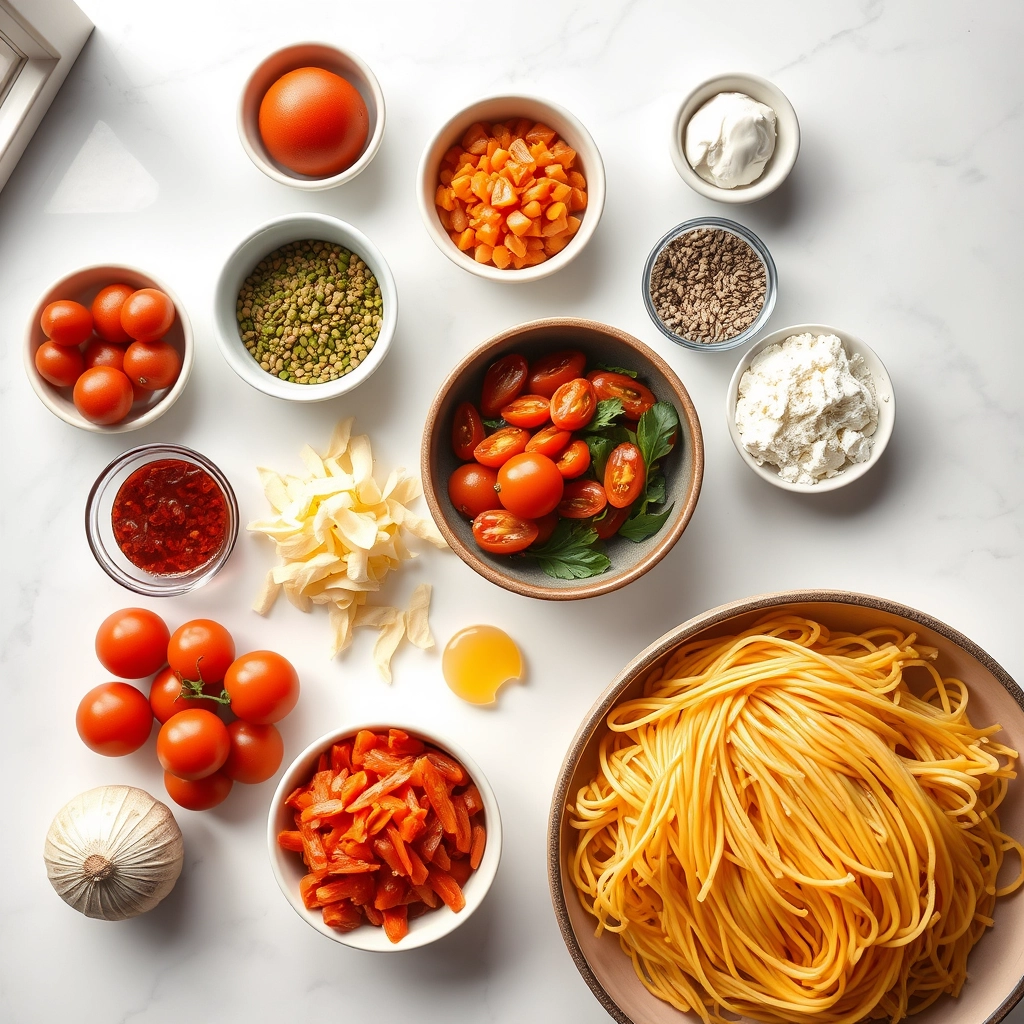
For the Crust:
8 oz penne pasta
2 tbsp olive oil
3 cloves garlic, minced
1 can (14.5 oz) crushed tomatoes
1/2 cup heavy cream
1/4 cup grated Parmesan cheese
1 tsp dried basil
1/2 tsp dried oregano
Salt and pepper to taste
Fresh basil for garnish
Instructions
1. Prepare the Crust:
Cook pasta according to package directions until al dente. Drain and set aside.
In a large skillet, heat olive oil over medium heat. Add garlic and sauté until fragrant, about 1 minute.
Pour in crushed tomatoes, basil, oregano, salt, and pepper. Simmer for 10 minutes, stirring occasionally.
Reduce heat to low and stir in heavy cream and Parmesan cheese until smooth and creamy.
Add cooked pasta to the skillet and toss to coat evenly in the sauce. Garnish with fresh basil before serving.
Notes
You can customize the seasonings to taste.
s-dish">How to Prepare This Dish
Steps and time-saving tips
First, gather all your ingredients for this Creamy Tomato Pasta before you even turn on the stove. This simple mise en place step saves you from frantic searching later. Meanwhile, bring a large pot of generously salted water to a rolling boil for your pasta. Next, heat a quality olive oil in a deep skillet over medium heat and sauté your aromatics until they become fragrant and soft. Then, add your tomato paste and cook it for a full minute to deepen its flavor, stirring constantly. After that, pour in your crushed tomatoes and bring the sauce to a gentle simmer. Let it bubble away for about ten minutes to allow the flavors to meld beautifully. Now, reduce the heat to low and stir in the heavy cream or your preferred creamy element. Finally, combine your al dente pasta directly into the skillet with the luxurious sauce, tossing everything together until each strand is perfectly coated. Serve your incredible Creamy Tomato Pasta immediately with a fresh basil garnish for a truly restaurant-quality meal at home.
Mistakes I’ve made and learned from
I have definitely learned a few lessons the hard way with this Creamy Tomato Pasta. My biggest mistake was adding the cream while the sauce was still at a high simmer; this almost always causes it to curdle and separate into a grainy, unappetizing mess. Now, I always take the skillet off the heat and let it cool for a minute before I slowly whisk in the cream for a perfectly smooth texture. Another error I used to make was using bland, out-of-season tomatoes for my sauce base, which resulted in a lackluster flavor. I finally solved this by relying on high-quality canned San Marzano tomatoes, which offer consistent, rich taste year-round. For more on selecting the best ingredients, my guide on choosing the right pasta is a great resource. And if you’re worried about timing, my post on achieving perfect al dente every single time will save your dinner.
n-and-variations">Cultural Connection and Variations
Where this recipe comes from
My nonna first showed me how to make Creamy Tomato Pasta in her sun-drenched kitchen. She never followed a written recipe. Instead, she relied on taste, memory, and what her garden offered that week. Her version always started with a rich soffritto, a base of finely chopped onion, celery, and carrot slowly cooked in olive oil. This technique, a cornerstone of Italian cooking, builds a profound depth of flavor that you simply cannot rush. Interestingly, regions across Italy approach this dish differently. For instance, in the north, they might swirl in a generous amount of butter and Parmigiano-Reggiano for creaminess. Meanwhile, in the south, they often emphasize the bright, acidic tang of San Marzano tomatoes with just a hint of fresh basil.
Around the world, cooks put their own unique spin on this classic. In America, we frequently add a splash of heavy cream for a luxurious, velvety texture. Conversely, other cultures might use coconut milk for a dairy-free alternative or add a pinch of chili flakes for some heat. Ultimately, the beauty of this dish lies in its incredible adaptability. Every family seems to have their own cherished version of Creamy Tomato Pasta, making it a truly global comfort food.
How it fits in today’s cooking
This dish absolutely thrives in modern kitchens because it perfectly balances comfort with convenience. Furthermore, it fits seamlessly into our busy lives, acting as a quick weeknight dinner that feels anything but ordinary. Many contemporary cooks are now embracing plant-based versions, using cashew cream or blended white beans to achieve that signature lush texture without dairy. You can easily find inspiration for these twists in our collection of quick vegetarian dinners.
Moreover, Creamy Tomato
Pasta remains a star for seasonal eating. In the summer, we can make it with ripe, juicy tomatoes from the farmer’s market. Then, during the colder months, a high-quality canned tomato creates a comforting and warm meal. Its role extends beyond the everyday, often appearing as a centerpiece at casual gatherings and holiday feasts. For a complete experience, pair it with a simple side; a crisp easy green salad provides the perfect fresh contrast to the rich, creamy sauce. Ultimately, its enduring appeal proves that some recipes truly are timeless.
Taste and Texture
What makes it delicious
This Creamy Tomato Pasta delivers a truly comforting experience. First, you notice the rich, sweet fragrance of simmered tomatoes and fresh basil. Each forkful coats the pasta in a luxuriously velvety sauce that feels incredibly smooth in your mouth. Simultaneously, the savory, umami depth from the parmesan cheese perfectly balances the tomato’s bright acidity. Ultimately, the final dish offers a harmonious blend of creamy, tangy, and herbal notes that makes every bite deeply satisfying.
Boosting the flavor
Fortunately, you can easily elevate your Creamy Tomato Pasta with a few clever tweaks. For instance, try stirring in a spoonful of pesto at the end for a vibrant, herby kick. Alternatively, a pinch of red pepper flakes will introduce a welcome warmth that cuts through the richness. Consider topping your bowl with crispy pancetta or toasted pine nuts for a fantastic contrasting crunch. For a fresh side, a simple arugula salad provides a peppery balance. Moreover, a slice of crusty homemade garlic bread is perfect for scooping up every last bit of the delicious sauce.
First, always use full-fat dairy for your sauce because it creates a much richer and more stable emulsion. Furthermore, reserve a cup of the starchy pasta water before you drain the noodles; consequently, you can use it to thin and perfect your sauce. Additionally, gently warm your cream before adding it to the tomatoes to prevent any potential curdling. Finally, toss the cooked pasta directly in the sauce pan so that every strand of your Creamy Tomato Pasta gets perfectly coated.
Mistakes to avoid
Avoid using pre-grated Parmesan cheese, as it often contains anti-caking agents that can make your sauce grainy instead of smooth; instead, always grate a block of cheese yourself right before using it. Moreover, do not rinse your cooked pasta after draining, as this removes the essential starch that helps the sauce cling beautifully. Also, never add cold cream directly to a very hot tomato base, because the sudden temperature change can cause it to split. For more on building perfect sauces, see our guide on how to make a roux, which covers essential techniques. Finally, always taste and season your dish at the end, just before serving, as this ensures your flavors are perfectly balanced, much like we recommend for our creamy garlic chicken pasta.
g-suggestions">Serving and Pairing Suggestions
How to serve this dish
Immediately serve your Creamy Tomato Pasta while it is still steaming hot for the best texture. For a beautiful presentation, twirl the pasta into a nest on a warm plate. Furthermore, finish with a final drizzle of high-quality olive oil and a sprinkle of fresh basil. This simple garnish makes the dish look restaurant-worthy. Consequently, this elegant approach works wonderfully for a date night at home. Alternatively, you can serve this comforting Creamy Tomato Pasta family-style in a large bowl for a casual weeknight dinner. Ultimately, its rich flavor and creamy sauce make it a fantastic centerpiece for any gathering.
What goes well with it
First, a crisp, green side salad provides a refreshing crunch that cuts through the richness of the Creamy Tomato Pasta. For the perfect pairing, try our classic Easy House Salad with its light vinaigrette. Next, a slice of crusty garlic bread is absolutely essential for scooping up every last bit of the delicious sauce. Moreover, a glass of chilled Pinot Grigio or a light-bodied red wine like Chianti beautifully complements the tangy tomato flavors. Finally, consider starting your meal with a simple appetizer, such as our popular Garlic Bruschetta, to prepare the palate for the main event.
math-faq-block">
What is creamy tomato pasta sauce made of?
A classic creamy tomato pasta sauce typically combines a simple tomato base, often from crushed tomatoes or passata, with a rich dairy element. This is most commonly heavy cream, but cream cheese, mascarpone, or even a roux with milk can be used to create that signature velvety texture. The best Creamy Tomato Pasta balances the acidity of the tomatoes with the richness of the cream.
How do you thicken creamy tomato pasta sauce?
To thicken your Creamy Tomato Pasta sauce, let it simmer uncovered for a few extra minutes to allow excess liquid to evaporate. You can also create a quick slurry by mixing a tablespoon of cornstarch with two tablespoons of cold water and stirring it into the simmering sauce. Adding a sprinkle of grated Parmesan cheese will also help thicken the sauce while adding a delicious savory flavor.
Can I use milk instead of cream for tomato pasta?
Yes, you can use whole milk instead of heavy cream, but the sauce will be less rich and more prone to curdling. To prevent this, temper the milk by slowly adding a small amount of the warm tomato sauce to it first, then whisk that mixture back into the main pot. For a safer and creamier result, a combination of milk and a tablespoon of flour or cream cheese works well.
ank-math-faq-item">
What can I add to creamy tomato pasta to make it better?
Elevate your Creamy Tomato Pasta by stirring in fresh basil, a pinch of red pepper flakes for heat, or a teaspoon of Italian seasoning. For extra depth, add a tablespoon of tomato paste when sautéing your garlic or finish the dish with a splash of high-quality olive oil. Adding cooked pancetta or grilled chicken can also turn it into a hearty main course.
Best Pumpkin Streusel Muffins – Easy Recipe
Introduction
Is there anything quite as comforting as the warm, spiced aroma of freshly baked Pumpkin Streusel Muffins filling your kitchen? Honestly, this smell alone can turn a dreary morning into something truly special. Furthermore, these muffins offer more than just incredible flavor; they create a moment of pure, cozy joy. Ultimately, baking a batch feels like wrapping yourself in a soft, autumnal blanket, and I cannot wait to share this perfect recipe with you.
Pumpkin Streusel Muffins are a quintessential fall treat that masterfully combines moist, spiced pumpkin bread with a delightfully crunchy, buttery streusel topping. This combination creates an irresistible texture and flavor experience that everyone adores. These muffins matter because they transform simple, seasonal ingredients into something extraordinary, perfect for breakfast, a snack, or even dessert. Moreover, they perfectly fit our blog’s tone of creating approachable, crowd-pleasing recipes that guarantee success. For instance, if you enjoy mastering classic baked goods, you will appreciate our complete guide on how to make the perfect muffin. This recipe uses canned pumpkin puree, which makes the process incredibly easy and ensures a consistently moist crumb every single time. The streusel, however, is the true star, adding a sweet and crunchy contrast that elevates the muffin from good to absolutely unforgettable. Additionally, this recipe is a fantastic way to celebrate the flavors of the season without any complicated steps. It is an ideal bake for both novice bakers and seasoned pros looking for a reliably delicious treat. For another wonderful way to use pumpkin, explore our popular easy pumpkin bread recipe, which shares the same cozy vibe.
Why I Love This Recipe
This recipe holds a special place in my heart because it reminds me of Saturday mornings growing up. My mom would always bake a batch of these Pumpkin Streusel Muffins, and the entire house would smell like cinnamon and nutmeg. Consequently, that aroma became my personal signal that the weekend had officially begun. I now love baking them for my own family, creating those same warm memories and filling our home with that familiar, comforting scent. It is a simple tradition that connects generations over something truly delicious.
Health and Nutrition
Why it’s good for your body
These Pumpkin Streusel Muffins do more than just satisfy your sweet tooth; they also deliver a surprising nutritional punch. For instance, pumpkin puree, the star ingredient, packs a serious dose of vitamin A, which actively supports your vision and immune system. Furthermore, this key ingredient provides a good amount of fiber, a crucial nutrient that promotes healthy digestion and helps you feel full and satisfied.
Additionally, the warming spices like cinnamon and nutmeg do more than just add flavor. In fact, they bring their own set of antioxidants to the table, which actively combat oxidative stress in your body. Consequently, enjoying a Pumpkin Streusel Muffin means you are treating yourself to a dessert with inherent health benefits. Moreover, when you use whole wheat flour, you instantly boost the fiber and nutrient content even higher, making each bite more wholesome.
Finally, choosing a homemade Pumpkin Streusel Muffin over a highly processed snack is a smart move for your overall wellness. You control the quality of ingredients, significantly reducing unnecessary additives and refined sugars. Therefore, this delicious bake becomes a mindful choice that actively contributes to your daily nutrient intake.
How it fits in a healthy lifestyle
These muffins perfectly fit into a balanced eating plan because they bridge the gap between a wholesome snack and a delightful treat. You can easily enjoy one as a satisfying afternoon pick-me-up with a cup of tea or pair it with Greek yogurt and fruit for a complete breakfast. The key is mindful enjoyment; savoring one muffin as part of your day is a fantastic way to honor a craving without derailing your goals.
You can also easily adapt this recipe to meet specific dietary needs. For our friends following a gluten-free lifestyle, simply swap the all-purpose flour for a reliable gluten-free flour blend. If you are looking to keep things lighter, consider reducing the sugar slightly or exploring natural alternatives like maple syrup. Remember, the best diet is one you can stick with, and including foods you love, like these Pumpkin Streusel Muffins, is essential for long-term success. For more inspiration on building a sustainable and healthy approach to eating, explore our guide on building balanced eating habits that work for real life.
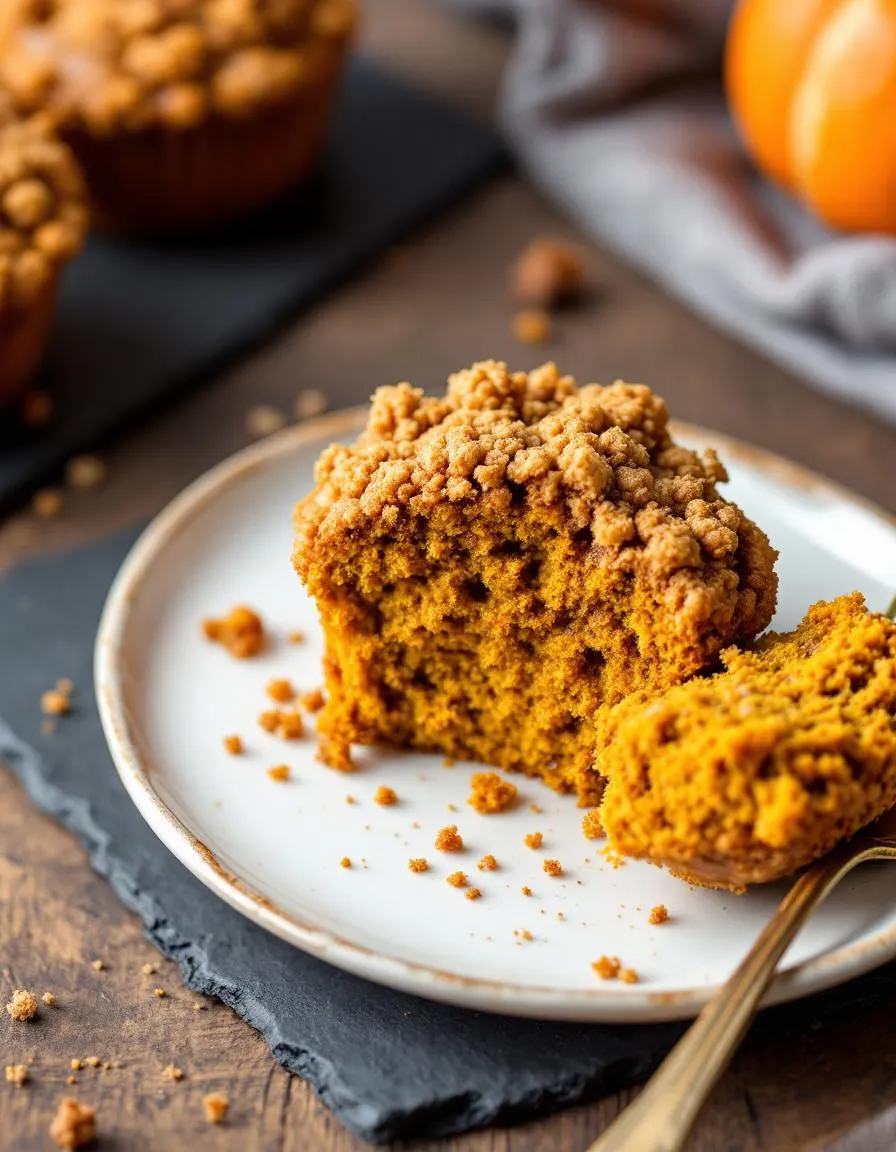
Moist and flavorful pumpkin muffins topped with a crunchy cinnamon streusel, perfect for autumn mornings or a sweet snack.
Ingredients
Scale
For the Crust:
1 3/4 cups all-purpose flour
1 cup granulated sugar
1/2 cup brown sugar
1 teaspoon baking soda
1/2 teaspoon salt
2 teaspoons pumpkin pie spice
2 large eggs
1 cup canned pumpkin puree
1/2 cup vegetable oil
1/3 cup water
1/2 cup all-purpose flour (for streusel)
1/4 cup brown sugar (for streusel)
1/4 cup cold butter, cubed (for streusel)
1 teaspoon cinnamon (for streusel)
Instructions
1. Prepare the Crust:
Preheat oven to 375°F (190°C) and line a muffin tin with paper liners.
In a large bowl, whisk together 1 3/4 cups flour, granulated sugar, 1/2 cup brown sugar, baking soda, salt, and pumpkin pie spice.
In another bowl, mix eggs, pumpkin puree, oil, and water. Combine wet and dry ingredients until just mixed.
For the streusel, mix 1/2 cup flour, 1/4 cup brown sugar, and cinnamon. Cut in cold butter until crumbly.
Fill muffin cups 3/4 full, sprinkle streusel on top, and bake for 20-25 minutes or until a toothpick comes out clean.
Notes
You can customize the seasonings to taste.
How to Prepare This Dish
Steps and time-saving tips
First, preheat your oven and line a muffin tin with papers. Meanwhile, whisk your dry ingredients together in a large bowl. This simple step ensures your Pumpkin Streusel Muffins bake evenly. In a separate bowl, vigorously whisk the wet ingredients until they are perfectly smooth. Next, gently fold the wet mixture into the dry ingredients. Remember, a few lumps are absolutely fine; overmixing is the real enemy of tender muffins. For the crumb topping, use a fork or your fingers to combine the ingredients until they form delightful clumps. Now, generously spoon the batter into your prepared muffin cups. Finally, top each one with a hearty handful of the streusel, pressing it down lightly so it adheres. Bake until the tops spring back to the touch. For a major time-saver, mix your dry ingredients the night before. Additionally, use a cookie scoop to distribute the batter quickly and cleanly. Let the Pumpkin Streusel Muffins cool in the pan for just five minutes before moving them. This patience prevents them from getting soggy on the bottom.
Mistakes I’ve made and learned from
I used to end up with dense, tough Pumpkin Streusel Muffins all the time, and I finally realized I was overmixing the batter in a fear of lumps. Now, I mix just until the flour disappears, and the texture is incredibly light. Another big mistake was packing my flour into the measuring cup, which led to dry muffins. I learned to spoon and level my flour for perfect results every time. Forgetting to properly grease the muffin tin was a disaster that left half the beautiful streusel topping behind. I also once used cold ingredients straight from the fridge, and my batter never emulsified correctly. Now I make sure everything is at room temperature, a tip I picked up from my deep dive into understanding baking ingredient temperatures. Learning these small lessons truly transformed my muffins from good to bakery-worthy.
Pumpkin Streusel Muffins weave a story that begins in early American kitchens. Settlers, embracing native ingredients like pumpkin, sought ways to create comforting, spiced baked goods that could sustain their families through colder months. Consequently, they often baked these treats in a communal oven, filling entire villages with the warm scent of cinnamon and nutmeg. My own grandmother, for instance, always made her version with a heavy hand on the cloves, claiming it warded off the autumn chill. Around the world, bakers interpret this concept differently. German bakers might incorporate quark cheese into the batter for richness, while in Australia, they often use golden syrup instead of molasses for a lighter, sweeter crumb. No matter the variation, the heart of the dish remains a celebration of harvest and home. Ultimately, a perfect batch of Pumpkin Streusel Muffins feels like a hug from the inside, connecting us to generations of bakers before us.
How it fits in today’s cooking
Today, these muffins absolutely thrive as a symbol of cozy, seasonal living. Modern home cooks enthusiastically adapt the classic recipe to fit various dietary needs and busy schedules, proving its enduring appeal. For example, many easily swap in gluten-free flour or a flax egg, ensuring everyone can enjoy a warm muffin straight from the oven. Furthermore, they perfectly complement a modern brunch menu, offering a handheld, spiced option that pairs wonderfully with coffee. Their versatility truly shines beyond breakfast, however. Moreover, a batch of these muffins makes for a fantastic, heartfelt gift during the holidays, often sparking a friendly baking exchange among neighbors. Honestly, their simple ingredients and straightforward method make them a reliable staple for both beginners and experts. Finally, for those seeking another classic to master, the process shares a similar comforting simplicity with a traditional vanilla cake, making it a foundational recipe for any baker’s repertoire.
>Taste and Texture
What makes it delicious
These Pumpkin Streusel Muffins offer a truly cozy experience. First, you notice the warm, fragrant aroma of cinnamon and nutmeg that fills your kitchen. Then, you bite into a wonderfully soft and moist crumb, packed with rich pumpkin flavor. Meanwhile, the buttery streusel topping provides a delightful sugary crunch that perfectly contrasts the tender muffin base. Ultimately, each bite delivers a harmonious blend of sweet, spiced, and savory notes that feel incredibly comforting.
Boosting the flavor
You can easily elevate these Pumpkin Streusel Muffins with a few creative twists. For instance, consider folding white chocolate chips into the batter for pockets of creamy sweetness. Alternatively, a simple vanilla glaze drizzled over the cooled muffins adds a professional bakery-style finish. Furthermore, a dollop of spiced whipped cream on the side introduces a cool, airy texture. If you love experimenting with mix-ins, our guide on baking with chocolate chips offers fantastic inspiration. Finally, serving them warm with a pat of cinnamon honey butter melts into the muffin, creating an exceptionally rich and memorable treat. For more topping ideas that pair beautifully, explore our tips for the perfect streusel topping on other desserts.
Tips for Success
Best practices for results
First, always use room temperature ingredients for a smooth, even batter that bakes uniformly. Furthermore, mix your dry and wet ingredients separately before combining them; this step prevents overmixing. For the most tender crumb, gently fold the ingredients together until you no longer see dry streaks of flour. Additionally, generously fill your muffin cups for a beautiful, domed top on your Pumpkin Streusel Muffins.
Mistakes to avoid
Avoid overmixing your muffin batter, as this develops gluten and leads to a tough, dense texture. Instead, stir gently until the ingredients are just combined. Many bakers also mistakenly use cold ingredients, which can result in a curdled batter and uneven baking. For perfect results every time, ensure your dairy and eggs are at room temperature; this is one of our top baking tips for fluffy cakes and muffins. Finally, do not overbake your Pumpkin Streusel Muffins, otherwise they can become dry. You can always check for doneness using the methods in our guide on how to tell if your baked goods are done.
Serving and Pairing Suggestions
How to serve this dish
Serve these Pumpkin Streusel Muffins warm to maximize their cozy aroma and tender crumb. For a beautiful brunch spread, arrange them on a rustic wooden board alongside fresh fruit. Furthermore, a light dusting of powdered sugar just before serving adds a lovely visual touch. These muffins truly shine during holiday gatherings or as a special weekend treat. Always present Pumpkin Streusel Muffins in a basket lined with a checkered napkin for a charming, homestyle feel.
h-it">What goes well with it
A hot mug of spiced chai tea makes a perfect companion, as its warm flavors echo the spices in the muffin. Alternatively, a glass of cold milk provides a classic, creamy contrast to the sweet streusel topping. For a fuller breakfast, pair your Pumpkin Streusel Muffins with a side of our savory Breakfast Casserole. Finally, consider our rich and creamy Vanilla Bean Latte for an ultimate coffee shop experience at home.
How do you keep streusel topping from sinking into muffins?
To prevent your streusel topping from sinking, make sure the crumb mixture is the right consistency—it should be clumpy and coarse, not sandy or overly wet. Pressing the streusel lightly onto the muffin batter right before baking helps it adhere and form a delicious, crisp crust on your Pumpkin Streusel Muffins.
ank-math-faq-item">
Can I use fresh pumpkin instead of canned for muffins?
Yes, you can absolutely use fresh pumpkin puree. Simply roast a sugar pumpkin, like a Sugar Pie variety, then scoop out and puree the flesh until smooth. Ensure your homemade puree is thick and has a similar consistency to canned pumpkin to keep the texture of your Pumpkin Streusel Muffins perfect.
Why are my pumpkin muffins so dense?
Dense muffins are often caused by overmixing the batter, which develops too much gluten. For light and tender Pumpkin Streusel Muffins, gently fold the wet and dry ingredients together until just combined, with a few streaks of flour still visible. Also, ensure your baking soda or powder is fresh for proper rise.
Can you freeze pumpkin streusel muffins?
Yes, these muffins freeze beautifully for up to 3 months. Allow them to cool completely, then wrap each muffin individually in plastic wrap and place them in a freezer-safe bag or container. Thaw at room temperature or warm them up in the oven to refresh that just-baked flavor and texture.