Beginners Sourdough Bread Recipe is an easy, no knead recipe made with sourdough starter, no yeast necessary. This homemade bread is made with bread flour but a small amount whole wheat can be used if desired. All of our recipes are tested with King Arthur flour for consistent results. We give you step by step instructions, a sample baking schedule and a video to make it as easy as possible!
Print
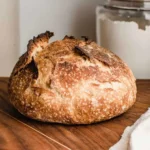
Beginner Sourdough Bread
Description
A simple sourdough bread recipe that can be made with minimal effort. The perfect recipe for home bakers that want a healthy loaf of bread to serve with dinner or for beginner sourdough bakers looking to get their hands into bread baking.
Ingredients
- 2 teaspoons (10 g) sourdough starter
- 3 tablespoons (25 g) all-purpose flour
- 5 teaspoons (25 g) water
Instructions
- 12 hours before you plan to mix the dough, add the ingredients to make ¼ cup (50 g) of active sourdough starter to a clean jar. Stir until combined, loosely cover the jar and let the starter rise at room temperature. (The ingredients will create a total of 60 g active starter but some of it will stick to the sides of the jar during the transfer, so we are making a little more than needed.) The sourdough starter is ready to use when it has doubled in size and there are plenty of bubbles on the surface and sides of the jar.
- Mix the dough: Transfer 50 g of the active starter and 350 g water into a large mixing bowl. Stir to distribute the starter evenly. Add 500 g bread flour and 10 g sea salt to the bowl and use a stiff spatula or your hands to work the ingredients together until it forms a shaggy mass and there are no dry bits of flour left in the bowl. Cover the bowl and let the dough rest for one hour at room temperature.
- Stretch and Fold: Wet your hand with a little water to prevent sticking. Pick up the dough on one side and stretch it up and over itself. Turn the bowl a quarter turn and repeat this step until you have turned the bowl a full circle. The dough should form into a tight ball. Cover the bowl and let the dough rest for 30 minutes. Repeat the stretch and fold process one more time to help build volume in the final loaf.
- Bulk Fermentation: Cover the bowl and let the dough rise for 7-10 hours on your kitchen counter. The dough will have risen by about 50-75%, not doubled, when it is ready to shape. (If the dough has doubled in size and/or is hard to shape, it may be over-proofed. Reduce the rising time on your next bake.)
- Shape and Second Rise: Turn the dough out onto a lightly floured surface. Shape the dough into a ball by pulling 4 sides of the dough into the middle of itself. Turn the dough over so that it is seam-side down. Use your hands to gently cup the dough, pulling and twisting towards yourself until it forms a tight skin on the outside. Center the dough onto a piece of parchment paper, seam-side down. Use the parchment paper like a sling to lift the dough up and transfer it into a medium-sized bowl. Cover the bowl with a tea towel and let the dough rest at room temperature for 1-2 hours. Use your thumb to make an indentation in the dough about a ½ inch deep. If the indentation quickly springs back all the way, or almost all the way, it's under-proofed and still needs more time to rise.
- Score and Bake: 30 minutes before you're ready to bake, preheat the oven, with the dutch oven inside, to 450°F (232°C). Using long silicone gloves, carefully remove the hot dutch oven and take the lid off. Score the top of the dough with a razor or a sharp knife. Once again, use the parchment paper as a sling to lift the dough up and transfer it into the dutch oven. Place the lid on the dutch oven, return it to the oven and bake for 20 minutes. Remove the lid and bake an additional 25-30 minutes or until crust is golden brown. (The internal temperature of the bread should be around 205-210°F (96-99°C) using a digital food thermometer.)
- Cool: Transfer the baked bread to a cooling rack for 1-2 hours before slicing. The bread will continue to cook inside during this time. If you slice into it too soon, it will result in a gummy loaf.
- Store: Keep the bread at room temperature, in a bread bag, wrapped in a kitchen towel or beeswax wrap. You can also store the bread, cut-side down, on a cutting board with a cake-stand top covering the bread. Do not refrigerate. Freeze full loaves or individual slices wrapped tightly in plastic wrap and inserted into a freezer-safe container for up to 3 months.
- Serve: Nothing beats the taste of warm sourdough bread slathered with homemade butter, unless it's homemade Nutella or strawberry jam!
Notes
NOTES This recipe was tested in a 68°F (20°C) kitchen. If your kitchen is colder, rising times will take longer and if it’s warmer, less time. If using all-purpose flour reduce water to 325g. Add more if necessary during first set of stretch and folds. This bread can be baked in a lightly greased 9″ x 5″ loaf pan. After the first rise, shape the dough, place it seam-side down into the loaf pan and allow it to rise. Bake the loaf in a 375°F (190°C) oven for 45 minutes or until the internal temperature is 190°F (88°C).
Nutrition
- Calories: 154kcal
- Sugar: 1g
- Protein: 5g