“`html
Table of Contents
- Warm Up Your Kitchen: Creamy Spinach Chicken Gnocchi
- Gather Your Cozy Components
- The Warm Embrace of Time
- Crafting Your Comfort Dish
- Nourishing Your Soul: Nutritional Insights
- Lighter Twists on a Comfort Classic
- Serving Up Warmth
- Avoiding Kitchen Hiccups
- Cherishing Leftovers
- Your Cozy Culinary Triumph
- Frequently Asked Questions
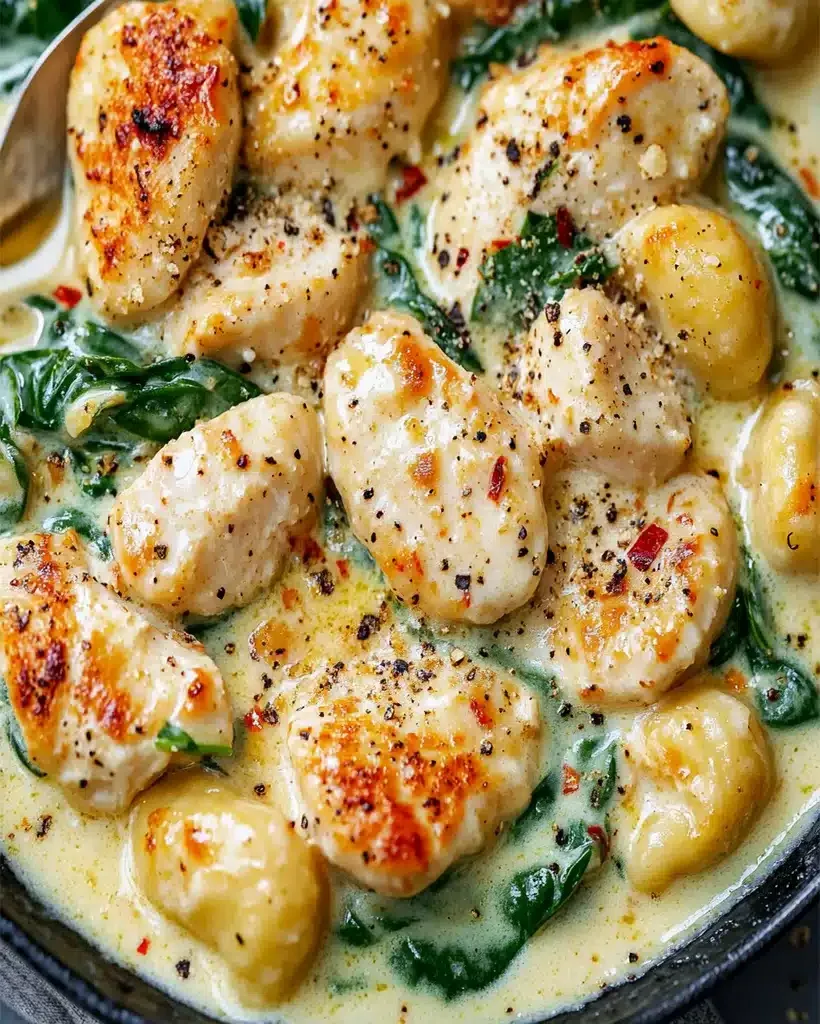
Cozy Up with Creamy Spinach Chicken Gnocchi
Warm Up Your Kitchen: Creamy Spinach Chicken Gnocchi
Are you searching for a dish that feels like a warm hug on a chilly evening? In a world where weeknight meals often lean towards the hurried and uninspired, does the idea of a rich, comforting, and utterly delicious Creamy Spinach Chicken Gnocchi sound like your perfect culinary escape? If you find yourself nodding along, you’ve landed in the right place! This recipe is a dream come true for anyone who loves the embrace of tender chicken, the delightful chew of gnocchi, and the velvety richness of a spinach-infused creamy sauce. It’s designed to be both easy enough for a busy weeknight and impressive enough for a relaxed weekend dinner. Forget the culinary stress; this dish is all about bringing joy and comfort to your table with minimal fuss and maximum flavor.
Gather Your Cozy Components
The magic of this Creamy Spinach Chicken Gnocchi lies in the harmony of its simple yet impactful ingredients. Each element plays a crucial role in creating that irresistible texture and depth of flavor. We’ve aimed for ingredients that are readily available, but also offered some thoughtful substitutions to cater to your pantry and preferences.
- Chicken Breast: 1.5 lbs boneless, skinless chicken breast, cut into bite-sized pieces. Look for plump, moist chicken that will stay tender after cooking. You can also use thighs for a richer flavor.
- Gnocchi: 1 lb package of potato gnocchi. Opt for a good quality brand; the texture is key! Fresh gnocchi often have a lighter, more tender bite than shelf-stable varieties.
- Aromatics:
- 1 tablespoon olive oil. A good extra virgin olive oil will impart a subtle fruity note.
- 1 medium yellow onion, finely chopped. Its sweetness mellows beautifully when sautéed.
- 3-4 cloves garlic, minced. The pungent soul of many savory dishes.
- The Creamy Sauce Base:
- 4 cups fresh spinach, roughly chopped. Baby spinach wilts down beautifully and is less fibrous.
- 2 cups chicken broth. Low-sodium is preferred so you can control the saltiness.
- 1.5 cups heavy cream. This is the luscious heart of our sauce, providing unparalleled richness and a silky texture.
- 1/2 cup grated Parmesan cheese. Freshly grated is always best for its sharp, nutty aroma and flavor.
- Seasonings:
- 1 teaspoon dried Italian seasoning. A blend of basil, oregano, and thyme to transport you to the Mediterranean.
- 1/2 teaspoon red pepper flakes (optional, for a touch of warmth). Adjust to your spice preference.
- Salt and freshly ground black pepper to taste. Essential for awakening all the other flavors.
The Warm Embrace of Time
Compared to other creamy chicken and pasta dishes, this Creamy Spinach Chicken Gnocchi is a weeknight wonder. Many similar recipes can take upwards of an hour, especially when factoring in longer simmering times or more complex sauce preparations. Our streamlined approach ensures you get that deeply satisfying, restaurant-quality meal on the table in under an hour, making it a perfect candidate for even the busiest of schedules.
Crafting Your Comfort Dish
Step 1: Searing the Chicken to Golden Perfection
Begin by patting your chicken pieces dry with paper towels. This crucial step ensures a beautiful sear, locking in their juices and adding a delightful golden-brown crust. Season generously with salt, pepper, and the Italian seasoning. Heat the olive oil in a large skillet or Dutch oven over medium-high heat. Once shimmering, add the chicken pieces in a single layer, being careful not to overcrowd the pan (cook in batches if necessary). Sear for about 3-4 minutes per side until nicely browned. Remove the chicken from the skillet and set aside on a plate. It doesn’t need to be cooked through at this stage; it will finish cooking in the sauce.
Step 2: Building the Aromatic Foundation
Reduce the heat to medium. Add the chopped onion to the same skillet, using any rendered chicken fat and the remaining olive oil. Sauté the onion for about 5-7 minutes until it becomes soft, translucent, and just begins to caramelize, releasing its sweet fragrance. Stir in the minced garlic and red pepper flakes (if using) and cook for another minute until fragrant, being careful not to burn the garlic. The aroma filling your kitchen at this point will be simply delightful!
Step 3: Introducing the Star – Gnocchi
Pour in the chicken broth, scraping up any browned bits from the bottom of the skillet with a wooden spoon. This deglazing process adds a wonderful depth of flavor to your sauce. Bring the broth to a gentle simmer. Now, it’s time for the gnocchi! Gently add the gnocchi to the simmering broth. They will sink at first, but as they cook, they will float to the surface, indicating they are done. This usually takes about 2-4 minutes.
Step 4: The Creamy Embrace of Spinach
Incorporate the heavy cream into the skillet, stirring well to combine it with the broth and aromatics. Bring the sauce back to a gentle simmer and let it thicken slightly for about 2-3 minutes. Add the chopped spinach in handfuls, stirring until it wilts into the creamy sauce. The vibrant green of the spinach will create a beautiful visual contrast against the creamy backdrop.
Step 5: Harmonizing Flavors
Return the seared chicken pieces (along with any accumulated juices) to the skillet. Stir in the grated Parmesan cheese. Continue to simmer gently for another 3-5 minutes, or until the chicken is cooked through and the sauce has reached your desired creamy consistency. Taste and adjust seasonings as needed with salt and freshly ground black pepper. The flavors will meld together beautifully, creating a rich, comforting, and utterly satisfying dish. Serve immediately, ensuring each bowl gets a generous portion of chicken, gnocchi, and that lush, creamy sauce.
Nourishing Your Soul: Nutritional Insights
While this dish is a celebration of comfort and flavor, it also offers a good balance of macronutrients. A typical serving provides:
- Calories: Approximately 550-650 kcal (depending on exact ingredients and portion size)
- Protein: Around 30-40g from the chicken
- Carbohydrates: Primarily from the gnocchi (potato-based)
- Fat: From the heavy cream and cheese; provides richness and satiety.
- Vitamins & Minerals: Spinach contributes vitamins A, C, K, folate, and iron.
Lighter Twists on a Comfort Classic
Craving a lighter version without sacrificing that comforting creaminess? Here are a few swaps you can make:
- Lighter Cream Sauce: Substitute half of the heavy cream with evaporated milk or a combination of milk and a roux (flour and butter cooked together) for thickening. You can also use half-and-half, though it will be less rich.
- Gnocchi Alternatives: Swap traditional potato gnocchi for whole wheat gnocchi or cauliflower gnocchi for fewer carbohydrates and extra fiber/vegetables.
- Leaner Protein: Opt for chicken breast over thighs, or even use firm tofu or white beans for a vegetarian twist.
- Extra Veggies: Bulk up the dish with more vegetables like sautéed mushrooms, bell peppers, or zucchini.
Serving Up Warmth
This dish is wonderfully self-contained, but you can elevate it further:
- Crusty Bread: A few slices of warm, crusty bread are perfect for soaking up every last drop of that delicious sauce.
- Side Salad: A simple green salad with a light vinaigrette offers a refreshing contrast to the richness of the gnocchi.
- Garnish: A sprinkle of fresh parsley or chives adds a pop of color and freshness.
Avoiding Kitchen Hiccups
To ensure your Creamy Spinach Chicken Gnocchi turns out perfectly, keep these common pitfalls in mind:
- Overcooking Gnocchi: Gnocchi cook very quickly. Overcooking can make them mushy or break apart too much. Keep an eye on them as they float.
- Burning Garlic: Garlic burns easily. Add it towards the end of sautéing aromatics and cook only until fragrant.
- Watery Sauce: Ensure your sauce is simmering gently to thicken. If it’s too thin, you can let it reduce a bit longer or create a cornstarch slurry (1 tbsp cornstarch mixed with 2 tbsp water) to stir in.
- Crowding the Pan: When searing chicken, don’t overcrowd the skillet. This leads to steaming rather than searing, resulting in less flavorful, pale chicken. Cook in batches if needed.
Cherishing Leftovers
Leftovers can be stored in an airtight container in the refrigerator for up to 3 days. Reheat gently on the stovetop over low heat or in the microwave, adding a splash of milk or broth if the sauce has thickened too much. Gnocchi can sometimes absorb liquid as they sit, so the texture might be slightly softer upon reheating.
Your Cozy Culinary Triumph
There you have it – a pathway to pure comfort food perfection! This Creamy Spinach Chicken Gnocchi recipe is designed to bring smiles to your table with its rich flavors, tender textures, and soul-warming nature. It’s a testament to how simple ingredients, combined with a little love and care, can create something truly extraordinary. So go ahead, gather your ingredients, and embark on this delightful culinary journey. We promise, the reward of that first creamy, savory bite will be well worth it. What are you waiting for? It’s time to create some delicious memories!
Frequently Asked Questions
***Can I use pre-cooked chicken?***
Yes, you can! If using pre-cooked chicken (like rotisserie chicken), simply add it towards the end of the cooking process, just long enough to heat it through, rather than searing it at the beginning.
***What if I don’t like spinach?***
No problem! You can omit the spinach entirely or replace it with other finely chopped, sautéed vegetables like mushrooms, zucchini, or kale for added nutrition and flavor.
***Can I make this dairy-free?***
Making it dairy-free will require some substitutions. You can use a plant-based milk (like unsweetened cashew or soy) combined with a thickener like a cornstarch slurry or a dairy-free cream alternative. Ensure your gnocchi are also dairy-free. The richness and flavor profile will change, but it can still be delicious.
***My gnocchi are sticking together, what should I do?***
Make sure your sauce has enough liquid and is simmering gently. Stirring the gnocchi in as they are added to the pot can also help prevent them from clumping. If they do stick, gently separate them with your spoon as they cook.

Creamy Spinach Chicken Gnocchi Recipe – Ultimate Comfort Food
Description
Welcome to this delightful journey of creating a rich and comfortingCreamy Spinach Chicken Gnocchi! This recipe is an ideal pick for a cozy meal, combining tender chicken, fluffy gnocchi, and a creamy spinach sauce. If you’re a fan of easy-to-make, deliciously creamy dishes, this is the perfect one to try.
Ingredients
- 1(16-ounce) package of potato gnocchi
- 1 1/2pounds (650g) boneless, skinless chicken thighs
- Kosher salt and freshly ground black pepper, to taste
- 1 teaspoonpaprika
- 1 teaspoonItalian seasoning
- 5 tablespoonsunsalted butter, divided
- 1medium onion, diced
- 3cloves garlic, minced
- 1 cup(240ml) chicken broth
- 1/2 cup(125ml) heavy whipping cream
- 1/2 cupshredded mozzarella
- 4 cupsbaby spinach
- 1 tablespoonfreshly grated Parmesan, for serving
- 1 teaspoonred chili pepper flakes, optional
- For a lighter version, substitute heavy cream with half-and-half.
- Use turkey or tofuinstead of chicken for a vegetarian option.
- Gluten-free gnocchican be used to cater to gluten sensitivity.
Instructions
- In a large pot of boiling salted water, cook gnocchi according to the package instructions. Drain well and set aside.
- Season chicken thighs with salt, pepper, paprika, and Italian seasoning. Melt2 tablespoonsof butter in a large skillet over medium heat. Add chicken thighs in a single layer and cook until golden brown and cooked through (about 4-5 minutes per side), ensuring the internal temperature reaches165°F (74°C). Remove chicken from the skillet and set aside.
- In the same skillet, melt the remaining3 tablespoonsof butter. Add diced onion and cook, stirring frequently until tender, about2-3 minutes. Stir in minced garlic and cook until fragrant, about1 minute.
- Gradually whisk in chicken broth, and cook, whisking constantly for2 minutesuntil it slightly thickens. Stir in the heavy cream and shredded mozzarella until combined and thickened, about1-2 minutes. Season with salt and pepper to taste.
- Add the cooked gnocchi and spinach to the skillet, stirring until the spinach has wilted (about1-2 minutes). Return the cooked chicken thighs to the skillet. Serve immediately, garnished with freshly grated Parmesan, red chili pepper flakes, and chopped parsley. Enjoy!
Notes
Use Fresh Gnocchi: While packaged gnocchi works, using fresh gnocchi will elevate the texture and flavor of the dish.
Add More Vegetables: Feel free to toss in some mushrooms, sun-dried tomatoes, or even artichokes for added depth.
Customize the Heat: Add more chili flakes if you like it spicier!
“`