“`html
Table of Contents
- What are Cinnamon Roll Muffins?
- Ingredients for Cinnamon Roll Muffins
- Perfectly Timed: Prep, Bake, Enjoy!
- How to Make Cinnamon Roll Muffins: Step-by-Step
- Step 1: Preheat and Prepare
- Step 2: Mix the Dry Ingredients
- Step 3: Mix the Wet Ingredients
- Step 4: Combine Wet and Dry to Form Batter
- Step 5: Prepare the Cinnamon Filling
- Step 6: Assemble the Swirled Masterpieces
- Step 7: Bake to Golden Perfection
- Step 8: Whip Up the Cream Cheese Glaze
- Step 9: Drizzle and Devour!
- Nutritional Snapshot
- Healthier Twists on Tradition
- Serving Suggestions: Beyond Breakfast
- Common Pitfalls to Avoid
- Storing Your Cinnamon Roll Muffins
- Your New Favorite Treat Awaits!
- Frequently Asked Questions (FAQs)
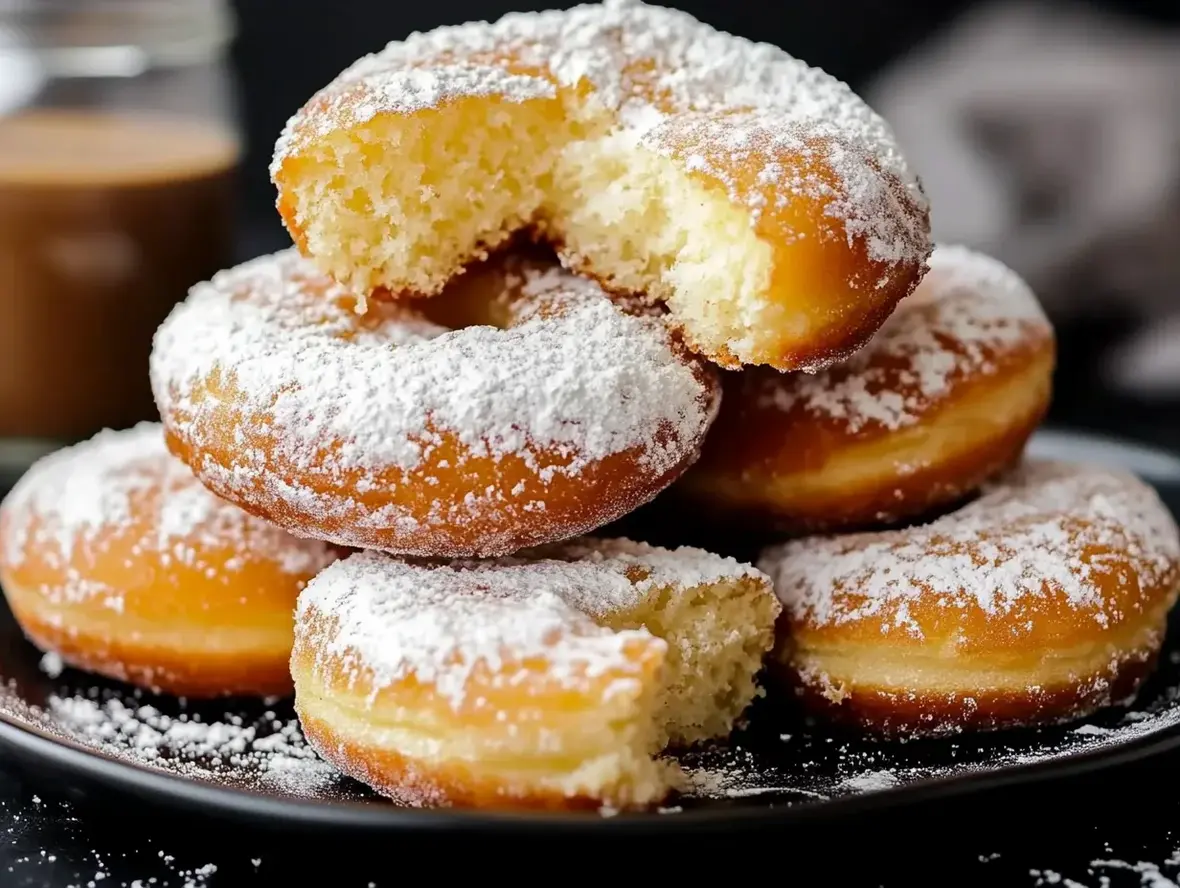
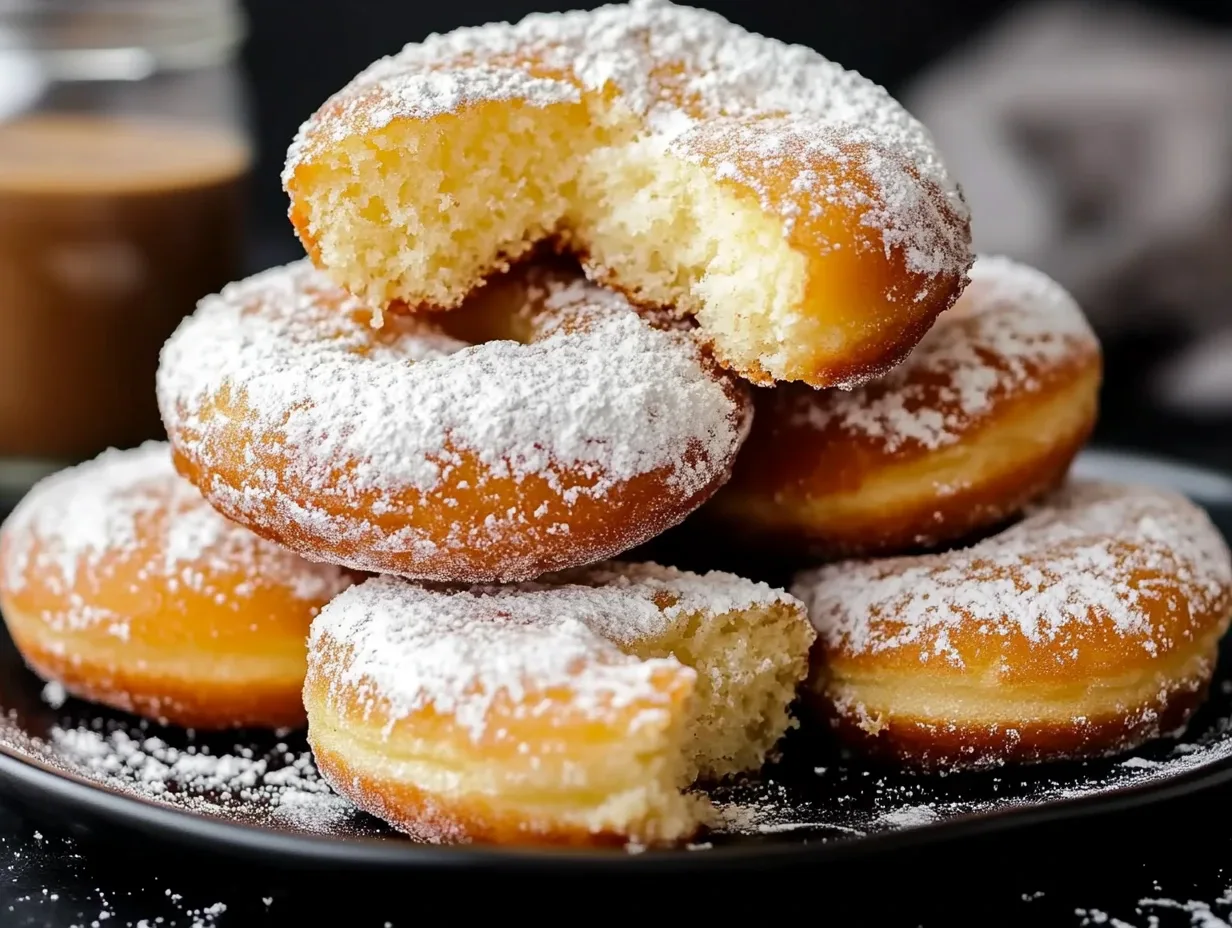
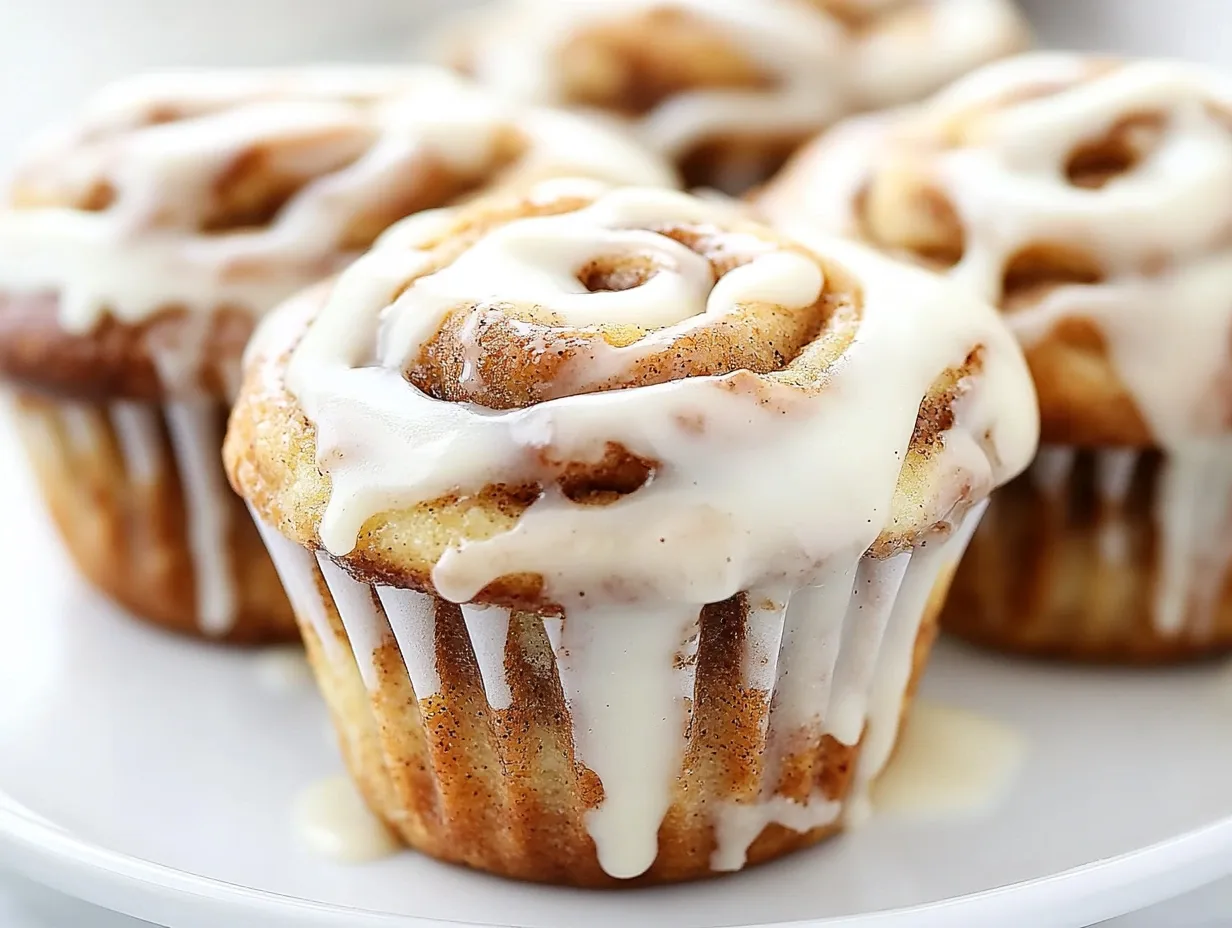
Muffin Cinnamon Rolls – The Best Homemade Treat
What are Cinnamon Roll Muffins?
Are you craving that irresistible gooey center, warm spice, and rich frosting of a classic cinnamon roll but don’t have the time for the lengthy process? You’re not alone! On average, traditional cinnamon roll recipes can take upwards of 3 hours from start to finish. But what if I told you there’s a way to capture all those beloved flavors in a fraction of the time? Introducing Cinnamon Roll Muffins! These delightful treats bring all the delicious flavors of a classic cinnamon roll in an easy-to-make muffin form! Soft, buttery muffins are swirled with a sweet cinnamon filling and topped with a rich cream cheese glaze for the perfect breakfast treat or snack. They’re the ultimate shortcut to cinnamon roll bliss, perfect for busy mornings or impromptu dessert cravings!
Ingredients for Cinnamon Roll Muffins
The magic of these muffins lies in their simplicity and the classic, comforting flavors. We’ve broken down the ingredients to make your baking journey smooth and enjoyable!
For the Muffin Batter:
- 2 cups (250g) All-Purpose Flour: The sturdy backbone of our muffins. All-purpose flour provides great structure.
- 1/2 cup (100g) Granulated Sugar: For that essential sweetness that balances the spices.
- 2 teaspoons Baking Powder: Our leavening agent, ensuring a wonderfully light and fluffy texture.
- 1/2 teaspoon Salt: Enhances all the other flavors and balances sweetness.
- 1/4 teaspoon Ground Nutmeg (optional): Adds a warm, aromatic depth that pairs beautifully with cinnamon.
- 1 cup (240ml) Milk: Whole milk is preferred for richness, but 2% works too.
- 1/2 cup (120ml) Vegetable Oil or Melted Unsalted Butter: Oil yields a moister muffin, while butter adds a richer flavor. Feel free to choose based on your preference!
- 1 large Egg: Acts as a binder and contributes to the muffin’s tender crumb.
- 1 teaspoon Vanilla Extract: A classic flavor enhancer that rounds out the sweetness.
For the Cinnamon Filling:
- 1/2 cup (100g) Light Brown Sugar, packed: Melts into a luscious, caramelized layer.
- 2 tablespoons Ground Cinnamon: The star of the show! Use a good quality cinnamon for the best aroma and taste.
- 2 tablespoons Unsalted Butter, softened: Binds the sugar and cinnamon, creating a spreadable paste.
For the Cream Cheese Glaze:
- 4 oz (113g) Cream Cheese, softened: The tangy, creamy base of our irresistible glaze.
- 1/4 cup (57g) Unsalted Butter, softened: Adds richness and smooths the texture.
- 1 cup (120g) Powdered Sugar: For sweetness and that signature smooth, pourable consistency. Sift if lumpy.
- 1/2 teaspoon Vanilla Extract: Tops off the glaze with a delightful aroma.
- 1-2 tablespoons Milk (or cream): To achieve the perfect drizzling consistency.
Perfectly Timed: Prep, Bake, Enjoy!
One of the biggest draws of these Cinnamon Roll Muffins is how quickly they come together. While traditional cinnamon rolls can take hours due to rising times, these gems are ready in a flash!
Compare this to the average 3+ hours for classic cinnamon rolls, and you can see why these muffins are a weeknight dessert or weekend breakfast hero!
How to Make Cinnamon Roll Muffins: Step-by-Step
Step 1: Preheat and Prepare
Begin by preheating your oven to 375°F (190°C). Line a 12-cup muffin tin with liners or grease it well. This ensures your beautiful muffins won’t stick!
Step 2: Mix the Dry Ingredients
In a large bowl, whisk together the all-purpose flour, granulated sugar, baking powder, salt, and optional nutmeg. Whisking well ensures everything is evenly distributed, leading to uniformly flavored muffins.
Step 3: Mix the Wet Ingredients
In a separate medium bowl or large measuring cup, whisk together the milk, vegetable oil (or melted butter), egg, and vanilla extract until well combined and slightly frothy.
Step 4: Combine Wet and Dry to Form Batter
Pour the wet ingredients into the dry ingredients. Gently stir with a spatula or wooden spoon until *just* combined. Be careful not to overmix! A few lumps are perfectly fine; overmixing develops the gluten in the flour, resulting in tough muffins.
Step 5: Prepare the Cinnamon Filling
In a small bowl, combine the packed light brown sugar and ground cinnamon. Add the softened butter and mix with a fork until it forms a crumbly, moist paste. This is where the magic happens!
Step 6: Assemble the Swirled Masterpieces
Spoon about half of the muffin batter into the prepared muffin cups, filling each about halfway. Then, dollop about 1-2 teaspoons of the cinnamon filling mixture over the batter in each cup. Finally, top with the remaining muffin batter, filling the cups about two-thirds to three-quarters full. The filling will naturally swirl as the muffins bake, creating that signature cinnamon roll look.
Step 7: Bake to Golden Perfection
Bake for 18-22 minutes, or until a wooden skewer inserted into the center of a muffin comes out clean. The tops should be golden brown and slightly springy to the touch.
Step 8: Whip Up the Cream Cheese Glaze
While the muffins are cooling slightly, prepare the glaze. In a medium bowl, beat the softened cream cheese and softened butter together with an electric mixer until smooth and creamy. Gradually beat in the powdered sugar and vanilla extract until well combined. Add 1-2 tablespoons of milk, one tablespoon at a time, mixing until you reach your desired drizzling consistency.
Step 9: Drizzle and Devour!
Once the muffins have cooled for about 10-15 minutes in the tin, transfer them to a wire rack. Drizzle generously with the cream cheese glaze. Serve warm for the ultimate comforting experience!
Nutritional Snapshot
While the exact nutritional values can vary based on ingredients used, here’s an approximate breakdown per muffin (without glaze):
- Calories: ~250-300 kcal
- Carbohydrates: ~35-40g
- Protein: ~3-4g
- Fat: ~12-15g
- Sugar: ~18-22g
(Note: The cream cheese glaze will add additional calories, fat, and sugar.)
Healthier Twists on Tradition
Looking to lighten things up without sacrificing flavor? Try these simple swaps:
- Flour Swap: Use whole wheat pastry flour or a 1:1 gluten-free baking blend for a boost of fiber.
- Sugar Reduction: Reduce the granulated sugar in the batter by 1/4 cup and in the filling by 1 tablespoon. You can also try a natural sweetener like maple syrup in the batter (adjust liquid accordingly).
- Oil to Applesauce: Replace half of the oil with unsweetened applesauce for reduced fat and added moisture.
- Lighter Glaze: For a lighter glaze, use Greek yogurt as a base instead of cream cheese and butter, thinning with a touch of milk and sweetened with stevia or a small amount of maple syrup.
Serving Suggestions: Beyond Breakfast
These versatile muffins are perfect for any occasion!
- Breakfast/Brunch: Serve warm with coffee or tea for a delightful start to the day.
- Afternoon Treat: A perfect pick-me-up with a glass of milk.
- Dessert: Enjoy them as a simple, comforting dessert, perhaps with a scoop of vanilla ice cream for an extra indulgence!
- Potlucks & Gatherings: They travel well and are always a crowd-pleaser.
Common Pitfalls to Avoid
To ensure your Cinnamon Roll Muffins turn out perfectly, keep these common mistakes in mind:
- Overmixing the Batter: This is the most common culprit for tough, dense muffins. Mix until just combined!
- Not Measuring Accurately: Especially flour. Spoon flour into your measuring cup and level it off, rather than scooping directly from the bag.
- Oven Temperature Issues: Ensure your oven is fully preheated. An oven thermometer can be helpful.
- Underbaking/Overbaking: Bake until a toothpick comes out clean, but avoid overbaking, which dries them out.
Storing Your Cinnamon Roll Muffins
These muffins are best enjoyed fresh, but they store well for a few days:
- Room Temperature: Store in an airtight container at room temperature for up to 2 days.
- Refrigeration: For longer storage (up to 5 days), keep them in an airtight container in the refrigerator. They can become a bit firmer, so warm them slightly before serving.
- Freezing: Wrap cooled muffins individually in plastic wrap and then place them in a freezer-safe bag or container for up to 3 months. Thaw overnight in the refrigerator or at room temperature.
Your New Favorite Treat Awaits!
There you have it – the ultimate shortcut to cinnamon roll perfection in muffin form! These Cinnamon Roll Muffins are incredibly satisfying, bursting with warm cinnamon spice, and topped with a dreamy cream cheese glaze. They deliver all the comfort of a classic without all the fuss. Perfect for a weekend brunch, a sweet breakfast surprise, or an afternoon pick-me-up, these muffins are sure to become a staple in your baking repertoire. Give them a try and get ready to impress yourself and your loved ones!
Loved this recipe? Share your creations with us on social media using #CinnamonRollMuffins and tag us! We can’t wait to see your delicious results!
Frequently Asked Questions (FAQs)
***_Can I make the batter ahead of time?_***
While these muffins are designed for quick baking, you can technically refrigerate the batter for up to 24 hours. However, it may affect the texture and rise slightly. For best results, bake immediately after mixing.
***_What if I don’t have cream cheese for the glaze?_***
You can make a simple vanilla glaze by mixing powdered sugar with milk or a little lemon juice until you achieve a drizzling consistency. Or, try a brown butter glaze for a different nutty flavor!
***_Can I add nuts to the filling?_***
Absolutely! Chopped pecans or walnuts are a fantastic addition to the cinnamon filling. Mix about 1/4 cup of chopped nuts into the cinnamon-sugar-butter mixture.
***_Why are my muffins dense?_***
The most common reason for dense muffins is overmixing the batter. Mix only until the dry and wet ingredients are just combined. A few lumps are perfectly okay!
Cinnamon Roll Muffins
Description
TheseCinnamon Roll Muffinsbring all the delicious flavors of a classic cinnamon roll in an easy-to-make muffin form! Soft, buttery muffins are swirled with a sweet cinnamon filling and topped with a rich cream cheese glaze for the perfect breakfast treat or snack.
Ingredients
- 2 cupsall-purpose flour½ cupgranulated sugar1 tbspbaking powder½ tspsalt½ cupunsalted butter, melted1 cupmilk1large egg1 tspvanilla extract
- ½ cupgranulated sugar1 tbspbaking powder½ tspsalt½ cupunsalted butter, melted1 cupmilk1large egg1 tspvanilla extract
- 1 tbspbaking powder½ tspsalt½ cupunsalted butter, melted1 cupmilk1large egg1 tspvanilla extract
- ½ tspsalt½ cupunsalted butter, melted1 cupmilk1large egg1 tspvanilla extract
- ½ cupunsalted butter, melted1 cupmilk1large egg1 tspvanilla extract
- 1 cupmilk1large egg1 tspvanilla extract
- 1large egg1 tspvanilla extract
- 1 tspvanilla extract
- ½ cupunsalted butter, softened½ cupbrown sugar2 tbspground cinnamon
- ½ cupbrown sugar2 tbspground cinnamon
- 2 tbspground cinnamon
- 4 ozcream cheese, softened½ cuppowdered sugar1–2tbsp milk½ tspvanilla extract
- ½ cuppowdered sugar1–2tbsp milk½ tspvanilla extract
- 1–2tbsp milk½ tspvanilla extract
- ½ tspvanilla extract
Instructions
- 1️⃣Preheat the Oven:Preheat your oven to350°F (175°C).Line a12-cup muffin tinwith muffin liners or lightly grease it with cooking spray.2️⃣Prepare the Muffin Batter:In a large mixing bowl, whisk together theflour, granulated sugar, baking powder, and salt.In another bowl, whisk together themelted butter, milk, egg, and vanilla extract.Add thewet ingredientsto thedry ingredientsand mix until just combined.Do not overmix, as this can make the muffins dense.3️⃣Prepare the Cinnamon Filling:In a small bowl, mix together thesoftened butter, brown sugar, and cinnamonuntil smooth and well combined.4️⃣Assemble the Muffins:Fill each muffin cuphalfwaywith muffin batter.Add aspoonful of the cinnamon fillingon top of the batter in each cup.Top with theremaining muffin batter, filling each cupalmost to the top.Using atoothpick or skewer, swirl the batter and filling together to create a marbled effect.5️⃣Bake the Muffins:Bake in thepreheated oven for 18-20 minutes, or until a toothpick inserted into the center comes out clean.Remove from the oven and let the muffinscool in the tin for a few minutes, then transfer them to a cooling rack.6️⃣Prepare the Cream Cheese Glaze:In a medium bowl, beat thesoftened cream cheesewith a hand mixer until smooth.Add thepowdered sugar, milk, and vanilla extract, and mix until well combined. Add more milk if needed for a drizzling consistency.7️⃣Glaze the Muffins:Once the muffins arecompletely cooled, drizzle thecream cheese glazeover the top using aspoon or pastry bag.8️⃣Serve & Enjoy!Serve the muffinswarm or at room temperaturefor a soft, sweet, and cinnamon-filled treat. Perfect with a hot cup of coffee or tea!
- Preheat your oven to350°F (175°C).
- Line a12-cup muffin tinwith muffin liners or lightly grease it with cooking spray.2️⃣Prepare the Muffin Batter:In a large mixing bowl, whisk together theflour, granulated sugar, baking powder, and salt.In another bowl, whisk together themelted butter, milk, egg, and vanilla extract.Add thewet ingredientsto thedry ingredientsand mix until just combined.Do not overmix, as this can make the muffins dense.3️⃣Prepare the Cinnamon Filling:In a small bowl, mix together thesoftened butter, brown sugar, and cinnamonuntil smooth and well combined.4️⃣Assemble the Muffins:Fill each muffin cuphalfwaywith muffin batter.Add aspoonful of the cinnamon fillingon top of the batter in each cup.Top with theremaining muffin batter, filling each cupalmost to the top.Using atoothpick or skewer, swirl the batter and filling together to create a marbled effect.5️⃣Bake the Muffins:Bake in thepreheated oven for 18-20 minutes, or until a toothpick inserted into the center comes out clean.Remove from the oven and let the muffinscool in the tin for a few minutes, then transfer them to a cooling rack.6️⃣Prepare the Cream Cheese Glaze:In a medium bowl, beat thesoftened cream cheesewith a hand mixer until smooth.Add thepowdered sugar, milk, and vanilla extract, and mix until well combined. Add more milk if needed for a drizzling consistency.7️⃣Glaze the Muffins:Once the muffins arecompletely cooled, drizzle thecream cheese glazeover the top using aspoon or pastry bag.8️⃣Serve & Enjoy!Serve the muffinswarm or at room temperaturefor a soft, sweet, and cinnamon-filled treat. Perfect with a hot cup of coffee or tea!
- 2️⃣Prepare the Muffin Batter:In a large mixing bowl, whisk together theflour, granulated sugar, baking powder, and salt.In another bowl, whisk together themelted butter, milk, egg, and vanilla extract.Add thewet ingredientsto thedry ingredientsand mix until just combined.Do not overmix, as this can make the muffins dense.3️⃣Prepare the Cinnamon Filling:In a small bowl, mix together thesoftened butter, brown sugar, and cinnamonuntil smooth and well combined.4️⃣Assemble the Muffins:Fill each muffin cuphalfwaywith muffin batter.Add aspoonful of the cinnamon fillingon top of the batter in each cup.Top with theremaining muffin batter, filling each cupalmost to the top.Using atoothpick or skewer, swirl the batter and filling together to create a marbled effect.5️⃣Bake the Muffins:Bake in thepreheated oven for 18-20 minutes, or until a toothpick inserted into the center comes out clean.Remove from the oven and let the muffinscool in the tin for a few minutes, then transfer them to a cooling rack.6️⃣Prepare the Cream Cheese Glaze:In a medium bowl, beat thesoftened cream cheesewith a hand mixer until smooth.Add thepowdered sugar, milk, and vanilla extract, and mix until well combined. Add more milk if needed for a drizzling consistency.7️⃣Glaze the Muffins:Once the muffins arecompletely cooled, drizzle thecream cheese glazeover the top using aspoon or pastry bag.8️⃣Serve & Enjoy!Serve the muffinswarm or at room temperaturefor a soft, sweet, and cinnamon-filled treat. Perfect with a hot cup of coffee or tea!
- In a large mixing bowl, whisk together theflour, granulated sugar, baking powder, and salt.
- In another bowl, whisk together themelted butter, milk, egg, and vanilla extract.Add thewet ingredientsto thedry ingredientsand mix until just combined.Do not overmix, as this can make the muffins dense.3️⃣Prepare the Cinnamon Filling:In a small bowl, mix together thesoftened butter, brown sugar, and cinnamonuntil smooth and well combined.4️⃣Assemble the Muffins:Fill each muffin cuphalfwaywith muffin batter.Add aspoonful of the cinnamon fillingon top of the batter in each cup.Top with theremaining muffin batter, filling each cupalmost to the top.Using atoothpick or skewer, swirl the batter and filling together to create a marbled effect.5️⃣Bake the Muffins:Bake in thepreheated oven for 18-20 minutes, or until a toothpick inserted into the center comes out clean.Remove from the oven and let the muffinscool in the tin for a few minutes, then transfer them to a cooling rack.6️⃣Prepare the Cream Cheese Glaze:In a medium bowl, beat thesoftened cream cheesewith a hand mixer until smooth.Add thepowdered sugar, milk, and vanilla extract, and mix until well combined. Add more milk if needed for a drizzling consistency.7️⃣Glaze the Muffins:Once the muffins arecompletely cooled, drizzle thecream cheese glazeover the top using aspoon or pastry bag.8️⃣Serve & Enjoy!Serve the muffinswarm or at room temperaturefor a soft, sweet, and cinnamon-filled treat. Perfect with a hot cup of coffee or tea!
- Add thewet ingredientsto thedry ingredientsand mix until just combined.Do not overmix, as this can make the muffins dense.3️⃣Prepare the Cinnamon Filling:In a small bowl, mix together thesoftened butter, brown sugar, and cinnamonuntil smooth and well combined.4️⃣Assemble the Muffins:Fill each muffin cuphalfwaywith muffin batter.Add aspoonful of the cinnamon fillingon top of the batter in each cup.Top with theremaining muffin batter, filling each cupalmost to the top.Using atoothpick or skewer, swirl the batter and filling together to create a marbled effect.5️⃣Bake the Muffins:Bake in thepreheated oven for 18-20 minutes, or until a toothpick inserted into the center comes out clean.Remove from the oven and let the muffinscool in the tin for a few minutes, then transfer them to a cooling rack.6️⃣Prepare the Cream Cheese Glaze:In a medium bowl, beat thesoftened cream cheesewith a hand mixer until smooth.Add thepowdered sugar, milk, and vanilla extract, and mix until well combined. Add more milk if needed for a drizzling consistency.7️⃣Glaze the Muffins:Once the muffins arecompletely cooled, drizzle thecream cheese glazeover the top using aspoon or pastry bag.8️⃣Serve & Enjoy!Serve the muffinswarm or at room temperaturefor a soft, sweet, and cinnamon-filled treat. Perfect with a hot cup of coffee or tea!
- 3️⃣Prepare the Cinnamon Filling:
- In a small bowl, mix together thesoftened butter, brown sugar, and cinnamonuntil smooth and well combined.4️⃣Assemble the Muffins:Fill each muffin cuphalfwaywith muffin batter.Add aspoonful of the cinnamon fillingon top of the batter in each cup.Top with theremaining muffin batter, filling each cupalmost to the top.Using atoothpick or skewer, swirl the batter and filling together to create a marbled effect.5️⃣Bake the Muffins:Bake in thepreheated oven for 18-20 minutes, or until a toothpick inserted into the center comes out clean.Remove from the oven and let the muffinscool in the tin for a few minutes, then transfer them to a cooling rack.6️⃣Prepare the Cream Cheese Glaze:In a medium bowl, beat thesoftened cream cheesewith a hand mixer until smooth.Add thepowdered sugar, milk, and vanilla extract, and mix until well combined. Add more milk if needed for a drizzling consistency.7️⃣Glaze the Muffins:Once the muffins arecompletely cooled, drizzle thecream cheese glazeover the top using aspoon or pastry bag.8️⃣Serve & Enjoy!Serve the muffinswarm or at room temperaturefor a soft, sweet, and cinnamon-filled treat. Perfect with a hot cup of coffee or tea!
- 4️⃣Assemble the Muffins:Fill each muffin cuphalfwaywith muffin batter.Add aspoonful of the cinnamon fillingon top of the batter in each cup.Top with theremaining muffin batter, filling each cupalmost to the top.Using atoothpick or skewer, swirl the batter and filling together to create a marbled effect.5️⃣Bake the Muffins:Bake in thepreheated oven for 18-20 minutes, or until a toothpick inserted into the center comes out clean.Remove from the oven and let the muffinscool in the tin for a few minutes, then transfer them to a cooling rack.6️⃣Prepare the Cream Cheese Glaze:In a medium bowl, beat thesoftened cream cheesewith a hand mixer until smooth.Add thepowdered sugar, milk, and vanilla extract, and mix until well combined. Add more milk if needed for a drizzling consistency.7️⃣Glaze the Muffins:Once the muffins arecompletely cooled, drizzle thecream cheese glazeover the top using aspoon or pastry bag.8️⃣Serve & Enjoy!Serve the muffinswarm or at room temperaturefor a soft, sweet, and cinnamon-filled treat. Perfect with a hot cup of coffee or tea!
- Fill each muffin cuphalfwaywith muffin batter.
- Add aspoonful of the cinnamon fillingon top of the batter in each cup.Top with theremaining muffin batter, filling each cupalmost to the top.Using atoothpick or skewer, swirl the batter and filling together to create a marbled effect.5️⃣Bake the Muffins:Bake in thepreheated oven for 18-20 minutes, or until a toothpick inserted into the center comes out clean.Remove from the oven and let the muffinscool in the tin for a few minutes, then transfer them to a cooling rack.6️⃣Prepare the Cream Cheese Glaze:In a medium bowl, beat thesoftened cream cheesewith a hand mixer until smooth.Add thepowdered sugar, milk, and vanilla extract, and mix until well combined. Add more milk if needed for a drizzling consistency.7️⃣Glaze the Muffins:Once the muffins arecompletely cooled, drizzle thecream cheese glazeover the top using aspoon or pastry bag.8️⃣Serve & Enjoy!Serve the muffinswarm or at room temperaturefor a soft, sweet, and cinnamon-filled treat. Perfect with a hot cup of coffee or tea!
- Top with theremaining muffin batter, filling each cupalmost to the top.Using atoothpick or skewer, swirl the batter and filling together to create a marbled effect.5️⃣Bake the Muffins:Bake in thepreheated oven for 18-20 minutes, or until a toothpick inserted into the center comes out clean.Remove from the oven and let the muffinscool in the tin for a few minutes, then transfer them to a cooling rack.6️⃣Prepare the Cream Cheese Glaze:In a medium bowl, beat thesoftened cream cheesewith a hand mixer until smooth.Add thepowdered sugar, milk, and vanilla extract, and mix until well combined. Add more milk if needed for a drizzling consistency.7️⃣Glaze the Muffins:Once the muffins arecompletely cooled, drizzle thecream cheese glazeover the top using aspoon or pastry bag.8️⃣Serve & Enjoy!Serve the muffinswarm or at room temperaturefor a soft, sweet, and cinnamon-filled treat. Perfect with a hot cup of coffee or tea!
- Using atoothpick or skewer, swirl the batter and filling together to create a marbled effect.
- 5️⃣Bake the Muffins:Bake in thepreheated oven for 18-20 minutes, or until a toothpick inserted into the center comes out clean.Remove from the oven and let the muffinscool in the tin for a few minutes, then transfer them to a cooling rack.6️⃣Prepare the Cream Cheese Glaze:In a medium bowl, beat thesoftened cream cheesewith a hand mixer until smooth.Add thepowdered sugar, milk, and vanilla extract, and mix until well combined. Add more milk if needed for a drizzling consistency.7️⃣Glaze the Muffins:Once the muffins arecompletely cooled, drizzle thecream cheese glazeover the top using aspoon or pastry bag.8️⃣Serve & Enjoy!Serve the muffinswarm or at room temperaturefor a soft, sweet, and cinnamon-filled treat. Perfect with a hot cup of coffee or tea!
- Bake in thepreheated oven for 18-20 minutes, or until a toothpick inserted into the center comes out clean.Remove from the oven and let the muffinscool in the tin for a few minutes, then transfer them to a cooling rack.6️⃣Prepare the Cream Cheese Glaze:In a medium bowl, beat thesoftened cream cheesewith a hand mixer until smooth.Add thepowdered sugar, milk, and vanilla extract, and mix until well combined. Add more milk if needed for a drizzling consistency.7️⃣Glaze the Muffins:Once the muffins arecompletely cooled, drizzle thecream cheese glazeover the top using aspoon or pastry bag.8️⃣Serve & Enjoy!Serve the muffinswarm or at room temperaturefor a soft, sweet, and cinnamon-filled treat. Perfect with a hot cup of coffee or tea!
- Remove from the oven and let the muffinscool in the tin for a few minutes, then transfer them to a cooling rack.
- 6️⃣Prepare the Cream Cheese Glaze:In a medium bowl, beat thesoftened cream cheesewith a hand mixer until smooth.Add thepowdered sugar, milk, and vanilla extract, and mix until well combined. Add more milk if needed for a drizzling consistency.7️⃣Glaze the Muffins:Once the muffins arecompletely cooled, drizzle thecream cheese glazeover the top using aspoon or pastry bag.8️⃣Serve & Enjoy!Serve the muffinswarm or at room temperaturefor a soft, sweet, and cinnamon-filled treat. Perfect with a hot cup of coffee or tea!
- In a medium bowl, beat thesoftened cream cheesewith a hand mixer until smooth.Add thepowdered sugar, milk, and vanilla extract, and mix until well combined. Add more milk if needed for a drizzling consistency.7️⃣Glaze the Muffins:Once the muffins arecompletely cooled, drizzle thecream cheese glazeover the top using aspoon or pastry bag.8️⃣Serve & Enjoy!Serve the muffinswarm or at room temperaturefor a soft, sweet, and cinnamon-filled treat. Perfect with a hot cup of coffee or tea!
- Add thepowdered sugar, milk, and vanilla extract, and mix until well combined. Add more milk if needed for a drizzling consistency.
- 7️⃣Glaze the Muffins:Once the muffins arecompletely cooled, drizzle thecream cheese glazeover the top using aspoon or pastry bag.8️⃣Serve & Enjoy!Serve the muffinswarm or at room temperaturefor a soft, sweet, and cinnamon-filled treat. Perfect with a hot cup of coffee or tea!
- Once the muffins arecompletely cooled, drizzle thecream cheese glazeover the top using aspoon or pastry bag.8️⃣Serve & Enjoy!Serve the muffinswarm or at room temperaturefor a soft, sweet, and cinnamon-filled treat. Perfect with a hot cup of coffee or tea!
- 8️⃣Serve & Enjoy!
- Serve the muffinswarm or at room temperaturefor a soft, sweet, and cinnamon-filled treat. Perfect with a hot cup of coffee or tea!
Notes
✔Storage:Store leftovers in anairtight containerat room temperature for2 days, or refrigerate for up to5 days. Warm slightly before serving for the best texture.✔Freezing:These muffins freeze well! Wrap individually and freeze for up to3 months. Thaw at room temperature or microwave for a few seconds before eating.✔Extra Cinnamon Flavor:Sprinkle a little extra cinnamon sugar on top before baking for added crunch!✔Make it Lighter:SubstituteGreek yogurtfor butter in the muffin batter for a slightly healthier version.
“`