Table of Contents
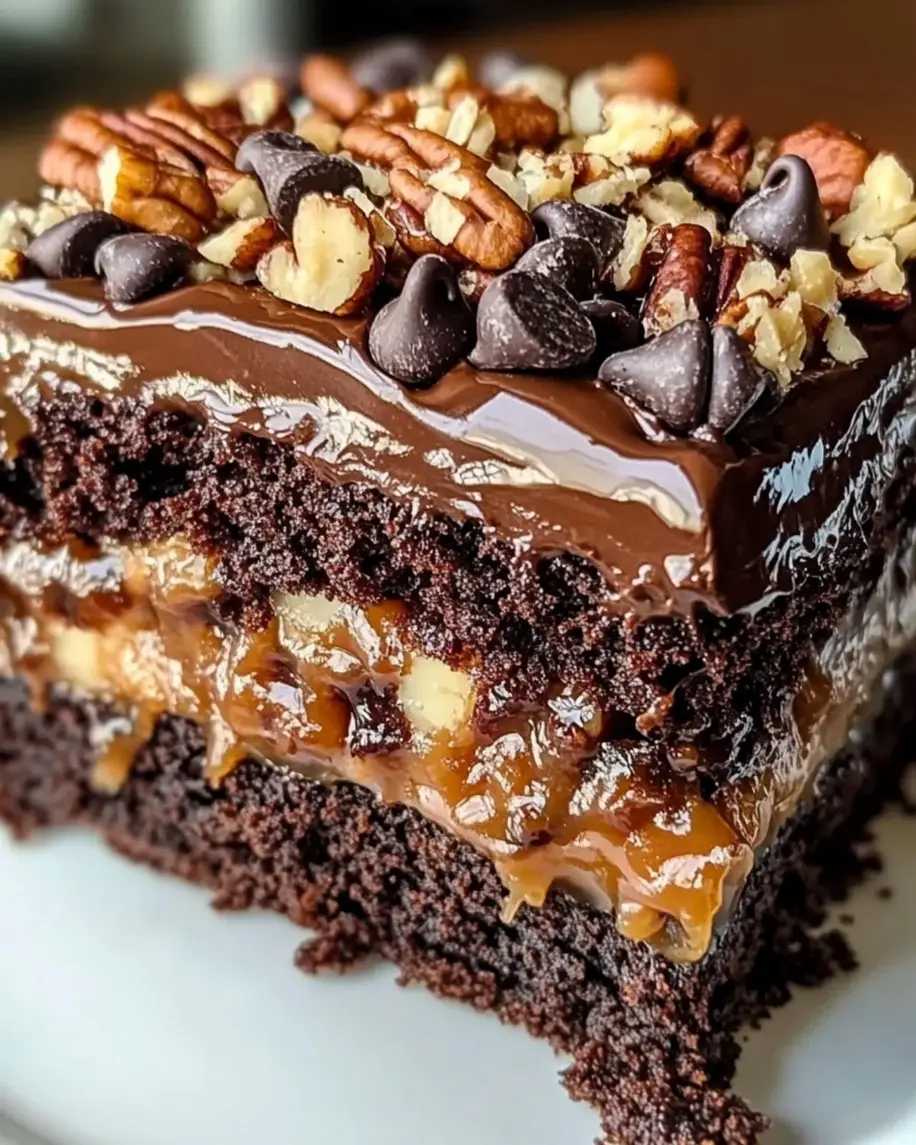
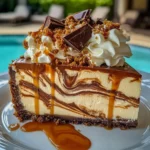
Caramel Chocolate Coffee Cheesecake
Craving a Showstopping Dessert? Meet Your New Obsession!
Are you on the hunt for a dessert that’s both visually stunning and incredibly delicious, something that truly wows guests and leaves them begging for the recipe? If you’re like many home bakers (and dessert enthusiasts!), you’ve probably searched for “decadent chocolate coffee dessert recipes” or “impressive cheesecake variations” countless times. Well, search no more! This Caramel Chocolate Coffee Cheesecake is the answer to your dessert prayers. It’s a rich, creamy, and utterly indulgent creation that perfectly balances the bold notes of coffee with the sweet allure of caramel and the deep richness of chocolate. Imagine a velvety smooth cheesecake infused with robust coffee, artfully swirled with luscious chocolate, and crowned with a buttery, golden caramel drizzle. This isn’t just a dessert; it’s an experience that elevates any occasion, from casual weeknight treats to grand celebrations. Let’s dive into what makes this cheesecake an absolute must-try!
Ingredients: The Building Blocks of Bliss
Crafting this masterpiece requires a thoughtful selection of ingredients. Using high-quality components will ensure the best flavor and texture. Here’s what you’ll need:
For the Crust: A Buttery Foundation
- 2 cups graham cracker crumbs (about 14-16 full crackers) – Provides a classic, slightly sweet base. For a richer flavor, consider chocolate wafer crumbs.
- 1/4 cup granulated sugar – Balances the saltiness of the butter and adds a touch of sweetness.
- 1/2 cup unsalted butter, melted – Binds the crumbs together and adds a delightful richness. Ensure it’s fully melted for even distribution.
- Pinch of salt – Enhances all the flavors and cuts through the sweetness.
For the Coffee Cheesecake Filling: The Heart of the Cake
- 4 (8-ounce) blocks cream cheese, softened to room temperature – This is crucial for a smooth, lump-free filling. Cold cream cheese can lead to a grainy texture.
- 1 1/3 cups granulated sugar – Sweetens the filling without overpowering the coffee flavor.
- 4 large eggs, at room temperature – Bind the ingredients and provide richness. Room temperature eggs incorporate better.
- 1 cup sour cream, at room temperature – Adds moisture and a subtle tang, contributing to a creamy texture. Full-fat is recommended for richness.
- 2 tablespoons all-purpose flour – Helps prevent the cheesecake from cracking.
- 1 tablespoon instant espresso powder or finely ground coffee – The star of our show! Use good quality espresso for a robust coffee flavor. Dissolve in a tablespoon of hot water if instructions specify for your type.
- 1 teaspoon vanilla extract – Enhances the overall flavor profile.
- 1/4 teaspoon salt – Balances the sweetness.
For the Chocolate Swirl: A Rich Decadence
- 1/2 cup semi-sweet chocolate chips or chopped semi-sweet chocolate – Can be melted with a tablespoon of heavy cream or milk for a ganache-like consistency.
- 1 tablespoon unsweetened cocoa powder – Intensifies the chocolate flavor.
For the Caramel Drizzle: The Sweet Finish
- 1 cup granulated sugar – The base for our caramel.
- 1/4 cup water – Helps the sugar dissolve evenly.
- 1/2 cup heavy cream, warmed – Adds creaminess and stops the caramelization process. Warm cream prevents seizing.
- 2 tablespoons unsalted butter, cut into pieces – For richness and a silky texture.
- 1/2 teaspoon vanilla extract (optional) – For an extra layer of flavor.
- Pinch of sea salt (optional, for salted caramel) – Enhances the caramel flavor beautifully.
Timing is Everything
Cheesecake requires patience, but the result is well worth the wait. Here’s a breakdown:
Compared to an average cheesecake recipe which might take around 90-120 minutes of baking and at least 4 hours of chilling, this recipe has a similar bake time but requires a longer chill time due to the added complexity of the swirls and drizzle, making it a bit more time-intensive overall but with manageable active prep hours.

Step-by-Step Instructions
Let’s get baking! Follow these steps carefully for a flawless cheesecake.
Step 1: Prepare the Crust
Preheat your oven to 350°F (175°C). In a medium bowl, combine the graham cracker crumbs, 1/4 cup granulated sugar, and a pinch of salt. Pour in the melted butter and stir until the crumbs are evenly moistened. Press this mixture firmly and evenly into the bottom and about 1 inch up the sides of a 9-inch springform pan. You can use the bottom of a glass or a measuring cup to help get a compact crust. Bake for 8-10 minutes, until lightly golden. Let it cool completely on a wire rack while you prepare the filling.
Step 2: Make the Coffee Filling
In a large bowl, beat the softened cream cheese on medium speed until it’s completely smooth and creamy, scraping down the sides as needed. Gradually add the 1 1/3 cups granulated sugar and continue beating until well combined and fluffy. Beat in the eggs one at a time, mixing just until each is incorporated. Be careful not to overmix once the eggs are added. In a small bowl, whisk together the sour cream, flour, dissolved espresso powder (if using dissolved), vanilla extract, and salt. Add this mixture to the cream cheese mixture and beat on low speed until just combined. Scrape down the sides and bottom of the bowl to ensure everything is incorporated, but avoid overbeating – this is key to preventing cracks!
Step 3: Add Chocolate Swirls
Melt the semi-sweet chocolate chips (or chopped chocolate) with about 1 tablespoon of heavy cream or milk in the microwave in 30-second intervals, stirring in between, until smooth. Alternatively, you can do this in a small saucepan over very low heat. Stir in the cocoa powder until fully incorporated. You want a thick but pourable consistency. Pour about two-thirds of the coffee cheesecake batter over the cooled crust. Dollop spoonfuls of the melted chocolate mixture over the batter. Pour the remaining coffee batter over the chocolate dollops. Drizzle the remaining chocolate mixture on top. Use a skewer or a knife to gently swirl the chocolate into the cheesecake batter, creating beautiful marbled patterns. Don’t over-swirl; simple patterns are best.
Step 4: Bake the Cheesecake
Reduce oven temperature to 325°F (160°C). Wrap the outside of the springform pan tightly with heavy-duty aluminum foil, ensuring it goes up the sides to prevent water from seeping in if using a water bath (highly recommended for best results and to prevent cracking). Place the foil-wrapped pan inside a larger roasting pan. Carefully pour hot water into the roasting pan, filling it about halfway up the sides of the springform pan. This water bath (bain-marie) creates a humid environment and ensures even, gentle baking. Bake for 70-80 minutes, or until the edges are set and the center is almost set but still has a slight jiggle. Carefully remove the springform pan from the water bath. Remove the foil.
Step 5: Cool and Chill
Let the cheesecake cool on a wire rack for about 1 hour. Then, carefully run a thin knife around the edge to loosen it from the pan before it sets too firmly. Cover the cheesecake loosely with plastic wrap and refrigerate for at least 6 hours, or preferably overnight. This extended chilling time is essential for the cheesecake to fully set and for its flavors to meld.
Step 6: Prepare Caramel Drizzle
While the cheesecake chills, or just before serving, make the caramel. In a medium saucepan, combine the 1 cup granulated sugar and 1/4 cup water. Stir gently until the sugar is dissolved. Bring to a boil over medium-high heat, without stirring. Let it bubble until it turns a deep amber color. Watch it carefully, as it can burn quickly. Immediately remove from heat. Carefully and slowly whisk in the warmed heavy cream. The mixture will bubble up vigorously. Stir until smooth. Whisk in the butter, vanilla extract, and sea salt (if using) until fully incorporated and the caramel is smooth and glossy. Let it cool slightly to a drizzling consistency.
Step 7: Decorate and Serve
Once the cheesecake is fully chilled and set, carefully release the sides of the springform pan. Drizzle the cooled caramel generously over the top of the cheesecake. You can add a few extra chocolate chips or shavings, or a sprinkle of sea salt for a salted caramel effect. Slice with a sharp knife dipped in hot water and wiped dry between each cut for clean slices. Serve and enjoy the delightful layers of flavor!
Nutritional Information
This rich cheesecake is a decadent treat. A typical serving (1/12th of the cake) contains approximately:
- Calories: 550-650 kcal
- Fat: 35-45g
- Saturated Fat: 20-25g
- Cholesterol: 150-200mg
- Sodium: 250-350mg
- Carbohydrates: 50-60g
- Sugar: 40-50g
- Protein: 8-10g
(Note: These are approximate values and can vary based on specific ingredients used.)
Healthier Alternatives
While this cheesecake is meant to be indulgent, here are a few ways to lighten it up slightly without sacrificing too much flavor:
- Crust: Use a whole wheat graham cracker crust or a nut-based crust (like almond flour and butter) for added fiber and healthy fats. Reduce the sugar in the crust.
- Cream Cheese: Use a mix of reduced-fat cream cheese and regular cream cheese, or consider Greek yogurt for some of the sour cream component.
- Sweeteners: Reduce the overall sugar slightly, or explore natural sweeteners like maple syrup or honey in moderation (though these can affect texture and flavor).
- Toppings: Opt for fresh berries or a lighter chocolate drizzle made with cocoa powder and a sugar substitute instead of a full caramel sauce.
Serving Suggestions
This cheesecake is quite rich on its own, so it pairs beautifully with simple accompaniments that complement its flavors.
- A small dollop of lightly sweetened whipped cream.
- A few fresh raspberries or strawberries to cut through the richness with their tartness.
- A dusting of cocoa powder or a sprinkle of flaky sea salt for a sophisticated finish.
- A strong cup of coffee or espresso is, of course, a natural pairing!
Common Mistakes to Avoid
Preventing common cheesecake issues will ensure a smooth, creamy, and crack-free dessert:
- Overmixing the batter: Incorporating too much air leads to cracks and a soufflé-like texture. Mix on low speed, especially after adding eggs.
- Using cold cream cheese or eggs: Room temperature ingredients are essential for a smooth, homogenous batter.
- Baking at too high a temperature: This causes the edges to overbake before the center is set, leading to cracks. A water bath and moderate oven temperature are crucial.
- Cooling too quickly: Sudden temperature changes cause cracking. Gradual cooling is key.
- Not chilling long enough: A cheesecake needs ample time to set completely for the best texture and flavor.
Storing Tips
Proper storage ensures your delicious cheesecake stays fresh:
- Refrigeration: Once cooled, refrigerate leftovers in an airtight container or loosely covered with plastic wrap for up to 4-5 days.
- Freezing: Unfrosted cheesecake freezes best. Wrap it tightly in plastic wrap and then in foil or place it in a freezer-safe container. Freeze for up to 2-3 months. Thaw overnight in the refrigerator before adding toppings and serving.
Frequently Asked Questions
***Is a water bath really necessary?***
While not strictly mandatory, a water bath is highly recommended. It provides a moist, even heat that prevents the cheesecake from cracking and ensures a creamy, smooth texture. If you skip it, be extra careful with oven temperature and cooling.
***Why is my cheesecake cracked?***
Cracks typically occur due to overmixing, overbaking, rapid temperature changes during cooling, or baking at too high a temperature. Using a water bath and gradual cooling can help prevent this.
***Can I make this cheesecake ahead of time?***
Absolutely! Cheesecakes are best made a day in advance. The chilling time allows the flavors to meld and the texture to set perfectly. The caramel drizzle can be made closer to serving time.
***What is the best way to cut cheesecake?***
For clean slices, use a long, sharp knife. Dip the knife in hot water, wipe it dry, then make your cut. Repeat this process for each slice.
***How do I store leftover caramel sauce?***
Leftover caramel sauce can be stored in an airtight container in the refrigerator for up to 2 weeks. Gently reheat it over low heat or in the microwave for a few seconds to make it pourable again.
This Caramel Chocolate Coffee Cheesecake is more than just a dessert; it’s a decadent experience. We hope you try it and fall in love with its rich, complex flavors. Don’t forget to share your creations with us on social media using #ExoRecipesCheesecake! Let us know in the comments below how yours turned out or if you have any variations you love!
Caramel Chocolate Coffee Cheesecake
Description
This Caramel Chocolate Coffee Cheesecake is a decadent dessert perfect for any occasion. With a creamy coffee-infused filling, swirls of chocolate, and a buttery caramel drizzle, it’s a showstopping treat that will impress everyone. Whether served at a dinner party or savored on a quiet evening, this cheesecake is an indulgent experience in every bite.
Ingredients
- For the Crust:
- For the Cheesecake Filling:
- For Topping:
Instructions
- Preheat your oven to 325°F (163°C). Grease a 9-inch springform pan and wrap the outside with aluminum foil to prepare for a water bath.
- In a medium bowl, combine chocolate cookie crumbs and melted butter. Press the mixture firmly into the bottom of the prepared pan to form the crust. Set aside.
- In a large mixing bowl, beat cream cheese and sugar together until smooth and creamy. Add the eggs one at a time, mixing just until combined after each addition.
- Stir in sour cream, vanilla extract, and the dissolved coffee mixture. Mix until smooth and fully incorporated.
- Pour half the cheesecake batter over the crust in the pan. Drizzle half of the melted chocolate over the batter and gently swirl with a knife to create a marbled effect. Repeat with the remaining batter and chocolate.
- Place the springform pan in a large roasting pan and pour hot water into the roasting pan until it reaches halfway up the sides of the springform pan.
- Bake for 50-60 minutes, or until the edges are set and the center has a slight jiggle. Turn off the oven and let the cheesecake cool inside with the door slightly ajar for 1 hour.
- Remove the cheesecake from the water bath and let it cool completely at room temperature. Cover and refrigerate for at least 4 hours or overnight.
- Before serving, drizzle the caramel sauce over the top of the cheesecake. Garnish with whipped cream and chopped chocolate or toffee bits. Slice and serve.
Notes
For best results, use room-temperature ingredients to ensure a smooth cheesecake batter.
If cracks form, don’t worry! The toppings will cover them beautifully.
The cheesecake can be stored in the refrigerator for up to 5 days or frozen for up to 2 months.