Easy No-Bake Berry Cheesecake – Creamy, Fruity & Irresistible!

Easy No-Bake Berry Cheesecake – Creamy, Fruity & Irresistible!

Introduction

Did you know that no-bake desserts are searched for over 300,000 times a month online, with berry cheesecake consistently ranking in the top 5? It’s clear we’re all craving that perfect blend of creamy indulgence and fresh fruit without the hassle of baking. Welcome to the world of Layered Berry Bliss No-Bake Cheesecake, where every bite delivers a taste of summer with its rich creaminess and burst of berry goodness! This delightful dessert combines the velvety smoothness of cheesecake with a refreshing layer of mixed berry jam and a buttery graham cracker crust—all without turning on the oven! Whether you’re hosting a party or simply craving a sweet treat, this No-Bake Berry Cheesecake is a quick and easy recipe that anyone can make. Let’s dive into creating this simple yet stunning dessert that’s sure to impress your family and friends!

Ingredients List

Gather these simple ingredients for a dessert that sings with flavor and texture. Each component plays a crucial role in creating the perfect no-bake berry cheesecake.

  • For the Graham Cracker Crust:
    • 2 cups graham cracker crumbs (about 16 full sheets) – Provides a sweet, crunchy, and slightly nutty base that holds everything together. Substitution: Use digestive biscuits, vanilla wafers, or gluten-free graham crackers for a similar effect.
    • 1/2 cup unsalted butter, melted – Acts as the glue for the crust, adding a rich, buttery flavor and golden color. Substitution: Coconut oil (refined for neutral taste) works for a dairy-free version.
    • 2 tablespoons granulated sugar – Enhances the natural sweetness of the crackers. Optional if you prefer a less sweet crust.
  • For the Creamy Cheesecake Filling:
    • 16 oz (2 blocks) full-fat cream cheese, softened – The star of the show! Full-fat is essential for that luxuriously thick, creamy, and sliceable texture. Substitution: For a lighter version, use Neufchâtel cheese. For dairy-free, a high-quality vegan cream cheese alternative.
    • 1 cup powdered sugar – Dissolves seamlessly into the filling without graininess, providing sweetness and helping to stabilize the structure.
    • 1 teaspoon pure vanilla extract – Adds a warm, aromatic depth that complements the berries perfectly.
    • 1 1/2 cups heavy whipping cream, cold – When whipped, it introduces air and lightness, transforming the dense cream cheese into a cloud-like mousse. Substitution: Full-fat coconut cream (chilled) can be whipped for a dairy-free topping.
    • 1 tablespoon fresh lemon juice – A bright, subtle zing that cuts through the richness and balances the sweetness.
  • For the Berry Layer & Topping:
    • 1 1/2 cups mixed berry jam or compote – This is your flavor bomb! Use a high-quality jam with visible fruit pieces for a gorgeous, glossy layer and intense berry flavor. Substitution: Fresh or frozen berries simmered with a bit of sugar and lemon juice until thickened.
    • Fresh mixed berries (strawberries, blueberries, raspberries) for garnish – Adds a pop of color, fresh texture, and a beautiful finish.
    • Fresh mint leaves for garnish (optional) – A touch of green makes the presentation restaurant-worthy.

Timing

Prep Time
20 minutes
Chill Time
4 hours (minimum)
Total Time
4 hours 20 minutes

Compared to a traditional baked cheesecake, which can take over an hour of active baking plus cooling time, this no-bake version shaves off significant effort and heat. The 4-hour chill is crucial for the perfect firm-but-creamy texture, but it’s mostly hands-off. You can even make it the night before for ultimate convenience—a true win for busy hosts and spontaneous dessert cravings!

Easy No-Bake Berry Cheesecake – Creamy, Fruity & Irresistible!

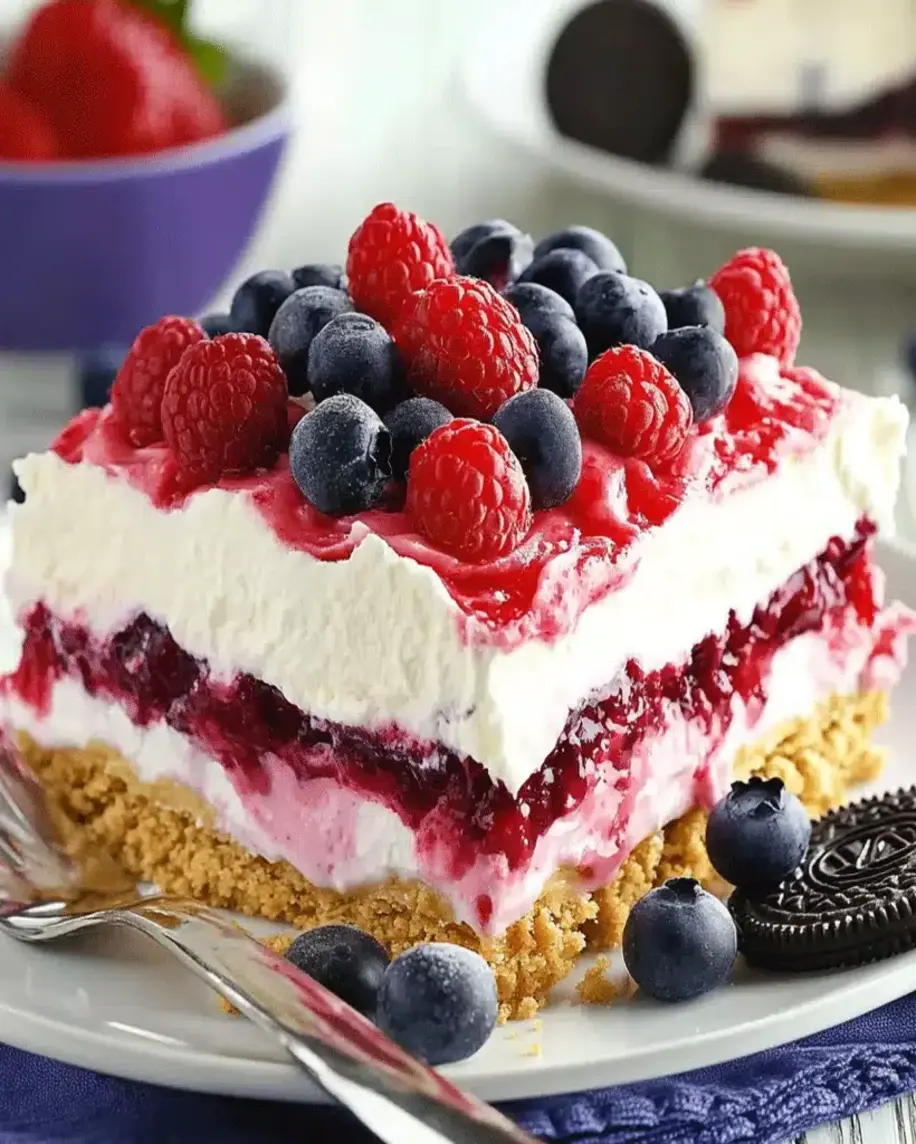
This stunning no-bake berry cheesecake is as beautiful as it is delicious, featuring layers of creamy filling and vibrant berry jam.

Step-by-Step Instructions

Step 1: Prepare the Crust

First, let’s build our foundation. In a medium bowl, combine the graham cracker crumbs, melted butter, and sugar. Mix it with a fork until the crumbs are evenly moistened and resemble wet sand. I like to press a bit between my fingers—if it holds together, it’s perfect. Transfer this mixture into a 9-inch springform pan (this is key for easy removal later!). Use the bottom of a flat glass or a measuring cup to press the crumbs firmly and evenly across the bottom and about halfway up the sides. This creates a sturdy “bowl” for our filling. Pop the crust into the refrigerator to set while you make the filling. This 10-minute chill helps the butter solidify, preventing a crumbly mess later.

Step 2: Make the Creamy Filling

Now for the magic. In a large mixing bowl, beat the softened cream cheese with an electric mixer on medium speed until it’s completely smooth and lump-free—this should take about 2 minutes. Scrape down the sides of the bowl. Add the powdered sugar and vanilla extract, and beat again until fully incorporated and creamy. In a separate, clean, cold bowl, whip the heavy cream until stiff peaks form. Be careful not to over-whip it into butter! Gently fold about one-third of the whipped cream into the cream cheese mixture to lighten it. Then, carefully fold in the remaining whipped cream and the lemon juice until no white streaks remain. You want a homogeneous, fluffy, and dreamy filling.

Step 3: Layer and Chill

Retrieve your chilled crust. Spread about two-thirds of the creamy cheesecake filling over the crust, smoothing the top with an offset spatula or the back of a spoon. Now, take half of your berry jam and gently dollop it over the filling. Use a knife or a skewer to gently swirl the jam into the cream cheese layer, creating beautiful marbled patterns. Be gentle; you want swirls, not a mixed mess. Carefully spread the remaining cheesecake filling over the swirled layer, sealing the edges. Give the pan a gentle tap on the counter to release any air bubbles.

Step 4: Add the Berry Topping

Warm the remaining berry jam slightly (10 seconds in the microwave does the trick) to make it more spreadable. Using a spoon, drizzle or spread it evenly over the top layer of cheesecake filling. This creates a gorgeous, glossy, and flavorful seal. If you’re using fresh berries for garnish, arrange them artistically on top of the jam layer now. A cluster of raspberries in the center with blueberries scattered around always looks fabulous.

Step 5: Slice and Serve

This is the hardest part: waiting. Cover the pan loosely with plastic wrap and refrigerate for at least 4 hours, but ideally overnight. This extended chill is non-negotiable—it allows the filling to set firmly so you get clean, beautiful slices. When ready to serve, run a thin knife under hot water, dry it, and gently run it around the inner edge of the springform pan before releasing the clamp. Transfer the cheesecake to a serving plate, garnish with fresh mint if desired, and slice with a clean, hot knife for pristine pieces.

Nutritional Information

The following estimates are per serving (based on 12 slices) and are provided as a general guide. Actual values may vary based on specific brands and ingredient substitutions used.

Calories
~480 kcal
Total Fat
~32g
Saturated Fat
~19g
Carbohydrates
~45g
Sugars
~35g
Protein
~5g

Healthier Alternatives

Love the flavor but want to lighten it up? These simple swaps maintain deliciousness while tweaking the nutrition profile.

  • Crust: Use almond flour or crushed nuts (like almonds or pecans) mixed with a bit of maple syrup and coconut oil for a grain-free, higher-protein base.
  • Filling: Swap full-fat cream cheese for a blend of Greek yogurt and light cream cheese. Use a natural sweetener like maple syrup or monk fruit powdered sugar. For the whipped cream, try whipping chilled coconut cream or using a light whipped topping.
  • Topping: Make a sugar-free berry compote by simmering fresh/frozen berries with a touch of lemon juice and a natural thickener like chia seeds or a sprinkle of cornstarch.

Remember, even with swaps, this remains a treat. The goal is a balance you feel good about!

Serving Suggestions

This cheesecake is a star on its own, but a few accompaniments can elevate it to a show-stopping dessert.

  • With Sauce: Serve with a drizzle of extra berry coulis, a warm chocolate sauce, or a caramel sauce for a decadent twist.
  • With Cream: A dollop of freshly whipped cream or a scoop of vanilla bean ice cream adds a lovely temperature contrast.
  • Beverage Pairing: Pair a slice with a cup of strong coffee, a glass of dessert wine like Moscato, or a sparkling berry-infused water for a refreshing finish to a meal.
  • For Events: Make mini cheesecakes in a muffin tin with liners for perfect individual portions at parties or picnics.

Common Mistakes

Avoid these pitfalls to ensure your no-bake berry cheesecake turns out perfect every time.

  • Using Cold Cream Cheese: This is the #1 cause of a lumpy filling. Ensure your cream cheese is softened at room temperature for at least 30-60 minutes before mixing.
  • Undermixing or Overmixing the Filling: Beat the cream cheese until completely smooth, but fold the whipped cream in gently. Vigorous beating after adding the cream can deflate it, resulting in a dense filling.
  • Not Chilling Long Enough: Impatience leads to a soupy, un-sliceable mess. Respect the 4-hour minimum chill. Overnight is always better.
  • A Weak Crust: Not pressing the crust mixture firmly enough into the pan can cause it to crumble when slicing. Apply firm, even pressure.
  • Watery Berry

Blooming Onion Sauce Recipe: Easy Outback Copycat!

Blooming Onion Sauce Recipe: Easy Outback Copycat!

Introduction

Did you know that over 70% of restaurant-goers cite signature sauces as a primary reason for ordering appetizers? If you’re one of the millions searching for that perfect, tangy, and creamy Blooming Onion Sauce to elevate your homemade game day snacks, you’ve landed in the right place. Hello food enthusiasts! Looking for the ideal dip for your homemade blooming onion? Look no further! This Blooming Onion Sauce is the delicious, savory, and slightly spicy condiment that brings restaurant flavors right to your kitchen. Whether you’re preparing a blooming onion at home or simply need a versatile dip for fries, veggies, or chicken tenders, this easy Outback copycat recipe is sure to please! Forget the drive-thru; with a few simple pantry staples, you can whip up a batch that’s arguably better than the original, all while controlling the ingredients to suit your taste. Let’s dive into the secret behind this iconic dip.

Ingredients List

This recipe relies on a harmonious blend of creamy, tangy, and spicy elements. Here’s what you’ll need for the classic version, plus some handy substitutions.

  • 1/2 cup Mayonnaise – The rich, creamy foundation. For a brighter flavor, use Kewpie mayo (Japanese mayonnaise). Substitution: Greek yogurt or sour cream for a tangier, lighter base.
  • 2 tablespoons Ketchup – Adds sweetness and a hint of tomato tang. Substitution: Tomato paste thinned with a teaspoon of water and a pinch of sugar.
  • 1 tablespoon Creamy Horseradish Sauce – The secret ingredient that provides the signature “kick” and depth. Substitution: 2 teaspoons of prepared horseradish (drained) mixed with 1 teaspoon of mayo.
  • 1 teaspoon Smoked Paprika – Imparts a warm, smoky aroma and a beautiful red hue. Substitution: Regular paprika plus a tiny pinch of chipotle powder.
  • 1/2 teaspoon Garlic Powder – For consistent, mellow garlic flavor without the bite of raw garlic.
  • 1/4 teaspoon Onion Powder – Enhances the savory, allium notes.
  • 1/4 teaspoon Cayenne Pepper – Adjustable heat! Start with 1/8 tsp if sensitive to spice.
  • 1/4 teaspoon Salt – Balances and enhances all the flavors.
  • 1/8 teaspoon Black Pepper – Freshly ground is best for a floral, sharp note.
  • 1-2 teaspoons Milk or Buttermilk (optional) – For thinning the sauce to your desired dipping consistency.

Timing

Prep Time5 minutes
Cook Time0 minutes
Total Time5 minutes (plus chilling)

Yes, you read that right! This blooming onion sauce recipe requires zero cooking and only 5 minutes of active prep time. Compared to the average homemade sauce recipe, which can take 10-15 minutes of prep and cooking, this is a lightning-fast way to achieve restaurant-quality flavor. The “secret” time is the chilling period, which allows the flavors to meld beautifully. You can technically use it immediately, but I promise the wait is worth it for that authentic, deep flavor profile.

Blooming Onion Sauce Recipe: Easy Outback Copycat!

Creamy, spicy, and utterly addictive—this copycat blooming onion sauce is ready in minutes.

Step-by-Step Instructions

Step 1: Prepare Your Base

Grab a medium-sized mixing bowl. Add the 1/2 cup of mayonnaise. I like to use a bowl with a bit of a lip to make whisking easier and less messy. Using a flat whisk or a fork, give the mayo a quick stir right in the bowl to loosen it up. This simple step ensures a smoother integration of the other ingredients, preventing any clumps and creating a silky base for your sauce.

Step 2: Whisk in the Flavor

Now, for the fun part—building the flavor profile. Add the 2 tablespoons of ketchup and 1 tablespoon of creamy horseradish sauce to the mayo. Whisk vigorously until the mixture is completely uniform and takes on a lovely pink-orange color. Next, sprinkle in all your dry spices: the smoked paprika, garlic powder, onion powder, cayenne pepper, salt, and black pepper. Whisk again until every speck of spice is fully incorporated. At this stage, the sauce will be thick and fragrant. Taste it! This is your chance to see the flavor foundation.

Step 3: Chill and Meld

Transfer the sauce to an airtight container—a mason jar or a small bowl covered with plastic wrap works perfectly. This is the most critical step for achieving that “Outback” taste. Refrigerate the sauce for at least 1 hour, but ideally 2-4 hours or overnight. During this time, the dried spices rehydrate and their flavors bloom, the horseradish mellows slightly, and everything comes together into a cohesive, complex dip. Patience here transforms a good sauce into a great one.

Step 4: Taste and Adjust

Once chilled, give your blooming onion sauce a final stir. Now, assess the consistency. If you prefer a thinner, more drizzle-able sauce (perfect for burgers or as a fry dip), whisk in 1-2 teaspoons of milk or buttermilk, one teaspoon at a time. Do a final taste test. Need more heat? Add a pinch more cayenne. Want it tangier? A tiny squeeze of fresh lemon juice can work wonders. Adjust to make it your own, then serve it proudly!

Nutritional Information

The following nutritional data is for the entire batch of sauce, which yields approximately 3/4 cup (about 12 tablespoons). Values are approximate.

  • Total Calories: ~600 kcal
  • Per Tablespoon (~15g): ~50 kcal
  • Total Fat: ~60g (Saturated: ~9g)
  • Total Carbohydrates: ~12g (Sugars: ~10g)
  • Protein: ~2g
  • Sodium: ~1200mg

Note: Nutrition can vary significantly based on the specific brands of mayonnaise and ketchup used. Using low-fat or sugar-free versions will alter these values.

Healthier Alternatives

Love the flavor but want a lighter version? These simple swaps cut calories and fat without sacrificing the creamy, tangy experience.

  • Base Swap: Replace full-fat mayonnaise with an equal amount of non-fat plain Greek yogurt. You’ll boost protein, slash fat, and add a pleasant tang. For a middle ground, use a 50/50 mix of light mayo and Greek yogurt.
  • Ketchup Control: Use a no-sugar-added or low-sodium ketchup to reduce sugar and salt content significantly.
  • Salt Savvy: Omit the added salt and rely on the seasoned salts already in the ketchup and horseradish. You can also use a salt-free seasoning blend.
  • Spice it Up: Amp up the flavor with fresh additions like minced garlic or chives instead of relying solely on powders, allowing you to use less sodium-heavy seasoning.

Serving Suggestions

While this sauce is the undisputed champion for dipping a crispy homemade blooming onion, its versatility is its superpower. Here are some delicious ways to use it:

  • The Classic: Served alongside a hot, crispy blooming onion or onion petals.
  • Fry Dip: An incredible companion for french fries, sweet potato fries, tater tots, or fried zucchini.
  • Burger & Sandwich Spread: Slather it on burgers, chicken sandwiches, or even as a spread for a roast beef wrap.
  • Seafood Partner: A fantastic dip for fried shrimp, fish sticks, or crab cakes.
  • Veggie Platter: A flavorful dip for raw vegetables like celery, carrots, and bell peppers.
  • Baked Potato Topper: Swap out sour cream for a spoonful of this zesty sauce.

Common Mistakes

Avoid these pitfalls to ensure your sauce is perfect every time.

  • Skipping the Chill Time: Using the sauce immediately results in a harsh, disjointed flavor where the spices haven’t fully integrated. Always chill!
  • Using Expired Spices: Garlic powder, paprika, and onion powder lose potency over time. If your spices are over a year old, the sauce will taste flat. Use fresh, high-quality spices.
  • Overdoing the Horseradish: Creamy horseradish sauce and prepared horseradish are different. If substituting with prepared horseradish, use less, as it’s much more potent and can overpower the sauce.
  • Not Tasting as You Go: Ingredients vary by brand. Taste after mixing and again after chilling, adjusting salt, heat, or acidity to your preference.
  • Storing Improperly: Leaving the sauce out at room temperature for extended periods can cause the mayo to separate and spoil quickly. Always refrigerate when not in use.

Storing Tips

Proper storage is key to maintaining freshness and food safety.

  • Container: Store in an airtight container like a glass jar with a lid or a bowl tightly covered with plastic wrap.
  • Refrigeration: The sauce will keep well in the refrigerator for up to 1 week.
  • Separation: If the sauce separates slightly after storage, simply give it a good stir or whisk to re-emulsify it.
  • Freezing: Not recommended. Freezing can cause the emulsion to break irreparably, resulting in a grainy, watery texture upon thawing.
  • Serving: For best texture and flavor, let the sauce sit at room temperature for about 10 minutes before serving from the fridge.

Conclusion

Mastering this Blooming Onion Sauce recipe is a game-changer for your appetizer repertoire. In just five minutes of prep, you can create a condiment that rivals any steakhouse version, customizable to your preferred level of heat and tang

The BEST Chicken Kabob Marinade – Quick, Easy & Bursting with Flavor!

The BEST Chicken Kabob Marinade – Quick, Easy & Bursting with Flavor!

Introduction

Did you know that a 2023 survey by the National Chicken Council revealed that 72% of grillers struggle with dry, bland chicken skewers? If you’re searching for the perfect Chicken Kabob Marinade recipe, you’re in the right place. Welcome! This quick and easy recipe is your solution, infusing your chicken skewers with the rich, vibrant flavors of lemon, garlic, and herbs. It turns simple chicken pieces into a mouthwatering delight that’s sure to impress your guests at any barbecue or family meal. The secret lies not just in the ingredients, but in the balance and technique that ensures every bite is juicy, tender, and packed with flavor. Forget about the guesswork and disappointing results; this guide will walk you through creating the most flavorful kabobs you’ve ever tasted.

Ingredients List

This marinade uses simple, fresh ingredients that work in harmony to create a complex flavor profile. Here’s what you’ll need for about 2 pounds of boneless, skinless chicken breasts or thighs, cut into 1.5-inch cubes.

  • 1/2 cup extra virgin olive oil – The rich, fruity base that carries flavors and keeps the chicken moist. (Substitution: Avocado oil for a higher smoke point).
  • 1/3 cup freshly squeezed lemon juice – Provides the essential bright, tangy acidity that tenderizes the meat. (Substitution: Lime juice for a slightly different citrus note).
  • 4-5 large garlic cloves, minced – For that deep, aromatic, and savory backbone. The scent alone is irresistible.
  • 2 tablespoons plain Greek yogurt – The secret weapon for ultra-tender chicken, adding a slight creaminess without overpowering. (Substitution: Buttermilk or a dairy-free yogurt alternative).
  • 1 tablespoon smoked paprika – Imparts a warm, sweet, and subtly smoky depth that mimics the grill’s char.
  • 1 tablespoon dried oregano – Earthy, slightly bitter notes that are classic in Mediterranean cooking.
  • 2 teaspoons ground cumin – Adds a warm, nutty, and earthy flavor that complements the smokiness.
  • 1.5 teaspoons salt – Crucial for enhancing all the other flavors and seasoning the meat throughout.
  • 1 teaspoon freshly ground black pepper – For a sharp, pungent kick.
  • 1/4 cup finely chopped fresh parsley or cilantro – Adds a final burst of fresh, green herbaceousness. (Substitution: 1 tablespoon dried parsley, though fresh is superior).

Timing

Prep Time
10 minutes
Marinate Time
2 hours (minimum) to overnight
Cook Time
10-12 minutes
Total Time
2 hours 20 minutes (active: 22 mins)

Compared to the average marinade recipe that requires 30+ minutes of prep and complex steps, this recipe is designed for efficiency. The active prep time is under 10 minutes. The magic happens hands-off while the chicken marinates. The total time from start to serving is just over 2 hours, but most of that is unattended marinating, making it perfect for prepping ahead. The quick cook time means you can have a gourmet-quality meal on the table in minutes once the grill is hot.

The BEST Chicken Kabob Marinade – Quick, Easy & Bursting with Flavor!

Juicy, flavorful chicken kabobs fresh off the grill, marinated to perfection.

Step-by-Step Instructions

Step 1: Prepare the Marinade

In a medium-sized mixing bowl, combine the olive oil and freshly squeezed lemon juice. Whisk them together vigorously until they start to emulsify slightly. This creates a stable base. Add the minced garlic, Greek yogurt, smoked paprika, oregano, cumin, salt, and black pepper. Whisk again until the mixture is completely smooth and uniform in color—a beautiful, deep orange-red hue. Finally, stir in the freshly chopped parsley. Take a moment to smell it; the aroma should be bright, garlicky, and herbaceous. This is your flavor powerhouse.

Step 2: Marinate the Chicken

Place your cubed chicken into a large, resealable plastic bag or a non-reactive glass dish. Pour the entire marinade over the chicken. If using a bag, seal it tightly, removing as much air as possible. If using a dish, cover it with plastic wrap. Now, massage the marinade into the chicken thoroughly, ensuring every piece is generously coated. This hands-on step is key for even flavor distribution. Place the chicken in the refrigerator. For optimal flavor and tenderness, let it marinate for at least 2 hours. For truly transformative results, let it go overnight (up to 12 hours). The acid and enzymes will work their magic, making the chicken incredibly tender.

Step 3: Assemble the Skewers

If you’re using wooden or bamboo skewers, soak them in water for at least 30 minutes before grilling to prevent them from burning. While your grill preheats to medium-high heat (about 400-450°F), thread the marinated chicken pieces onto the skewers. Don’t pack them too tightly; leave a tiny gap between pieces to ensure even cooking and those desirable charred edges. Discard the used marinade—do not reuse it on cooked food.

Step 4: Grill to Perfection

Lightly oil your grill grates. Place the skewers on the hot grill. Cook for 4-6 minutes per side, turning once, until the chicken is deeply browned, has visible grill marks, and reaches an internal temperature of 165°F. Avoid constantly flipping the skewers; let them develop a good sear. The yogurt in the marinade might cause some initial sticking, but the chicken will release naturally once a crust forms. Total cook time is typically 10-12 minutes. Remove from the grill, tent loosely with foil, and let rest for 5 minutes before serving. This allows the juices to redistribute, guaranteeing moist kabobs.

Nutritional Information

The following estimates are per serving (approx. 2 skewers), based on using chicken breast and the full marinade recipe divided among 4 servings.

  • Calories: ~320 kcal
  • Protein: 35g
  • Total Fat: 18g (Saturated: 3g)
  • Carbohydrates: 4g
  • Fiber: 1g
  • Sugar: 1g
  • Sodium: ~950mg (varies with salt adjustment)

Healthier Alternatives

You can easily adapt this fantastic Chicken Kabob Marinade to fit various dietary needs without sacrificing flavor.

  • Lower Fat: Reduce olive oil to 1/4 cup and supplement with 1/4 cup low-sodium chicken broth. The yogurt will still help with tenderness.
  • Lower Sodium: Cut the salt in half (to 3/4 tsp) and rely more on the garlic, herbs, and lemon for flavor. You can also use a salt-free seasoning blend.
  • Sugar-Free/Dairy-Free: The recipe is naturally sugar-free. For dairy-free, substitute the Greek yogurt with an equal amount of unsweetened, plain dairy-free yogurt (like coconut or almond) or simply omit it, adding an extra tablespoon of olive oil.
  • Whole30/Paleo: Ensure your yogurt is compliant (like a coconut milk yogurt) or omit it. Double-check that your smoked paprika contains no additives.

Serving Suggestions

These versatile kabobs are the star of any meal. Serve them traditionally on a bed of fragrant saffron rice or fluffy couscous to soak up the delicious juices. For a low-carb option, pair with a crisp Greek salad, grilled vegetables (like bell peppers and onions on their own skewers), or a tangy tzatziki sauce for dipping. They also make fantastic fillings for warm pita bread or flatbreads, topped with lettuce, tomato, and a drizzle of tahini. For a complete feast, add sides like hummus, baba ganoush, and grilled lemon halves to squeeze over the top.

Common Mistakes

  • Not Marinating Long Enough: 30 minutes won’t cut it. The 2-hour minimum is crucial for flavor penetration and tenderness.
  • Using Bottled Lemon Juice: Freshly squeezed lemon juice has a brighter, cleaner acidity. Bottled juice can taste metallic and flat.
  • Overcrowding the Skewers or Grill: Crowded skewers steam instead of sear. Leave space between chicken pieces and on the grill for proper air circulation and char.
  • Constant Flipping: Let the chicken develop a sear before turning. If it sticks, it’s not ready to flip.
  • Skipping the Rest: Cutting into the kabobs immediately lets all the precious juices run out. The 5-minute rest is non-negotiable for juicy meat.

Storing Tips

  • Raw, Marinated Chicken: Can be stored in an airtight container in the refrigerator for up to 24 hours before cooking. Do not exceed this for food safety with the acidic marinade.
  • Cooked Kabobs: Allow to cool completely, then store in an airtight container in the refrigerator for 3-4 days.
  • Freezing: Freeze cooked, cooled kabobs in a single layer on a baking sheet before transferring to a freezer bag for up to 3 months. Thaw overnight in the fridge. You can also freeze the raw chicken in the marinade for up to 2 months; thaw in the refrigerator before skewering and grilling.
  • Reheating: Reheat gently in a 350°F oven, covered with foil, until warmed through, or for best texture, reheat on a grill or grill pan for a few minutes per side.

Conclusion

This truly is The BEST Chicken Kabob Marinade—quick to prepare, easy to execute, and absolutely bursting with the vibrant, balanced flavors of lemon, garlic, and herbs. It solves the common problems of dry, bland grilled chicken and elevates a simple ingredient into a show-stopping meal. Whether it’s a casual weeknight dinner or a weekend barbecue with friends, this recipe delivers consistent, impressive results every time. The combination of tenderizing yogurt, bright citrus, and aromatic spices is a guaranteed winner.

Greek Chicken Tzatziki Bowls 🥗 – Easy, Fresh & Flavorful!

Greek Chicken Tzatziki Bowls 🥗 – Easy, Fresh & Flavorful!

Introduction

Did you know that the Mediterranean diet, celebrated for its heart-healthy and longevity-boosting properties, consistently ranks as one of the world’s healthiest eating patterns? This Greek Chicken Tzatziki Bowl recipe is your delicious gateway to those benefits. Welcome to a flavor-packed journey through the Mediterranean! This dish brings the vibrant, fresh, and aromatic tastes of Greece to your kitchen. Whether you’re a fan of hearty meals or looking for a quick yet delicious option, this dish is for you. Let’s dive into how you can create a perfect balance of seasoned chicken, fresh vegetables, and creamy tzatziki. It’s more than just a meal; it’s a colorful, nutrient-dense experience that will make you feel like you’re dining on a sun-drenched Greek island.

Ingredients List

Gather these fresh, simple ingredients to build your bowl. I’ve included sensory notes and easy substitutions to make this recipe work for you.

  • For the Greek Chicken:
    • 1.5 lbs (680g) boneless, skinless chicken breasts or thighs – Thighs offer a juicier, more flavorful bite with a richer mouthfeel, while breasts are leaner.
    • 3 tbsp extra virgin olive oil – The fruity, peppery base of the marinade.
    • Juice of 1 large lemon (about ¼ cup) – For that essential bright, tangy zing.
    • 3 cloves garlic, minced – Provides a pungent, aromatic backbone.
    • 1 tbsp dried oregano – The quintessential Greek herb, earthy and slightly bitter.
    • 1 tsp dried thyme – Adds a subtle, minty-lemony layer.
    • 1 tsp smoked or sweet paprika – For a hint of warmth and a beautiful red hue.
    • Salt and freshly cracked black pepper – To taste.
  • For the Tzatziki Sauce:
    • 1 cup full-fat Greek yogurtSubstitution: Use dairy-free coconut or almond yogurt for a vegan version. The full-fat variety gives a luxuriously creamy, tangy base that clings beautifully to the other ingredients.
    • 1 medium cucumber, grated and squeezed dry – This is crucial! Removing excess water prevents a watery sauce and ensures a thick, refreshing crunch.
    • 2 cloves garlic, minced
    • 2 tbsp fresh dill, finely choppedSubstitution: 2 tsp dried dill or 1 tbsp fresh mint for a different herbal note.
    • 1 tbsp extra virgin olive oil
    • 1 tbsp lemon juice or red wine vinegar – Lemon is brighter, vinegar is more traditional and sharp.
    • Salt to taste
  • For the Bowls:
    • 2 cups cooked quinoa, brown rice, or farro – Quinoa adds a complete protein and a light, fluffy texture.
    • 1 cup cherry tomatoes, halved – Their sweet, juicy burst contrasts the creamy elements.
    • 1 medium red onion, thinly sliced – Soak in ice water for 10 minutes to mellow the sharpness if desired.
    • 1 large bell pepper (any color), sliced – For a crisp, sweet crunch.
    • ½ cup Kalamata olives, pitted – Salty, briny, and unmistakably Greek.
    • 4 oz (115g) feta cheese, crumbledSubstitution: Vegan feta or omit for dairy-free.
    • Fresh parsley or dill for garnish

Timing

Prep Time
20 minutes
Cook Time
15 minutes
Total Time
35 minutes

This Greek Chicken Tzatziki Bowl recipe clocks in at just 35 minutes from start to finish. Compared to the average weeknight dinner that can take 45-60 minutes, this is a significant time-saver. The secret is the quick, no-cook marinade and the ability to prep veggies while the chicken cooks. It’s a perfect example of how a meal bursting with fresh, complex flavors doesn’t have to be a weekend project.

Greek Chicken Tzatziki Bowls 🥗 – Easy, Fresh & Flavorful!

A vibrant, colorful Greek Chicken Tzatziki Bowl, ready to enjoy in under 35 minutes.

Step-by-Step Instructions

Step 1: Marinate the Chicken

In a medium bowl, whisk together the olive oil, lemon juice, minced garlic, oregano, thyme, paprika, salt, and pepper. Place your chicken breasts or thighs in a shallow dish or a resealable bag. Pour the marinade over the chicken, ensuring every piece is thoroughly coated. For the deepest flavor, let it marinate for at least 15 minutes at room temperature. If you have more time, cover and refrigerate for up to 4 hours. This step is non-negotiable for infusing the chicken with that iconic Greek character.

Step 2: Prepare the Tzatziki

While the chicken marinates, make your tzatziki. Grate the cucumber using a box grater. Here’s the pro tip: place the grated cucumber in a clean kitchen towel or several layers of paper towels and squeeze firmly over the sink to remove as much liquid as possible. This is the key to a thick, creamy sauce, not a runny one. In a separate bowl, combine the strained cucumber, Greek yogurt, minced garlic, chopped dill, olive oil, lemon juice, and salt. Stir until smooth. Taste and adjust seasoning. Cover and refrigerate until ready to serve; this allows the flavors to meld beautifully.

Step 3: Cook the Chicken

Heat a grill pan, skillet, or outdoor grill to medium-high heat. Remove the chicken from the marinade, letting the excess drip off. Cook the chicken for 6-8 minutes per side, or until the internal temperature reaches 165°F (74°C) and the exterior is beautifully charred and caramelized. The smell will be incredible! Transfer the chicken to a cutting board and let it rest for 5 minutes. This allows the juices to redistribute, ensuring every bite is moist. Then, slice it against the grain into strips or bite-sized pieces.

Step 4: Assemble Your Bowls

This is the fun, creative part! Start with a base of fluffy quinoa or your grain of choice in each bowl. Artfully arrange your sliced Greek chicken, halved cherry tomatoes, sliced bell pepper, red onion, and Kalamata olives around the perimeter. Generously dollop (or drizzle) the cool, creamy tzatziki sauce over everything. Finish with a hearty sprinkle of crumbled feta cheese and a final flourish of fresh herbs like parsley or dill. The visual contrast is as satisfying as the taste.

Nutritional Information

The following estimates are for one bowl, assuming the recipe serves 4 and includes quinoa, chicken breast, and all listed ingredients.

  • Calories: ~520 kcal
  • Protein: ~42g
  • Carbohydrates: ~38g
  • Dietary Fiber: ~6g
  • Sugars: ~8g
  • Fat: ~22g (Saturated Fat: ~7g)
  • Sodium: ~780mg (varies based on feta/olive saltiness)

Healthier Alternatives

Want to tweak this Greek Chicken Tzatziki Bowl recipe for specific dietary goals? Here are flavorful, nutrition-friendly swaps:

  • Lower Carb: Swap the grain base for a bed of mixed greens, cauliflower rice, or zucchini noodles (“zoodles”).
  • Lower Fat: Use chicken breast instead of thighs, and opt for low-fat or non-fat Greek yogurt in the tzatziki. Reduce the feta cheese by half.
  • Higher Protein: Increase the portion of chicken breast. You can also add a can of rinsed chickpeas to the bowl for extra plant-based protein and fiber.
  • Dairy-Free/Vegan: Use a thick, plain vegan yogurt for the tzatziki, skip the feta or use a vegan alternative, and replace the chicken with marinated, grilled chickpeas or extra-firm tofu.

Serving Suggestions

These bowls are a complete meal on their own, but you can elevate your Greek feast with a few simple sides:

  • With Pita: Serve with warm, toasted pita bread or pita chips for scooping.
  • As a Salad: Deconstruct it! Chop all ingredients smaller and toss everything (including the grain) in a large bowl with a simple lemon-oregano vinaigrette for a fantastic Greek chicken salad.
  • Meal Prep Hero: This recipe is a meal prep superstar. Store components separately in airtight containers. The chicken and tzatziki will keep for 4 days, and the chopped veggies for 3. Assemble fresh bowls throughout the week.

Common Mistakes

  • Watery Tzatziki: Not squeezing the cucumber dry is the #1 mistake. Take the extra minute to do it—it makes all the difference.
  • Overcooked, Dry Chicken: Use a meat thermometer! Pull the chicken at 165°F and let it rest. Slicing immediately lets all the precious juices run out.
  • Bland Marinade: Don’t be shy with the herbs, garlic, and lemon. Taste your marinade; it should be potent. If using dried herbs, rub them between your palms before adding to wake up their oils.
  • Soggy Bowls (Meal Prep): Assembling everything in advance, especially putting tzatziki on the grain, will lead to a soggy mess.

Kentucky Sawdust Pie Mini – O Prazer Crocante em Cada Mordida! 🥧

Kentucky Sawdust Pie Mini – O Prazer Crocante em Cada Mordida! 🥧

Introduction

Did you know that over 70% of home bakers are actively seeking unique, conversation-starting desserts that break the mold of traditional pies? If you’re in that majority, you’re in for a treat. Greetings, pie lovers! If you’re in search of a unique and indulgent dessert, you’ve come to the right place. Today, we’re diving into the delightful world of Mini Kentucky Sawdust Pie Delight. This sweet treat is sure to become a family favorite. But what exactly is a Mini Kentucky Sawdust Pie? Imagine a dessert that combines the nostalgic crunch of graham crackers with the rich, gooey sweetness of pecans and coconut, all baked into a perfect, personal-sized portion. It’s a Southern classic, reimagined for modern convenience and maximum flavor impact. This recipe delivers that iconic “sawdust” texture—a delightful contrast of crisp and chewy—that makes every single bite an unforgettable experience.

Ingredients List

Gathering the right ingredients is the first step to pie perfection. Here’s what you’ll need for about 12 mini pies:

  • For the Crust:
    • 1 ½ cups graham cracker crumbs – Provides a sweet, honey-kissed, and sturdy base with a fragrant aroma. Substitution: Digestive biscuits or vanilla wafer crumbs for a different flavor profile.
    • ⅓ cup granulated sugar – Balances the crumbs and helps them caramelize.
    • 6 tablespoons unsalted butter, melted – The binding agent that creates a rich, golden, and hold-together crust. Use it while still warm for best results.
  • For the Sawdust Filling:
    • 1 cup chopped pecans – Toasted for a deep, nutty fragrance and buttery crunch. Substitution: Walnuts or almonds work beautifully.
    • 1 cup sweetened shredded coconut – Adds chewy texture and tropical sweetness. For less sweetness, use unsweetened coconut.
    • 1 cup light brown sugar, packed – This is the soul of the filling, delivering molasses notes and creating the signature gooey texture.
    • 3 large eggs – Binds the filling and gives it a custard-like structure as it bakes. Ensure they are at room temperature.
    • ½ cup (1 stick) unsalted butter, melted and slightly cooled – Infuses the filling with luxurious richness.
    • 1 teaspoon pure vanilla extract – A warm, aromatic enhancer that rounds out all the flavors.
    • Pinch of salt – The secret weapon to heighten every other flavor and cut through the sweetness.

Timing

Prep Time
20 minutes
Cook Time
25-30 minutes
Total Time
50 minutes (plus cooling)

Compared to a full-sized pie which can take over an hour to bake and several hours to set, these mini Kentucky Sawdust Pies are a speed demon in the dessert world. You get that same complex flavor and satisfying texture in nearly half the time, making them perfect for weeknight cravings or last-minute gatherings.

Kentucky Sawdust Pie Mini – O Prazer Crocante em Cada Mordida! 🥧

Mini Kentucky Sawdust Pies fresh from the oven, showcasing their golden, crackly top and irresistible texture.

Step-by-Step Instructions

Step 1: Prepare the Crust

Preheat your oven to 350°F (175°C). In a medium bowl, combine the graham cracker crumbs and granulated sugar. Pour the warm, melted butter over the mixture. Using a fork, mix until the crumbs are uniformly moistened and resemble wet sand. Firmly press about 2 tablespoons of this mixture into the bottom and slightly up the sides of each cup in a standard muffin tin. I like to use the bottom of a small glass or a tamper to get an even, compact layer. This creates the foundation for our crunchy delight. Par-bake the crusts for 8 minutes. This step is crucial—it sets the crust so it doesn’t become soggy when the wet filling is added.

Step 2: Make the Sawdust Filling

While the crusts are par-baking, let’s make the magic happen. In a large mixing bowl, whisk the eggs until they are just combined—you don’t want to incorporate too much air. Add the packed brown sugar, melted (and slightly cooled) butter, vanilla extract, and pinch of salt. Whisk vigorously until the mixture is smooth and all the sugar has dissolved. Now, gently fold in the chopped pecans and shredded coconut with a spatula. The mixture will be thick, glossy, and incredibly fragrant. This is your “sawdust” filling, ready to transform in the oven.

Step 3: Assemble and Bake

Carefully remove the muffin tin from the oven. The crusts will be lightly set and fragrant. Divide the sawdust filling evenly among the 12 par-baked crusts, filling each cup nearly to the top. The filling will not rise much, so it’s safe to fill them generously. Gently tap the tin on the counter to settle the filling and remove any air bubbles. Place the tin back in the oven and bake for 25-30 minutes. You’ll know they’re done when the tops are a deep golden brown, the edges are set, and the center has a slight, beautiful jiggle—it will firm up as it cools.

Step 4: Cool and Serve

This is the hardest part: patience! Allow the pies to cool completely in the muffin tin on a wire rack for at least 1 hour. As they cool, the filling will set into that perfect chewy-crisp texture. Once cooled, you can run a small offset spatula or knife around the edges to gently lift each mini pie out. Serve them as is, or with a dollop of freshly whipped cream or a scoop of vanilla ice cream for the ultimate indulgence.

Nutritional Information

(Approximate values per mini pie)

  • Calories: 320 kcal
  • Total Fat: 22g
  • Saturated Fat: 10g
  • Carbohydrates: 30g
  • Fiber: 2g
  • Sugars: 24g
  • Protein: 4g

Healthier Alternatives

Love the flavor but want a lighter version? Here are some simple swaps that maintain deliciousness:

  • Sweeteners: Replace the brown sugar with a 1:1 swap of coconut sugar or a monk fruit/allulose blend designed for baking. The flavor will be slightly different but still deeply caramel-like.
  • Fats: Use a light-tasting olive oil or melted coconut oil in place of the butter in the filling. For the crust, you can reduce the butter by 1 tablespoon and use applesauce to bind.
  • Nuts & Coconut: Opt for unsweetened coconut flakes and raw, unsalted pecans to better control the sugar and sodium content.
  • Crust: Use whole wheat graham crackers or blended oats for added fiber.

Serving Suggestions

These mini pies are stars on their own, but pairing them elevates the experience:

  • À la Mode: A small scoop of high-quality vanilla bean, butter pecan, or bourbon ice cream melts beautifully into the warm pie.
  • With a Beverage: Serve with a strong cup of black coffee, a glass of cold milk, or a dessert wine like a late-harvest Riesling to complement the sweetness.
  • Garnish: A light dusting of powdered sugar, a drizzle of salted caramel sauce, or a few fresh raspberries add visual appeal and flavor contrast.
  • For a Crowd: Create a dessert board with an assortment of mini pies, fresh fruit, and different whipped creams (cinnamon, coconut).

Common Mistakes

  • Overbaking: The center should still have a slight jiggle when you take it out. Overbaking leads to a dry, crumbly texture instead of the desired chewy-crisp.
  • Not Toasting the Nuts: Skipping the toasting step for the pecans means missing out on a huge depth of flavor. A quick 5-7 minutes in a 350°F oven will transform them.
  • Warm Filling into Hot Crust: If your melted butter for the filling is too hot when added to the eggs, it can scramble them. Let it cool for a few minutes first.
  • Skipping the Par-bake: This is non-negotiable for a crisp crust that holds its own against the moist filling.
  • Not Letting it Cool: Cutting into a warm pie will cause it to fall apart. The filling needs time to set for the perfect texture.

Storing Tips

To keep your mini Kentucky Sawdust Pies tasting fresh:

  • Room Temperature: Store in an airtight container at room temperature for up to 2 days.
  • Refrigerator: For longer storage, up to 5 days, keep them refrigerated in an airtight container. Let them come to room temperature for 20 minutes before serving to restore the best texture.
  • Freezer: These pies freeze exceptionally well! Wrap each cooled pie individually in plastic wrap and then place them in a freezer bag. They will keep for up to 3 months. Thaw overnight in the refrigerator or at room temperature for a few hours.
  • Reheating: For a just-baked feel, warm a thawed pie in a 300°F oven for 8-10 minutes.

Conclusion

The Mini Kentucky Sawdust Pie Delight is more than just a dessert; it’s a textural adventure and a guaranteed conversation starter. With its perfect balance of crunchy, chewy, sweet, and nutty elements, it captures the heart of Southern baking in a convenient, personal package. I hope this recipe brings as much joy to your kitchen as it has to mine. Don’t forget to share your baking triumphs—snap a photo of your gorgeous mini pies and tag @exorecipes on social media! We love seeing your creations. Have a question or a twist you added to the recipe? Drop a comment below and let’s chat all things pie!