Decadent Chocolate S’mores Cupcakes – Gooey Marshmallow Center!

Decadent Chocolate S’mores Cupcakes – Gooey Marshmallow Center!

Introduction

Did you know that over 50 million s’mores are enjoyed around campfires each summer in the US alone? But what if you could capture that iconic, gooey, chocolatey magic in a portable, party-perfect cupcake? Hello, cupcake lovers and s’mores enthusiasts! If you’re looking for a dessert that combines the best of both worlds—think gooey marshmallows, rich chocolate, and a delightful graham cracker crust—then these Decadent Chocolate S’mores Surprise Cupcakes are about to become your new favorite treat. Imagine biting into a moist, tender chocolate cupcake only to discover a hidden, molten marshmallow surprise inside, all topped with creamy chocolate frosting and a crunchy graham cracker crumble. This recipe is engineered for maximum flavor and texture contrast, creating an unforgettable experience. Whether you’re at a summer BBQ or cozying up for a winter night, these cupcakes are the perfect show-stopping dessert for every occasion!

Ingredients List

Gather these high-quality ingredients for the ultimate s’mores cupcake experience. Using the best cocoa and real butter makes a world of difference.

  • For the Graham Cracker Crust:
    • 1 ½ cups graham cracker crumbs (about 12 full sheets) – for a sweet, honey-kissed, and crunchy base. Substitution: Use digestive biscuits or gluten-free graham crackers.
    • 5 tablespoons unsalted butter, melted – binds the crumbs and adds a rich, toasty flavor.
    • 2 tablespoons granulated sugar – enhances the natural sweetness of the crackers.
  • For the Chocolate Cupcakes:
    • 1 ½ cups all-purpose flour – the structural backbone for a tender crumb.
    • ¾ cup unsweetened cocoa powder (Dutch-process preferred) – delivers a deep, intensely chocolatey flavor and dark color.
    • 1 ½ cups granulated sugar – for sweetness and moisture.
    • 1 ½ teaspoons baking soda & ¾ teaspoon baking powder – the perfect leavening duo for a perfect dome.
    • ¾ teaspoon salt – balances and intensifies all flavors.
    • 2 large eggs, room temperature – for richness and structure.
    • ¾ cup buttermilk, room temperature – the secret to an incredibly moist and tender texture. Substitution: Mix ¾ cup milk with 2 tsp lemon juice or vinegar, let sit 5 minutes.
    • ¾ cup hot strong brewed coffeetrust me, you won’t taste coffee! It magnifies the chocolate flavor exponentially.
    • ⅓ cup vegetable oil – ensures a supremely moist cupcake.
    • 2 teaspoons pure vanilla extract – the aromatic finishing touch.
  • For the Filling & Topping:
    • 12 large marshmallows (or ½ cup marshmallow fluff) – the glorious, sticky, gooey surprise center.
    • 1 ½ cups semi-sweet chocolate chips – for a glossy, decadent frosting.
    • ¾ cup heavy cream – transforms chocolate chips into a silky ganache.
    • Additional graham cracker crumbs and mini marshmallows – for the authentic s’mores garnish.

Timing

Prep Time 25 minutes
Cook Time 20 minutes
Total Time 1 hour 15 minutes (includes cooling & assembly)
Servings 12 cupcakes

Compared to the average cupcake recipe which often takes just 30 minutes total, this recipe is a bit more involved—but for good reason! The extra 15 minutes of prep time ensures you build the signature graham cracker crust and prepare for the marshmallow surprise, which is what elevates these from ordinary to extraordinary. The active time is well worth the unforgettable result.

Decadent Chocolate S’mores Cupcakes – Gooey Marshmallow Center!

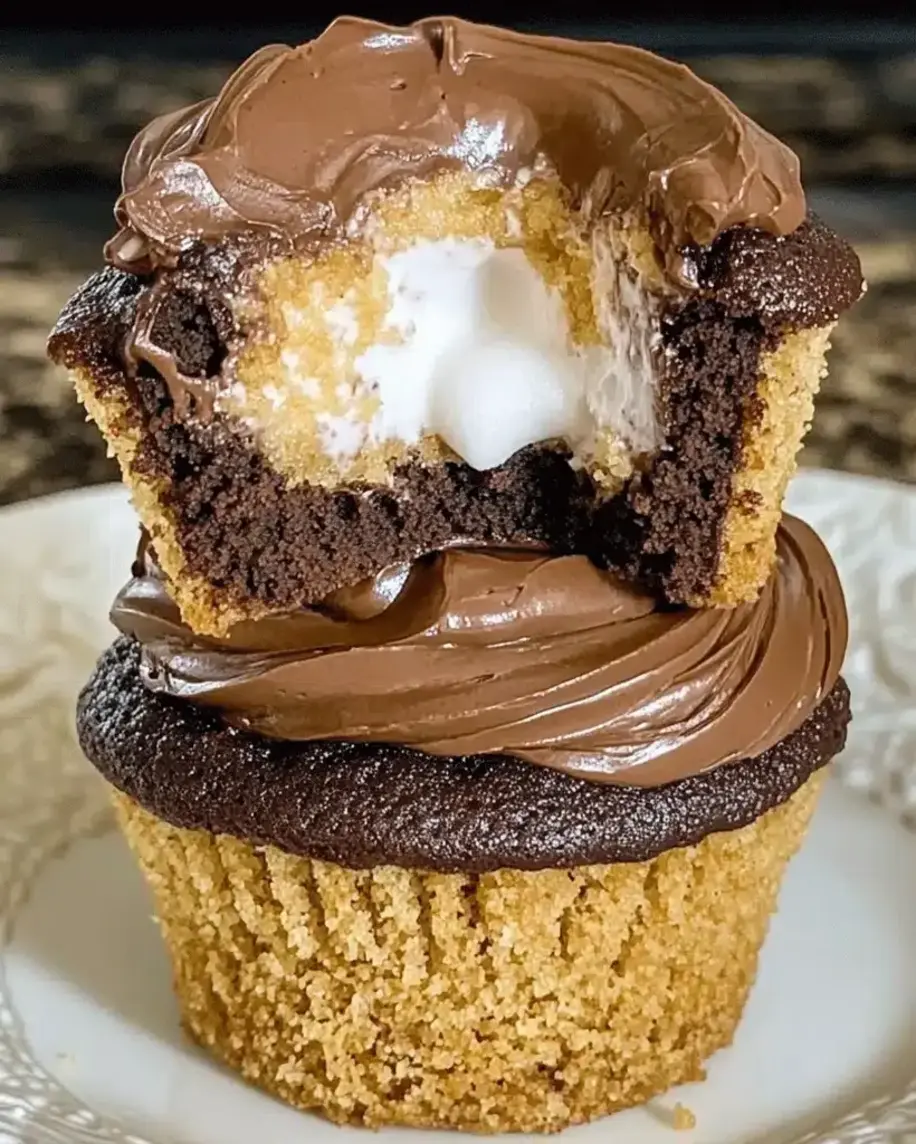
These decadent cupcakes feature a molten marshmallow center, rich chocolate frosting, and a graham cracker crumble—pure s’mores magic in every bite!

Step-by-Step Instructions

Step 1: Prepare the Graham Cracker Crust

First, let’s create that essential s’mores foundation. Preheat your oven to 350°F (175°C) and line a 12-cup muffin tin with high-quality parchment liners (they prevent sticking better than paper). In a medium bowl, combine the graham cracker crumbs, melted butter, and sugar. Mix with a fork until the mixture resembles wet sand and holds together when pinched. Press about 1 heaping tablespoon of this mixture firmly into the bottom of each prepared liner. Use a small glass or measuring spoon to compact it evenly. This pre-bakes for 5 minutes to set, which prevents it from mixing into the batter later.

Step 2: Make the Chocolate Cupcake Batter

While the crusts bake, whisk together your dry ingredients. In a large bowl, sift the flour, cocoa powder, sugar, baking soda, baking powder, and salt. Sifting is non-negotiable here—it aerates the flour and cocoa, preventing lumps and ensuring a light texture. In a separate bowl or large measuring jug, whisk the eggs, buttermilk, hot coffee, oil, and vanilla until smooth and homogenous. Now, make a well in the center of your dry ingredients and pour the wet mixture in. Gently fold with a spatula just until combined. A few streaks of flour are okay; overmixing is the enemy of tender cupcakes. The batter will be thin—this is perfect and will yield a moist crumb.

Step 3: Assemble and Bake

Remove the muffin tin from the oven (the crusts should look slightly set). Carefully pour or scoop the chocolate batter over the warm crusts, filling each liner about two-thirds full. Immediately place the tin back in the oven and bake for 18-22 minutes. The cupcakes are done when a toothpick inserted into the cake part (avoid the center where the marshmallow will go) comes out with a few moist crumbs. Do not overbake! Let them cool in the tin for 5 minutes, then transfer to a wire rack to cool completely. This cooling step is critical before adding the marshmallow.

Step 4: Create the Gooey Marshmallow Center

Here’s the fun part—creating the surprise! Once cupcakes are completely cool, use a small paring knife or a cupcake corer to cut a 1-inch wide by 1-inch deep cone from the center of each cupcake. Reserve the tops. Place one large marshmallow into each hole. If using marshmallow fluff, simply spoon it in. For an extra gooey experience, you can briefly toast the marshmallows with a kitchen torch before placing them in. Place the reserved cake tops back over the marshmallow, trimming them to fit flush if needed. This seals the surprise inside!

Step 5: Frost and Garnish

For the luxurious frosting, make a simple ganache. Place chocolate chips in a heatproof bowl. Heat the heavy cream in a small saucepan until it just begins to simmer (small bubbles around the edges). Pour the hot cream over the chocolate chips, let it sit for 2 minutes, then whisk slowly from the center outwards until smooth, glossy, and combined. Let it cool and thicken slightly for 10-15 minutes. Frost each cupcake generously with the chocolate ganache. While the frosting is still soft, sprinkle with reserved graham cracker crumbs and press a few mini marshmallows on top. For a final campfire touch, lightly toast the mini marshmallows on top with a kitchen torch.

Nutritional Information

(Approximate values per cupcake, based on 12 servings.)

  • Calories: 420 kcal
  • Total Fat: 22g
  • Saturated Fat: 11g
  • Carbohydrates: 55g
  • Fiber: 3g
  • Sugars: 36g
  • Protein: 5g

Healthier Alternatives

You can enjoy this treat with a lighter twist without sacrificing the s’mores spirit!

  • Flour: Substitute all-purpose flour with whole wheat pastry flour or a 1:1 gluten-free blend for added fiber.
  • Sugar: Reduce granulated sugar in the cake to 1 cup, or use coconut sugar for a lower glycemic index.
  • Frosting: Make a lighter frosting by blending 1 ripe avocado with ¼ cup cocoa powder, 3 tbsp maple syrup, and a splash of vanilla for a rich, creamy, nutrient-dense topping.
  • Marshmallow: Use a homemade marshmallow fluff made from aquafaba (chickpea water) and maple syrup, or look for vegan, gelatin-free marshmallows.
  • Crust: Use crushed, low-sugar cereal or oat flour mixed with a bit of honey and coconut oil.

Serving Suggestions

These cupcakes are a star on their own, but pairing them correctly elevates the event.

  • Serve slightly warm (10 seconds in the microwave) to re-activate the gooey marshmallow center.
  • Pair with a glass of cold milk, a scoop of vanilla bean ice cream, or a bold cup of coffee to cut the sweetness.
  • For a summer party, present them on a tiered stand alongside a DIY s’mores bar for a thematic dessert spread.
  • Drizzle with a salted caramel sauce for an added dimension of sweet and salty flavor.

Common Mistakes

  • Overmixing the Batter: This develops gluten, leading to tough, dense cupcakes. Fold gently until just combined.
  • Adding Marshmallow to Hot Cupcakes:

Chicken Pot Pie Soup – Cozy Comfort in Every Spoonful! 🥄

Chicken Pot Pie Soup – Cozy Comfort in Every Spoonful! 🥄

Introduction

Did you know that over 70% of home cooks crave the nostalgic flavors of a classic comfort dish but are often deterred by the time commitment? If you adore traditional Chicken Pot Pie but want something quicker to make, this creamy, hearty soup is the perfect solution. Welcome, cozy food lovers! Today, we’re diving into a recipe that’s perfect for chilly days: Creamy Comfort Chicken Pot Pie Soup! Packed with tender chicken, colorful vegetables, and rich broth, this recipe will warm you up from the inside out. It’s like comfort in a bowl! This deconstructed version captures every beloved element—the flaky crust, the creamy filling, the savory gravy—but in a spoonable, soul-satisfying format that comes together in a fraction of the time. Gather your ingredients, and let’s start cooking this delicious twist on a classic.

Ingredients List

For the best flavor, use fresh vegetables and high-quality broth. Here’s what you’ll need for this Chicken Pot Pie Soup:

  • 2 tbsp Unsalted Butter or Olive Oil – For a rich, savory base. Butter adds a classic, velvety mouthfeel.
  • 1 medium Yellow Onion, diced – Provides a sweet, aromatic foundation.
  • 3 cloves Garlic, minced – For that essential, pungent depth.
  • 3 medium Carrots, peeled and diced – Adds natural sweetness and a vibrant orange color.
  • 3 stalks Celery, diced – Contributes a subtle, refreshing crunch and earthy flavor.
  • 1/3 cup All-Purpose Flour – The key to a luxuriously thick and creamy soup base.
  • 4 cups Low-Sodium Chicken Broth – The soul of the soup. Low-sodium lets you control the seasoning.
  • 2 cups Whole Milk or Half-and-Half – For creaminess. Half-and-half creates an extra-indulgent texture.
  • 2 cups Cooked Chicken, shredded or diced – Use rotisserie chicken for ultimate convenience and juicy flavor, or poach your own.
  • 1 cup Frozen Peas – Adds pops of sweet green color and freshness.
  • 1 cup Frozen Corn – Brings a touch of sweetness and pleasant texture.
  • 1 tsp Dried Thyme – The classic herb pairing, offering a warm, slightly floral note.
  • 1/2 tsp Dried Rosemary (crushed) – Adds a piney, aromatic complexity.
  • Salt and Freshly Ground Black Pepper – To taste. Season in layers!
  • Optional: 1 sheet Puff Pastry, baked as “croutons” – For that iconic pot pie topping experience.

Quick Substitutions: No all-purpose flour? Use a cornstarch slurry (2 tbsp cornstarch + 3 tbsp cold water) added at the end. Dairy-free? Swap milk for full-fat canned coconut milk or unsweetened almond milk with a tablespoon of nutritional yeast. Vegetarian? Use vegetable broth and hearty chickpeas or white beans instead of chicken.

Timing

Prep Time 15 minutes
Cook Time 30 minutes
Total Time 45 minutes

This Chicken Pot Pie Soup clocks in at under 45 minutes from chopping to serving. Compared to the average 90+ minutes required for a traditional pot pie (making pastry, blind-baking, assembling, and baking), this soup delivers all the cozy satisfaction in half the time. It’s the ultimate weeknight win for busy families or anyone needing a quick comfort food fix.

Chicken Pot Pie Soup – Cozy Comfort in Every Spoonful! 🥄

A steaming, creamy bowl of Chicken Pot Pie Soup, filled with tender chicken, carrots, peas, and corn—the ultimate cozy meal.

Step-by-Step Instructions

Step 1: Sauté the Aromatics

In a large Dutch oven or heavy-bottomed pot, melt the butter (or heat the oil) over medium heat. Add the diced onion and cook for 4-5 minutes, stirring occasionally, until it becomes soft and translucent. You’ll know it’s ready when your kitchen smells incredible. Now, stir in the minced garlic and cook for just 60 seconds more—this wakes up the garlic’s flavor without letting it burn, which can make the soup bitter.

Step 2: Add Vegetables and Herbs

Toss in the diced carrots and celery. Stir everything together so the vegetables get coated in the buttery goodness. Let them cook for about 7-8 minutes. You want them to just start softening—they’ll finish cooking in the broth, so don’t worry about getting them fully tender yet. This step builds a deep flavor base. Sprinkle the dried thyme and rosemary over the veggies and give it a quick stir to toast the herbs lightly.

Step 3: Build the Creamy Broth

Here’s where the magic happens! Sprinkle the flour evenly over the sautéed vegetables. Stir constantly for 2 full minutes. This cooks the raw flour taste out and creates a “roux,” which is your thickening agent. It should look like a pasty coating on the vegetables. Now, slowly pour in the chicken broth while whisking continuously. This prevents any lumps from forming. Bring the mixture to a gentle simmer, and you’ll see it thicken beautifully. Then, whisk in the milk or half-and-half.

Step 4: Add Chicken and Simmer

Reduce the heat to medium-low. Add the shredded cooked chicken, frozen peas, and frozen corn. There’s no need to thaw the frozen veggies—they’ll cook perfectly in the hot soup. Give it a good stir, season generously with salt and pepper, and let the soup simmer gently for 10-15 minutes. This allows all the flavors to marry and the vegetables to become perfectly tender. Taste it! This is your moment to adjust the seasoning. Need more pepper? A pinch more thyme? Make it yours.

Step 5: Finish and Serve

Once the soup is thick, creamy, and bubbling gently, it’s ready. If it seems too thick, you can thin it with a splash of extra broth or milk. Ladle the hot soup into deep bowls. For the ultimate pot pie experience, top each bowl with a piece of flaky, buttery puff pastry you’ve baked separately until golden, or with some homemade biscuit croutons. The contrast of the creamy soup and the crispy topping is pure heaven.

Nutritional Information

(Approximate values per serving, based on 6 servings without puff pastry topping.)

  • Calories: 320 kcal
  • Protein: 22g
  • Carbohydrates: 28g
  • Dietary Fiber: 4g
  • Sugars: 10g (natural from vegetables and milk)
  • Fat: 14g
  • Saturated Fat: 6g
  • Cholesterol: 65mg
  • Sodium: 480mg (will vary based on broth used)

Healthier Alternatives

Love the comfort but want to lighten it up? These swaps keep the flavor high and the guilt low:

  • Thicken with Cauliflower: Purée 2 cups of steamed cauliflower and stir it into the broth instead of the flour roux. It adds creaminess, fiber, and vitamins.
  • Leaner Protein: Use shredded skinless chicken breast instead of a mix of dark and light meat.
  • Lighter Dairy: Swap whole milk for 2% milk or even unsweetened almond milk blended with a tablespoon of cornstarch for body.
  • Boost the Veggies: Add diced zucchini, mushrooms, or spinach in the last 5 minutes of cooking for extra nutrients and volume.
  • Topping Swap: Instead of puff pastry, try a sprinkle of whole-grain croutons, roasted chickpeas for crunch, or a dollop of plain Greek yogurt for tangy creaminess.

Serving Suggestions

This soup is a complete meal in a bowl, but a few accompaniments can turn it into a feast:

  • The Classic: Serve with the puff pastry “lid” or warm, buttered dinner rolls for dipping.
  • Fresh & Bright: A simple side salad with a sharp vinaigrette (like apple cider vinegar and Dijon) cuts through the richness perfectly.
  • Cozy Carb: A side of garlic mashed potatoes or buttery egg noodles makes for the ultimate comfort food plate.
  • For Kids: Serve with “soup dippers” like cheese sticks, pretzel rods, or baked tortilla strips.

Common Mistakes

  • Not Cooking the Flour: If you don’t cook the flour with the veggies for a full 2 minutes, your soup can have a raw, pasty taste. Don’t rush this step!
  • Adding Dairy Too Fast/Hot: Pouring cold milk into a very hot roux too quickly can sometimes cause curdling. Let the broth-thickened mixture cool slightly off the heat for a minute, or temper the milk by whisking a ladle of hot soup into it first.
  • Overcooking the Chicken: Since you’re using pre-cooked chicken, add it at the end to warm through. Simmering it for too long can make it tough and stringy.
  • Underseasoning: Chicken soup needs bold seasoning. Be generous with salt and pepper, and taste at the end. A squeeze of lemon juice or a dash of white wine vinegar at the end can brighten all the flavors.

Storing Tips

Hawaiian Pineapple Cream Cake – A Tropical Dream in Every Bite!

Hawaiian Pineapple Cream Cake – A Tropical Dream in Every Bite!

Introduction

Did you know that over 80% of people associate the taste of pineapple with feelings of happiness and vacation? That’s the magic we’re bringing straight to your kitchen with this show-stopping Hawaiian Pineapple Cream Cake. Aloha, cake lovers! Today, we’re diving into a tropical treat that’s sure to brighten any dessert table—our irresistible Hawaiian Pineapple Cream Cake. If you’re a fan of rich, creamy cakes with a refreshing tropical twist, this recipe is a must-try. Get ready to experience a delightful blend of moist cake layers infused with pineapple juice and topped with a dreamy cream cheese frosting, crowned with fresh pineapple chunks. Perfect for gatherings, celebrations, or simply a sweet escape to the islands, this Hawaiian Pineapple Cream Cake recipe brings a taste of paradise right to your kitchen!

Ingredients List

Gather these fresh, vibrant ingredients to build your tropical masterpiece. For the best flavor, use room-temperature ingredients unless otherwise noted.

  • For the Pineapple Cake Layers:
    • 2 ½ cups all-purpose flour – The sturdy, reliable base for a tender crumb.
    • 2 teaspoons baking powder – For that perfect, airy rise.
    • ½ teaspoon baking soda
    • ½ teaspoon salt – Enhances all the sweet flavors.
    • 1 cup unsalted butter, softened – Creates a rich, moist texture and buttery aroma.
    • 1 ½ cups granulated sugar
    • 4 large eggs – Bind the batter and add structure.
    • 1 teaspoon pure vanilla extract – A warm, fragrant backbone.
    • 1 cup full-fat sour cream – The secret to incredible moisture and a slight tang. Substitution: Plain Greek yogurt for a slightly lighter texture.
    • ½ cup pineapple juice – Use 100% juice, not syrup, for authentic tropical sweetness. Substitution: If fresh, strain the juice from crushed pineapple.
    • 1 cup finely crushed pineapple, well-drained – Packed with bright, juicy flavor and fiber.
  • For the Cream Cheese Frosting:
    • 16 oz full-fat cream cheese, softened – The star of the show, providing a lush, tangy creaminess.
    • 1 cup unsalted butter, softened
    • 4 cups powdered sugar, sifted – Sifting is non-negotiable for a silky-smooth frosting.
    • 1 teaspoon pure vanilla extract
    • Pinch of salt – Balances the sweetness perfectly.
  • For Garnish & Assembly:
    • 1 ½ cups fresh pineapple chunks – For a juicy, vibrant top layer.
    • ¼ cup toasted shredded coconut (optional) – Adds a nutty aroma and delightful crunch.
    • Fresh mint leaves (optional) – A pop of color and fresh fragrance.

Timing

While the average layer cake recipe takes about 2 hours from start to finish, our Hawaiian Pineapple Cream Cake is worth the extra love. The chilling time is crucial for perfect slicing and flavor melding.

Prep Time
30 minutes
Cook Time
28-32 minutes
Chill Time
2 hours (minimum)
Total Time
About 3 hours
Hawaiian Pineapple Cream Cake – A Tropical Dream in Every Bite!

A slice of paradise: our moist Hawaiian Pineapple Cream Cake with luscious cream cheese frosting and fresh pineapple.

Step-by-Step Instructions

Step 1: Prepare the Pineapple Cake Layers

First, preheat your oven to 350°F (175°C). Grease and flour two 9-inch round cake pans, and line the bottoms with parchment paper for foolproof release. In a medium bowl, whisk together the flour, baking powder, baking soda, and salt. This aerates the dry ingredients, ensuring an even rise. In your stand mixer fitted with the paddle attachment, cream the softened butter and granulated sugar on medium-high speed for 3-4 minutes. You’re looking for a pale, fluffy mixture. This step incorporates air, which is key for texture. Add the eggs one at a time, beating well after each addition, then mix in the vanilla. Now, with the mixer on low, add the dry ingredients in three parts, alternating with the sour cream and pineapple juice, beginning and ending with the dry ingredients. Mix just until combined—overmixing leads to a tough cake. Finally, gently fold in the well-drained crushed pineapple with a spatula. Divide the batter evenly between your prepared pans and smooth the tops.

Step 2: Whip Up the Dreamy Cream Cheese Frosting

While the cakes bake and cool, make your frosting. Ensure both the cream cheese and butter are truly softened to room temperature; cold ingredients will cause lumps. In the clean bowl of your stand mixer, beat the cream cheese and butter together on medium speed until completely smooth, creamy, and unified—about 2 minutes. Reduce the speed to low and gradually add the sifted powdered sugar, one cup at a time. Once incorporated, add the vanilla and pinch of salt. Scrape down the bowl, then increase the speed to medium-high and beat for another 2-3 minutes until the frosting is noticeably lighter, fluffier, and holds stiff peaks. This extra whipping makes it spreadable and dreamy. Cover and set aside at room temperature if using within an hour, otherwise refrigerate.

Step 3: Assemble Your Tropical Masterpiece

Once the cake layers are completely cool to the touch (this is vital—warm cakes will melt the frosting), you can begin assembly. Place one layer on your serving plate or cake stand. Using an offset spatula, spread a generous, even layer of frosting (about 1 cup) over the top, right to the edges. Carefully place the second cake layer on top. Now, apply a thin layer of frosting over the entire cake to create a “crumb coat.” This seals in any loose crumbs and gives you a smooth base. Pop the cake in the refrigerator for 20-30 minutes to set this coat. After chilling, apply the remaining frosting in a thick, luxurious layer all over the cake, swirling the top decoratively with your spatula.

Step 4: Chill and Garnish

For the best flavor and clean slices, the cake needs to chill and set. Refrigerate the frosted cake for at least 2 hours, or ideally overnight. The flavors will meld beautifully, and the texture will become perfectly sliceable. Just before serving, artfully arrange the fresh pineapple chunks on top of the cake. Sprinkle with toasted coconut and add a few mint leaves for a final touch of tropical elegance. Use a sharp knife dipped in hot water and wiped dry for pristine slices.

Nutritional Information

The following estimates are for one serving (1/12th of the cake) including frosting and pineapple garnish. Values are approximate.

  • Calories: ~580 kcal
  • Total Fat: 32g
  • Saturated Fat: 20g
  • Cholesterol: 135mg
  • Sodium: 280mg
  • Total Carbohydrates: 68g
  • Dietary Fiber: 1g
  • Sugars: 52g
  • Protein: 6g

Healthier Alternatives

You can enjoy the tropical spirit of this cake with some mindful swaps that don’t sacrifice flavor.

  • Flour: Substitute half the all-purpose flour with whole wheat pastry flour for added fiber and a nuttier taste.
  • Sugar: Reduce granulated sugar in the cake to 1 cup and use a natural sweetener like coconut sugar. In the frosting, try using 3 cups of powdered erythritol or monk fruit sweetener blend.
  • Fat: Replace half the butter in the cake with unsweetened applesauce or mashed ripe banana for moisture. For the frosting, use Neufchâtel cheese (⅓ less fat) and reduce the butter by half, adding a touch more powdered sugar for stability if needed.
  • Garnish: Load up on extra fresh pineapple chunks and skip the toasted coconut to reduce added fats.

Serving Suggestions

This cake is a celebration in itself, but pairing it thoughtfully elevates the experience.

  • Beverage Pairings: Serve with a glass of chilled Prosecco or a tropical mocktail with muddled mint and lime. A strong cup of black coffee or vanilla rooibos tea also cuts through the sweetness beautifully.
  • On the Side: A small scoop of coconut sorbet or vanilla bean ice cream creates an irresistible à la mode moment. For a textural contrast, offer a side of buttery shortbread cookies or macadamia nuts.
  • For Presentation: Use edible flowers, lime zest, or even a dusting of turmeric (for color) alongside the pineapple. Serve on a vibrant, tropical-patterned platter.

Common Mistakes

  • Not Draining the Pineapple Enough: Excess liquid will make the cake layers soggy and dense. Press the crushed pineapple in a fine-mesh strainer, even squeezing gently in a clean kitchen towel.
  • Using Cold Dairy Ingredients: Cold cream cheese and butter will never whip into a smooth frosting. Plan ahead and let them sit out for 1-2 hours.
  • Skipping the Crumb Coat and Chill: This seems like an extra step, but it’s the professional secret to a clean, beautiful, crumb-free final frosting layer.
  • Overbaking the Layers: Check

German Black Forest Cake Easy & Decadent Recipe You’ll Love!

German Black Forest Cake Easy & Decadent Recipe You’ll Love!

Introduction

Did you know that the classic German Black Forest Cake, or Schwarzwälder Kirschtorte, is one of the most searched-for European desserts online, with over 2 million monthly searches? This iconic treat, with its perfect harmony of rich chocolate, tart cherries, and billowy cream, has captivated hearts worldwide. Welcome to this delightful recipe for a classic German Black Forest Cake! This dessert is a showstopper with its layers of rich chocolate cake, luscious whipped cream, and sweet cherry filling. Perfect for special occasions or indulgent weekends, this cake is loved by chocolate and cherry fans alike. Whether you’re an experienced baker or just starting out, you’ll find this recipe easy to follow and incredibly rewarding. Let’s dive into the art of making this iconic German treat!

Ingredients List

Gather these high-quality ingredients for a truly authentic and decadent experience. I’ve included substitutions where possible, but for the best flavor, try to stick to the original list.

For the Chocolate Cake:

  • All-Purpose Flour (2 cups): The backbone of our cake, providing structure. For a slightly denser, richer crumb, you can substitute with cake flour.
  • Granulated Sugar (1 ¾ cups): Sweetens and tenderizes. Its fine crystals dissolve perfectly for a smooth batter.
  • Unsweetened Cocoa Powder (¾ cup): Use a high-quality, dark cocoa powder for that deep, luxurious chocolate flavor that is the soul of this cake.
  • Baking Powder & Baking Soda (1 ½ tsp each): Our leavening dream team ensures a light, airy rise.
  • Salt (1 tsp): A crucial flavor enhancer that makes the chocolate taste more chocolatey.
  • Eggs (2 large), room temperature: Bind the ingredients and add richness. You’ll see the batter become beautifully pale and fluffy when creamed with the sugar.
  • Whole Milk (1 cup), room temperature: Adds moisture and fat for a tender crumb. Buttermilk is a fantastic substitute for a subtle tang.
  • Vegetable Oil (½ cup): Keeps the cake incredibly moist for days. The neutral flavor lets the chocolate shine.
  • Vanilla Extract (2 tsp): The aromatic secret weapon that rounds out all the flavors.
  • Boiling Water (1 cup): The magic ingredient! It “blooms” the cocoa powder, intensifying its flavor and creating an incredibly moist batter.

For the Cherry Filling & Soaking Syrup:

  • Morello Cherries (2 cans, 14.5 oz each), pitted: The traditional choice. Their perfect balance of sweet and tart is irreplaceable. You can use frozen, thawed cherries in a pinch.
  • Granulated Sugar (⅓ cup): Sweetens the cherry compote.
  • Cornstarch (2 tbsp): Thickens the cherry juices into a glossy, spoonable filling.
  • Kirschwasser (Cherry Brandy, ¼ cup): The authentic touch! This clear cherry brandy gives the cake its signature grown-up flavor. Substitution: For an alcohol-free version, use the syrup from the cherry cans or cherry juice mixed with 1 tsp of almond extract for complexity.

For the Whipped Cream Frosting:

  • Heavy Whipping Cream (3 cups), cold: Must be very cold to whip up stiff and stable. You’ll love watching it transform into soft, cloud-like peaks.
  • Powdered Sugar (⅓ cup): Sweetens and slightly stabilizes the cream. It dissolves instantly, leaving no graininess.
  • Vanilla Extract (1 tsp): Adds a warm, sweet aroma to the cream.

For Garnish:

  • Dark Chocolate Shavings or Curls (1 cup): Use a vegetable peeler on a bar of good dark chocolate. They add texture, visual drama, and intense chocolate bursts.
  • Fresh Cherries (optional): For a stunning, classic finish on top.

Timing

Prep Time 45 minutes
Cook Time 35 minutes
Chill Time 4 hours (minimum)
Total Time About 5 hours 20 minutes

While the total time may seem long, most of it is hands-off chilling, which is crucial for the cake to set and the flavors to meld beautifully. Compared to many elaborate layer cakes that can take all day, this streamlined German Black Forest Cake recipe is surprisingly efficient, with active prep and baking wrapped up in just over an hour.

German Black Forest Cake Easy & Decadent Recipe You’ll Love!

A slice of the finished, decadent German Black Forest Cake, showing perfect layers of chocolate cake, cherry filling, and whipped cream.

Step-by-Step Instructions

Follow these detailed steps for a foolproof, stunning cake. I’ll guide you through each stage with tips from my own kitchen.

Step 1: Prepare the Chocolate Cake

Preheat your oven to 350°F (175°C). Grease and flour two 9-inch round cake pans, then line the bottoms with parchment paper for guaranteed easy release. In the bowl of your stand mixer, sift together the flour, sugar, cocoa powder, baking powder, baking soda, and salt. This aerates the dry ingredients, preventing lumps and ensuring an even rise. Add the eggs, milk, oil, and vanilla. Beat on medium speed for about 2 minutes until the batter is smooth and well combined. The final step is key: carefully stir in the boiling water with a spatula. The batter will be very thin—this is normal and promises an ultra-moist cake! Divide the batter evenly between the prepared pans. Bake for 30-35 minutes, or until a toothpick inserted into the center comes out clean. Let the cakes cool in the pans for 10 minutes, then turn them out onto a wire rack to cool completely. Once cool, use a long serrated knife to carefully slice each cake layer in half horizontally, giving you four thin layers.

Step 2: Make the Cherry Filling

While the cakes bake and cool, make the filling. Drain the cherries, reserving ½ cup of the syrup. In a medium saucepan, whisk the reserved syrup with the sugar and cornstarch until smooth. Add the cherries and cook over medium heat, stirring frequently, until the mixture thickens and becomes glossy, about 5-7 minutes. Remove from heat and stir in 2 tablespoons of the Kirschwasser (if using). Set aside to cool completely. This filling should be thick enough to not run when spooned.

Step 3: Whip the Cream

Chill your mixing bowl and beaters in the freezer for 10 minutes. This is my non-negotiable tip for perfect whipped cream. Pour the cold heavy cream, powdered sugar, and vanilla into the chilled bowl. Start beating on low speed, then gradually increase to high. Beat until stiff peaks form—this means when you lift the beaters, the cream stands straight up and doesn’t droop. Be careful not to overbeat, or you’ll start making butter! Keep this bowl in the fridge until you’re ready to assemble.

Step 4: Assemble the Black Forest Cake

Place your first cake layer on a serving plate or cake stand. If using Kirsch, lightly brush the top of the layer with about 1-2 teaspoons of the remaining liquor. This adds incredible depth of flavor. Spread a thin, even layer of whipped cream over the cake. Then, create a “dam” by piping a thick ring of whipped cream around the very edge of the layer. This barrier will hold in the cherry filling. Spoon about one-third of the cooled cherry filling inside the cream dam. Repeat this process (cake layer, Kirsch brush, cream layer, cream dam, cherries) with the next two cake layers.

Step 5: Chill and Garnish

Place the final cake layer on top. Brush with the last of the Kirsch (if using). Now, apply a thin “crumb coat” of whipped cream over the entire cake—a thin layer that seals in crumbs. Refrigerate for 30 minutes. This step makes final frosting much cleaner. Remove the cake from the fridge and use the remaining whipped cream to frost the top and sides smoothly. Generously press dark chocolate shavings onto the sides of the cake. Pipe remaining cream rosettes on top if desired, and garnish with fresh cherries. For the best texture and flavor, refrigerate the assembled cake for at least 4 hours, or ideally overnight, before serving.

Nutritional Information

The following is an approximate nutritional breakdown per serving (based on 12 slices). Values can vary based on specific brands and ingredient measurements.

Calories ~520 kcal
Total Fat 28g
Saturated Fat 14g
Carbohydrates 65g
Sugars 45g
Fiber 3g
Protein 6g
Cholesterol 95mg
Sodium 320mg

Healthier Alternatives

You can enjoy this classic with a lighter touch! Here are flavorful swaps that don’t sacrifice satisfaction:

  • Flour & Sugar: Substitute half the all-purpose flour with whole wheat pastry flour for added fiber. Reduce granulated sugar in the cake by ¼ cup and use a natural sugar substitute like monk fruit blend.
  • Cream: For the frosting, use a combination of half heavy cream and half Greek yogurt (full-fat, strained). Whip the cream first to stiff peaks, then gently fold in the yogurt and sweetener. It’s tangy, protein-rich, and still deliciously creamy.
  • Cherry Filling: Use no-sugar-added canned cherries or fresh/frozen cherries sweetened lightly with a touch of honey or maple syrup. Thicken with a bit of extra cornstarch.
  • Chocolate: Garnish with shavings from a bar of 85% dark chocolate for less sugar and more antioxidants.

Serving Suggestions

This cake is a celebration in itself, but you can elevate the experience. Serve each slice with a small dollop of extra whipped cream and a fresh cherry on the side. For a coffee pairing, a strong espresso or a cup of dark roast coffee cuts through the sweetness perfectly. If you’re serving adults and used Kirsch, a small glass of the same cherry brandy on the side makes for a

Mozzarella-Stuffed Spinach & Garlic Meatballs – So Juicy & Cheesy!

Mozzarella-Stuffed Spinach & Garlic Meatballs – So Juicy & Cheesy!

Introduction

Did you know that over 70% of home cooks report that a “cheesy surprise” inside a dish significantly boosts family meal satisfaction? If you’re looking for that perfect, crowd-pleasing centerpiece, you’ve found it. Our Mozzarella-Stuffed Spinach & Garlic Meatballs are not just another recipe; they are a culinary experience designed to deliver maximum flavor and joy in every bite. Hello, food enthusiasts! Are you ready to indulge in a dish that combines the juiciness of classic meatballs with a delightful cheesy surprise? Our Mozzarella-Stuffed Spinach & Garlic Meatballs are here to elevate your meal game. These tasty bites are filled with rich mozzarella, infused with spinach and garlic, and perfect for any dinner or gathering. Whether you’re a fan of Italian-inspired flavors or looking for a creative way to serve up meatballs, these mozzarella-stuffed delights are sure to impress. Let’s dive into this simple yet satisfying recipe!

Ingredients List

Gather these fresh, flavorful ingredients. I’ve included sensory notes and substitutions to ensure success no matter what’s in your pantry.

  • For the Meatballs:
    • 1 lb ground beef (80/20 blend): The higher fat content guarantees a juicy, tender texture. Substitute: Ground turkey or chicken for a leaner option, or a 50/50 mix of beef and pork for extra richness.
    • 10 oz fresh spinach, finely chopped: Adds a vibrant green color, earthy flavor, and a nutrient boost. Substitute: 1 cup of thawed and thoroughly squeezed frozen spinach.
    • 4-5 large garlic cloves, minced: Provides a pungent, aromatic backbone. For a milder taste, use 2-3 cloves.
    • 1 large egg: Acts as the binder, holding everything together.
    • 1/2 cup breadcrumbs (Panko preferred): Creates a light, airy texture. Substitute: Gluten-free breadcrumbs or rolled oats for a whole-grain twist.
    • 1/2 cup grated Parmesan cheese: Offers a salty, umami depth. Freshly grated is best!
    • 1 tsp dried oregano & 1/2 tsp dried basil: Classic Italian herbs for that authentic aroma.
    • 1 tsp salt & 1/2 tsp black pepper: Essential for seasoning the meat perfectly.
  • For the Cheesy Filling & Cooking:
    • 8 oz block of low-moisture mozzarella cheese: Cut into 1/2-inch cubes. Low-moisture is key—it melts beautifully without making the meatballs soggy.
    • 2 tbsp olive oil: For browning, creating a gorgeous, flavorful crust.
    • 24 oz marinara sauce (homemade or jarred): The perfect bath for the meatballs to finish cooking and soak up flavor.

Timing

Prep Time
20 minutes
Cook Time
25 minutes
Total Time
45 minutes

Compared to the average meatball recipe which often takes over an hour with simmering, this recipe is streamlined for efficiency. The 45-minute total time includes browning for maximum flavor and a quick simmer in sauce, making it a weeknight-friendly option that doesn’t sacrifice gourmet results.

Mozzarella-Stuffed Spinach & Garlic Meatballs – So Juicy & Cheesy!

Golden-brown, cheesy, and packed with spinach and garlic—these meatballs are a visual and flavorful feast.

Step-by-Step Instructions

Step 1: Prepare the Spinach and Aromatics

In a large skillet over medium heat, add a tiny drizzle of olive oil and your fresh spinach. Sauté for just 2-3 minutes until wilted and bright green. Transfer the spinach to a colander and let it cool. Once cool enough to handle, take handfuls and squeeze out as much liquid as humanly possible. This step is CRUCIAL—excess water will make your meatball mixture loose and difficult to shape. Finely chop the squeezed spinach. In the same skillet, add a bit more oil and sauté the minced garlic for about 60 seconds until fragrant but not browned. Let both the spinach and garlic cool completely before adding to your meat mixture.

Step 2: Mix the Meatball Base

In a large mixing bowl, combine the ground beef, cooled spinach and garlic, egg, breadcrumbs, grated Parmesan, oregano, basil, salt, and pepper. Now, here’s my pro tip: use your hands! Clean hands are the best tool for gently but thoroughly combining everything. Over-mixing with a spoon can compact the meat, leading to dense meatballs. Mix just until all ingredients are evenly distributed. The mixture should be moist but hold its shape when pinched.

Step 3: Assemble and Stuff the Meatballs

Line a baking sheet with parchment paper. Take a small handful of the meat mixture (about 2 tablespoons) and flatten it in your palm. Place one cube of mozzarella in the center. Carefully fold the meat around the cheese, rolling gently between your palms to form a smooth, sealed ball. Ensure the cheese is completely enclosed to prevent leaks during cooking. Place the stuffed meatball on the prepared sheet. Repeat until all mixture and cheese is used—you should get about 16-18 meatballs.

Step 4: Cook to Perfection

Heat the 2 tablespoons of olive oil in a large, deep skillet or Dutch oven over medium-high heat. Working in batches to avoid crowding, add the meatballs. Brown them on all sides, turning carefully with tongs, for about 6-8 minutes total. This step isn’t about cooking them through—it’s about building a beautiful, flavorful crust. Once all meatballs are browned, pour the marinara sauce into the skillet. Gently nestle the meatballs back into the sauce. Reduce heat to low, cover, and let simmer for 15-18 minutes. The meatballs will cook through, and the cheese inside will become gloriously molten.

Step 5: Serve and Enjoy

Carefully remove the lid. The aroma will be incredible! Let the meatballs rest in the sauce for a couple of minutes off the heat. This allows the juices to redistribute. Serve them hot, spooning plenty of that flavorful sauce over the top.

Nutritional Information

The following estimates are per meatball (based on 16 meatballs), including sauce.

  • Calories: ~180 kcal
  • Total Fat: 12g
  • Saturated Fat: 5g
  • Cholesterol: 45mg
  • Sodium: 380mg
  • Total Carbohydrates: 6g
  • Dietary Fiber: 1g
  • Sugars: 2g
  • Protein: 12g

Healthier Alternatives

You can easily adapt this recipe for different dietary needs without losing the “wow” factor.

  • Leaner Protein: Swap the ground beef for 93% lean ground turkey or chicken. Add 1 tablespoon of olive oil to the mix to maintain moisture.
  • Lower-Fat Cheese: Use part-skim mozzarella cubes. The melt will be slightly less dramatic but still delicious.
  • Gluten-Free & Whole Grain: Use certified gluten-free oats pulsed in a food processor instead of breadcrumbs. They add fiber and a lovely nutty flavor.
  • Reduced Sodium: Use a no-salt-added marinara sauce and reduce the added salt in the meatball mixture to 1/2 tsp. The Parmesan will still provide plenty of savory flavor.

Serving Suggestions

These versatile meatballs are the star of the show. Here’s how to build a memorable meal around them:

  • The Classic: Toss with spaghetti or linguine for the ultimate comforting pasta night.
  • Low-Cob Hero: Serve over a bed of zucchini noodles (zoodles) or spaghetti squash with extra sauce.
  • Appetizer Excellence: Skewer each meatball with a toothpick and serve as a party appetizer with the sauce on the side for dipping.
  • Sub Sandwich Glory: Pile 3-4 meatballs into a toasted hoagie roll, top with extra sauce and a sprinkle of Parmesan, and broil for a minute for a phenomenal meatball sub.

Common Mistakes

  • Not Squeezing the Spinach: This is the #1 reason for falling-apart meatballs. Take the time to remove all excess moisture.
  • Using Fresh (High-Moisture) Mozzarella: The excess water will steam out and make the meatballs wet. Always use low-moisture, block-style mozzarella.
  • Overmixing the Meat: This develops the proteins and leads to tough, rubbery meatballs. Mix gently and just until combined.
  • Skipping the Browning Step: Browning creates the Maillard reaction—hundreds of complex flavor compounds. Simmering alone won’t give you that deep, savory taste.
  • Crowding the Pan: Browning meatballs too close together steams them instead of searing them. Work in batches for the perfect crust.

Storing Tips

  • Refrigeration: Let leftovers cool completely. Store meatballs and sauce in an airtight container in the fridge for up to 4 days.
  • Freezing for Future Feasts: These meatballs freeze beautifully. Place cooled, cooked meatballs (with or without sauce) on a parchment-lined baking