Dive into the delicious simplicity of our Baked Salmon recipe, a heart-healthy delight that’s as easy to prepare as it is beneficial for your body. This dish brings a golden, flaky finish to your table with the light zest of lemon and the aromatic hint of dill, perfect for a family dinner or a special gathering. Follow our straightforward recipe for a meal that not only satisfies your tastebuds but also supports a healthy lifestyle.
 Chef Mia
Honey Sesame Chicken (Air Fryer Recipe)
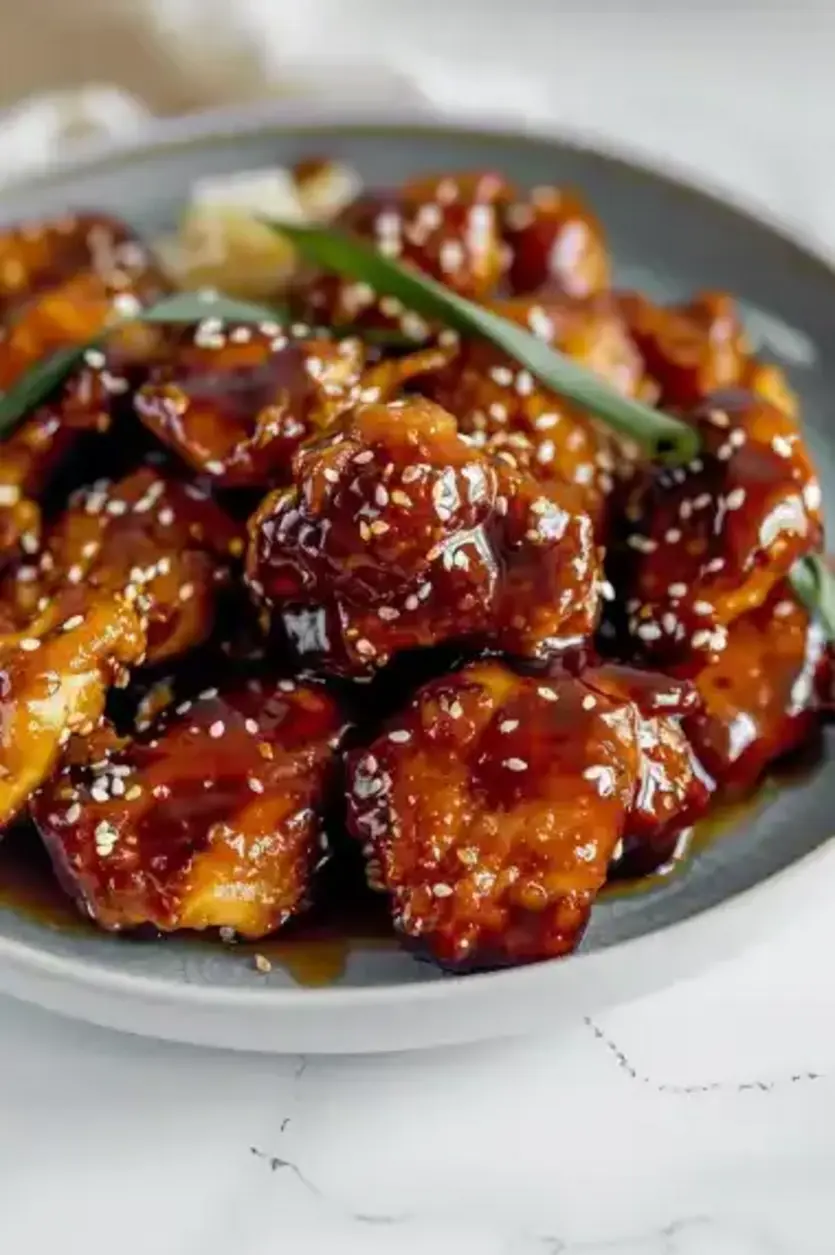
Honey Sesame Chicken (Air Fryer Recipe): The Only Recipe You’ll Ever Need
Imagine coming home after a long day, craving something crispy, flavorful, and satisfying without the guilt of deep-fried calories. That’s exactly what this Honey Sesame Chicken (Air Fryer Recipe) delivers—a healthier twist on a classic Asian-inspired favorite. Using the air fryer to achieve that irresistible crispy exterior while locking in juicy tenderness, this recipe is perfect for busy weeknights or impressing guests with minimal effort. Whether you’re a novice cook or a seasoned pro, our air fryer honey sesame chicken will become your go-to for quick, delicious meals that taste like they came from a restaurant.
Sink your teeth into the golden, crunchy coating of this honey sesame chicken air fryer recipe, where each bite offers a symphony of textures and flavors. The succulent chicken thighs are tossed in a glossy, sweet-savory sauce that balances the richness of honey with the nutty depth of sesame oil, creating an explosion of taste that’s both comforting and exotic. Aromas of garlic and sesame fill your kitchen, evoking the vibrant streets of Asia, while the air fryer’s magic ensures every piece is perfectly crisp on the outside and moist inside—without the excess oil.
What sets this Honey Sesame Chicken (Air Fryer Recipe) from exorecipes.com apart is our commitment to making it the ultimate, foolproof guide, drawing from Chef Mia’s expertise and rigorous testing. You’ll discover the Chef’s Secret that elevates this dish to crispy air-fried perfection, along with pro tips, common mistakes to avoid, and adaptations for dietary needs. By the end, you’ll feel like a kitchen confident, ready to whip up this crowd-pleaser every time—let’s dive in and make your mealtimes extraordinary!
Prep Time: 10 minutes
Cook Time: 20 minutes
Total Time: 30 minutes
Servings: 4 servings
Why This Honey Sesame Chicken (Air Fryer Recipe) is a Game-Changer
The Chef’s Secret lies in the air fryer’s innovative use, which circulates hot air for crispy air-fried perfection without submerging the chicken in oil. This technique, championed by Chef Mia, ensures each piece of chicken achieves a restaurant-quality crunch while staying juicy inside, making it a healthier alternative to traditional frying. By coating the chicken in cornstarch and seasoning it just right, we’re unlocking that golden, caramelized exterior that sets this honey sesame chicken air fryer recipe apart from the rest.
Unbeatable Texture comes from the science of air frying, where rapid hot air circulation mimics deep-frying but with less fat. The cornstarch coating creates a barrier that crisps up beautifully at 375°F, allowing moisture to escape while forming a delectable crust. This results in chicken that’s tender and flavorful, with the honey sesame sauce adhering perfectly for a sticky, glossy finish—proving why our recipe is the best for air fryer honey sesame chicken enthusiasts.
Foolproof for a Reason, this recipe has been tested multiple times in various air fryer models to guarantee consistent results. We’ve fine-tuned every step to account for common variables like chicken size and air flow, ensuring even beginners can achieve success. It’s not just another honey sesame chicken air fryer recipe; it’s a reliable staple that delivers every time, backed by exorecipes.com’s dedication to quality and ease.
Ingredient Spotlight: Quality Makes the Difference
Starting with 1 lb boneless, skinless chicken thighs, this cut is ideal for air fryer honey sesame chicken because it’s naturally juicy and flavorful, absorbing marinades beautifully while staying tender. Opt for fresh, high-quality thighs from a reputable source to avoid any toughness—quality matters as it directly impacts the dish’s succulence. If you’re looking for a substitution, chicken breasts can work, but they might dry out; reduce cook time by 2-3 minutes and add a splash of extra sesame oil for moisture.
Cornstarch, at 1/4 cup, is the key to that crispy air-fried magic, creating a light, even coating that crisps up without sogginess. Always use fresh cornstarch for the best results, as it ensures a flawless texture; stale versions can clump and lead to uneven cooking. For a gluten-free option, this ingredient is already suitable, but if you’re out, arrowroot powder makes an excellent substitute, maintaining the same crunch in your honey sesame chicken air fryer recipe.
Soy sauce, 2 tablespoons, adds that essential umami depth to the sauce, balancing the sweetness of honey in this air fryer recipe. Choose low-sodium versions if watching salt intake, as it prevents the dish from becoming overly salty. For a gluten-free twist, swap with tamari to keep the flavors intact while accommodating dietary needs, ensuring your honey sesame chicken remains a versatile favorite.
Honey, 3 tablespoons, provides the signature sweetness that coats the chicken in glossy perfection, enhancing the nutty sesame notes. Use pure, raw honey for its richer flavor profile, which elevates the overall taste; artificial honey alternatives can fall flat. If you’re substituting, agave syrup works well for a vegan version, keeping the sticky texture without altering the honey sesame chicken air fryer recipe’s appeal.
Sesame oil, 1 tablespoon, infuses a nutty, aromatic essence that’s irreplaceable in Asian-inspired dishes like this. High-quality, toasted sesame oil makes all the difference, amplifying flavors without overpowering; cheap versions can taste bitter. For a milder option, try a neutral oil like avocado, but you’ll miss the authentic sesame punch that defines our crispy air-fried honey sesame chicken.
Minced garlic (2 cloves) and rice vinegar (1 tablespoon) form the backbone of the sauce’s zesty kick. Fresh garlic ensures a pungent, fresh taste that brightens the dish, while rice vinegar adds a subtle tang—avoid substitutes like white vinegar, which can be too harsh. If garlic is too strong for you, roasted garlic powder can mellow it out, maintaining the harmony in your honey sesame chicken air fryer recipe.
Step-by-Step Instructions
Step 1: Preparing the Chicken
In a large bowl, combine 1 lb boneless, skinless chicken thighs, cut into bite-size pieces, with 1/4 cup cornstarch, 1/2 teaspoon salt, and 1/4 teaspoon black pepper. Toss until the chicken is evenly coated, ensuring every piece is lightly dusted for optimal crispiness. This step helps create a barrier that locks in juices while promoting that perfect golden exterior in the air fryer.
Pro Tip: Use your hands to mix for even coverage, but wear gloves if you have sensitive skin—the cornstarch can get messy, but this ensures no lumps and maximizes the crispy air-fried texture.
Step 2: Cooking the Chicken
Preheat your air fryer to 375°F (190°C). Arrange the coated chicken pieces in a single layer in the air fryer basket, avoiding overcrowding. Cook for 10 minutes, then flip each piece carefully with tongs and cook for another 10 minutes until golden and crispy. This method guarantees even cooking and that signature crunch we’re aiming for in this honey sesame chicken air fryer recipe.
Common Mistake to Avoid: Overcrowding the basket can lead to steaming instead of crisping; if your air fryer is small, cook in batches to maintain airflow and achieve the best results.
Step 3: Preparing the Sauce
While the chicken cooks, in a saucepan over medium heat, mix 2 tablespoons soy sauce, 3 tablespoons honey, 2 tablespoons ketchup, 1 tablespoon sesame oil, 2 cloves minced garlic, 1 tablespoon rice vinegar, and 1 teaspoon chili paste (if using). Stir continuously and simmer until the sauce thickens, about 3-5 minutes, creating a glossy coating that’s ready to embrace the chicken.
Pro Tip: Stir frequently to prevent burning the garlic, which can turn bitter—taste and adjust sweetness with a bit more honey if needed for a personalized twist on this air fryer honey sesame chicken.
Step 4: Combining and Garnishing
Once the chicken is done, transfer it to a bowl and toss it with the thickened sauce until every piece is well-coated. Immediately garnish with sesame seeds and sliced green onions for a fresh, visually appealing finish. Serve right away to enjoy the flavors at their peak.
Common Mistake to Avoid: Letting the chicken sit in the sauce too long before serving can make it soggy; toss just before plating to preserve that crispy air-fried perfection.
Serving & Presentation
Elevate your Honey Sesame Chicken (Air Fryer Recipe) with creative plating that makes it a feast for the eyes. Arrange the saucy chicken on a bed of steamed jasmine rice or quinoa for a balanced meal, using the vibrant green onions and sesame seeds as garnishes to add color and texture. For an impressive touch, drizzle a little extra sesame oil or sprinkle crushed red pepper flakes on top. This dish pairs beautifully with stir-fried vegetables, like broccoli or bell peppers, to complement its sweet-savory profile, or serve it as a main with a side of egg rolls for a full Asian-inspired spread.
Make-Ahead & Storage Solutions
For Make-Ahead Strategy, prepare the chicken coating and sauce up to 3 days in advance. Cut and coat the chicken, storing it in an airtight container in the fridge, and make the sauce separately, reheating it gently before use. This allows you to assemble and cook quickly on busy nights, maintaining the crispy air-fried magic of your honey sesame chicken.
Storing Leftovers is simple for maximum freshness: Place cooled chicken in an airtight container and refrigerate for up to 3 days, or freeze for up to 2 months. Use shallow containers to prevent sogginess, and avoid storing with excess sauce if possible.
The Best Way to Reheat is in the air fryer at 350°F for 3-5 minutes to restore the original crispy texture and flavor. If using a microwave, add a splash of water and cover to prevent drying, though it won’t be as crisp—always reheat in small batches for the best results in this honey sesame chicken air fryer recipe.

Frequently Asked Questions (FAQ)
How do you make Honey Sesame Chicken extra crispy?
To make Honey Sesame Chicken extra crispy in the air fryer, ensure the chicken is thoroughly coated in cornstarch and avoid overcrowding the basket for proper air circulation. Patting the chicken dry before coating removes excess moisture, and flipping midway promotes even browning. This technique, central to our honey sesame chicken air fryer recipe, guarantees that irresistible crunch every time.
Can you substitute butter with oil in this recipe?
While this Honey Sesame Chicken (Air Fryer Recipe) doesn’t use butter, if you’re adapting for other recipes, sesame oil can substitute for a nutty flavor, but it’s not necessary here. For this dish, stick with sesame oil as specified to maintain authenticity and texture—swapping might alter the sauce’s consistency, so test in small batches if experimenting.
How long do you bake this in the air fryer?
For this Honey Sesame Chicken (Air Fryer Recipe), cook at 375°F for a total of 20 minutes, flipping halfway through. This timing ensures juicy, crispy results; adjust by 1-2 minutes based on your air fryer’s model, but always check for an internal temperature of 165°F to guarantee safety and perfection.
What are the best ways to store homemade Honey Sesame Chicken?
The best ways to store homemade Honey Sesame Chicken involve refrigerating leftovers in an airtight container for up to 3 days or freezing for up to 2 months. To preserve crispiness, store sauce separately and reheat in the air fryer. Always cool the chicken completely before storing to avoid condensation, keeping your air fryer honey sesame chicken fresh and flavorful.
Can I make this recipe gluten-free?
Yes, you can easily make this Honey Sesame Chicken (Air Fryer Recipe) gluten-free by swapping regular soy sauce with tamari or coconut aminos. Ensure all other ingredients, like ketchup, are gluten-free certified. This simple change maintains the dish’s integrity while making it accessible for gluten-sensitive diets.
Is this recipe suitable for meal prep?
Absolutely, this Honey Sesame Chicken is ideal for meal prep. Prepare the components ahead and store them separately, then air fry just before eating to retain crispiness. It’s a time-saver for lunches or dinners, fitting perfectly into a busy lifestyle while delivering that fresh, honey sesame flavor.
Tried This Recipe? Leave a Comment!
Did you make this recipe? I’d love to hear how it turned out! Please leave a comment and a rating below. Your feedback helps other home cooks and supports exorecipes!
For more delicious inspiration, follow me on Pinterest!
Print


Honey Sesame Chicken (Air Fryer Recipe)
- Prep Time: 10 minutes
- Cook Time: 20 minutes
- Total Time: 30 minutes
- Yield: 4 servings 1x
- Method: Main Dish
- Cuisine: Asian-Inspired
Description
Dive in the crispy, succulent joy ofHoneySesame Chicken fresh from yourair fryer! This recipe combines the enticing sweetness ofhoneywith the rich, nutty flavor of sesame for a dish that is as delightful to eat as it is simple to prepare. Ideal for busy weeknights or when you crave something a little special without the fuss, this chicken will leave your taste buds singing and your family applauding your chef skills!
Ingredients
Scale
- 1lb boneless, skinless chicken thighs, cut into bite-size pieces
- 1/4 cupcornstarch
- 1/2 teaspoonsalt
- 1/4 teaspoonblack pepper
- 2 tablespoonssoy sauce
- 3 tablespoonshoney
- 2 tablespoonsketchup
- 1 tablespoonsesame oil
- 2cloves garlic, minced
- 1 tablespoonrice vinegar
- 1 teaspoonchili paste (optional)
- Sesame seeds, for garnish
- Sliced green onions, for garnish
Instructions
- In a large bowl, combine chicken pieces with cornstarch, salt, and pepper until evenly coated.
- Preheat theair fryerto 375°F (190°C). Arrange the chicken in a single layer in theair fryerbasket. Cook for 10 minutes, flip, and cook for another 10 minutes until golden and crispy.
- Meanwhile, prepare the sauce by mixing soy sauce,honey, ketchup, sesame oil, minced garlic, rice vinegar, and chili paste in asaucepanover medium heat. Simmer until the sauce thickens.
- Toss the cooked chicken in the sauce until well-coated. Garnish with sesame seeds and green onions.
- Serve immediately and enjoy the burst of flavors!
Notes
Ensure the chicken is cooked in batches if theair fryerbasket is small to maintain the crispiness.For a gluten-free version, use tamari instead of regular soy sauce.
Nutrition
- Calories: 320
- Sugar: 10
- Fat: 15
- Carbohydrates: 22
- Protein: 26
Conclusion
This Honey Sesame Chicken air fryer recipe delivers a perfect balance of sweet honey and nutty sesame flavors, making it an ideal choice for a quick, healthy weeknight dinner that satisfies cravings without the guilt. The air frying method ensures a crispy exterior while keeping the chicken juicy and tender inside. For the best results, serve it alongside steamed rice and fresh vegetables to create a complete meal. If you’d like to experiment, try swapping the chicken for tofu to make a delicious vegetarian version.
Air Fryer Falafel
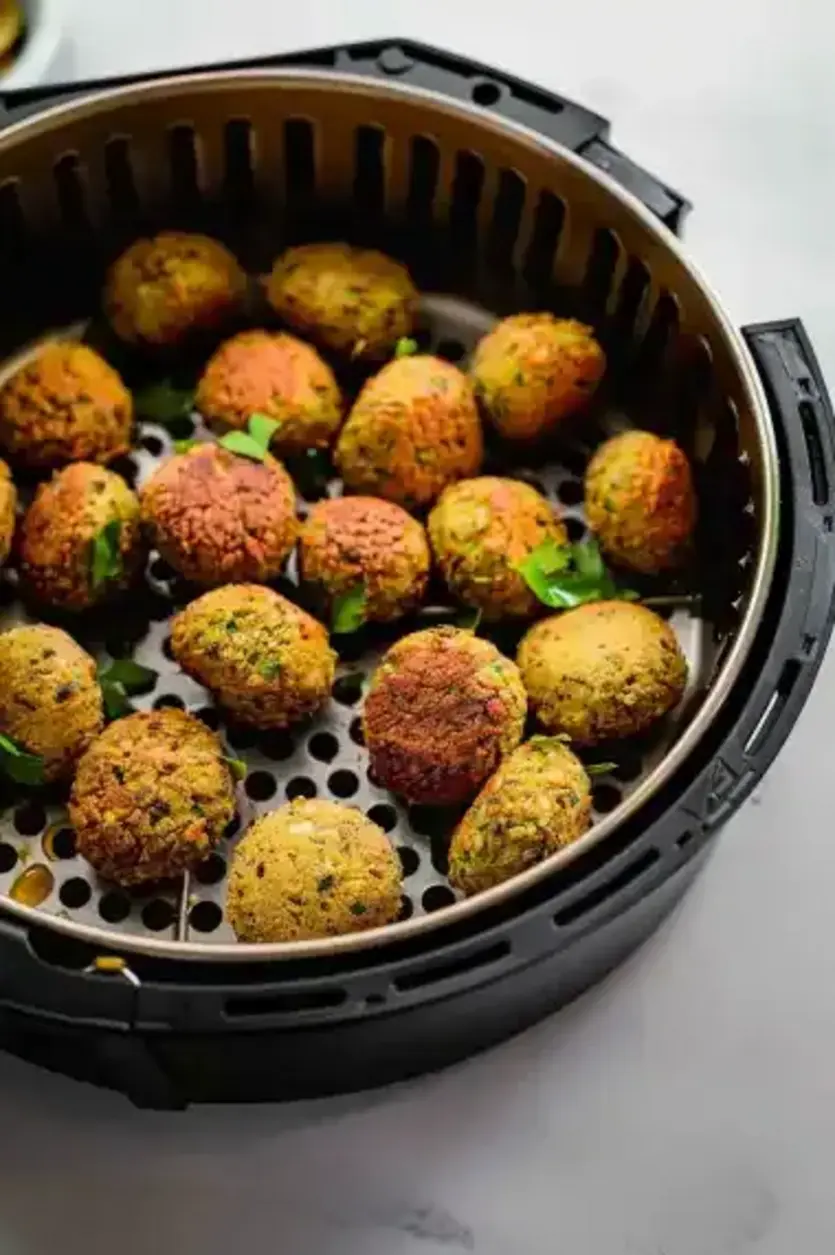
Table of Contents
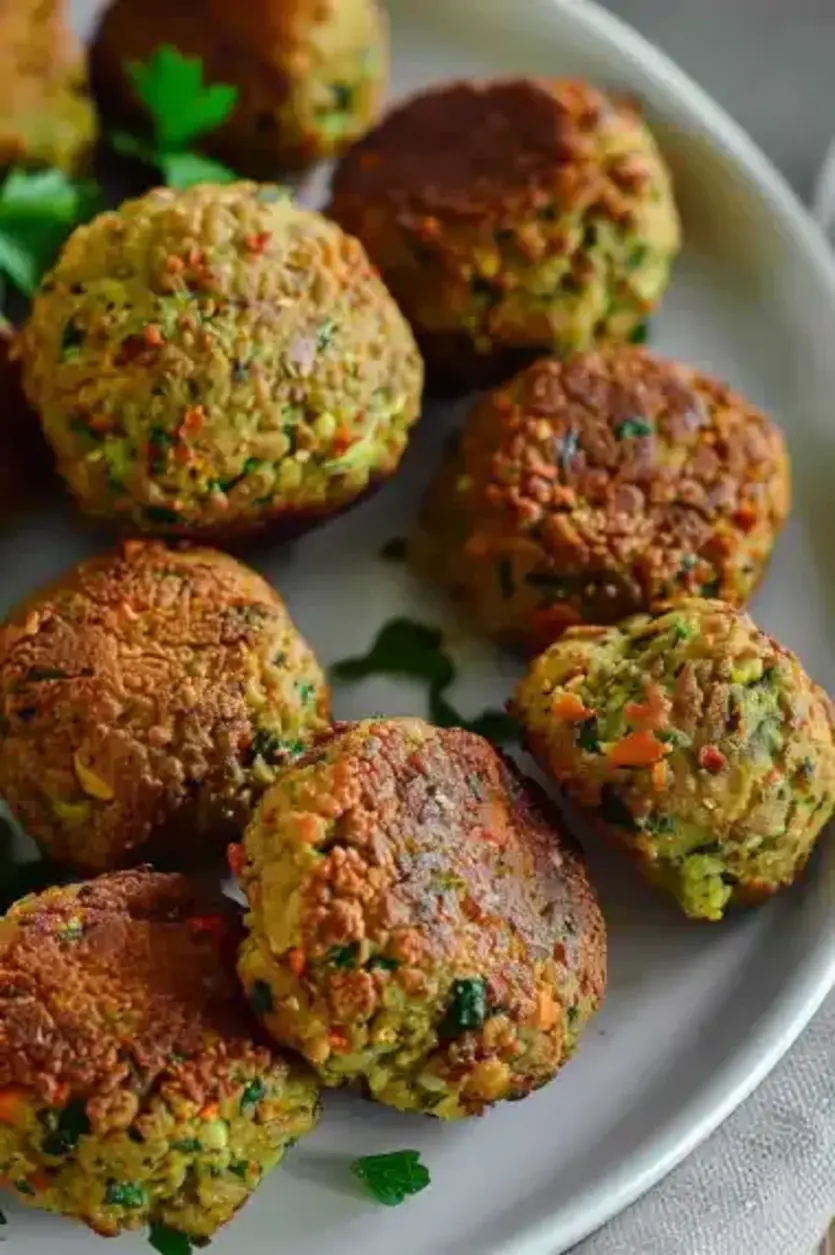
Air Fryer Falafel: The Only Recipe You’ll Ever Need
If you’re craving that irresistible crunch of traditional falafel without the guilt of excess oil, this Air Fryer Falafel recipe is your ultimate solution. Imagine achieving perfectly crispy, golden bites using just a simple air fryer, making it easier and healthier than ever before. As the go-to expert for Air Fryer Falafel on exorecipes.com, we’ve crafted this recipe with fresh herbs and spices to deliver Oil-Reduced Crispy Perfection in every morsel. Whether you’re a busy home cook looking for quick meals or someone exploring Middle Eastern flavors, this method ensures your falafel turns out flawlessly every time—proving that healthy eating can still be deliciously satisfying.
The allure of Air Fryer Falafel lies in its vibrant flavors and textures that dance on your palate. Each bite offers a satisfying crispiness on the outside, giving way to a tender, flavorful interior bursting with the earthy notes of cumin and coriander, the freshness of parsley and cilantro, and a subtle kick from cayenne pepper. The air fryer’s magic creates an aroma that fills your kitchen, evoking the streets of the Middle East with its warm, herbaceous scent. This isn’t just food; it’s an experience that feels indulgent yet light, with that Oil-Reduced Crispy Perfection making it ideal for wrapping in a warm pita or pairing with creamy tahini.
What sets this Air Fryer Falafel recipe apart on exorecipes.com is our commitment to making it the single best resource for home cooks worldwide. Drawing from Chef Mia’s expertise and our rigorous testing, we’ve incorporated the Chef’s Secret to elevate this classic dish. You’ll learn insider tips, from ingredient selections to foolproof techniques, ensuring your results are consistently outstanding. Dive in to discover how to achieve that perfect balance of health and taste, including adaptations for dietary needs, all while building your confidence in the kitchen with this healthier take on falafel.
Prep Time: 8 hours (includes soaking chickpeas)
Cook Time: 15 minutes
Total Time: 8 hours 15 minutes
Servings: 15-20 falafel
Why This Air Fryer Falafel Recipe is a Game-Changer
The Chef’s Secret to our Air Fryer Falafel lies in the Oil-Reduced Crispy Perfection technique, achieved by using soaked dried chickpeas instead of canned ones and incorporating a precise blend of baking powder and flour. This method ensures the falafel binds perfectly without added oils, resulting in a lighter texture that retains all the authentic flavors. By pulsing the ingredients just right, we lock in moisture and spices, elevating the dish above traditional frying methods and making it a healthier staple for your Air Fryer Falafel repertoire.
Unbeatable Texture: The science behind this Air Fryer Falafel’s texture comes from the air fryer’s rapid hot air circulation, which mimics deep-frying but with minimal oil. The soaked chickpeas create a coarse dough that expands slightly with baking powder, leading to a crispy exterior while keeping the inside fluffy and moist. This Oil-Reduced Crispy Perfection is all about even cooking at 375°F, preventing sogginess and ensuring a golden finish that rivals restaurant-quality falafel.
Foolproof for a Reason: We’ve tested this Air Fryer Falafel recipe multiple times in various air fryers to guarantee success, even for beginners. From measuring spices accurately to avoiding over-processing the mixture, every step is designed for reliability, making it a trustworthy go-to for healthy falafel recipes that deliver consistent results without the mess or calories of oil-heavy alternatives.
Ingredient Spotlight: Quality Makes the Difference
Dried chickpeas are the foundation of any great Air Fryer Falafel, providing the hearty texture and nutty flavor that make this dish shine. Soaking them overnight ensures they soften just enough for processing into a coarse dough, which is key to achieving that Oil-Reduced Crispy Perfection. Always opt for high-quality, organic dried chickpeas to avoid additives; their fresh, earthy taste enhances the overall flavor profile. If you’re looking for a substitution, you could use fava beans for a traditional twist, but note that they might alter the texture slightly—stick with chickpeas for the best results in air fryer recipes.
Onion adds a subtle sweetness and moisture to Air Fryer Falafel, balancing the spices and herbs while helping the mixture bind. Fresh, finely chopped onions release their natural juices during processing, contributing to the falafel’s tender interior. Choose firm, yellow onions for their mild flavor; red onions can be substituted for a sharper edge, but they may intensify the taste, so adjust quantities if you’re sensitive to pungency in your healthy falafel recipe.
Garlic infuses Air Fryer Falafel with its aromatic punch, elevating the dish with a robust depth that complements the herbs. Using fresh cloves ensures a clean, potent flavor without any bitterness; crush them before adding for better integration. If garlic isn’t your thing, substitute with a teaspoon of garlic powder, but fresh is always superior for authentic Middle Eastern cuisine in air fryer falafel preparations.
Fresh parsley brings a bright, grassy note to Air Fryer Falafel, adding color and a refreshing element that cuts through the spices. Its high vitamin content makes this recipe even healthier, so select vibrant, unwilted bunches for maximum flavor. Curly parsley can replace flat-leaf if needed, though the latter offers a more pronounced taste in Oil-Reduced Crispy Perfection recipes.
Fresh cilantro contributes a citrusy, herbal complexity to Air Fryer Falafel, enhancing the overall freshness and making it a standout healthy appetizer. Opt for leaves without stems to avoid bitterness; if cilantro isn’t available, swap with extra parsley or mint for a milder variation, ensuring your air fryer falafel retains its vibrant profile.
Ground cumin is the star spice in Air Fryer Falafel, delivering a warm, earthy essence that’s essential for that authentic Middle Eastern flair. Freshly ground cumin seeds provide the most intense flavor, so quality matters to avoid dull tastes; substituting with caraway seeds could work in a pinch, but it will slightly change the traditional falafel recipe dynamics.
Ground coriander adds a citrusy, floral note to Air Fryer Falafel, harmonizing with other spices for a well-rounded taste. Sourced from fresh seeds, it enhances the Oil-Reduced Crispy Perfection; if you’re out, a bit of ground fennel can mimic its sweetness, though it’s not a perfect match for this healthy falafel recipe.
Cayenne pepper provides the gentle heat in Air Fryer Falafel, giving it a spicy kick without overwhelming the herbs. Use high-quality, finely ground cayenne for even distribution; for less heat, substitute with paprika, adjusting to taste to keep your air fryer recipes balanced and flavorful.
Salt and black pepper are the simple enhancers in Air Fryer Falafel, bringing out the natural flavors of the ingredients. Kosher salt is preferred for its pure taste, while freshly ground black pepper adds a fresh zing; no direct substitutions needed, but always season to taste for the best healthy falafel results.
Baking powder acts as the leavening agent in Air Fryer Falafel, helping the mixture puff up for that ideal texture. Opt for aluminum-free varieties to prevent any metallic aftertaste; if unavailable, a mix of baking soda and cream of tartar can substitute, ensuring your Oil-Reduced Crispy Perfection isn’t compromised.
Flour binds the Air Fryer Falafel mixture, providing structure without heaviness. All-purpose flour works wonders, but for gluten-free options, use almond or chickpea flour to maintain the recipe’s integrity in air fryer falafel dishes.
Olive oil spray is the final touch for Air Fryer Falafel, adding just enough to promote crisping without the oil overload. Choose a high-quality, extra-virgin version for subtle flavor; alternatives like avocado oil spray can be used for a neutral taste in your healthy falafel recipe.
Step-by-Step Instructions
Step 1: Process Ingredients
In a food processor, combine the soaked and drained chickpeas, chopped onion, garlic, parsley, cilantro, cumin, coriander, cayenne pepper, salt, and black pepper. Pulse the mixture until it forms a coarse, grainy dough, being careful not to over-process into a paste.
Pro Tip: Always use a food processor with a sharp blade for even pulsing; this ensures the chickpeas break down uniformly, preserving the texture that leads to Oil-Reduced Crispy Perfection in your Air Fryer Falafel.
Step 2: Add Binders
Sprinkle in the baking powder and flour, then pulse again until the mixture starts to bind together. If the dough seems too dry, add a tablespoon of water at a time until it holds shape without becoming sticky.
Common Mistake to Avoid: Overadding water can make the falafel too moist and lead to them falling apart in the air fryer, so add it sparingly and test the consistency first to maintain that perfect Air Fryer Falafel structure.
Step 3: Shape Falafel
Form the mixture into small balls or patties, about the size of a golf ball, using your hands to gently press them together.
Pro Tip: Wet your hands slightly before shaping to prevent sticking, which helps create uniform shapes that cook evenly for the best Oil-Reduced Crispy Perfection.
Step 4: Cook
Preheat your air fryer to 375°F (190°C). Lightly spray the falafel with olive oil and place them in the air fryer basket, ensuring they’re not overcrowded. Cook for 10-15 minutes, turning halfway through, until they’re golden and crispy.
Common Mistake to Avoid: Forgetting to turn the falafel midway can result in uneven cooking, so set a timer to flip them for that flawless, healthy falafel recipe outcome.
Step 5: Serve
Remove the falafel from the air fryer and let them cool for a minute before serving hot and crispy, perhaps with tahini dip or in a pita wrap with fresh vegetables.
Pro Tip: Serve immediately after cooking to enjoy the peak crispiness of your Air Fryer Falafel, as this enhances the Oil-Reduced Crispy Perfection and makes for an impressive presentation.
Serving & Presentation
Elevate your Air Fryer Falafel by plating it on a colorful mezze board alongside complementary dips like creamy tahini or hummus for a balanced Middle Eastern feast. Garnish with a sprinkle of fresh parsley and a dash of sumac for a pop of color and tang, making your dish visually appealing and Instagram-worthy. For an impressive touch, arrange the falafel in a pyramid shape and add sliced cucumbers, tomatoes, and pickled onions to create a vibrant, healthy salad wrap.
To complement this Oil-Reduced Crispy Perfection, pair it with light sides like tabbouleh or grilled vegetables, which enhance the flavors without overwhelming the palate. As a Middle Eastern appetizer, it shines in a full meal, perhaps preceding a main course of stuffed grape leaves or lamb kebabs, ensuring a wholesome and satisfying dining experience for your air fryer falafel recipe.
Make-Ahead & Storage Solutions
For a Make-Ahead Strategy, prepare the falafel mixture up to 3 days in advance by processing the ingredients, adding binders, and shaping the balls, then store them in an airtight container in the refrigerator. This allows you to simply air fry them when needed, saving time while preserving the Oil-Reduced Crispy Perfection of your Air Fryer Falafel.
Storing Leftovers: Once cooked, let the falafel cool completely, then place them in an airtight container in the fridge for up to 3 days or freeze for up to 2 months to maintain freshness. Always use parchment paper between layers to prevent sticking and retain that crispy texture in your healthy falafel recipe.
The Best Way to Reheat: To restore the original texture and flavor, reheat in the air fryer at 350°F for 3-5 minutes, which revives the crispiness without drying them out, ensuring your Air Fryer Falafel tastes just as good as freshly made.
Frequently Asked Questions (FAQ)
How long does it take to cook Air Fryer Falafel?
It takes about 15 minutes to cook Air Fryer Falafel once your air fryer is preheated to 375°F, with a flip halfway through for even crisping. Including prep time, factor in the overnight soaking of chickpeas, making the total process around 8 hours and 15 minutes for a complete Air Fryer Falafel recipe.
Can I substitute canned chickpeas for dried ones in Air Fryer Falafel?
While it’s possible to use canned chickpeas, they don’t work as well for Air Fryer Falafel because they can make the mixture too soft and lead to less crispy results. For that Oil-Reduced Crispy Perfection, stick with dried chickpeas soaked overnight; if you must substitute, drain and rinse canned ones thoroughly and add extra flour to help bind, but expect a slightly different texture in your healthy falafel recipe.
What are some tips for making the perfect Air Fryer Falafel?
To make the perfect Air Fryer Falafel, ensure your chickpeas are soaked properly for the right texture, pulse the ingredients without over-processing, and don’t overcrowd the air fryer basket for even cooking. Experiment with spice levels to suit your taste, and always use fresh herbs for maximum flavor in this Oil-Reduced Crispy Perfection recipe.
How should I store homemade Air Fryer Falafel to keep it fresh?
Store homemade Air Fryer Falafel in an airtight container in the refrigerator for up to 3 days or freeze for up to 2 months. Reheat in the air fryer to maintain crispiness, avoiding microwaves which can make them soggy, ensuring your healthy falafel recipe stays delicious.
Is Air Fryer Falafel suitable for a vegan diet?
Yes, Air Fryer Falafel is naturally vegan as it uses plant-based ingredients like chickpeas, herbs, and spices. Double-check for any additions like non-vegan binders, but this recipe is vegan-friendly straight from the instructions, making it a great option for healthy falafel recipes.
Can I make Air Fryer Falafel gluten-free?
Absolutely, you can make Air Fryer Falafel gluten-free by swapping the all-purpose flour with a gluten-free alternative like chickpea flour or almond flour. This simple adjustment maintains the Oil-Reduced Crispy Perfection while keeping the recipe accessible for those with gluten sensitivities.
Tried This Recipe? Leave a Comment!
Did you make this Air Fryer Falafel recipe? I’d love to hear how it turned out! Please leave a comment and a rating below. Your feedback helps other home cooks and supports exorecipes!
For more delicious inspiration, follow me on Pinterest!
Print

Air Fryer Falafel
- Prep Time: 8 hours (includes soaking chickpeas)
- Cook Time: 15 minutes
- Total Time: 8 hours 15 minutes
- Yield: 15-20 falafel 1x
- Method: Appetizer
- Cuisine: Middle Eastern
Description
Welcome to the world of healthier indulgences! ThisAir FryerFalafel recipe brings you all the joy and richness of traditional falafel with significantly less oil. It’s easy, it’s tasty, and it’s wonderfully crispy — perfect for a light lunch, a party appetizer, or just a fun cooking experiment at home. Made with fresh herbs and a medley ofspices, each bite is packed with flavor. Theair fryerworks its magic, making each falafel perfectly golden and crispy without the heaviness of oil. Dive into this recipe and let your culinary senses soar!
Ingredients
Scale
- 1 cupdried chickpeas, soaked overnight
- 1small onion, chopped
- 2cloves garlic
- 1/2 cupfresh parsley, chopped
- 1/2 cupfresh cilantro, chopped
- 1 teaspoonground cumin
- 1 teaspoonground coriander
- 1/2 teaspooncayenne pepper
- 1 teaspoonsalt
- 1/2 teaspoonblack pepper
- 1 teaspoonbaking powder
- 2 tablespoonsflour (all-purpose or gluten-free)
- Olive oil spray
Instructions
- Process Ingredients: In a food processor, combine the soaked and drained chickpeas, onion, garlic, parsley, cilantro, cumin, coriander, cayenne, salt, and black pepper. Pulse until mixed into a coarse, grainy dough.
- Add Binders: Sprinkle in baking powder and flour. Pulse again until the mixture starts to bind together. If necessary, add a little water to help the dough form.
- Shape Falafel: Form the mixture into small balls or patties about the size of a golf ball.
- Cook: Preheat yourair fryerto 375°F (190°C). Lightly spray the falafel with olive oil and place in theair fryerbasket. Cook for 10-15 minutes, turning halfway through, until golden and crispy.
- Serve: Enjoy your falafel hot and crispy, with dips like tahini or wrapped in a pita with fresh vegetables.
Notes
Soaking the chickpeas overnight is essential for the right texture; canned chickpeas will not work as well.You might need to cook the falafel in batches depending on the size of yourair fryer.Experiment with different herbs andspicesto find your perfect falafel flavor.
Nutrition
- Calories: 5070
- Sugar: 1
- Fat: 1
- Carbohydrates: 10
- Protein: 3
Conclusion
Air Fryer Falafel delivers a crispy, flavorful twist on a classic Middle Eastern favorite, making it an easy and healthy option for weeknight dinners or casual gatherings. Packed with fresh herbs, chickpeas, and aromatic spices, this recipe captures that authentic taste without the added oil from deep-frying. For the best results, serve it wrapped in warm pita bread with a simple salad, or experiment with adding a dash of cumin for an extra layer of warmth.
Air Fryer Chicken Parmesan

Table of Contents
Air Fryer Chicken Parmesan: The Only Recipe You’ll Ever Need
Imagine sinking your teeth into a perfectly crispy, golden Air Fryer Chicken Parmesan that’s not only mouthwatering but also a healthier twist on the classic Italian-American favorite. If you’re tired of the greasy aftermath of traditional fried versions, this recipe is your game-changer, using the air fryer to deliver that irresistible crunch with minimal oil. As a top resource on exorecipes.com, we’re excited to share this foolproof method that makes Air Fryer Chicken Parmesan accessible for beginners and pros alike. In just 30 minutes, you’ll enjoy juicy chicken breasts topped with melty cheese and zesty marinara, proving that healthy eating doesn’t mean sacrificing flavor.
The allure of this Air Fryer Chicken Parmesan lies in its sensory symphony—picture the satisfying crunch of the breadcrumb coating giving way to tender, succulent chicken inside. Each bite bursts with the aromatic blend of garlic, onion, and oregano, while the melted mozzarella creates gooey strings that pull you back for more. The air fryer’s magic ensures a light, airy crispiness that mimics deep-frying without the heaviness, filling your kitchen with the warm, comforting scents of Italian herbs and bubbling cheese. It’s a dish that feels indulgent yet light, making it perfect for family dinners or a quick weeknight treat.
What sets this Air Fryer Chicken Parmesan recipe apart on exorecipes.com is our commitment to making it the ultimate, trustworthy guide, straight from Chef Mia’s expertise. We’ve tested and refined every step to ensure consistent results, incorporating a chef’s secret that elevates the texture and taste beyond ordinary recipes. You’ll discover insider tips on achieving that perfect golden crust, substitutions for dietary needs, and ways to customize it to your preferences. By the end, you’ll feel empowered to whip up this crowd-pleaser with confidence, turning your kitchen into a haven for delicious, health-conscious meals.
Prep Time: 10 minutes
Cook Time: 20 minutes
Total Time: 30 minutes
Servings: 4
Why This Air Fryer Chicken Parmesan Recipe is a Game-Changer
The Chef’s Secret: The unique angle here is the “Crispy and Guilt-Free” air fryer technique, which uses hot air circulation to mimic frying without drowning the chicken in oil. This method, perfected by Chef Mia, ensures each bite has a shatteringly crisp exterior while keeping the chicken juicy inside—elevating the dish by reducing fat content by up to 80% compared to traditional frying. By preheating the air fryer and avoiding overcrowding, you lock in flavors and achieve a restaurant-quality finish that makes this recipe stand out from the crowd.
Unbeatable Texture: The science behind the texture involves the rapid air flow in the air fryer, which promotes even browning and crisping through Maillard reactions. This creates a golden, breadcrumb-crusted layer that’s firm yet not overly dry, thanks to the combination of Italian-seasoned breadcrumbs and Parmesan cheese, which add moisture-retaining fats and proteins for that ideal crunch.
Foolproof for a Reason: This recipe has been rigorously tested in multiple home kitchens to guarantee success every time. Whether you’re a novice or a seasoned cook, the step-by-step guidance minimizes errors, ensuring your Air Fryer Chicken Parmesan turns out perfectly crispy and flavorful, making it a reliable go-to for busy weeknights.
Ingredient Spotlight: Quality Makes the Difference
For boneless, skinless chicken breasts, these form the heart of the dish, providing a lean protein base that’s easy to season and cook evenly. Opt for fresh, high-quality chicken to ensure tenderness and juiciness; look for organic options to avoid additives. If you’re watching sodium, choose low-sodium varieties. A tested substitution is turkey breasts for a lighter alternative, maintaining the recipe’s crispy texture while cutting calories.
Regarding all-purpose flour, it serves as the first coating layer, helping the egg and breadcrumbs adhere for that essential crunch. Quality matters because finer flour creates a smoother base—avoid clumpy brands. For a gluten-free version, swap with almond flour or a gluten-free blend to keep the dredging process intact without altering the final texture.
The beaten eggs act as a binder, sealing in moisture and flavors while promoting adhesion of the breadcrumb mixture. Fresh eggs from reputable sources ensure the best consistency; older eggs might not coat as effectively. If you’re vegan, substitute with flax eggs (1 tablespoon ground flaxseed mixed with 3 tablespoons water per egg) for a similar binding effect, though it may slightly alter the crispiness.
Italian-seasoned breadcrumbs provide the outer crunch and herb-infused flavor, enhancing the Italian-American essence. Choose freshly made or high-quality store-bought for better taste and texture; stale breadcrumbs can lead to sogginess. For a low-carb option, use crushed pork rinds as a substitute to maintain the crispy exterior.
Grated Parmesan cheese adds a nutty, salty depth that melts into the breadcrumbs, boosting umami. Freshly grated cheese melts better than pre-grated; it ensures a smooth integration. Vegans can replace it with nutritional yeast for a cheesy flavor profile without dairy.
Marinara sauce brings tangy sweetness to balance the savory chicken, acting as a flavorful topping. Select a low-sugar, high-quality jarred sauce or make your own for authenticity. If avoiding nightshades, try a pesto-based alternative to keep the recipe vibrant.
Shredded mozzarella cheese offers the gooey, stretchy melt that defines Chicken Parmesan. Freshly shredded cheese melts more evenly; pre-shredded often contains anti-caking agents. For dairy-free, use a vegan mozzarella alternative to achieve similar melting properties.
Fresh basil leaves serve as a garnish, adding a burst of aromatic freshness. Use organic leaves for the best flavor; they brighten the dish visually and taste-wise. There’s no direct substitute, but dried basil can work in a pinch, though it lacks the same vibrancy.
Step-by-Step Instructions
Step 1: Preparing the Chicken
Start by seasoning the 4 boneless, skinless chicken breasts with salt and pepper on both sides for even flavor distribution. Lay them out on a clean surface and gently pound if needed to ensure uniform thickness, which helps them cook evenly. Set up three separate bowls: one with 1 cup of all-purpose flour, another with 2 beaten large eggs, and the third with a mixture of 1 cup breadcrumbs, 1/2 cup grated Parmesan cheese, 1 tsp garlic powder, 1 tsp onion powder, and 1 tsp dried oregano—mix thoroughly for a cohesive coating.
Pro Tip: Always use room-temperature eggs for better adhesion; cold eggs can cause the coating to slide off during cooking, ensuring a perfectly crisp result.
Step 2: Dredging and Cooking the Chicken
Dip each seasoned chicken breast first into the flour, shaking off excess, then into the beaten eggs, allowing any drips to fall, and finally into the breadcrumb mixture, pressing gently to adhere. Preheat your air fryer to 375°F and lightly spray the basket with non-stick spray to prevent sticking. Place the coated chicken in the basket, ensuring not to overcrowd—cook in batches if necessary. Air fry for 10 minutes, then flip each piece carefully and continue cooking for 5-7 minutes until golden and cooked through.
Common Mistake to Avoid: Overcrowding the air fryer basket can trap steam and lead to soggy results; always leave space between pieces to allow hot air to circulate freely for that crispy finish.
Step 3: Adding Toppings
Once the chicken is crispy, remove the basket and top each breast with about 1/4 cup of marinara sauce, spreading it evenly, followed by a generous handful of shredded mozzarella cheese. This layering ensures the cheese melts perfectly over the sauce. Return the basket to the air fryer and cook for an additional 3-4 minutes, monitoring closely to avoid over-browning the cheese.
Pro Tip: Use a spoon to create small wells in the marinara for the cheese to nestle into, which helps it melt uniformly and prevents it from sliding off.
Step 4: Garnishing and Serving
Carefully remove the chicken from the air fryer using tongs and let it rest for a minute on a plate. Garnish with fresh basil leaves, tearing them gently for release of oils and added aroma. Serve immediately while hot for the best texture and flavor.
Common Mistake to Avoid: Serving too soon after cooking can cause the cheese to string messily; a brief rest allows everything to set, making it easier to plate without losing that gooey appeal.
Serving & Presentation
Elevate your Air Fryer Chicken Parmesan with creative plating by arranging the crispy breasts on a bed of al dente spaghetti or a fresh arugula salad for a balanced meal. Garnish with extra fresh basil leaves and a sprinkle of red pepper flakes for a pop of color and subtle heat, making the dish visually stunning and Instagram-worthy. Pair it with complementary sides like garlic bread, roasted vegetables, or a light Caesar salad to enhance the Italian-American flavors, ensuring a well-rounded dinner that feels restaurant-quality at home.
Make-Ahead & Storage Solutions
Make-Ahead Strategy: Prepare the chicken breasts up to 24 hours in advance by seasoning and dredging them, then store in an airtight container in the refrigerator. You can also mix the breadcrumb coating ahead and keep it sealed. For components like marinara sauce, make it up to 3 days earlier and refrigerate, allowing you to assemble and cook quickly on the day of serving.
Storing Leftovers: To maintain freshness, let leftovers cool completely, then store in an airtight container in the fridge for up to 3 days. For longer storage, freeze portions in freezer-safe bags for up to 2 months, which preserves the crispy texture as much as possible.
The Best Way to Reheat: Restore the original crispy texture by reheating in the air fryer at 350°F for 3-5 minutes, which recirculates hot air without making it soggy. Avoid microwaving, as it can make the coating limp; instead, use the oven at 375°F for 10 minutes if an air fryer isn’t available.

Frequently Asked Questions (FAQ)
How do you make a chocolate cake from scratch?
While this isn’t directly related to our Air Fryer Chicken Parmesan recipe, making a chocolate cake from scratch involves creaming butter and sugar, adding eggs, then mixing in dry ingredients like flour, cocoa powder, and baking soda, followed by wet elements like milk and vanilla. Bake at 350°F for 25-30 minutes. For a savory twist, apply similar precision as in our recipe to ensure even cooking.
Can you substitute cocoa powder with melted chocolate in a chocolate cake recipe?
Yes, you can substitute cocoa powder with melted chocolate, but adjust quantities carefully—for every 1/4 cup of cocoa, use about 1 ounce of melted chocolate plus reduce the fat in the recipe slightly to avoid greasiness. This technique can add richer flavor, much like how we enhance our Air Fryer Chicken Parmesan with quality cheese for depth.
How long does it take to bake a chocolate cake?
Baking a chocolate cake typically takes 25-35 minutes at 350°F, depending on the pan size and oven. Always test with a toothpick for doneness. In comparison, our Air Fryer Chicken Parmesan is ready in just 20 minutes of cooking time, making it a quick alternative for busy evenings.
What are the best ways to decorate and serve a chocolate cake?
To decorate a chocolate cake, use frosting like ganache or buttercream, add fresh fruits, or sprinkle nuts for texture. Serve with ice cream or whipped cream for contrast. Similarly, for Air Fryer Chicken Parmesan, focus on garnishes like basil and pair with sides for an elevated presentation.
Is Air Fryer Chicken Parmesan suitable for a low-carb diet?
Yes, it can be adapted for a low-carb diet by swapping breadcrumbs with almond flour or crushed pork rinds and using a low-sugar marinara sauce. This keeps the crispy texture while reducing carbs, making it a versatile option for various dietary needs.
What’s the best air fryer to use for this recipe?
For optimal results with Air Fryer Chicken Parmesan, choose a model with good air circulation, like basket-style air fryers from brands such as Ninja or Philips, which can handle up to 4 servings without overcrowding. Ensure it’s at least 5 quarts for even cooking.
Tried This Recipe? Leave a Comment!
Did you make this Air Fryer Chicken Parmesan recipe? I’d love to hear how it turned out! Please leave a comment and a rating below. Your feedback helps other home cooks and supports exorecipes.com!
For more delicious inspiration, follow me on Pinterest!
Print

Air Fryer Chicken Parmesan
- Prep Time: 10 minutes
- Cook Time: 20 minutes
- Total Time: 30 minutes
- Yield: 4 servings 1x
- Method: Main Course
- Cuisine: Italian-American
Description
Dive into a healthier version of a beloved classic with thisAir FryerChicken Parmesan recipe. Perfectly seasoned and crisped to golden perfection, this dish brings all the flavor without the extra grease. It’s quick, easy, and absolutely delicious — an ideal meal for any night of the week!
Ingredients
Scale
- 4boneless, skinless chicken breasts
- Salt and pepper, to taste
- 1 cupall-purpose flour
- 2large eggs, beaten
- 1 cupbreadcrumbs (Italian seasoned preferred)
- 1/2 cupgrated Parmesan cheese
- 1 tspgarlic powder
- 1 tsponion powder
- 1 tspdried oregano
- 1 cupmarinara sauce
- 1 cupshredded mozzarella cheese
- Fresh basil leaves, for garnish
Instructions
- Prep the Chicken: Season the chicken breasts with salt and pepper. Set up three bowls for dredging: one with flour, one with beaten eggs, and one with a mix of breadcrumbs, Parmesan, garlic powder, onion powder, and oregano.
- Dredge and Cook: Coat each chicken breast in flour, dip in egg, then breadcrumb mixture. Preheat theair fryerto 375°F and spray the basket with non-stick spray. Cook the chicken for 10 minutes, flip, and continue cooking for 5-7 minutes.
- Add Toppings: Top each breast with marinara sauce and mozzarella. Cook for an additional 3-4 minutes until the cheese is melted and bubbly.
- Garnish and Serve: Garnish with fresh basil and serve immediately.
Notes
Ensure yourair fryeris preheated for the crispiest results.Cook in batches to avoid overcrowding, which helps achieve that desirable crispiness.Substitute with gluten-free flour and breadcrumbs for a gluten-free version.
Nutrition
- Calories: 345
- Sugar: 3
- Fat: 9
- Carbohydrates: 27
- Protein: 36
Conclusion
Air Fryer Chicken Parmesan offers a crispy, golden crust with tender, juicy chicken and a flavorful marinara topping that brings classic Italian comfort to your table with a healthier twist. This dish is perfect for a quick weeknight dinner or a special family meal, highlighting the irresistible combination of melted cheese and savory herbs. For a fresh variation, try swapping the breadcrumbs for panko to add extra crunch, and serve it alongside a simple pasta or steamed vegetables for a complete, balanced meal.
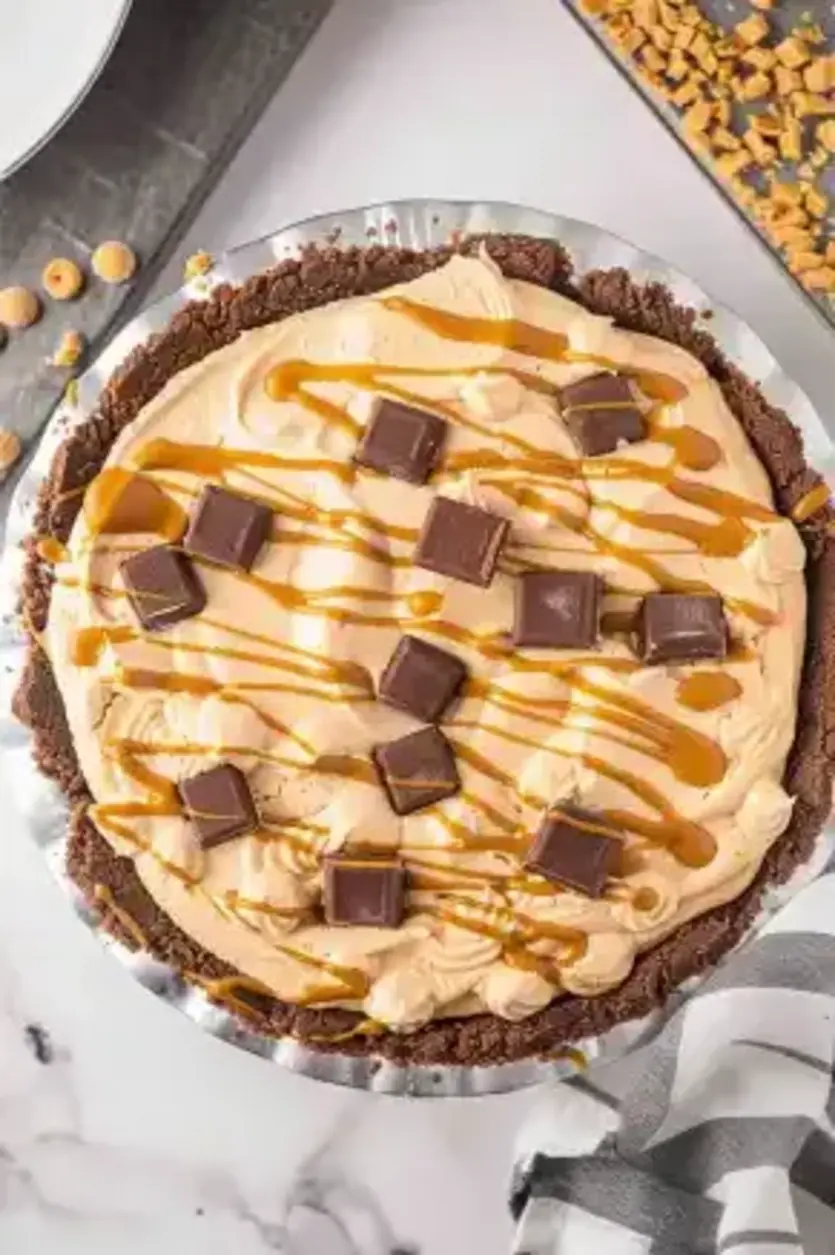
No-Bake Peanut Butter Pie Recipe

Table of Contents
No-Bake Peanut Butter Pie Recipe: The Only Recipe You’ll Ever Need
Imagine craving a decadent dessert but dreading the oven’s heat on a sweltering summer day—this is where the No-Bake Peanut Butter Pie Recipe truly shines. As a busy home cook, I often turn to this effortless treat to satisfy sweet tooths without breaking a sweat. With its extra creamy texture from a perfectly blended filling, this No-Bake Peanut Butter Pie Recipe is a game-changer for anyone seeking a foolproof dessert that delivers rich, peanutty bliss in just minutes of prep. Sourced from exorecipes.com, it’s designed for beginners and pros alike, promising a pie that’s as simple as it is irresistible. You’ll learn insider tips, substitutions, and why this version stands out among countless others online.
The No-Bake Peanut Butter Pie Recipe tantalizes the senses with its velvety smooth filling, where creamy peanut butter melds seamlessly with softened cream cheese and a hint of vanilla, creating a luxurious mouthfeel that’s hard to resist. Picture the satisfying crunch of the graham cracker crust contrasting against the silken layers, releasing aromas of toasted nuts and sweet butter as you slice into it. Each bite bursts with nutty richness, balanced by a subtle sweetness that lingers, making it the ultimate comfort food for peanut butter enthusiasts. The extra creamy consistency ensures every forkful feels indulgent, almost like a gourmet treat from a high-end bakery.
What sets this No-Bake Peanut Butter Pie Recipe apart at exorecipes.com is our commitment to thorough testing and expert insights from Chef Mia, ensuring it’s the most reliable resource you’ll find. We’ve fine-tuned every detail, from ingredient swaps to chilling techniques, to make it extra creamy and consistently perfect. In this post, you’ll discover the Chef’s Secret for achieving that dreamy texture, step-by-step guidance to avoid common pitfalls, and answers to your burning questions. Whether you’re hosting a party or enjoying a quiet night in, this recipe will boost your kitchen confidence and become your go-to for no-bake desserts.
Prep Time: 20 minutes
Cook Time: 0 minutes
Total Time: 4 hours 20 minutes (including chilling)
Servings: 1 9-inch pie
Why This No-Bake Peanut Butter Pie Recipe is a Game-Changer
The Chef’s Secret to this No-Bake Peanut Butter Pie Recipe lies in its extra creamy filling, achieved by blending high-quality creamy peanut butter with softened cream cheese and a precise amount of milk. This technique creates an emulsion that locks in moisture, making the pie ultra-smooth and velvety, far superior to standard versions that can turn out grainy. By gradually incorporating the milk while beating, we ensure a homogenous mixture that prevents separation, elevating the overall texture to professional levels.
For unbeatable texture, the science is simple: the fat content in the peanut butter and cream cheese binds with the powdered sugar to form a stable, airy filling. This extra creamy base contrasts beautifully with the crunchy graham cracker crust, providing a delightful mouthfeel that keeps the pie from being overly dense. We’ve tested this No-Bake Peanut Butter Pie Recipe multiple times to confirm its consistency, adjusting ratios to achieve the perfect balance of creaminess without sogginess.
This recipe is foolproof for a reason—it’s been refined through real kitchen trials to guarantee success every time. Whether you’re a novice or a seasoned baker, the straightforward steps and detailed tips make this No-Bake Peanut Butter Pie Recipe accessible and reliable, ensuring your dessert turns out extra creamy and impressive, no matter the occasion.
Ingredient Spotlight: Quality Makes the Difference
Graham cracker crumbs form the foundation of this No-Bake Peanut Butter Pie Recipe, providing a crunchy base that contrasts the extra creamy filling. Use fresh, finely ground crumbs for the best texture, as stale ones can make the crust brittle. Quality matters because high-quality crumbs absorb the butter evenly, creating a sturdy yet crumbly layer. For substitutions, try crushed digestive biscuits if you’re out of graham crackers, but note that they may add a slightly sweeter note to your peanut butter pie.
Sugar plays a key role in sweetening the crust and balancing the nutty flavors in this No-Bake Peanut Butter Pie Recipe. Opt for granulated sugar to ensure it dissolves properly and doesn’t leave a gritty feel. Why quality matters: Using pure cane sugar avoids any artificial aftertaste, enhancing the overall extra creamy profile. A tested substitution is coconut sugar for a lower-glycemic option, which will impart a subtle caramel undertone without overpowering the peanut butter’s richness.
Unsalted butter, melted, binds the crust together in this No-Bake Peanut Butter Pie Recipe, adding a rich flavor and helping it set in the fridge. Choose high-fat, European-style butter for superior creaminess, as it melts evenly and contributes to the pie’s decadent texture. Quality is crucial to prevent the crust from becoming oily; always use unsalted to control sodium levels. For dairy-free swaps, coconut oil works beautifully, maintaining that extra creamy consistency while keeping the recipe vegan-friendly.
Creamy peanut butter is the star of this No-Bake Peanut Butter Pie Recipe, delivering that signature nutty taste and contributing to the extra creamy filling. Select natural peanut butter without added oils for a purer flavor and better texture, as hydrogenated versions can make the pie too oily. It acts as an emulsifier, blending seamlessly with other ingredients. If allergies are a concern, almond butter is a great substitute, though it will introduce a milder, nuttier profile to your no-bake pie.
Powdered sugar sweetens and thickens the filling in this No-Bake Peanut Butter Pie Recipe, ensuring a smooth, lump-free result. Use sifted powdered sugar to avoid any grittiness, which can ruin the extra creamy mouthfeel. Quality matters because finely milled sugar dissolves instantly, creating a silky base. For a lower-sugar alternative, try erythritol, but adjust quantities as it may affect the pie’s firmness during chilling.
Vanilla extract adds depth and aroma to this No-Bake Peanut Butter Pie Recipe, enhancing the extra creamy filling with warm notes. Always go for pure extract over imitation for authentic flavor that complements the peanut butter without overwhelming it. It helps mask any potential bitterness. A reliable substitution is almond extract for a twist, but use half the amount to prevent it from dominating the pie’s profile.
Cream cheese provides the rich, tangy base for the extra creamy filling in this No-Bake Peanut Butter Pie Recipe. Ensure it’s full-fat and softened to room temperature for easy blending and a velvety texture. Quality cream cheese prevents lumps and adds stability. For a dairy-free version, opt for cashew-based cream cheese, which mimics the creaminess while keeping the pie’s structure intact.
Milk thins the filling to the perfect consistency in this No-Bake Peanut Butter Pie Recipe, making it extra creamy and easy to spread. Whole milk works best for richness, but any full-fat version will do. Quality ensures no watery results; always use fresh milk. Lactose-free alternatives like almond milk are ideal for substitutions, though you may need to add a touch more to achieve the same creamy texture.
Whipped cream, for topping, adds a light, airy finish to this No-Bake Peanut Butter Pie Recipe, enhancing its extra creamy appeal. Freshly whipped cream offers the best flavor and stability, so avoid store-bought if possible. It provides visual and textural contrast. For a vegan swap, use coconut whipped cream, which maintains the fluffy topping while aligning with dairy-free diets.
Step-by-Step Instructions
Step 1: Preparing the Crust
In a medium bowl, combine 1 1/2 cups graham cracker crumbs, 1/4 cup sugar, and 6 tablespoons melted unsalted butter. Mix thoroughly until the ingredients form a wet, sandy texture that holds together when pressed. Press this mixture firmly and evenly into the bottom and sides of a 9-inch pie dish using the back of a spoon or a flat-bottomed glass for a compact base. Refrigerate for at least 30 minutes to allow it to set properly.
Pro Tip: For the best results, chill the pie dish in the freezer for the first 10 minutes to speed up setting and prevent the crust from crumbling when you add the filling.
Step 2: Making the Filling
In a large mixing bowl, beat 8 ounces of softened cream cheese, 1 cup creamy peanut butter, 1 cup powdered sugar, and 1 teaspoon vanilla extract together until fully combined and creamy, about 2-3 minutes with an electric mixer. Gradually pour in 1/2 cup milk while continuing to beat on low speed until the mixture is smooth and lump-free. Once ready, pour the filling over the chilled crust and use a spatula to smooth the top evenly.
Common Mistake to Avoid: Don’t add all the milk at once, as this can cause curdling; add it slowly to maintain the extra creamy texture and ensure a silky finish.
Step 3: Chilling the Pie
Place the assembled pie in the refrigerator and let it chill for at least 4 hours, or until the filling is firm and set. This step is crucial for the flavors to meld and for the extra creamy consistency to develop fully.
Pro Tip: Cover the pie with plastic wrap before chilling to prevent it from absorbing odors from the fridge, which could affect the peanut butter’s natural taste.
Step 4: Serving the Pie
Remove the pie from the refrigerator and garnish with whipped cream, a drizzle of chocolate syrup if desired, and a sprinkle of chopped peanuts for added crunch. Slice and serve chilled to maintain the extra creamy texture and fresh flavors.
Common Mistake to Avoid: Wait until just before serving to add garnishes, as moisture from the whipped cream can make the crust soggy if added too early.
Serving & Presentation
Elevate your No-Bake Peanut Butter Pie Recipe with creative plating by using a sharp knife dipped in hot water for clean slices, revealing the extra creamy layers. For impressive garnishes, try a swirl of chocolate syrup in artistic patterns or a scattering of toasted peanuts for contrast. Pair this peanut butter pie with fresh fruit like sliced bananas or strawberries to balance the richness, or serve it alongside a light vanilla ice cream for a decadent twist. As a dessert course, it complements casual family dinners or elegant parties, making it versatile for any occasion.
Make-Ahead & Storage Solutions
For make-ahead strategies, prepare the crust up to 3 days in advance and store it covered in the refrigerator; make the filling the day before and keep it in an airtight container, then assemble just before chilling for up to 24 hours ahead. This ensures your No-Bake Peanut Butter Pie Recipe stays extra creamy without compromising texture.
To store leftovers, cover the pie tightly with plastic wrap or transfer slices to an airtight container and refrigerate for up to 5 days; for longer storage, freeze the pie (ungarnished) for up to 2 months, wrapped in foil. The best way to reheat is to thaw in the refrigerator overnight and let it come to room temperature for 10-15 minutes, restoring the original extra creamy consistency without melting the filling.
Frequently Asked Questions (FAQ)
How do you make chocolate cake moist and fluffy?
While this question relates to chocolate cake, the principles can apply to desserts like our No-Bake Peanut Butter Pie Recipe. To make chocolate cake moist and fluffy, use ingredients like oil instead of butter for better moisture retention, and avoid overmixing the batter to preserve air pockets. For our pie, ensuring the filling is extra creamy involves similar care, like gradual milk addition.
Can I substitute oil for butter in chocolate cake?
Yes, you can substitute oil for butter in chocolate cake recipes for a moister result, as oil doesn’t solidify like butter. In the context of our No-Bake Peanut Butter Pie Recipe, this isn’t directly applicable, but if adapting for a baked version, oil could work in the crust for a softer texture—however, we recommend sticking to butter for the best crunch.
How long does it take to bake a chocolate cake from scratch?
Baking a chocolate cake from scratch typically takes 25-40 minutes at 350°F (175°C), depending on the recipe and pan size. Since our No-Bake Peanut Butter Pie Recipe requires no baking, it saves time with just chilling, making it an ideal alternative for quick desserts in under 5 hours total.
What are some good serving ideas for chocolate cake at a party?
For chocolate cake at a party, serve it with fresh berries, whipped cream, or a scoop of ice cream for contrast. Similarly, for our No-Bake Peanut Butter Pie Recipe, you could adapt by pairing it with coffee or tea to enhance the extra creamy flavors, making it a crowd-pleaser just like cake.
Can I make this No-Bake Peanut Butter Pie Recipe vegan?
Absolutely! To make this No-Bake Peanut Butter Pie Recipe vegan, substitute the cream cheese with a plant-based version like cashew or tofu-based cream cheese, use dairy-free milk such as almond or oat milk, and opt for a vegan whipped cream topping. Ensure your peanut butter is free of honey, and the crust can stay the same or use vegan butter for full compliance.
What’s the best way to store this pie for later?
The best way to store this No-Bake Peanut Butter Pie Recipe is in the refrigerator, covered, for up to 5 days. For longer-term storage, freeze it for up to 2 months, and thaw in the fridge overnight to maintain the extra creamy texture.
Can I use crunchy peanut butter instead?
Yes, you can use crunchy peanut butter for added texture in this No-Bake Peanut Butter Pie Recipe, but it may make the filling less extra creamy. If you do, reduce the amount slightly to avoid overpowering the smooth base, and ensure it’s well-blended for the best results.
Tried This Recipe? Leave a Comment!
Did you make this No-Bake Peanut Butter Pie Recipe? I’d love to hear how it turned out! Please leave a comment and a rating below. Your feedback helps other home cooks and supports exorecipes!
For more delicious inspiration, follow me on Pinterest!
Print

No-Bake Peanut Butter Pie Recipe
- Prep Time: 20 minutes
- Cook Time: 0 minutes
- Total Time: 4 hours 20 minutes (including chilling)
- Yield: 1 9-inch pie 1x
- Method: Dessert
- Cuisine: American
Description
Dive into the effortless world of no-bake desserts with this creamy, dreamy No-Bake Peanut Butter Pie! Perfectly blending the rich flavors of peanut butter with a crunchy graham cracker crust, this pie is topped with luscious whipped cream and a decadent chocolate drizzle. It’s an absolute must-try for peanut butter lovers and a delightful treat that promises to steal the show at any gathering. The best part? Noovenrequired!
Ingredients
Scale
- 1 1/2 cupsgraham cracker crumbs
- 1/4 cupsugar
- 6 tbspunsalted butter, melted
- 1 cupcreamy peanut butter
- 1 cuppowdered sugar
- 1 tspvanilla extract
- 8 ozcream cheese, softened
- 1/2 cupmilk
- Whipped cream, for topping
- Chocolate syrup, for drizzling (optional)
- Chopped peanuts, for garnish (optional)
Instructions
- Prepare the Crust:Mix graham cracker crumbs, sugar, and melted butter until well blended. Press firmly into a 9-inch pie dish and refrigerate to set for 30 minutes.
- Mix graham cracker crumbs, sugar, and melted butter until well blended. Press firmly into a 9-inch pie dish and refrigerate to set for 30 minutes.
- Make the Filling:In a large bowl, beat cream cheese, peanut butter, powdered sugar, and vanilla extract until creamy. Gradually add milk, beating until smooth. Pour over the crust and smooth the top.
- In a large bowl, beat cream cheese, peanut butter, powdered sugar, and vanilla extract until creamy. Gradually add milk, beating until smooth. Pour over the crust and smooth the top.
- Chill:Refrigerate the pie for at least 4 hours or until firm.
- Refrigerate the pie for at least 4 hours or until firm.
- Serve:Garnish with whipped cream, drizzle with chocolate syrup, and sprinkle chopped peanuts, if using. Serve chilled.
- Garnish with whipped cream, drizzle with chocolate syrup, and sprinkle chopped peanuts, if using. Serve chilled.
Notes
Cream Cheese: Ensure the cream cheese is at room temperature to avoid lumps in your filling.Chilling Time: Extend chilling time for a firmer setting.Substitution Tip: For a dairy-free version, use suitable substitutes for cream cheese, whipped cream, and milk.
Nutrition
- Calories: 450
- Sugar: 28
- Fat: 30
- Carbohydrates: 38
- Protein: 10
Conclusion
This no-bake peanut butter pie is a creamy, indulgent dessert that’s perfect for satisfying sweet cravings with minimal effort, featuring rich peanut butter flavors in every bite. Its simple preparation makes it ideal for quick treats or gatherings, allowing you to skip the oven and dive straight into the fun. For a delightful variation, try topping it with crushed nuts or drizzling chocolate sauce before serving.