*Cheater buttermilk: in a glass measuring cup add 1 teaspoon vinegar or lemon juice. Fill to the 1/2 cup line with milk, preferably whole milk. Stir and let sit 5 minutes, then use as directed in the recipe.
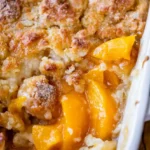
Canned peaches: Drain 4 (29 ounce) cans of sliced peaches. When drained, this comes out to about 9 cups of peaches. Let them sit in the colander for at least 10 minutes, stirring occasionally. Make the recipe as stated, but only add 1 cup of sugar to the peach filling (not 1 and 1/2 cups. Canned peaches have been sitting in syrup and are already so sweet.) That’s the only change you need to make!
Frozen peaches: Buy three (16 ounce) packages of frozen peaches. (Should be about 9 cups.) Do not thaw. Dump in your casserole dish, add the other ingredients as specified, and voila! That’s it. Frozen peaches have a lot of moisture in them, so your cobbler might be a little juicer than usual, but who’s going to complain about that?
This recipe is super easy to halve! Just cut all the ingredients in half and bake in an 8×8 or 9×9 square pan.
Hungry for Peach Crisp? Use the base peach filling recipe found here (fresh, canned, or frozen), and cover with the topping ingredients found on my Apple Crisp Recipe, (maybe cut the nutmeg a smidge unless you love nutmeg). Bake as instructed on the Crisp post.